
Open Broadcaster Software (OBS) is a great open-source software for creating high-quality videos, but it can be difficult to set up.
This guide will help you adjust your video and audio settings to find the best recording configuration based on your output resolution, downscale filter, framerate, recording format, encoder, rate control, video and audio bitrate, and other factors.
Let’s dive deep into the guide for the best recording settings for OBS.
What is OBS?
OBS is a free, open-source software for video recording and streaming.
It is compatible with Windows, macOS, and Linux, making it an excellent choice for all content creators looking to produce professional videos.
OBS is perfect for multi-source audio/video capturing and mixing, adjusting audio settings, and switching between scenes on the fly, previewing scenes and sources via Studio Mode, and monitoring eight different scenes simultaneously via Multiview.
What are the Best Recording Settings for OBS?
Before you start recording, it’s important to set up OBS correctly to ensure smooth video playback without performance issues.
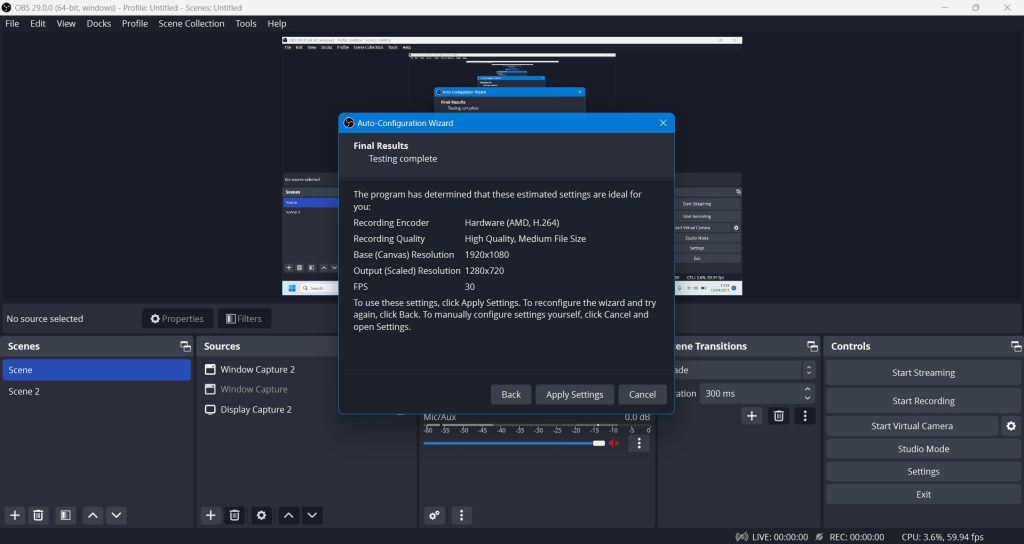
Keep in mind that there is no one-size-fits-all solution, and your ideal OBS setup will depend on your CPU and GPU. A good starting point to find your best recording settings for OBS is via the Auto-Configuration Wizard.
To access this menu, simply follow these steps:
- Open OBS
- Go to “Tools” in the top menu bar
- Choose “Auto-Configuration Wizard”
- Select “Optimize just for recording, I will not be streaming”
- Set the “Base (Canvas) Resolution” to match your monitor resolution, and leave the FPS settings as they are
- OBS will show you the recommended settings for recording
If you have a higher-end processor and graphics card, you can increase your video and audio settings. However, if you have lower or mid-level options, you will need to settle for them. Let’s proceed with this in mind!
1. Video Settings
While working out your optimal OBS recording settings, you’ll mainly focus on two sections: Video and Output.
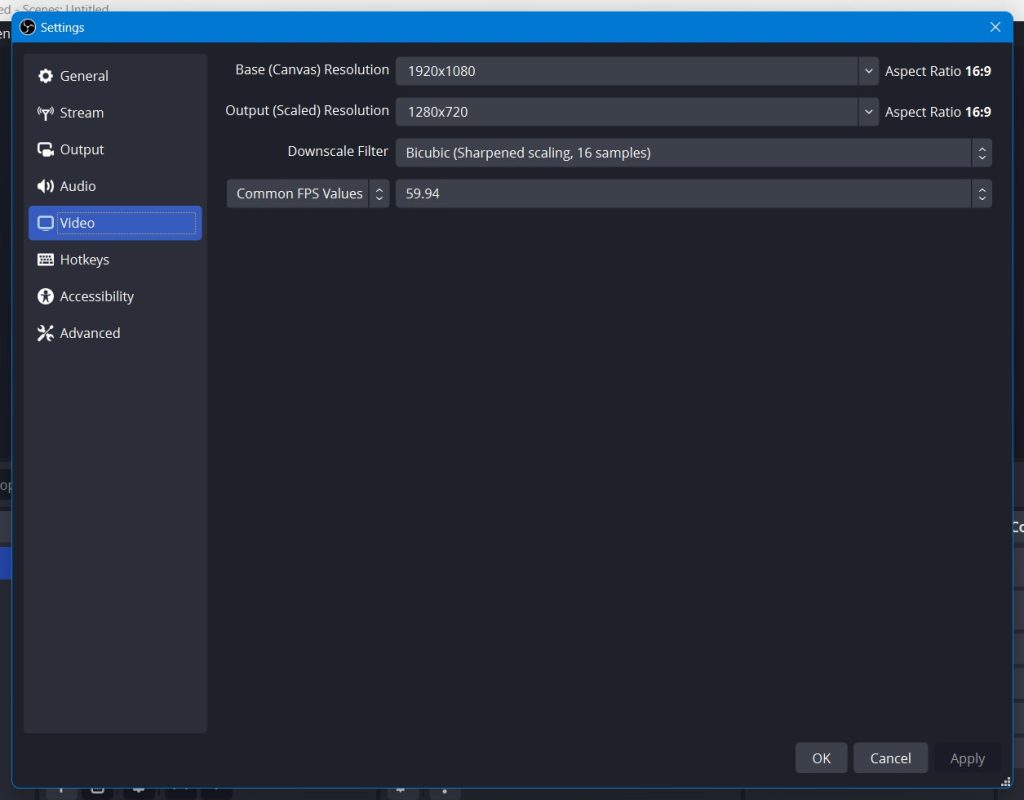
To start, make your way to Settings. You can find them in the lower right corner of the interface or go to the File tab in the top left corner then Settings. Either way, you’ll open up a new window with an array of options. Your first point of interest is Video.
On the video settings, there are several settings that you need to know
- Base (Canvas) Resolution: This is the resolution of the area where you will edit the layout of your recording.
- Output (Scaled) Resolution: This is the size of your recorded video. You can set it to be the same as your resolution or lower.
- Downscale Filter: This program is used to downscale your resolution from the base to the output.
- Common FPS Value: This is the frame rate of your recording.
You can leave the base canvas resolution as it is since it won’t impact your recording performance. However, you should consider the output resolution, downscale filter, and FPS value.
For PCs with lower specifications, you can set the output to 720p (1280 x 720) with 30 FPS. To ensure that the recording won’t burden your CPU too much, you can select the downscale filter to “Billeniar.”
If you have a higher-end PC, you can use the same output resolution as the base and set the FPS value to 60 FPS.
2. Output Settings
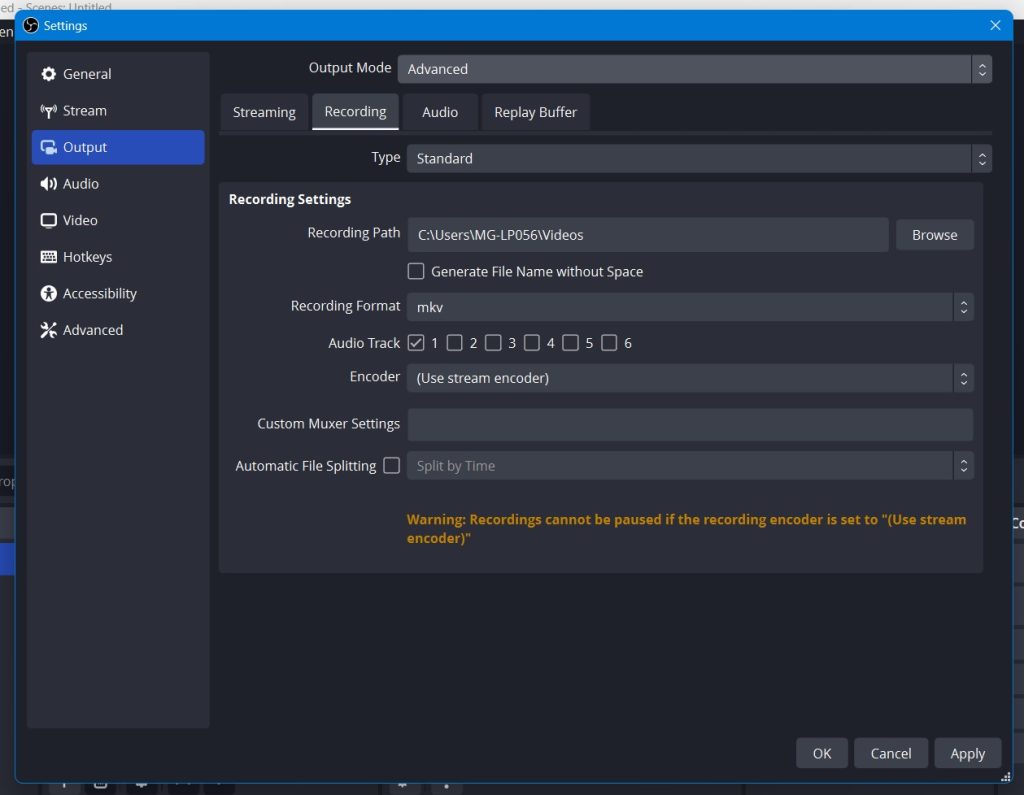
Your next step should be the Output section. Start by changing the Output Mode to Advanced. This will allow you to fine-tune the settings for the best recording performance in OBS.
Then, navigate to the Recording tab, where you’ll find the following settings:
- Recording Path: The destination where your recording will be saved.
- Recording Format: Choose the format of your recorded video.
- Audio Track: If you’re using multi-track audio, you can select which track you want to record.
- Encoder: A hardware device or software program that enables you to record and manage an advanced production with multiple cameras and audio tracks.
If you have a straightforward setup with single audio, the key settings to focus on are Recording Format and Encoder.
The best Recording Format options are .MKV or .FLV since they allow you to recover recordings in the event of a power outage, BSOD, or OBS crashing. However, if you prefer a more commonly used format for video editing, you can choose .MP4 or .MOV.
Choosing the right Encoder is a crucial decision and it depends on the capabilities of your CPU and GPU.
For those who have an Nvidia Series GPU, it is recommended to opt for NVENC.
On the other hand, if you have a mid-range CPU and AMD graphics card, then AMF would be a better option.
Finally, for those who have a powerful processor, it is advisable to go with x264.
3. Encoder Settings

After you choose your Encoder, several options will appear. The encoder type you choose will also impact the best Rate Control for your OBS recordings.
There are three smart options to consider:
- CQP (NVENC and AMF only) for high-quality videos with large file sizes
- CRF (x264 only) for another high-quality recording option
- VBR for less detailed videos with more reasonable file sizes.
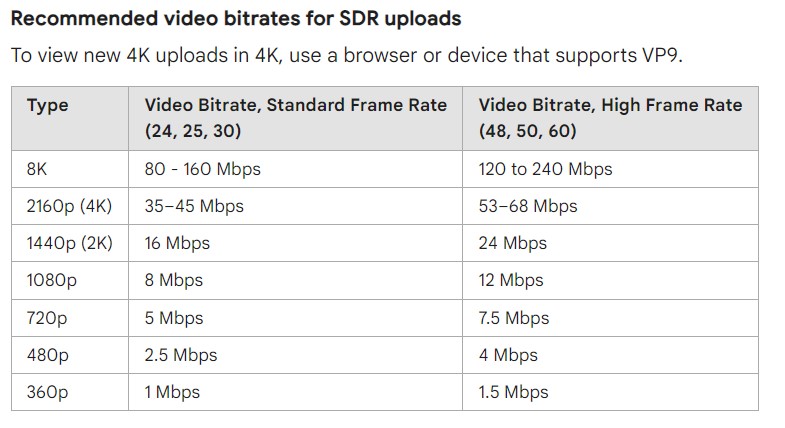
Once you’ve determined your Rate Control, the next step is to find the right OBS Recording Bitrate that balances your output resolution, framerate, and the platform you’ll be uploading to.
A good starting point is to follow YouTube’s recommended bitrates.
Keyframe Intervals are crucial for live streaming, but for determining your best recording settings in OBS, you can be more flexible and try out intervals between 2-8 seconds.
Lastly, you should consider the CPU Usage Presets, which determine the speed of encoding and the amount of CPU power used.
In most cases, the Veryfast setting strikes the best balance between video quality and CPU usage. However, if you encounter overload issues, you can switch to Superfast or Ultrafast.
4. Audio Settings
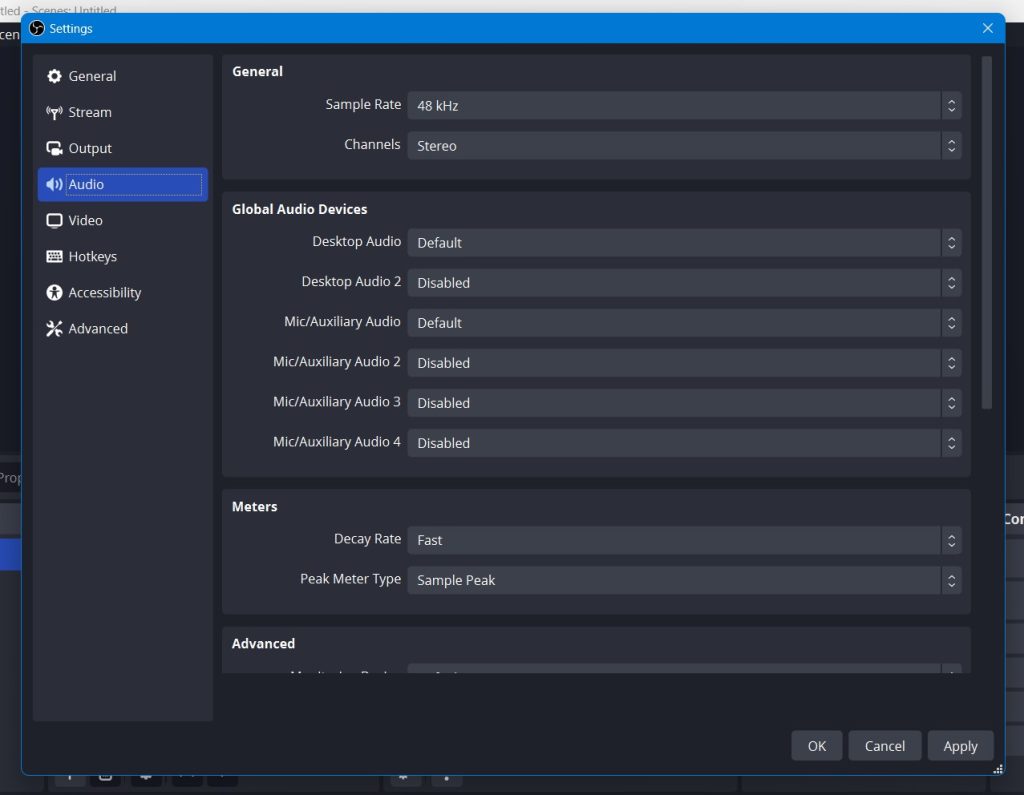
Proceed to the Audio settings section. The initial setting you will notice is the Sample Rate which should match your microphone’s.
Keep the Channels as Stereo. The Global Audio Devices are all the audio inputs available, enable only the ones you intend to use for your recording, and leave the others unchanged.
Tips in Content Creation Using OBS Recordings

There are many purposes for recording using OBS. However, if you’re a gaming content creator, we’ve got some tips to help you create more content faster.
Creating gaming content from OBS recordings can involve hours of scrolling through your gameplay recordings to look for epic or funny moments. But there’s a tool that can save you so much time doing that.
Try Eklipse.gg, an AI-highlight generator tool that allows you to automatically generate clips from your live stream VOD.
Recently, we released an update that allows you to use Google Drive to export your gameplay recordings to Eklipse, so our AI can generate epic gaming highlights for you! Even better, Eklipse is also equipped with a “convert to TikTok” video editor, so you can easily edit any highlights into a vertical format video using templates, stickers, and many editing tools.
Why not give Eklipse a try? Learn more about the features by clicking the button below.
Boost Your Streaming Presence in Social Media with AI Highlights
Eklipse help streamer improve their social media presence with AI highlights that clip your Twitch / Kick streams automatically & converts them to TikTok / Reels / Shorts
Conclusions
Having learned the best OBS recording settings for both video and audio, you should keep in mind that your computer specifications may affect your ultimate setup. However, with some adjustments, even older systems can capture polished and seamless videos.
Now that you are familiar with OBS recording, why not experiment with live streaming? It could be an enjoyable experience!
Tech writer, gaming, streaming, gadgets. A decade’s experience. Informative, engaging.
Featured in web publications. Reviews new products. Loves gaming, tinkering.