
If you are a streamer on Twitch, you might often feel like you want to take a little break during streaming, right? You can take a snack or drink, go to the bathroom, or simply walk around to stretch your legs. It can be anything. This is why you need to know how to add a be right back screen for twitch.
This type of screen is necessary when you have a kind of long duration without any significant activities such as taking a break for a while or even dealing with some technical errors. Additionally, by showing this screen, it can prevent the audiences feel abandoned and questioning your sudden-disappearing.
Therefore, a lot of streamers want to make this BRB screen as fantastic as it could be. They often want to know how to make animated Twitch screens of BRB or other info to make it more appealing. However, you don’t need to do such kind of complicated method to get it done. All you need to do is only a streaming software.
How can it be? Well, this article will guide you to make a great and good-looking BRB screen on Twitch without any advanced editing tools. Let’s just begin.
What Is Actually A Be-Right-Back Screen on Twitch?

As mentioned above, a BRB screen is a screen where you can put any information during break time. It can be a ‘be-right-back’ message or anything that might be related to the content.
A BRB screen can also serve as camouflage when you want to step away from your computer. So, your audience will not be boring while waiting for your come back streaming. In addition, to keep amusing the audience while you’re away, you need to make an appealing BRB screen.
You can add some free animated be-right-back screen or any great editing to the screen. However, it’s also okay if you want to make a simple yet interesting BRB scene. As long as it’s in a video or GIF format, that’s totally fine.
How To Make Be-Right-Back Screen For Twitch With Streaming Software

You might think that to produce a fantastic BRB scene or screen on your streaming, you have to use an advanced tool. Nonetheless, you don’t always need that. If you are not master enough or simply have no more time to create a complex scene, you can actually use the streaming software.
Setting up the BRB Screen on OBS Studio
OBS Studio is one of the most popular software tools used for live streaming, and it’s an essential part of any streamer’s toolkit. It provides an easy-to-use platform that allows you to set up your stream, manage your sources, and interact with your viewers.
In this article, we will guide you to make an animated BRB screen or scene using OBS Studio or Streamlabs OBS.
To get started, open up OBS Studio and navigate to the Scenes panel. Click on the “+” button to create a new scene and name it “BRB.” From there, you can add your BRB screen as a source by clicking on the “+” button in the Sources panel and selecting “Image.” Choose the image file for your BRB screen and adjust the settings as necessary to fit the screen.
Adding BRB Screen on Streamlabs OBS
Without further ado, here are the steps:
- First, make sure you have installed a webcam and streaming software on your device
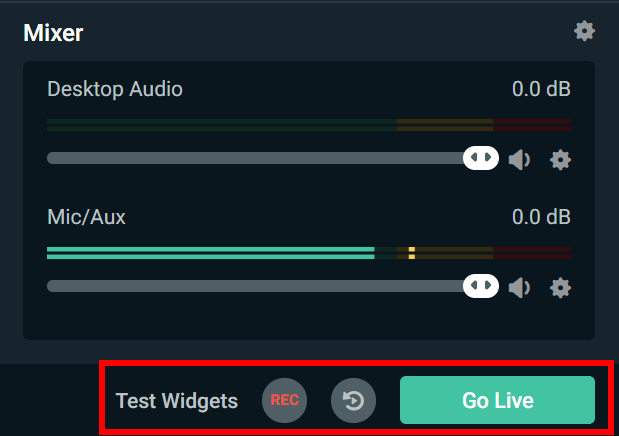
- Secondly, open the Streamlabs OBS and hit the settings icon at the left-bottom of the screen
- Then, hit the Output tab and make the Video Bitrate to 6000

- Click the Video tab, change the Output Resolution to be 1920 x 1080

- Make sure that the recording is enabled by clicking the recording icon on the right-bottom of the screen
- After that, you can record anything you want but keep in mind that you need to make a loop video. Therefore, it’s not necessary to record a long video
- Once you finished recording, you can press the recording icon to stop. Your video will automatically be saved in the download folder
- Next, click the ‘+’ button in the resource box
- Then, choose the Media Source, find the video you just made and click Open
- Do not forget to check the small box next to Loop, then click Done
- If you are going to make some changes to the video, just do the right-click and you can add filters and explore the colour correction
- After adding filters and playing out with the colour effects, you can close the box
- Add the ‘+’ button again, hit Text, and click Add Source
- Then, type anything you want on the Text box. Since it’s a BRB scene, you are going to write “Be Right Back” on your video
- Next, adjust the font size, family, and anything to make the text looks prettier
- Once you’ve done, just click Done and place the text somewhere you want
- Finally, your BRB scene or screen is done and you can apply it to your streaming video
Just so you know that this tutorial is not strict. Meaning that you can still explore the features and the tools within the software. For example, you can add the streaming label the chatbox, or anything. Aside from using Streamlabs OBS, you can also do this using OBS Studio and the directions are pretty much the same.
Conclusion
So now, you have learned how to make a be-right-back screen for Twitch only by using the streaming software. In case you thought streaming software could only be used to record live streaming, you’re wrong. This is proof that you are also able to make additional screens or scenes for your streaming video.
Tech writer, gaming, streaming, gadgets. A decade’s experience. Informative, engaging.
Featured in web publications. Reviews new products. Loves gaming, tinkering.