
Level Up Your Marvel Rivals Gameplay
Capture your epic wins, clutch moments, and even hilarious fails with Eklipse. Easily create and share highlight reels with your friends—even if you're not streaming!
Learn MoreStream delay is the amount of time that elapses between when you broadcast your video and when it appears on your viewers’ screens.
The default stream delay on Twitch is usually set to around 5-30 seconds, which can help reduce the chances of stream sniping and other unfair tactics during gaming events.
However, many streamers find that this delay makes it difficult for them to interact with their viewers in real-time, which can detract from the overall viewing experience.
So, the question is, “can you change the stream delay on Twitch?”
The short answer to it is yes
In this article, we’ll take you through the steps you need to take to change the stream delay on your Twitch channel, and a few things to consider when changing it.
Change Stream Delay on Twitch via Creator Dashboard Menu
Can you change the stream delay on Twitch? Yes, you can change it. The option is available on the “Stream” sub-menu inside the “Creator Dashboard”.
Here are the step-by-step to change the stream delay on Twitch via the Creator Dashboard menu:
- Go to Twitch
- Click Profile Icon > Choose “Creator Dashboard”
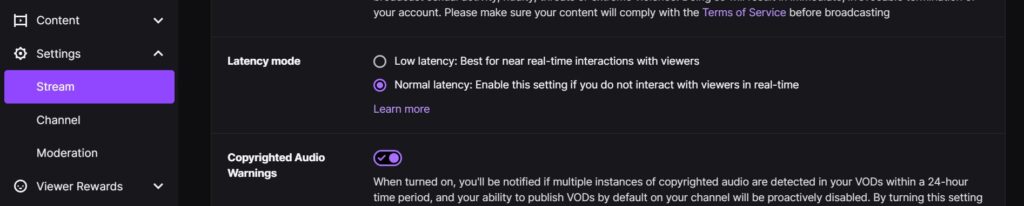
- Go to “Settings” > Choose “Stream” on the dropdown menu on your left
- Scroll down a little bit until you found the “Latency mode” menu
- You can change the stream delay between the “Normal latency” or “Low latency”.
Low latency option will reduce the stream delay to around 7 seconds. However, the default “Normal latency” stream delay is around 5-30 seconds.
Changing the Stream Delay on Twitch via OBS
For all of you who are streaming using PC, you can change the stream delay via your encoder or your broadcasting software such as OBS.
It’s actually pretty easy to change the stream delay on Twitch via OBS, here’s how:
- Open OBS
- Go to the “File” > “Settings” on the top-left menu
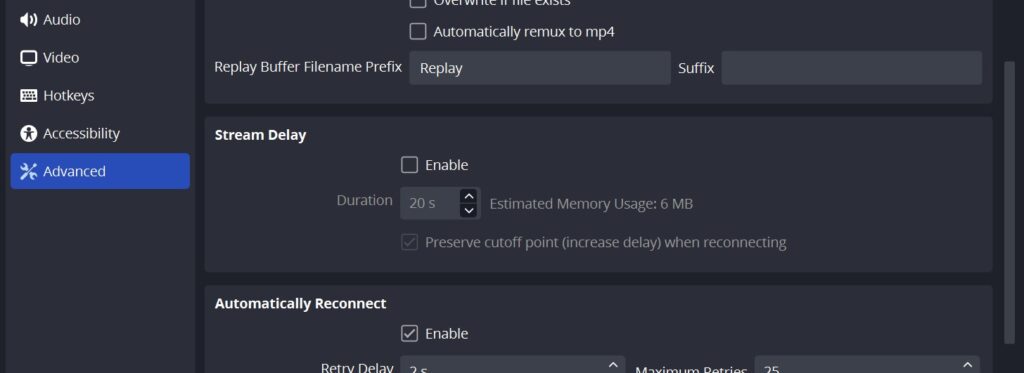
- Choose “Advanced”
- Scroll a bit, you’ll found “Stream delay” option
- Tick the “Enable” box, then customize your delay duration
Change Stream Delay on Twitch via Streamlabs
Streamlabs is another popular encoder or broadcasting software on PC. You can also changing your stream delay if you are using that software.
The option to change the stream delay is a bit similliar like the OBS. Here’s the step-by-step instruction change your stream delay on Twitch via Streamlabs.
- Open Streamlabs
- Click gear icon on your left-sidebar menu
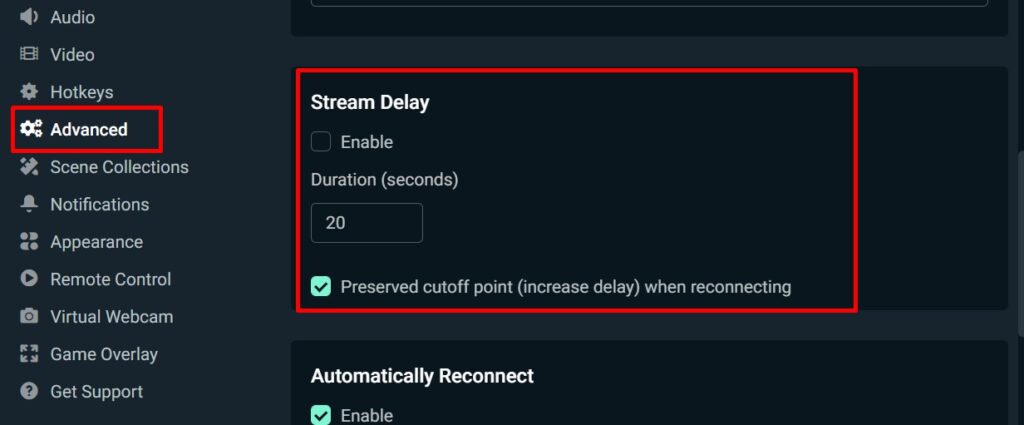
- Look for the “Advanced” options
- Scroll a bit, and you’ll find “Stream delay” option
- Tick the “Enable” box, then customize your delay duration
Things to Know When Changing Stream Delay
While changing the stream delay on Twitch can be a great way to improve your streaming experience, there are a few things to keep in mind.
First, it’s important to understand that decreasing the stream delay can increase the risk of stream sniping and other unfair tactics during gaming events.
If you’re planning on streaming competitive games, you may want to consider leaving the stream delay at its default setting to reduce the chances of these types of incidents.
More on Eklipse Blog >> 7 Best Twitch Video Editors To Make Highlights in 2023
Maximize your Black Ops 6 rewards—Create highlights from your best gameplay with with Eklipse
Eklipse help streamer improve their social media presence with AI highlights that clip your Twitch / Kick streams automatically & converts them to TikTok / Reels / Shorts
Conclusion
In conclusion, changing the stream delay on Twitch is a relatively simple process that can be accomplished through the platform’s settings menu or via your encoders like OBS or Streamlabs.
Whether you’re looking to interact with your viewers in real time or reduce the risk of unfair tactics during gaming events, the stream delay setting is an important tool that can help you achieve your goals.
Just remember to consider the impact of your stream delay to the risks involved with reducing it.
🎮 Play. Clip. Share.
You don’t need to be a streamer to create amazing gaming clips.
Let Eklipse AI auto-detect your best moments and turn them into epic highlights!
Limited free clips available. Don't miss out!
