
Level Up Your Marvel Rivals Gameplay
Capture your epic wins, clutch moments, and even hilarious fails with Eklipse. Easily create and share highlight reels with your friends—even if you're not streaming!
Learn MoreOne of the most popular YouTube content nowadays is gaming. Since it has become a never-ending trend, gaming content always has the power to attract a lot of viewers. This is why many YouTube users want to know how to make gaming videos for YouTube. Gaming videos on YouTube refer to videos that showcase gameplay from various video games, along with commentary from the person playing the game.
These videos can show you how to play a game, how to beat it quickly or even live streaming of someone playing. They can also be videos of people opening new games and giving their first impressions or reviews. These videos can be made by anyone, from professional gamers to just regular players, and are enjoyed by both gamers and non-gamers alike. They can be really fun to watch and can also help you learn how to play a game better.
You might be asking “can you make money from gaming videos on YouTube?”. Of course you can. If you have great content, you’ll get known and get famous, and you’ll get many viewers that can ‘give’ you money eventually. So let’s just start with the guide to creating and editing great YouTube gaming videos.
Step 1: Brainstorm The Content Idea
Before you start to record your gaming moment, think about the idea first. The quality of your content depends on the idea. Therefore, you need to pay more attention to seriously do brainstorming.
Try to find a new and fresh content idea that is still related to your gaming theme. If you ask “what type of gaming videos should I make for YouTube?”, the answer is if you are working on an RPG game, try to find the newest RPG game to play. Other than that, you can also put on the best highlight as your content.
Make sure that you make content with following the trend. It won’t make you look mainstream. Otherwise, you’ll get much of the search volume of your content.
Step 2: Screen Record Your Gameplay Using OBS
Once you’ve planned well the idea of your content, now is time to make it real by recording it. From many streaming software all around the world, we recommend you to use OBS Studio. It’s easy and convenient to use, yet has complete features. Here’s how to record gaming videos for YouTube on a laptop or PC using OBS Studio.
- Firstly, launch and open the OBS Studio app on your device
- Secondly, go to Settings > click Output
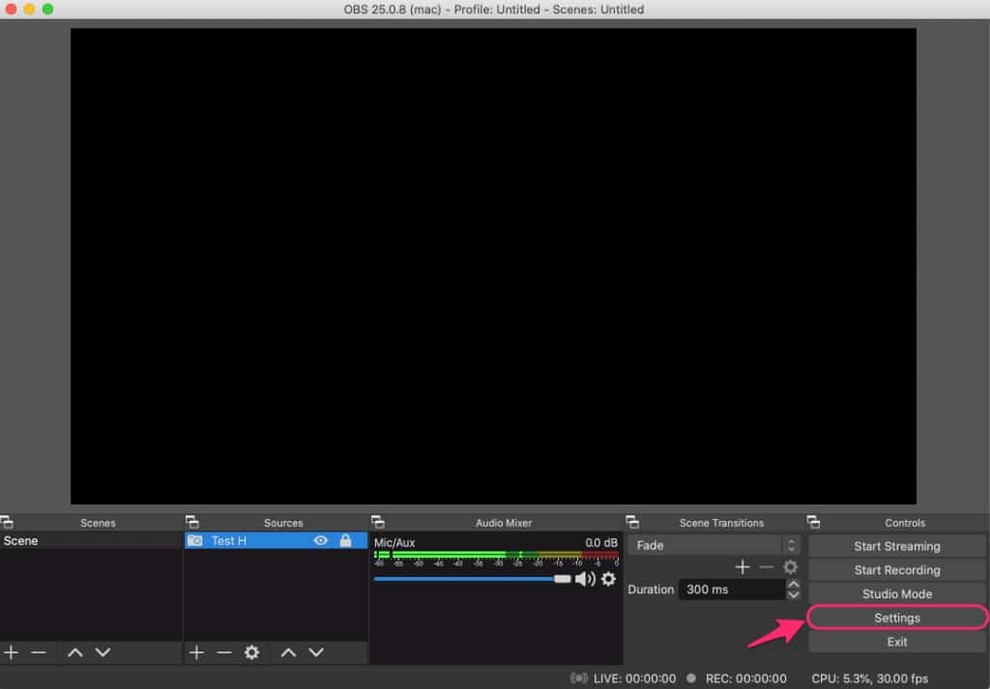
- Then, choose Recording > set the Output Mode to Simple/Advance > set the Recording Format
- After setting the Output, go to the Audio and set all as you wish
- Next, click the Video and set the Base Resolution to be 1920 x 1080 and the Output Resolution to be 1280 x 720
- Once you have done, click Apply and OK
- Hit the gear icon and choose Display Capture > click OK
- Set the display and press OK
- Then, your OBS is now showing your desktop
- Whenever you’re ready, just hit Start Streaming and Start Recording
Finally, you can start to stream and record your streaming moment. Assuming that you’ve done streaming, just click on Stop Recording first and followed by hitting Stop Streaming. Your streaming video is now saved in the download folder.
Step 3: Use Microphone & Camera for Better Result

When you’re making a YouTube gaming video, using a microphone and camera can take your content to the next level. A mic lets you talk to your viewers and give them tips and tricks, or just your thoughts on the game while you play. It’s like you’re playing with a buddy and giving them tips.
And a camera, well that’s like giving your viewers a front row seat to the action. They can see your reactions, your facial expressions and sometimes even hear you scream in excitement or frustration. It’s like they’re right there with you. Overall, using a microphone and camera in your videos makes it more personal and engaging for your viewers, and it makes your video stand out from the rest.
Step 4: Edit The Streaming Video Using Sony Vegas Pro
Additionally, now you need to edit the streaming video before you post it on YouTube. In this article, we’ll give you a guide on using Sony Vegas as one of the greatest video editors. It’s friendly for beginners and professionals. Here’s what you need to do:
- To begin with, Launch the Sony Vegas app to your device and open it
- After that, drag the video file to the working project on Sony Vegas
- You can trim the length of the video by adjusting the bar at the beginning and the end of the video track
- Then, if you’re going to zoom into something, click on the Crop icon at the end of the video track

- Next, you’ll see Video Pan/Crop work project. Here, you can set the resolution, the preview of your video, etc

- If you want to erase the unwanted part of your video, you can just block the part you want to delete, and press Delete on your Keyboard
- Want to add music tracks? Do the same way as you import your streaming video
- After finishing the editing process, you can now render the video by hitting File > click Render As
- Then, pick the location where you want to save your video
- Next, give it a name and click Save
- Choose the MainConcept AVC/ AAC format > click Internet HD 1080p > hit Customize Template

- After that, make sure the Profile is set to High and set everything there based on your computer
- Go to Project and set the Video Rendering Quality to Best > click OK
- When you’re finished, go ahead and click Render
- Finally, it’ll render out the video. Just wait until the process is done
Editing is an important part of how to make gaming videos on PC. You can take out the unwanted parts, rearrange the good parts, add effects, filters, and anything you like to make your video interesting.
Step 4: Creating the Thumbnail for YouTube
Creating a good video is not enough to attract many audiences. Hence, you also need to make an appealing thumbnail for your YouTube post. And to do so, you can use any photo editor software you used to try.
Additionally, there are two best options of photo editors you can try: Photoshop if you think you’re advance enough or Canva. The simple, friendly, yet comprehensive tool to make a great thumbnail image.
The nice thumbnail is when it represents your video content and consist of appealing images related with your content.
Step 5: Post The Gaming Video To YouTube
Along with all the guides above, the final step is to post your video on YouTube. Then, to start it, you can just follow this tutorial to really show the world what you’ve done. Be ready, and we’ll start.
- First, go to YouTube and log into your account
- While you see the homepage, click on the little ‘+’ button at the top-right of the screen
- Then, click Upload Video > hit Select Files
- You’ll be brought up to the folder where your video in
- Select the video you want to upload

- Do all you need to do: Make an interesting title, write the descriptions
- Next, upload the thumbnail from your documents folder
- Add some tags
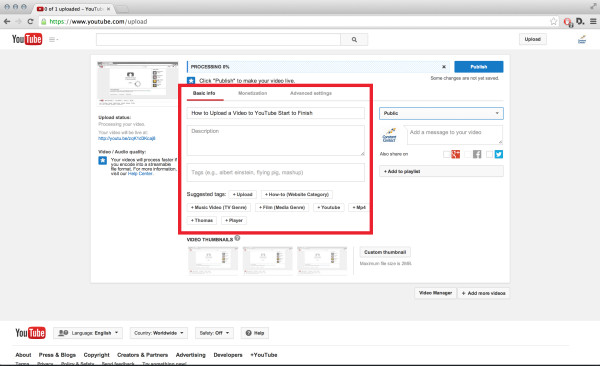
- Go to More Options > find the Category and choose Gaming and on the box next to Category, type the name of the game you’re playing
- Hit the End Screen to give you the option for the closing part of your video
- Don’t forget to set the Visibility to be Public

- Finally, click Save and hit Create
YouTube is now processing your video to be uploaded. Then, wait until it is successfully shown on your YouTube homepage.
Bonus: How to Create Cool Gaming Montage Using Eklipse
Looking for a more convenient way to create incredible montages for YouTube? Try Eklipse!
Eklipse is an A.I-driven tool that allows you to automatically clip your best gaming moments. You only need to sit and do a few clicks, then our powerful A.I will get it done.
If you are curious and want to learn how to make cool gaming highlights using Eklipse, follow the instruction below.
- Start off by clicking the following button to go to Eklipse official website, and log in with your account. If you don’t have, just sign up for free.
Maximize your Black Ops 6 rewards—Create highlights from your best gameplay with with Eklipse
Eklipse help streamer improve their social media presence with AI highlights that clip your Twitch / Kick streams automatically & converts them to TikTok / Reels / Shorts
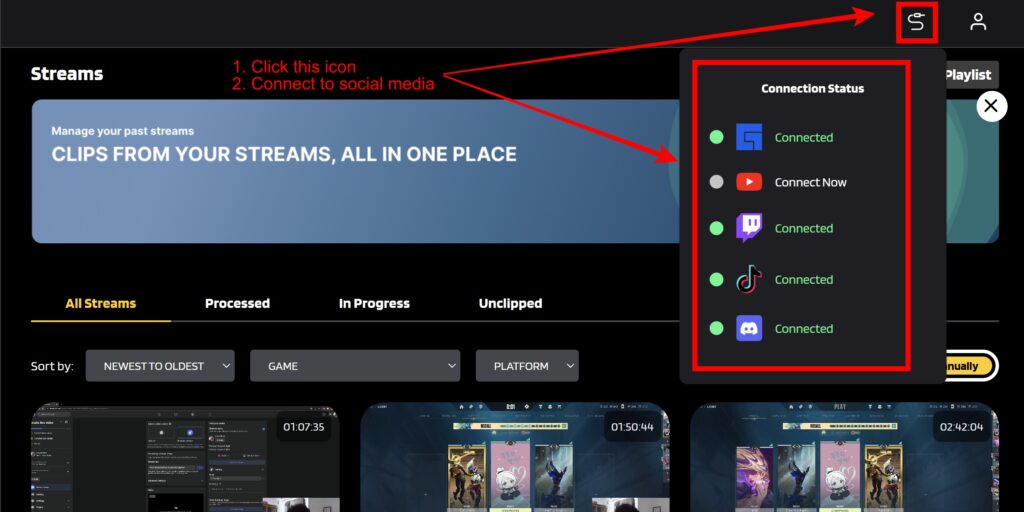
- Then, link your Twitch, YouTube, and or Facebook account with Eklipse. You can do it by clicking the cable icon at the top right side of the screen, and toggling on to any option you like.
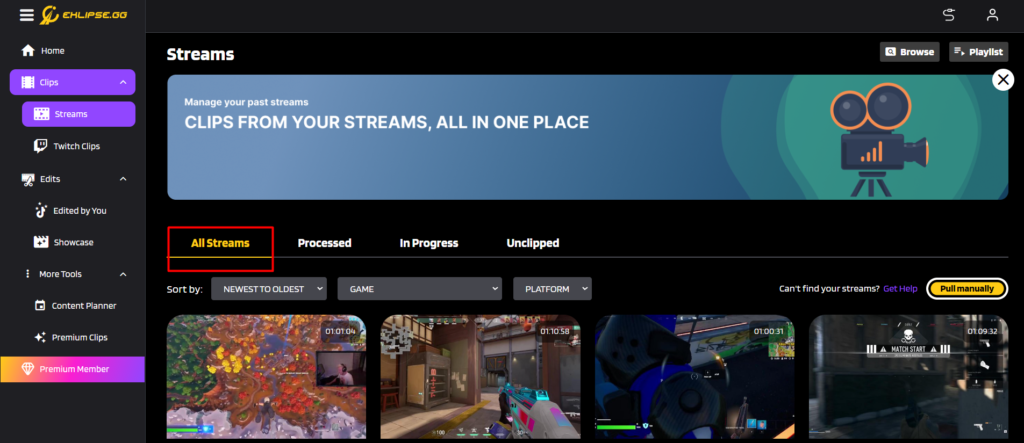
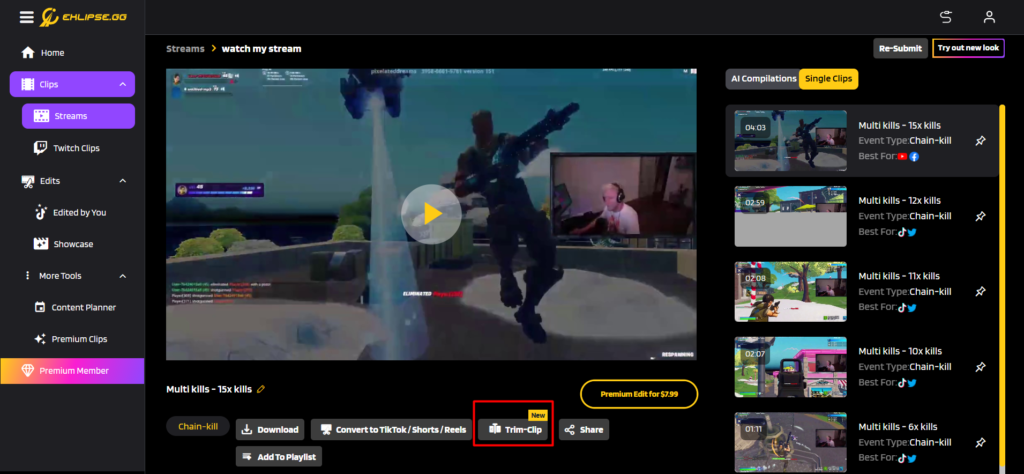
- The A.I will generate your videos automatically. You can see them through the Streams tab on the left-side menu, and click the All Streams tab to find the video you would like to edit.
- Next up, if you want to trim the video duration, click the Trim-clip button underneath the video then adjust the bar to select the duration lengths as you wish. Once you’re sure about it, just hit Compile button at the right bottom of the page. Wait until your trim request has proceeded.
Finally, you can share your montage directly to YouTube. To do so, click on your edited clip under the Processed tab, hit the Share button under the video, and then check the small square beside the YouTube options. Give it a title and write the description, then hit Share Now button.
Conclusion
There you have it. After knowing how to make gaming videos for YouTube, now is your turn to do it yourself. If you are dreaming to be a famous gaming streamer or YouTuber, this is a nice start. Just do it right now and don’t miss the chance!
Maximize your Black Ops 6 rewards—Create highlights from your best gameplay with with Eklipse
Eklipse help streamer improve their social media presence with AI highlights that clip your Twitch / Kick streams automatically & converts them to TikTok / Reels / Shorts
🎮 Play. Clip. Share.
You don’t need to be a streamer to create amazing gaming clips.
Let Eklipse AI auto-detect your best moments and turn them into epic highlights!
Limited free clips available. Don't miss out!
