Level Up Your Marvel Rivals Gameplay
Capture your epic wins, clutch moments, and even hilarious fails with Eklipse. Easily create and share highlight reels with your friends—even if you're not streaming!
Learn Moreortnite offers an exhilarating gaming experience where every match is filled with strategic plays, intense battles, and memorable moments. Whether you’re aiming to improve your skills, analyze your strategies, or simply relive your most epic victories, saving and managing your replays is essential. By capturing your gameplay footage, you can create a library of your best performances, share impressive plays with friends, and gain valuable insights to enhance your gaming prowess.
Fortnite provides two primary methods for saving gameplay footage: automatically generated highlights and manually saved replays. Understanding how to utilize these features effectively can significantly enhance your overall gaming experience. This guide will walk you through the process of enabling replay recording, saving your highlights and replays, and managing your recordings on your PC.
Additionally, we’ll cover important considerations such as storage management and the differences between highlights and full match replays. By following these steps, you’ll ensure that your Fortnite adventures are always preserved and easily accessible for future viewing or sharing.

1. Enabling Replays
Before saving replays, ensure the replay recording feature is enabled in Fortnite. Here’s how:
Step 1: Open Settings
From the lobby, access the main menu (three horizontal lines or equivalent button prompt) and select “Settings” (gear icon).
Step 2: Navigate to Game Settings
Switch to the “Game” or “Game Options” tab.
Step 3: Enable Replay Recording
Find the “Replays” section and toggle on the “Record Replays” option. You can also enable replays for specific game modes like large team games or creative mode.
Step 4: High-Quality Replays (Optional)
For better footage quality, enable “High-Quality Replays”. Be aware that this setting will consume more storage space, so ensure you have enough disk space available.

Step 5: Apply Changes
Save the settings by clicking “Apply” and close the menu.
2. Saving and Managing Replays
Once replays are enabled, follow these steps to save and manage them effectively:
Step 1: Access the Career Tab
From the main lobby, go to the “Career” tab.
Step 2: Open the Replays Section
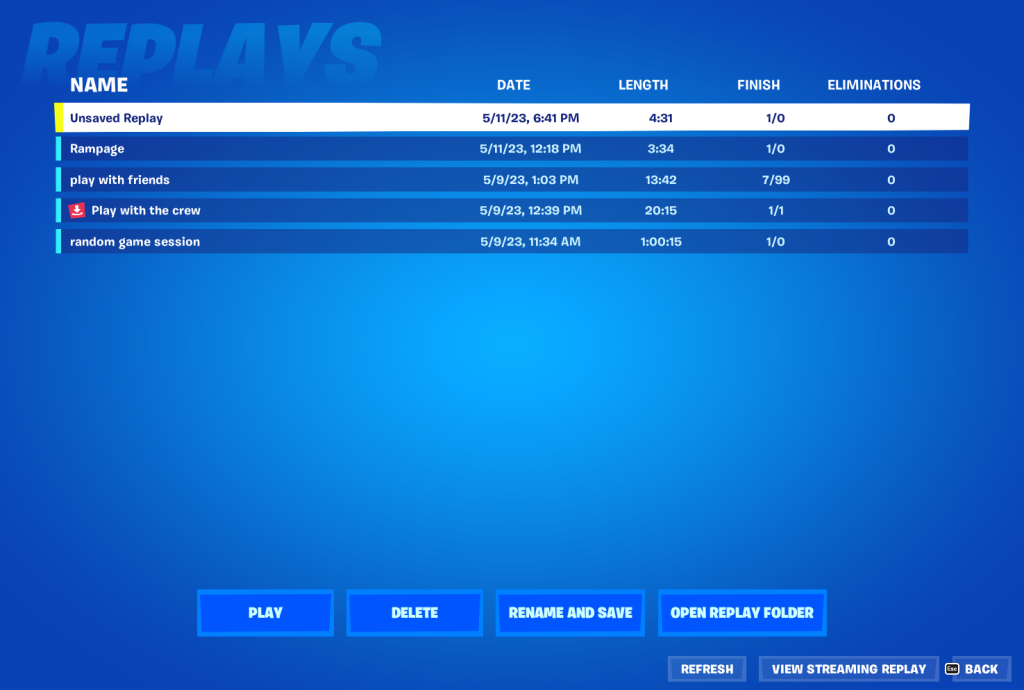
Click the “Replays” button near the bottom of the screen to view a list of your recent matches.
Step 3: Select and Save a Replay
- Choose a Replay: Highlight the replay you want to save from the list.
- Rename and Save: Click “Rename and Save” (or the equivalent button prompt). This lets you give the replay a descriptive name, ensuring it won’t be overwritten.
Step 4: Play or Delete Replays
- Play a Replay: Select a replay and click “Play” to watch your match.
- Delete a Replay: To free up storage, highlight an old or corrupted replay and click “Delete.”
Step 5: Open Replay Folder
For PC users, use the “Open Replay Folder” option to directly access the directory where your replay files are stored.

3. Replay File Location
Understanding where Fortnite stores replay files can help you organize and back up your footage.
Unsaved Replays
Initially, unsaved replays are stored temporarily within Fortnite’s system files. These replays may be overwritten by new matches unless saved manually.
Saved Replays
When you rename and save a replay, it’s stored permanently in a designated folder on your computer. The typical directory is:
mathematicaCopyC:\Users\[YourUsername]\Videos\Fortnite\Replays
Note: Replace [YourUsername] with your actual Windows username. If you’re unsure of the exact location, use the “Open Replay Folder” option in Fortnite to find the directory.
Tips for Replay Management
- Avoid Storage Issues: Regularly delete old or unneeded replays to free up space on your hard drive.
- Back Up Important Files: Transfer your favorite replays to an external drive or cloud storage to prevent accidental loss.
- Use Replay Controls: Fortnite’s replay system includes advanced controls, allowing you to change camera angles, slow down footage, and focus on specific players during playback.
Conclusion
Saving Fortnite replays is a simple yet powerful way to capture and preserve your gameplay highlights. By enabling the replay feature, renaming and saving important matches, and managing your stored files, you can ensure that your best moments are always accessible. Whether you’re analyzing strategies, sharing clips with friends, or creating content, Fortnite’s replay system has you covered.
For enhanced editing and sharing capabilities, consider using tools like Eklipse.gg. Eklipse streamlines the process of turning your replays into polished highlights, perfect for social media or content creation.
Start recording your Fortnite adventures today, and never miss a moment worth saving!
🎮 Play. Clip. Share.
You don’t need to be a streamer to create amazing gaming clips.
Let Eklipse AI auto-detect your best moments and turn them into epic highlights!
Limited free clips available. Don't miss out!
