
Level Up Your Marvel Rivals Gameplay
Capture your epic wins, clutch moments, and even hilarious fails with Eklipse. Easily create and share highlight reels with your friends—even if you're not streaming!
Learn MoreAre you an avid gamer looking to share your fun gaming experiences with the world? If you’re seeking how to stream on Twitch with OBS you’re in luck! Here’s a complete guide to start your Twitch streaming from different devices with OBS.
How to Stream on Twitch with OBS on PC
Streaming on Twitch is a fantastic way to connect with like-minded gamers and build a community around your passion. Whether you’re a seasoned streamer or a beginner, these step-by-step instructions will help you get started and create engaging content that captivates your audience.
Part 1: Getting Started with Twitch Streaming
Before you dive into the streaming world, make sure you have a Twitch account. If you already have one, you’re good to go. If not, head over to the Twitch website and sign up for an account to get started.
A stable internet connection is also crucial for a smooth streaming experience. Ensure you have the best possible internet connection, with low latency and fast upload speeds.
Part 2: Connecting OBS Studio to Twitch
- Launch OBS Studio.
- Access the Settings by clicking on the gear icon in the bottom right corner. Alternatively, navigate to File > Settings.
- In the Settings panel, select “Stream” from the left-hand menu.
- On the right, choose “Twitch” as your service (if it’s not already selected).
- Click on “Connect Account.”
- Enter your Twitch login credentials.
- If you prefer not to log in, you can use your stream key obtained from the Twitch dashboard (Profile > Settings > Channel and Videos).
- Click “Apply” to save your settings.
More on Eklipse Blog >> How to Use OBS Studio: Starters Guide
Part 3: Configuring OBS Studio Settings
Now, let’s continue with configuring your OBS Studio settings. Follow this guide:
- Access the Settings in OBS Studio.
- Click on “Video” in the left-hand menu to configure video settings.
- Select “Output (Scaled) Resolution“.
- Click “Apply“.
- Choose a suitable “Video Bitrate” based on your desired quality.
- Select an encoder: NVENC (NVIDIA), QSV (AMD or Intel), or x264 (software).
- Proceed to the “Audio” settings on the left-hand menu.
- Under “Global Audio Devices,” ensure the correct sources are selected for “Desktop Audio” (your game) and “Mic/Auxiliary Audio” (your microphone).
- Click “Apply”.
Note: “Base (Canvas) Resolution” determines what you see on your screen, while the “Output (Scaled) Resolution” is what viewers will see.
Part 4: Creating Your Streaming Scene
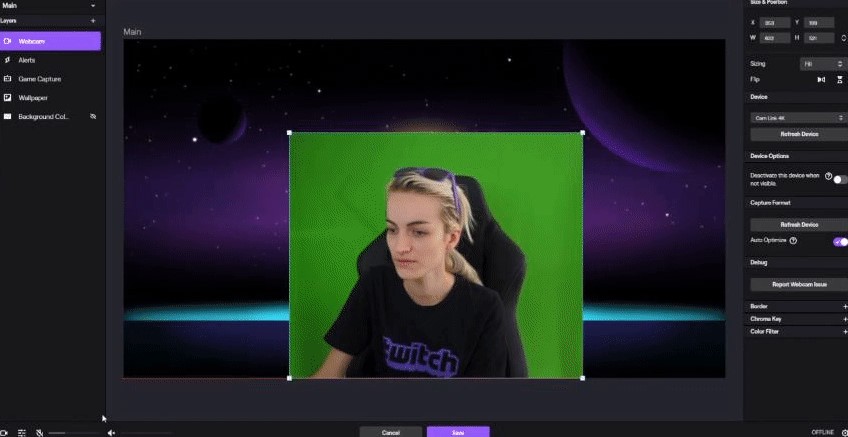
- Find the “Scenes” section located in the bottom left corner of OBS Studio.
- Click the “+” icon.
- Give your scene a name and confirm.
- Under “Sources,” click the “+” icon again.
- Select “Game Capture” from the pop-up menu and give it a name.
- In the Properties panel, choose a “Mode” (Fullscreen, Specific Window, or Foreground Window).
- Enable any additional elements you want to include in your broadcast, such as third-party overlays.
- Click “OK” when you’re ready.
- Still in the “Sources” section, click the “+” icon again.
- Choose “Video Capture Device” from the pop-up menu and name your webcam source.
- In the Properties panel, select the appropriate device and adjust other settings as needed.
- Click “OK.”
Part 5: Adding Twitch Chat to Live Stream
Don’t forget to add Twitch chat to your live stream for increasing your viewers’ engagement during the session. Here’s how:
- Log in to Twitch in your web browser.
- Click on your profile icon.
- Select “Channel” from the drop-down menu.
- Click on “Chat.”
- In the chat interface, click the cog icon in the bottom right corner.
- Choose “Pop-Out Chat” from the pop-up menu.
- Copy the URL of the pop-out chat window.
- Return to OBS Studio and click “View.”
- Select “Docks” and then “Custom Browser Docks.”
- Enter a name for the browser dock, paste the URL of the pop-out chat, and click “Apply.”
More on Eklipse Blog >> How to View Twitch Chat While Streaming? 5 Easy Ways
Part 6: Initiating Your Stream
- Start your game.
- In OBS Studio, click the “Start Streaming” button to go live.
- To end your stream, click the “Stop Streaming” button, and conclude your game session.
Congratulations! You’ve successfully learned how to stream on Twitch using OBS Studio on PC. Now, immerse yourself in the world of live gaming, engage with viewers, and build your community one broadcast at a time.
FAQs
Q1: Can I use any streaming software other than OBS for Twitch streaming?
While there are other streaming software options available, OBS Studio is highly recommended for its customization capabilities, broad platform support, and popularity among streamers.
Q2: Is a high-end computer necessary for Twitch streaming with OBS?
While a powerful computer can enhance the streaming experience, OBS Studio is designed to be resource-friendly. With the right settings and optimization, you can achieve excellent results on various hardware configurations.
Q3: Do I need a gaming console to stream on Twitch with OBS?
No, OBS Studio works with various gaming platforms, including consoles, PCs, and mobile devices. As long as you have the necessary hardware to capture your gameplay, you can stream on Twitch.
Q4: Can I stream games other than popular titles on Twitch?
Absolutely! Twitch caters to a diverse range of gaming interests. While popular games attract a significant audience, streaming niche or lesser-known games can help you find a dedicated and passionate community.
Q5: What should I do to grow my Twitch channel’s viewership?
Building a loyal viewership takes time and dedication. Interact with your audience, engage in the Twitch community, and collaborate with other streamers. Consistency, quality content, and genuine connections will contribute to the growth of your channel.
Conclusion
Streaming on Twitch with OBS is an exhilarating experience that allows you to share your passion for gaming with the world. By following this comprehensive guide, you can confidently set up your streaming environment and engage with your viewers. Have fun!
Maximize your Black Ops 6 rewards—Create highlights from your best gameplay with with Eklipse
Eklipse help streamer improve their social media presence with AI highlights that clip your Twitch / Kick streams automatically & converts them to TikTok / Reels / Shorts
🎮 Play. Clip. Share.
You don’t need to be a streamer to create amazing gaming clips.
Let Eklipse AI auto-detect your best moments and turn them into epic highlights!
Limited free clips available. Don't miss out!
