Level Up Your Marvel Rivals Gameplay
Capture your epic wins, clutch moments, and even hilarious fails with Eklipse. Easily create and share highlight reels with your friends—even if you're not streaming!
Learn MoreHave you ever felt frustrated when your most epic Marvel Rivals moments go unnoticed, stuck in the depths of gameplay sessions? You’re not alone. Capturing the thrill of a perfect combo or a game-winning move can feel overwhelming without the right tools or knowledge. These moments deserve to be celebrated and shared with the world—but how?
The good news is, you don’t have to be a tech wizard to turn those highlights into stunning visual content. From accessing your gameplay clips to enhancing and sharing them like a pro, this guide will show you everything you need to know. Let’s transform your Marvel Rivals skills into shareable masterpieces that will wow your friends and followers.

Accessing Highlights in Marvel Rivals

Capturing your epic moments is the first step to showcasing your gameplay. Marvel Rivals includes built-in tools that make it easy to access and manage highlights.
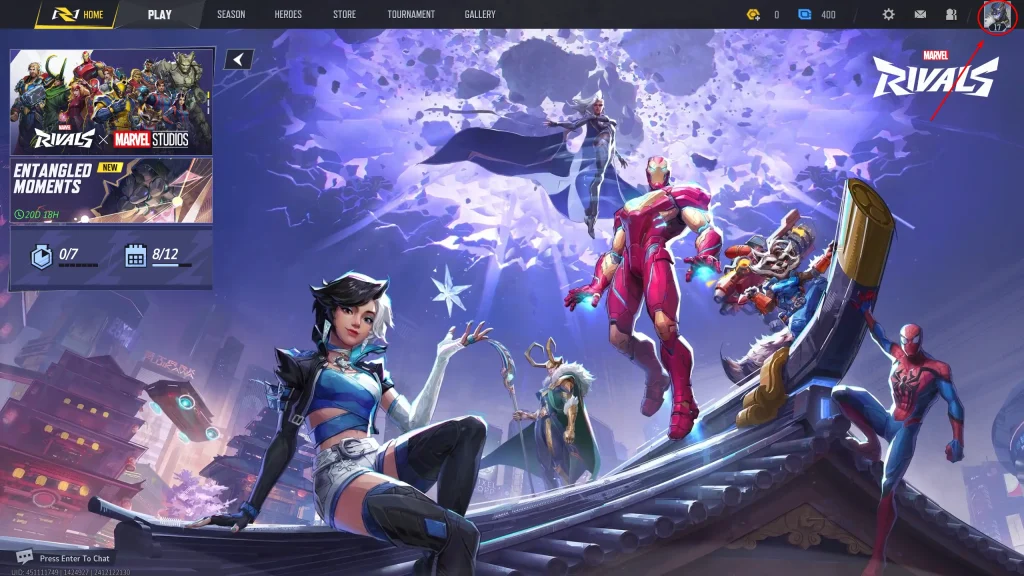
- Launch Marvel Rivals and navigate to the main menu.
- Click on your profile icon located at the top-right corner.
- Select the “Highlight” tab to view your saved clips.
- Scroll through the list of automatically saved highlights from your recent matches.
Pro Tip:
- Optimizing your game settings to capture high-quality clips can make editing smoother and result in better-looking highlights.
- These tools allow you to quickly locate your gameplay clips and set the foundation for editing and sharing.
Saving Highlights to Your Device
Saving your highlights ensures they’re accessible for later editing or sharing. Marvel Rivals provides straightforward options for saving clips to your device.
- Select a Highlight: Choose the gameplay clip you want to save.
- Click Save: Press the “Save” button on the highlight interface.
- Locate Saved Files: By default, saved clips are stored in:
C:\Users\[YourUsername]\AppData\Local\Marvel\Saved\ShareVideos- Change the Save Location (Optional): Navigate to the game’s settings and update the save folder as desired.
Warning:
- Check your storage regularly to avoid running out of space, especially if you plan to save multiple highlights.
- Saving your clips keeps your gameplay moments secure and ready for editing.
Enhancing Highlight Quality
Transforming your raw gameplay footage into a professional-looking highlight reel requires attention to quality. Here’s how you can enhance your highlights:
Adjust Graphics Settings
Start by optimizing your in-game settings to ensure crisp visuals.
- Open Settings: Go to the “Graphics” section in the game settings.
- Set High Graphics Quality: Choose the highest possible settings your hardware can support.
Use Video Editing Software
After saving your highlights, refine them with editing tools.
- Import Your Clips: Upload your saved highlights to video editing software such as Adobe Premiere Pro, DaVinci Resolve, or CapCut.
- Apply Enhancements: Add effects, transitions, and music to create a polished and engaging video.
- Export in High Resolution: Save your edited video in 1080p or higher to maintain quality when sharing.
Enhancing your highlights with professional tools ensures they stand out and leave a lasting impression.
Sharing Highlights on Social Media
Sharing your gameplay highlights is the final step to getting the recognition your skills deserve.
- Select Your Platform: Decide where to share, such as YouTube, TikTok, or Instagram.
- Upload the Clip: Open the platform’s app or website, click “Upload” or “Post,” and select your file.
- Add a Caption: Write a catchy description that draws attention to your clip.
- Publish: Hit “Post” or “Upload” to share your content with your audience.
Bonus Tip:
- Incorporate trending hashtags like #MarvelRivalsHighlights or #EpicGameplay to increase your visibility and engagement.
- By following these steps, you can connect with the gaming community and showcase your skills.
Why Use Eklipse for Your Highlights?
Want to make the process even easier? Consider using Eklipse, an AI-powered tool that automates the creation of stunning highlights. Here’s why Eklipse is perfect for Marvel Rivals players:
- Automatic Clip Detection: Eklipse identifies your most exciting moments without manual intervention.
- Advanced Editing Features: Quickly enhance your clips with transitions, effects, and music.
- Social Media Integration: Share your highlights directly to platforms like YouTube and TikTok.
Eklipse simplifies highlight creation, saving you time while delivering professional results.
Final Thoughts
Creating stunning Marvel Rivals highlights doesn’t have to be complicated. With this guide, you can effortlessly access and save your best gameplay moments, transform raw clips into polished highlights with editing tools, and share your creations to impress the gaming community.
Ready to take your highlights to the next level? Try Eklipse! Automate the process, enhance your gameplay videos, and share your epic moments with ease. Don’t let your best plays go unnoticed—start creating and sharing today!
🎮 Play. Clip. Share.
You don’t need to be a streamer to create amazing gaming clips.
Let Eklipse AI auto-detect your best moments and turn them into epic highlights!
Limited free clips available. Don't miss out!
