
Facebook is undoubtedly the latest leading platform of social media for the past decade. Launching quite new and amazing features each year, Facebook live video brings a lot of entertaining and interesting things to our busy social media lives. Sounds good, right?
Many people have started their journey through Facebook and got millions of followers. It clearly means that even a common man can become famous on this wonderful platform by remaining active most of the time. All in all, a live video on Facebook can be a sweet spot in this regard. And yes, the best editing can make it super fantastic and play a vital role in this case.
After live streaming, you might put irrelevant filters, effects, or stickers on your Facebook video, and you need to change them. Don’t worry, though. It’s very possible to do, even without any additional apps or software. Yes, Facebook has a default trimming feature that allows you to make some changes to your video before posting it. It only took a few steps and you’ll be good.
Well, just have a look below to know what steps you can follow to edit a live video. Let’s get started.
How to Edit Facebook Live Video
Before you get into the tutorial, make sure that you have done the live streaming on Facebook. Once you’ve owned the live video recorder, you can do the following steps.
Step 1. First of all, locate your video on your computer. It could be either in your feed or in the video library.
Step 2. Then, hit the three-dots icon on the top-right corner, and select the Edit Video option under the drop-down menu.
 Source: Varvid
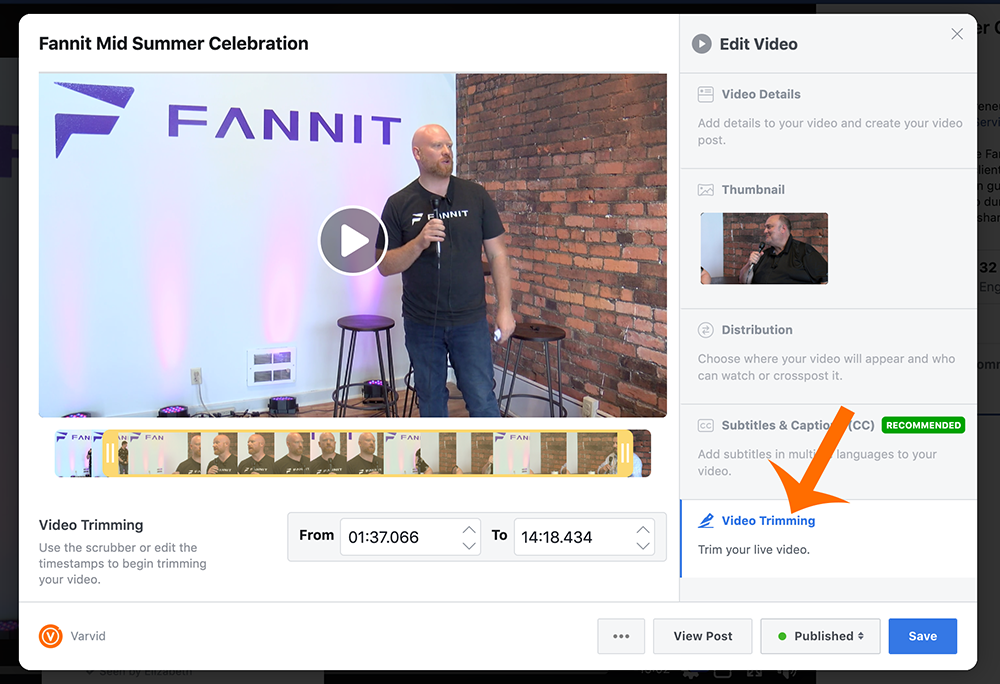
Step 3. Click on the Trimming option.
Step 4. After that, set the length by moving the yellow slider at the beginning and the end of the video.
Step 5. Once you’ve been satisfied with the result, click Save to save your trimmed video.
 Source: Varvid
Voila! Your Facebook live video is now ready to publish everywhere you want.
How to Edit Facebook Live Video With Eklipse
Although Facebook enables its users to make some edits towards their video, they don’t provide enough features to make your video looks cooler. Luckily, we have Eklipse, an AI-powered clip-maker tool that will turn your video to be more catchy only in a snap. Here’s how to use it.
Step 1. Go to Eklipse’s official website and sign in or sign up if you don’t have an account.
Step 2. After that, link your Eklipse account with your Facebook account by hitting the cable icon in the upper-right corner.

Step 3. The AI will automatically load your Facebook videos. To find them, just go to the Streams tab > All Streams.

Step 4. Once you’ve found the video you’re going to edit, just hit the Get Clip button.
Step 5. There, you’ll get several options for short videos. Just pick anything you want.

Step 6. If you want to trim the video, just hit the Trim-Clip button under the preview. Or, you can convert it into TikTok or reel video by clicking the Convert to TikTok/Reel button.

Step 7. Select any templates you think will suit your Facebook video, then select the area and the video length. Hit Next.

Step 8. It’s probably the best part of editing. Yes, you are able to add a soundtrack by heading to Add Music option. Just pick the best song and follow the steps.
Step 9. Once you’ve done editing, hit Confirm and your video will be saved in the Edited Clips option.

Step 10. Then, go to that option to find the video. if you have found the video, you can download or share them directly on Facebook, TikTok, or YouTube.

Conclusion
So, that’s all about how to edit Facebook Live videos using the default feature and Eklipse. We hope this article will be helpful for you, folks! Don’t forget to share to your social media and let everyone know about this tips.

Almira spends most of her time reading, writing, and playing games with her cats. She enjoys playing console games like GTA and Resident Evil. But among all those popular games, it’s always Cooking Mama that captures her heart.