Home Blog Page 35

7 Best Cutlabs Alternatives, Try for Effortless Video Editing

0
Cutlabs
Cutlabs

As video content takes center stage in the digital landscape, creators require tools that streamline editing without compromising quality. Whether you’re an experienced creator or just starting out, Cutlabs and six other AI-powered alternatives offer the efficiency and creative flexibility needed to turn lengthy videos into captivating short clips.

1. Klap – $29 per Month

Klap uses AI to identify captivating moments in videos, creating engaging short clips with intelligent framing and captions. It’s perfect for TikTok and Instagram Reels creators.

Why Choose Klap?

  • AI-driven topic identification.
  • Engaging captions for enhanced virality.

Downside: Higher price compared to others.

2. Pictory – $19/Month/User

Pictory transforms long videos into branded snippets, allowing for extensive customization. Its AI transcription simplifies editing and summary creation.

What Makes Pictory Unique?

  • Fast content creation.
  • Comprehensive customization (logos, fonts, intros/outros).

Limitations: Limited sound editing features.

3. Eklipse.gg – The Best AI Clipping Alternative

Eklipse AI Video Generator
Eklipse AI Video Generator – Source: Eklipse

Eklipse.gg stands out as the top alternative for creating highlight clips, especially for gamers and streamers. With advanced AI capabilities, Eklipse identifies your best moments and converts them into shareable, professional-quality short clips effortlessly.

Why Choose Eklipse.gg?

  • Ease of Use: Just upload or connect your streaming account, and the AI does the rest.
  • Customizable Templates: Add branding, captions, and effects to elevate your content.
  • Best for Gamers: Tailored tools for Twitch, YouTube, and gaming content.
  • Affordable Plans: Accessible for creators of all levels, with free and premium options.

If you’re looking for a simple yet powerful alternative, Eklipse.gg is your go-to solution. Why settle for less when you can have everything in one platform?

4. vidyo.ai – $21/Month (Billed Annually)

vidyo.ai transforms long videos into clips optimized for platforms like YouTube Shorts. With auto-captioning and advanced editing tools, it’s a robust tool for creators focused on virality.

Highlights of vidyo.ai:

  • Auto aspect ratio adjustments for multiple platforms.
  • Virality prediction feature.

Drawback: Might require advanced editing skills.

5. Snapcut – $8 per Month

Snapcut offers affordability and efficiency, analyzing content to create viral-ready clips with animated captions.

Why Choose Snapcut?

  • Budget-friendly.
  • High accuracy in captioning.

Downside: Fewer features compared to premium tools.

6. Recast Studio – $17 per Month

Ideal for podcast creators, Recast Studio generates short clips, captions, and even social media posts from podcast episodes.

Why Use Recast Studio?

  • Automatic clip and show notes creation.
  • Shareable highlights for greater reach.

Limitation: Primarily for audio content.

7. Flowjin – $29 per Month

Flowjin structures long educational videos into digestible chapters and identifies key highlights for short clips.

What Sets Flowjin Apart?

  • Topic-based chapter creation.
  • Full control over clip customization.

Consideration: Higher pricing may deter casual users.

Why Eklipse.gg Should Be Your First Choice

While many alternatives offer useful features, Eklipse.gg excels with its focus on gaming and streaming content. It provides an intuitive, efficient, and high-quality experience, positioning itself as the top alternative to Cutlabs. Whether you’re a gamer, creator, or marketer, Eklipse helps your highlights stand out on social media.

Join today and discover why creators globally trust Eklipse.gg to enhance their content strategy!

Who is JellyBean? Age, Real Name, Controversies Explained

0
JellyBean Streamer
JellyBean Streamer

JellyBean, a prominent streamer from the United States, has built a reputation through platforms like YouTube and TikTok. Known for their engaging content and unique style, JellyBean Streamer has also been at the center of online debates and controversies.

From introducing viral trends to sparking heated discussions, JellyBean’s journey reflects both the rewards and challenges of fame in the digital age. In this article, we’ll delve into their rise as a streamer and the lasting impact on their community reputation.

Who is JellyBean?

Source: Facebook

Bean was born on November 23, 2004, in the United States. They identify as Hispanic and are both bisexual and non-binary, preferring to be referred to using “they/them” pronouns. Bean is of Mexican descent. You can find their personal boundaries information here. They are 5’1″ tall. Bean finished high school on May 12, 2022.

In March 2022, their eye was exposed on their TikTok account, which has since been banned.

JellyBean’s Content

They made their channel on October 8, 2020, and posted their first video on February 8, 2021. Later, on October 21, 2021, they uploaded their first YouTube Short named “Mexican Dream in Minecraft.” On September 15, 2021, they, along with Cdotkom, CourseCorrected, and Jpegi, applied for MCC Rising. Unfortunately, they didn’t get selected for MCC Rising.

More on Eklipse Blog >>> Top Female Twitch Streamers Dominating the Platform

Controversies

Source: The Vibely

Although JellyBean is a content creator, they’re known for their controversies. Here are some of them:

Spamming Trend

In 2021, they started a trend where their fans would comment “it’s not a mistake, ✨IT’S A MASTERPIECE✨” on every TikTok and YouTube Short they saw. Other YouTubers like Twi Shorts and Beesechurger 73 joined in too.

The trend caused a lot of spamming and upset many TikTokers, YouTubers, and streamers. They later apologized for the spam and asked their fans to stop doing it to other YouTubers and streamers.

Pedophile Joke

During a Five Nights at Freddy’s: Security Breach stream, JellyBean repeatedly called the daycare attendants pedophiles. People on YouTube and TikTok criticized them for making such a joke, calling it harmful and in poor taste. On February 8, 2022, they responded to the criticism.

Using Slurs

In February 2021, screenshots of JellyBean using slurs spread on social media. They said the screenshots were fake because the profile picture and name pronunciation were incorrect.

More on Eklipse Blog >>> Tyler1 Net Worth, Age, Social Media, and Facts You Should Know!

Feud with Meowbahh

When JellyBean saw Meowbahh gaining attention in the Minecraft Shorts Community, they asked on Twitter, “Who’s Meowbah?”. After some replies, they regretted asking and blocked Meowbahh on Twitter.

Banned from TikTok

JellyBean privated their TikTok account when they received hate. They unprivated it on April 1, 2022, but their account was terminated on the same day for unknown reasons. JellyBean tweeted that it was an April Fools prank, but TikTok didn’t respond, and they remained banned. Meowbahh asked JellyBean to message them and get them unbanned. However, Meowbahh also made offensive comments about JellyBean.

JellyBean’s fans tried to help them get unbanned on TikTok, but it didn’t work. People thought the ban was unfair since JellyBean’s content was about Minecraft and didn’t violate TikTok rules. Someone made a video defending JellyBean, but it received mixed reactions, with some criticizing the person for being too supportive.

Trivia

  • They have a dog
  • They are a plushie collector
  • They are considered to have popularized the phrase “PNGtuber”, for YouTubers who use illustrated stills to express themselves
  • They are afraid of the dark

Final Thoughts

JellyBean Streamer rose to fame through their engaging content on YouTube and TikTok, capturing the attention of many. However, their online presence has not been without controversy. From sparking spamming trends to making controversial jokes, JellyBean has faced significant criticism and debate.

Despite the backlash, their loyal fanbase continues to support them, highlighting the ongoing influence they hold in the digital world. JellyBean’s journey underscores the weight of responsibility that comes with being a prominent figure online and the lasting impact of their actions.


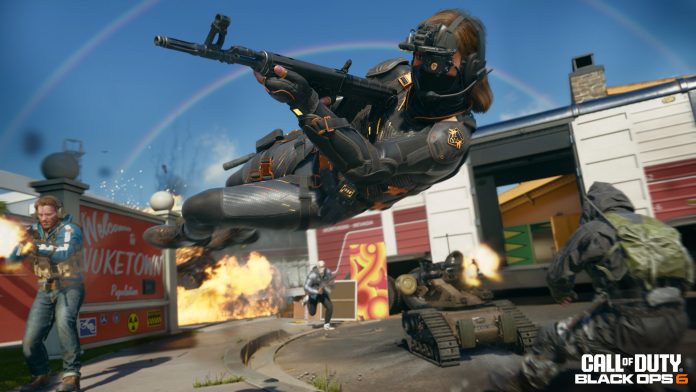
Maximize your Black Ops 6 rewards—Create highlights from your best gameplay with with Eklipse

Eklipse help streamer improve their social media presence with AI highlights that clip your Twitch / Kick streams automatically & converts them to TikTok / Reels / Shorts
Kristina Kika Kim: Bio, Net Worth, Boyfriend, Trivia [2024]

0

Kristina Kika Kim, a renowned model from Kazakhstan, has captured the internet’s attention with her dazzling talent and charm. Known for her stunning modeling work and viral content, Kristina has become a global sensation, especially on platforms like TikTok and YouTube. Her unique blend of fashion and entertainment keeps fans hooked, making her a standout in the online community.

Curious about how Kristina Kika Kim skyrocketed to fame and became a social media icon? This article dives into her journey, exploring the secrets behind her success and the strategies that keep her in the spotlight.

Who is Kika Kim?

Source: Instagram/kika.kim

Kristina “Kika” Kim is a Kazakh-American social media star, well-known for her creative and engaging content on TikTok, Instagram, and YouTube. Born on July 26, 1999, in Kazakhstan, Kika has built an impressive online presence with her unique style and relatable videos.

Standing at 5 feet (152 cm) tall and weighing around 46 kg (101 lbs), Kika is of Swiss and South Korean descent. Her social media journey took off during the pandemic, and she now has millions of followers across platforms:

  • TikTok: @kikakiim
  • Instagram: @kika.kim

Her popularity stems from her light-hearted lip-syncing, dance routines, and comedic skits, making her a prominent figure in the digital space.

More on Eklipse Blog >>> Pokimane Profile, Age, Career, and Latest News

How much does Kika Kim earn?

Kika Kim’s income comes from multiple sources, with social media and brand deals being her primary channels:

  • TikTok: Kika reportedly earns between $2,000 to $4,000 per sponsored post, based on her follower engagement and collaborations.
  • YouTube: With 9.4 million total views, her YouTube ad revenue and sponsored content bring in a decent income.
  • Brand Collaborations: Kika works with several fashion, beauty, and tech brands, adding a significant boost to her earnings.

As of 2024, Kika Kim’s net worth is estimated to be between $2 million and $3 million, showcasing her financial success as a digital content creator.

Career Journey

Source: Instagram/kika.kim

Kristina Kika Kim’s career trajectory has been on a steady upward climb, starting as a model before gaining fame on TikTok and other platforms. Even before her rise on social media, Kika had built a presence on Instagram, posting her first selfie in 2018, which quickly garnered attention. Her early success showcased her natural appeal and ability to connect with an audience.

When TikTok exploded in popularity, Kika saw an opportunity. She began posting a variety of content, including romantic clips, lip-syncs, fashion, and beauty videos. Her authenticity and engaging style quickly drew a massive following. By late 2021, she had surpassed 25 million followers on TikTok and had amassed over 5 million followers on Instagram.

Her YouTube journey started in late 2021 as well, and in just a few years, her channel has seen substantial growth, with millions of subscribers tuning in for life vlogs, unboxings, and creative content.

Kika’s success didn’t go unnoticed, leading to brand endorsements and collaborations that boosted her career further. To handle the growing workload, she partnered with XO Agency, which now manages her schedule and professional commitments.

Her Path to Success on TikTok and YouTube

Kristina Kika Kim is best known for her entertaining lip-sync and dance videos on TikTok. Her relatable content has attracted over 36 million followers, and she has received more than 1 billion likes on the platform. Her videos often blend humor, fashion, and trends, creating a versatile appeal.

Kika has also made significant strides on YouTube, where she shares a mix of life vlogs, behind-the-scenes clips, and unboxings. Her YouTube channel boasts 8.95 million subscribers, with over 462 videos uploaded. Her content variety continues to grow, appealing to fans of different genres.

On Instagram, she maintains her influence with over 8.4 million followers, posting lifestyle shots, travel updates, and fashionable looks that resonate with her fanbase. She is also an active member of the XO Team, a TikTok collective of popular creators, further solidifying her position in the social media world.

Financial Success and Brand Partnerships

While Kristina Kika Kim’s exact net worth is not publicly available, her multi-platform success suggests substantial earnings through brand deals, endorsements, and ad revenue. Her presence on TikTok, YouTube, and Instagram has led to partnerships with well-known brands, adding to her financial portfolio.

Kika’s influence extends beyond her personal content as she continues to collaborate with other creators and companies. Her work with XO Agency has streamlined her business endeavors, allowing her to focus on content creation while growing her brand.

Personal Life and Interests

Kika keeps much of her personal life private, particularly regarding her relationships, but she often shares glimpses of her hobbies and interests. She enjoys traveling and has visited various countries such as Italy, Turkey, and France. Additionally, she has a passion for cooking, nail art, and pets, often featuring her furry companions on social media.

Despite her global fame, Kika remains down-to-earth and relatable, making her a favorite among her fans.

Kika Kim is Collaborating with Eklipse

Taking her online strategy to the next level, Kika Kim has partnered with Eklipse, a platform that uses cutting-edge AI to automatically transform her long-form content into bite-sized snippets perfect for platforms like TikTok, Instagram Reels, and YouTube Shorts.

This strategic move underscores Kika’s commitment to expanding her reach and fostering deeper engagement with her audience across the ever-evolving social media landscape.

Final Thoughts

Kristina Kika Kim’s transformation from a model to a leading social media influencer showcases the power of creativity and authenticity in building a digital empire. With millions of followers across TikTok, Instagram, and YouTube, she has become a key figure in the online entertainment world. Kika’s success is fueled by her diverse content, strategic brand partnerships, and her collaboration with innovative platforms like Eklipse.

If you’re inspired by Kristina Kika Kim’s journey and want to elevate your digital presence, Eklipse is here to help! This platform not only provides advanced tools to enhance your content but also offers an Affiliate Program to help you monetize your passion. Whether you’re a budding creator or an established influencer, Eklipse makes it easier to grow your brand and turn creativity into income. Try it now!

How to Open the Vault in Nightshift Forest

0
open the vault in Nightshift Forest

Unlocking the Mythic Vault in Nightshift Forest is a thrilling challenge for Fortnite players. This vault is packed with valuable loot that can greatly enhance your gameplay. However, accessing it requires strategic planning and interaction with key characters within the game. By following our step-by-step instructions, you’ll not only learn how to open the vault but also familiarize yourself with essential locations in Nightshift Forest.

From locating a Sprite to interacting with Bushranger, each step is crucial for a successful treasure hunt. To successfully open the Vault in Nightshift Forest in Fortnite Chapter 6, follow this detailed guide that outlines the steps you need to take, along with important tips for maximizing your treasure hunt experience.

How to Open the Vault in Nightshift Forest

Open the Vault in Nightshift Forest – Source: Screen Plays Mag

Step 1: Find a Sprite

Your journey begins by locating a Sprite, which are small creatures scattered throughout the map. They are typically found near trees or water sources. If you’re having trouble spotting them, you can use any Sprite Shrine to highlight their locations.

Key Features:

  • Location Variety: Sprites can be found in various terrains.
  • Visibility Aid: Activate Sprite Shrines for easier identification.

Step 2: Visit Bushranger

Once you have a Sprite, head northwest of the main temple in Nightshift Forest to find an NPC named Bushranger. Engaging with him is crucial for progressing towards opening the vault.

Key Features:

  • NPC Interaction: Essential for obtaining the Mythic Key.
  • Helpful Tips: Bushranger may provide hints or additional items.

Step 3: Show Item to Bushranger

Approach Bushranger while holding your Sprite and select the option to ‘Show Item’. This interaction is pivotal as it triggers his response, allowing you to obtain the Mythic Key necessary for accessing the vault.

Key Features:

  • Interaction Prompt: Ensure you’re holding a Sprite when interacting.
  • Unlocking Mechanism: This action reveals hidden content needed for progress.

Step 4: Obtain the Mythic Key

After showing him your Sprite, Bushranger will lift a night spell that cloaks the forest and drop a Mythic Key. Be quick; other players may try to interfere during this process!

Key Features:

  • Critical Item: The key is essential for entering the vault.
  • Limited Time Window: Act fast after receiving it!

Step 5: Head Towards The Vault

With your newly acquired Mythic Key, make your way back towards the vault located beneath a large structure in front of a prominent tower within Nightshift Forest.

Important Locations:

  • Vault Location: Look directly east from Bushranger; there are stairs leading below ground level.

Step 6: Interact With The Vault Door

Finally, approach the vault door adorned with symbols reminiscent of Zelda lore and interact with it using your Mythic Key. Once unlocked, prepare yourself for some fantastic loot!

Loot Highlights:

  • Weapons
  • Typhoon Blade
  • Ammo
  • Health Packs
  • Slurp Barrels

Conclusion

Opening the Vault in Nightshift Forest involves several steps — locating a Sprite, visiting Bushranger, acquiring the Mythic Key, and finally accessing one of Fortnite’s most sought-after loot caches. By following these straightforward steps and remaining vigilant against potential challenges from other players along your journey, you’ll significantly enhance both your gameplay experience and success rate! Happy gaming!

How to Enable VODs on Twitch to Watch Past Broadcast

0
how to enable VODs on Twitch

Enabling Video on Demand (VOD) on Twitch can enhance your streaming experience by allowing viewers to watch your past broadcasts. This feature is particularly valuable for streamers who want to engage with their audience even when they’re not live. In this guide, you can find how to enable VODs on Twitch, so you don’t miss out on potential content engagement.

With the right settings in place, you can save and store your streams as VODs, making them accessible for viewers at any time. We’ll cover everything from checking your eligibility as an affiliate or partner to navigating the settings on both desktop and mobile platforms. By the end of this article, you’ll be equipped with all the knowledge needed to enable VODs on Twitch and maximize your streaming potential.

How to Enable VODs on Twitch

how to enable VODs on Twitch

Step 1: Log Into Your Twitch Account

Visit the Twitch website and log in using your credentials. If you’re using a mobile device, switch to desktop view if necessary.

Step 2: Access Your Creator Dashboard

Once logged in, navigate to your Creator Dashboard by clicking on your profile picture at the top right corner of the screen.

Step 3: Go to Content Settings

In the Creator Dashboard, find and click on “Settings” located in the left sidebar. Then select “Stream” from the dropdown menu.

Step 4: Locate VOD Settings

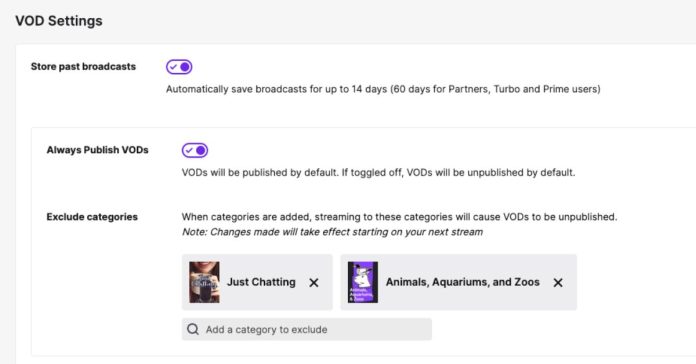
Scroll down until you find “Store past broadcasts.” This option allows you to save previous streams as VODs.

Step 5: Enable Storing VODs

Toggle the switch next to “Store past broadcasts” to enable it. This ensures that all future streams will be saved automatically as VODs.

Step 6: Save Changes

After adjusting your settings, make sure to click “Save Changes” at the bottom of the page so that your preferences are updated.

Step 7: Verify Storage Option

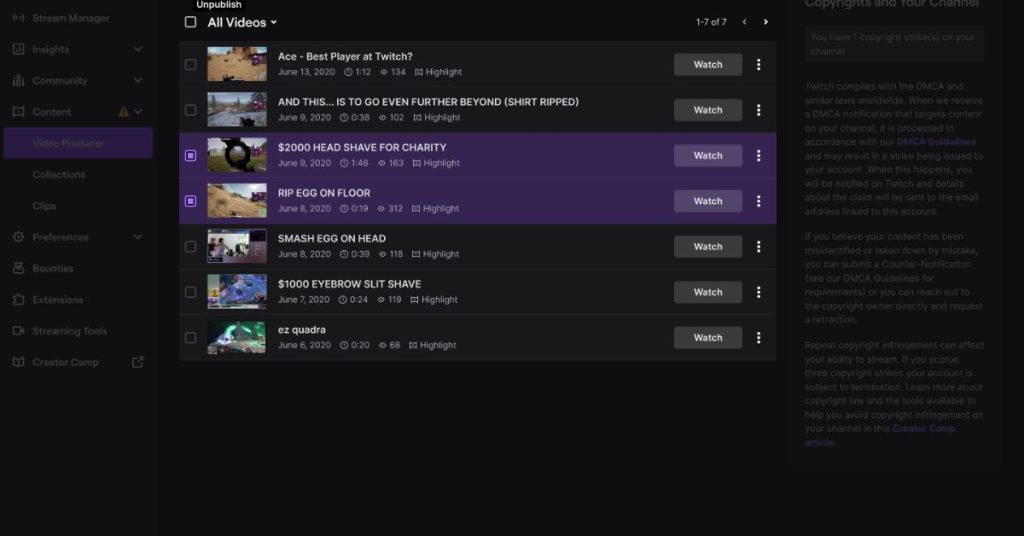
Return back to your dashboard’s main page and check under “Content” > “Video Producer.” Here you should see a list of saved videos indicating that storing has been enabled successfully.

By following these steps carefully, you’ll have enabled VOD storage which enhances viewer engagement significantly by allowing access to previously streamed content anytime they wish.

Final Thoughts

Enabling VODs on Twitch is a straightforward process crucial for enhancing user interaction with past content. Remember that being an affiliate or partner is typically necessary for full access features like storing broadcasts.

Now that you know how to enable VODs on Twitch, consider how this feature can benefit your streaming strategy moving forward! Whether it’s building a library of content or engaging with fans off-stream, having those recordings available can boost both viewership and community engagement dramatically.

Why Is My Stream FPS Low? Common Causes and Solutions

0

Streaming has become a massive part of gaming culture, allowing players to share their experiences with audiences worldwide. However, many streamers face frustrating issues with low frames per second (FPS) during their broadcasts. Understanding the reasons behind this problem can help you enhance your streaming experience and provide smoother content for your viewers.

This article delves into common causes of low stream FPS and offers solutions to improve your performance. By addressing these factors, you’ll be better equipped to enjoy seamless gameplay while maintaining high-quality streams. Let’s explore the various elements that contribute to this issue and how you can tackle them effectively.

Whether you’re a casual streamer or looking to build an audience, ensuring optimal performance is crucial. Read on to discover actionable insights that can help elevate your streaming setup in 2024.

High CPU Usage

Image: Kochise

One significant reason for low stream FPS is high CPU usage. Streaming software like OBS or Streamlabs requires substantial processing power, which can lead to reduced game performance if your CPU is overwhelmed.

Solution: Monitor CPU usage using Task Manager and close unnecessary applications before streaming.

GPU Load

Another critical factor is GPU load. If your graphics card is overloaded—especially when playing graphically intensive games—it may struggle to maintain high FPS while also encoding video for streaming. A GPU running at over 90% capacity may not leave enough headroom for smooth streaming.

Solution: Lower in-game graphics settings or cap frame rates below 240 FPS.

OBS Settings Configuration

Image: Steam

Improperly configured OBS settings can significantly affect stream performance. Incorrect resolution settings or bitrate configurations might lead to lower FPS during broadcasts. Using CPU instead of GPU for downscaling output can cause lag.

Solution: Adjust output resolution settings in the Video tab rather than Output tab in OBS.

V-Sync and Frame Rate Capping

Many gamers overlook the significance of enabling V-Sync or capping their game’s frame rate. This setting aligns the frame rate with your monitor’s refresh rate, potentially preventing stuttering during gameplay and streaming sessions alike.

Solution: Enable V-Sync or set an appropriate frame cap within game settings.

Internet Bandwidth Limitations

Image: Eyesurf

A stable internet connection is paramount for smooth streaming; insufficient upload speed will lead to lagging streams regardless of hardware capability. Low upload speeds result in buffering and dropped frames during live streams.

Solution: Test your internet speed regularly; aim for at least 6 Mbps upload speed for good quality streams at 60 FPS.

Background Applications Interference

Running multiple applications simultaneously while streaming can hinder performance as they compete for resources needed by both OBS and the game itself. Therefore, other apps consuming significant memory impact game playability.

Solution: Close unused programs before starting your stream session to free up resources.

Game Mode Interference

Windows’ Game Mode aims to optimize resource allocation but sometimes hampers OBS functionality instead, leading to suboptimal performance metrics during streams.

Solution: Disable Game Mode through Windows Settings if experiencing issues while streaming.

Final Thoughts

In conclusion, addressing low stream FPS involves understanding various factors such as CPU load, GPU utilization, OBS configurations, internet bandwidth limitations, background applications interference, and Windows Game Mode conflicts. By identifying these aspects within your setup, you can implement solutions that significantly enhance both gaming performance and streaming quality.

How to Complete The Madness Calling Card in BO6

0

Achieving the Madness Calling Card BO6 in Call of Duty: Black Ops 6 can be a thrilling yet challenging task. This coveted calling card is earned by completing specific challenges that require precision, strategy, and a bit of patience.

Here’s a detailed guide to help you unlock the Madness Calling Card and claim your reward in no time.

What Is the Madness Calling Card Challenge?

Source: Reddit/CODZombies

The Madness Calling Card is tied to earning Alchemist medals, which require players to eliminate five zombies in rapid succession while they are simultaneously affected by two different elemental effects.

While the objective may sound straightforward, this challenge is notorious for being buggy, with players frequently reporting progress-tracking issues. As frustrating as these glitches may be, persistence and the right strategies can help you overcome them.

Proven Strategies to Unlock the Madness Calling Card BO6

Source: MmonsteR

To tackle this challenge effectively, follow these strategies:

1. Equip Elemental Weapons and Tools

Elemental damage is key to completing this challenge. Use weapons or equipment that apply fire, electricity, or other elemental effects. Some top choices include:

  • Molotov Cocktails: Excellent for dealing fire damage over a wide area.
  • Shock Charges: These inflict electrical damage, complementing fire-based effects.
  • Specialist Weapons: If available, use weapons with elemental modifiers to maximize your chances.

A common strategy involves using two Molotovs and one shock charge in quick succession to trigger the elemental effects needed for the Alchemist medal.

2. Group Zombies Using a Training Technique

Herding zombies together (often called “training”) allows you to maximize the efficiency of your elemental attacks. Here’s how to do it:

  • Find a large, open area to maneuver.
  • Lead a group of zombies in a circular path until you have gathered around 10.
  • Use your elemental attacks to hit multiple zombies simultaneously, increasing your chances of earning the required medal.

3. Manage Your Health Wisely

An unconventional but effective tip involves intentionally lowering your health. Allow zombies to hit you until your screen turns red, then activate a healing ability like the Healing Aura before deploying your elemental attacks. This method can increase your likelihood of earning the medal by ensuring all zombies are affected during the critical moment.

4. Monitor and Troubleshoot Progress

Since the challenge has known bugs, keep a close eye on your progress after each game. If your medal count isn’t updating correctly:

  • Record your gameplay as evidence.
  • Report the issue through Call of Duty community channels or forums.
  • Check for game updates or patches that may resolve tracking issues.

5. Utilize Community Resources

Many players share valuable insights on forums, social media, and YouTube. Watching video tutorials or engaging in discussions can provide additional tips and tricks to refine your approach.

Tips to Overcome Bugs in Madness Calling Card BO6

If you encounter issues, here are some extra measures to ensure success:

  • Play in solo mode to reduce the chance of server-related glitches.
  • Restart the game periodically to ensure challenges sync correctly.
  • Use stable internet to minimize connection-related issues.

Final Thoughts

Unlocking the Madness Calling Card BO6 requires a mix of preparation, strategy, and patience. While the challenge may be tricky due to its buggy nature, focusing on elemental attacks, smart health management, and community resources will improve your chances of success.

Stay persistent, adapt your strategies as needed, and celebrate your achievement once you’ve earned this highly sought-after calling card. Good luck on your journey through the undead in Call of Duty: Black Ops 6!

Click here to join our Discord and win the prize!


Maximize your Black Ops 6 rewards—Create highlights from your best gameplay with with Eklipse

Eklipse help streamer improve their social media presence with AI highlights that clip your Twitch / Kick streams automatically & converts them to TikTok / Reels / Shorts

How to Effortlessly Change Your Name in Call of Duty: Black Ops 6, Rebranding Now!

0
Missions in Call of Duty: Black Ops 6

Change your name in Call of Duty: Black Ops 6 can feel overwhelming, especially for new players navigating Activision’s Rename Token rules. By following these guidelines, you can confidently customize your gaming identity without unnecessary hassle.

Whether you’re rebranding or fine-tuning your nickname, understanding these tools ensures a seamless and personalized gaming experience. Let’s dive into the details.

How to Change Your Name in Call of Duty Black Ops 6 from Game Settings

Change your name in Call of Duty Black Ops 6 – Source: gamerant

By following these steps directly within Black Ops 6, players can quickly and efficiently update their display names without needing any additional devices or platforms.

  1. Press the Start button (or Menu on Xbox).
  2. Navigate to Settings.
  3. Select Account & Network.
  4. Go to the Activision Account under Online settings.
  5. Choose “Change Display Name.”
  6. Click “Confirm” to save changes.
  7. Restart the game for updates.

How to Change Your Activision ID on a Browser

This method allows for a more extensive alteration of not just Black Ops 6 but all linked games associated with your account. For those who prefer making changes via a web browser, here’s how you can update your Activision ID:

  1. Visit the official Call of Duty website.
  2. Log into your existing Activision account.
  3. Select “Basic Info” from account settings.
  4. Click “Edit” next to your current Activision ID.
  5. Enter the verification code sent to your email.
  6. Type in your new desired display name or tag.
  7. Re-enter your password, click Save, and then Submit.

Understanding Rename Tokens

These restrictions ensure that players think carefully about their chosen names since frequent changes are not feasible. Rename Tokens are essential when changing names in Call of Duty: Black Ops 6 as they limit how often you can make alterations each year:

  • Allocation: Players receive two Rename Tokens annually.
  • Usage: Each token allows one name change every six months; thus, careful planning is advisable when selecting a new name.
  • Limitations: The tokens are shared between both in-game changes and modifications made through the website; using one will deduct from the total available.

Common Issues: “Name Not Accepted” Error

During gameplay, some users may encounter an error stating “Name Not Accepted.” This issue primarily stems from automated filters designed to prevent inappropriate usernames:

  • If you believe there’s no reason for rejection:
  • Try altering the spelling of your username slightly or choose an entirely different option that avoids potential problematic terms.
  • If problems persist, reaching out directly to game support is recommended for resolution assistance.

Being mindful of character choices can help circumvent this issue altogether.

Final Thoughts

To change your name in Call of Duty: Black Ops 6, you can follow simple steps either through the game settings or the Activision website. Understanding Rename Tokens and avoiding common issues like the “Name Not Accepted” error will streamline the process.

With this guide, you have all the tools to update your gaming identity. Feel free to experiment with different names and use these tips to make future changes hassle-free.

Resolve DirectX Errors in Black Ops 6 Like a Pro

0
DirectX Errors in Black Ops 6

Encountering a DirectX errors in Black Ops 6 can be disruptive, impacting gameplay and frustrating many players. This common issue stems from technical glitches like corrupted game files or misconfigured graphics settings.

Whether the game crashes at launch or mid-session, these troubleshooting tips will address the root causes effectively. Follow the guidance below to resolve DirectX errors and enhance your gaming experience without unnecessary downtime. Let’s get started!

Verify and Repair Game Files

DirectX Errors in Black Ops 6 – Source: Reddit

One of the first steps you should take when facing DirectX errors is verifying and repairing your game files. Corrupted or missing files are common culprits for such issues.

  1. Open the Xbox App.
  2. Navigate to “My Library.”
  3. Right-click on Call of Duty: Black Ops 6.
  4. Click on “Manage.”
  5. Select the “Files” tab.
  6. Click on “Verify and Repair.”

This process ensures that all game files are intact and functioning correctly.

More on Eklipse Blog >>> How to Split Screen in Black Ops 6 for Epic Multiplayer Action

Lower Texture Quality

Another effective method is lowering your texture quality settings within the game’s options menu.

  1. Launch Black Ops 6.
  2. Go to Settings.
  3. Navigate to Graphics.
  4. Find Texture Resolution settings.
  5. Set it to Medium or Low.

Reducing texture quality can decrease the demand on your GPU, potentially resolving DirectX-related crashes.

Delete Shader Cache

Deleting and reinstalling your shader cache may also help eliminate performance issues related to graphics rendering.

  1. Open Black Ops 6.
  2. Go to Settings.
  3. Select Display options.
  4. Look for “Restart Shaders Pre-loading” and select it.

This action refreshes shaders which might be causing conflicts during gameplay.

Update Graphics Drivers

Outdated or corrupt graphics drivers can lead directly to DirectX errors in games like Black Ops 6.

  1. Visit your graphics card manufacturer’s website (NVIDIA/AMD).
  2. Download the latest driver compatible with your video card model.
  3. Install the driver following their instructions.
  4. Restart your PC after installation.

Keeping your drivers updated ensures optimal performance with new titles, reducing chances of errors occurring.

Disable Overlays

Overlays from applications such as Discord or Steam may interfere with game performance leading to crashes.

  1. Close any unnecessary background applications before launching Black Ops 6.
  2. Specifically disable overlays:
  • For Discord: Go into User Settings > Overlay and toggle off Enable In-Game Overlay.
  • For Steam: Open Steam > Settings > In-Game and uncheck Enable the Steam Overlay while in-game.

Disabling these overlays can help improve stability during gameplay sessions.

Check Windows Updates

Sometimes, pending Windows updates can cause compatibility issues leading to DirectX errors as well:

  1. Press Windows Key + I to open Settings.
  2. Navigate to Update & Security > Windows Update.
  3. Click “Check for updates” and install any available updates.
  4. Restart your PC once updates are installed.

Ensuring that you have all necessary updates installed helps maintain system stability overall.

Change Performance Options

Adjusting performance options in Windows itself may yield better results too:

  1. Right-click on ‘This PC’ and select Properties.
  2. Choose Advanced system settings from the left sidebar.
  3. Under Performance, click on Settings button > Adjust for best performance option selected or custom adjustments made based on preference (e.g., disabling animations).

Optimizing these settings could free up additional resources for running intensive games like Black Ops 6 more smoothly without interruptions caused by DirectX errors.

Final Thoughts

By applying these solutions to fix DirectX errors in Black Ops 6, players can expect improved stability and smoother gameplay. These methods address frequent issues across various platforms, enhancing the overall gaming experience. Enjoy intense battles with friends while minimizing disruptions caused by technical errors.

Unlock Unlimited XP and Camos with the New Solo Glitch in Call of Duty: Black Ops 6 Zombies

0

The new solo glitch in Black Ops 6 has emerged as a game-changer for players seeking to enhance their experience points (XP) and unlock camos without needing a team. This glitch in Call of Duty: Black Ops 6 allows gamers to efficiently farm unlimited XP and camos on the Terminus map by utilizing specific game mechanics to create a safe zombie pile-up. This guide will equip you with all the necessary details to effectively exploit this glitch.

Get ready for an exciting exploration of how this glitch works, its benefits, and strategies to maximize your XP gains. Let’s get started!

Overview of the New Solo XP/Camo Glitch

New Solo Glitch in Black Ops 6 – Source: YouTube/ YTLukeyy

The latest solo glitch in Call of Duty: Black Ops 6 Zombies enables players to easily gather XP and unlock camos by exploiting specific game features on the Terminus map. This method focuses on creating a safe zone where zombies become immobilised while still allowing players to rack up kills.

Key Features

  • Solo-Friendly: Designed for individual players, eliminating reliance on teammates.
  • Efficient Farming: Allows for quick accumulation of XP and camo progress.
  • Safe Location: Utilises specific spots on the Terminus map that keep players secure from zombie attacks.

Step-by-Step Process to Execute the Glitch

To successfully perform the new solo XP/camo glitch in Call of Duty: Black Ops 6 Zombies, follow these straightforward steps:

  1. Load up Terminus map.
  2. Gather two or more players if possible; however, it’s effective alone too.
  3. Navigate to the specified location shown in video guides.
  4. Activate Godmode using available glitches.
  5. Find an elevator area as demonstrated in various tutorials.
  6. Create a pile-up by luring zombies towards your position.
  7. For solo play:
  • Use the kiosk at zip line platform to summon a small boat.
  • Head towards a tiny island located farthest right on the map screen.
  1. Stand in one place as zombies spawn and wait until they crowd around edges.

This process ensures that zombies only approach you without attacking directly, making it easier for you to secure headshots needed for camouflage challenges.

Strengths of Using This Glitch

  • Easily Accessible: The glitch is simple enough for beginners while offering advanced techniques for experienced players.
  • High Efficiency: Maximises kill counts rapidly compared to traditional methods, allowing completion of camo challenges significantly quicker.
  • Minimal Effort Required: Once established at the safe spot, players can focus solely on shooting rather than running away or dodging zombies.

Weaknesses and Considerations

While this glitch offers numerous benefits, several considerations should be kept in mind:

  • Difficulty with High Rounds: As rounds increase in difficulty during solo play, exfiltration may become challenging or impossible due to heightened zombie strength and numbers.
  • Potential Game Patches: Exploits may be patched out by developers in future updates; therefore, users should stay informed about game changes that could affect this strategy.

Conclusion

Exploring the new solo glitch in Call of Duty: Black Ops 6 Zombies reveals valuable opportunities within the game’s mechanics, particularly for farming XP and unlocking camos. Players can now achieve their objectives more effectively, whether playing solo or with friends, which can enhance their overall gaming experience.

By understanding how this glitch operates and incorporating it into their gameplay strategies, gamers can improve their skills and achieve better results over time, including significant gains in XP and access to various camo options. It’s important to use these techniques thoughtfully while remaining aware of any updates from developers that could change gameplay mechanics.