
Level Up Your Marvel Rivals Gameplay
Capture your epic wins, clutch moments, and even hilarious fails with Eklipse. Easily create and share highlight reels with your friends—even if you're not streaming!
Learn MoreStreaming has revolutionized content creators’ connection with their audience, allowing real-time engagement. Adding chat to OBS is a popular method to foster interactions, create inside jokes, and form lasting bonds.
In this article, we’ll guide you on how to add chat to OBS for streaming on platforms like Twitch, YouTube, or Facebook.
How to Add Twitch Chat to OBS
You need to use 3rd party extension to add Twitch Chat to OBS. You can use Streamlabs or StreamElements. Here are the step-by-step instructions to do that:
Using Streamlabs
Source: Eklipse.gg
- Visit the Streamlabs website.
- Log in with your Twitch account.
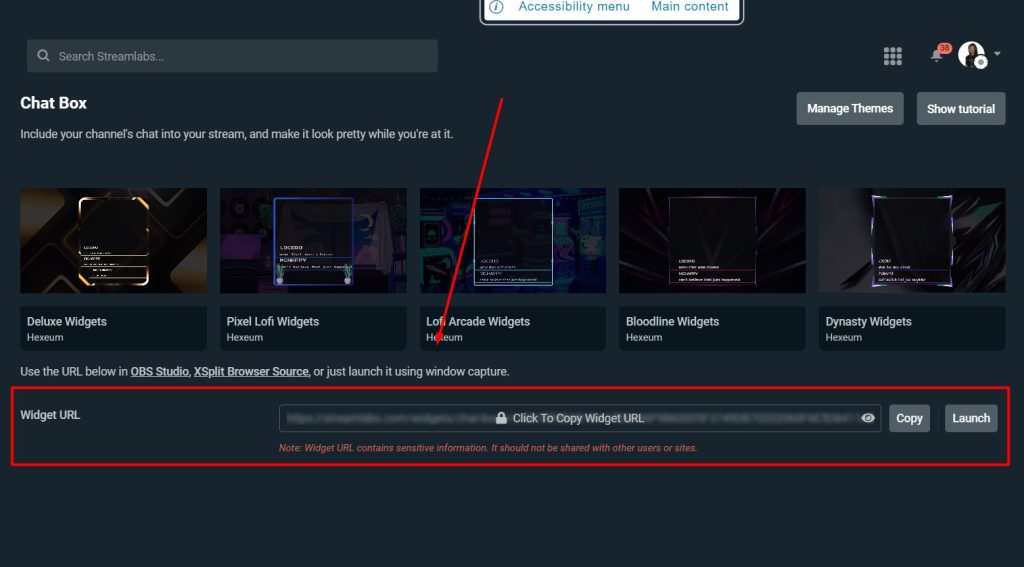
- Access the All Widgets section and click on Chat Box.
- Hit the “Copy” button on the “Widget URL” section
- You can customize the looks of your Twitch chat overlay by tweaking all the settings below the “Widget URL” section
- Copy the Widget URL (remember to keep it private).
- Open OBS
- Add a Browser Source under Sources.
- You can rename the source as Twitch Chat Box and click OK.
- Paste the copied Chat URL and click OK to save.
- Adjust the width and height for the desired layout.
- Start streaming to showcase your show with an embedded chat window.
Using StreamElements

Source: Recorder.easeus.com
- Head to the StreamElements website and log in.
- Click on Streaming Tools >> Overlays in the menu.
- Create a new overlay with the right resolution for your stream, say 1080p.
- Give your overlay a catchy name like “Chat Window” and save it.
- Add a widget to your overlay.
- Choose “Your Stream’s Chat” from the Stream tools menu.
- Copy the URL link from the top right corner.
- Open OBS and pick the scene where you want your chat box.
- Add a Browser source under Sources.
- Name it something like “Twitch Chat Box” and hit OK.
- Paste the URL you copied earlier and save. You can tweak the size to fit your layout.
- When everything’s set, hit Start Streaming and enjoy your stream with an embedded chat window.
More on Eklipse Blog >> Streamlabs vs StreamElements – Which One is Best in 2024: Comparison Guide
How to Add YouTube Live Chat to OBS
Adding the live chat feature to your OBS (Open Broadcaster Software) setup is essential. With YouTube Live Chat, you can establish real-time interaction with your audience, fostering a dynamic and engaging streaming environment.
Here are the steps to do that, assuming that you are already logged in with your Google account:
Source: Eklipse.gg
- Open a browser and navigate to YouTube.
- Click on the camcorder icon with a “+” sign in the top right corner, then select “Go Live.”
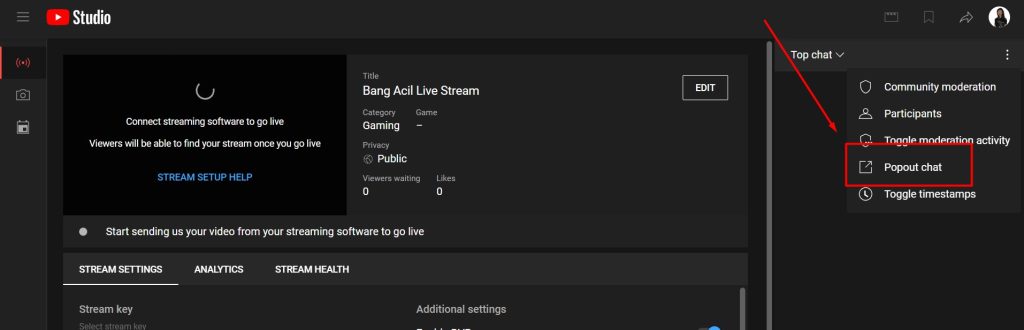
- In the top right corner’s three dots menu, choose “Popout Chat.”
- Copy the URL of the pop-up chat window.
- Launch OBS and add a “Browser Source” under “Sources.”
- Rename the source as “YouTube Chat Box” and click OK.
- Paste the copied Chat URL and save by clicking OK.
- Adjust the dimensions of the chat box for the desired layout.
- Start streaming and enjoy your show with an embedded chat window.
How to Make YouTube Chat Transparent on OBS
If you want a transparent YouTube chat on OBS, you can use a custom CSS that a tool automatically generates.
Here’s how to make YouTube chat transparent on OBS:
Source: Eklipse.gg
- Go to chatv2.septapus.com.
- Customize the desired chat appearance.
- Scroll to the “CSS” section, select all (Ctrl + A or CMD + A), and copy the code.
- Open OBS, and double-click on the “YouTube Chat Box” browser source.
- Go to the “Custom CSS” section, paste the code, and click OK.
And voila! It’s done! You’ll have a transparent YouTube chat on OBS.
How to Add Facebook Gaming Chat to OBS
Source: Eklipse.gg
- Access your Facebook Like Page.
- Navigate to the Meta Business Suite on the page’s left-hand side.
- Choose “Go Live” from the More menu.
- Enable the test broadcast button, then click Select to start a live broadcast. This button allows you to check your configuration before going live.
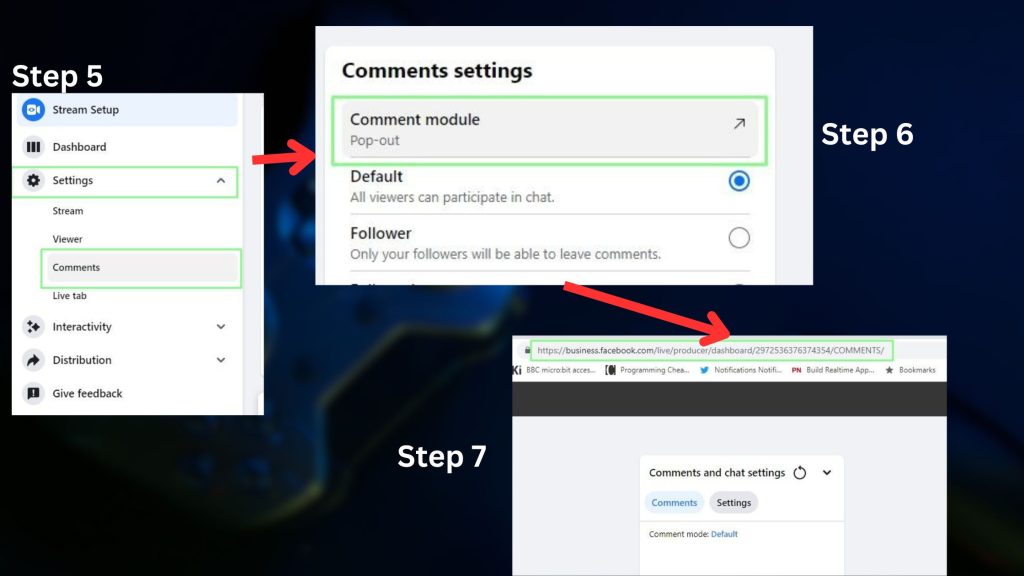
- Select “Comments” from the Settings menu.
- Open the comments module separately.
- Copy the URL from the new Comments tab.
- Launch OBS.
- In your chosen scene, add a Browser source named “Facebook Chat” in the Sources.
- Replace the URL with the Chat URL.
- Log in to your Facebook account using the Browser window in OBS. Click the Interact button above Sources and enter your login details.
- The chat window is now ready to be used. Remember to refresh your URL comments Browser source whenever you start a live session. You’re all set!
Final Thoughts
To sum up, integrating chat into your OBS stream makes it more interactive for viewers on platforms like Twitch, YouTube, and Facebook Gaming. By following the steps on how to add chat to OBS, you can easily add chat windows to your streams. Whether you’re using Streamlabs, StreamElements, or embedding chat directly, the process is simple.
Ready to take your viewer engagement to the next level? Look no further than Eklipse. With its innovative AI highlight generator and “convert to TikTok” tool, Eklipse effortlessly transforms your live stream content into captivating TikTok videos. Sign up for free at Eklipse.gg now.

🎮 Play. Clip. Share.
You don’t need to be a streamer to create amazing gaming clips.
Let Eklipse AI auto-detect your best moments and turn them into epic highlights!
Limited free clips available. Don't miss out!
