Level Up Your Marvel Rivals Gameplay
Capture your epic wins, clutch moments, and even hilarious fails with Eklipse. Easily create and share highlight reels with your friends—even if you're not streaming!
Learn MoreHaving trouble with Twitch VODs not showing up on your channel? You’re not alone. Many new streamers face this problem due to Twitch’s default settings, which don’t save broadcasts automatically. This can be frustrating for those wanting to share past streams or review their content.
In this article, we’ll uncover why Twitch VODs are not showing up and outline 11 simple fixes to resolve it. Additionally, we’ll explain how to access unpublished VODs and ensure your streams are saved for future viewing. Let’s get started!
Why Isn’t Twitch Saving My Broadcasts?

Twitch has a significant number of users, both watching and streaming. Just consider how much space Twitch would require if thirty percent of its users saved their streams—it’s a substantial amount!
That’s why the default setting for “Keep my previous broadcasts” is typically not enabled. If you want to save your broadcasts, you must ensure that you manually turn this option on in your settings. However, this can happen due to other factors.
If you notice that Twitch isn’t saving your broadcasts as it should, here’s a simple guide on how to fix that.
6 Things to Know When Your Twitch VODs not Showing Up

Are your Twitch VODs missing or disappearing sooner than expected? This is a common issue for many streamers due to Twitch’s default settings. From enabling the “Store Past Broadcasts” option to understanding Twitch’s storage policies, here’s everything you need to know to resolve it.
1. Your “Store Past Broadcasts” Option is Turned Off
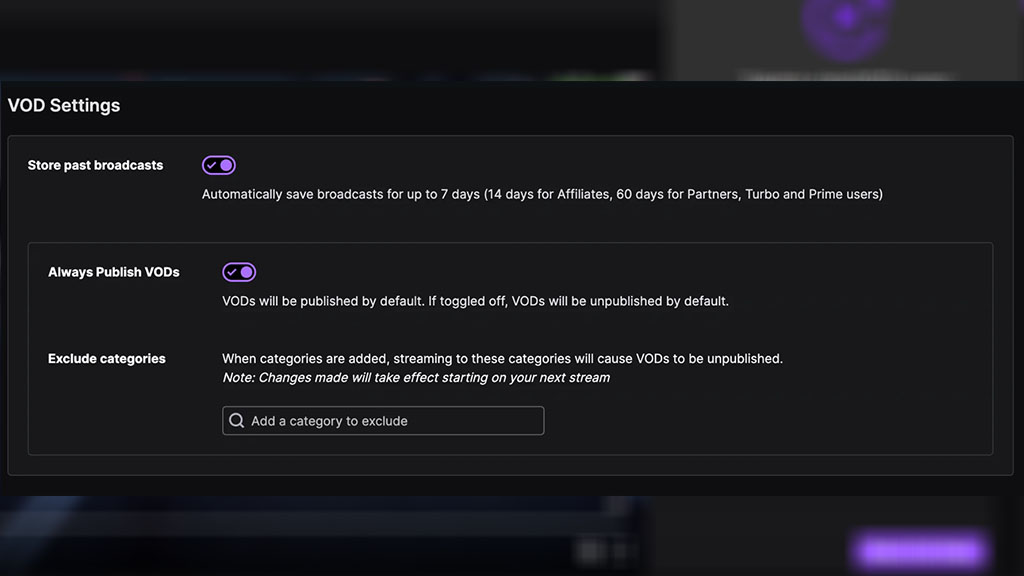
Yes, that’s right. One of the reasons why your VODs not showing up on your Twitch channel is that the option to “Store Past Broadcasts” is simply turned off by default.
Technically, it means that if you turn on that option then the VODs will start showing up on your channel. Don’t forget that Twitch VODs are also not saved indefinitely, especially for all of you newbie streamers.
Twitch official help blog says that they only save the past broadcast for 7 days, except if you are a Partner, Turbo, or Prime user.
2. How to Turn on the “Store Past Broadcasts” Settings on My Twitch Account
So your Twitch channel starts showing up on your VOD, you need to turn on the Store Past Broadcasts option. Here’s how to ensure that your past videos are saved on Twitch:
- You can go to Twitch.tv via the browser or open your Twitch app
- You can go to this menu by clicking your Avatar which will show up in the sidebar menu
- Click Settings, select Stream
- Scroll down, switch on the Store Past Broadcast option
- After that, then your Twitch VODs will start showing up after you finish your stream. There’s an option to “Always Publish VODs”. You can check that also if you want Twitch to automatically show up your VOD publicly on your channel.
3. Why My Twitch VODs Still Don’t Show Up?
Well, if the tips on how to enable Twitch to store past broadcasts do not resolve your issue, you may want to try clearing up some of your tools to open Twitch. You can clear your browser cache and history, or even reinstall the Twitch app.
Clear Browser Cache and History (Chrome)
- Open your browser
- Use hotkey ctrl + shift + delete
- Let all the checkmarks on
- Choose All Time on the Time Range dropdown menu
- Click Clear Data
4. How Can I Download My Past Broadcast?
If your stream’s VODs already appear on your channel, you may want to download these VODs so you can create a clip from it and share it on other platforms like TikTok, Facebook, YouTube, Twitter, or even Reddit.
Unfortunately, Twitch does not support this feature by default. However, don’t worry, as the internet is full of tools and solutions to help you with this problem! You can try downloading Twitch VODs using Eklipse by following these 5 easy steps:
- Go to Eklipse.gg, do free registration with Twitch, Facebook, or Email
- Connect your Twitch account
- Load and choose your Twitch VODs
- You can edit, trim, also convert your stream to TikTok through the Eklipse app
- Download your VODs
5. Why are My Old Streams’ VODs Not Showing Up on My Twitch Account?
How long does it take for past broadcasts to appear on Twitch? By default, Twitch only stores your past broadcasts for 7 days. Therefore, you can rewind your Twitch stream within that period.
If you want more storage for your VODs, you need to be a Twitch Affiliate first, which allows you to store past broadcasts for up to 14 days. If you want even larger storage, Prime Users enable you to store past broadcasts for up to 60 days.
6. Twitch Turbo And Longer Storage Periods
You may want to subscribe to Twitch Turbo, which includes a longer storage period for previous broadcasts.
How to Troubleshoot and Fix Twitch VODs Not Showing Up

If your Twitch VODs are not showing up, it can be frustrating, especially if you’re trying to share your content or analyze your gameplay. Here are some step-by-step instructions for troubleshooting and fixing Twitch VOD issues.
1. Check Privacy Settings
Ensure that your privacy settings are set to allow VODs to be saved and shared. Go to your Twitch settings, select “Channel & Videos,” and then ensure that the “Store Past Broadcasts” option is enabled.
2. Wait for Processing
Sometimes, Twitch deleted VODs may take some time to process before they appear on your channel. Wait a few hours and check back to see if they have appeared.
3. Check Your Internet Connection
Ensure that you have a stable and reliable internet connection. Poor connection quality can cause issues with VODs appearing.
4. Contact Twitch Support
If the VODs are not showing up due to technical issues, contact Twitch support for assistance. Provide them with details about the issue, such as error messages or specific VODs that are not showing up.
5. Use Third-Party Software
If you’re having issues with Twitch’s built-in VOD system, consider using third-party software to download and share your VODs. These tools can provide more flexibility and control over your VODs.
In addition to these troubleshooting steps, it’s important to regularly check and maintain your Twitch account to prevent future VOD issues. This can include checking your privacy settings, using trusted third-party software for downloading and sharing VODs and following Twitch’s copyright guidelines.
FAQ
1. Why are my VODs not publishing on Twitch?
That happens when Twitch detects copyrighted sounds in your vods. You won’t be able to publish them until the copyrighted parts are removed from all of the infringing ones you have stored.
2. Where are my Twitch VODs?
To get there, go to your Creator Dashboard, then select Video Producer under the Content dropdown menu.
3. Why are my Twitch VODs muted?
If copyrighted audio is detected in a VOD, we automatically mute that portion of the VOD.
Final Thoughts
Twitch VODs are essential for streamers to analyze gameplay, share highlights, and engage audiences across different platforms. When Twitch VODs are not showing up, it can disrupt these efforts and create unnecessary frustration.
By enabling the “Store Past Broadcasts” setting and utilizing tools like Eklipse, you can ensure your VODs are saved and accessible. Eklipse, an AI-powered clipping tool, makes it easy to turn streams into engaging content for platforms like TikTok, Shorts, and Reels. Take control of your content and elevate your Twitch channel with these solutions.
🎮 Play. Clip. Share.
You don’t need to be a streamer to create amazing gaming clips.
Let Eklipse AI auto-detect your best moments and turn them into epic highlights!
Limited free clips available. Don't miss out!
