TL;DR: Twitch clip templates are overlay designs applied to short-form clips before posting to TikTok, YouTube Shorts, or Instagram Reels. They standardize your aspect ratio, add visual identity (logo, colors, captions), and make clips recognizable across platforms without manual editing per clip.
Most streamers do not have a template problem. They have a consistency problem. The clip goes out without a logo one day, with a different font the next, cropped differently for Shorts versus Reels. After six months of posting, there is no visual brand — just a pile of clips that do not look like they came from the same channel.
That is the actual cost of skipping templates. Not one bad clip. Months of missed branding.
This guide covers what Twitch clip templates actually do, which elements are worth standardizing, and how streamers with 200 viewers build the same visual identity as channels with 20,000.
Why twitch clip templates matter more than clip quality
The first instinct is to focus on the clip itself: the kill, the clutch, the play. That is correct. But two streamers can post the same quality clip and get completely different viewer retention rates. The difference is usually recognition.
Twitch clip templates create visual anchors. Viewers on TikTok do not know they follow your channel. They see a clip in their feed. If your clip looks identical to the one they saw three days ago — same border, same font, same logo position — they are looking at a brand. That familiarity drives follows faster than any single viral moment.
The data behind this is straightforward: branded content gets 3x more shares than unbranded clips of equivalent quality, per a 2025 analysis of gaming creator channels on TikTok (Tubics). The mechanic is simple — when viewers share something, they are implicitly endorsing it. Branded clips make that endorsement feel like an association with a recognizable creator.
The practical implication for Twitch streamers: you do not need a designer. You need a template that applies consistently across every clip you export.
The five elements of a Twitch clip template
Not all overlay elements carry equal weight. These five are worth standardizing. Everything else is decoration.
1. Aspect ratio and safe zones
Twitch clips are 16:9 horizontal. TikTok, YouTube Shorts, and Instagram Reels are 9:16 vertical. Every clip you post to short-form needs a format conversion.
A template handles this by defining a 9:16 frame with designated zones. The gameplay appears in a center or full-frame vertical crop. Above and below the gameplay — the black bands that appear when you just letterbox a horizontal clip — are replaced by visual elements: your banner, a facecam, a caption bar, or a color fill.
Streamers who skip this step post letterboxed clips. On mobile, a letterboxed clip has a white or black bar at the top and bottom of the screen. The video itself uses roughly 50% of the display area. This consistently underperforms against full-frame vertical content — TikTok’s algorithm deprioritizes it for the simple reason that it looks like an accident.
2. Logo placement
Logo placement in a clip template follows one rule: consistent position, every time. Bottom-right corner is the standard. Bottom-left is acceptable. Centered-top is used by some larger creators but competes with captions.
The wrong approach is repositioning the logo per clip based on what looks good in that specific frame. Inconsistency is worse than imperfect positioning.
Size matters. A logo that takes up 5-8% of the frame is visible without dominating. Larger than that competes with the gameplay. Smaller than that is invisible at mobile viewing size.
3. Caption style
Auto-captions on gaming clips improve watch time by 15-40% depending on the platform (Kapwing, 2025 internal data). The template defines caption font, size, color, and position — not the words themselves, which are generated per clip.
Standard approach: white text, black or colored background, bottom-center position. The gaming-native variant: highlighted individual words with a contrasting color as they appear (the “karaoke” caption style used by most top gaming TikTok accounts).
Caption style is the highest-impact single design choice in a clip template. It determines whether mobile viewers who watch without sound stay in the clip or scroll past.
4. Channel name or handle
Distinct from the logo. This is your @handle displayed as text. Standard placement: top-left corner, small font size, consistent color matching your brand palette.
This element has a specific job: watermarking. When your clips are reposted without credit (which happens at any significant scale), the handle on the clip itself is the attribution mechanism. Without it, your content builds someone else’s audience.
5. Color palette
Not a background color — a palette used consistently across border, caption background, and any text elements. Two colors maximum. One dominant, one accent.
Most streamers already have a stream layout with colors. Use the same ones. The goal is that someone who watches your stream and then sees your TikTok clip has an immediate visual connection between the two surfaces.
How to set up a Twitch clip template: the workflow
There are two paths for setting up Twitch clip templates: standalone design tools and integrated clip workflow tools.
Path A: Standalone design tools (Canva, Adobe Express)
Design the template in a standard tool, export it as a transparent overlay PNG, then apply it manually to each clip in a video editor.
This works but does not scale. For a streamer posting five clips a week, that is five manual exports per week. Three months in, that is 60 manual exports. The template exists but the workflow does not.
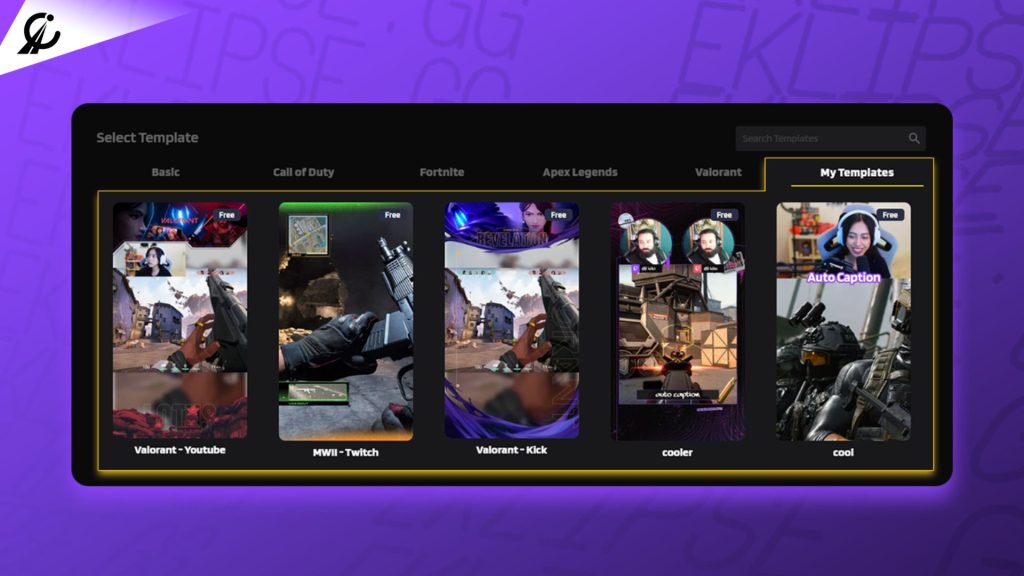
Path B: Integrated clip workflow (Eklipse Studio)
Eklipse Studio includes template overlays that apply directly to clips generated from Twitch and Kick VODs. The template is set once. Every clip that comes out of your Eklipse session exports with the overlay applied.
The workflow: connect your Twitch account, AI detects your highlights, clips are queued, you select a template, export. No separate editor. No per-clip manual overlay application.
For streamers already using Eklipse for AI highlight detection, this is the same session. You are not adding a step — you are completing a step that was already empty.
Ready to brand your clips without adding time to your workflow? Try Eklipse Studio free — templates apply automatically to every clip you export.
What top streamers actually do: the pattern behind the branding
Kai had been streaming Apex Legends for 18 months. Decent gameplay, 400 average viewers, inconsistent clip posting. His clips varied — sometimes a square crop, sometimes letterboxed, sometimes vertical with no overlay. He posted when he remembered, which was roughly twice a week.
In February 2026, he standardized. One template: purple border, white caption with black fill, logo bottom-right, @kai_apex top-left. Set it up in Eklipse Studio in 25 minutes.
Three months later his TikTok following had grown from 1,200 to 8,400. His posting frequency had not changed significantly — he was still averaging two to three clips a week. What changed was recognition. His clips looked like his clips. Viewers who scrolled past one came back for the next one because the visual identity was consistent.
The pattern behind what top streamers do is simpler than it looks:
- One template. Not multiple “moods” or “styles.” One.
- Applied consistently. Every clip from every stream, same template.
- Updated rarely. A template refresh every six to twelve months. Not per game, not per season.
- Optimized for mobile. Everything designed for a 6-inch screen at arm’s length, not a 27-inch monitor.
The streamers who build visual brands fast are not the ones with the best designers. They are the ones who picked one design and applied it without exception.
Twitch clip templates by platform: what changes, what stays the same
The same template does not work identically across TikTok, YouTube Shorts, and Instagram Reels. The core design stays consistent. The execution adapts.
| Element | TikTok | YouTube Shorts | Instagram Reels |
|---|---|---|---|
| Aspect ratio | 9:16 | 9:16 | 9:16 |
| Safe zone (bottom) | 200px — algorithm UI | 200px — subscribe button | 150px — controls |
| Caption position | Bottom center (above safe zone) | Bottom center (above subscribe) | Bottom center |
| Logo position | Bottom right (above safe zone) | Bottom right | Bottom right |
| Caption style | Bold, high-contrast | Slightly smaller — less aggressive | Clean, brand-color text |
| Max clip length | 10 min (Creativity Program: 1 min+) | 60 seconds | 90 seconds |
The key variable is the safe zone at the bottom of the screen. TikTok overlays UI elements (like / dislike, comments, share) on the bottom 200 pixels of the video. A logo or caption placed in that zone is partially or fully obscured. Design your template with the safe zone in mind.
For streamers posting the same clip across all three platforms: build the template to TikTok’s safe zone requirements. It will work on Shorts and Reels without modification. Do not build three templates.
Common template mistakes that undercut your branding
Mistake 1: Changing the template per game
Some streamers design a Valorant template, an Apex template, and a COD template. The logic is that the visuals should match the game’s aesthetic. The result is no brand identity — the viewer sees three different-looking channels.
Keep one template. The game changes. The brand does not.
Mistake 2: Overcrowding the frame
A facecam box, a logo, a channel name, a caption bar, a subscriber count, a donation alert — all of these on a 9:16 frame means none of them are visible. Viewers on mobile have a small screen and no patience.
Maximum three overlay elements: one caption, one logo, one handle. Everything else is clutter.
Mistake 3: Low-contrast captions
White text on a bright explosion. Yellow text on a yellow background in the kill feed. Captions that cannot be read are not captions. Use a filled background (dark or brand color) behind caption text regardless of what is happening in the gameplay behind it.
Mistake 4: Not updating the safe zone after platform UI changes
TikTok and Instagram both adjust their in-app UI overlays periodically. A template built in 2024 may place key elements exactly where the 2026 interface puts the share button. Review your template against actual in-app viewing every six months.
Mistake 5: Different aspect ratios on different clips
If some clips export at 9:16 and others at 1:1 (square) or 4:5, the feed looks inconsistent even if the template design is the same. Lock your export settings to one aspect ratio and do not change it.
Frequently asked questions
What is a Twitch clip template?
A Twitch clip template is a reusable overlay design applied to short-form clips before publishing. It typically includes your logo, channel handle, caption style, and a color-consistent frame — applied consistently across every clip so your content is visually recognizable across TikTok, YouTube Shorts, and Reels.
Do I need design experience to make a clip template?
No. Tools like Eklipse Studio include ready-to-use overlay templates. You customize the logo and colors once and the template applies automatically to every clip you export. Design experience helps but is not a requirement for functional templates.
How long does it take to set up a clip template?
Setting up a clip template takes 20-30 minutes the first time. After that, the template applies automatically with no per-clip effort required. The time investment is a one-time setup, not a recurring cost.
Should I use the same template for TikTok and YouTube Shorts?
Yes — with one caveat. Design the template to TikTok’s bottom safe zone (200px) and it will work on Shorts and Reels without modification. The core design should be identical across platforms for consistent branding.
How often should I update my Twitch clip template?
Every six to twelve months is the typical cadence for top creators. More frequent changes undermine recognition — if your clips look different each month, viewers do not build a visual association. Less frequent than once a year risks the template looking dated as platform aesthetics evolve.
Does the template affect how TikTok or YouTube’s algorithm treats the clip?
Indirectly yes. A properly framed 9:16 template (not letterboxed) means the video fills the full mobile screen, which signals native vertical content to both algorithms. Auto-captions within the template improve watch time, which is the primary algorithmic signal on both platforms. The template itself is not read by the algorithm — but the output quality it enables is.
Conclusion
Twitch clip templates are not a creative project. They are a system. Set one up, apply it without exception, and every clip you post builds the same brand.
The streamers who post inconsistently branded content are not losing to better players. They are losing to players who look more professional — because consistent templates make even average clips look intentional.
The right approach: pick one template, set it up in Eklipse Studio, and let it apply automatically every time Eklipse processes your stream highlights. Your clips get branded without adding time to your workflow.
Try Eklipse free and export your first branded clips from your next stream.