Twitch “Clip That” voice command: how to use it
Saying “Twitch, clip that” out loud during your stream tells Twitch to save the moment that just happened as a clip, with no hotkey and no alt-tab. The clip lands in your Clips Manager under Creator Dashboard → Content → Clips. It only works if your channel’s set to English, Clips are enabled, Auto Clips are switched on, and the rollout has actually reached your account.
That is where most people get stuck. The feature grew out of Twitch’s Auto Clips experiment, which started life as a waitlist announced at TwitchCon San Diego and had only reached a closed beta by TwitchCon Rotterdam. Partners and Affiliates go first. So the common experience right now isn’t “I said it and it clipped.” It’s “I said it, chat laughed, and nothing appeared.”
Key Takeaways
– The phrase is “Twitch, clip that,” said during a live broadcast. It saves the moment that just passed, not the one about to happen.
– It needs Clips enabled, Auto Clips enabled, an English channel language, and Partner or Affiliate status. Miss any one and the phrase does nothing.
– Meeting every requirement still isn’t enough. Auto Clips has run as a waitlist and closed beta rather than a full launch, so eligible channels are still waiting.
– The clip arrives captioned, and Twitch now auto-generates a vertical version for its mobile feed. What it does not do is leave Twitch, or cover moments you never called out.
What Twitch’s “Clip That” feature actually does
Clip That is the voice trigger sitting on top of Auto Clips, Twitch’s AI clipping tool. Auto Clips watches your broadcast, decides which stretches are worth keeping, and publishes them on its own. Clip That is the manual trigger: you tell Twitch which moment mattered instead of waiting for Auto Clips to decide.
The clip saves to your Clips Manager, reachable from Creator Dashboard → Content → Clips. From there you can trim it and share it the same way you’d handle a clip a viewer made.
How to enable Twitch Clip That
The setup itself is short. Twitch’s own Auto Clips help article and Clips Settings page carry the authoritative version, so this is the compressed one:
- Check eligibility. You need Partner or Affiliate status and an English channel language.
- Enable Clips. Creator Dashboard → Settings → Stream → Clips. If clips are off for your channel, nothing downstream works.
- Enable Auto Clips. Same settings area. Clip That is a feature of Auto Clips, not a separate toggle.
- Go live. The trigger only exists during an active broadcast.
- Say “Twitch, clip that” immediately after the play lands.
- Check Clips Manager. Creator Dashboard → Content → Clips.
One detail that trips people up on every voice clipping system, Twitch’s included: say it after, not before. The clip is built from the seconds that already passed. A callout made in anticipation marks a window where nothing has happened yet, and you end up with 30 seconds of you saying “oh this is gonna be good.”
Here is a third-party walkthrough of voice-triggered clipping on Twitch, useful for seeing the settings screens even though it covers a bot-based setup rather than the native feature:
Why “Clip That” isn’t working on your channel
This is the section worth bookmarking. If you said the phrase and nothing happened, work down this list in order. It’s ordered by how often each cause is the actual one, not by how easy it is to check.
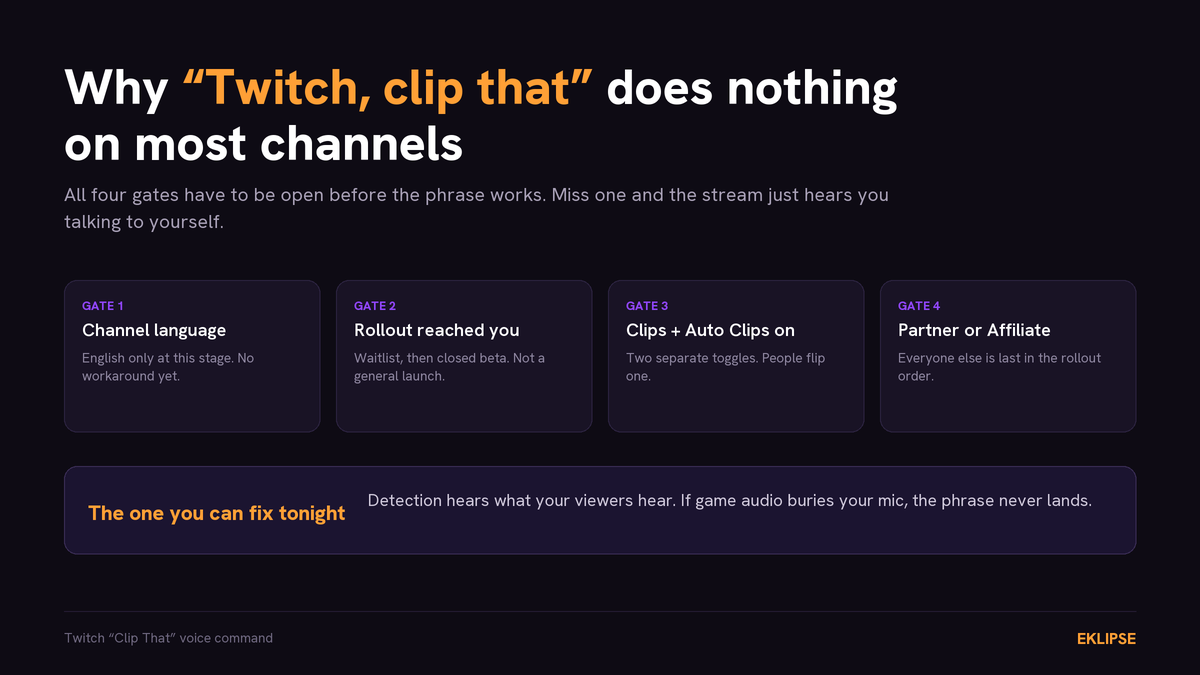
Four gates decide whether “Twitch, clip that” does anything on your channel. Mic level is the only one you can fix the same night.
1. Your channel language is not English. The voice model only understands English right now. This isn’t a setting you can work around by saying the phrase in an English accent on a German-language channel. Fix: none available yet. Wait for language expansion.
2. The rollout has not reached you. Auto Clips has been running as a waitlist and then a closed beta rather than a general release, and Clip That inherits that gate. If Auto Clips doesn’t appear in your dashboard settings at all, that’s your answer. Fix: join the waitlist from your stream settings and wait. Twitch has said eligible channels should see it arrive over subsequent days rather than all at once.
3. Clips are disabled on your channel. Some streamers turn clips off to stop out-of-context reposts. That switch also kills everything built on top of clips, including this. Fix: Creator Dashboard → Settings → Stream → Clips.
4. Auto Clips is off even though Clips is on. These are two separate toggles and people commonly flip the first without the second. Fix: enable Auto Clips in the same settings area.
5. You are not a Partner or Affiliate. Non-affiliated channels are last in the rollout order. Fix: none besides meeting Twitch’s Affiliate requirements, which is a longer project than a settings change.
6. Your mic is buried in the mix. Voice detection hears what your viewers hear. If game audio sits well above your mic, the phrase gets lost before any model gets a chance at it. Fix: play back thirty seconds of your own VOD. If you cannot clearly hear yourself over the game, raise mic gain or lower game output before the next session. This is the one cause on the list you can fix tonight, and it is worth ruling out before you assume you are ineligible.
If you get through all six and the phrase still does nothing, the honest answer is that you’re in the waiting group. That’s not a satisfying diagnosis, but it beats hunting for a seventh settings toggle that doesn’t exist.
What you get, and what it doesn’t cover
Assume it worked. The clip lands in Clips Manager already captioned, because Twitch now generates captions on clips automatically and lets you edit their text, timing, and style for sound-off viewing. Twitch also auto-generates a vertical version, which is the default orientation in the clips feed on its redesigned mobile app; landscape stays the default on desktop.
So the old complaint about Twitch clips, that you get a bare 16:9 file and a night of editing ahead of you, no longer holds. The platform absorbed that work.
Two things the voice command still doesn’t do. It’s Twitch-only, and a vertical clip optimised for Twitch’s mobile feed is not the same as a file posted to TikTok, Shorts, or Reels. And it only captures what you remembered to call out. The plays you were too deep in a fight to name are still sitting in the VOD, uncatalogued.
Eklipse Clip It: the same reflex, without the eligibility gate
If the phrase appeals to you but the eligibility wall doesn’t, Eklipse’s Voice Command feature does the same job with a different set of constraints.
You say “clip it,” “clip this,” or “clip that.” All three do the same thing. Padded versions like “get that clip” aren’t recognised, and neither is “clip” on its own, which keeps ordinary stream chatter out of your dashboard. Like Twitch’s version, you say it after the play.
The differences that matter:
- No Partner or Affiliate requirement, and no waitlist. Connect a channel and it works.
- Twitch, Kick, YouTube, and Facebook, with the same behaviour on each. If you stream anywhere but Twitch, this is the whole argument.
- The callout is a backstop, not the system. AI Highlights reads the entire VOD and surfaces the plays you never named. Say nothing all stream and it will still automate Twitch clips after you go offline.
- Exports off-platform, reframed to 9:16 and captioned, up to 1440p, aimed at TikTok and Shorts rather than a feed inside Twitch.
- Cloud-side processing. Nothing to install, no OBS audio routing to change, no local capture running against your frame rate.
The second and third points are the real ones. Twitch has closed the captions-and-cropping gap; what it hasn’t closed is covering the moments you forgot to call out, or existing anywhere but Twitch.
Two honest limits, one of them shared with Twitch. Detection reads your stream audio, so your mic still has to be audible over the game; the voice command troubleshooting guide walks through the mix check. And a callout has to happen live, so markers can’t be added to a VOD after the fact.
Eklipse holds a 4.1 out of 5 rating from 917 reviews. Creating an account costs nothing; generating clips from your callouts runs on a paid plan.
Twitch Clip That vs Eklipse Clip It
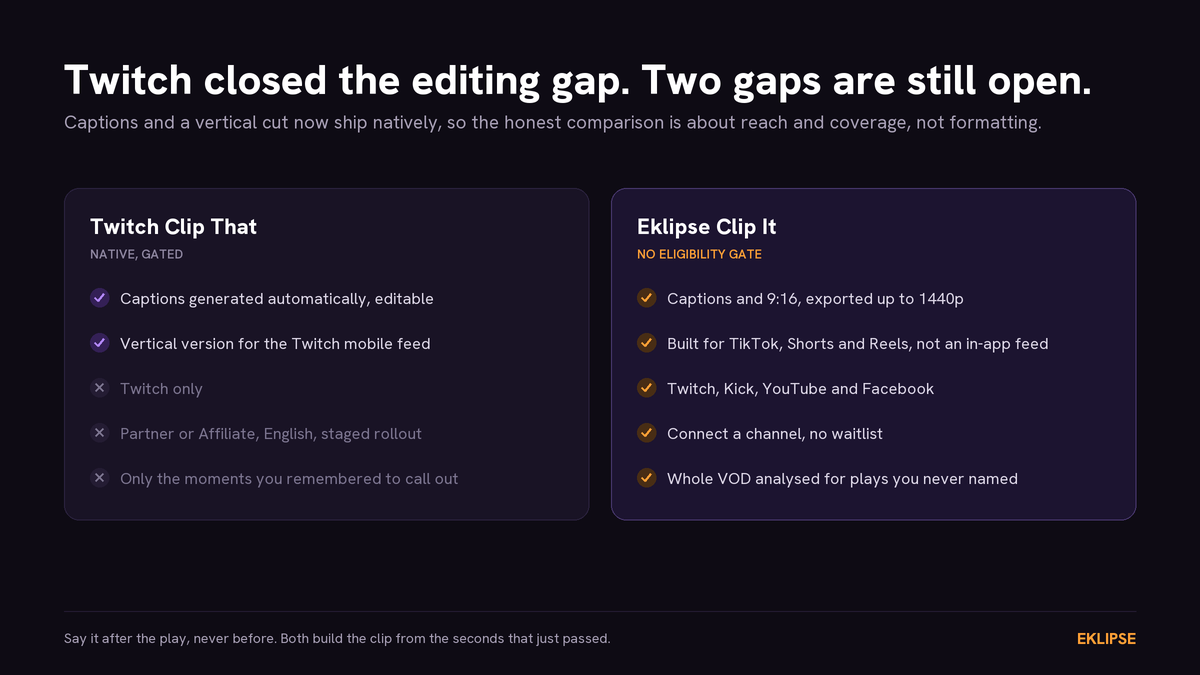
Twitch now ships captions and a vertical cut natively. The remaining differences are platform reach and whether the moments you never called out get found.
| Twitch Clip That | Eklipse Clip It | |
|---|---|---|
| Trigger phrase | “Twitch, clip that” | “clip it,” “clip this,” or “clip that” |
| Platforms | Twitch only | Twitch, Kick, YouTube, Facebook |
| Access gate | Partner/Affiliate, English-only, staged rollout | Connect a channel |
| Captions | Automatic, editable | Automatic |
| Vertical version | Auto-generated for Twitch’s mobile feed | Exported for TikTok, Shorts, Reels |
| Moments you didn’t call out | Auto Clips picks some | Whole VOD analysed by AI Highlights |
| Max quality | Twitch clip quality | Up to 1440p |
Both do the same first job. They diverge on where the clip can go and what happens to the plays you never named.
Frequently asked questions
Who can use Twitch Clip That?
Partners and Affiliates with English-language channels, and only as the staged rollout reaches them. It has been running as a waitlist and closed beta rather than a general launch, so meeting the requirements doesn’t guarantee immediate access.
Can chat trigger a clip by typing “clip that”?
No. Voice detection reads stream audio, not chat text. Nothing a viewer types can clip on your channel. This holds for both Twitch’s version and Eklipse’s.
What’s the difference between Twitch Clip That and Eklipse Clip It?
Twitch’s version is Twitch-only and gated behind Partner or Affiliate status plus a staged rollout. Both now return a captioned clip with a vertical version. The differences are reach and coverage: Eklipse works on Twitch, Kick, YouTube, and Facebook with no eligibility gate, exports for TikTok and Shorts rather than Twitch’s own feed, and analyses the full VOD for moments you never called out.
🎮 Play. Clip. Share.
You don’t need to be a streamer to create amazing gaming clips.
Let Eklipse AI auto-detect your best moments and turn them into epic highlights!
Limited free clips available. Don't miss out!