Level Up Your Marvel Rivals Gameplay
Capture your epic wins, clutch moments, and even hilarious fails with Eklipse. Easily create and share highlight reels with your friends—even if you're not streaming!
Learn MoreClipping on Twitch is an essential skill for streamers looking to capture and share their best moments. This feature allows both streamers and viewers to highlight epic plays, funny interactions, or memorable reactions, engaging audiences beyond the live stream. Understanding how to clip on Twitch effectively can significantly enhance your content and attract more viewers.
In this guide, we’ll walk you through the process of clipping on Twitch, from finding the clip button to publishing and optimizing your clips for maximum exposure. Let’s explore how to clip on Twitch effectively and enhance your content creation process!
How to Create Clip on Twitch

Step 1: Find Your Stream
Start by navigating to any live stream on Twitch. You can search using the platform’s search bar or access streams from your followed channels.
Step 2: Click on the Clip Icon
Locate the “Clip” icon, which looks like a movie clapperboard. It’s situated at the bottom right corner of the stream window. Alternatively, you can use the keyboard shortcut Alt + X for Windows or Command + X for MacOS.
Step 3: Create Your Clip
Once you’ve clicked on the icon, a new window will open allowing you to create your clip. You can adjust the clip duration between 5 seconds and 60 seconds, capturing any part of the stream you wish.
Step 4: Title Your Clip
Adding a title is crucial; it helps others understand what they’re about to watch. Aim for something catchy but concise—ideally under 100 characters—to grab attention quickly.
Step 5: Publish Your Clip
After editing and titling your clip, click “Publish” to make it available for public viewing. You can also opt to download it directly from this screen if you wish to share it elsewhere.
Step 6: Share Your Clip
Promote your newly created clip across social media platforms! Use platforms like Twitter or Instagram Stories for broader reach. Remember that visual content tends to perform better when shared directly rather than as links.
More on Eklipse Blog>>> How To Share A Twitch Video At A Certain Time
Tips for Effective Clipping
- Be Mindful of Duration: Keep clips short yet impactful—around 10-30 seconds is ideal.
- Edit Thoughtfully: If necessary, go back after publishing and make adjustments based on viewer feedback.
- Engage with Viewers: Encourage audience members during streams to clip their favorite moments; this not only engages them but provides you with additional content.
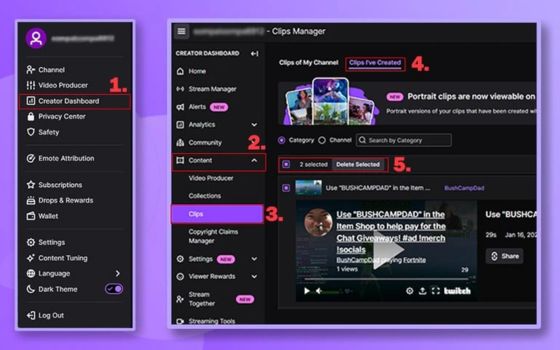
- Enable Clipping: Ensure that clipping is enabled in your Creator Dashboard under Settings > Stream > Clip Settings before going live.
Clipping is an integral part of building an engaging presence on Twitch in 2024. By following these simple steps, you’ll be able to capture highlights efficiently while maximizing viewer engagement through strategic sharing methods.
More on Eklipse Blog>>> A Beginner’s Guide to Affiliate Marketing on Twitch
Summary
Clipping allows streamers on Twitch not only to showcase their best moments but also expands their reach significantly through social sharing. Understanding how to effectively clip on Twitch and when to create clips can enhance both viewer engagement and growth within this vibrant community. By mastering these steps—from finding streams and creating clips all the way through promoting them—you’ll set yourself up for success in cutting through digital noise in today’s competitive streaming landscape!
🎮 Play. Clip. Share.
You don’t need to be a streamer to create amazing gaming clips.
Let Eklipse AI auto-detect your best moments and turn them into epic highlights!
Limited free clips available. Don't miss out!
