Level Up Your Marvel Rivals Gameplay
Capture your epic wins, clutch moments, and even hilarious fails with Eklipse. Easily create and share highlight reels with your friends—even if you're not streaming!
Learn MoreElevate your streams & explode engagement! Eklipse: Clips, highlights & shorts – instantly!
Ever wondered how to record PSP screen on PC? No worries, pals, you’re going to find out the answer here. Luckily, PSP allows you to record a screen while you’re playing a game.
However, since PSP has no built-in recording feature to capture gameplay, you’ll need additional software or even a capture card to get it done. Additionally, it’s a bit different from recording a screen on PS4 or Xbox. We’ll help you through this guide, though.
Recording a screen while playing a game is a common thing to do. It’s actually how gamers preserve their gaming moment. After recording, the video can be stored or shared on social networks. Whatever you plan to do with it, just stay tuned and learn how to screen capture PSP.

What to Prepare Before Recording PSP Screen
To be able to record your PSP gameplay, here’s what you need:
- PC
- PSP (the 2000 or 3000 version)
- Remote JoyLite plug-in
- Remote JoyLite Windows Program.
- A specific USB cable to connect the PSP to the monitor.
- Capture card.

Once you have got all of that, you can start doing the main steps on how to mirror PSP to PC.
More on Eklipse Blog>>> How To View PlayStation Clips On A Computer [2 Ways]
How to Record PSP Screen Into PC With JoyLite Plug-in
To learn how to connect a PSP to a monitor, you can definitely follow the tutorial below. This is how to record PSP without a capture card. Let’s jump right into it.
- To start over, make sure that your PSP is already in the CFW (Custom Firmware) mode, and not on its own firmware.
- Download the remote JoyLite plug-in and remote JoyLite program. These things allow users to broadcast and record the PSP screen to the PC.
- Then, add the RemoteJoyLite.prx in the seplugins PSP folder in a remotejoy folder. It will then add the plugin to the appropriate text file according to the content you would like to broadcast, it’s either POPS, VSH, or GAME).
- Edit a single or all three text files. Then, write this code: ms0:/seplugins/remotejoy/RemoteJoyLite.prx 0. For the PSP GO users, you need to type ef0:/seplugins/remotejoy/RemoteJoyLite.prx 0
- After that, save your modifications then go to the recovery menu to enable the plugins.
- Next, install the drivers needed for the PSP on your computer by opening the Zadig app, and choosing the PSP.
- You’ll then see the WinUSB box appears next to a green arrow. Change the ‘libusb-win32’ to ‘libusb-win32’ with the arrows.
- Then, press this button to start installing the driver. It may take up to 5 minutes until the installation process is completed.
- Once you have installed the driver, the device is supposed to be listed as ‘libusb-win32’. You will find the PSP Type B under that.
- Turn on your PSP and enable the Remote JoyLite plugins. Then, put VSH in recovery mode.
- Connect your PSP to your PC using a PSP video cable.
- Finally, run Remote JoyLite en.exe, and you will be able to see your PSP screen on your PC right away.

More on Eklipse Blog >> How to Make Kick Highlight From Stream: A Step-by-Step Guide
How to Secord a PSP Screen With a Capture Card
Another alternative to record your PSP screen is using a capture card. If you use capture card, it means you don’t need to install the JoyLite plug-in.
However, this method may require you to have a deep pocket since the capture card is quite pricey. But if you think this is more your cup of tea, then let’s get to know how it works.
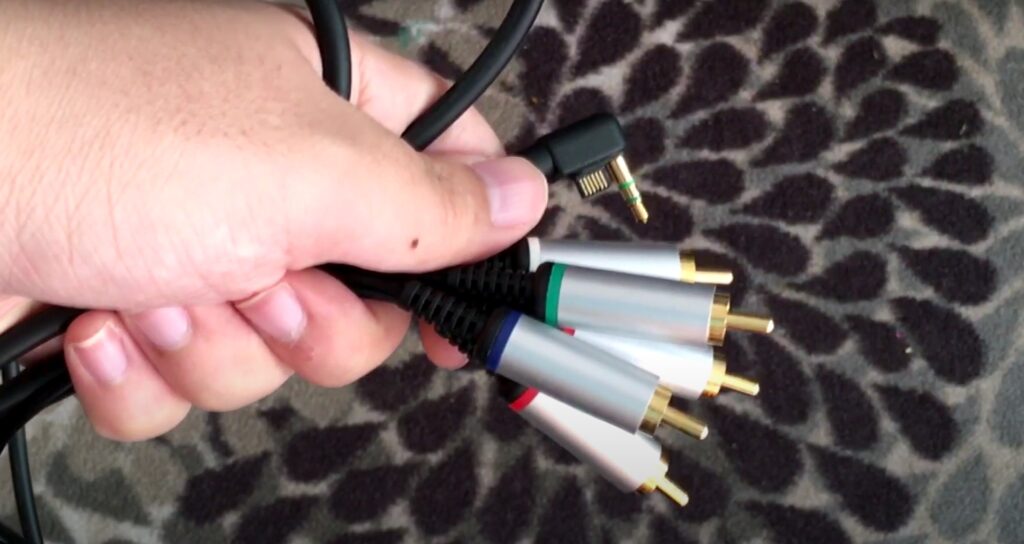
- First, prepare all the component cables for the PSP (YPBPR), a capture card, and components for HDMI.

- Then, plug every necessary cable component into the PSP.
- Plug the other end of the cable into the capture card or into a converter.
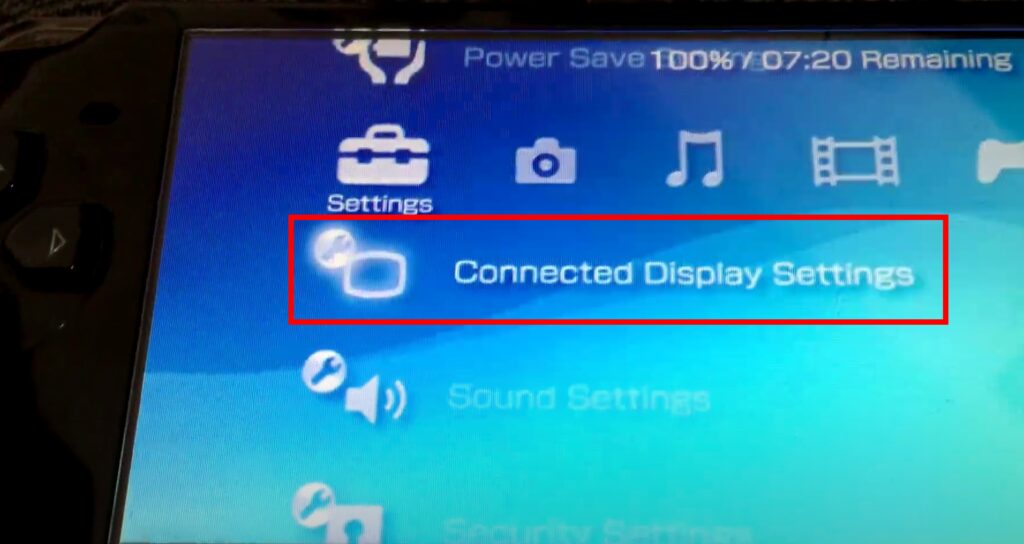
- Next up, connect your PSP to your TV by hitting the Connected Display Settings on your PSP.

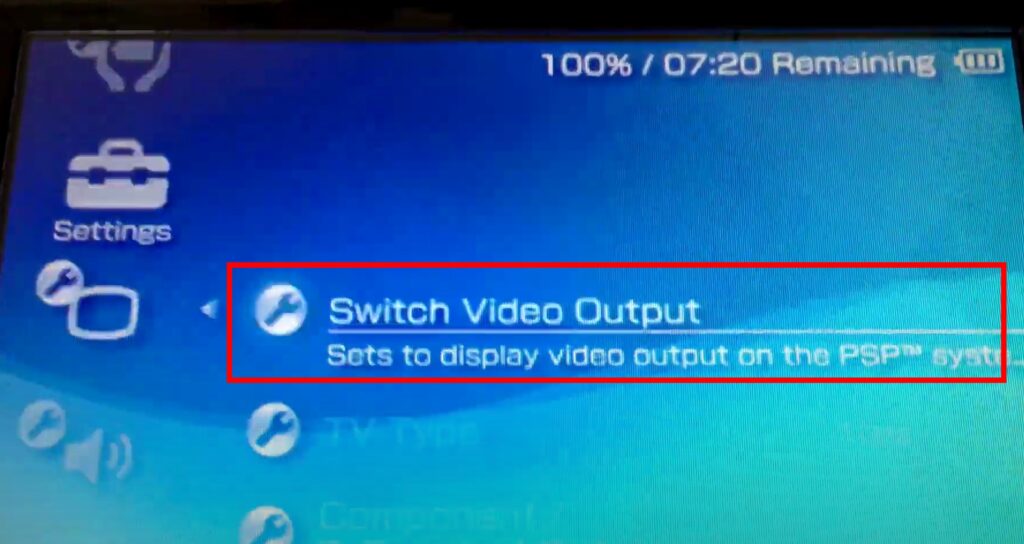
- Hit Switch the video output and then hit Yes.

- Now your PSP display has already shown up on your TV and the capture card is recording it.
More on Eklipse Blog >> How to Clip Kick Stream Automatically: Create Content in Seconds!
Conclusion
So, that’s all about how to record a PSP screen. It may take a few steps to do, but it’s not as difficult as you guys think. On top of that, it’s really worth trying since you can record your gameplay and share it on other social media.
Imagine being able to clip and share your best gaming moments in one tap, without any hassle. With Eklipse‘s powerful AI, you can!
Eklipse will quickly pick the best moments during your game livestream, and turn them into captivating TikTok, Shorts, and Reels that will wow your audience.
Try Eklipse today for free by clicking here and see how fast your audience grows!
Maximize your Black Ops 6 rewards—Create highlights from your best gameplay with with Eklipse
Eklipse help streamer improve their social media presence with AI highlights that clip your Twitch / Kick streams automatically & converts them to TikTok / Reels / Shorts
🎮 Play. Clip. Share.
You don’t need to be a streamer to create amazing gaming clips.
Let Eklipse AI auto-detect your best moments and turn them into epic highlights!
Limited free clips available. Don't miss out!
