
Level Up Your Marvel Rivals Gameplay
Capture your epic wins, clutch moments, and even hilarious fails with Eklipse. Easily create and share highlight reels with your friends—even if you're not streaming!
Learn MoreLooking for the best OBS settings for streaming in low-end PC? You’re not alone! Many streamers face the challenge of achieving smooth, high-quality live streams without upgrading to expensive hardware. The good news? You can optimize OBS to get the most out of your current setup without breaking the bank.
Whether you’re just starting your streaming journey or trying to work around a budget-friendly PC, this guide will walk you through practical tips and settings to maximize performance. Let’s dive in and transform your low-end PC into a streaming powerhouse!
Best OBS Settings for Low-end PC (General)

While OBS is one of the best streaming software options friendly for newbies and professionals, setting it up for a low-end PC can be a bit technical. But, even though the settings may seem advanced, you only need to pay attention to 3 things: FPS, canvas resolution and audio sample rate.
To make it work smoothly with your PC, let’s take a look at the best OBS settings for recording on a low-end PC.
1. 24 or 30 FPS (Frames per Second)
When it comes to best OBS settings for Low-end PC, the recommended frame rates are typically 30 or 24 FPS. These frame rates align with industry standards employed in professional video production, striking a balance between quality and performance that ensures satisfactory playback. Higher frame rates, such as 60 FPS, can strain slower computers.
Framerate determines how smooth your stream will be. For 1280 x 720 resolution, setting 30 FPS is enough. But if you want to increase the view experience, 60 FPS is great and it’s even better if you combine this with the full-HD resolution.
One more thing to make sure that your streaming quality is great is setting the right bitrate. You can read our article below to learn how bitrate affects the quality of your video and how to set the right bitrate.
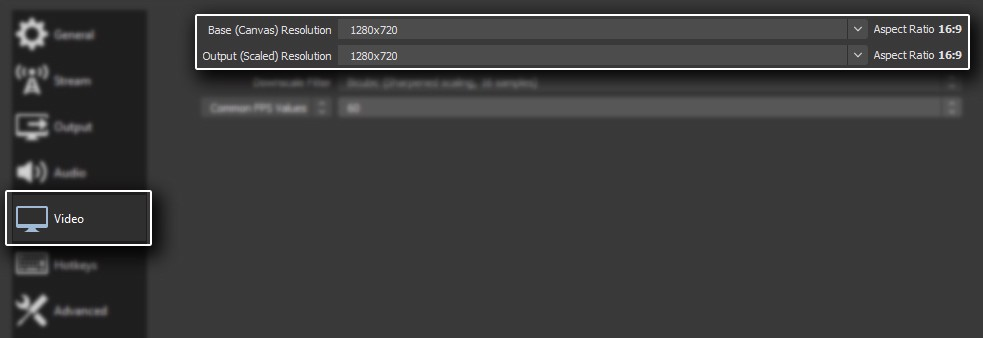
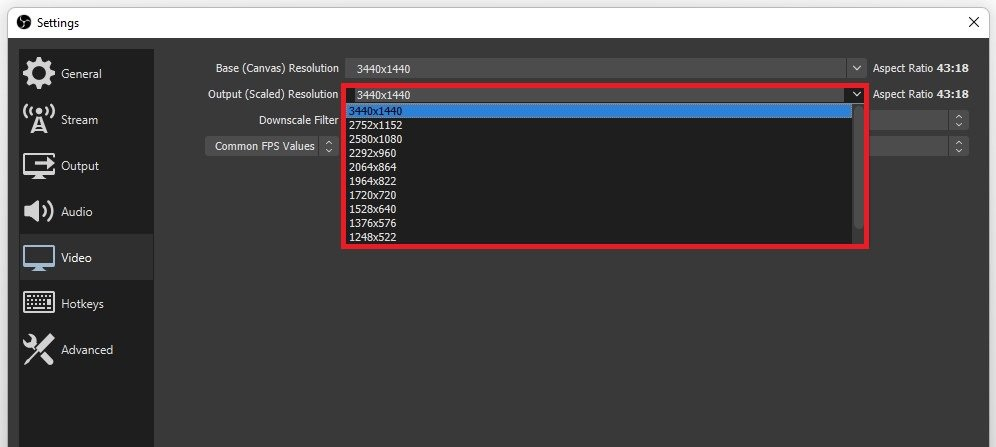
2. 1280 x 720p or 1920 x 1080p Canvas Resolution
While 1280 × 720p may not boast the highest canvas resolution, it becomes a viable option for those concerned about their computer’s capabilities.
For a low-end PC, the best OBS settings may still allow for recording at 1920 × 1080p, providing superior quality. However, this higher resolution may pose challenges for less powerful computers.
Experiment with both settings to identify any issues with 1920 × 1080p. This resolution proves especially advantageous when showcasing videos on an HD screen, offering a quality worth pursuing.
It’s advisable to start with HD resolution for the starter. It’ll give a clear picture without taking so much of your bandwidth. If you decide to have this quality, then set the resolution to 1280 x 720.
Moreover, in case you want to give a full-HD performance, then you can set your base to 1920 x 1080.

3. 44.1 kHz or 48 kHz Audio Sample Rate
In addition to the video quality, the audio also plays an important role to make your audience stick around. In order to have a clear sound, you have to nail the higher sound bitrate.
Now let’s set up the sound on OBS. For the Sample Rates, select either 44.1 kHz or 48 kHz. However, it’ll be better to set it to 48 kHz for the best audio.
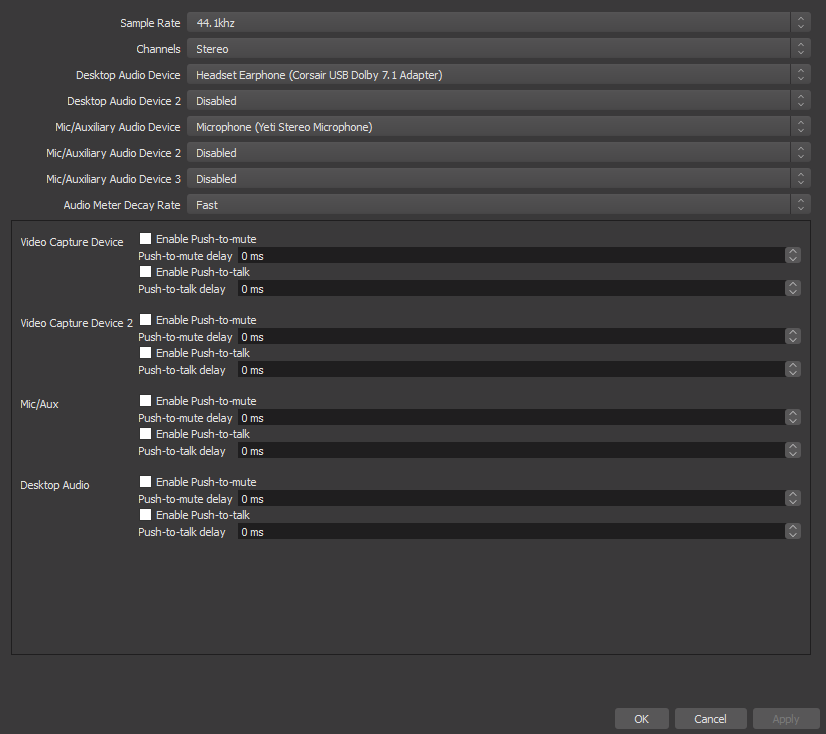
While 44.1 kHz demands less processing power, making it suitable for low-end laptops, it sacrifices some level of detail compared to the higher alternative. Higher sample rates are preferable for capturing games or videos where audio nuances matter.
The difference between the two settings is not drastic, unlike the impact of switching frame rates from 30 to 60, which can strain lower-end computers. Additionally, consider whether stereo or mono recording is appropriate.
Stereo captures a full stereo field, suitable for scenarios with left and right audio variations, while mono, although lower in quality, works well for simpler videos with a single speaker.
4. Hotkeys
While hotkeys don’t directly influence video quality or significantly impact machine performance, they play a crucial role in OBS Studio control.
Customizable within the software, hotkeys enable precise control over screen capture, facilitating quicker and simpler recording initiation, termination, and other adjustments.
More on Eklipse Blog >> OBS Game Capture Not Working: 4 Ways to Fix Black Screen
Best OBS Settings for Streaming in Low-end PC
It’s time to talk about the best OBS settings for streaming in low-end PC. Streaming introduces an additional layer of complexity, especially when your computer’s capabilities are limited. When venturing into Twitch, Facebook Live, or any other streaming platform, it’s essential to adhere to minimum settings to ensure a seamless streaming experience.
Another thing to keep in mind before working on your streaming setup is ensuring your internet connection. Your network should have a high Upload speed or at least be stable to conduct streaming.
More on Eklipse Blog>>> Top 7 Low-End PC Video Tools for Content Creators
1. 24 or 30 FPS
Selecting the right frames per second (FPS) for streaming is crucial, and caution should be exercised not to opt for excessively high FPS. Striking a balance between 30 or 24 FPS ensures a decent video quality and maintains streaming reliability.
Prioritize the ability to stream a video smoothly, even if it falls short of HD resolution. Attempting to stream in a higher definition than your computer can handle may lead to failure or crashes.
2. 1280 x 720p
Unless your computer can handle more, consider 1280 × 720p as the baseline resolution that strikes a balance between visual quality and compatibility with platforms like Twitch. While this resolution may appear suboptimal on UHD screens, it serves as a practical compromise for low-end PCs.
Take into account your computer’s specifications, particularly if it has limited RAM, as attempting higher resolutions may strain its performance.
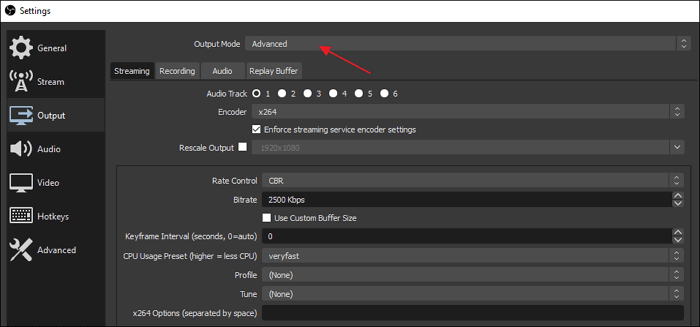
3. Streaming Bitrate
Mindful consideration of the bitrate is crucial when streaming through OBS Studio. Your processor’s capability to handle a higher bitrate and a robust internet connection are prerequisites for a successful stream.
Aim for an optimal video bitrate of around 4000 kbps for video and 320 kbps for audio. While these values may impose a significant demand on your stream, adjustments can be made for lower definitions, potentially working with as little as 1500 kbps for video.
Audio bitrate requirements vary, with 96 kbps being acceptable for less critical applications.
More on Eklipse Blog >> How to Edit Twitch Clips to YouTube Shorts in 5 Steps
4. Audio and Video Sources
Similar to video capture, configure audio and video sources within OBS Studio. Utilize straightforward settings to modify audio and video inputs.
If incorporating a webcam or external audio source, ensure they are set up in advance, especially if you plan to overlay your webcam stream on the video or use an external microphone for commentary.
FAQ
1. How to Make OBS Less CPU-Intensive?
To make OBS less CPU-intensive, you can:
- Lower the Output Resolution: Reduce the streaming resolution to 720p or lower.
- Adjust Frame Rate: Stream at 30 FPS instead of 60 FPS.
- Change Encoder: Use hardware encoding (e.g., NVENC or AMF) instead of software encoding (x264).
- Optimize Scene Composition: Simplify your scenes by reducing overlays, animations, or sources.
- Set Process Priority: Change OBS’s process priority to “Above Normal” in the Task Manager for smoother performance.
- Limit Bitrate: Lower your video bitrate to reduce encoding demand.
2. What is the Minimum CPU for OBS Streaming?
The minimum CPU for OBS streaming depends on your desired resolution and frame rate:
- Basic Streaming (720p at 30 FPS): A dual-core processor, such as Intel Core i3-8100 or AMD Ryzen 3 2200G, is sufficient.
- Higher Quality Streaming (1080p at 60 FPS): At least a quad-core processor, such as Intel Core i5-10400 or AMD Ryzen 5 3600, is recommended.
Keep in mind that streaming at higher settings requires better hardware to maintain stable performance.
Final Thoughts
In conclusion, OBS remains a powerful and adaptable streaming tool, even for low-end PCs. By fine-tuning your video, audio, and stream settings, you can significantly improve your streaming performance without needing expensive hardware upgrades.
Focus on optimizing resolution, framerate, and bitrate to achieve smooth video quality, and ensure clear and balanced audio for an engaging viewer experience. Combined with a stable internet connection, these adjustments will allow you to stream confidently on platforms like Twitch, Kick, or YouTube. Happy streaming!
You can also rely on Eklipse, the AI-powered tool for effortlessly turning your live streaming moments into TikTok/Short/Reels content with just one click! This free platform not only detects but also automatically creates short videos of your best live moments.
Still not convinced? Try Eklipse for free now and start becoming a viral sensation on social media!
Maximize your Black Ops 6 rewards—Create highlights from your best gameplay with with Eklipse
Eklipse help streamer improve their social media presence with AI highlights that clip your Twitch / Kick streams automatically & converts them to TikTok / Reels / Shorts
🎮 Play. Clip. Share.
You don’t need to be a streamer to create amazing gaming clips.
Let Eklipse AI auto-detect your best moments and turn them into epic highlights!
Limited free clips available. Don't miss out!
