
Level Up Your Marvel Rivals Gameplay
Capture your epic wins, clutch moments, and even hilarious fails with Eklipse. Easily create and share highlight reels with your friends—even if you're not streaming!
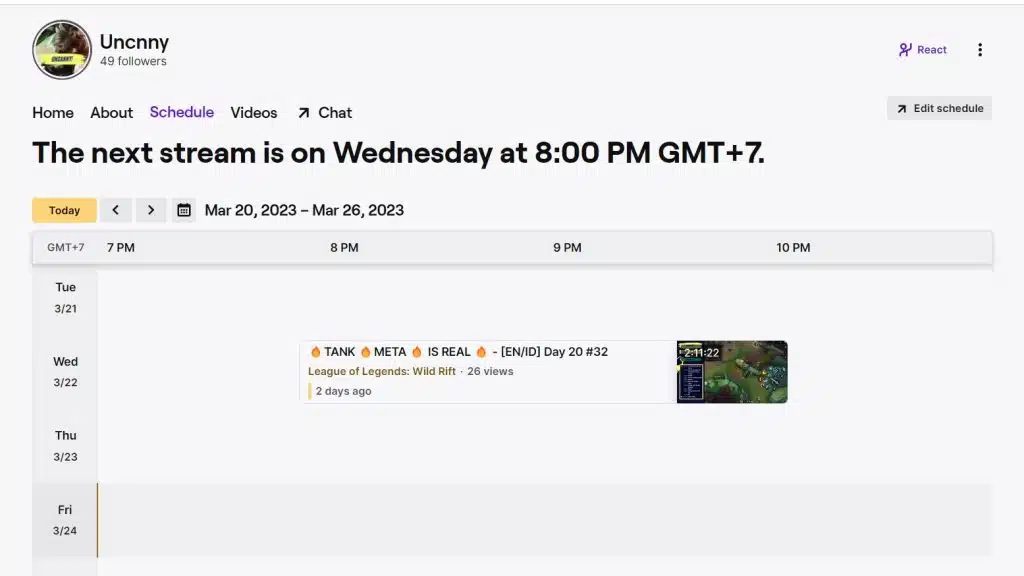
Learn MoreCreating a consistent Twitch streaming schedule is essential for growing your audience and maintaining their engagement. Having a Twitch schedule lets viewers know when they can expect to see you online and helps you build a loyal following.
In this article, we’ll provide step-by-step instructions on how to set up a streaming schedule on Twitch, offer tips for managing and updating it, and highlight the benefits of having a well-planned schedule, including increased views and audience growth.
So if you want to take your streaming game to the next level, keep reading!
Why Do You Need a Twitch Stream Schedule?
Having a consistent streaming schedule on Twitch can have numerous benefits for your channel.
Firstly, it increases visibility. When you regularly stream at the same time, is more likely to show up in user recommendations and searches, leading to increased organic growth and exposure.
Secondly, a schedule can increase viewer engagement as your potential audience can anticipate when you will be live.
Additionally, it allows you to plan your content more effectively and ensure consistent, high-quality content. This can help maintain viewer engagement and retention, as well as build a loyal following.
Lastly, having a schedule can help you manage your time effectively. So, you can dedicate enough time to your channel while still leaving time for other commitments.
By setting a consistent streaming schedule, you can boost your viewer engagement and achieve your Twitch Affiliate goals.
Set up your Twitch stream schedule now and learn how on the creator dashboard.
How to Set Up Twitch Stream Schedule
Creating a Twitch stream schedule is easier than you think! With just a few simple steps, you’ll be on your way to consistent streaming success.
- Open Twitch and log in to your account.
Click on your profile icon in the top-right corner of the screen.
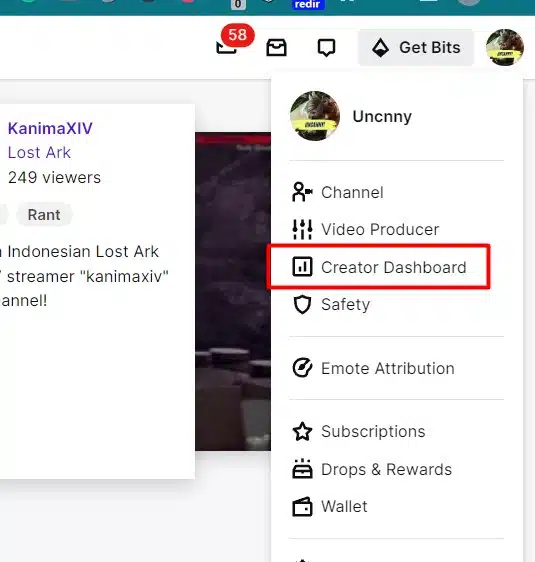
- Select “Creator Dashboard” from the dropdown menu.
Click on the “Settings” tab in the left-hand menu.
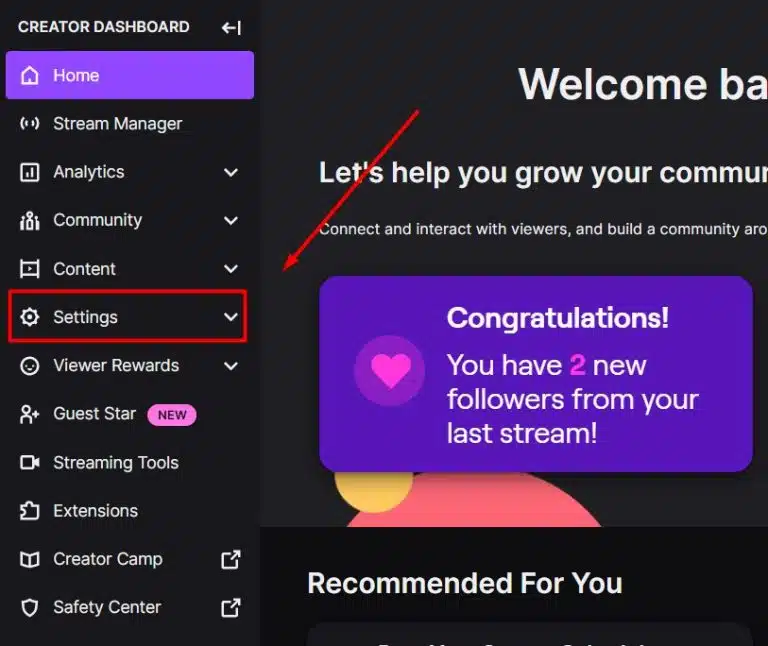
- Select “Channel” from the list of settings options.
Choose “Schedule” tab and click “Add Stream”
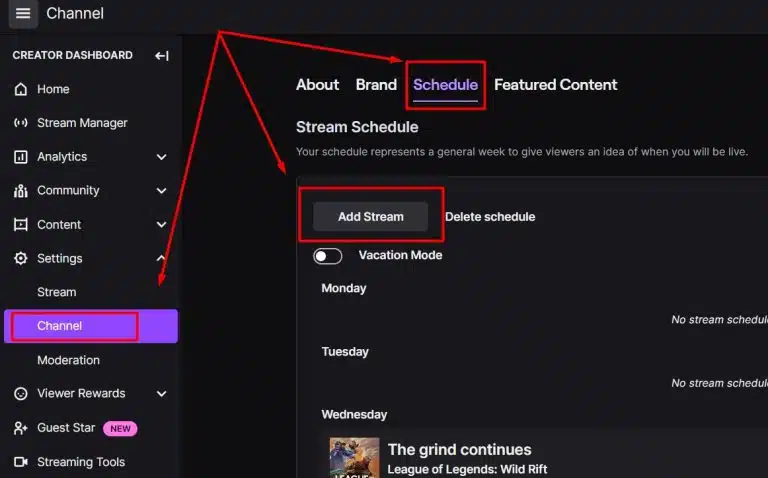
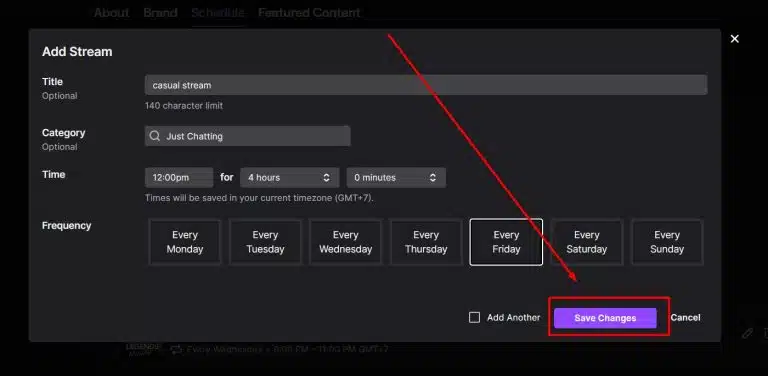
- Add information to your stream schedule
You can write the title of the stream, the game or category you want to stream, time and duration, and the stream frequency (like “Every Monday” for example)
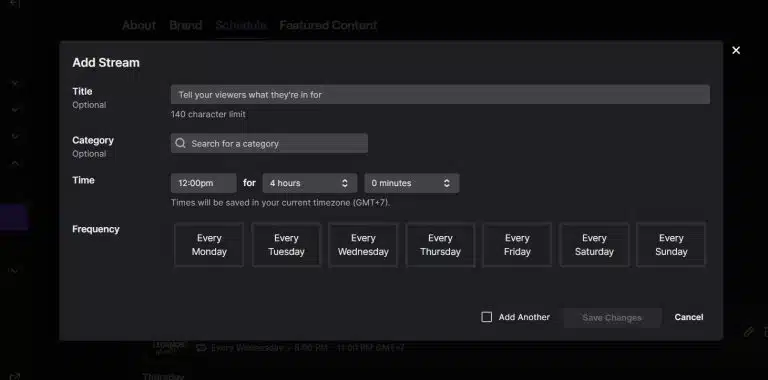
- Click “Save Change” when you are done
How to Edit Existing Schedule
To edit your Twitch stream schedule, access your ‘Creator Dashboard’ and locate the schedule on the same menu where you create a schedule. From there, follow these steps:
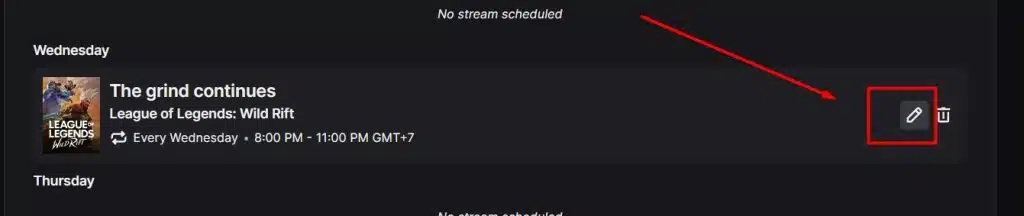
- Click on the pencil icon next to the schedule.
- Change the title of your stream by editing the text in the “Title” field.
- Choose a new category for your stream by typing the game or content you want to stream on “Category” field.
- Change the time and duration of your stream by adjusting your start time and duration.
- Adjust the frequency of your stream by selecting one of the schedule like “every monday” or etc
- Click on “Save Changes” to confirm your edits.
How to Delete or Cancel a Stream Schedule
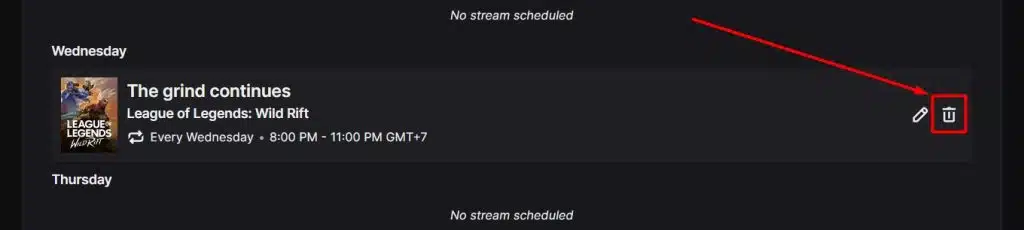
To delete a schedule on Twitch, simply locate the schedule on your ‘Creator Dashboard,’ click the trash can icon, and confirm by clicking ‘Yes’ on the dialog prompt.
Alternatively, you can delete all your schedules by clicking the ‘Delete Schedule’ button next to the ‘Add Stream’ button. A confirmation dialog will appear; simply click ‘Yes’ to delete all your schedules.
It’s quick and easy to keep your schedule up-to-date with just a few clicks.
How to Set Up Vacation Mode on Twitch
If you’re planning to take a break from streaming, Twitch’s vacation mode is a handy feature. Simply access the schedule menu in your settings and turn on vacation mode to let your viewers know when you’ll be back. It’s an easy way to keep your channel active even when you’re not streaming regularly.
Here is the step by step to turn on that mode.
- Log in to your Twitch account and go to your “Creator Dashboard.”
- Click on “Settings” on the left-hand side of the screen.
- Scroll down to the “Channel” section and click on “Schedule.”
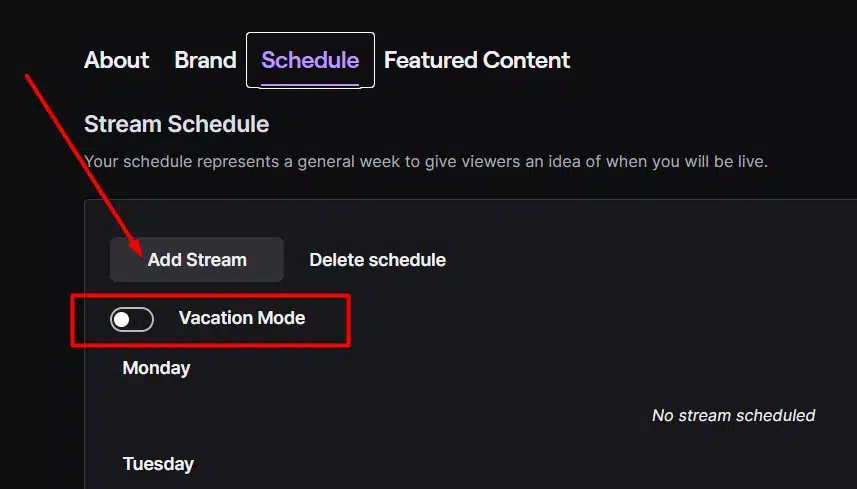
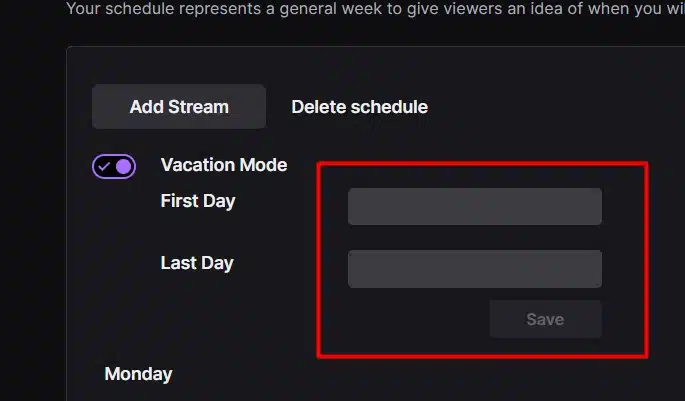
- Toggle on vacation mode by clicking the switch next to “Vacation Mode.”
- Select the date of the first day and last day of your vacation by clicking on the “First Day” and “Last Day” fields and choose a date from the calendar.
- Click on “Save Changes” to confirm your vacation mode settings.
💡Now you’ve learned about creating the stream schedule. Next, explore our tips on ‘8 Twitch branding ideas’ to learn how to grow your channel positively!
Conclusion
Consistent Twitch schedules are vital for building an engaged audience. Access the Creator Dashboard, create, edit, or delete schedules, turn on vacation mode when necessary, and keep viewers informed of any changes.
By doing so, you’ll demonstrate commitment, build trust, and create an engaged following.
Create a schedule, keep it consistent, and use Twitch’s features to ensure viewers know when you’ll be streaming. By following these tips, you’ll create a successful and engaging Twitch channel.
Plus, don’t forget to use Eklipse to help you create amazing Twitch highlights in minutes. With Eklipse‘s advanced AI tool, you can easily capture the best moments from your streams and directly share them with your audience on social media.
With Eklipse, you can save time and effort, create high-quality videos, engage your audience, and increase your earnings. Sign up for Eklipse today and start creating amazing highlights from your Twitch streams!
Maximize your Black Ops 6 rewards—Create highlights from your best gameplay with with Eklipse
Eklipse help streamer improve their social media presence with AI highlights that clip your Twitch / Kick streams automatically & converts them to TikTok / Reels / Shorts
🎮 Play. Clip. Share.
You don’t need to be a streamer to create amazing gaming clips.
Let Eklipse AI auto-detect your best moments and turn them into epic highlights!
Limited free clips available. Don't miss out!
