
Level Up Your Marvel Rivals Gameplay
Capture your epic wins, clutch moments, and even hilarious fails with Eklipse. Easily create and share highlight reels with your friends—even if you're not streaming!
Learn MoreKick is a new live-streaming platform that’s quickly gaining popularity among gamers and other content creators. It offers a variety of features that make it a great choice for streamers. However, if you’re experiencing poor stream quality on Kick, it can be frustrating for both you and your viewers. So you might want to know how to improve Kick stream quality.
Even the best streaming platform can’t guarantee perfect stream quality all the time. There are a number of factors that can affect your stream quality, including your internet connection, your hardware, and your software settings.
In this article, we’ll give you 10 tips on how to improve your Kick stream quality. We’ll cover everything from your internet connection to your software settings, so you can be sure that your streams are always looking and sounding their best.

1. Check Your Upload Speed
The upload speed you need for your live broadcast will vary depending on the quality you want to output.
Higher-quality video requires more information to upload, which means you need more Mbps. You can use Speedtest to test your upload speed. For a good-quality stream, you should have:
- 6 Mbps for 720p
- 13 Mbps for 1080p
2. Use Ethernet Cable
Using an Ethernet cable connection instead of Wi-Fi can help improve your live streaming quality.
Wi-Fi connections can be unstable, which can affect your results. If you have access to a cable connection, you’ll have more stability, and your stream quality will increase. However, you can still go live on a Wi-Fi connection if:
- There aren’t too many people using it at the same time
- The upload speed is high
- You do a dry run to test different video resolutions
More on Eklipse Blog>>> Top 5 Livestreaming Software for Kick Streamer
3. Try Going Live at Different Times of Day
The time of day and day of the week can influence the quality of your internet connection, impacting your live stream quality.
Each region has its live streaming peak hours, which you might be able to find online. Otherwise, it’s a good idea to try going live at different times of day and weekdays to evaluate when you get the best quality stream.
4. Limit Ongoing Tasks
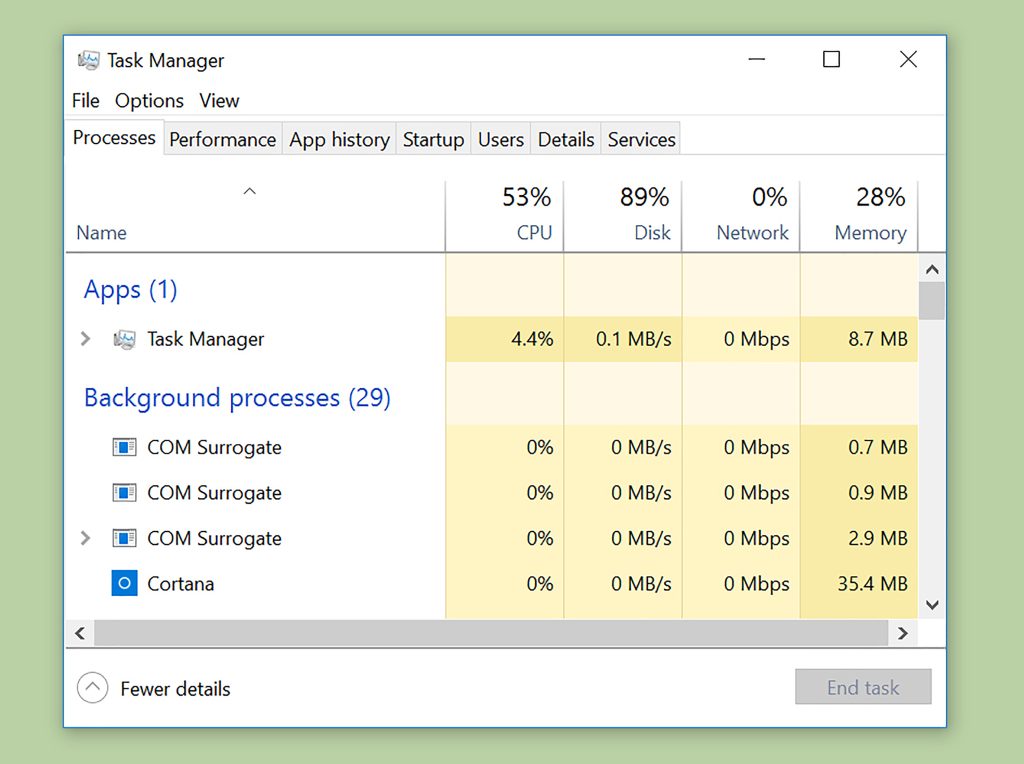
Before your live stream, make sure you close all the software applications that you won’t use during the broadcast. For example, Skype, browsers, Outlook, and so on. This will help ensure that your computer is running at its best.
5. Disable Other Connections
To further optimize your computer, you can disable connections that aren’t necessary for your live stream. If you are connected via Ethernet cable, you can disconnect the Wi-Fi. If you see any other useless connections, make sure you disable them.
Once you have optimized your computer and internet connection to the best of your abilities, it’s time to focus on your live streaming settings.
More on Eklipse Blog >> Guide to Edit Kick Clips into YouTube Shorts with Just 5 Steps.
6. Video Quality vs. Stream Quality
Choosing between higher video quality or better stream quality can be a difficult decision. A lower-quality video has less information to transmit to your viewers, which takes up fewer resources and loads faster. If your live video is laggy, try lowering its resolution.
7. Adjust the Video Bitrate
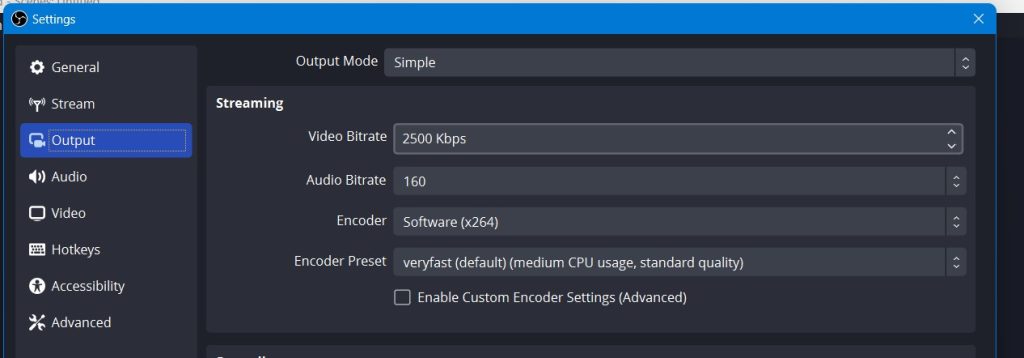
Changing the bitrate can help you improve your live streaming quality. It controls how much information is transmitted per second. Lower your video bitrate when you lower the video resolution. Try playing with different variables to see what works best for your resources.
More on Eklipse Blog>>> How to Download Kick VODs and Clip: Easily Share Your Content
8. Change the FPS (Frames per Second)
If your live video is choppy and far from smooth, you can change your FPS rate to try and improve your live streaming quality. Set your live stream to above 25 FPS, with 30 FPS being ideal. You can stream at 60 FPS for even higher quality, but it will require more power and upload speed.
9. Use an Encoder with Hardware Acceleration
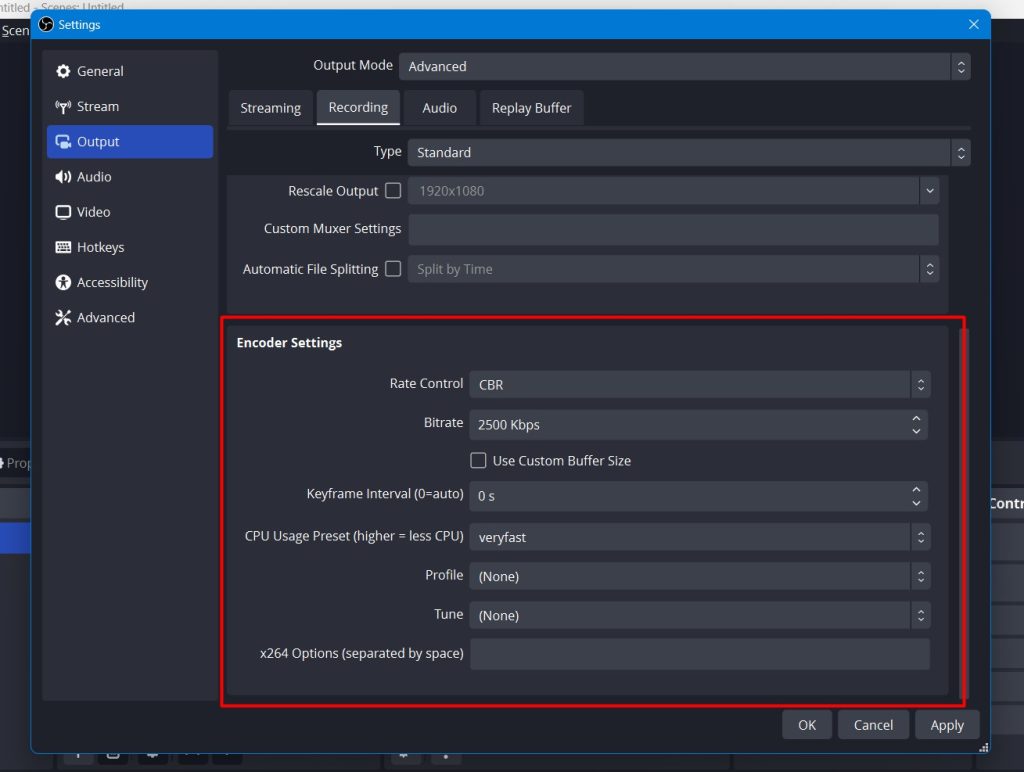
Using multiple video sources, such as screencasting, cameras with different points of view, and apps, can increase the load on your computer and slow it down.
Using hardware as your encoder can save your CPU power, and your broadcast will be processed by your GPU. You can check these settings on OBS and try to fine-tune them until you find the best settings possible for your PC.
10. Check the guidelines of your live streaming platform
Each live-streaming platform has its own guidelines for video quality and settings, so it’s essential to check these before going live. For example, many streaming platforms including Kick, recommend a maximum bitrate of 4000 Kbps for 1080p streams.
Tips To Boost Kick Viewer Engagement
In addition to improving the quality of your Kick stream, it’s equally important to engage your audience effectively. Here are some tips to boost viewer engagement:
- Interactive Content: Incorporate polls, Q&A sessions, or interactive games to keep viewers engaged and actively participating during your streams.
- Engage with Comments: Respond to viewer comments and questions in real-time, fostering a sense of community and making viewers feel heard and valued.
- Consistent Schedule: Stick to a regular streaming schedule to build anticipation and loyalty among your audience. Consistency helps viewers know when to tune in.
- Promotion: Announce your upcoming streams on social media and other platforms to attract a larger audience. Tease the content or any special guests to generate excitement.
- Collaborate: Partner with other Kick streamers or influencers in your niche for joint streams or shoutouts. Collaborations can introduce your content to new audiences and create buzz.
More on Eklipse Blog >> How to Promote Your Kick Stream With Channel Name Sticker
By implementing these five tips, you can enhance viewer engagement and create a more vibrant and interactive Kick streaming community.
Conclusion
By following these ten tips, you can significantly improve the quality of your Kick stream.
Remember to check your upload speed, use an Ethernet cable if possible, try going live at different times of day, limit ongoing tasks, disable other connections, adjust your video quality and stream quality, change the FPS rate, use an encoder with hardware acceleration, and check the guidelines of your live streaming platform.
With these tips, you’ll be able to provide your viewers with a high-quality and engaging live stream.
If you’re a Kick streamer, you know that it’s important to create engaging content to keep your viewers entertained. But with so many streamers competing for attention, it can be difficult to stand out.
One way to make your content more engaging is to create highlights of your best moments. But editing highlights can be time-consuming and tedious.
That’s where Eklipse comes in. Eklipse is an AI-powered tool that automatically creates highlights of your Kick livestreams for free!
If you’re serious about streaming on Kick, then Eklipse is a must-have tool. Sign up for a free account today and start creating amazing Kick highlights automatically!
Maximize your Black Ops 6 rewards—Create highlights from your best gameplay with with Eklipse
Eklipse help streamer improve their social media presence with AI highlights that clip your Twitch / Kick streams automatically & converts them to TikTok / Reels / Shorts
🎮 Play. Clip. Share.
You don’t need to be a streamer to create amazing gaming clips.
Let Eklipse AI auto-detect your best moments and turn them into epic highlights!
Limited free clips available. Don't miss out!
