
Level Up Your Marvel Rivals Gameplay
Capture your epic wins, clutch moments, and even hilarious fails with Eklipse. Easily create and share highlight reels with your friends—even if you're not streaming!
Learn MoreTwitch is a live streaming platform where you can share your passions with an audience in real-time. Whether you’re a gamer, musician, artist, or just someone who loves to talk, streaming on Twitch is a great way to connect with people who share your interests.
Starting a Twitch channel is easy and free. You can stream on Twitch using different devices like computers, phones, or gaming consoles such as Nintendo Switch and Xbox. Once you have your equipment set up, you can create an account and start streaming.
Of course, there’s a bit more to it than that if you want to be successful on Twitch. But don’t worry, we’re here to help you. In this article, we’ll walk you through everything you need to know about how to start streaming on Twitch, from choosing the right equipment to building an audience, and of course, earning some money. Let’s get started!

Preparation To Stream on Twitch
Before we go further about the step-by-step to going live on this particular streaming platform, you need to prepare some things for having great live streaming results. They are:
- Pay attention to Twitch Community Guidelines
- Create an account on Twitch
- Enable two-factor authentication
- Plan the streaming software you want to choose
- Prepare the equipment such as mic, headphones, camera, etc
It’s worth noting that you don’t always have to use a webcam to stream. Using mirrorless or DSLR can also be a good idea to elevate your video quality. Learn how to set it on your computer through our previous post.
Additionally, there are many options for streaming software that are the best for your streaming section. The very common streaming software that is mostly used is OBS Studio. This is claimed as the best streaming software because it has many advanced features that can support you to produce a great video. On the other hand, it is also still friendly for the beginner.
If you’re interested in pursuing a career in streaming, one of the first things you might want to think about is creating a dedicated gaming room. This can be a great way to ensure that you have a comfortable and distraction-free space to focus on your streams. You could also start researching different streaming platforms, learning about different types of equipment you might need, and practicing your streaming skills. There’s a lot to learn and explore when it comes to streaming, so why not start expanding your knowledge today? Who knows, you might just discover a new and exciting career path!
If you want to do thorough preparation as a starter, let us help you through a comprehensive guide here: Streaming Tips For Beginner: A Complete Guide.
How to Start Streaming on Twitch Using PC or Mac
The most popular streaming method you can try on Twitch is by using a PC or Mac. Everyone chooses to go live on Twitch in this way. To make it happen, you can just follow this guide below.
Step 1. Setting Up The Twitch
- To begin with, connect and set up the gear. Make sure that the camera and mic can work well on your computer
- Prepare the streaming software (we use OBS Studio).
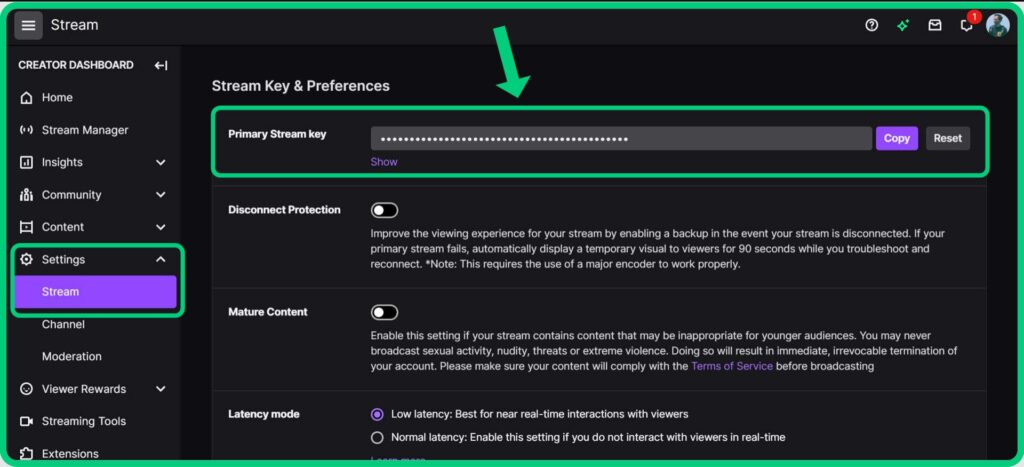
- Getting the stream key to connect OBS Studio to Twitch. Do it by heading to Profile Picture on the Twitch homepage.
To get your Twitch stream key, you can check out this post: How to Get Your Twitch Stream Key

Step 2. Setting Up OBS Studio Before Start Streaming on Twitch
Now that you have prepared to start streaming on PC or Mac, we’ll move to the next step, which is to connect and set up the OBS studio and connect it to Twitch. Here’s what you can do.
- Download, install, and launch OBS Studio app on your PC.
*Notes for Mac users: Make sure you download the right installer
- If you use Intel processor Mac (Ex: Macbook 2020 and below ), you need to choose Download Installer (x86_64/Intel).
- If you use Apple silicon Mac (Ex: Macbook 2021 and above with M1 or M2 processor), you need to choose Download Installer (arm64/Apple Silicon)
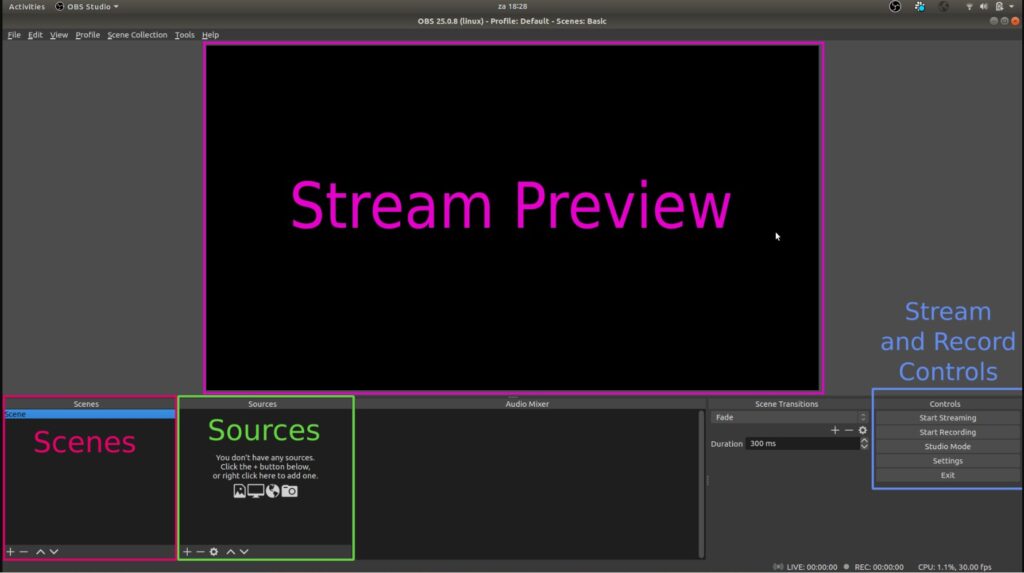
- Then organize it into Scenes and Sources. Right-click on the Sources box > Add > Game Capture.

- Select Create New, name it whatever you want, and hit OK.
- Hit Mode and select Capture any fullscreen application. Click Capture specific window if you play a windowed game.

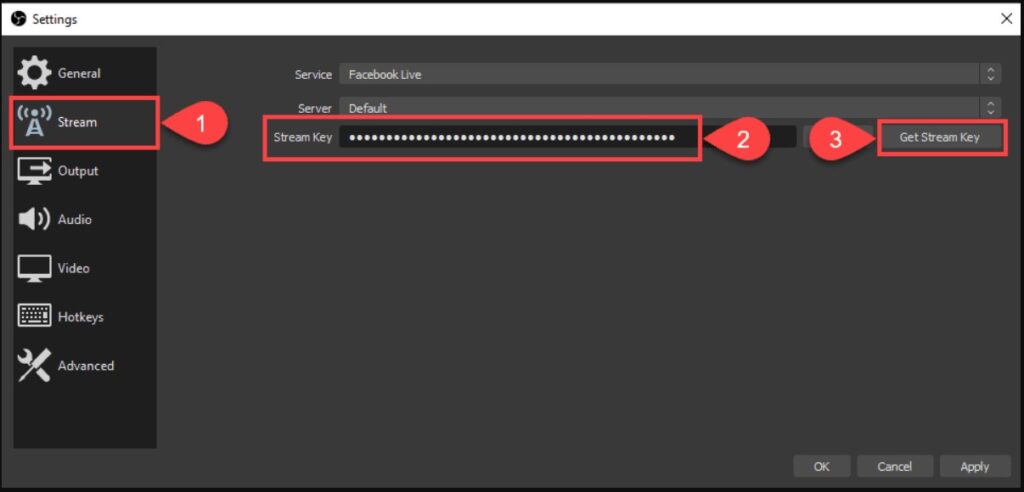
- Afterward, connect OBS Studio to Twitch by heading to Settings , select Streams, and choose Streaming Services. Then, select Twitch.
- Paste the copied stream key from Twitch to the stream key box on OBS Studio. Select the closest server and click OK.
- Click on Start Streaming button on the right side of the page to start streaming your gameplay.
- If you want to record it as well, hit the Start Recording button.
There you go. Now you have known how to stream on Twitch from PC or Mac. In addition to that, you can also stream Twitch via mobile phone or even Xbox if you desire.
How to Start Streaming on Twitch Using Xbox
Alternatively, you can also stream your gameplay via Xbox Series S/X. Here are the required steps for going live from Xbox.
Method 1. Streaming Using Twitch App
- Start off by downloading the Twitch app from the Xbox Store.
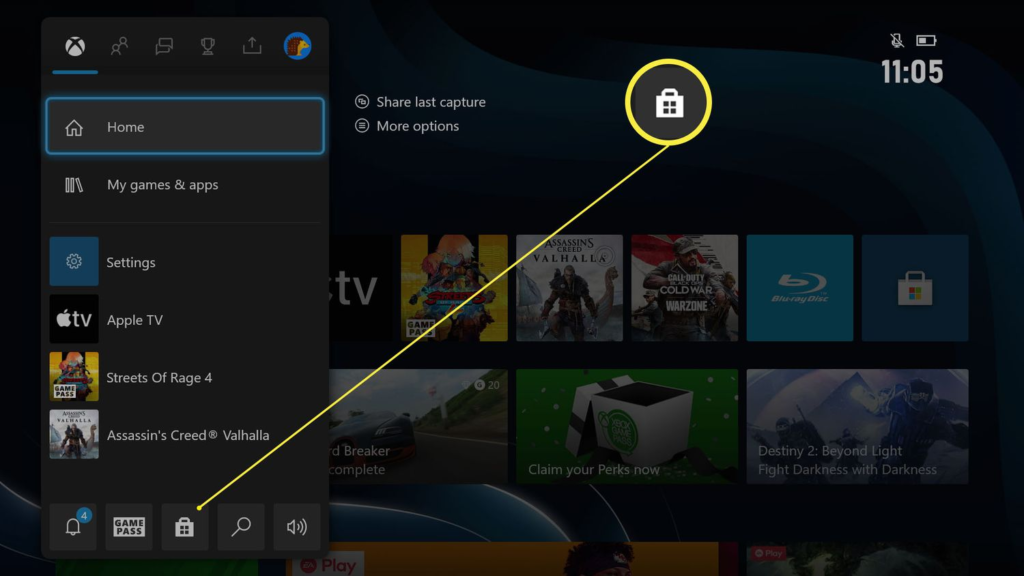
- Then, sign in or create a new account.
- Now go to Settings and hit the Profile tab.
- Add a profile picture, banner, and description.
- Afterward, back to Settings, and select Moderation to moderate the chatroom.
- To adjust the streaming settings, head to Settings and hit Broadcast.
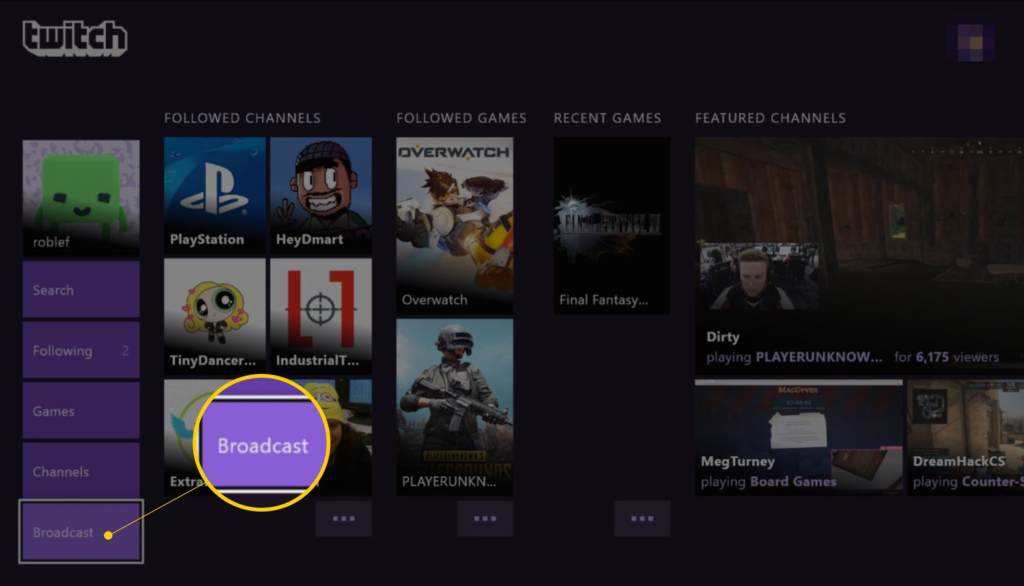
- Next up, navigate to the Broadcasting option from the main menu.
- Select the game you want to stream, as well as the streaming duration.
- Bingo! You’re now streaming your gameplay from Xbox.
- Once you’ve done streaming, hit the Stop Broadcasting option to stop streaming.
Method 2. Streaming Using Xbox One
- First, download the Twitch Xbox App from the Xbox Store.
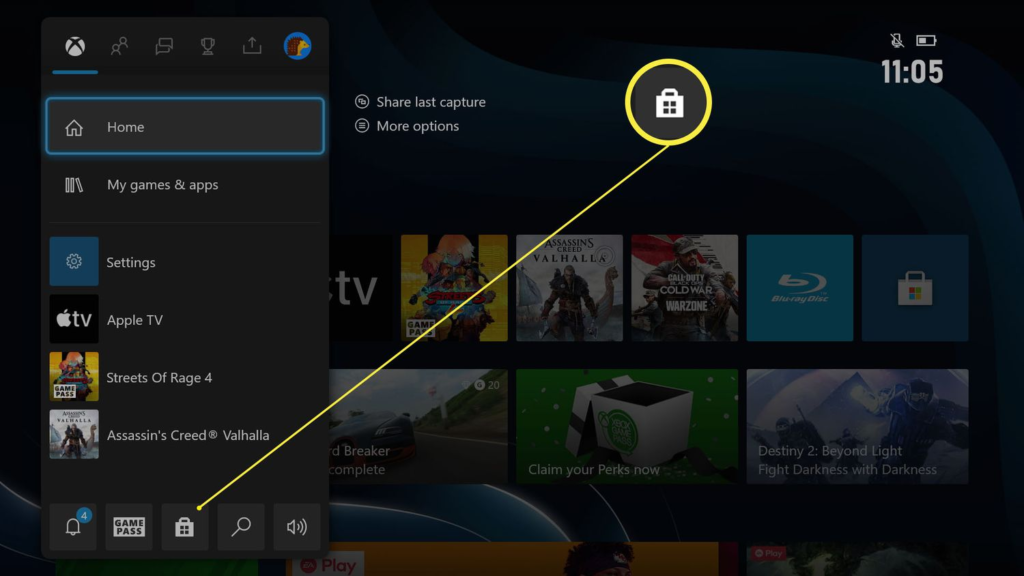
- Once done, create a new account or sign in with the existing one.
- Now go to Settings > Preferences > Xbox One Connection > Broadcast your game to enable game streaming.
- Alternatively, you can use the Xbox One Kinect sensor by saying “Hey Cortana, broadcast my game”.
- Then, navigate to Settings > Twitch on the Xbox One app. Sign in with your account.
- After signing in, set up your broadcast by changing the bitrate, camera options, and more.
- Next up, open the game you’d like to stream and hit the Xbox button on your controller, go to Broadcast & capture > Broadcast > Start Broadcasting.
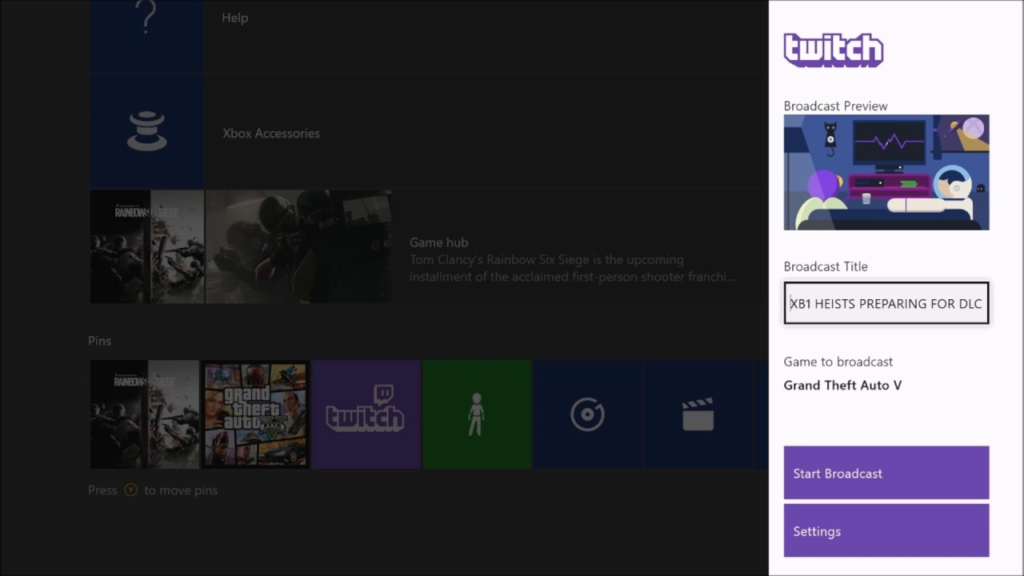
- Finally, you’re already live on Twitch.
How to Clip The Best Gaming Moments Using Eklipse
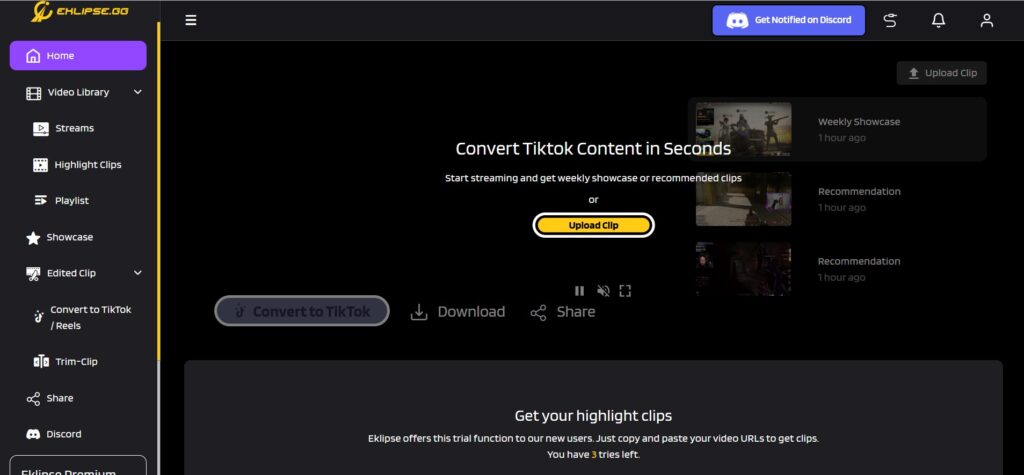
Once you’ve finished streaming on Twitch, your video will automatically be saved on Twitch and will last for 14 days. Now, if you want to capture the best gaming moment and show it on your social media, you can create highlight clips using Eklipse.
Eklipse is an A.I-driven tool that will automatically analyze and get your best gaming scene. On top of that, you can also convert your amazing clips to TikTok or reels in just a single click! Sharing your best clips also will be easier in Eklipse with only just clicking the Share icon.
Want to make your clips or montage more attractive? Choose the best template and add a cool soundtrack using our new feature. Apart from all that, just register yourself and play around with all the features. Stay tuned on Eklipse blog for more guides and news!
Conclusion
That’s all about how to start streaming on Twitch. Now that you know the steps, you can give it a shot and start your streaming career. Don’t let equipment limit your steps to be successful in the streaming field. You can always go live using a laptop if a PC seems unreachable now.
Anyway, if someday you’re experiencing a black-screen problem on OBS during streaming, don’t freak out. This problem is actually common and of course, it’s manageable. Just read our article to troubleshoot the problem. Don’t forget to take a look at more tips and tricks to promote your stream and be a successful streamer.
Maximize your Black Ops 6 rewards—Create highlights from your best gameplay with with Eklipse
Eklipse help streamer improve their social media presence with AI highlights that clip your Twitch / Kick streams automatically & converts them to TikTok / Reels / Shorts
🎮 Play. Clip. Share.
You don’t need to be a streamer to create amazing gaming clips.
Let Eklipse AI auto-detect your best moments and turn them into epic highlights!
Limited free clips available. Don't miss out!
