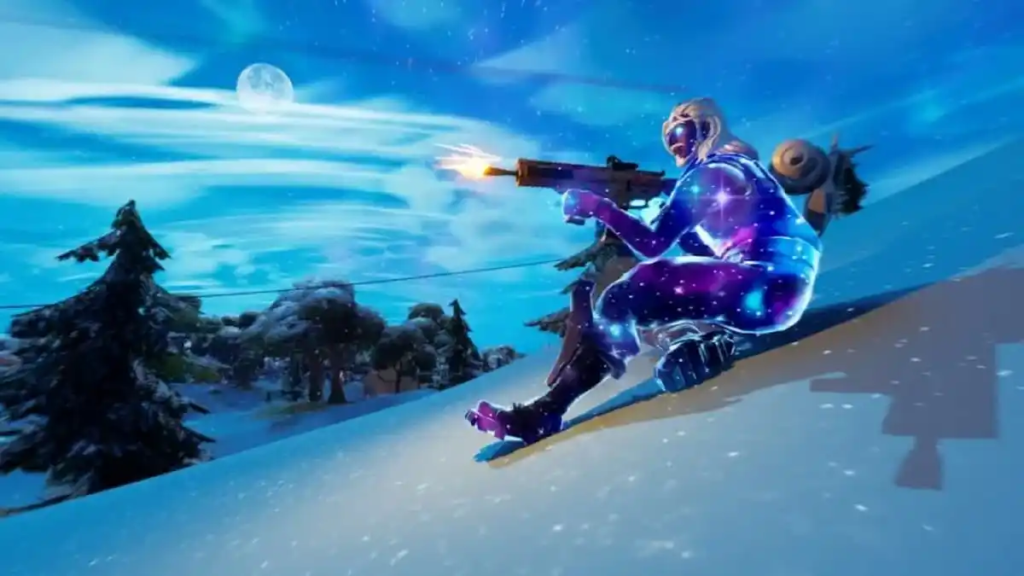
Fortnite Chapter 3 Season 4 has been airing since September 18, 2022. And as usual, Epic Games introduces weekly challenges that require you to do some tricks to complete the quest. The Fortnite slide kick mechanism is one of the tricks you should be able to do. Additionally, this trick is basically helpful for dislodging a runaway boulder.
Many players might struggle to figure out how to slide kick in Fortnite. But turned out that doing the slide kick requires no complicated technique, so you’ll be mastering it easily. Let’s get to know how to do it through the guide below.
As long as you have mastered the art of sliding, then you’ll be fine. All you need to do is slide regularly by holding down the CTRL button on the PC as the crouch button while moving.
How to slide in Fortnite on the controller then? Well, it’s pretty easy though. You can just hold down the crouch button on the right stick, and there you have it. Once you’ve made contact with another object at the end of your slide, you’ll perform a kick.
Additionally, you can still use your weapon and pick items while sliding. To cancel sliding, just hit the crouch button again.
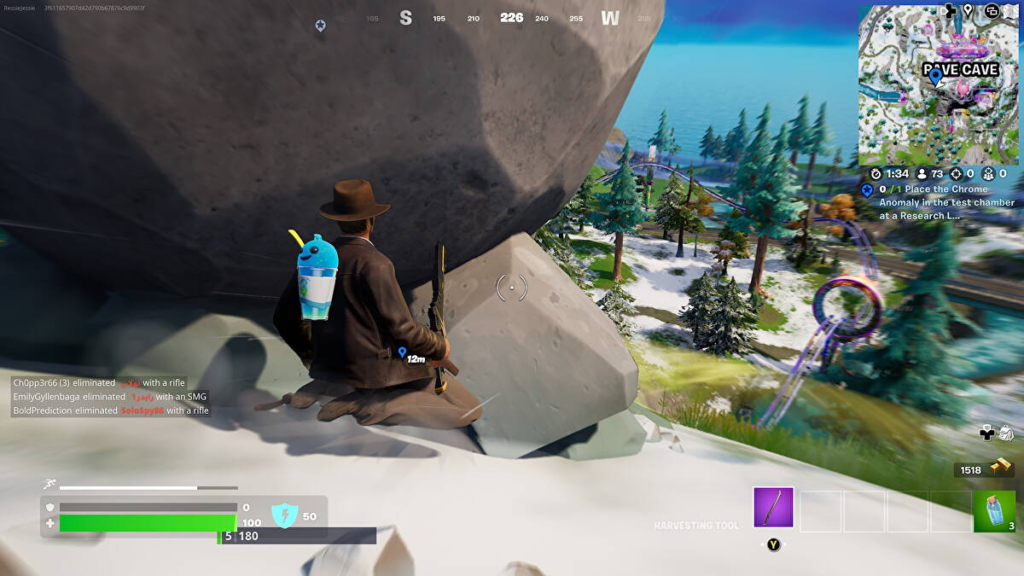
How to Do Fortnite Slide Kick to Dislodge the Runaway Boulder
Source: Euro Gamer
As previously stated, dislodging the boulder with a sliding kick become season 4’s quest. To be able to complete this quest, find the runaway boulder on the map. The boulder can be found around and north of The Reality Tree or in the snow biome.
Once you’ve found it, damage it to low health without breaking it. After that, slide into it until you successfully dislodge it from its place. Finally, congratulations on completing the quest! You’ve done great!
Conclusion
There you have it. Now that you know everything about Fortnite slide kick, you can have fun with other players in the new season of Fortnite. In case you want to obtain any interesting advantages from the wildlife, we have provided a guide to tame one of the wild animals in Fortnite: How to Tame a Boar in Fortnite: The Tips and Tricks.
Anyway, if you are a truly Fortnite fan, you have to record your gameplay while playing this game, capture the best moment of your stream with Eklipse, and convert it to TikTok, Reels, and YouTube Shorts format immediately. Don’t forget to share it on your social media as well.
With the powerful AI, Eklipse can grant you a time-saving service where you can produce incredible highlight clips in a snap. Dare to try our tool? Then just hit the following button to prove how great Eklipse is. Ciao!
Maximize your Black Ops 6 rewards—Create highlights from your best gameplay with with Eklipse
Eklipse help streamer improve their social media presence with AI highlights that clip your Twitch / Kick streams automatically & converts them to TikTok / Reels / Shorts
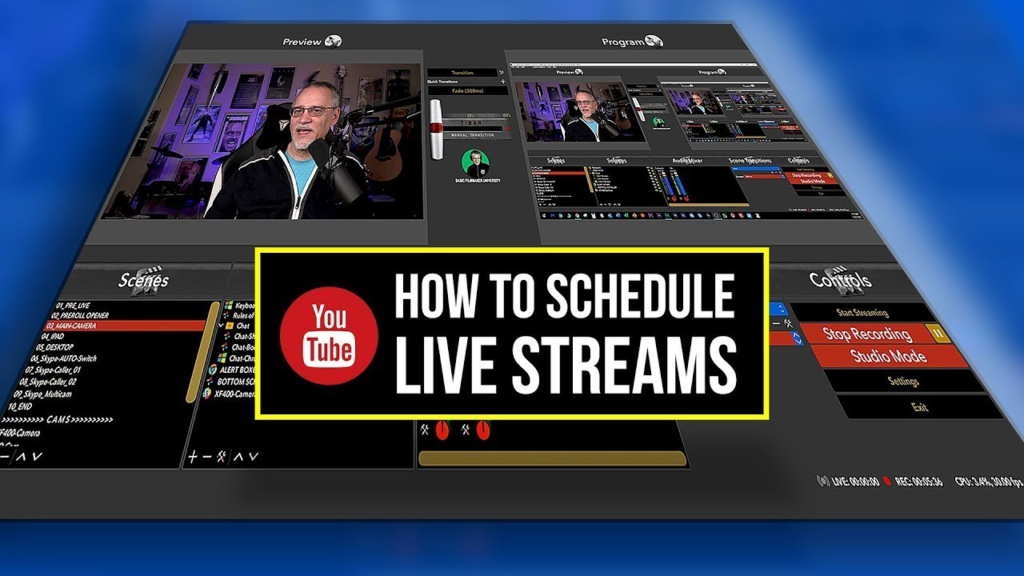
Posting and going live on YouTube at the right time is necessary if you want your content to reach the right target. Unfortunately, many creators, especially newbies, still have no idea how to schedule a livestream on YouTube.
Sometimes, you might have a lot on your plate and miss your scheduled live stream. That’s why you need to schedule your activities in order to avoid repeating the mistakes.
Thankfully, YouTube enables you to schedule your posts or livestream directly from the native platform. Just see the guide from this article.
YouTube live streaming is an excellent way to connect with your audience in real-time. Among the many features that YouTube offers, if you’re planning on live streaming sometime later in the future, the platform allows you to schedule a Livestream on YouTube in advance.
The benefit of doing so is that it would appear in your subscribers’ feed as an upcoming live event. And they can then click Set Reminder to get notified when the live event begins. Meanwhile, your scheduled stream will gain exposure through your subscribers. This would help ensure that you have a strong and engaged audience when you go live. Otherwise, you might have to wait some time for your audience to gather up in decent numbers.
Plus, you also risk disappointing your loyal fans if they miss any of your unannounced live streams. In fact, even if you make an announcement for your followers, it may just slip from their minds in the hustle and bustle of their day-to-day lives. But when they set a reminder, they get push notifications even before you go live. So this way they too have the time to settle down and enjoy the event.
Requirements to Go Live on YouTube
To live stream on YouTube mobile app, you need to meet some requirements, which are:
At least 1,000 subscribers. Once you get 1,000 subscribers, you may have to wait to get access to mobile live streaming.
If you meet all the requirements, then you can start to go live both on your PC or mobile phone.
How to Schedule a Livestream on YouTube Through a PC?
Creating a YouTube Live on pc is different from creating it on mobile. Both, in terms of the available features, and the minimum eligibility requirements for going live. Starting with a guide for desktop users, here’s how to schedule a Livestream on YouTube:
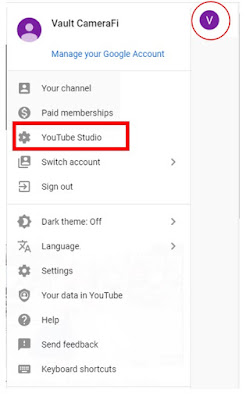
First, open YouTube and sign in.
Hop on to the profile icon and hit YouTube Studio option.
Source: blog.camerafi.com
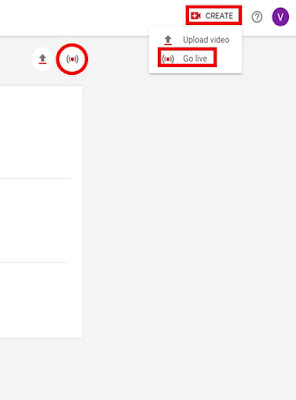
In Studio, click on the Create button (webcam icon) at the top right corner of the screen and select the Go Live option.
Source: blog.camerafi.com
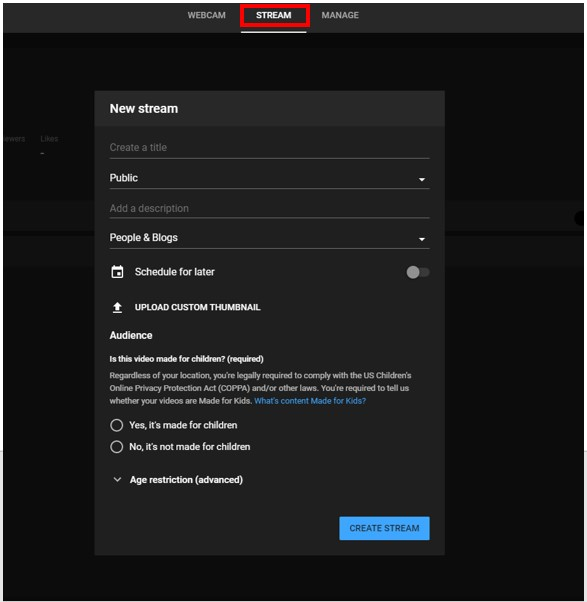
Then, hit the Stream option in YouTube Studio and write a title, description, audience, and thumbnai.
Source: CameraFi Live Blog
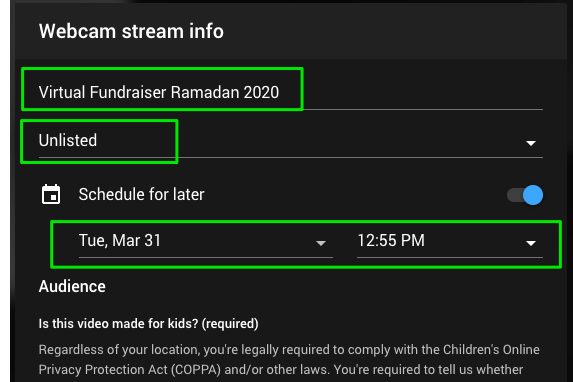
Afterward, click on the Schedule for Later option and set the exact time you wish to go live later.
Source: Mohid How to Article
If you have set all the streaming info, you can hit Done.
That’s it. Once you’ve tuned into your desired settings, you can sit back and relax.
How to Schedule a Livestream on YouTube Mobile
Do you want to set your live streaming through your YouTube app? We got you. Luckily, the steps are basically same as you do it on a PC. But to make it clear, do these following instructions.
Open the YouTube app, sign in to your account
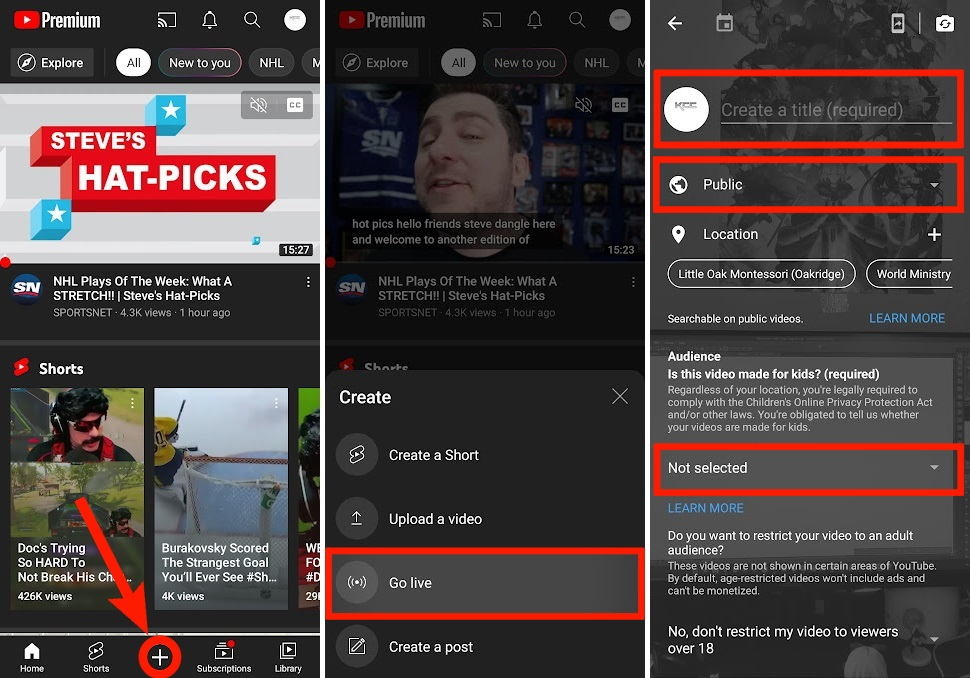
After that, tap on the ‘+’ button at the bottom of the screen.
Select Go Live.
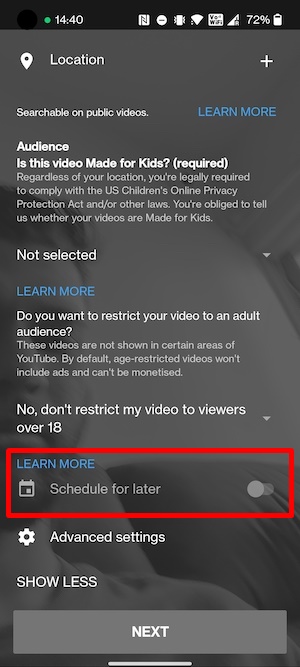
Now, enter your stream details such as title, description, and audience.
Source: Android Authority
Then, tap on More Options.
Next, you’ll have a drop-down list with additional options. Enable Schedule for Later from that list.
Set the Date and Time, and move on to the thumbnail selection screen. Then, press Go Live.
Bingo! You’re all set now.
Schedule Posts on Social Media Using Eklipse
If have recorded your livestream and feel like sharing it to other social media such as TikTok, and Instagram, or else, you can give it a shot to Eklipse. Eklipse is originally an AI-clip maker that will help you capture the best moment of your stream video, even transform it into bite-size format automatically.
What’s even interesting is that Eklipse allows you to share the clip on your social media even without downloading it first. Not in the right time to post your content? Don’t sweat it. Just schedule your post away, and let it publish automatically even when you’re away. To do so, just follow the steps below.
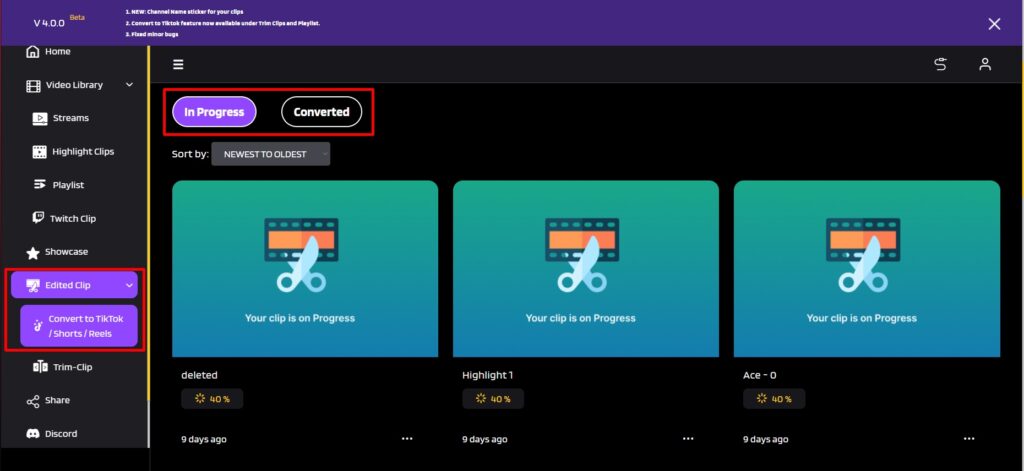
Then, find your edited clip under the Edited Clips option.
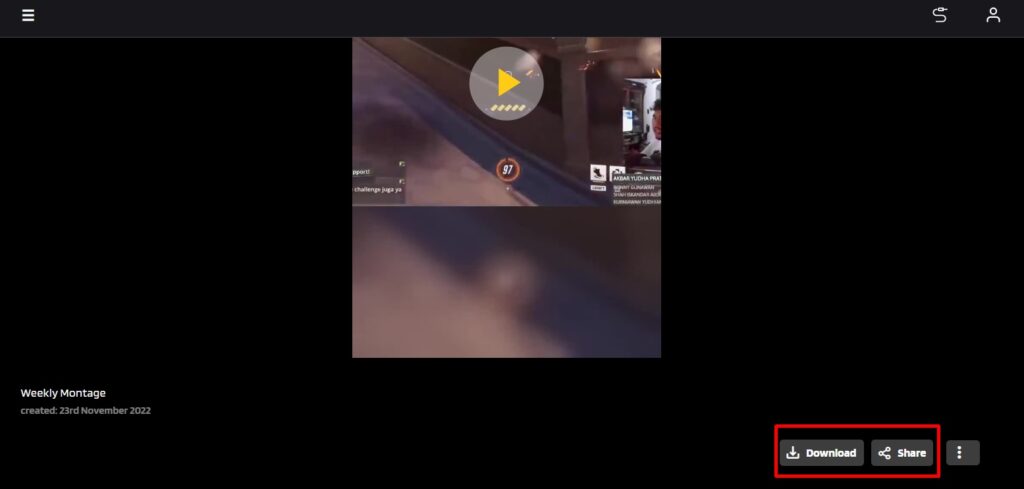
Click on the specific clip you want to share.
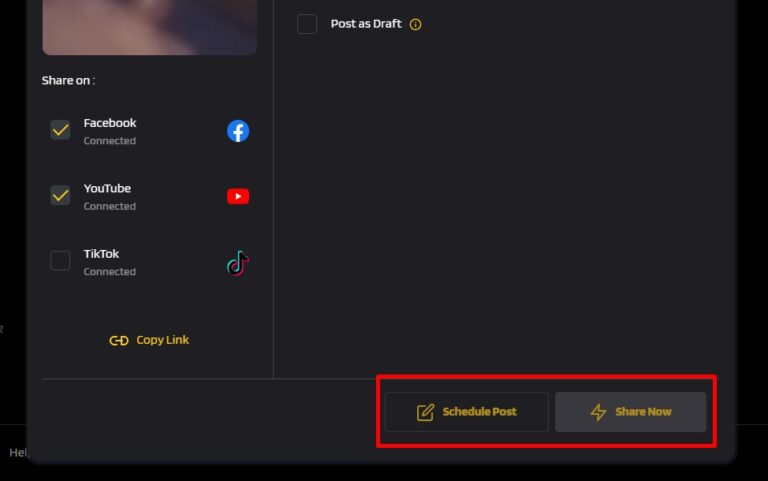
Under the video preview, click the Shareoption.
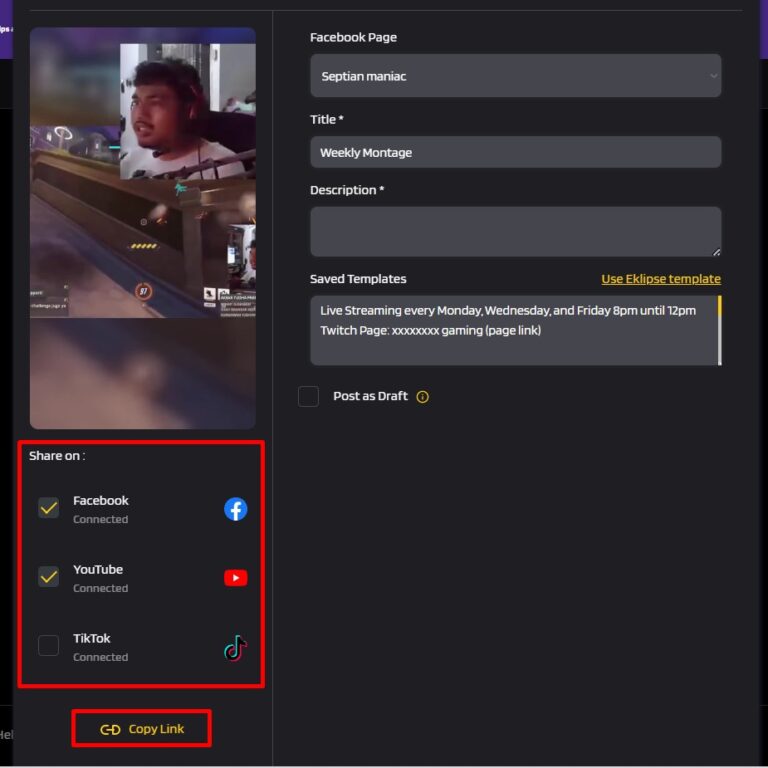
Click on the platform option where you will publish your clip later.
Afterward, give it a title, description, and more.
Finally, hit the SchedulePost button at the bottom of the screen.
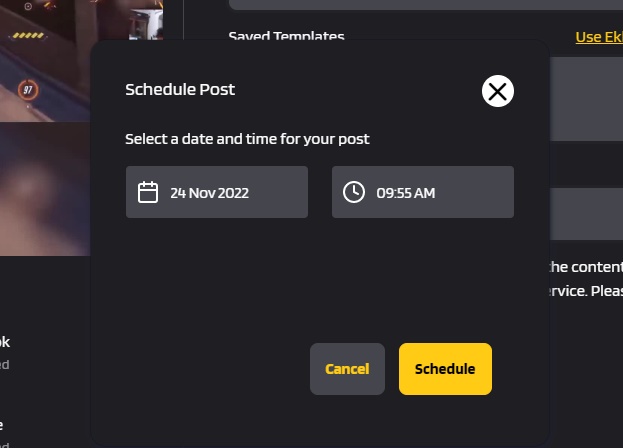
Set the exact time when you’ll post your clip on social media and hit Schedule.
Final Thoughts
Now that you know how to schedule a live stream on YouTube through a PC or mobile phone, you can start to set your content airing at the best time so that it can reach your audience when they’re on their online time.
For many streamers, it’s always a good idea to schedule live streams just to be on the safer side. However, you must remember that you can only schedule a live stream if you plan to go live at least 12 hours from when you begin to schedule it. So, if you want to go live sooner, you’ll just have to do it spontaneously. Having said that, we hope the blog helped, and wish you the best of luck for your next live stream.
There are plenty of great free games out there, but not all of them are available on every platform. That’s why we’ve put together this list of the best free cross-platform games.
If you’re looking for something to play on your PC, console, or mobile, we’ve got you covered!
There’s something for everyone on this list, so make sure to read it up until the end! Without further ado, here are the best free cross-platform games:
The newest version of the popular game franchise, Call of Duty Warzone 2.0, has been released and is available for free on all platforms. The update includes new maps, weapons, and game modes, as well as a host of other improvements and changes.
The updates of the game and content are the big reasons that made the inclusion of Warzone 2.0 in this list. And if you looking to stream your gameplay, and wanted to share highlights of your play, you can try Eklipse!
Besides that, Eklipse.gg has just released Warzone 2.0 AI Engine to capture the perfect highlight of your kill and victory in the game. Go check up links below to try it on!
Available on: PlayStation, Xbox, PC Windows
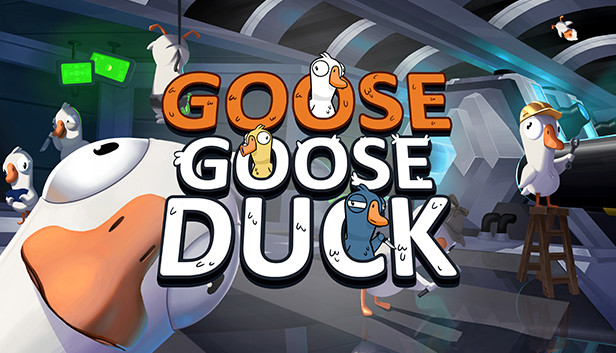
2. Goose Goose Duck
Goose Goose Duck is the latest iteration of the “Among Us-Like” free-to-play alternative. The game was developed by an indie studio named Gaggle Studios, Inc in October 4, 2021.
The gameplay offered by Goose Goose Duck is similar to Among Us, a social deduction game where you need to do a social deduction while completing your mission and keeping an eye on the other players.
Available on: Mobile (Android & iOS), PC Windows, MacOS
3. Genshin Impact
Genshin Impact is a free-to-play, cross-platform game that is available on PC, PlayStation 4, and mobile devices.
The game is set in the world of Teyvat and follows the journey of the Traveler, a mysterious figure who has lost their memories. The Traveler must explore the world and uncover the secrets of their past. Along the way, they will meet other characters who will help them on their journey.
This game offers a unique combat system combined with action RPG elements and environmental puzzles. Genshin Impact includes a co-operative cross-platform multiplayer mode where players can compete and take on quests.
Available on: Mobile (Android & iOS), PC Windows, MacOS, PlayStation
4. Warframe
If you want a free-to-play action-packed game, you need to try Warframe. It’s an RPG with third-person shooter element that can be played cross-platform with multiplayer online play ability.
In Warframe, players control members of the Tenno race, ancient warriors who have awoken from centuries of cryosleep to find themselves at war with different factions. Players can specialize their Tenno warrior with a variety of unique weapons and abilities, and customize their appearance with an extensive system of cosmetic upgrades.
Warframe is a free-to-play game supported by microtransactions, and it features cross-platform play between Windows, PlayStation 4, and Xbox One.
Available on: PlayStation, Xbox, Nintendo Switch, PC
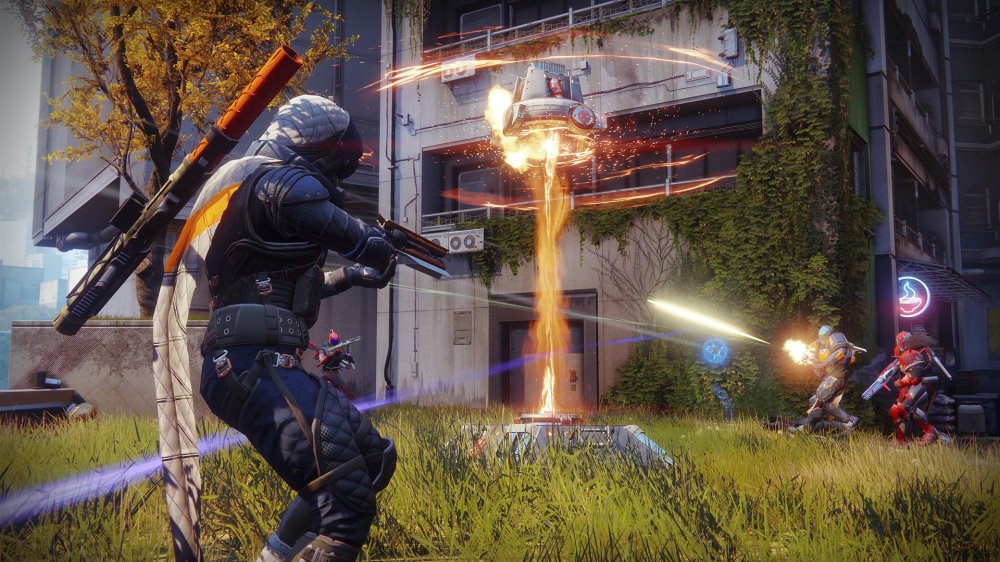
5. Destiny 2
Another RPG shooter that is worth noting is Destiny 2. It was developed by Bungie and was originally released as pay-to-play game in 2017.
In Destiny 2, players take on the role of Guardians of Earth’s last safe city as they wield a power called Light to protect humanity from different alien races and combat the looming threat of the Darkness.
Played in the first-person perspective, Destiny 2 offers you PVE and PVP game types. So if you are either feeling challenged or competitive, Destiny 2 can always be the game you choose to play with your friend.
Available on: PlayStation, Xbox, Nintendo Switch, PC
6. Rogue Company
This multiplayer shooter is available to be played cross-platform on PC, PS4, Xbox One, and Switch. Rogue Company has been an interesting game to play since it offers you a third-person action shooter PVP gameplay.
With its fast-paced gameplay and over-the-top attitudes, Rogue Company is definitely a fun and interesting game to visit.
Available on: PlayStation, Xbox, Nintendo Switch, PC
7. Brawlhalla
Fighting games feel like a genre that you’ll never have enough to play. Brawlhalla gives you a Smash-Brawl gameplay experience that needs you to send away other players off the platform. Since it has simple, easy-to-learn gameplay with fast-paced action gameplay, Brawlhalla is definitely one of the best cross-platform games to play.
Though Brawlhalla is cross-platform, it’s not cross-play (on some combination of platforms). Cross-play is available for PC, Xbox One, and Switch players but not available for those who play Brawlhalla with PS4.
Available on: PlayStation, Xbox, Nintendo Switch, PCor Mac, Mobile (Android or iOS)
8. Paladins
Paladins is a free-to-play, online multiplayer FPS. It is a cross-platform game that can be played on PC, Xbox One, PlayStation 4, and macOS. The game was developed by Hi-Rez Studios and released in 2016.
In Paladins you need to capture objectives and eliminate the enemy team. There are five players on each team, and each player needs to select a Champion with a unique set of abilities.
With its action-packed and fast-paced gameplay, Paladins is one of the definitely must-play free cross-platform games.
Available on: PlayStation, Xbox, Nintendo Switch, PCor Mac
9. Rocket League
As one of the most popular free games out there, Rocket League has something for everyone. Featuring simple yet addictive gameplay, Rocket League is a cross-platform game that can be enjoyed by players of all skill levels.
In Rocket League, you are controlling a race car in a third-person perspective, but you are not racing here – you are playing soccer. So your objective is to hit the giant ball to score a goal. Certainly a must-try-free cross-platform game!
Available on: PlayStation, Xbox, Nintendo Switch, PC (Windows Only)
10. Dauntless
Dauntless is a free-to-play, co-op action RPG developed by Phoenix Labs. The game was released on May 21, 2019 for PC, PlayStation 4, and Xbox One.
Dauntless is an exciting new game that offers players a unique co-op experience as they team up to take down these massive Behemoths. The game features beautiful graphics and fast-paced action that will keep you coming back for more. So if you’re looking for a new co-op game to play with your friends, be sure to check out Dauntless!
Available on: PlayStation, Xbox, Nintendo Switch, PC (Windows Only)
Conclusions
That’s all our recommendations on free Cross-Platform Games. Don’t forget to share this post with your friend and so you can play together! Keep checking out Eklipse blog from time to time, so you won’t miss out on any streaming tips or gaming-related content!
Call of Duty Warzone 2 was released back on November 16, 2022. From there, we heard your feedback, requesting on Eklipse update its AI Engine to start capturing Warzone 2 gameplay moments automatically.
Now the wait is over, The Warzone 2 AI (beta) is live on Eklipse! Capture your best moments while playing and streaming Call of Duty Warzone 2 and Modern Warfare 2!
About Call of Duty Warzone 2 AI (beta) Feature
You guys might hear that Eklipse AI has already been doing amazing things capturing every moment of best play perfectly while you are doing your stream. Now with this update, it means Eklipse AI engine will capture your Call of Duty: Warzone 2 and Modern Warfare 2 best moments!
You don’t need to worry while you play or stream Call of Duty: Warzone 2, just focus on getting either Killstreak or Victory ’cause Eklipse AI Engine got your back! We capture every best moment of your play perfectly, automatically.
Don’t have time on editing your gameplay moments content? Try our Weekly Showcase! With this update, Eklipse will also create a Weekly Showcase on your stream, so you don’t need to waste your effort editing the videos for the content.
This is our beta version of Eklipse Call of Duty: Warzone 2 AI Engine, so it might be a bumpy road ahead. But don’t dwell on it, we’ll always hear your feedback!
Join our Discord channel, and feel free to submit your feedback! Your satisfaction is our priority!
Conclusion
So, what are you waiting for? Try Eklipse latest Call of Duty: Warzone 2 AI Engine now and share your feedback to us. Don’t forget to tag Eklipse when you share your content on social media!
Have you ever unintentionally recorded a video in wrong orientation and wanted to change it? We got you. Not only a photo that can be rotated at your disposal. This also applies to video, as long as you know how to rotate a video.
Rotating video means you change the orientation of the video from landscape to portrait or vice versa. Well, if rotating photos could be done easily with default editing tools on a phone or PC, so does with rotating a video.
In this article, we’re going to give you some options to flip the video orientation using the simplest tools. You can do both from your phone or PC. There you go!
If you are a Windows user, this could be one of the easiest softwares to use when it comes to rotating videos. Here’s how to use this tool.
First of all, make sure you have installed the app on your device.
Then, open your specific video using this app.
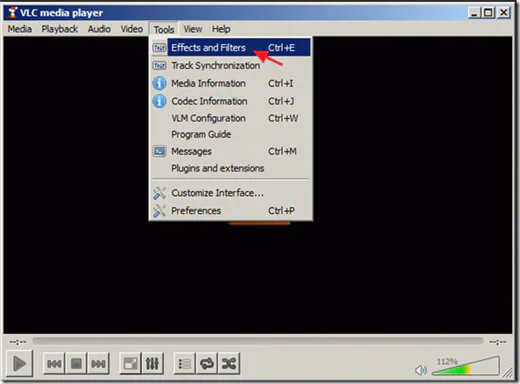
Navigate to the Tools menu and select Effects and Filters.
Source: Wondershare Video Converter
Alternatively, press Ctrl + E on the keyboard for a shortcut.
The Adjustment and Effect window will open.
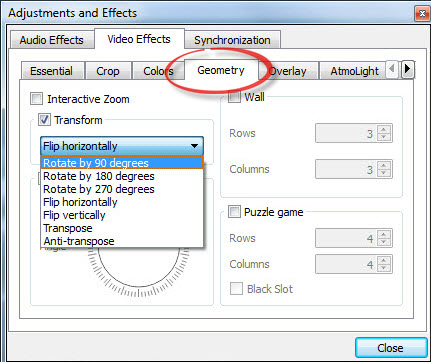
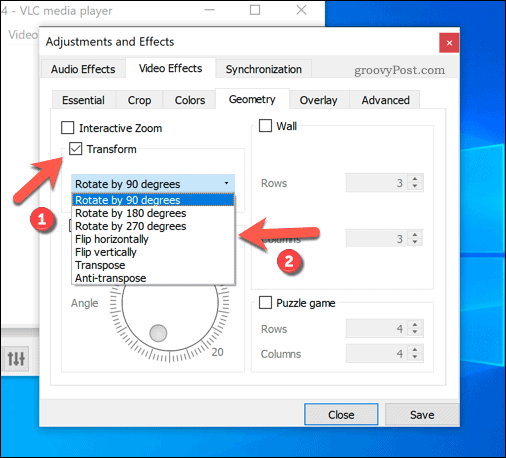
Hit the Video Effects tab and click on the Geometry option.
Source: Joyoshare
After that, tick the Transform check box.
Next up, select a rotation from the dropdown menu and hit Close.
Source: GroovyPost
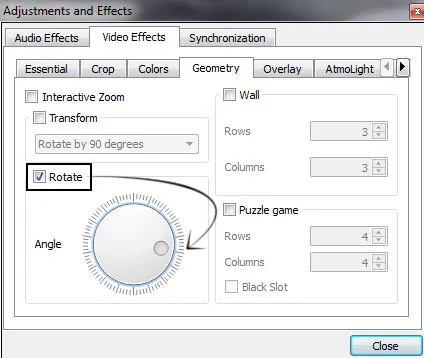
In addition, you can check the Rotate option to do it manually.
Source: VLC Media Player Guide
Once done, back to the Tools option and select Preferences.
For a shortcut, just press Ctrl + P.
Then, enable All settings under the preferences window.
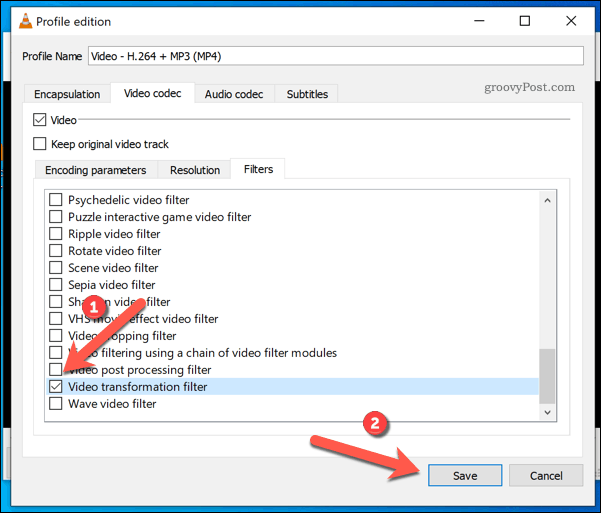
Drill down to the Sout stream heading (under the Stream output) > Transcode.
Finally, select the Video transformation filter option and hit Save.
Source: GroovyPost
There you have it. Now the video has been in the position you desire.
How to Flip Video Orientation Using Windows Movie Maker
In addition to VLC, Windows users can also try Movie Maker to change the video orientation. Well, Microsoft has actually discontinued this tool. However, many PCs still have the tool installed. What’s more interesting is that Movie Maker offers simpler steps to edit a video. Follow the steps below to operate this tool.
To begin with, make sure you have the tool installed on your PC.
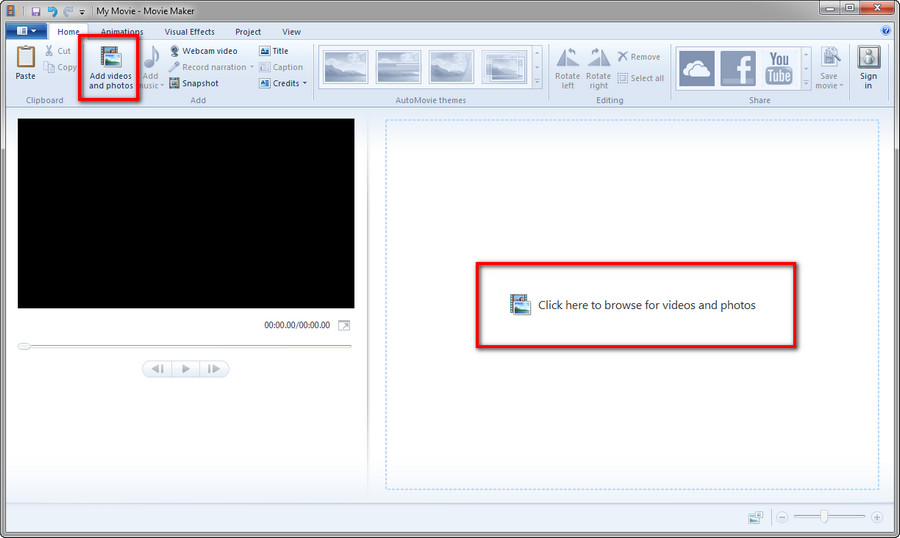
Run it and import the video from your local device by clicking on the Add videos and photos option in the toolbar.
Otherwise, you can just drag and drop the file.
Source: Video Converter Factory
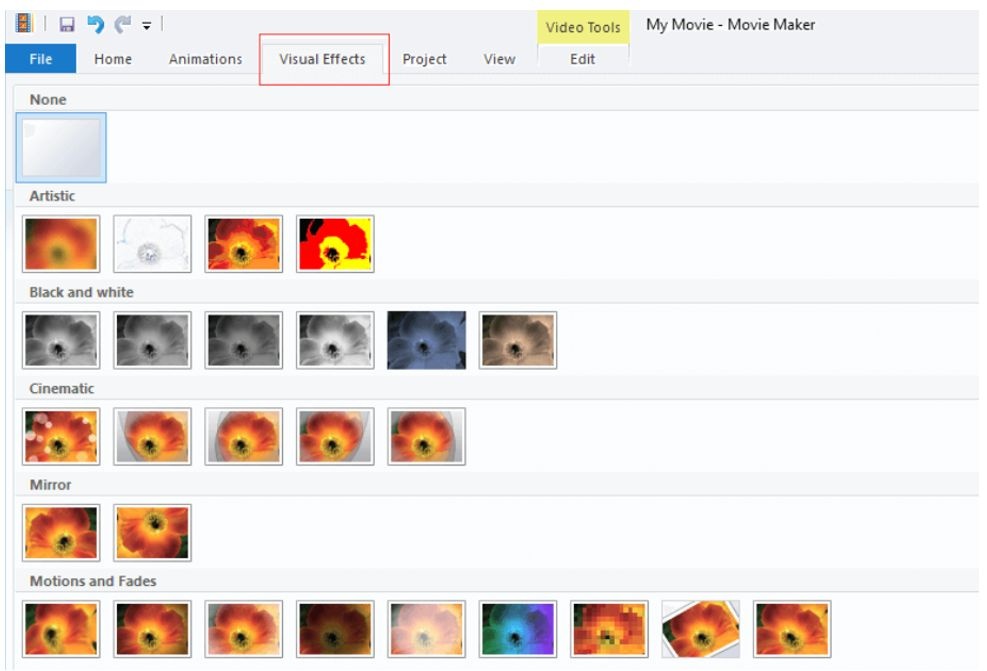
Next, navigate to the Visual Effects tab and select the Mirror section.
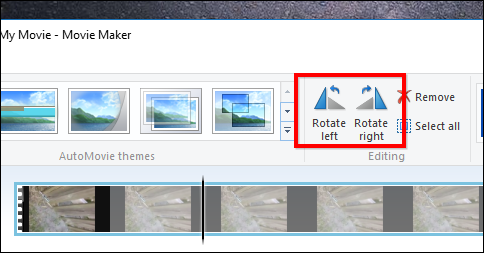
Source: iMyfone Filme
Once you’ve identified it, hit Rotate Left or Rotate Right.
Source: Joyoshare
You are able to keep changing the orientation until you find the best one that suits your needs.
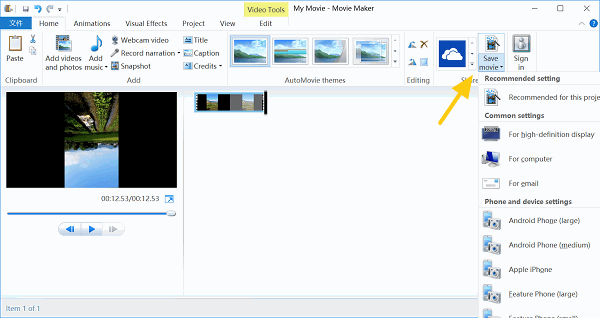
Hop on to the File icon to save the new video.
On the popup screen, click on Save movie.
Source: FonePaw
Choose any video format such as MP4, AVI, 3GP, or more.
Voila! You are all set!
How to Rotate a Video Using iMovie
Not a Windows user and trying to edit your video from Mac? We’ve got you covered too! Try iMovie for a facile editing process. The instructions are as follows:
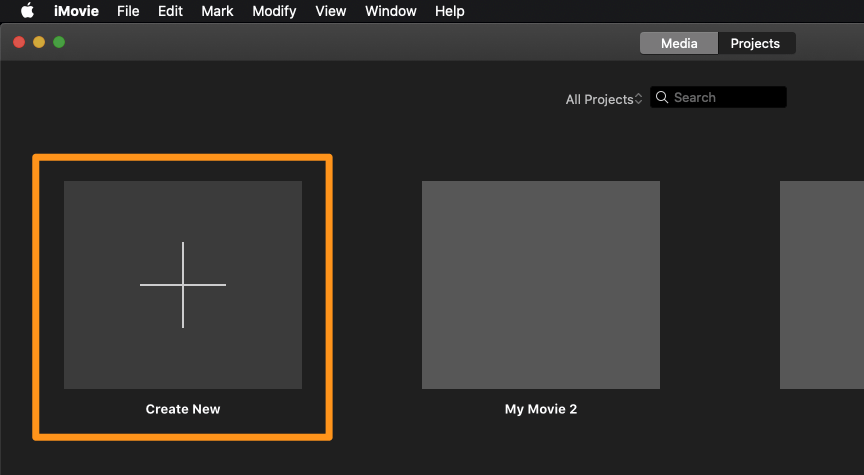
Start off by opening the iMovie app on your device.
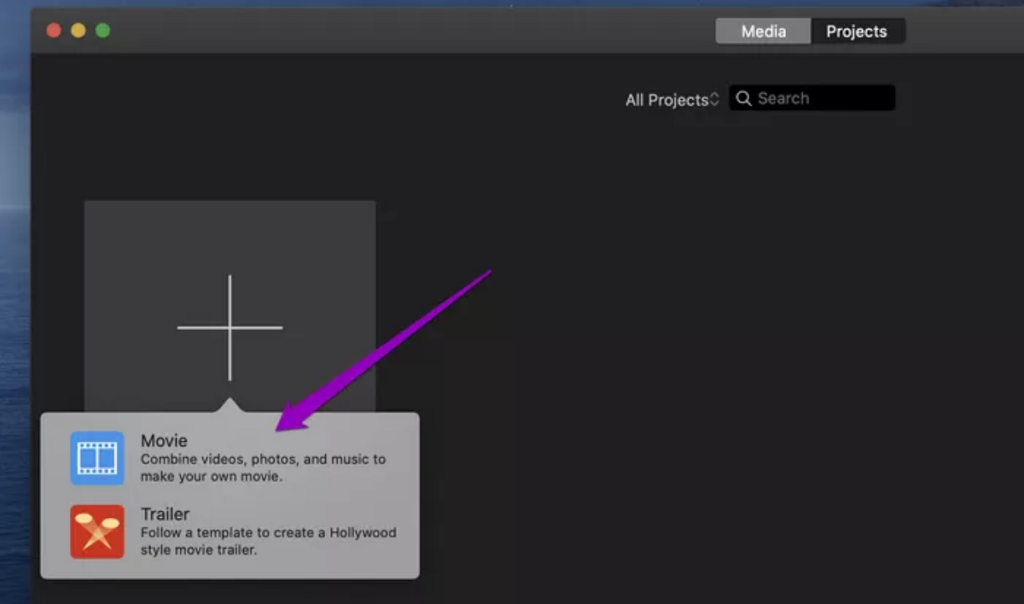
Navigate to Projects and select Create New option.
Source: Animaker
Choose Movie between the two options that appear.
Source: Keevi
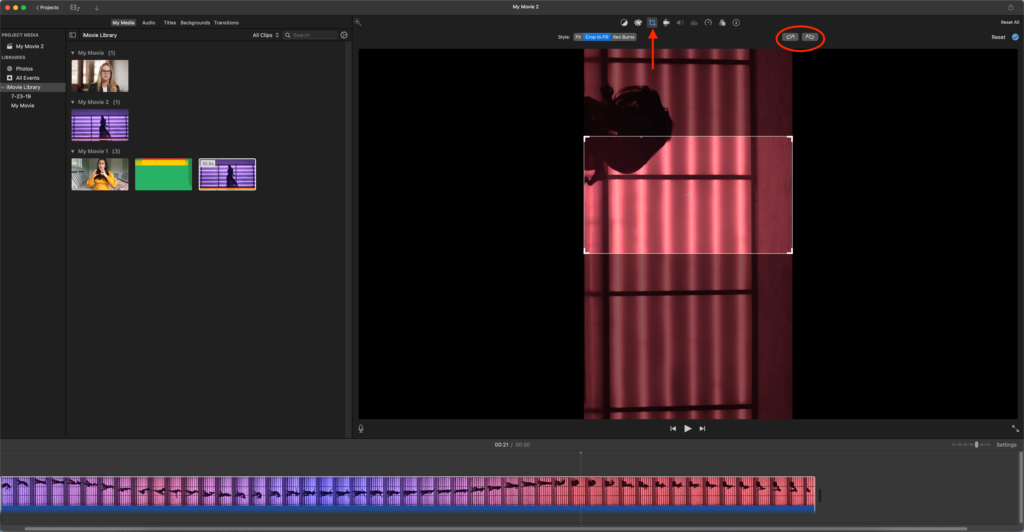
Then, hit Import Media.
Click on the Cropping button to show the cropping controls.
Source: Support Apple
Now, you can Rotate Clockwise or Rotate Counterclockwise to find the right orientation.
Source: Veed
Afterward, adjust the handles of the cropping tool to get rid of the bars.
Once done, hit the blue check.
We’re almost there! Now hit the share icon and click on File.
Name the file and decide the location where you want to save the file.
Bingo! You’re done now.
Flipping Video Orientation on Android
As above stated, spinning video orientation is as simple as rotating a photo. You can even do it on your phone. Thankfully, Android’s default editing tool allows you to do it so you don’t need any additional app to help you out. Here’s how to use it.
Start over by opening the Google Photos App on your phone.
After that, select any video you want to rotate.
Now to edit the video, hit the Edit option at the bottom of the screen.
Next, tap on the crop option and move the slider to get the perfect orientation.
Source: Hello Tech
Then, hit Save Copy to save your edited video as a new file.
How to Rotate a Video on iPhone
Rotating a video on iPhone requires different steps as in Android. But don’t sweat it as it applies the same ease. Follow the guide below.
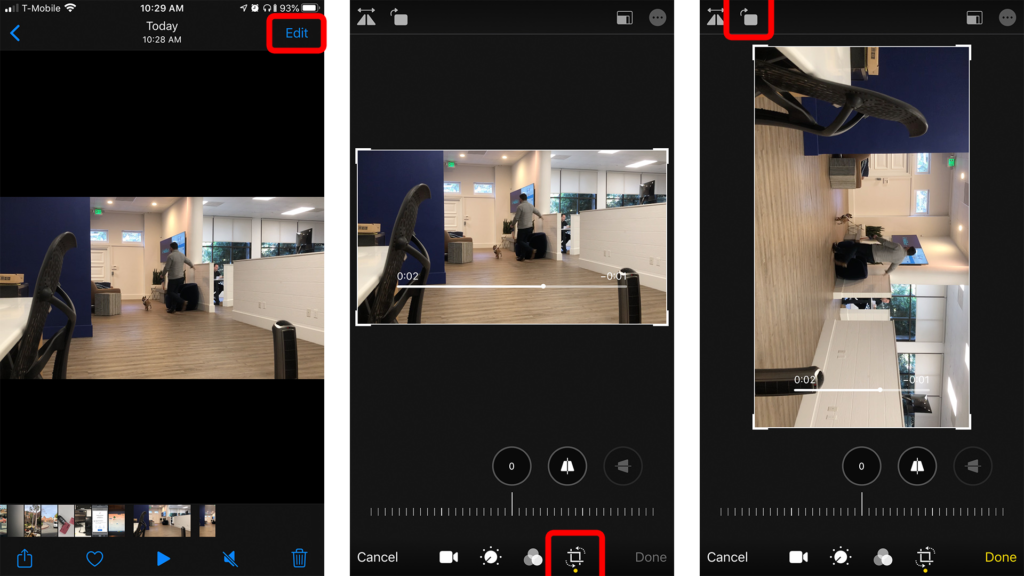
Open the camera gallery and select the video you want to rotate.
Hit the Edit button at the top-right corner of the screen.
Afterward, tap on the Crop and Straighten icon.
Then, select Rotate (a box with a curving left arrow).
Each tap will change the orientation of the video, so keep tapping until you get your preferred direction.
Once done, click Done.
Conclusion
So, that’s everything you need to know about how to rotate a video on Windows PC, Mac, and Android. Additionally, if using the app is not really your thing, you can learn how to rotate a video online. Luckily, online editing softwares are widely available on the Internet. Pick one that you think suits your needs.
Eklipse is an AI-powered software that is capable of clipping and converting streams into bite-size videos. What makes this tool special is it will make you get away from manual editing process. Yes, Eklipse wholeheartedly offers an automatic service that will allow you to process your videos in the easiest way. Say bye to any time-consuming process.
Don’t fret about flat and boring clips, because Eklipse provides bountiful FREE incredible templates to choose from. Once your clips are ready, share them immediately on your social media in just a couple of clicks!
Additionally, Eklipse could be the best companion to help you go viral and achieve popularity on every platform due to its capability in scheduling your clip. That means you are able to set up when to publish your content for the best result.
Why Do We Need Schedule Time To Publish Clip?
Source: Sprout Social
Good content will be meaningless if nobody sees it. That’s why publishing content at the right time is necessary to increase your discoverability, so people can easily find your video, especially when you have added the right hashtags to your post.
To make sure that your content can reach your target audience at the time they’re online, you’ll need to observe their screening behavior and find the best time to publish your content on social media. Once you’ve known it, you can immediately set it to publish later.
How to Schedule your Post in Eklipse?
Fortunately, scheduling clip in Eklipse is super easy. Get a closer look at the guide below.
Then, find your edited clip under the Edited Clips option.
Click on the specific clip you want to share.
Under the video preview, click the Shareoption.
Click on the platform option where you will publish your clip later.
Afterward, give it a title, description, and more.
Finally, hit the SchedulePost button at the bottom of the screen.
Set the exact time when you’ll post your clip on social media and hit Schedule.
Voila! Now you can sit back and enjoy your free time while your social media account is still actively posting content. Don’t let your fans miss out on your best masterpiece! Stay tuned to our blog for more updates and tutorials about Eklipse, streaming tips, and games. Happy clipping!
Having too many clips can make your Twitch clip gallery look untidy. You can manage your clip collection by only keeping the best clips and deleting the old ones. But, do you know how to delete clips on Twitch? If you have no idea how to do it, we got you.
Deleting clips means getting rid of any short videos you no longer needed on your channel permanently. Once you’ve removed the clips, you cannot revert them unless you’ve backed them up before doing the action. So, make sure you only remove the unwanted ones. Anyway, let’s dig deeper into the tutorial.
How to Delete Clips on Twitch From Your Clip Collection?
Here are the following steps to delete some clips from your collection:
First, open Twitch and log in to your account.
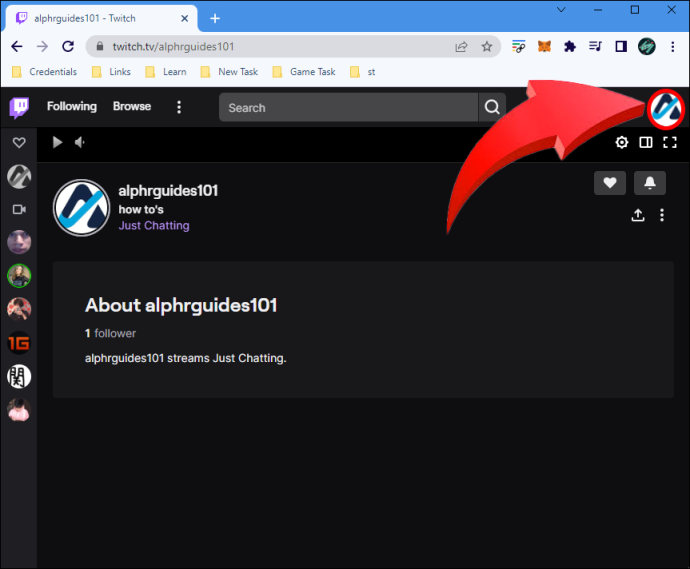
Click your profile picture.
Source: Alphr
Go to the Creator Dashboard.
Then, navigate to the Content section.
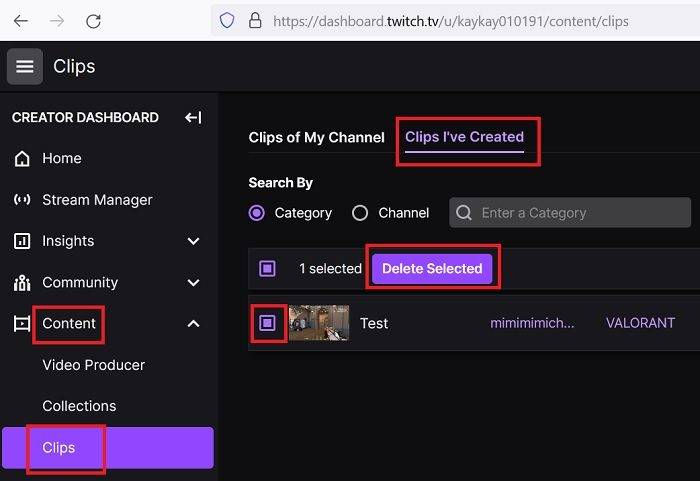
Select Clips. You are then able to choose the Clips of My Channel or Clips I’ve Created option.
Source: The Windows Club
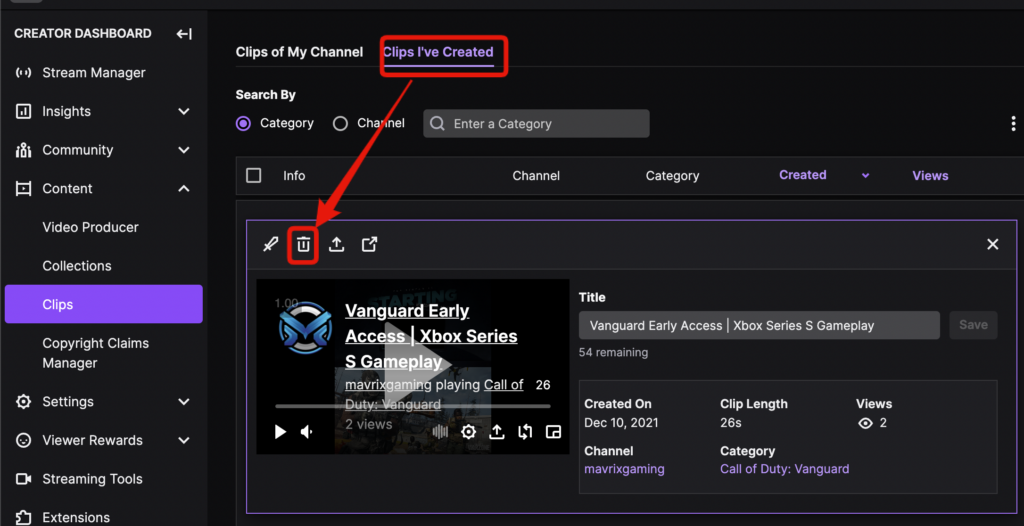
Now, select the clips you want to delete.
Afterward, click the trash button.
Source: Get on Stream
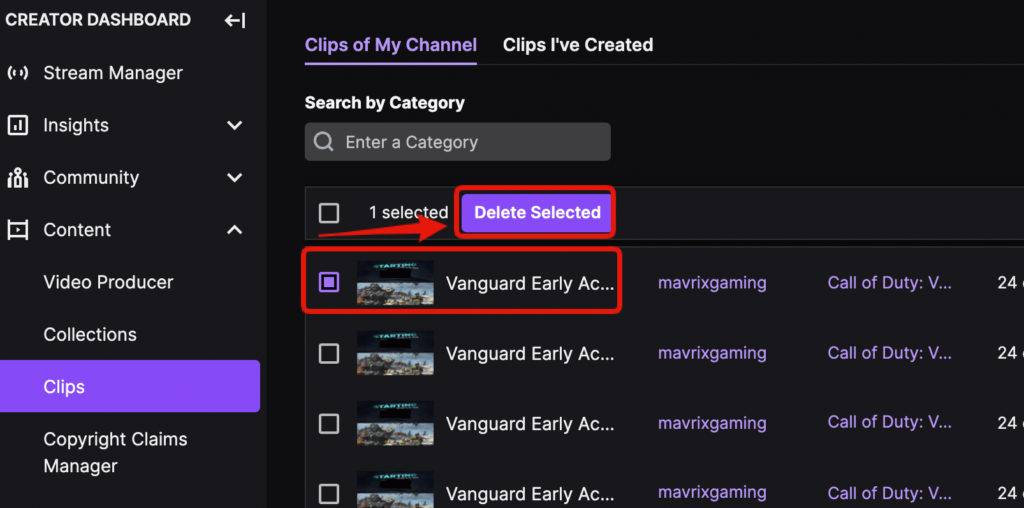
Alternatively, you can delete several clips at once by ticking the small box next to each clip.
Next up, hit Delete Selected button.
Source: Get on Stream
Finally, the selected clips will be removed from your library.
In addition, if you want to delete some clips your followers have saved, you can do the same steps. But select the Clips of my channel option instead of Clips I’ve created one. However, it’s advisable to have them save clips of your channel so you can build a gaming community.
Are There Any Risks with Deleting Twitch Clips?
Now that you have successfully deleted the unwanted clips from your channel, you might wonder if there are any risks after doing it. Well, luckily there are no risks associated with removing clips from Twitch – as long as you don’t accidentally delete them. That’s why you need to be so careful when deciding the clips you are going to get rid of.
What are the Benefits of Deleting Clips on Twitch?
Instead of risks, you’ll actually get some benefits after deleting clips on your Twitch. Let’s take a look at the list below.
Declutters your channel.
Frees up your storage device or computer disk space.
Keeps your channel organized and easy to navigate.
Creates more professional look for your channel.
Improves overall quality of your content.
Avoids copyright infringement issues if other streamers using the same clip you’ve posted on their channel.
Prevents your content from being flagged as inappropriate or offensive by Twitch and users.
Helps viewers to find clips they are looking for easily.
Keeping your content clean and well-managed can maintain your reputation as a good streamer.
Turning off Automatic Clip Creation on Twitch
Once you create your account on Twitch, an automatic clip creation feature is created. Anyone can save clips of your streams due to this automatic clip creation feature. If you want to switch off this automatic clip creation feature for good, follow these steps.
Go to Twitch site and log in to your account.
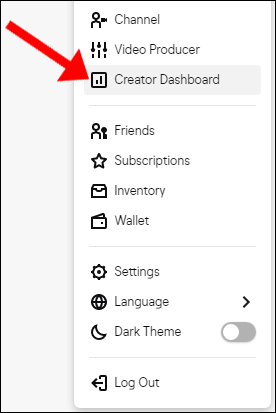
Then, hit the Profile icon and select Creator Dashboard.
Source: How to Geek
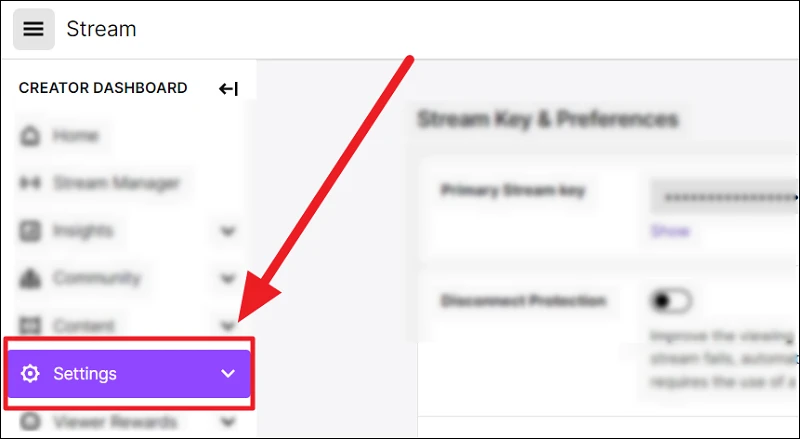
Now, go to Settings and select Channel.
Source: All Things How
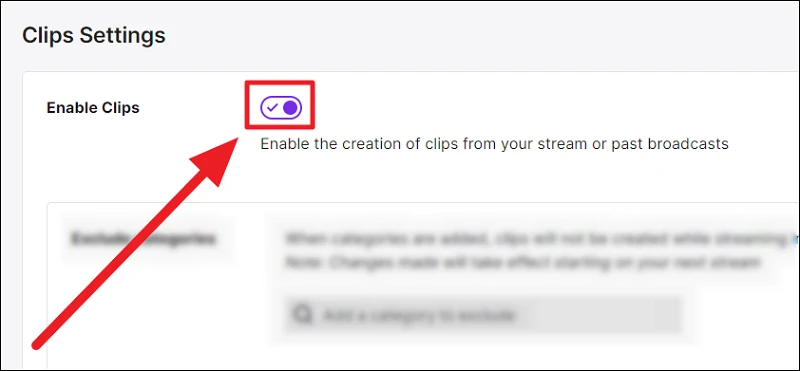
Locate the Enable clips section and click on it. This will untick the box.
Source: All Things How
You have successfully switched off the automatic clip creation feature.
Managing Who Can Create Clips on Your Twitch Channel
Additionally, Twitch enables you to regulate who can create clips on from your channel. Here are the following steps to limit those who create clips.
Start off by going to your Twitch account.
Click your Profile Picture.
Now, select the Creator Dashboard.
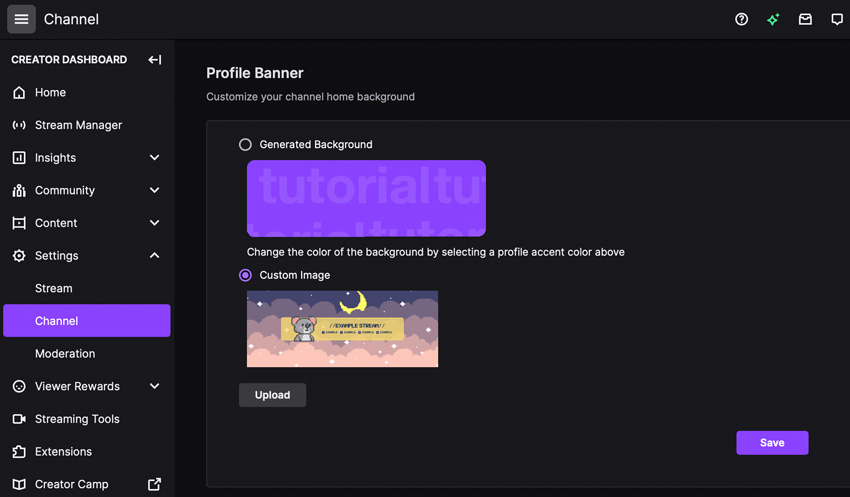
Select Channel.
Source: Envato Tuts
Now you are able to select the followers-only option to change how long your followers need to follow you to get permission for creating clips.
In addition, you can also select the subscribers-only option. This will ensure that only your subscribers can create clips on Twitch.
Conclusion
So that’s how you can delete your clips from your Twitch clips collection. There will be many instances where you want to remove some clips so you should know how to do so.
Love capturing the epic moment from your Twitch streams? Eklipse provides you with an automatic feature to capture the best highlights from your streams. You can even use Eklipse to reach a wider audience so that you can grow your Twitch channel in a New Your minute. Only with a couple of clicks, your clip is ready to launch on your social media. Interested to give it a shot? Do a free sign-up now!
When you’re not familiar with editing TikTok videos, you may find adjusting the length of your clips complicated or confusing. Not to mention TikTok is continuously making updates, some of which affect how you adjust clips on TikTok (more on that to come).
However, adjusting clips on TikTok is an important thing to do, since you need to make a short but engaging video.
Luckily for you, there are a few tips and tricks that will help make adjusting clip length easier on TikTok. Let’s deep dive into the topics!
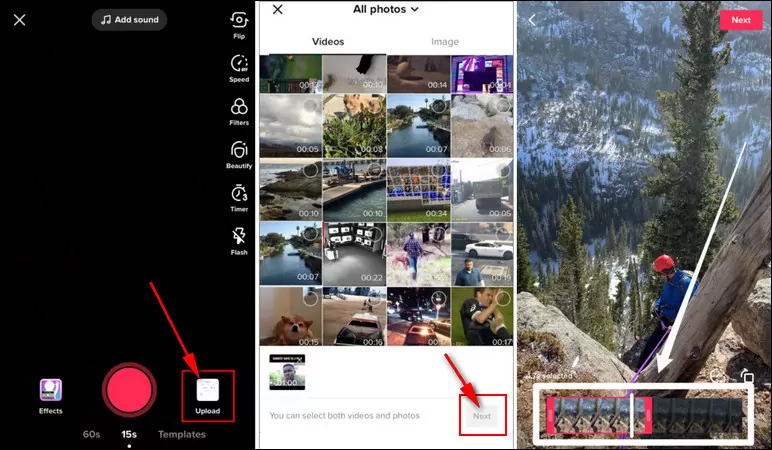
To adjust your video length, you can either trim a video directly from the TikTok app or adjust the length of the videos recorded from your camera roll. We will tell you how you can do both of these things.
1. Trimming the Length of videos You Recorded on TikTok
Here’s how you can adjust the length of the videos from the app:
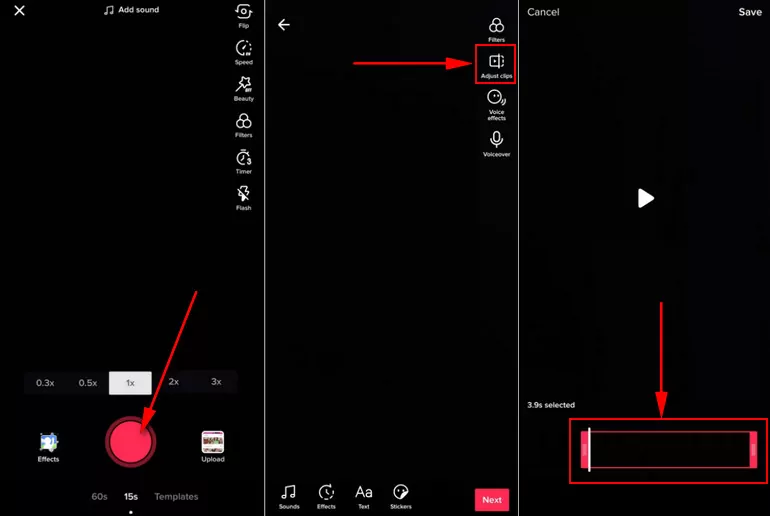
Step 1. Open the TikTok app and start recording your video by tapping the big red button
Step 2. Once you are done recording the video, click on the checkmark icon to finish the recording
Step 3. Then, you can click on the Adjust clips option at the top-right corner of the app. Here you will find a slider for adjusting the length of your video.
Step 4. After that, use the slider options to trim and adjust the length of your video.
Step 5. Once you are done, click Next in the top right corner of the app.
Step 6. Finally, you can add additional effects, stickers, text, or filters if you want before posting it.
Option 2: How to Adjust TikTok Clips with Eklipse
Actually, there are other options you can do to adjust the clip length of your TikTok videos. In addition, you can try other secondary tools to trim your videos and give them a finished effect. Eklipse is one of the best choices of all tools. It has various incredible features that will help you to capture your best streaming moments.
You can sign-up using Facebook or Twitch or you can create an account manually using email, all for FREE.
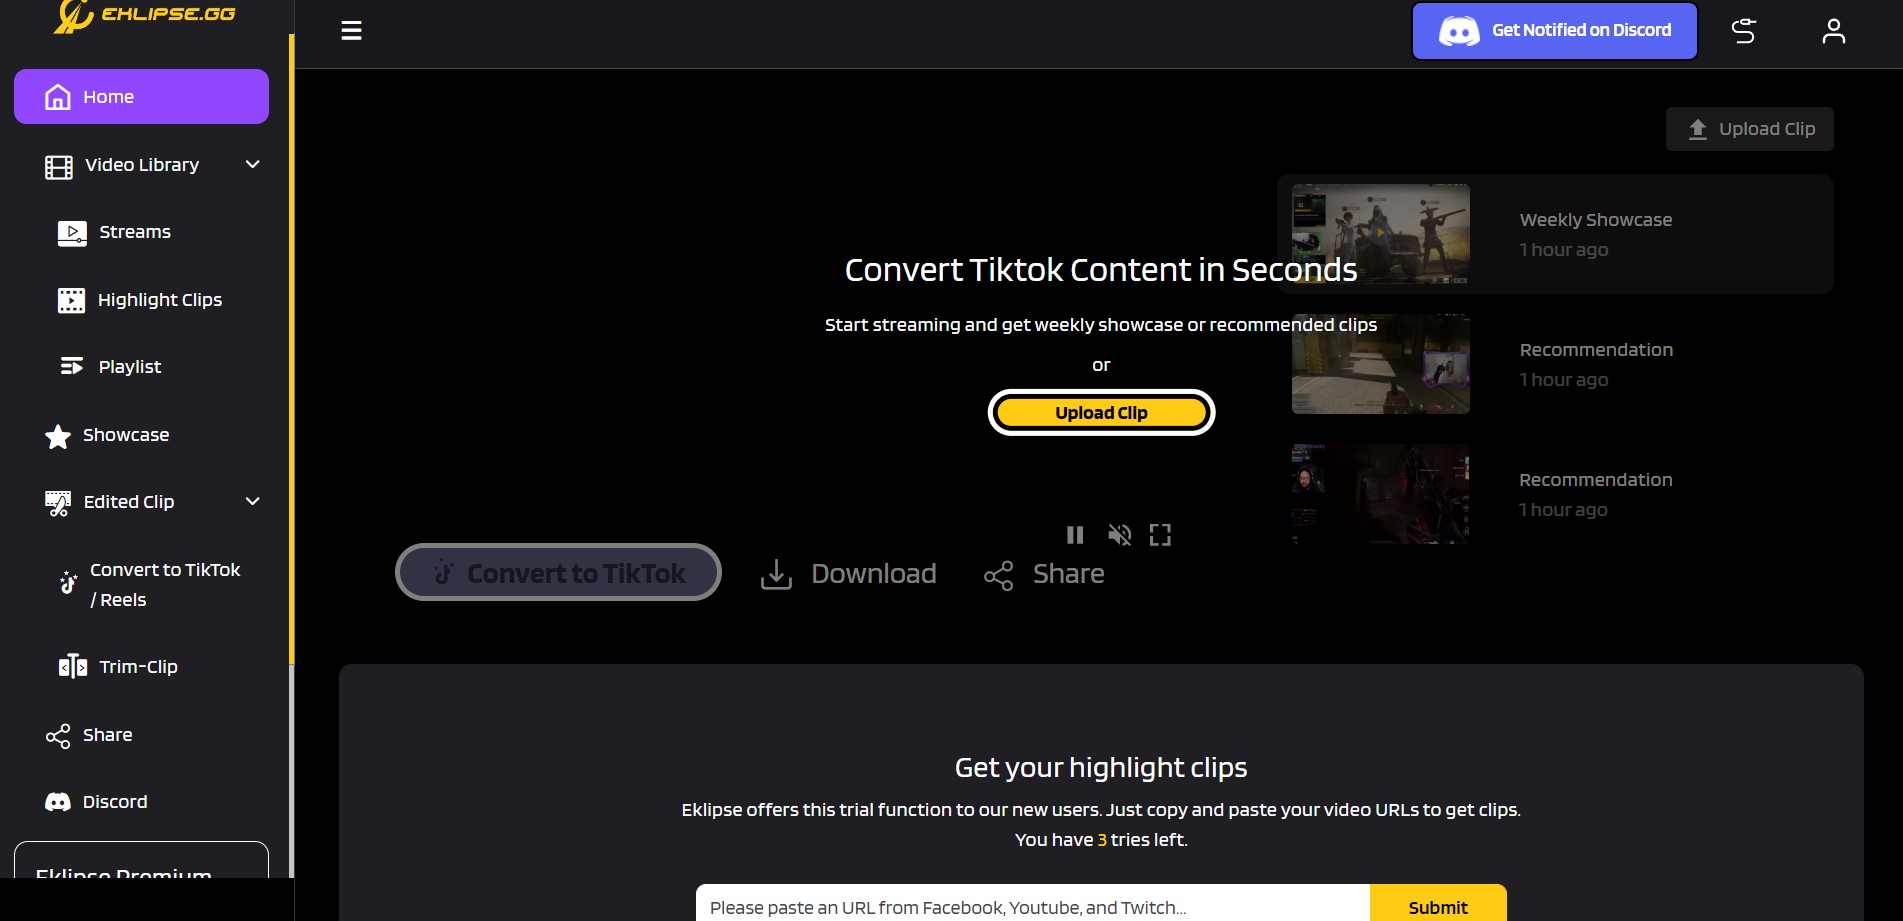
Click Upload Clip menu at the center of homepage.
By clicking Upload Clip menu, you will be brought to the Eklipse Studio tools.
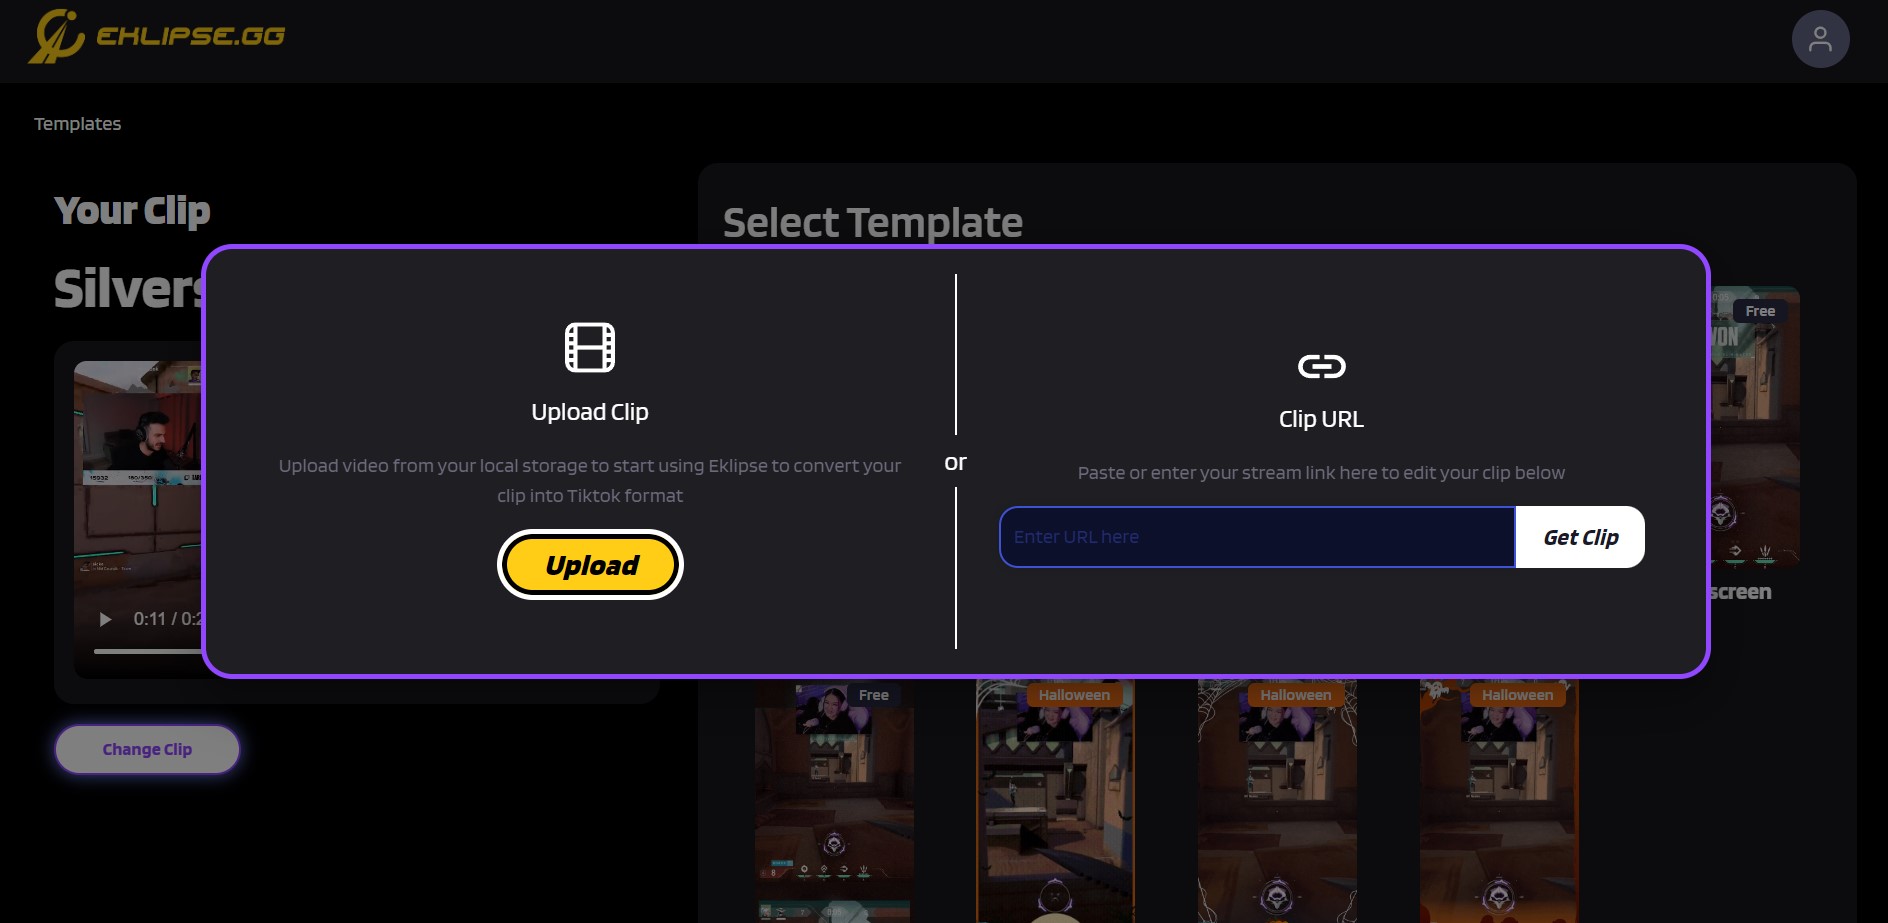
Insert your clip into the app.
You can just put Clip URL into Eklipse, click Get Clip, or upload it from your local storage. – If you insert a YouTube video URL, ensure the video duration is under 2 minutes long. – If you upload a clip from local storage, ensure the video has a maximum of 100MB in size and 5 minutes in duration.
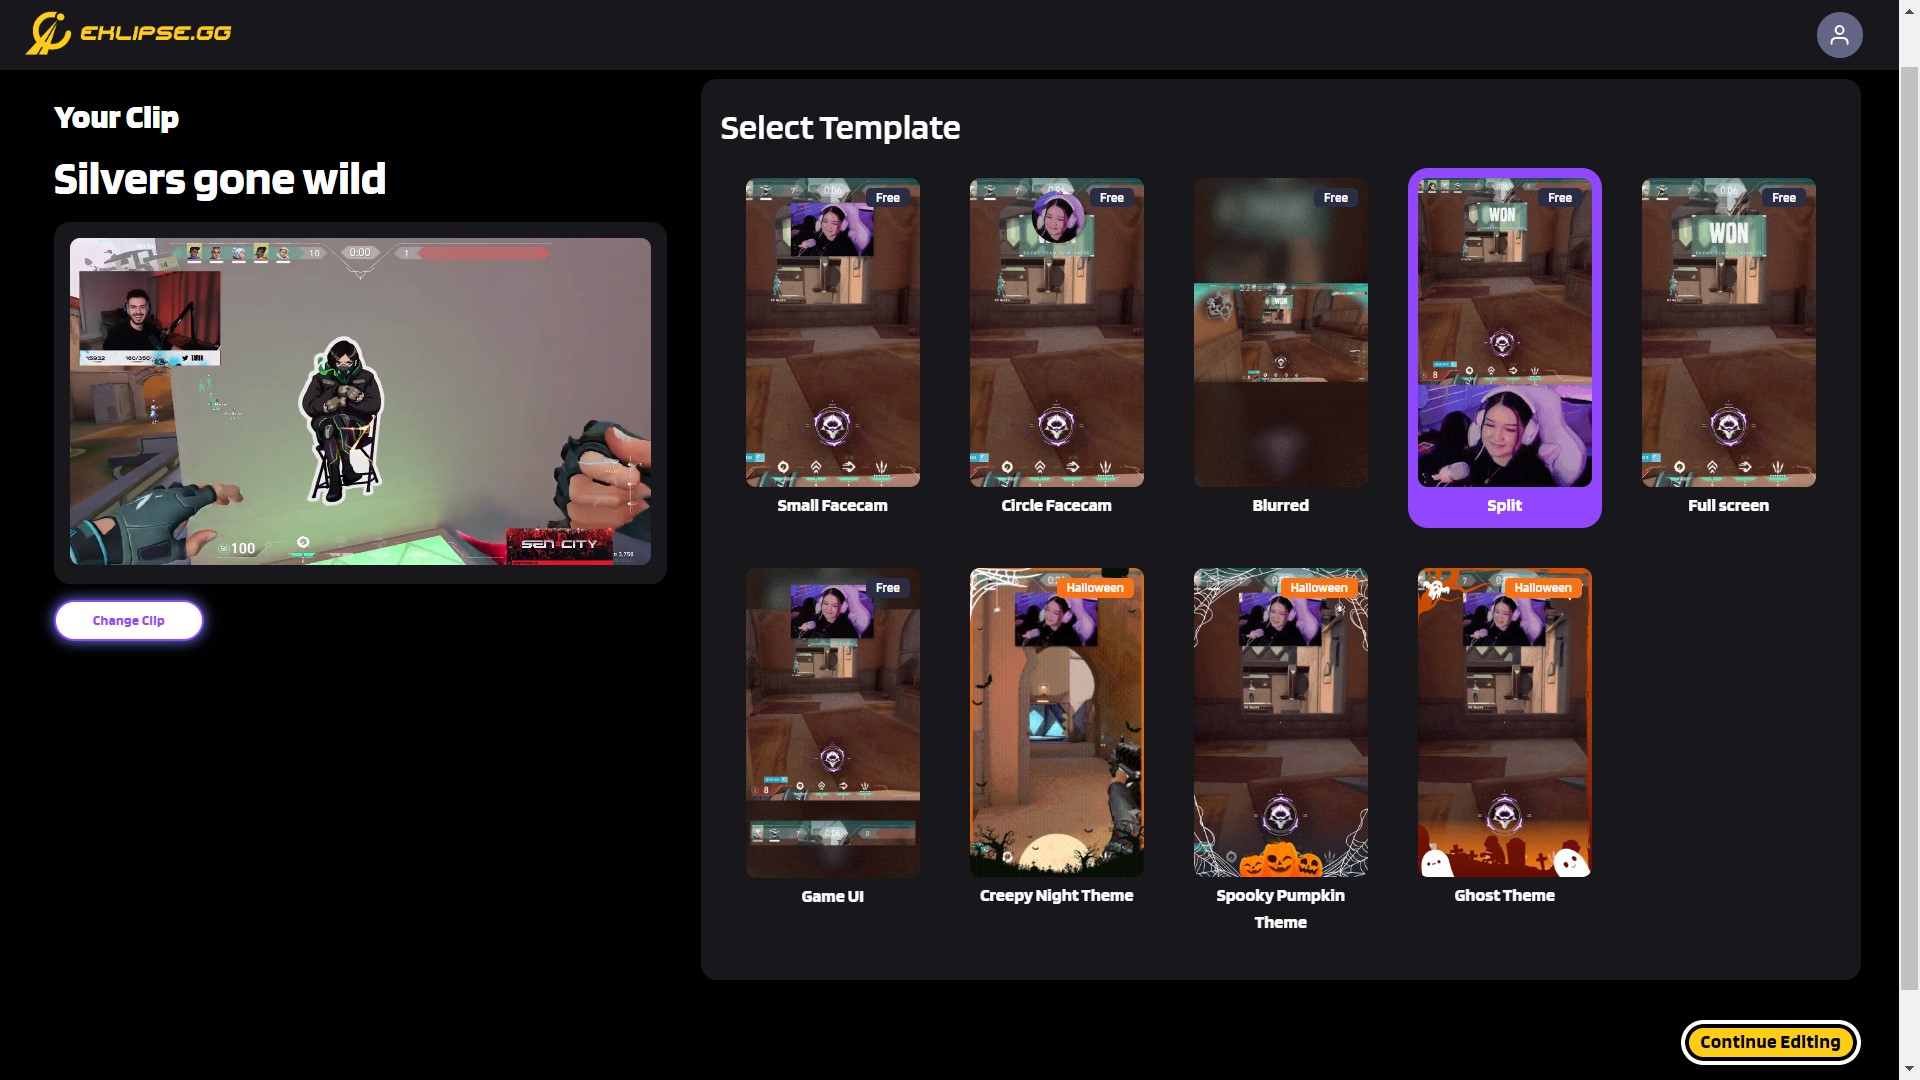
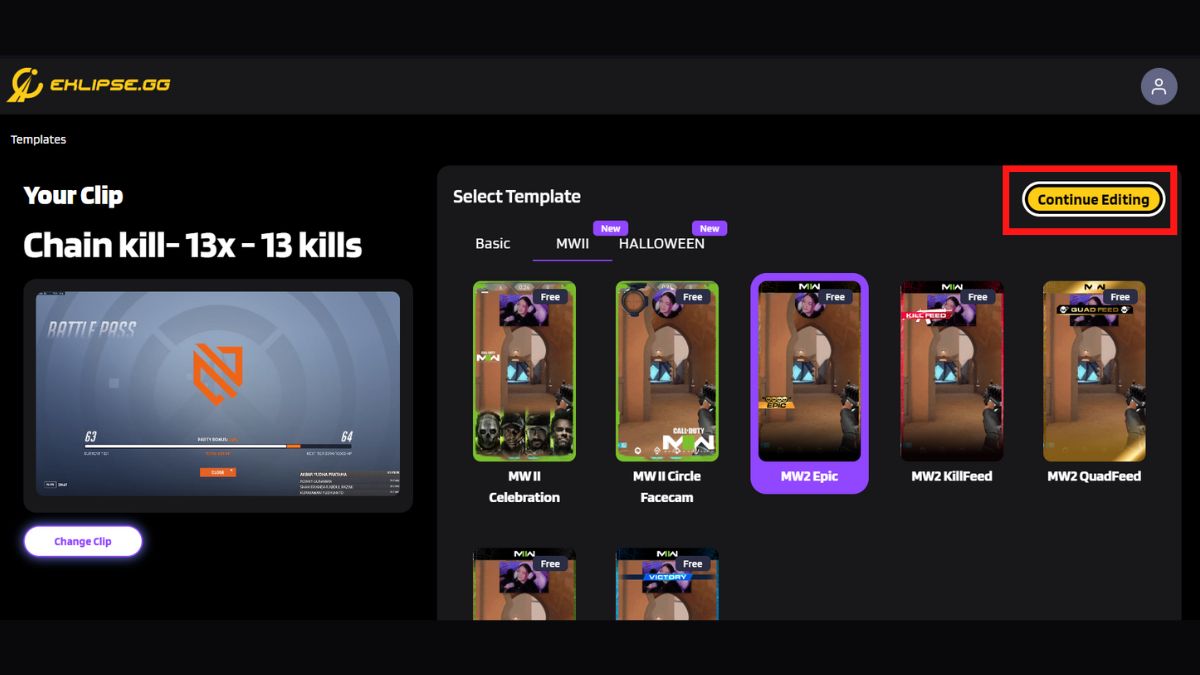
Choose the TikTok template you want to use.
Eklipse has 9 TikTok video templates that you can choose to use. After done selecting your template, click Continue Editing button.
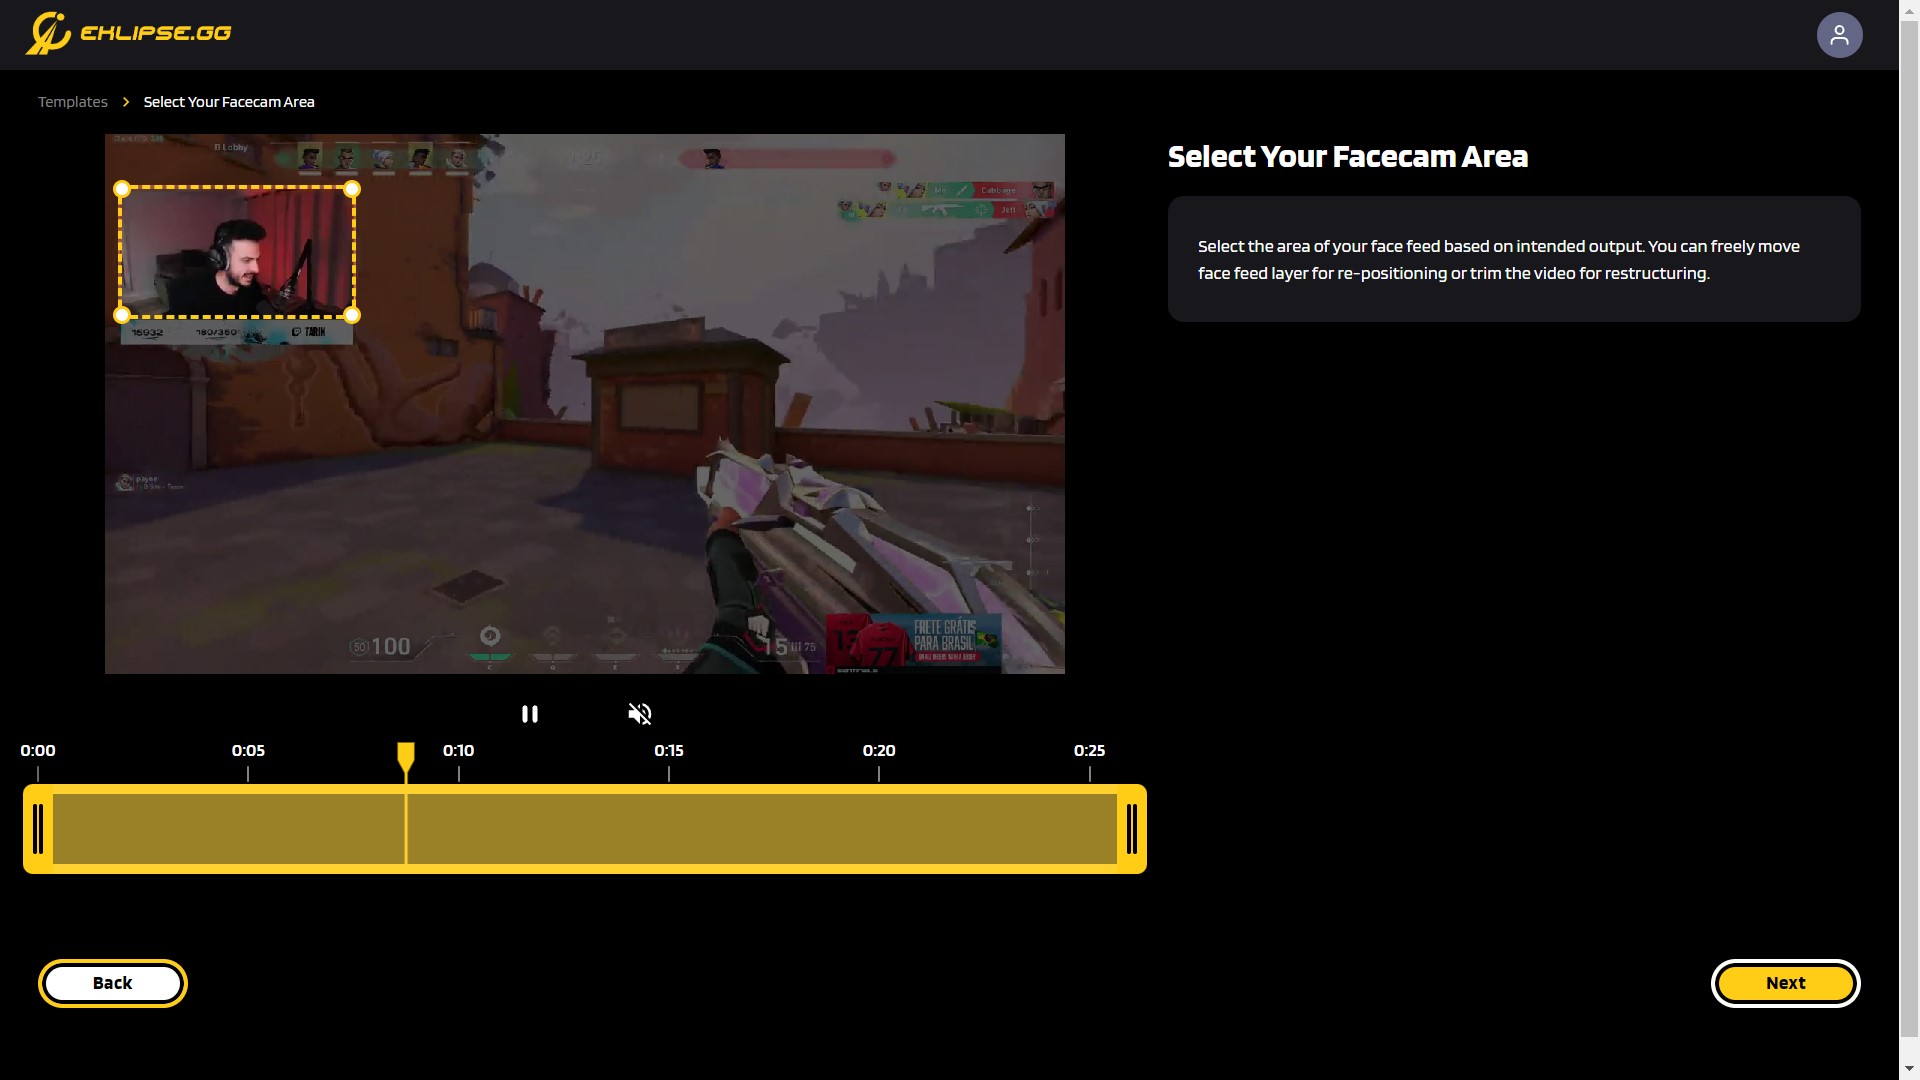
Adjust your clip for TikTok
You can trim your clip, also select facecam and game feed area for the best result
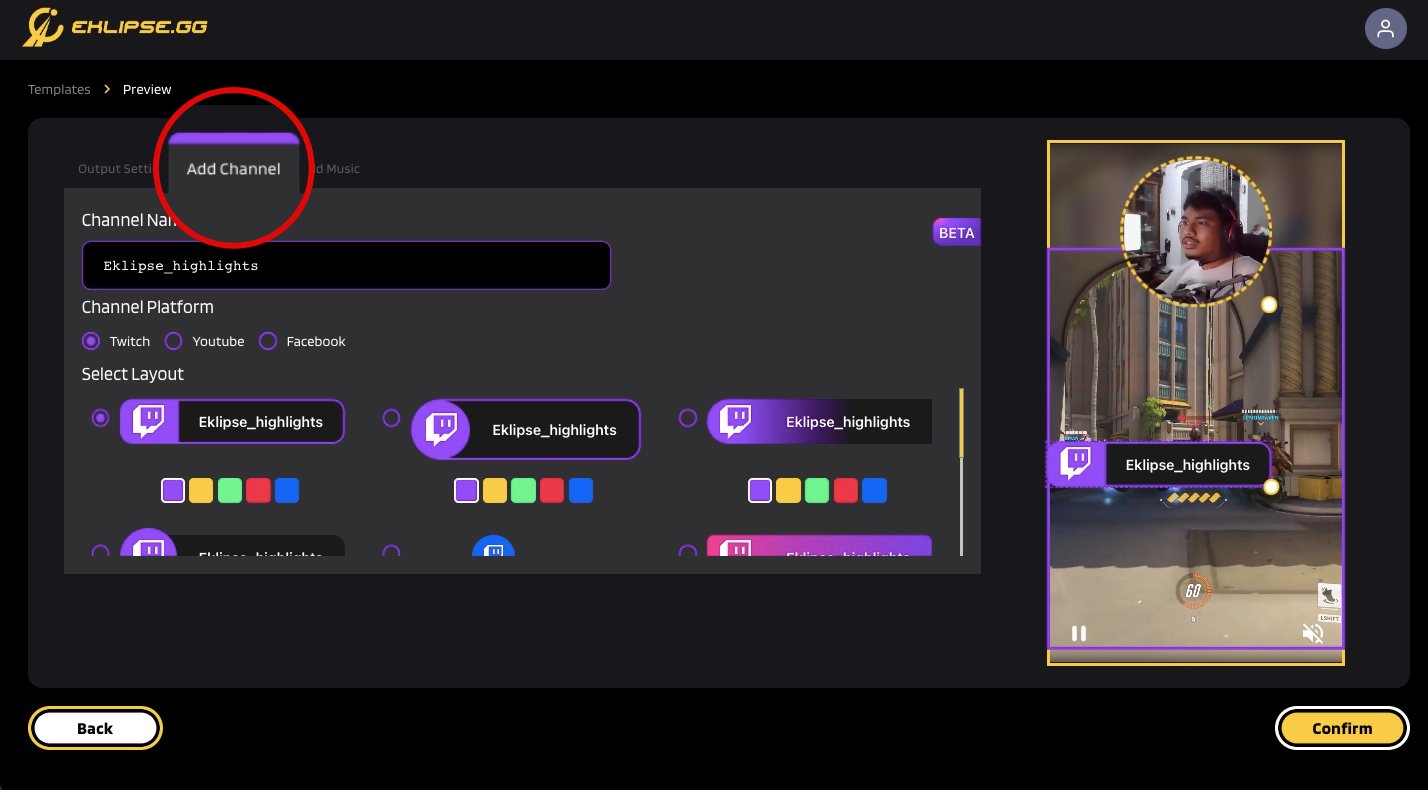
Customize the video all you want
You can change your output settings, add music, or try our latest feature, add channel name sticker!
Click Confirm to go back to the Eklipse app home page.
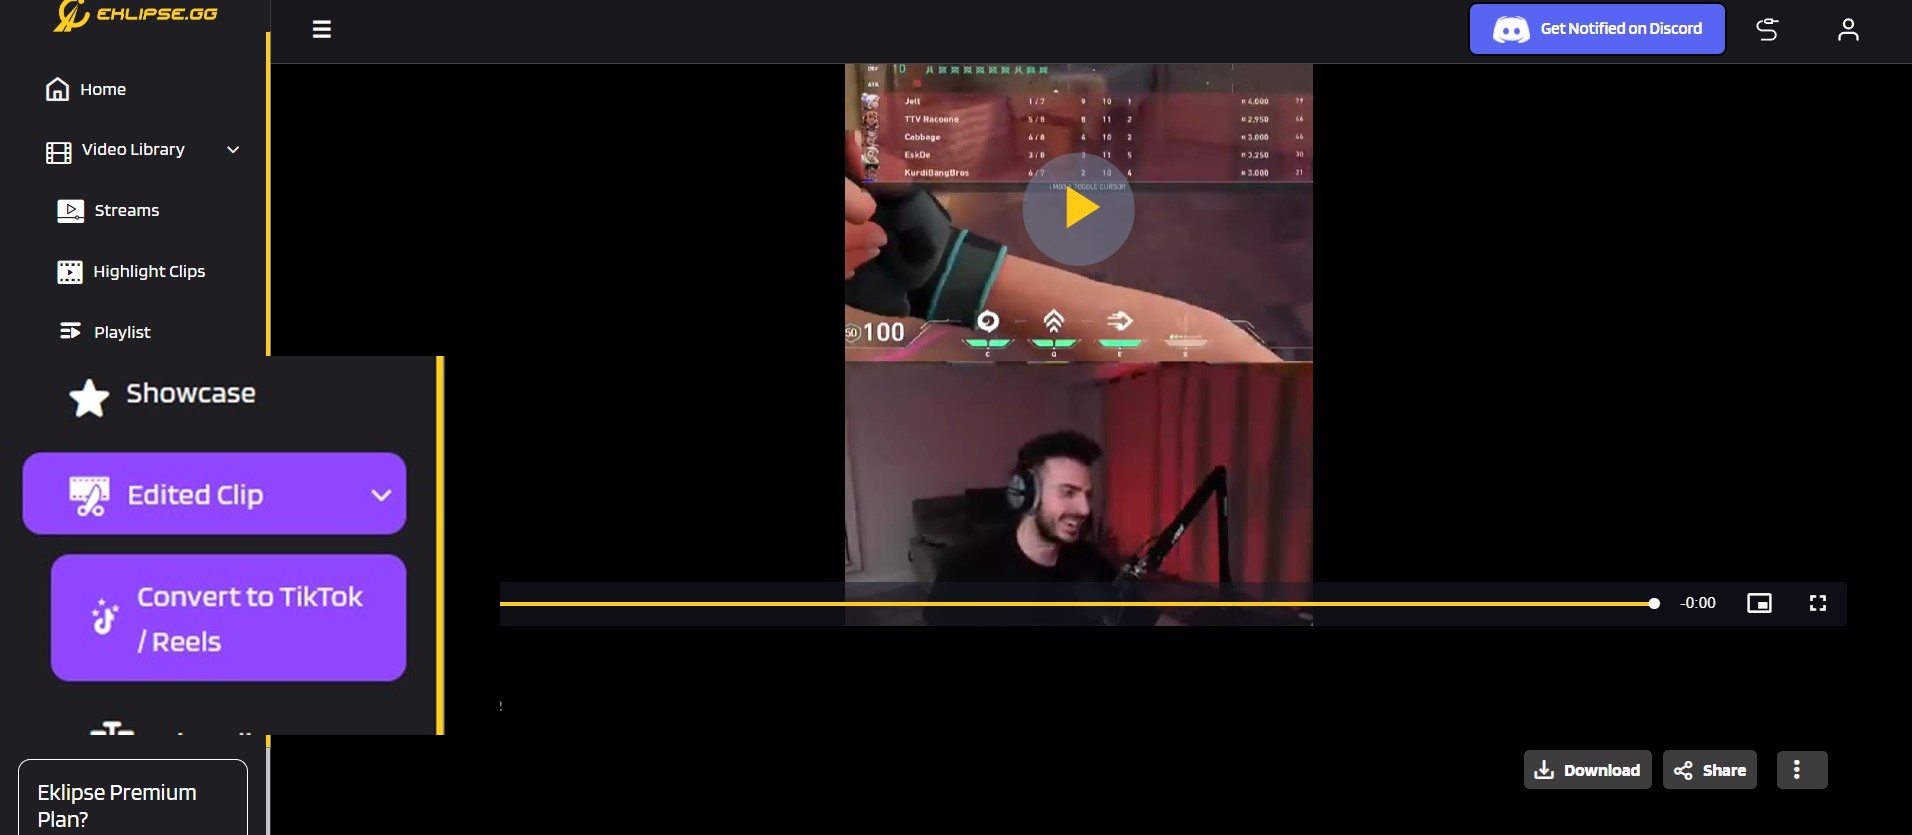
Go to Edited Clip > Convert to TikTok/ Reels on the left sidebar menu.
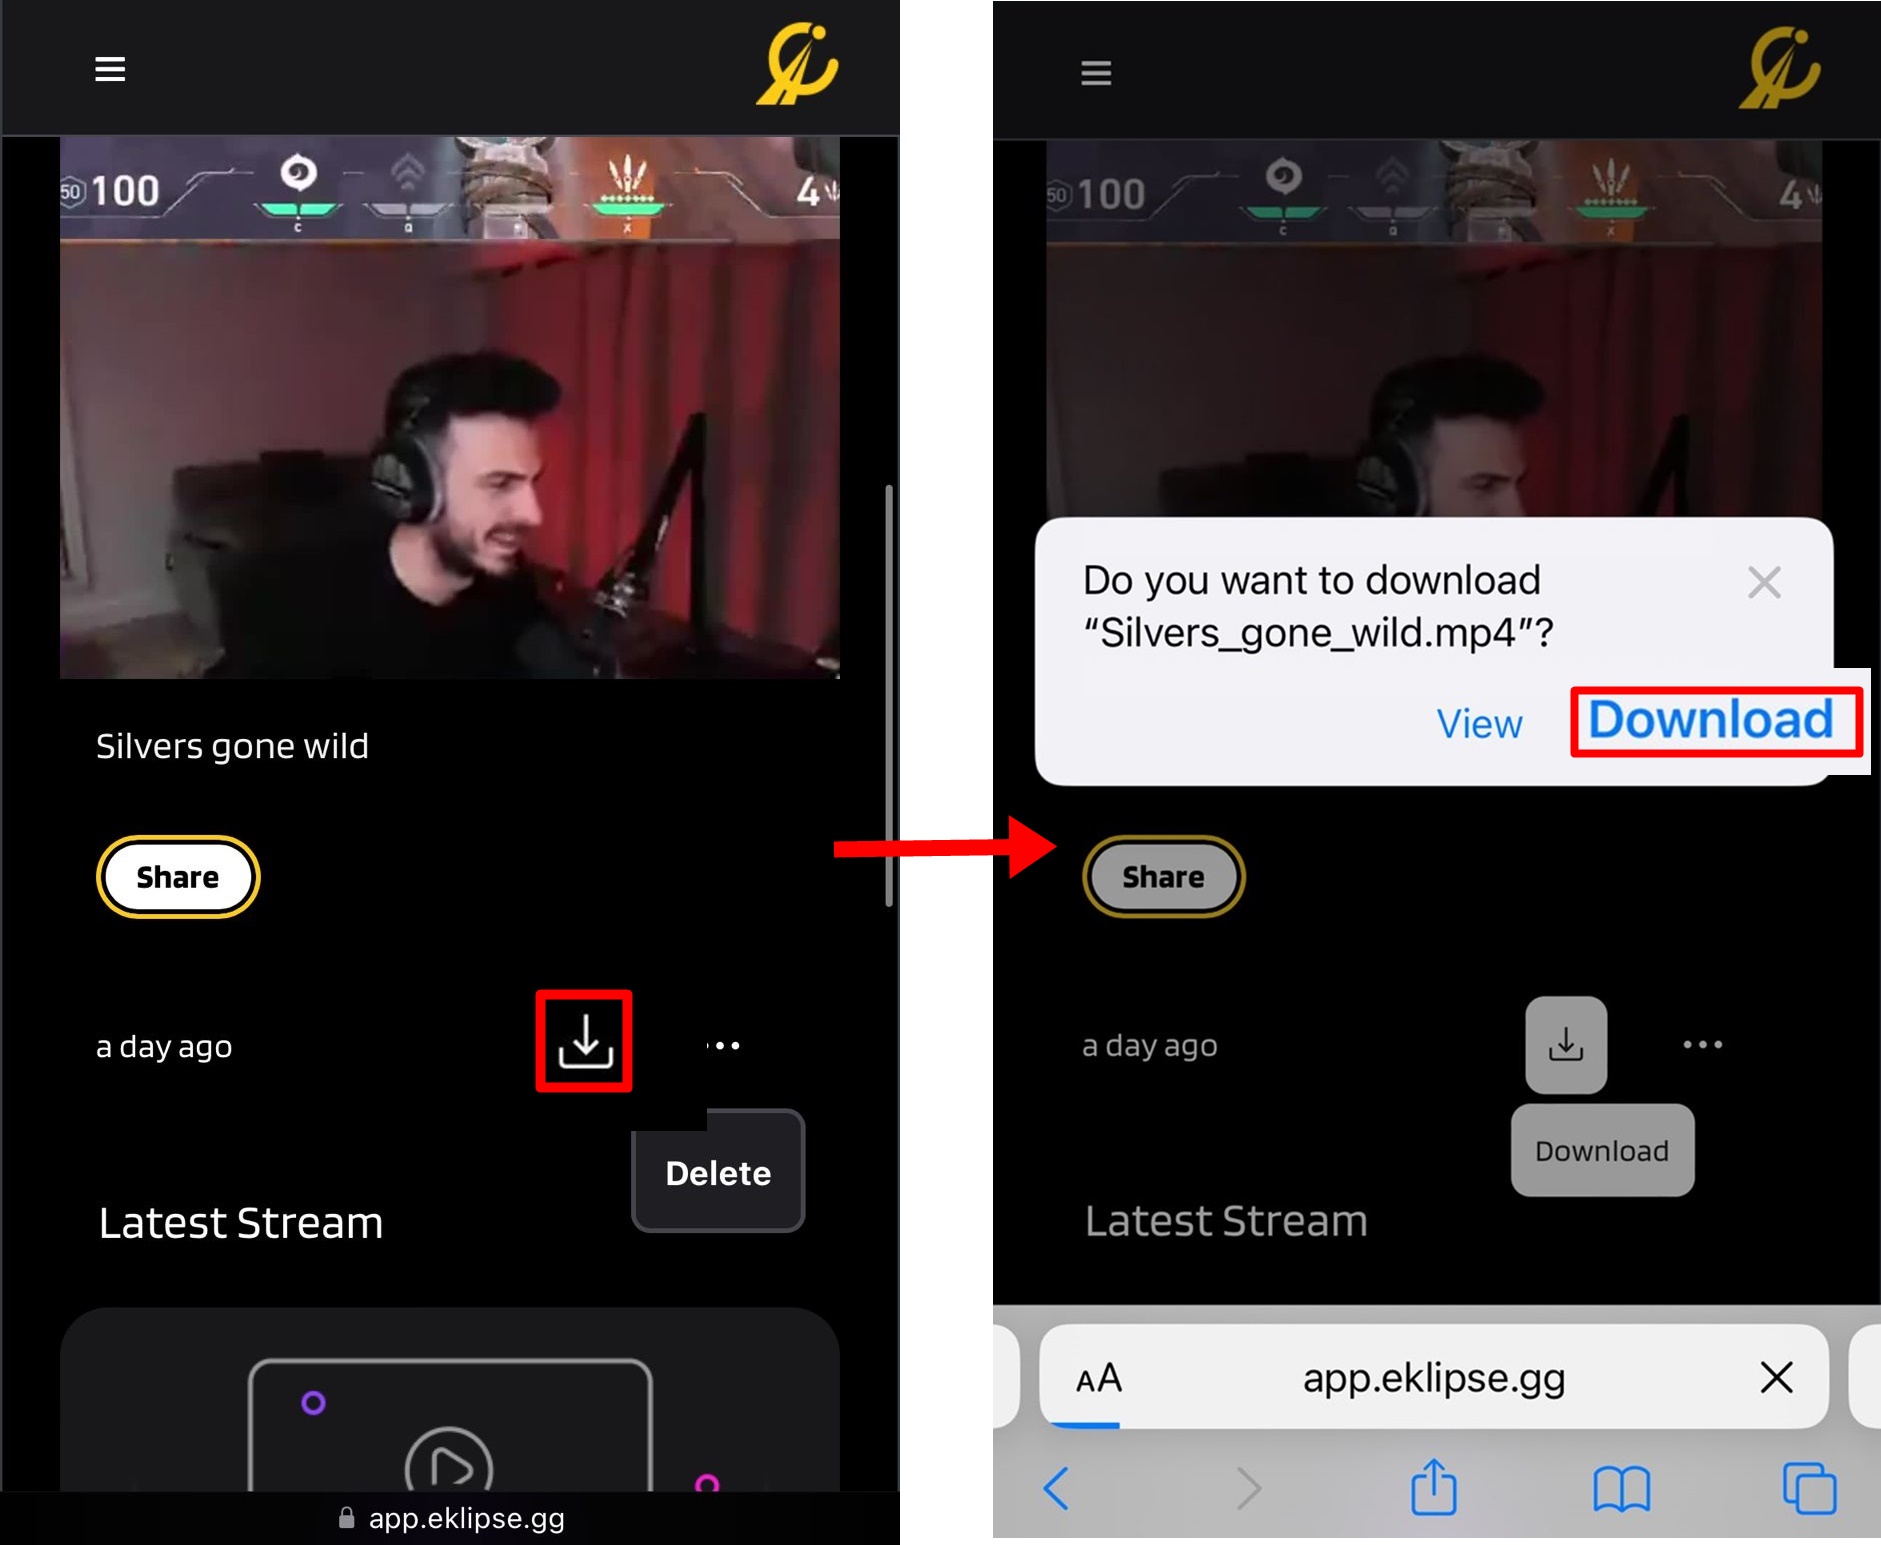
Click Download or Share straight to your social media account.
You can download your clip to share it to TikTok directly from Eklipse.
Voila! Your TikTok video is now successfully edited and ready to post on your account.
Conclusion
So, that’s how you can trim the length of your clips from TikTok. It’s necessary to adjust the length of your clips due to the time limit provided by Twitch. Always adjust the length of your video to make sure that only relevant content is included in the final context.
Source: Eklipse Blog - how to change your birthday on tiktok
TikTok is all about creating short and engaging video contents that can go viral overnight. With around 86.9 million users in the US alone, it’s not surprising that content creators want a piece of the pie.
So, if you just started creating content for TikTok, you might be wondering how to get more followers on TikTok? You can check out these 5 quick tips so your TikTok account can start to grow followers instantly!
The first step in growing your followers on any social channel is to make sure you know who to target with your content. Identifying your audience will help you get more attention from the target audience and eventually get more followers on TikTok.
You can identify your target audience by doing 3 things:
Take a look at competitors and influencers in your industry,
Translate that knowledge into a content idea,
Rinse and repeat.
You don’t need to overthink your content the first time, growing your TikTok is an iteration process. So keep learning, do trials and errors, don’t be afraid of the cringe, and embrace your cringe!
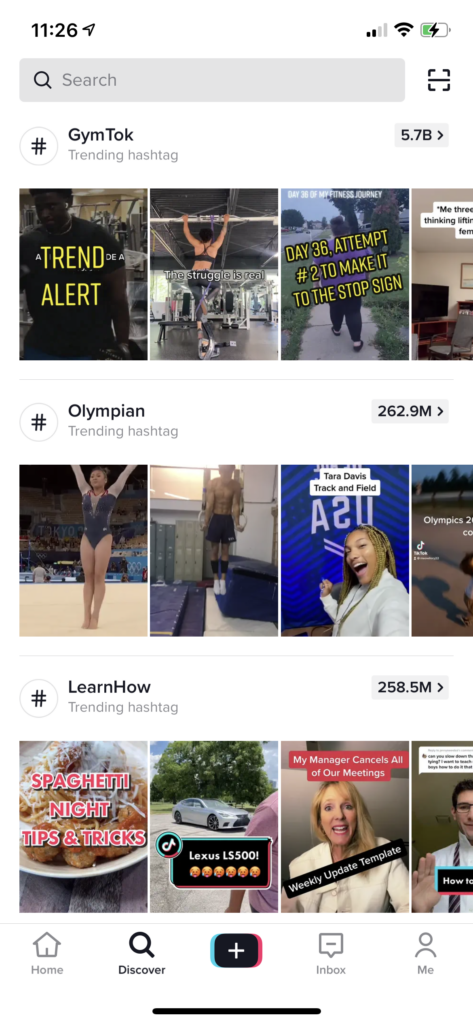
2. Pay Attention to Trends
Trends are a big thing on TikTok. You may have noticed, “Why are there videos using the same format and audio in TikTok?” The answer is yes … they are trending videos.
You can easily identify this by going to the Discover page on your app. From there, you can see what hashtags and sound clips are trending. You can use this as your content inspiration, so you can eventually join the bandwagon to reach the #fyp heaven.
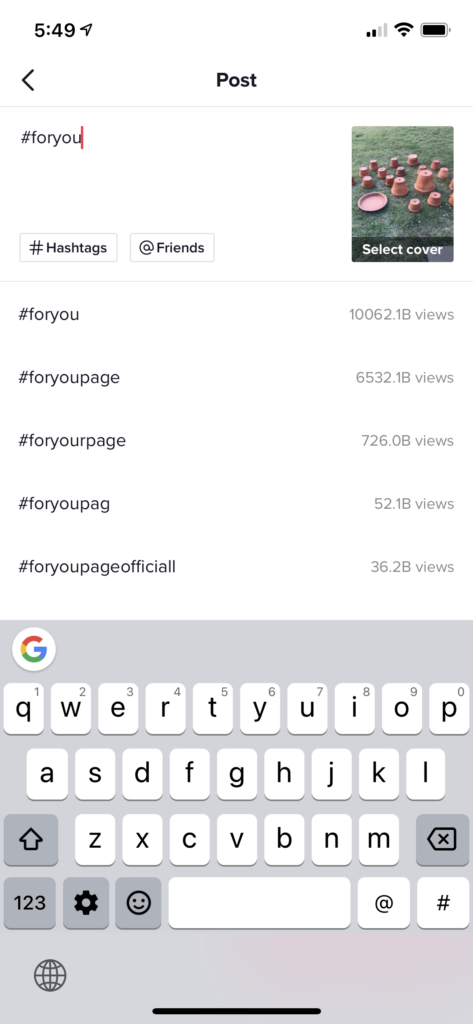
3. Include the Right Hashtags
TikTok uses almost identical logic to Instagram and any other social media, which is using hashtags to group one content with another.
It’s important to use the right hashtags, but you can’t just tag all trending hashtags, cross your fingers, and wish to get more followers on TikTok.
You can start brainstorming hashtag ideas by start typing in relevant hashtags when creating your caption. Don’t forget to include #fyp or #foryou hashtag! Or else, you can go back to Discover page and try to check what hashtag your competitors use.
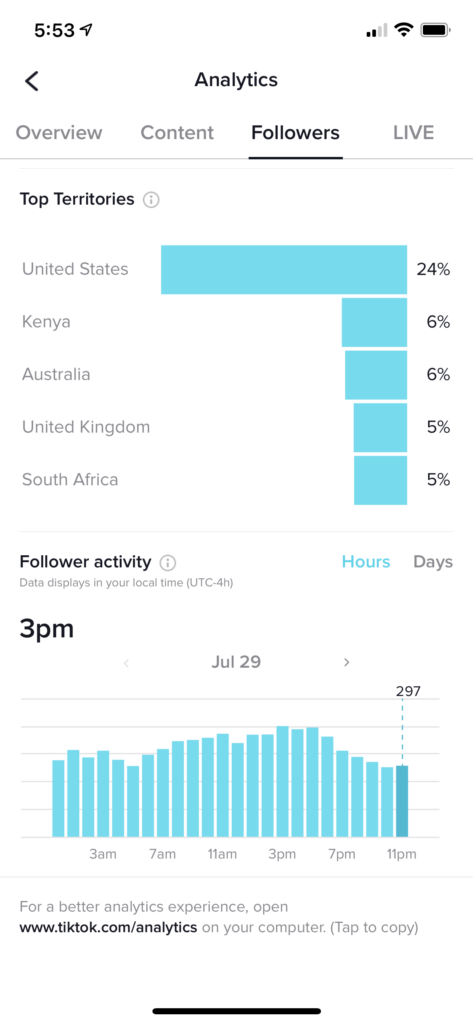
4. Publish Your Videos at the Right Times
It’s important to find the best time to post, so you can reach more audiences with your videos and get more followers on TikTok. If you have already posted videos for a while, you can find this information on your analytics.
To access your analytics, you can follow these steps:
Tap your Profile on the bottom-right corner of your screen.
Tap hamburger menu on the top-right corner of your screen.
Choose Creator tools.
Choose Analytics.
After finding your followers active time, now you can start using the knowledge to set publish time for your videos.
But remember, don’t post at the most active time! Post 1 – 2 hours before that time to ensure that your followers receive the content when they are active.
5. Growth Hack Your TikTok by Automating the Creation Process
One of the ways to get more followers on TikTok is by increasing the quantity of your content. Posting more content means more viewers, and ultimately grows your TikTok followers.
We know that you will like these tips, especially if you are a streamer either on Twitch or YouTube. Growth hack your TikTok by automating your creation process using Eklipse!
Eklipse.gg is an AI highlight generator that will automatically create highlights from your stream. Even better, it can also convert a stream to a TikTok video format!
You can follow these simple steps to start growth and hack your TikTok to get more followers instantly!
Create your Eklipse account.
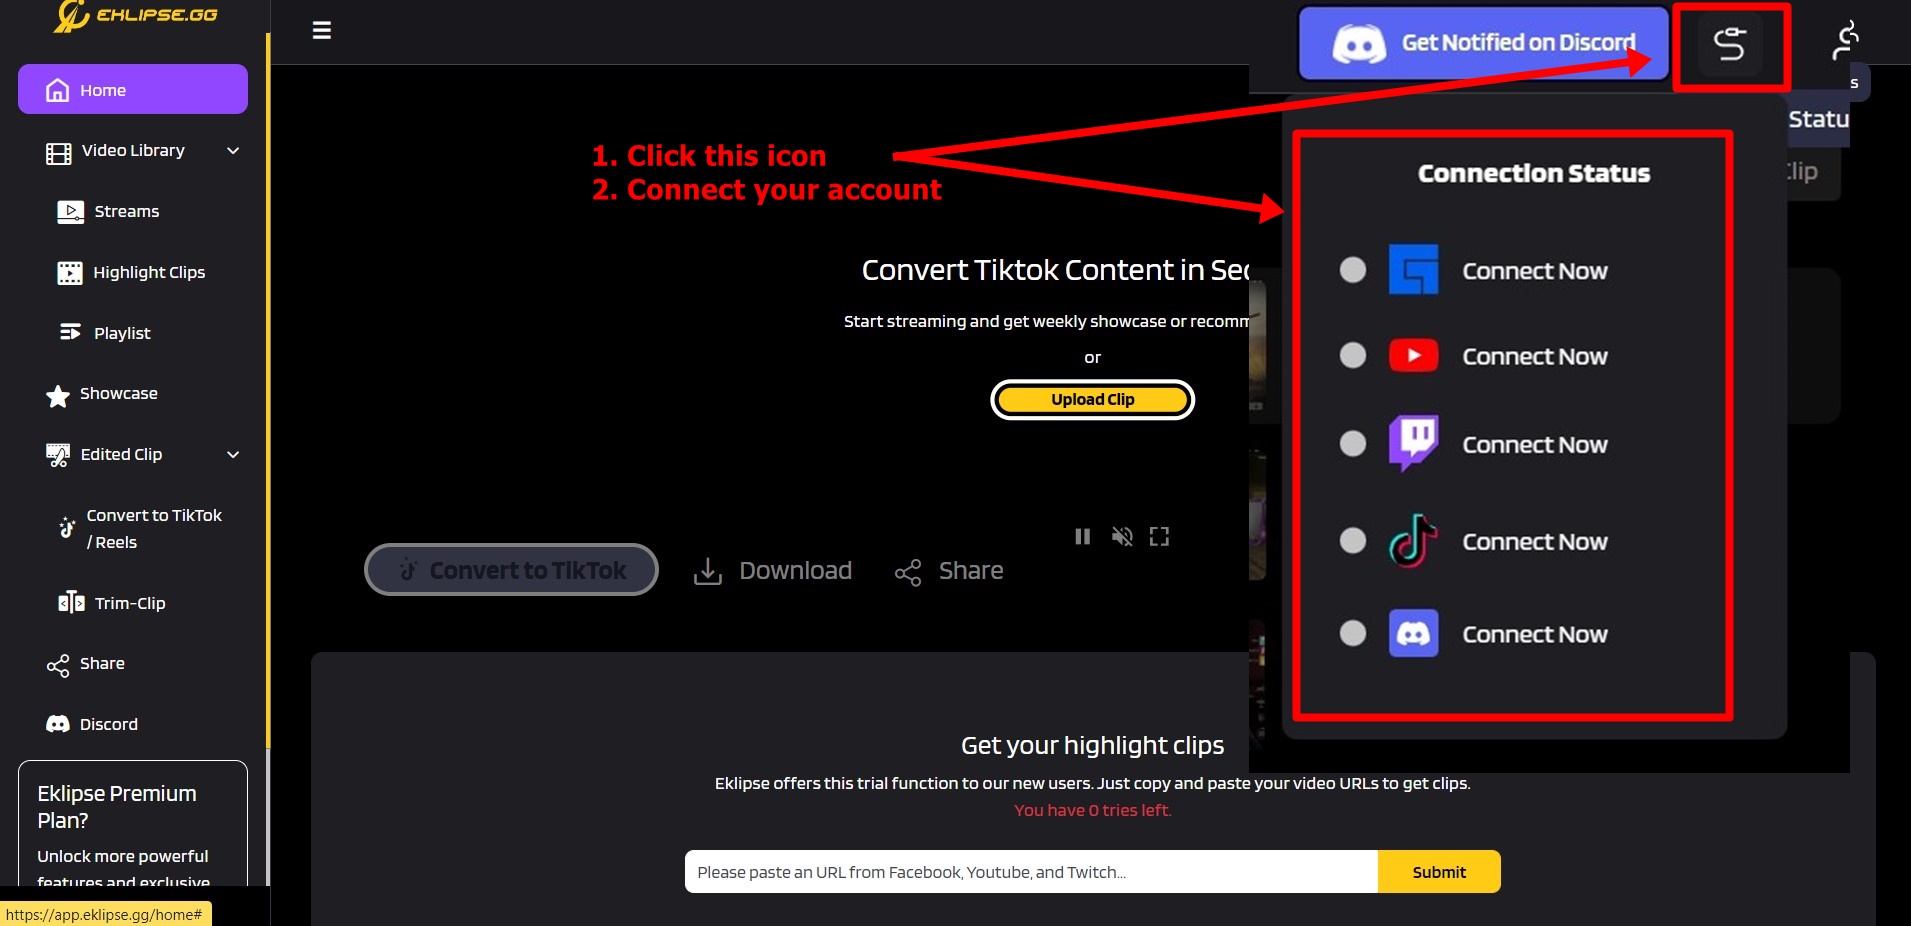
Sign up with Twitch, Facebook, or an email address.
Click the cable icon on the top right corner.
This will take you to link your Twitch, YouTube, and Facebook Gaming account. After the accounts are linked, Eklipse will automatically pull your stream video from Twitch/YouTube/Facebook Gaming to your Eklipse. account.
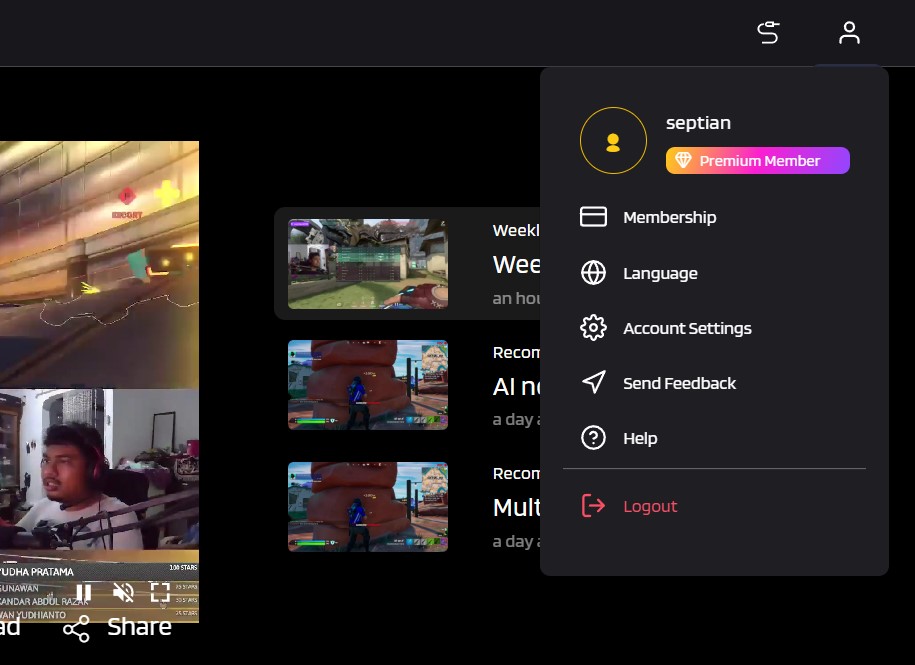
Click your profile icon and choose Account Settings.
Choose Preferences Tab.
Turn Stream auto-processing on so Eklipse can start creating clips from your stream.
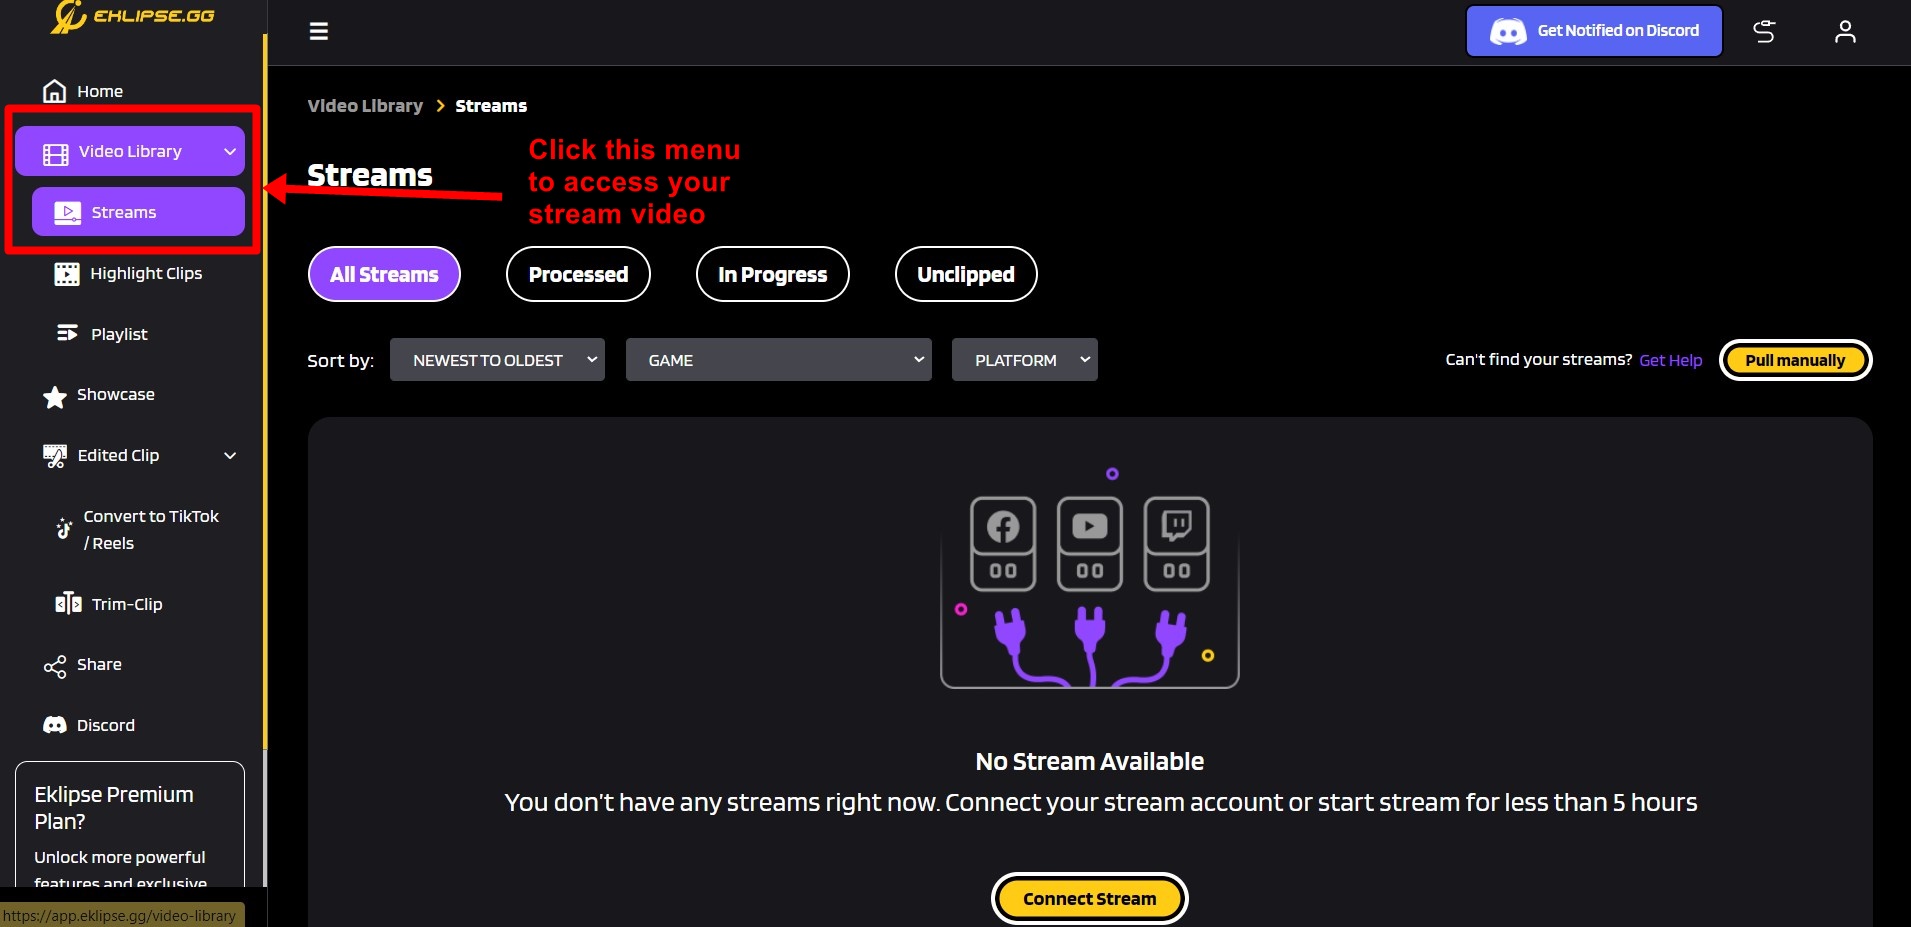
Click the Streams menu on your left sidebar.
Choose Processed so you can choose a clip from your stream.
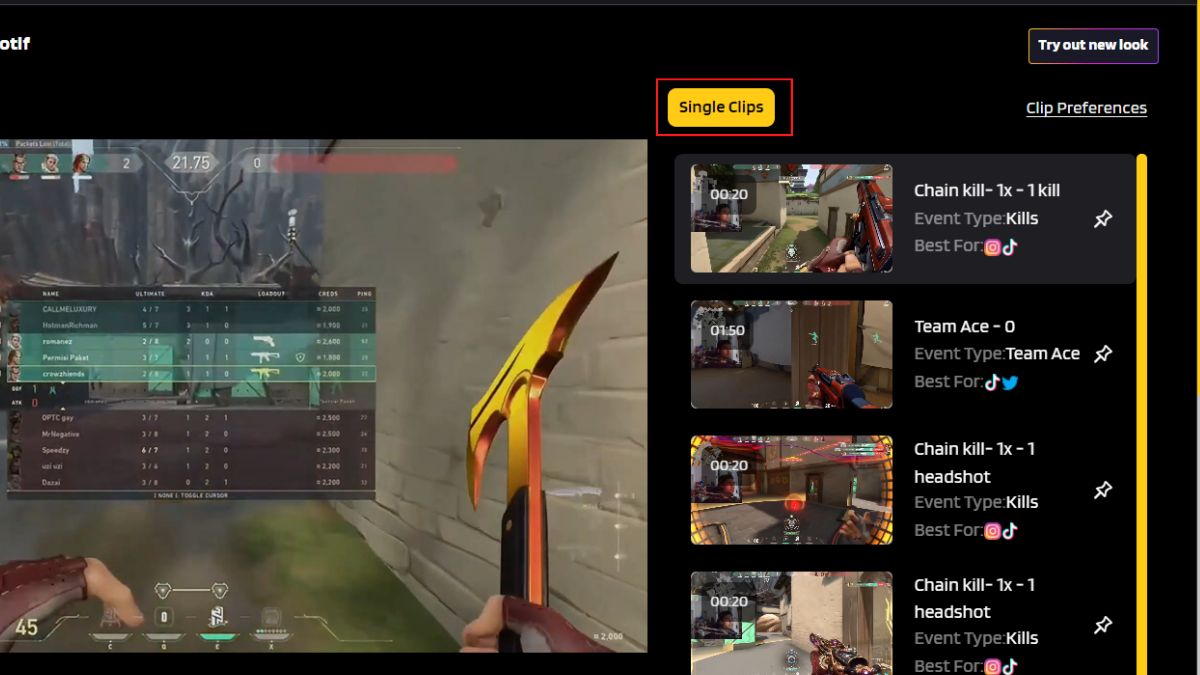
Pick one of your clip video to convert it to TikTok.
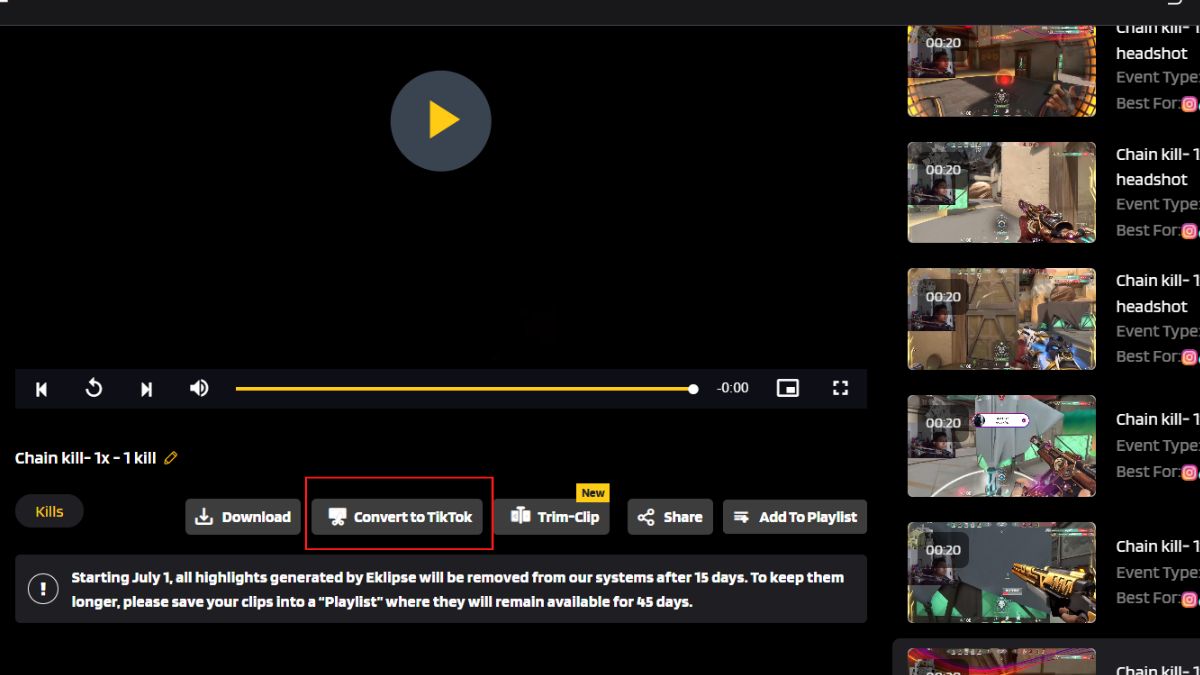
Choose Convert to TikTok at the bottom of your chosen clip.
By clicking that, you will be brought to Eklipse Studio.
Customize your clip all you want when convert it to TikTok.
You can choose a template, customize it, trim your video, add music, or convert it to TikTok vertical video format.
All done!
You can choose to download the clip or share it straight to TikTok, YouTube, or Facebook. P.S: You can do it on mobile too!
Conclusion
Identifying your audiences, paying attention to trends, including the right hashtags, publishing videos at the right time, and automating the creating process are all tips to help you get more followers on TikTok.
We hope these tips can help you grow your brand as content creators or streamers. Don’t forget to share this article if you find it helpful!
Dropping the best hashtags for TikTok content is essential if you want to increase your discoverability. Hashtag plays a significant role in categorizing posts on social media, so it will make it easy for users to find content that’s relevant to their interest.
That’s why, to gain a lot of viewers, you’ll not only need to create informative and innovative content, but you’ll also need to put the content into the right place. This is where hashtags come in.
In this article, we are going to explain some tips on how to find TikTok hashtags for views and the list of the best hashtags you can use. Let’s begin.
If you want your content to reach potential target, you can’t write it randomly. There should be a strong line between the content niche and the hashtag itself. If you still don’t know where to get started, just take a look at our guide on how to find trending hashtags on TikTok below.
1. Check competitors’ post
You don’t have to use the same hashtag strategy as your competitors. But you can understand their tactic in putting the best hashtags for TikTok posts. This will be a good foundation to start growing your channel.
2. Find the Relevant Hashtags
As previously mentioned, you need to put any relevant hashtags for your content. This is important to make your content grouped with similar content, making it easier to find.
3. Spot Popular Hashtag
It’s advisable to put extra attention on the hashtags to spot the popular ones. Popular hashtags are often used on popular videos on TikTok. So, it’s necessary to establish what they have in common while your video still offers something different and original.
List of The Best Hashtags for TikTok 2022
Source: Pingpong Root
To make it easier to find the best hashtags for your post, we have already listed some popular hashtags in 2022. Let’s get a closer look at them.
#fyp
#foryoupage
#tiktok
#trending
#viralvideos
#tiktokchallenge
#followme
#funnyvideos
#savagechallenge
#duet
#repost
#music
#comedy
#workout
#artist
#memes
#love
#cute
#new
#recipe
#likeforlikes
#photography
#fashion
#tiktokdance
#tiktokindonesia
#like
#funny
#tiktokers
#tiktokmemes
#tiktokviral
#funnyvideos
#makeup
#lol
#fun
Popular TikTok Hashtags By Post
In addition, we have also covered the popular hashtags by the number of posts on TikTok. You better try these best hashtags for TikTok to go viral in 2022 right away!
#
Hashtag
Posts
1
#tiktokindonesia
8,762,124
2
#tiktokindia
8,457,835
3
#tiktokmemes
8,228,671
4
#tiktokers
6,420,010
5
#tiktokviral
4,759,056
6
#tiktokindo
4,459,465
7
#tiktokhot
4,043,389
8
#tiktokdance
3,694,435
9
#tiktokchallenge
3,388,010
10
#tiktokgirls
2,860,973
11
#tiktokmalaysia
2,449,563
12
#tiktoker
1,826,812
13
#tiktokgeneration
1,569,346
14
#tiktoks
1,466,674
15
#tiktokturkey
1,451,868
16
#tiktokhits
1,265,886
17
#tiktokvideos
1,226,860
18
#tiktokboys
1,065,541
19
#tiktokid
1,023,553
20
#tiktokstar
943,355
Source: Best-hashtags.com
Conclusion
Those were some of the best trending hashtags on TikTok. Put the most relevant ones to your niche on your daily TikTok post to increase engagement.
In case you are looking for the most popular hashtags for Instagram Reel, you can visit our blog and find the answer there. Ciao!