Do you want to learn how to host someone on Twitch as a way of boosting your own popularity or for any other reason? If so, you have visited the right page. This article will cover everything you need to understand before using the Host mode.
Hosting is one of the best ways to get more viewers and followers. In addition, Twitch enables you to host a channel, regardless of whether or not your are Twitch streamers. If you are a streamer, you can generate more eyeballs to your channel, while if you are not, you can do this as a support for your favorite broadcaster.
This can be an effective strategy in keeping your channel active when you’re running low on ideas or just taking time off from broadcasting regularly. Well, basically there are three different ways to host a channel: via chat, from Twitch dashboard, and setting up auto-hosting.
How to Host Someone on Twitch Via Chat
You can host another streamer through the chat room, and this is the simplest way. Here’s how to do it.
Step 1. First of all, click your profile picture icon at the top right corner and head to your Twitch channel.
Step 2. Then, choose Channel option under the drop-down menu.
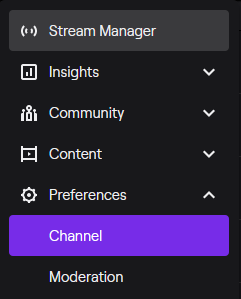 Source: The WP Guru
Step 3. Enter /host followed by the target username. For instance, if you wanted to host the official XCV Twitch channel, just type “host/XCV” in the chat box.
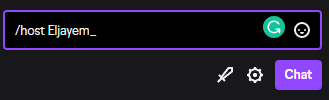 Source: StreamScheme
Step 4. Voila! Now you can start hosting other channels directly from your own Twitch channel.
Additionally, the hosted channels can be changed up to three times every half hour with no limits. However there is a cooldown period before being able do so again after those changes have been made.
How to Host Someone on Twitch from Twitch Dashboard
Alternatively, you can host a channel by setting up the auto-host channel option from your dashboard. Hosting another channel in this way will enable you to support other channels, even when you are offline. To do so, follow the steps below.
Step 1. Start off by hitting your profile icon, and hit Settings from the drop-down menu.
 Source: All things how
Step 2. After that, select the Channel and Videos tab, scroll down and hit the Auto Hosting section.
 Source: Business Insider
Step 3. In this section, add the channels you want to host and customize your setting for hosting. Basically, you are able to host random streamer from your list.
Enabling Auto-host Option on Twitch
Auto-hosting a channel is one of the most common ways to host and it simply requires adding them as an auto selection on your list. This means that when you go offline, they’ll be pulled from this long list in order. So whichever channels are selected will automatically show up.
To set up auto-hosting option, you can do the same way as previously explained: go to Settings > Channel and Videos > Auto Hosting. Under the Auto Hosting section, toggle the Auto host channel button to the on position. Then, on the Host List option, add channels you would like to host and you’re all set.
How to Host a Channel Via Twitch Application
Twitch has introduced a new feature that allows you to become the host of your favorite channel by choosing Host from inside either their iOS or Android app. This is your chance to be a Twitch Host! Tap the gear icon on any channel and choose “Host” from that drop down menu. Once you’ve done doing this, you are now ready to host a channel.
Pros and Cons of Hosting Another Channel
The key to being part of the Twitch community is transparency. Hosting another user’s stream will allow you to show off your own games or videos, and it costs very little time in return for all that visibility! Here are some of the pros and cons of hosting:
Promotion
You could be getting a lot more than just an exciting live stream! Twitch hosts are able to promote their channel by displaying the name of any favourite or recent viewers on screen.
The type of promotion will depend on what’s best for your channel/brand, but it is typically placed near where people chat about them most often- even if its just during commercials or loading screens. Not only does this make you stand out from other channels, it also allows potential new subscribers who missed seeing pertinent information in previous broadcasts learn all they need before tuning into next time around.
Being a host for another channel will also keep your account prominently displayed within the Live Hosts category of Twitch website and apps. This can lead to new users discovering you, potentially following what they watch on their streams!
A Perfect End to Your Stream
As Twitch streamers continue to set milestones for themselves, many of them end up hosting a different channel. This is done by clicking “Host Another” as soon as their own broadcast ends and letting someone else take over the reigns on what happens next.
This is done because many find it easier than launching into individual game play and they often encourage followers who have left to jump back on when the hosted player has ended his or her broadcast.
Lesser Communication With Audience
When hosting another Twitch channel, any message that you’ve designed for your broadcast will be hidden and replaced with the video of that particular live stream. The best way to post messages on your profile is in a less-prominent position. You’ll need to do this for all future hosting times, so be sure and take care of that first.
Content Could Be Irrelevant
Hosted channels can offer a unique and engaging experience, but they are not always the best option for every game. If your followers don’t enjoy what you’re playing or it doesn’t match their interests in other games then this could be an issue with hosting instead of video content creation.
Final Thoughts
That’s all about how to host someone on Twitch. This is a perfect solution if you’re looking for a way to engage your Twitch audience in real time.
There are many benefits of hosting someone else’s content on your own platform such as increased interaction from viewers through chat or even by voting their favorite channels higher up in the rankings.
However, there may be some drawbacks like communicating less directly because it isn’t technically yours and that you could end up promoting irrelevant content if not careful about who you choose to host.


")