Who doesn’t love Twitch emotes? Although they are used often, some users may still not know how to add emotes to twitch. Twitch emotes are fun ways to show off your creativity and engage with other viewers.
You can use them in chat rooms or express support for fellow creators! It’s also a great way to make your channel stand out on Twitch, whether you’re looking at getting more subscribers there yourself or simply love watching people play games while chatting about what they like best about it.
In this article we will cover how customizing an emote works; where to find some amazing ones that others have made available, as well as provide links so anyone interested has easy access right away.
Looking for a guide on how to stream mobile games through a PC? If so, you have stopped in the right place. Many mobile games are quite popular, such as Call of Duty Mobile, Apex Legends Mobile, and more.
While playing those games, you shouldn’t keep all your epic game moments to yourself. Let anyone know you’re so good at creating massive damage or doing great headshots. So it would be much better to show it to other people through live streaming.
In addition, streaming mobile games to PC is very doable. However, the process might require several steps. But if you really want to learn it, let’s begin the tutorial.
Before you start streaming your gameplay from mobile phone to PC, there is a checklist to follow. Once all the boxes are checked, you can continue to the next step.
Step 1. Software and Hardware Preparation
Here are some stuff you need to prepare.
A smartphone as the main tool.
A PC (either Windows or Mac).
A copy of streaming software (we recommend you using OBS Studio).
A program that allows mobile projection into a PC.
A microphone.
A webcam.
Step 2. Projecting the Mobile Screen Into a PC
Basically, you can stream a game from mobile phone into a PC with a capture card. However, this device might be a little pricey. But do not worry about it. There is an alternative to do a live streaming without a capture card. A software called Reflector 4 could be the answer.
Reflector4 allows you to project the display from your mobile phone into a PC. This program works on Mac and Windows. In addition, it is also supported by Android, Windows mobile, or iOS. Here’s how to use it
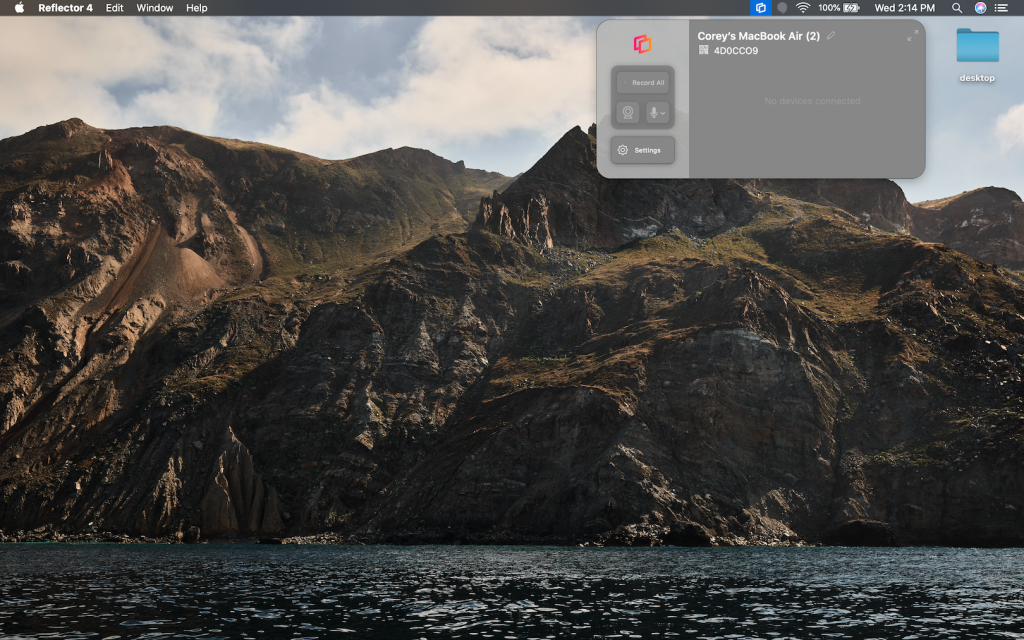
First of all, download the Reflector 4, install, and open it.
Then, open the app on your computer.
Source: ReflectorApp
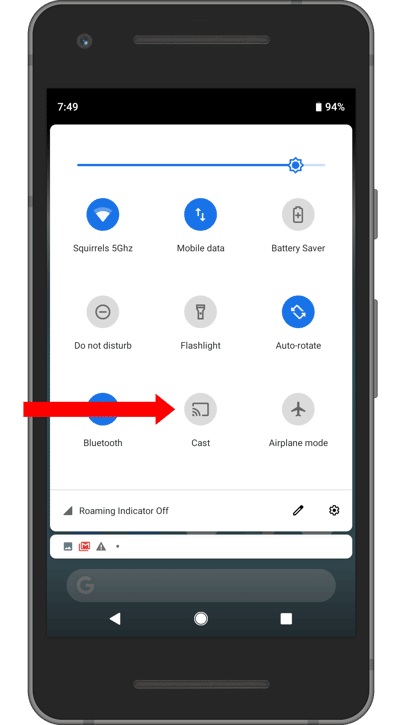
For Android users, you can open the Notification Center > Cast icon > More Setting > Choose your computer.
Source: ReflectorApp
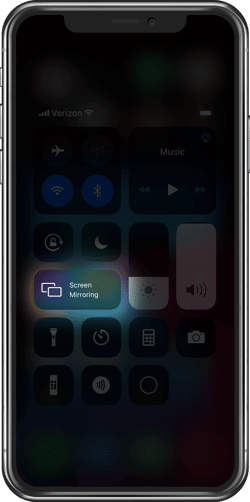
For iPhone, iPod Touch, and iPad users please swipe up your device screen > open Control Center.
After that, hit the Screen Mirroring option.
Source: Doc. ReflectorApp
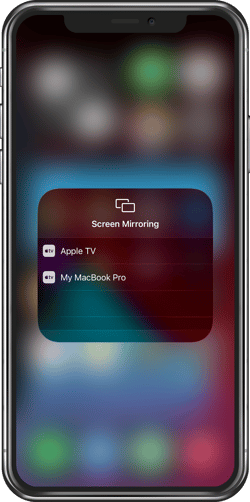
Select where you want to project your mobile screen.
Source: Doc. ReflectorApp
Now, your mobile phone has been projected into your PC
Step 3. Setting Up The Streaming Software
OBS Studio is one of the best streaming software you can use. This software is considered to be a quite advance tool, but luckily beginners still can learn about it. Follow the steps below to start using OBS.
Source: Elegant Themes
Make sure you have already installed it
Then, if you want to stream on Twitch, log in to Twitch with your active account.
After that, head to Dashboard > Settings > Stream Key on Twitch.
Click the purple button to show your stream key, and Copy it.
Once you’ve copied the stream key, back to OBS Studio and go to Setting > Streaming > Service > Select Twitch.
Paste the streaming key there.
Voila! Now everything you want to record using OBS Studio will be shown up on Twitch.
Step 4. Add The Media Source to OBS Studio
As both OBS Studio and Reflector 4 have been set up, now you need to add the Reflector 4 into OBS Studio so that the streaming software will start showing your mobile display. Here are the steps:
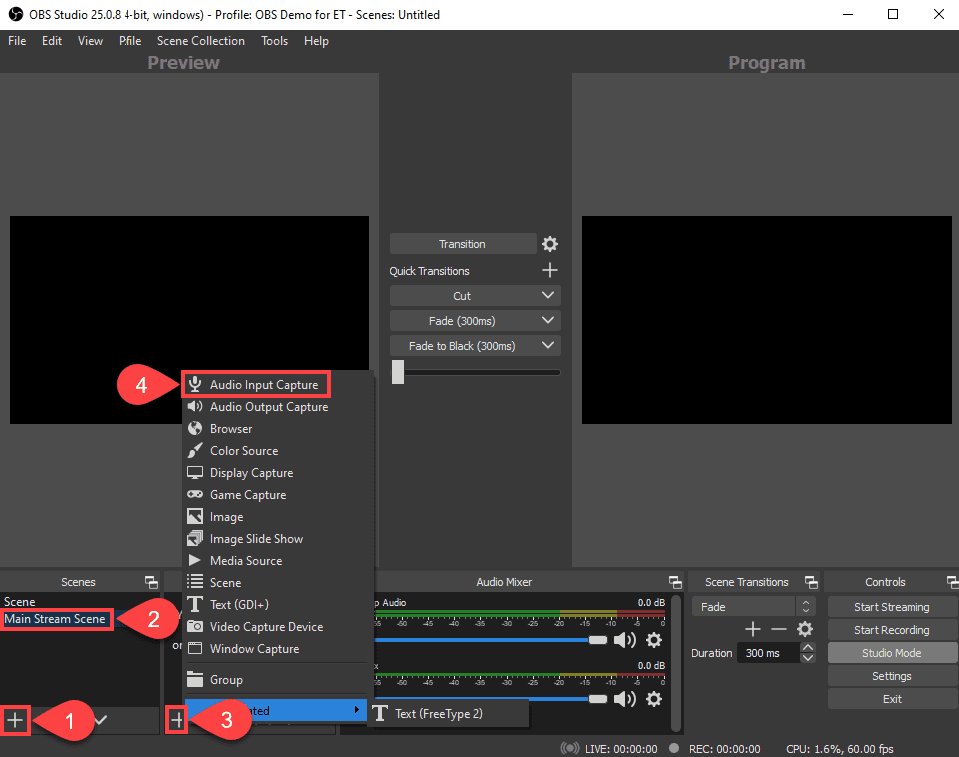
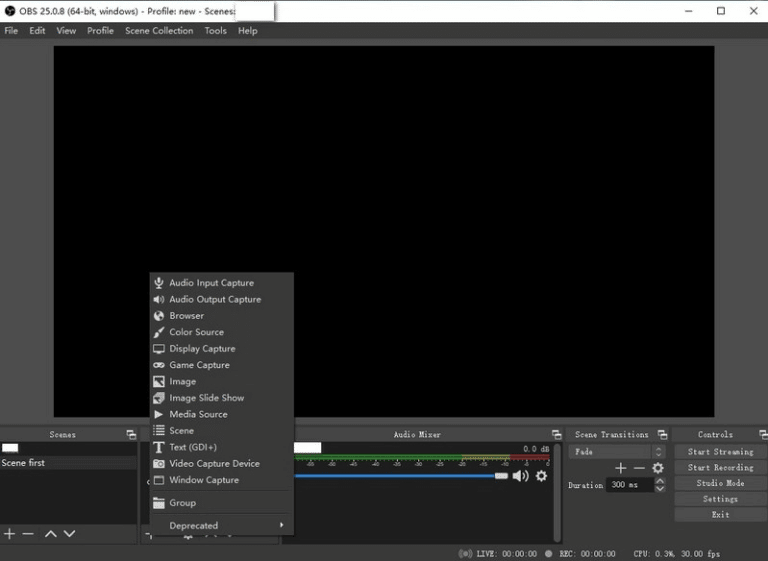
To begin with, find the plus symbol under Sources at the bottom of OBS Studio.
Choose Window Capture > select Reflector 4 > OK.
Source: Democreator.wondershare
Then, resize and adjust your screen as the way you want.
The black workspace will be what your viewers see. Make it more catching with images.
After that, add more sources by repeating the same method above.
Finally, add your webcam by clicking plus symbol under Sources > Video Capture Device > Webcam > OK.
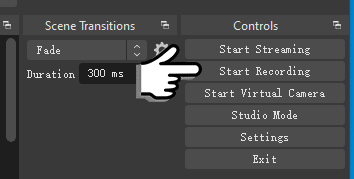
Now, you can begin your game streaming by clicking the Start Streaming button on the right-bottom of your OBS Studio.
Source: itopvpn
Conclusion
So, that’s all about how to stream mobilegames through a PC. Going online with your mobile device does require a few steps, but this is worth trying though. So, are you ready for game streaming on YouTube or Twitch? Start it now and enjoy the game!
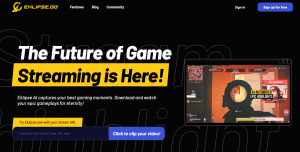
How to Create a Highlight Clip With Eklipse in 2026
TL;DR
To create a highlight clip, sign up free, open Video Library → Streams, pick an unclipped Twitch/Kick/YouTube VOD, and let Eklipse AI cut it automatically.
The AI detects kills, clutches, multi-kills, and chat spikes, no scrubbing, no manual timestamps.
Eklipse skips streams under 30 minutes and low-quality broadcasts; stream at 1080p with a 3,500–8,000 kbps bitrate for the sharpest clips.
Finished clips land under Highlights, where you can trim them and convert them to vertical TikTok, Reels, and Shorts.
To create a highlight clip with Eklipse, connect a Twitch or Kick account (or paste a YouTube VOD link), open the Streams section, and let the AI cut your best moments into ready-to-post clips automatically. The whole process takes a few clicks and a few minutes of processing.
You streamed for six hours. The Multi-Kill in hour two, the clutch 1v3, the chat losing it at your fail, they are all in the VOD. The problem is never that the highlights do not exist. It is that scrubbing back through hours of footage to find them is the part nobody has time for.
This guide walks through exactly how to create a highlight clip with Eklipse, what stream settings produce the cleanest output, when the AI works best, and why a stream sometimes refuses to process.
A Twitch or Kick account where you stream, or a public YouTube VOD link
A valid email address
A free Eklipse account (sign-up takes under a minute)
If you stream on Twitch or Kick, connecting that account is the fastest path, Eklipse imports your past broadcasts automatically through OAuth, so there is nothing to upload. No streaming platform? You can still paste a YouTube VOD URL and clip it the same way, which is how a lot of non-streamers turn recorded gameplay into Shorts.
To sign up, paste your link into the “Paste your link here” field on the homepage, or use the “Sign up for free” button. Pick a username, email, and password, or authenticate straight through Twitch or Facebook to skip the form.
How to Create a Highlight Clip With Eklipse, Step by Step
Once your account is connected, the highlight clip workflow is five steps:
Open the Streams library. In the left panel, expand the Video Library menu and click Streams. This is where every imported broadcast lives.
Pick an unclipped stream. Filter by All Streams, Processed, In Progress, or Unclipped. Choose an Unclipped stream to send it into the AI pipeline.
Let the AI process it.Eklipse’s AI highlight detection identifies the game, then analyzes the broadcast for kills, clutches, multi-kills, eliminations, and chat reaction spikes, and cuts each one into its own clip.
Get the notification. When clips are ready, the bell icon in the top-right corner alerts you. Processing runs in the cloud, so it does not touch your local CPU or in-game FPS while it works.
Edit and share. Open the finished clips, trim them, and push them to TikTok, YouTube Shorts, or Reels.
That is the entire manual workload: choose a stream, wait a few minutes. The AI does the moment-finding that used to mean watching your own VOD back at 2x speed. It is the simplest way to auto clip Twitch streams with no timeline scrubbing and no manual exports.
Faster than the menu: If you stream on PC, the voice command feature lets you say “Clip it” mid-game and Eklipse marks that moment live, so your best plays are flagged before the stream even ends.
Recommended Stream Settings for Sharper Highlight Clips
Eklipse clips whatever quality you streamed at. A blurry 720p VOD produces blurry clips, so the input settings matter more than any edit you make afterward. Match your encoder to your hardware:
Stream profile
Resolution
Recommended bitrate
Full HD, standard
1080p
3,500 – 5,000 kbps
Full HD, high
1080p
4,500 – 6,000 kbps
Maximum (capable rigs)
1080p+
4,000 – 8,000 kbps
Higher bitrate means more visual data per second, which keeps fast FPS gameplay sharp instead of smearing into compression blocks during a firefight. These ranges line up with Twitch’s official broadcast guidelines. Push toward the top of the range only if your upload speed and encoder can sustain it without dropped frames, a stable 5,000 kbps beats an unstable 8,000 kbps every time. For desktop PC capture above 1080p, Ultra Highlights records at up to 1440p for noticeably crisper output.
Where to Find and Edit Your Clips
Finished clips live under the Highlights option in the Video Library menu. Eklipse adapts the filters to the game it detected, so a Warzone session and a League of Legends session surface different highlight categories. The AI is tuned for 3,000+ supported games, including:
From there, the Eklipse Studio editor doubles as a Twitch clip editor: it converts a raw highlight into a vertical post. It auto-reformats to 9:16 for TikTok and Shorts, and you can add copyright-free music, stickers and emotes, captions, and trim the clip to the exact length a platform rewards. One stream becomes a week of short-form content without opening a desktop editor.
When Eklipse AI Clips Best (and When It Struggles)
Being honest about this saves you a frustrating first session. Eklipse’s detection model is trained on discrete, on-screen events, so accuracy is highest where the game produces clear signals:
Strongest: FPS and battle royale titles with visible kill feeds, Warzone, Valorant, Apex, Fortnite, Marvel Rivals. Kills, clutches, and squad wipes are unambiguous events the AI catches reliably.
Good: reaction-heavy and Just Chatting segments, where the model reads audio energy and chat-spike intensity to find the loud, funny, or shocked moments.
Weakest: slow strategy and narrative games with no event feed. The AI has fewer hard signals to anchor on, so review those clips manually before posting.
The practical rule: if your game shows kills or eliminations on screen, expect strong automatic results. If it does not, treat Eklipse’s output as a fast first cut rather than a finished edit. This is also why FPS streamers get the cleanest highlight reels with zero manual work.
Why a Stream Won’t Process (and How to Fix It)
If a stream sits in the library and never returns clips, it almost always hits one of these conditions:
Under 30 minutes. Eklipse does not process streams shorter than 30 minutes, there is not enough footage for the AI to find a reliable highlight set. Fix: stream a full session, or paste a longer VOD.
Low-quality broadcast. Heavily dropped frames or a very low bitrate fails the quality filter before clipping. Fix: re-stream with the bitrate settings above.
Private or unlisted VOD. If the source Twitch VOD or YouTube video is private, Eklipse cannot access it. Fix: set the VOD to public, then re-import.
VOD storage expired. Twitch deletes VODs after 7–60 days depending on account type. Fix: clip soon after streaming, or download and re-upload the file.
Work through that list top to bottom and the stream will clip on the next pass. If you stream on Kick, the same rules apply through Eklipse’s Kick highlight support.
Frequently Asked Questions
How long does it take Eklipse to create a highlight clip? A few minutes after you select an unclipped stream. Processing happens in the cloud, so it runs without using your computer’s CPU or affecting in-game FPS. You get a bell notification the moment your clips are ready.
Can I create a highlight clip without streaming? Yes. Paste a public YouTube VOD link instead of connecting a streaming account, and Eklipse clips it the same way. This is how non-streamers turn recorded gameplay or co-op sessions into shareable highlights.
Why won’t Eklipse process my stream? The most common reasons are a stream under 30 minutes, a low-quality or frame-dropped broadcast, or a private VOD the AI cannot access. Stream a full session at 1080p with a 3,500+ kbps bitrate and keep the VOD public to avoid all three.
Does Eklipse work with Kick and YouTube, not just Twitch? Yes. Built as an AI clip maker for Twitch first, Eklipse also connects to Kick accounts directly and accepts public YouTube VOD links. Twitch is the most common path because import is fully automatic, but Kick and YouTube produce the same AI-detected clips.
Are the clips ready for TikTok and Shorts? Yes. Eklipse Studio auto-reformats clips to vertical 9:16 and lets you add music, captions, stickers, and trim length before exporting straight to TikTok, Reels, or YouTube Shorts.
Do I need video editing skills to use Eklipse? No. The AI selects the moments and the editor handles formatting. Your only manual steps are picking a stream and, optionally, trimming or styling the final clip.
Conclusion
Creating a highlight clip with Eklipse comes down to one decision and a short wait: connect a Twitch, Kick, or YouTube source, pick an unclipped stream, and let the AI cut your kills and clutches while you do something else. A standard video editor would have you scrubbing the same VOD for hours to produce the same three clips manually.
Stream at a stable 1080p bitrate, keep sessions over 30 minutes, and the AI does the rest, turning every broadcast into a stack of TikTok-ready highlights. Try Eklipse for free and turn your next stream into clips.
Call of Duty bunker codes are something that’ll help you greatly in achieving victory in Call of Duty Warzone. By opening bunkers using special codes, you will be able to access the best loot to battle your opponent.
Before Season 2, there was a variety of bunkers. Most of them only need collected cards, access code and some just plain nothing. Of course, the last one only applies to the ones that make it out alive since these places are usually stormed by people.
However, now bunkers are built differently. Most of them have been made inaccessible on the map. The ones remaining, though, require some special tricks to get into. If you’re wondering how to open these bunkers in Call of Duty Warzone, you’re at the right place.
Before using Call of Duty bunker codes, first you should know where to find bunkers in CoD on the map. Technically, you can easily find them from the map. However, some of the locations may be too close together so the indications might be inaccurate.
Here is a detailed picture that consists of all bunker locations in the map that you can use to find old and mysterious new bunker.
00: On the coast south of Promenade West
01: North of the go-kart track and southwest of Boneyard.
02: North along the road from the previous bunker.
03: Right next to bunker 02.
04: Southeast of Dam.
05: On the west side of the Crash Site.
06: Between Quarry and Lumber, above the train tunnel locations.
07: East of TV station, northeast of Stadium.
08: Opposite bunker 07.
09: Northeast of Prison.
10: South of Tavorsk Park.
A quick tip for you. When you are heading to one of these bunkers, make sure that you are fully loaded. Since they possess high quality loot, there is a high chance you will encounter other players here.
One thing you can do is wait. If you are confident that you are the first person to get there, you can try to be sneaky. Set yourself somewhere up close and attack the next person trying to enter the bunker.
2. Call of Duty Bunker Codes
Here is a list of codes to open Call of Duty bunkers locations. If you manage to get inside and loot precious things and legendary supply boxes in the map, congrats.
North Junkyard – 87624851
Park (nuke) – 60274513
TV Station – 27495810
Prison – 72948531
Farmland – 49285163
South Junkyard – 97264138
3. How to Access Warzone Bunkers
This is pretty straightforward. As soon as you see a bunker, you can just type the code above. But, what if the bunker doesn’t have keypads?
As mentioned earlier, the new update brings changes to how bunkers work. Some require codes, while some can only be accessed using a Red Access card.
Red access card is a very rare item that can be used to open non-keypad Warzone bunkers. You can only find them inside legendary crates. Even then, securing an access card is only half the battle. Other than that, you also need to head inside the bunker safely.
There will always be a threat of others stealing your card before you can use it. Therefore, you should always be aware of your surroundings.
If you manage to open the bunker using an access card or CoD bunker code though, enjoy your new gears!
4. Warzone Park Bunker Tips
Treasure hunting in Warzone is a lot more fun when you know where to look. In this guide, we’ll teach you how to get into the Park Bunker as well as our cut of your loot!
When searching for the park bunker, you must be between a memorial and sea. Don’t bother with that ugly building because it’s not there! You should head south until you reach the park then start to make your way through it.
Afterwards, head to the bottom edge to look for the ‘hideout’ that usually appears in some rocks. You can always fly over or take the coast road if you have any troubles finding it.
Once you’ve done hauling your butt down to the bottom of the map, you are going to need a keycode for Park Bunker. The code is 60274513!
Take a look around inside! There is some cool stuff in here like model rocket on desk and lots of loot. The real fun part can be found down the side corridor though…
Here is what you need to know about Park (NUKE!) bunker: first, fly in or head through the park. Second, take a right onto some rocks until you see an ugly building with lots of loot – this should be your destination! There’s one very important rule here though… please do not set off the nuke inside Park (NUKE!) bunker because that will result in both death and disappointment.
5. Deactivated Bunker Codes
All bunkers and bunker codes listed above will no longer be accessible in Warzone Season 3: Reloaded. However, it is possible they may come back online so keep this handy information for when the time comes!
Bunker 01: 97264138
Bunker 03: 87624851
Bunker 10: 60274513
Hut 1: 27495810
Hut 2: 72948531
Locked Room: 49285163
6. Bunker Codes in Caldera
Good news, Bunkers are back in Caldera. These are the ultimate rooms in Warzone that will provide you high tier loots that will benefit you in fights. Here are the locations and codes for the bunkers in Caldera.
West Peak Bunker Entrance: code has not been discovered, but will be updated.
West Beachhead Bunker Entrance: code has not been discovered, but will be updated.
East Beachhead Bunker Entrance: code has not been discovered, but will be updated.
Secret War Room Beneath Arsenal: 627830
One of the Houses in the Capital Suburbs: 032703
7. How to Use Call of Duty Bunker Codes?
Technically speaking, using a bunker code in Warzone is easy. However, keep in mind that, when doing so you will be vulnerable for a few moment. That is why it is advised to do this when you have teammates covering you. Simply follow these steps below to activate the bunker codes.
First, locate one of the bunker entrances from above.
As you approach the door, you should find a keypad on the right-hand side.
A prompt will ask you whether you want to interact with the keypad, select yes.
Enter the numbers on the keypad.
The door will slide open and you are free to take your loot.
TikTok has given hundreds of interesting content to its users. But it seems incomplete if you participate on TikTok without creating content too. Well, if you are interested in dipping your toe into this platform, you’ll need to learn how to record a TikTok video first.
Basically, recording a TikTok video is quite simple to do. But making incredible and aesthetic content will require more skill and creativity. But for beginners, it would be better to learn about recording TikTok videos as the basics before you start exploring it. Here we go.
How to Record a TikTok: Setting Up The Video Length
TikTok allows you to record a video from 15 seconds to 60 seconds. So, before recording a new video, make sure you have set the duration. To do it, just follow the steps below.
First, open the TikTok app on your device and log in with your account.
Then, hit the ‘+’ button on the middle bottom side.
Source: Tuneskit Acemovi
Once the camera is open, it will automatically be set to a 15-second video.
To choose another option, just swipe left and it will turn into a 30 or 60-second video.
Source: Malavida
After that, you can start recording.
How to Record a TikTok Hands-Free
Additionally, you shouldn’t always grab your phone while recording. You can record a new video using a timer. Thankfully, TikTok offers you the hands-free feature. Let’s see how to use it.
Open up the TikTok app, log in, and tap the ‘+’ button at the bottom screen.
After that, press the Timer button on the right corner of the screen.
Source: Hootsuite
Then, set the timer, either a 3- or 10-second.
Whenever you’re ready to record, tap on the Start Countdown button.
Voila! Now you can record a new video without having to hold your phone.
How to Changing Speed on TikTok Video
Sometimes you need to speed up and slow down your TikTok video to make them look more appealing. No worries, it’s very possible to do. You can do it just in a few seconds. Here are the steps.
Head to the TikTok app and log in with your account.
After that, tap on the ‘+’ button.
Then, find the Speed button on the right side of the screen.
Source: Alphr
Select any speed options to use on your video.
Now, you can produce a slow-motion or speed-up video.
How to Add Effects To TikTok Video
Do you want to make aesthetic and nice TikTok videos that can attract many viewers? Try to put on an appealing effect or filter. TikTok offers many options of that. Here’s how to add the TikTok effect and filter.
To begin with, open the TikTok app and go into your account.
Tap on the ‘+’ button to open the camera.
Then, see the right side of your screen and tap on the Filter button. As for the effect, tap on the Effects button at the bottom left of the screen.
Source: Alphr
Scroll down and find whichever Filters or effects you would like to use.
Source: backlightblog
Next up, adjust the intensity of the filter.
Source: backlightblog
After that, tap the screen to exit the Filters or the Effects gallery. At this point, the filters or the effect should have been applied.
Lastly, record your video.
Additionally, TikTok provides its users with a lot of filters and effect options. It includes the greenscreen effect, slideshow, TikTok stickers and more! You can learn how to try them through our previous article on our blog.
How to Record a TikTok with Music
A good TikTok won’t be complete without music. Fortunately, TikTok lets you add cool background music easily. No need for additional tools at all. Just follow the tutorial below.
Open up the TikTok app and log in with your account.
Hit the ‘+’ button to open the TikTok camera.
At the top of the screen, you’ll see an Add Sound button. Hit it up.
Source: FlexClip
Then, search for a specific song from the TikTok playlist or type the title in the search bar.
Press the song to hear it start playing before adding it to your video.
If you’re sure about the song, just press the red checkmark on the right of the song
Finally, the song will be added to your video and you can start recording.
Other than a music background, you can also add a voiceover to your TikTok video. You can learn how to do it through our article here.
Conclusion
So, that’s all about how to record a TikTok video. Now that you have known the basics, you can start to explore your creativity using any features provided by TikTok. Create your masterpiece and let the world know about it. Happy TikToking!
Affiliates are the backbone of Twitch, but what does it mean to be a Twitch Affiliate? A Twitch Affiliate is someone who streams on Twitch for at least one hour per day (and sometimes more). They usually rots videos every week via YouTube Live like yesterday’s video will appear inside your feed tomorrow morning which means there may even be.
Stepping away from social media, including TikTok is sometimes necessary to make your life healthier. You can choose to get away permanently or just for a temporary time. But whichever your choice will be, you can learn how to delete TikTok account through this article.
Well, removing your TikTok account is relatively easy to do. Moreover, it can be done both from a phone or a PC. Without further ado, let’s take a look at the tutorial.
The common method to remove your TikTok account is using your phone. To do so, you should follow the instruction below.
First of all, open the TikTok app and log in with your account.
Once you’ve logged in, go to your Profile by hitting your profile icon.
Source: Insider
Then, tap the three lines in the top right corner.
You should see the Privacy and Settings page.
Source: Insider
After that, navigate to Manage account and hit Delete Account.
Source: Today
There will be a popup message asking why you’re leaving TikTok. You can select an option or skip them by tapping on the Skip button in the top right corner.
Source: The Verge
Next, TikTok will ask you if you want to download your data before removing your account.
If you want to save the data, tap the acknowledgement at the bottom and TikTok will back up your TikTok data.
Tap the continue button on the next page for verifying your choice.
Finally, for confirming to the last decision, tap the Delete account button, and say bye to your account.
How to Delete TikTok Account on Computer or Laptop
Alternatively, you can delete your TikTok account as well through a PC or laptop. The steps are basically similar to the phone’s methods. Here’s how to do it.
On your computer, open any browser and open the TikTok web.
Then, hover over your profile picture in the top right corner of the screen.
After that, click on Settings and hit Manage Account.
Under the Account control, click the Delete button and follow the process which is exactly the same as the phone method.
Source: Backlight
How to Back Up Your TikTok Data
Although you have decided to delete your account entirely and permanently, you may want to save some little pieces of your TikTok data just for your archive. Thankfully, it’s very possible to do. Here’s how you can do it.
To begin with, open the TikTok mobile app and log in with your account.
Then, go to your profile and hit the three lines icon to open the Settings and Privacy section.
Choose the Privacy option and hit Download your data.
For the TXT option, you’ll get a human-readable text file, while JSON will give you a text file that’s formatted like Javascript.
It will take a few days before your data is ready to download.
Once your file has been created, you can hit Download your data.
Additionally, the data you’d like to back up includes profile info, video and comment history, and settings info. However, it doesn’t include your videos. If you want to save your TikTok videos, you’ll have to download them manually.
Conclusion
So, that’s all about how to delete TikTok account on a phone or a PC. It’s worth noting that TikTok will give you 30 days if you want to reactivate your account. This is only if you want to deactivate your account for a temporary time. However, if you don’t reactivate your account for more than 30 days, your account will be permanently deleted.
Knowing how to get verified on TikTok is tremendously necessary. A verified TikTok lends authenticity, trustworthiness, and legitimacy to your account. That means you can get a bigger chance to grow your status, channel, or even your brand.
However, to be recognized and confirmed by TikTok is a bit tricky. The verification is commonly reserved for celebrities, public figures, or big brands. The question is that what makes them legit enough to get the blue tick on their TikTok?
Additionally, getting recognition on TikTok is not the same as you apply for verification on Instagram or YouTube. Only the TikTok teams will seek account that might need verification and grants them to their initiative. But don’t worry about that because we have some great tips on how to get verified on TikTok 2022. Just keep reading!
Well, if you really craving this blue tick checkmark, you need to do these tips to make TikTok glance at you. Let’s take a look at them.
Consistently Produce Contents
Source: Search Engine Journal
The most important point to be noticed by viewers on TikTok is by production content. To make them know you, make sure that you consistently post new content. If you can regularly create new content, at least within the past 6 months, TikTok will see you as an active account.
Fresh and new posts every day will also affect exposure, and increase viewers. In this way, you can grow your channel as well. It doesn’t matter with baby steps. As long as you’re consistent and persistent enough, you’ll get your goal.
Consistently posting new content is not enough to get attention from TikTok. Furthermore, you need to make sure that your content can steal the spotlight too. That said, you have to make sure that your TikTok video got thousands of viewers and stands on the TikTok trend list.
To be able to do that, create original, creative, and appealing content. Try to not be too mainstream. In this case, you can learn how to make your content viral through our previous article.
Have Media Coverage
To spread your message wider, you can try to appear as well on other online media posts. It’s including YouTube clips, any podcast, or others. Additionally, it’s basically helpful to increase your brand exposure and bring traction to your account.
TikTok will count this to verify your account. Otherwise, TikTok doesn’t consider paid media or press release to make your account looks legit.
Create an Authentic Account
Source: Cicero Online
Aside from all that, to make TikTok put you into their consideration, your account should represent a real person or your business. To achieve this, your account’s email domain should match your business, institution, or entity during the verification approval process.
Follow TikTok’s Guideline
It’s worth noting that TikTok will only verify accounts that follow their community guidelines and terms of service. Therefore, you should be careful about behaving on TikTok, or you could violate certain rules unintentionally.
Once you’ve crossed their guidelines, TikTok’s moderators will flag your account. If you ever got a flag, then it will hamper being verified. Or worse….you could say goodbye to the TikTok blue tick.
How Many Followers to Get Verified On TikTok?
Source: PDAM Purworejo
Basically, TikTok doesn’t really have a clear verification process or requirements. Other than that, TikTok also gives no chance to its users to request verification just like on other platforms. When it comes to followers, it’s uncertain how many followers you should have to be taken into account by TikTok.
Some popular creators have hundreds or thousands of followers but they have no blue tick. That’s really strange indeed. But we assume that if your content got thousands of viewers consistently, TikTok may start to look at you. Just don’t give up, and enjoy every process.
Conclusion
So that’s all we can suggest to you regarding how to get verified on TikTok. As one of the most popular platforms, TikTok seems quite strict to recognize its users. Yes, they don’t give any clear requirements, and they even don’t let them request verification.
But overall, the blue tick is only a reward for your hard work. If you’re happy to be a TikTok creator and everyone loves your content, that‘s actually more precious.
Enjoying TikTok videos is undoubtedly addictive and it takes hours to really stop it. But staring in front of a blinding white screen for a long time could make your eyes feel uncomfortable. Thankfully, TikTok dark mode enables you to prevent that from ever happening again. Therefore, you need to learn how to turn on dark mode on TikTok.
Currently, TikTok dark mode is only available for the latest version of iOS. But Android users shouldn’t worry about that, since you still can turn the mode on using our tips here.
Well, to cover TikTok users’ confusion about how to turn TikTok into dark mode, take a look at the tutorial below.
To enable the dark mode on an iPhone is actually easy. You can either use the in-app switch to turn the dark mode on or use system settings on your iPhone. Here’s how.
To begin with, open the TikTok app on your device and log in with your account.
Then, tap on the profile icon on the right bottom side of the screen.
Once you’ve seen your profile page, hit the three lines icon at the top right corner of the screen.
Source: Alphr
Under the Content & Activity section, navigate to the Dark Mode option.
Source: Alphr
After that, you’ll see the appearance options.
Select the Dark option and your interface will immediately switch into dark mode.
Source: doc Alphr
Additionally, you can also turn on the dark mode using iPhone system settings. Once you enable it, TikTok’s interface will alternate between light and dark modes according to your phone’s appearance settings. To do this, follow the instructions below.
First, open the Settings app and hit the Display & Brightness option.
Source: doc. Alphr
In the Appearance section, there will be Light and Dark options.
Then, tap the Dark option to enable it.
Alternatively, you can swipe down your screen from the top corner to open the Control Center menu.
After that, tap and hold the Brightness control button.
Source: Alphr
You’ll see the appearance mode button and tap on the Dark mode to switch your screen into dark mode.
Source: Alphr
How to Turn On TikTok Dark Mode Android
All Android users now can assemble. Though TikTok on Android isn’t supported with an in-app dark mode like on iPhone, there’s still a way to make it happen. Just do the following step by step.
Start over by heading to the Settings app.
After that, select Accessibility.
Then, under Display, turn on the Dark theme.
Voila! Your TikTok interface will turn into dark according to your system UI now.
Conclusion
There you have it. Now that you have known how to turn on dark mode on TikTok, you can spend more time enjoying TikTok dance trends, or other interesting content without having a strain on your eyes. Happy TikToking!
Twitch has become a king of streaming platforms recently. No wonder, many people are starting their streaming careers here. But to optimize your engagement, viewers, and even subscribers, you need to know the best time to stream on Twitch.
Determining when people are most likely to tune in is necessary to make your content reach the right audiences. So, this article will tell you what to stream on Twitch to get viewersand also give tips for how you can attract more people during those prime hours. Check this out.
The best time to go live on Twitch is completely different from the best time to post on TikTok and Instagram. If you are a newcomer and trying to grow your channel and catch more viewers, it’s advisedly to stream at 12 AM and 4 AM PST. At this time, some decent viewers will watch your stream, but most importantly you will not be competing against other channels during these hours of broadcasting.
In addition to that, if your channel has got a big name and you want to reach maximum viewership, then the best time to stream on Twitch PST is between 11 AM and 2 PM. At this time, a lot of people are online and your live streaming might appear on their homepage.
The Best Days to Stream on Twitch
When it comes to the best day to go live on Twitch, Saturdays and Sundays are ideal. People mostly have more free time on the weekend. However, you may have to compete with other streamers as well if you decide to stream these days.
Having less energy to compete with other big Twitch channels? No worries, you can try to broadcast on Monday, Tuesday, and Wednesday. According to the data, those are the days with the lowest amount of competition. Hence, you can gain more engagement and viewers without competing with too many channels.
How to Find The Best Time to Stream on Twitch
Source: Streamers Playbook
Can’t stream during those days and hours? No worries, because you can still find the best schedule for gaining a bunch of audiences with some tips. Curious about that? Well, let’s take a look at our tips below.
Choose the Ideal Time Zone
If you’re a US streamer, and your audience is primarily situated in the United States of America (or more specifically Washington D.C.), it’s best to stick with US time. It can make it easier to people from across our great nation can tune into watch. Some other times may work better for different countries’ viewership – some choose split their live video feed into two parts while others prefer not do this at all but rather make single continuous broadcasts which both have benefits depending on who watches them.
Instead of doing a single 6-hour stream, they’ll split it into two 3 hour streams during the day. This is an excellent strategy if you’d like to stream to two different audiences, targeting multiple audiences.
Game-Centric Times and Viewer Ratio
Some games have a core audience at certain times of day. This is usually the case for party-based or table tops style games, which tend to have their largest influx in evening hours rather than mornings on Twitch streams. Game-centric times might differ from your usual times of streaming. But they can be effective when playing certain types of games.
To realise, when the most viewers are present on your stream, you can check it manually or third-party tool. Such tools are a must-have for any gamer with Twitch. With the most popular games being streamed on this platform, it helps you aggregate data and sees what people are watching at different times of day or night so that your content can be even more appealing. You’ll also get an insight into which periods during gameplay would work best to maximize viewing potential from both viewers and enthusiasts alike.
Choose Times Based on Events
Achieving milestones is important, but it’s not the only way to show your community that they are appreciated. You can also do events like streaming 24 hours in a row or even just giving out prizes for certain tasks completed with #rewardshotline type of hashtags on Twitter.
Planning ahead for your next gaming event is important. Although you may want to keep it sparse, don’t forget that a community build up and saturation period can really help make an unforgettable experience.
Gain Traction Using Social Media
If you have other social media with a following, such as YouTube or Facebook that your audience may be on already, then it’s possible to leverage the momentum from those platforms. For example, there are “Going Live” posts which can generate hype by telling them what type of content will come next in their stream session while also giving viewers an idea for when they should tune into see how things go down.
We hope this guide helped you find the perfect time to stream on Twitch. Remember that it’s important to choose a time zone based on your audience and find times when there are fewer channels streaming so viewers will pay attention to yours. Keep in mind, too, that what works for one person may not work for another-there is no magic formula here! But these tips should help get you started with finding the best possible schedule.


 Source: YouTube
 Source: Streamers Playbook