Home Blog Page 2

Eklipse GG vs Opus Clip: The Best AI Video Editor 2025

0

Creating engaging video content is key for platforms like TikTok, Instagram Reels, and YouTube Shorts. Two powerful tools that stand out are Eklipse GG and Opus Clip. Each tool offers unique features to enhance your video editing, but they cater to different needs and content styles.

Wondering which is the best AI video editor in 2025: Eklipse GG vs Opus Clip? This comparison will guide you in choosing the right tool based on your editing requirements. Keep reading to explore their features and differences.

Eklipse GG vs Opus Clip Comparison

To help you quickly understand the key differences and strengths of each tool, here’s a comparative summary:

FeatureEklipse GGOpus Clip
AutomationAI-powered highlight detection, voice commandAI-driven clip generation from long-form videos
CustomizationCustomizable gaming-centric templatesCustomizable styles and templates for various content types
Ease of UseUser-friendly, designed for gamers and streamersIntuitive interface with advanced features
Best ForGamers and streamersContent creators repurposing long-form videos
AvailabilityOnline via their web appOnline via their web app
ProsSimplifies editing, integrates with multiple platformsEfficient repurposing, supports various content types
ConsRequires internet, focused on gamingLearning curve, subscription for advanced features

More on Eklipse Blog >>> Eklipse vs Vizard: Clash of the AI Video Editing Titans

Detailed Comparison: Eklipse GG vs Opus Clip

Eklipse GG

Source: Eklipse.gg

Overview

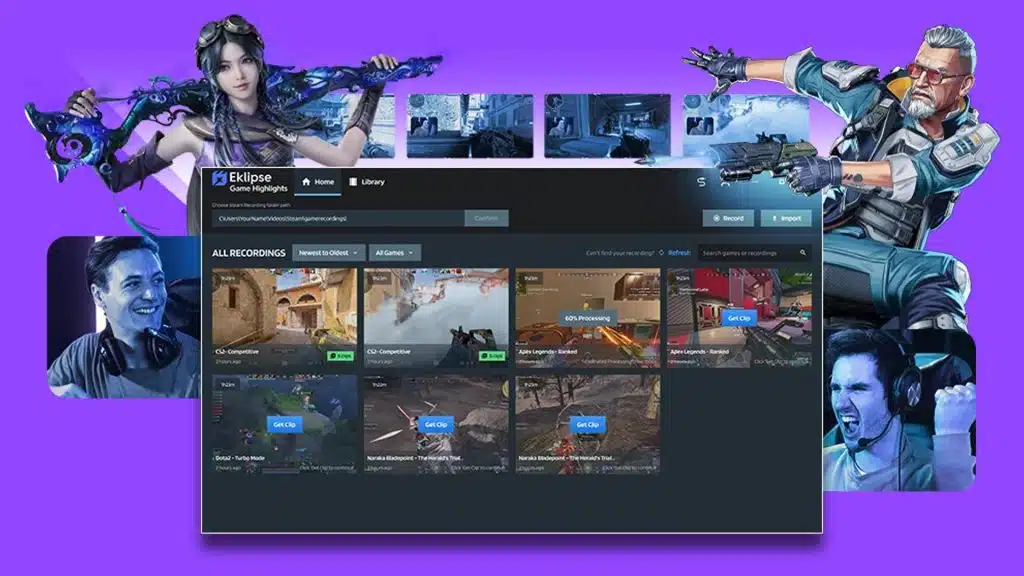
Eklipse GG is an AI-powered tool designed to automatically generate highlights from gaming streams. It identifies key moments in your streams and converts them into short, shareable clips. This makes it particularly useful for gamers and streamers who want to produce engaging content quickly and effortlessly.

Key Features

  • AI Highlight Detection: Automatically detects and clips the best moments from your streams.
  • Voice Command: Allows hands-free clipping while streaming, making it incredibly convenient for gamers.
  • Customizable Templates: Offers various templates to customize your clips and enhance their appeal.
  • Social Media Optimization: Tailors clips for platforms like TikTok, Instagram, and YouTube, ensuring they are ready for immediate sharing.
  • Mobile App: Features a mobile app for on-the-go editing and clip management, adding to its versatility.
  • Expanded Content Support: Now caters to other niches including sellers, podcasters, and sports highlights, broadening its appeal beyond gaming.

Pros

  • Automated Clipping: Reduces the time and effort needed to create highlight reels.
  • Easy to Use: Intuitive interface suitable for both beginners and experienced users.
  • Versatile: Works with multiple streaming platforms including Twitch, YouTube, and Facebook Gaming.

Cons

  • Internet Dependence: Requires a stable internet connection for AI features.
  • Gaming Focused: Primarily designed for gaming content, which might not suit all users.

Availability

  • Platform: Online via their web-app
  • Learn More: Eklipse

More on Eklipse Blog >>> Eklipse vs Kapwing: Throwdown in the Video Editing Arena!

Opus Clip

Overview

Opus Clip is a robust AI-driven video editing tool that converts long-form content into short, engaging clips. It is ideal for content creators looking to repurpose their YouTube videos, podcasts, webinars, and other long-form content into shorter videos for social media. This versatility makes it suitable for various users beyond just gamers.

Key Features

  • AI-Driven Clip Generation: Automatically generates clips from long-form videos, perfect for social media.
  • Customizable Styles and Templates: Offers various themes and styles to personalize your videos.
  • Text-to-Video: Converts text into engaging videos with AI-driven automation.
  • Multi-Platform Sharing: Optimizes videos for multiple platforms, including TikTok, Instagram, and YouTube, ensuring your content reaches a broad audience.

Pros

  • Efficient Repurposing: Great for converting long-form content into bite-sized clips, saving time and effort.
  • Multi-Purpose: Suitable for various types of content beyond gaming, such as educational and marketing videos.
  • Customizable: Provides extensive customization options for videos, allowing for creative flexibility.

Cons

  • Learning Curve: May require some time to learn all the features effectively.
  • Subscription Costs: Some advanced features may require a subscription, which could be a consideration for budget-conscious users.

Availability

  • Platform: Online via their web app
  • Learn More: Opus Clip

More on Eklipse Blog >>> Eklipse vs Powder.gg: Choose Your Warrior!

Final Thoughts

When deciding between Eklipse GG and Opus Clip, it’s important to consider your content creation needs. Eklipse GG is ideal for gamers and streamers looking to generate highlight reels easily. Recently, the platform has expanded its capabilities, now supporting YouTube, podcasts, sports, and e-commerce videos, making it a versatile tool.

Interested in seeing how Eklipse works? Sign up for a free account at Eklipse.gg and explore its features for yourself. Eklipse GG vs Opus Clip is a tough comparison, but the best AI video editor will depend on your specific content goals.


Maximize your Black Ops 6 rewards—Create highlights from your best gameplay with with Eklipse

Eklipse help streamer improve their social media presence with AI highlights that clip your Twitch / Kick streams automatically & converts them to TikTok / Reels / Shorts


Top 10 Free AI Voice Generators, Create Professional Sounding Audio!

0
AI Voice Generator
AI Voice Generator

Advancements in AI and voice synthesis have made it simpler to access free AI voice generator. Nowadays, creating high-quality voiceovers no longer requires expensive equipment or multiple voice samples. With AI’s capabilities, anyone can now replicate a wide range of voices, making it a valuable tool for creators of all kinds.

As more individuals explore AI voice technology like ElevenLabs, Lovo.ai, Murf.ai, the opportunities for utilizing these tools grow. If you’re just starting out, there are several free AI voice generators available to help you create professional-sounding audio quickly and easily.

1. ElevenLabs: Best AI for Voice Cloning

Source: ElevenLabs

ElevenLabs is an advanced AI tool designed for audio production, voice cloning, and content creation. Its features make it a top choice for content creators, businesses, and game developers. With high-quality audio capabilities, ElevenLabs is transforming how audio content is produced and consumed. As one of the best free AI voice generator, it also offers free AI voice text to speech technology. Users can take advantage of its AI voice generator free download option to explore its full potential.

Key Features:

  1. High-Quality Audio: ElevenLabs generates spoken audio that mirrors human intonation and inflections, making it suitable for various applications such as content creation, game development, and business storytelling.
  2. Diverse Applications: The tool is perfect for anyone involved in the content creation industry, including content creators, game developers, and businesses. It’s also a great tool for authors and publishers looking to create engaging audiobooks.
  3. AI Models: ElevenLabs offers different AI voice models that can be used for various purposes, including text-to-speech, speech-to-speech, and voice cloning.
  4. Knowledge Base and Email Tickets: The platform provides a comprehensive knowledge base with over 90 articles covering major user queries, as well as email support for troubleshooting issues.
  5. Discord Community: ElevenLabs has a helpful Discord community where users can interact with each other and get assistance with any problems they encounter.
  6. ElevenLabs Roadmap: The platform is actively developing new features, with a changelog that shows consistent additions of features, such as the Dubbing Studio Alpha and the Voice Library 3.0.

Pros:

  • Realistic voice synthesis
  • Free plan available
  • Voice cloning technology
  • Text-to-speech model
  • Creative AI toolkit

Cons:

  • Limited customization options
  • Average voice dubbing
  • Complex pronunciation dictionary

Price: 

  • Free with basic features
  • Starter plan at US$5 per month
  • Creator plan at US$22 per month
  • Pro plan at US$99 per month 
  • Scale plan at US$330 per month

2. Murf.ai: Best Voice Generator with Large Voice Library

free ai voice generator murf.ai
Source: Murf.ai

Murf.ai is one of the top AI voice generators available and it makes it easy for anyone to turn text into speech, voiceovers, and dictation. This tool is particularly useful for product developers, podcasters, educators, and professionals. 

Murf generates natural-sounding voices quickly and with minimal effort, and they can be applied to a variety of industries. With over 110 voices in 15 different languages, Murf offers a wide range of possibilities.

Key Features:

  1. Large Voice Library: Choose from over 120+ realistic AI voices in 20+ languages.
  2. Voice Cloning: Create a voice that sounds similar to a specific person (may require additional fees).
  3. Voice Customization: Control aspects like pitch, pace, and emphasis for a personalized feel.
  4. Studio Controls: Fine-tune your recordings with features like background music and noise reduction.
  5. Integration with popular platforms (e.g., Youtube, Google Drive) for easy workflow.

Pros:

  • Produce professional-sounding voiceovers.
  • Faster and more affordable than hiring voice actors.
  • Simple interface for quick content creation.
  • Wide range of voice options for different project needs.
  • Adjust the tone to convey specific emotions (e.g., excitement, seriousness).

Cons:

  • Less control over voice characteristics compared to some competitors.
  • Downloads and features are restricted in the free tier.
  • Voice cloning technology raises privacy questions.

Price:

  • Free with basic features
  • Creator plan at US$29 per month
  • Business Unlimited plan at US$99 per month
  • Enterprise package (custom)

More on Eklipse Blog >> 5 Best AI Video Generator Online That You’ll Love to Use!

3. Listnr.tech: Best AI Voice Generator for Bloggers

free ai voice generator listnr.tech
Source: Lstnr

At the top of our list of the best AI voice generators is Listnr.tech, a text-to-speech tool that allows you to convert text into speech with various options like genre selection, pauses, accent choice, and more.

One of its standout features is the ability to get your customized audio player that can be easily embedded in your blog as an audio version. Listnr supports over 17 languages and AI technology can translate blog posts into different languages and dialects. 

Key Features:

  1. Text-to-Speech (TTS): Convert written text into audio with a variety of voices and languages.
  2. Audio Editing: Basic editing tools to trim, add silence, and adjust audio levels.
  3. Content Creation Tools: Insert background music and sound effects (availability might depend on plan).
  4. Multi-platform Distribution: Publish your audio content directly to major podcast platforms.
  5. Analytics Tracking: Monitor the performance of your content (might depend on plan).

Pros:

  • Straightforward interface for quick audio creation.
  • Produces clean and clear voiceovers.
  • Use for various purposes like podcasts, audiobooks, and explainer videos (depending on plan).
  • Free plan available for basic use
  • Creates audio content for visually impaired audiences.

Cons:

  • Simpler editing tools compared to dedicated audio editing software.
  • Limited word count and features in the free tier.
  • Voices may not sound perfectly natural in all situations.

Price:

  • Free with basic features
  • Student plan at US$5 per month
  • Individual plan at US$19 per month
  • Solo plan at US$39 per month
  • Agency plan at US$99 per month

4. Audiosonic: Best AI to Generate Human-Like Voice

Writesonic’s Audiosonic is a revolutionary AI voice generator that transforms your text into lifelike, human voices instantly. Ideal for businesses and creators seeking exceptional audio experiences, Audiosonic offers professional AI voiceovers with a natural touch.

Unlike other tools, Audiosonic doesn’t produce robotic speech; instead, it breathes life into words, creating astonishingly authentic human-like voices within seconds. Whether you’re crafting gaming content or engaging podcast stories, Audiosonic is your all-in-one voiceover solution.

Key Features:

  1. Human-Like Voices: Audiosonic delivers a natural, emotionally rich speech that captivates your audience instantly, making AI voice generation effortless.
  2. Global Communication: With support for multiple languages, Audiosonic facilitates seamless global communication, enabling you to expand your business worldwide.
  3. On-Demand Audio Generation: No more waiting—Audiosonic instantly converts your text into high-quality, engaging audio, ensuring your brilliant ideas are captured while they’re hot.
  4. Seamless Integration: Audiosonic seamlessly integrates with Writesonic and Chatsonic, elevating content creation to a new level. Enjoy a full suite of content creation with Audiosonic by your side.

Pros:

  • Turns text into audio quickly.
  • Cheaper than hiring voice actors.
  • Simple interface for quick audio creation.
  • Works seamlessly with other Writesonic content creation tools (if applicable).
  • Choose from a variety of voices for different project needs (depending on your Writesonic plan).

Cons:

  • Fewer voices compared to some competitors (might depend on plan).
  • May not achieve perfect human-like quality.
  • Might require purchasing the entire Writesonic package.

Price:

  • Free trial for 10 minutes duration
  • US$10 for 40 minutes duration
  • US$25 for 100 minutes duration 
  • US$50 for 200 minutes duration
  • US$100 for 400 minutes duration

5. Synthesys.io

free ai voice generator synthesys.io
Source: Synthesys

Synthesys.io is a widely used and highly effective AI voice generator that makes it easy for anyone to create professional-sounding AI voiceovers for Kick, Twitch, and many more platforms with just a few clicks.

This cutting-edge platform uses advanced algorithms to convert text into voiceovers and videos for commercial purposes. Synthesys’ Text-to-Speech (TTS) and Text-to-Video (TTV) technology will turn your script into dynamic and engaging media presentations.

Key Features:

  1. Text-to-Speech (TTS): Convert written text into realistic-sounding voices in multiple languages.
  2. AI-powered Avatars: Generate lip-synced videos featuring avatars that speak your script. You can even upload custom avatars.
  3. Easy to Use: Cloud-based platform with a simple interface. No technical skills required.
  4. Multiple Voice Options: Choose from a variety of pre-recorded voices or use their custom voice creation tool (which might require additional fees).

Pros:

  • High-quality, natural-sounding voices.
  • User-friendly interface for quick video creation.
  • Cost-effective compared to hiring voice actors and video editors.
  • Produce a high volume of content consistently.
  • Make content more accessible for visually impaired users.

Cons:

  • Limited control over avatar appearance and animation.
  • Can be expensive for high-volume usage.
  • The free plan has limitations (number of videos, voice options).

Price:

  • Free with basic features
  • Personal plan at US$29 per month
  • Creator Unlimited plan at US$59 per month
  • Business Unlimited plan at US$99 per month
  • Enterprise package (custom)

More on Eklipse Blog >> 4 Best AI Video Clipping Tools to Try

6. Wellsaid Labs: Best AI to Generate Realistic Voice

WellSaid Labs excels in delivering top-notch voice synthesis, producing remarkably clear and natural-sounding voices that maintain a professional and engaging quality. The platform offers a wide range of customizable voice avatars, empowering users to tailor voices to their specific brand identity, and enhancing the personalization of their digital experiences and content. Additionally, the user-friendly interface and streamlined pro.

Key Features:

  1. WellSaid Studio: A text-to-speech bot that generates high-quality, natural-sounding voices from written text.
  2. WellSaid Avatar: A custom voiceover AI tailored to match a brand’s identity, allowing for unique and personalized voiceovers.
  3. WellSaid API: A RESTful API that provides direct access to WellSaid Labs services, enabling seamless integration into various workflows and applications.

Pros:

  • High-quality voice synthesis
  • Offers a range of voice styles, tones, and languages
  • Seamless integration with various platforms and tools
  • Allows for customization of voice tone, pace, and volume
  • Easy to use for beginners

Cons:

  • Limited language options
  • Limited customization
  • Quality variation between voiceless makes it accessible to users without requiring extensive technical expertise.

Price:

  • Free 1-week trial for studio features
  • Free 2 weeks trial for API access
  • Maker plan at US$49 per month
  • Creative plan at US$99 per month
  • Business plan at US$199 per month
  • Enterprise (custom)

7. Synthesia: Best Multilingual AI Voice Generator

Synthesia is an AI video generation platform that enables companies to transform boring documents, PowerPoints, or PDFs into engaging training, marketing, or how-to videos. It offers a range of features that make video creation easy, fast, and cost-effective. The platform supports multiple languages and avatars, allowing for personalized and high-quality video content.

Key Features

  1. Text-to-Video: Convert simple text into professional-looking videos up to 30 minutes long.
  2. 60+ Languages: Supports a wide range of languages for multilingual video creation.
  3. 60+ AI Avatars: Offers a variety of avatars for customization, with the option to create custom avatars.
  4. Custom Backgrounds: Upload any image or video as a background for videos.
  5. Audio Uploads: Record real voice clips and upload them to create video clips with the AI presenter.
  6. Background Music: Includes a selection of royalty-free background music tracks.
  7. MP4 Downloads: Each video comes in Full HD (1920×1080) resolution and can be downloaded from the platform.
  8. Video Sharing Pages: Each video gets a dedicated video-sharing page for sharing with colleagues or clients.
  9. Multi-Slide Videos: Combine Synthesia videos into one video or create rich slide deck video experiences.

Pros:

  • Easy to use and navigate
  • High-quality video output
  • Versatile customization options
  • Supports multiple languages and avatars
  • Fast video creation process

Cons:

  • A limited number of videos and no API access in the Personal plan
  • Some minor issues with lip-syncing and pronunciation
  • Limited selection of avatars and voices for specific branding needs

Price:

  • Free trial
  • Starter pack at US$29 per month
  • Creator pack at US$89 per month
  • Enterprise pack (custom)

8. Play.ht: Best AI Voice Generator for Podcasts

Play.ht is a text-to-speech (TTS) platform that offers a wide range of AI voices for converting written content into natural-sounding human-like voice performances across multiple languages and accents. It is trusted by individuals and teams for generating expressive speech, voice cloning, and creating conversational human-like agents. Numerous individuals leverage this platform to produce voiceovers for podcasts, trailers, or explanatory videos.

Key Features:

  1. AI Voice Generator: Offers over 900 AI voices that can create ultra-realistic text-to-speech voiceovers.
  2. Play Agents: Allows users to create conversational human-like agents using Voice AI.
  3. Voice Cloning: Enables users to clone voices using 2-3 hours of speech.
  4. Customization Options: Includes features like adjusting the speed and pitch of the voice.
  5. Integration: Supports integration with platforms like WordPress, Shopify, Medium, and others.
  6. API and Voice Cloning Technical Support: Offers technical support for API and voice cloning.

Pros:

  • Offers a variety of voice options, including male, female, and neutral voices.
  • Allows for adjustments to voice speed and pitch.
  • Simple integration with various platforms.
  • Produces high-quality audio with natural-sounding voices.
  • Enables users to clone voices with high accuracy.

Cons:

  • Voice generation can sometimes sound robotic or unnatural.
  • Limited audio post-processing capabilities, such as noise reduction or equalization.
  • Limited support for non-English languages

Price:

  • Free plan with basic features
  • Creator plan at US$39 per month
  • Unlimited plan at US$99 per month
  • Enterprise plan (custom)

9. Respeecher: Best Voice Generator for Creative Content

Respeecher is a cutting-edge AI-powered platform that specializes in voice cloning technology, offering a range of innovative features and applications across various industries. The platform is designed to create speech that closely matches the original speaker’s voice, with a focus on high-quality audio production and the retention of emotional tone and subtle nuances. 

This technology has significant implications for content creators, filmmakers, game developers, advertisers, and other professionals who require realistic voiceovers or voice manipulation.

Key Features:

  1. Speech-to-Speech Conversion: Respeecher’s primary function is to convert audio recordings into different languages or voices. This feature is particularly useful for content creators, marketers, and businesses looking to expand their global reach or create engaging content.
  2. AI-Powered Technology: The platform utilizes advanced artificial intelligence and machine learning algorithms to ensure high-quality conversions, making it an efficient and reliable tool for users.
  3. Multi-Language Support: Respeecher supports a wide range of languages, including popular languages like English, Spanish, French, Mandarin, and many more.
  4. Voice Conversion: Users can also convert audio recordings into different voices, such as male or female, or even create a custom voice based on a specific speaker.

Pros:

  • High-quality conversions
  • Efficient and reliable
  • Supports multiple languages
  • Customizable voice options
  • Cost-effective

Cons:

  • Limited control over the conversion process
  • May not always produce perfect results
  • Can be computationally intensive

Price:

  • Free trial
  • Text-to-Speech feature only at US$0.8 per month
  • Explorer plan at US$29 per month
  • Creator plan at US$45 per month
  • Power plan at US$250 per month
  • Credits: US$6.6 per credit

10. Lovo.ai: Best AI in Generating Emotional Voice

Lovo.ai specializes in generating emotional voices.  Their AI can add inflections and emotions to your text-to-speech output, useful for creating engaging audiobooks, educational content, or marketing narratives. Lovo.ai is particularly useful for creating voiceovers for videos, phone systems, and podcasts, as well as for virtual assistants and chatbots, content creation and marketing, language learning and education, and accessibility and inclusion initiatives.

Key Features:

  1. AI Voice Generation: Lovo.ai utilizes advanced artificial intelligence technology to generate realistic and high-quality voiceovers that are almost indistinguishable from human voices.
  2. Text-to-Speech Conversion: Lovo offers a powerful text-to-speech conversion capability, allowing users to convert written text into natural-sounding speech with ease.
  3. Extensive Voice Library: Lovo provides access to an extensive library of voices, languages, and accents, ensuring users can find the perfect voice to match their brand or project.
  4. Multiple Speakers: Lovo allows users to create voiceovers featuring multiple characters effortlessly, with a wide selection of stock voices to choose from.
  5. Customization Options: Lovo enables users to customize their voiceovers by adjusting speed, adding pauses, and editing timing to match their video or audio content.
  6. Document and SRT Upload: Lovo supports document upload in various formats like doc, pdf, and txt, making it easy to create audio versions of articles, books, presentations, and more. It also allows for the upload of SRT files for automated alignment of voiceover to video.

 Pros:

  • Highly realistic and emotional voices
  • Custom voice cloning
  • Export videos in HD
  • Supports accessibility for individuals with visual impairments or learning disabilities
  • Wide range of AI voices and languages

Cons:

  • Voice cloning only supports English
  • No background noise is allowed during voice cloning
  • Some voice skins may sound robotic

Price:

  • Free plan with basic features
  • The basic plan at US$29 per month
  • Pro plan at US$48 per month
  • Pro+ plan at US$149 per month
  • Enterprise (custom)

FAQ

1. Is there a free AI generator?

Yes, there are free AI generators available. Many offer basic features at no cost.

2. Is voice AI free forever?

Some voice AI tools offer free plans, but they may have limitations. Paid plans provide additional features and functionality.

3. What is best free AI?

The best free AI depends on your needs. Popular options include tools for text generation, voice synthesis, and image creation.

Final Thoughts

The 10 AI voice generators listed here are among the best in 2025. These tools offer various features, from AI voice generator text to speech to advanced voice cloning. They are ideal for different content creation needs, including language support and budget considerations. Choosing the right generator depends on the specific type of content you’re working on.

Eklipse is another impressive AI app to explore. While not a voice generator, it acts as an AI video tool that creates clips from streams. Its advanced algorithms scan gameplay, bloopers, and viewer interactions, making it a great option for content creators. Eklipse automatically curates exciting and engaging moments, acting like a personal editor for your streams.

Best TikTok Alternatives in 2025: Reels vs. Shorts vs. RedNote

0

As TikTok faces increasing scrutiny and potential bans in some regions, users and content creators are exploring alternative platforms for short-form videos. The landscape for social media platforms is rapidly changing, and in 2025, several strong alternatives have emerged, offering unique features and opportunities for creators. Whether you’re seeking a larger audience, different content styles, or more monetization options, these platforms provide solid options.

In this article, we’ll explore the top TikTok alternatives in 2025: Instagram Reels, YouTube Shorts, and RedNote (Xiaohongshu), alongside other notable contenders. By comparing these platforms, we aim to help you determine which one best suits your content creation style, audience reach, and marketing needs.

Let’s dive into the features, pros, and cons of each, and discuss how creators and marketers can make the most of these platforms for sharing their videos.

1. Instagram Reels

how to post instagram reels
Instagram Reels

Instagram Reels is integrated directly into Instagram, giving creators access to over 2 billion active users. Reels allows videos up to 90 seconds and provides a variety of editing tools, filters, and effects.

  • User Base: Instagram’s massive user base makes Reels an excellent platform for creators looking to reach a global audience. With a built-in network, it’s ideal for both new and established creators, though building a following may take time due to the algorithm’s complexity.
  • Revenue Share: Instagram provides monetization options through Instagram’s in-app ads (including Reels ads) and affiliate marketing opportunities. However, it’s still not as straightforward as TikTok’s Creator Fund.
  • Content Policy & Potential Issues: Instagram has a robust content policy, and creators should be mindful of their content adhering to community guidelines. As Reels is part of Facebook’s broader ecosystem, it faces similar regulatory pressures, particularly around privacy concerns, much like TikTok. While Instagram isn’t directly at risk of a ban, increased scrutiny in some countries is possible.

Pros:

  • Huge, established audience.
  • Familiar interface and integration with Instagram’s broader features.
  • Monetization through ads and affiliate programs.

Cons:

  • Algorithm can be difficult for new accounts to break through.
  • Less music-centric compared to TikTok.

2. YouTube Shorts

YouTube Shorts

YouTube Shorts operates within YouTube’s ecosystem, which has over 2 billion active users. It’s focused on discoverability and provides strong monetization opportunities, especially for creators already on YouTube.

  • User Base: YouTube’s immense global audience and search engine integration make Shorts a powerful tool for creators. Shorts is particularly beneficial for those who already have YouTube channels, as it helps boost traffic to other video content.
  • Revenue Share: YouTube Shorts offers monetization through the YouTube Partner Program (YPP), with ad revenue sharing. Shorts creators can earn from ads shown in Shorts, though it’s still a new program and less developed than YouTube’s long-form monetization.
  • Content Policy & Potential Issues: YouTube has stringent content policies, but it remains one of the safest platforms in terms of regulatory scrutiny. While YouTube Shorts is unlikely to face the same kind of bans TikTok faces, it is still subject to YouTube’s broader content and privacy regulations.

Pros:

  • Massive audience with great discoverability.
  • Established monetization through ads and the YPP.
  • Great SEO potential for evergreen content.

Cons:

  • Competition is high, especially for new creators.
  • The algorithm favors established channels over newcomers.

RedNote (Xiaohongshu)

Rednote TikTok

RedNote, also known as Xiaohongshu, is a rapidly growing Chinese platform that blends social commerce, lifestyle content, and short-form videos. With 300 million active users, it has a strong presence, especially in Asia.

  • User Base: RedNote is ideal for creators focused on product discovery, lifestyle content, and social commerce. While it’s still growing globally, it has a strong foothold in China and Southeast Asia. However, creators targeting non-Asian audiences may face limitations.
  • Revenue Share: RedNote offers monetization through partnerships with brands, social commerce features, and influencer marketing. Direct revenue share options like TikTok’s Creator Fund are not yet available.
  • Content Policy & Potential Issues: RedNote faces regulatory challenges similar to TikTok. As a platform based in China, it may be subject to government scrutiny, and some users outside China have expressed concerns over censorship and privacy. However, it’s less likely to face the same level of risk as TikTok in the West due to its more niche focus.

Pros:

  • Unique blend of social commerce and video content.
  • Rapidly growing user base, especially in Asia.
  • Great for creators in lifestyle, beauty, and product niches.

Cons:

  • Primarily Mandarin-based, which may limit accessibility.
  • Faces similar scrutiny to TikTok, particularly regarding privacy issues.

4. Lemon8

Also owned by ByteDance, Lemon8 is focused on aesthetics and lifestyle content, attracting creators who emphasize visual appeal and curated experiences. With 12.5 million users, Lemon8 is still a small player compared to giants like Instagram and YouTube.

  • User Base: Lemon8 is growing, but its user base is smaller than other platforms like Instagram and YouTube. It’s best for creators who focus on aesthetically-driven content but may not yet be ideal for creators seeking a broad audience.
  • Revenue Share: As of now, Lemon8 doesn’t have a clear monetization model like YouTube or Instagram. However, it is expected that monetization options may emerge as the platform grows.
  • Content Policy & Potential Issues: As with TikTok, Lemon8’s ByteDance ownership raises concerns over data privacy. Additionally, the platform’s niche appeal could limit its growth or face potential bans in certain regions due to its connection to ByteDance.

Pros:

  • Focus on visually appealing and aesthetic content.
  • Growing user base, especially in lifestyle niches.

Cons:

  • Smaller audience compared to other platforms.
  • Possible future challenges due to ByteDance ownership and privacy concerns.

5. Triller

Triller is a music-driven video platform, offering AI-powered editing tools that make it popular among musicians and content creators in the entertainment sector. With 65 million users, Triller targets the music and entertainment niches.

  • User Base: Triller’s user base is smaller compared to platforms like Instagram and YouTube. It caters mostly to musicians, artists, and content creators in the entertainment industry, making it more niche.
  • Revenue Share: Triller does not have a significant ad revenue share program yet, but it focuses on influencer collaborations and brand partnerships for monetization.
  • Content Policy & Potential Issues: While Triller isn’t under the same regulatory pressures as TikTok, it may face some scrutiny in the U.S. and other markets due to its focus on music and entertainment. However, it is not at immediate risk of bans like TikTok.

Pros:

  • Focus on music and entertainment, ideal for creators in these niches.
  • Easy-to-use editing features with AI-powered tools.

Cons:

  • Smaller audience than mainstream platforms.
  • Limited monetization options.

6. Snapchat Spotlight

Snapchat’s Spotlight platform is dedicated to short-form videos, allowing creators to share spontaneous, fun content. Snapchat has 375+ million users, with a strong focus on creative, real-time video.

  • User Base: Snapchat has a strong and engaged user base, though its focus is more on younger demographics. Spotlight provides a space for quick, creative videos but lacks long-term content strategies.
  • Revenue Share: Snapchat offers a monetization program for Spotlight creators, providing a share of its revenue pool based on performance.
  • Content Policy & Potential Issues: While Snapchat has stricter guidelines than TikTok, it faces less regulatory scrutiny. However, Snapchat’s ephemeral nature (content disappearing after 24 hours) and its reliance on AR lenses for creativity may make it less suitable for long-form or evergreen content.

Pros:

  • Emphasis on creativity with AR lenses and fun features.
  • Revenue share for top-performing Spotlight videos.

Cons:

  • Focus on short-term, spontaneous content.
  • Less suited for creators seeking to build long-term, evergreen content.

Other Alternatives

Several other platforms also offer short-form video capabilities, such as Clapper (community engagement), Funimate (creative editing), Zigazoo (kid-friendly), and Fanbase (niche communities). Each platform provides unique features, but they tend to have smaller, more focused user bases compared to the major players listed above.

Considerations for Creators and Marketers

  • Audience Reach: Instagram Reels and YouTube Shorts offer the largest audiences, making them ideal for creators looking to maximize reach.
  • Monetization: YouTube Shorts provides monetization through ad revenue sharing, while platforms like Triller and RedNote rely on brand partnerships and influencer collaborations.
  • Content Style: For music-driven content, Triller shines, while RedNote caters well to lifestyle and product-focused videos. Lemon8 appeals to aesthetically driven content creators.

Conclusion

The best TikTok alternative in 2025 depends on your content style, audience, and monetization needs. Platforms like Instagram Reels and YouTube Shorts offer large user bases and monetization opportunities, making them excellent choices for most creators. Meanwhile, platforms like RedNote and Triller cater to more niche audiences but offer unique opportunities in social commerce and music-driven content.

As the short-form video landscape evolves, creators need to consider what matters most—whether it’s audience reach, creative tools, or monetization opportunities. By understanding each platform’s strengths and weaknesses, you can make a more informed decision on where to focus your efforts and maximize your content’s potential.

How to Stream Snipe in Warzone [Full Guide 2025]

0

Recently, players have been searching for answers to how to stream snipe in Warzone. But what exactly is stream sniping? It refers to a situation where a player watches someone else’s live gameplay stream and uses that information to gain an unfair advantage. This may involve tracking the streamer’s movements, eliminating them, or otherwise disrupting their gameplay.

Deceptive actions in gaming can be just as harmful as those in the real world. Stream sniping can also lead to severe consequences. This article aims to highlight the risks of stream sniping and help streamers remain vigilant against such tactics.

Repurpose, reignite, repeat! Eklipse helps you milk the most out of your Warzone streams by converting highlights into captivating social media shorts, keeping your audience hooked and your channel thriving.

How To Stream Snipe in Warzone?

It may be tricky and risky to stream snipe other players. Especially when you are targeting famous and professional players. But if you are brave enough to attempt this, let’s explore the methods used.  Again, we strongly discourage this behavior.

1. Be In The Same Game With The Target

First, you would need to be in the same game and on the same map as your target. You’d have to be able to see their perspective to gain any advantage.

2. Prepare The Same Skill Rating

Skill-based matchmaking (SBMM) in games like Warzone makes it more likely you’ll encounter players of similar skill levels. Stream snipers often try to manipulate this to get into the same match as their target.

3. Make Sure You Get In The Same Server

Depending on the game, server selection might play a role. Stream snipers may try to guess the streamer’s server to increase their chances of being in the same match.

Call of duty warzone
Source: IST – How to Stream Snipe in Warzone

4. Pay Attention to the Streaming Mode (and Delays)

Most online games have user-friendly mode as their feature, including Warzone. So, you have to take advantage of this. As a bander, you’ll be anonymized. That means, there will be no one cutting you off.

5. Follow The Banner Flows

If you are successful in stream snipping and you will do it to the same target, you just need to go to the same place on another day. Then, follow the flow. This may be the hardest part to stream snipe.

Though it may seem easy, stream sniping is difficult, unreliable, and unethical. It’s simply not worth doing. Focus on improving your own skills and enjoying the game fairly.

How to Prevent Other People Stream Snipe

latency mode can prevent stream snipe in warzoine
Source: IST

There are several ways to prevent stream snipers. One of the easiest methods to prevent stream snipers is by delaying your stream. By adding a delay, the stream snipers will have a harder time using the information they see, as it will be outdated.

We have a detailed guide article on how to prevent stream snipers that you can check out: What is Stream Sniping? And 2 Easy Tips to Prevent Them

But, for the quick guide, you can follow these steps to delay your streams via Twitch:

  1. Go to the Twitch.
  2. Click the profile icon, choose Creator Dashboard.
  3. Click Settings Stream.
  4. Look for the Latency Mode option.
  5. Tick the Normal Latency option.

Additional tips:

  • Hide Queue Times:  Avoid revealing how long you’re waiting in queues, as this can help snipers time their entry into matches.
  • Obscure Identifying Information: Be mindful of information that could reveal your location in-game, such as map details or unique landmarks.
  • Report Stream Snipers: If you encounter stream snipers, report them to the platform you’re streaming on.

Clip Your Stream Sniping Using Eklipse

Okay, you succeeded stream sniping. Then, what’s next? Of course you need to share the best moments through your social media, right?

Now you can easily edit your gaming streams using Eklipse. Our amazing AI will help you turn those long footage into short clips that’s TikTok-ready. And it’s all for free!

Wondering how to do it? Find out the steps below:

  1. Sign up for a free Eklipse account here.
  2. Connect Eklipse with your streaming platform, like Twitch, Kick, or YouTube by hitting the cable icon.
  3. Clips > Streams tab > All Streams section.
  4. Find the stream you want to edit, click it.
  5. Click Convert to TikTok/Reel/Shorts.
  6. Edit it however you like. You can trim, add channel stickers, template, and even audio.
  7. Hit Share to directly share your clip.

More on Eklipse Blog>>> How to Clip Something on PC in 3 Different Methods

FAQs

1. Can you get banned for stream sniping?

Stream sniping violates the terms of service on most streaming platforms. Offenders can be reported and may face bans based on the severity of their actions.

2. Is it cheating to stream snipe?

Stream-sniping is unfair cheating that ruins the experience and violates fair play principles.

3. Is stream sniping rude?

Stream sniping can lead to harassment and bullying, negatively affecting streamers’ mental health and well-being.

Conclusion

In conclusion, while learning how to stream snipe in Warzone might seem tempting, it ultimately disrupts the fair play environment and can lead to penalties or bans. Players should focus on improving their skills through legitimate strategies and avoid negative behaviors. Streamers can protect themselves by using stream delays, creating a safer and more enjoyable experience for everyone involved. Always prioritize respect and fair play in the gaming community.


Maximize your Black Ops 6 rewards—Create highlights from your best gameplay with with Eklipse

Eklipse help streamer improve their social media presence with AI highlights that clip your Twitch / Kick streams automatically & converts them to TikTok / Reels / Shorts


A Guide on How to Marvel Rivals Highlights, Saving Your Best Plays for Sharing

0

Marvel Rivals offers intense gameplay that highlights your best moments, whether you’re executing a flawless strategy or pulling off a game-winning move. Capturing these moments is a great way to relive your victories, share with friends, or create content. The game automatically saves some of your top plays as highlights, making it easy to keep track of your achievements.

However, many players struggle with how to save these highlights or full match replays to their PC. If you’re someone who wants to preserve your best plays for later, this guide is for you. We’ll walk you through the steps to save your highlights and full match replays, ensuring you never miss a moment.

By following these simple instructions, you’ll know exactly how to save your top moments in Marvel Rivals and keep them accessible for future viewing or sharing. Let’s dive in!


Steps to Save Highlights on PC

Saving highlights in Marvel Rivals allows you to keep those amazing gameplay moments. Before you start, it is important to know where you need to navigate in order to find and save your highlights from within the game itself. The following steps will help you navigate the game’s menus.

1. Access the Career Tab

Begin by launching Marvel Rivals on your PC. Once you’re in the game, navigate to the “Career” tab. You can find this by clicking the grey Marvel Rivals symbol located in the upper right corner of the home menu.

2. Go to Favorites

Within the Career tab, select the “Favorites” section. This area is dedicated to storing your preferred matches and highlights, making it easier to access them later.

3. Find Highlights

In the Favorites section, locate the “Highlights” subsection. Marvel Rivals automatically saves your top gameplay moments here. Typically, the game retains the last five highlights, allowing you to keep track of your most recent impressive plays.

4. Select a Highlight

Browse through the list of saved highlights and choose the one you wish to keep. Click on the specific highlight to view more options.

5. Click Save

After selecting your desired highlight, click the “Save” button located below the highlight. This action will prompt you to customize your saving preferences.

6. Customize Settings (Optional)

Before finalizing the save, you have the option to adjust the highlight’s name, resolution, frame rate, and graphics quality. Higher quality settings will provide a better viewing experience but may increase the saving time.

7. Choose Save Location (PC)

To specify where the highlight will be stored on your PC, click the “Change” button. You can select your preferred folder, though by default, highlights are saved in your computer’s Videos folder.

8. Confirm

After customizing your settings and selecting the save location, confirm the action. The highlight will then be saved to your designated folder, ready for viewing or sharing.

Read more: How to Save Highlights in Marvel Rivals: A Gamer’s Guide


Steps to Save Full Match Replays

Saving full match replays is another great way to review your performance. To start saving full matches you’ll need to navigate to another section of the game. This section is where all your played games are logged. The following steps will walk you through how to save full matches.

1. Go to History

Within the “Career” tab, navigate to the “History” section. This area logs all your past matches, providing a comprehensive record of your gameplay.

2. Locate the Match

Browse through your match history to find the specific game you want to save. Each match entry typically includes details like date, time, and outcome.

3. View Details

Click on the “Details” button for the selected match. This will open a detailed view of the game, including statistics and performance metrics.

4. Favorite the Match

In the match details view, click the star icon located in the bottom right corner. Favoriting the match ensures it is saved as a replay, making it easily accessible for future viewing.

5. Access Replay

Once favorited, the match will appear under the “Match Replays” section within your “Favorites” tab. You can access and watch these replays anytime, allowing you to analyze your gameplay or share memorable moments.

Read more: How to Screen Share on TikTok Live for Gaming, Tutorials, and More


Additional Information

Here is some additional information you should be aware of when saving highlights and replays. Knowing the limitation and requirement of saved content in Marvel Rivals will help you better manage your saved games.

Highlight Expiration

Be aware that saved highlights in Marvel Rivals are subject to expiration upon game updates. When you update to a new version of Marvel Rivals, previously saved highlights may be deleted. To prevent losing your highlights, make sure to back them up before performing any game updates.

Highlight Requirements

Marvel Rivals automatically generates highlights based on your in-game performance. While the exact criteria for a moment to be considered a highlight are not specified, focusing on achieving significant victories, impressive plays, or strategic maneuvers increases the likelihood of your moments being saved as highlights.

Highlights vs. Replays

It’s important to note the difference between highlights and full match replays:

  • Highlights are automatically generated and showcase your top gameplay moments.
  • Replays are saved recordings of entire matches that you have favorited manually. Unlike highlights, replays capture the full scope of your gameplay, providing a comprehensive view of each match.

Conclusion

Saving highlights and full match replays in Marvel Rivals is a straightforward process that allows you to preserve and share your best gameplay moments. By following the steps outlined above, you can effortlessly save your top plays and full matches to your PC, ensuring that your impressive performances are always accessible. Remember to back up your highlights before updating the game to avoid losing any treasured moments. Whether you’re looking to analyze your strategies, share your victories with friends, or simply relive your favorite battles, Marvel Rivals provides the tools you need to keep your gameplay memories intact.

Hope this guide helps you effectively save and enjoy your Marvel Rivals highlights and replays! Happy gaming!

How to Fix OBS Black Screen When Capturing Marvel Rivals

0

Capturing or streaming gameplay is a popular way to share your gaming experiences with a wider audience on platforms like YouTube, Twitch, and Facebook. However, many users encounter a frustrating black screen when attempting to record or stream Marvel Rivals using OBS Studio. This issue can disrupt your content creation process and hinder your ability to engage with your audience.

This guide provides comprehensive solutions to resolve the black screen problem, enabling you to seamlessly capture and stream Marvel Rivals with OBS Studio. Whether you’re a beginner or an experienced user, these steps will help you overcome common obstacles and enhance your streaming experience.

Steps for OBS Setup

Source: IWillLift on X

Before you can start capturing the action, it’s important to configure OBS Studio correctly. This initial setup will lay the foundation for a smooth recording and streaming experience with Marvel Rivals. These steps ensure that OBS has the necessary permissions and is properly configured to capture the game.

1. Run OBS as Administrator

Running OBS Studio with administrative privileges is crucial for resolving various compatibility and access issues that might cause a black screen. Ensuring OBS has the necessary permissions to access system resources is often the first step to solving capture problems.

How to Do It:

  • Right-click the OBS Studio icon on your desktop or in the Start menu.
  • Select “Run as administrator” from the context menu.

Running OBS as an administrator ensures that the application has the necessary permissions to access system resources required for capturing gameplay.

2. Launch Marvel Rivals

Before diving into OBS settings, ensure Marvel Rivals is running correctly. Having the game launched in the proper mode will help make the configuration process easier. Here are a few tips to prepare the game for capture.

Tips:

  • Ensure the game is running in either Windowed or Borderless Windowed mode, as full-screen mode can sometimes cause capture issues.
  • Verify that the game is not running in compatibility mode, as this can interfere with OBS capturing the game window.

3. Add Game Capture Source in OBS

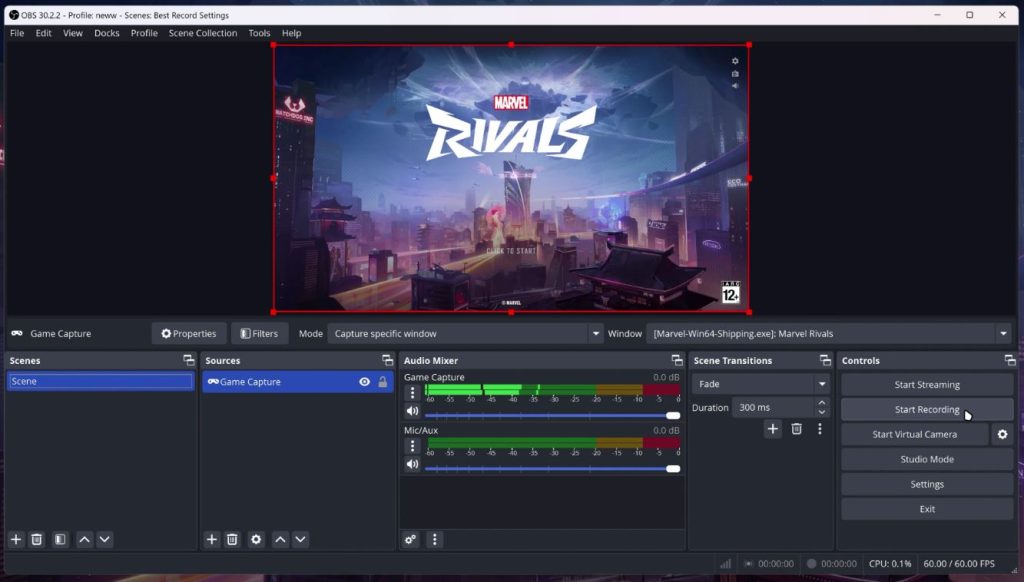
To capture Marvel Rivals, you need to add a Game Capture source in OBS Studio. This source allows OBS to specifically target and capture your gameplay, and it’s an essential step in ensuring everything works correctly. This is how you create and configure this source.

Steps:

  • Open OBS Studio.
  • In the “Sources” panel at the bottom, click the “+” button.
  • Select “Game Capture” from the list.
  • Name the source (e.g., “Marvel Rivals Capture”) and click “OK”.

4. Capture Specific Window

Configuring the Game Capture to target Marvel Rivals specifically can help prevent the black screen issue. By selecting the specific game window, you ensure that OBS focuses on the correct application, reducing capture errors. Here’s how to adjust these settings.

How to Configure:

  • In the “Properties” window of the Game Capture source, set the “Mode” to “Capture specific window”.
  • From the “Window” dropdown menu, select “Marvel Rivals”.
  • Ensure that “Capture Cursor” is enabled if you want the cursor to appear in your recordings.
  • Click “OK” to apply the settings.

By specifying the game window, OBS focuses on capturing Marvel Rivals, reducing the chances of encountering a black screen.

Read more: How to Save Highlights in Marvel Rivals: A Gamer’s Guide

Troubleshooting Black Screen Issues

Source: YouTube

If you’ve followed the setup steps and still encounter a black screen, don’t worry. There are several troubleshooting steps you can try to get your game capture working. These steps address common issues that prevent OBS from capturing Marvel Rivals effectively.

1. Ensure OBS is Running as Administrator

If the black screen persists, double-check that OBS Studio is running with administrative privileges. This step is frequently the primary solution to capture issues and is worth verifying again if things don’t work at first.

2. Use Window Capture as an Alternative

If Game Capture still results in a black screen, try using Window Capture as an alternative method. Window capture uses a different way of grabbing the screen information and might work when game capture does not. Here is how to set it up.

Steps:

  • In OBS Studio, click the “+” button in the “Sources” panel.
  • Select “Window Capture”.
  • Name the source (e.g., “Marvel Rivals Window Capture”) and click “OK”.
  • From the “Window” dropdown, choose “Marvel Rivals”.
  • Click “OK” to apply the settings.

Note: Window Capture may have limitations compared to Game Capture, such as lower video quality or potential lag, but it can serve as a viable workaround.

3. Reinstall OBS Studio and Marvel Rivals

If the issue remains unresolved, consider reinstalling both OBS Studio and Marvel Rivals. This can address issues with corrupted files or software conflicts that are not always fixed by updates. Here’s the process for reinstallation.

Steps:

  • Uninstall OBS Studio via Control Panel > Programs and Features.
  • Download the latest version of OBS Studio from the official OBS website.
  • Reinstall OBS Studio.
  • Similarly, uninstall and reinstall Marvel Rivals from your game distribution platform (e.g., Steam, Epic Games).

4. Check for Updates

Keeping both OBS Studio and Marvel Rivals updated is crucial. Updates often come with bug fixes that can resolve capture issues. Check both programs regularly for any new releases.

How to Check:

  • OBS Studio: Open OBS, go to “Help” > “Check for Updates”.
  • Marvel Rivals: Use your game platform’s update feature to ensure the game is current.

Audio Capture Setup

Proper audio setup is essential for delivering a high-quality streaming or recording experience. Capturing clear game audio and, optionally, your voice over, is crucial for engaging content.

1. Add Audio Output Capture

To capture in-game audio from Marvel Rivals, add an Audio Output Capture source in OBS. This setup allows OBS to capture all audio from the game, ensuring your audience hears all the sounds.

Steps:

  • In the “Sources” panel, click the “+” button.
  • Select “Audio Output Capture”.
  • Name the source (e.g., “Game Audio”) and click “OK”.
  • Choose your audio device (usually “Default”) and click “OK”.

2. Add Audio Input Capture (Optional)

If you want to include your microphone audio in the recording or stream, add an Audio Input Capture source. This allows you to add your own commentary over the game audio.

Steps:

  • Click the “+” button in the “Sources” panel.
  • Select “Audio Input Capture”.
  • Name the source (e.g., “Microphone”) and click “OK”.
  • Choose your microphone device and click “OK”.

With these settings, you can independently adjust the volume levels of game audio and microphone input, ensuring clear and balanced sound in your recordings or streams.

Additional Tips

Beyond the basic setup and troubleshooting, here are some additional tips to help enhance your streaming and recording experience with Marvel Rivals. These tips can help improve performance and avoid common pitfalls.

1. Use Streamlabs OBS

If you continue to face difficulties with OBS Studio, consider switching to Streamlabs OBS (SLOBS), which is based on OBS Studio but offers a more user-friendly interface and additional integrated features tailored for streamers.

2. Disable Windows Game Bar

Windows Game Bar can sometimes interfere with OBS capturing. Disabling it can free up system resources and prevent conflicts. Disabling can often resolve unforeseen errors in recording.

Steps:

  • Open Settings > Gaming > Xbox Game Bar.
  • Toggle off “Enable Xbox Game Bar for things like recording game clips, chatting with friends, and receiving game invites.”

3. Adjust Graphics Settings in Marvel Rivals

Lowering in-game graphics settings can improve performance and reduce the likelihood of capture issues, especially on systems with limited resources. This adjustment can sometimes make the difference for a stable and reliable capture experience.

How to Adjust:

  • Open Marvel Rivals and go to the Settings menu.
  • Navigate to the Graphics section.
  • Lower the resolution, texture quality, and other graphics settings to reduce the load on your system.

Conclusion

By following the steps outlined above, you can effectively resolve the black screen issue when capturing or streaming Marvel Rivals with OBS Studio. Running OBS as an administrator, correctly configuring the game capture source, and setting up audio capture are essential for a smooth recording or streaming experience. Additionally, utilizing alternative capture methods and implementing troubleshooting tips can further enhance your setup.

Remember to keep both OBS Studio and Marvel Rivals updated to their latest versions and consider using Streamlabs OBS for a more streamlined experience. With these solutions and tips, you’ll be well-equipped to create high-quality recordings and streams of your Marvel Rivals gameplay.

Has MrBeast or Kick Bought TikTok Yet? TikTok Acquisition Update

0

TikTok, the widely popular social media platform, is under intense scrutiny in the U.S., with threats of a potential ban looming. The platform’s immense cultural influence, especially among younger generations, has made it a focal point of controversy and interest.

Amid these developments, prominent figures like MrBeast and the streaming platform Kick have expressed interest in acquiring TikTok. Both parties aim to prevent a potential ban while leveraging TikTok’s massive user base for future growth. This article offers the latest updates as of January 2025, on TikTok’s ownership, estimated value, and ongoing acquisition attempts.

Current Status of TikTok’s Ownership

TikTok remains owned by ByteDance, a Chinese technology company. Despite growing pressure from U.S. lawmakers concerned about data security and national security risks, ByteDance has repeatedly stated it has no intention of selling TikTok. As of now, neither MrBeast nor Kick has successfully purchased the platform, and ByteDance continues to operate TikTok globally. The looming deadline of January 19, 2025, set by U.S. authorities for ByteDance to divest its U.S. operations or face a ban, has heightened interest in the platform’s future.

MrBeast’s Involvement

Jimmy Donaldson, known to millions as MrBeast, has shown strong interest in acquiring TikTok. The YouTube star, whose net worth is estimated between $85 million and $500 million, has openly voiced concerns about the platform’s potential ban and its consequences for creators.

MrBeast (Jimmy Donaldson) announced his interest in buying TikTok on his Twitter

MrBeast has reportedly engaged in discussions with investors and billionaires to form a financial consortium capable of making a competitive offer. However, TikTok’s valuation—ranging from $50 billion to $300 billion—poses a significant financial hurdle. For MrBeast to lead such a purchase, substantial backing from high-profile investors would be required. Despite his influence and innovative vision, the feasibility of MrBeast spearheading this acquisition remains uncertain due to the immense scale of resources needed.

Kick’s Involvement

Kick, a rapidly growing streaming platform, has also entered the fray. The platform has expressed interest in acquiring TikTok’s U.S. operations and recently shared a redacted letter of intent dated January 13, 2025. While Kick’s ambitions signal its desire to expand its footprint in the digital content space, the details of their bid remain unclear. Key elements such as the purchase price, ownership terms, and financial structure have not been disclosed, casting doubt on the seriousness of their proposal.

Kick’s purchase intent letter going viral last week – Kick via x.com

Additionally, ByteDance’s reluctance to sell TikTok complicates matters further. Combined with skepticism over Kick’s financial strength, it remains uncertain whether the platform can successfully negotiate such a high-stakes deal.

How Much Does TikTok Cost?

TikTok’s valuation varies widely depending on the source. Estimates place the platform’s total worth between $50 billion and $300 billion. If only its U.S. operations are considered, the price is speculated to range between $62 billion and $77 billion. These figures underscore the enormous financial challenge for any potential buyer, even those with strong investor backing.

Why TikTok’s Ownership Matters

The U.S. government has demanded that TikTok separate from ByteDance due to concerns over data privacy and potential foreign influence. Failure to comply with the divestiture order by January 19, 2025, could result in a nationwide ban of TikTok in the U.S., one of its largest and most lucrative markets.

Such a ban would have wide-reaching effects on creators, advertisers, and the broader social media landscape. Platforms like Instagram and YouTube could see increased user activity, while TikTok creators may face challenges in migrating their audiences to other platforms. The uncertainty surrounding TikTok’s future has significant implications for the global digital content ecosystem.

Conclusion

As of January 2025, neither MrBeast nor Kick has acquired TikTok. Both parties face substantial challenges, including ByteDance’s refusal to sell and TikTok’s immense valuation. The situation remains fluid, with the January 19, 2025, deadline approaching rapidly. Whether TikTok will be sold, banned, or continue under ByteDance’s ownership is yet to be determined. Creators, advertisers, and users alike are eagerly awaiting updates on this high-stakes scenario. Stay tuned for further developments as the story unfolds.

Source

  1. oneindia.com
  2. uniladtech.com
  3. insider-gaming.com
  4. complex.com
  5. uniladtech.com
  6. thedeepdive.ca
  7. sportskeeda.com
  8. soapcentral.com
  9. forbes.com
  10. thetab.com

7 Tips on How to Use Green Screen on Live Stream

0
Green Screen
Green Screen

Standing out in live streaming requires visually captivating content that sets you apart from competitors. Whether on Twitch, YouTube, Facebook Gaming, or Kick, the secret to success is delivering quality streams. A powerful way to elevate your content is by mastering how to use green screen on live stream setups.

With a green screen, you can create immersive virtual environments that engage your audience and enhance their viewing experience. In this comprehensive guide, we’ll share seven crucial tips every streamer should know to maximize their green screen’s potential.

What are the Key Benefits of Using a Green Screen for Streaming?

Benefits of Using a Green Screen – Source: Doc.

By removing the background environment, the green screen allows only your figure to appear over what you are streaming. Green screen software helps you eliminate distracting elements from your environment while helping your audience focus on what matters: you and your game.

There are two ways a green screen can enhance your streaming to viewers: overlay and full-screen. Overlay helps you take up less screen real estate, while full-screen allows you to create a different world or environment to immerse your viewers.

You can download videos and images and turn them into your background by finding videos and images online.

Using a green screen can transform your small room into an artificial universe.

Why Should You Use a Green Screen for Live Streaming?

Green Screen for Live Streaming – Source: resources.overlays.uno

The best green screen for streaming is one that fits within your budget while also working with the space you have. It’s about finding the right balance between functionality and your specific needs.

Buying a Green Screen

If you plan to purchase one, the best place to look for green screen options is on Amazon, local markets, or online retailers specializing in photography and video equipment. Prices range from as low as $15 for basic fabric screens to premium ones priced at $200 or more for professional-grade, wrinkle-resistant options.

The advantage of choosing a foldable panel is that you can protect it from dirt or damage by storing it when not in use. Standing versions are narrower than most green screens out there, which can be great if you work in a limited space. Consider pop-up options for easy setup and portability.

If you are just starting out and not even sure if you will use it for gaming on platforms like Twitch, YouTube, or Facebook, consider taking the DIY route if you want to test it out first. You can easily create your own DIY green screen for streaming using some colored fabric and a way to attach the sheets to your wall.

Did you know that the green screen doesn’t have to be green? They can also be blue, black, or any solid color you don’t have. Green is the safest color, while blue is relatively safe. However, avoid colors that match your clothing or hair to ensure proper keying.

How to Make a Green Screen

How to Make a Green Screen – Source: Doc.

DIY Fabric Sheet

You can make a DIY green screen by buying a piece of green-colored fabric from any fabric store, with a minimum size of 6×7 feet for individual use, and larger for group settings. Consider using a non-reflective material to avoid issues with lighting.

If you’re using the DIY route, make sure the fabric is tightly attached to your wall. Secure it with staples, nails, clothespins, or anything that works, and make sure there are minimal wrinkles by ironing it first or using a steam cleaner regularly.

More on Eklipse Blog >>> The Best Webcam Angle for Live Streaming in 2023: A Guide

DIY Paint

If you’re not attached to the color on your wall, you can even paint your wall with green paint! Use a matte finish to avoid reflections.

Preparing the Green Screen Setup

Chroma Key Panel

Green screen is sometimes referred to as a “chroma key panel.” The key is the process of matching the color code with the same shade as your green screen. This tells the software program to remove the same green shade behind you so that it appears invisible, and you can replace it with an image or video.

Most streaming software will have a chroma key feature. The basic steps usually involve:

Source > Filters > Chroma Key > Key Color Type > Green (Or Custom)

Streaming Software for Chroma Keying

Your choice of live green screen software includes programs like OBS Studio (Open Broadcaster Software), which is compatible with Windows, Mac, and Linux, Streamlabs Desktop, and XSplit Broadcaster. OBS Studio is a popular free and open-source option. For an overview of OBS, you can find many tutorials online.

In OBS Studio, the setup will be similar to other programs, with slight differences in the interface.

Go to Sources and right-click on the gear icon. It will bring you to a drop-down menu where you can select “Filters.” In the Filter Effect panel, choose “Chroma Key.”

The Filter Effect panel view in OBS Studio.

If you select “Green” as your Key Color Type, you will get a solid background behind your image, but some adjustments may be needed. Use the sliders to adjust until the webcam displays you in a solid background.

Choosing “Green” as your Key Color Type will yield good results in OBS Studio.

If you don’t adjust the sliders properly, you may encounter issues like the one below:

Not using sliders to adjust settings will result in nightmarish fuel like this.

When streaming with a green screen, the best thing you can do to make the setup easier is to have good lighting.

Proper Lighting is Key

You want the lighting to be as even as possible. You don’t want it to be too bright, causing reflections from your shoulders. If you have a large light source such as a window or a softbox, that’s ideal. If the green screen is positioned too close to you, and your lighting is the only bright light source creating shadows, then you may need to reposition yourself, your screen, or the light source. Consider using multiple light sources to eliminate shadows.

Which Webcam Works Best with Green Screen Software?

Webcam – Source: Doc.

Any camera you have will work. Keep it simple; you don’t need to dig deep into your pockets to set up a green screen. For pro users, you’re looking for clean HDMI out with 4:2:2 subsampling. Higher-resolution cameras will also help separate you from the environment more easily.

Can I Set Up a Green Screen for Xbox One?

Xbox One doesn’t support chroma keying or any green screen features on the console. If you want to stream through Xbox and use a green screen, you’ll need to use a capture card to do it through a PC. The same applies to PlayStation consoles.

Common Green Screen Issues in Live Streaming

Green Screen Issues – Source: Doc.

Here are some mistakes people make when they’re new to this:

  1. Insufficient lighting
  2. Uneven and harsh lighting sources causing shadows.
  3. Green screen placed too close behind you, resulting in shadows.
  4. Wrinkles on the fabric creating mini shadows captured by your webcam.
  5. Dirt, stains, etc., obstructing the green color from appearing on your webcam.
  6. Leaving the green screen unattended, and furry friends digging their claws into it instead of preserving it.

Final Thoughts

Incorporating a green screen into your setup can transform your streams, boosting both quality and visual impact. Mastering how to use green screen on live stream setups is key to standing out in today’s competitive streaming landscape.

By applying the practical tips shared in this guide, you can create dynamic and engaging content. These techniques will help captivate your audience and ensure your streams leave a lasting impression.


Maximize your Black Ops 6 rewards—Create highlights from your best gameplay with with Eklipse

Eklipse help streamer improve their social media presence with AI highlights that clip your Twitch / Kick streams automatically & converts them to TikTok / Reels / Shorts


7 Best Private Streaming Platforms for Streamers to Try in 2025

0

The surge in live streaming highlights the growing need for secure platforms that prioritize privacy and exclusivity. Businesses hosting events or individuals sharing moments now seek tailored solutions. This article uncovers the best private streaming platforms for streamers in 2025, each offering advanced features to protect your content.

Netflix is one of the best streaming service with offers endless streaming of TV shows, movies, and comedy specials. It also features a wide range of original content. Twitch, meanwhile, is one of the most popular streaming platforms, especially for gaming.

From security measures to customization options, we will explore what sets these platforms apart. Get ready to find the ideal service that ensures your content remains accessible only to your intended audience!

1. Eklipse Private Stream – Best Private Streaming Platform for Gamers

What is Eklipse?
What is Eklipse?

For gamers who want to keep their gameplay private without the distractions of a live audience, Eklipse’s Private Stream feature offers the perfect solution. Unlike traditional live streaming platforms that come with audience interactions and feedback, Eklipse allows you to record your gaming moments in a completely private setting.

Key Features:

  • Stream Without Distractions: Enjoy uninterrupted gaming, free from chat and comments.
  • Premium Streaming Quality: Offers sharp, up-to-1440p resolution with no compression.
  • Automatic Stream Processing: Eklipse automatically processes your streams once you’re done.
  • Optimized Storage: Records are stored locally to keep your device free from excess storage use.
  • Accessible to All Games: Designed for all kinds of gameplay.

Who is Eklipse Private Stream For?

  • Solo Gamers
  • Former Streamers/Ex-Content Creators
  • Content Creators Seeking Privacy
  • Competitive Grinders
  • Beta Testers/Explorers

Pricing: Private Stream is available for Premium users who get full access to all its features. Free users can try it with limited access.

Strengths:

  • Focused, audience-free gaming experience.
  • High-quality streaming with no compression.
  • Instant replay available for review.

Weaknesses:

  • Available only to Premium users.

2. Dacast – Best Private Streaming Platform for Security

Dacast stands out as one of the most comprehensive solutions for private streaming. Known for its robust security features such as AES encryption and password protection, it allows seamless broadcasting of live events while maintaining control over content distribution.

Key Features:

  • Secure global content delivery
  • Multi-user access on premium plans
  • Live stream recording capabilities
  • Real-time analytics dashboard

Pricing: Starting from $39/month.

Strengths: User-friendly interface, excellent customer support.

Weaknesses: Requires some time to fully master all features.

More on Eklipse Blog >>> Best VoiceMeeter Banana Setup for Live Streaming, Full Tutorial 2025

3. Vimeo Livestream – Best Private Streaming Platform for Corporate Use

Vimeo Livestream offers a powerful blend of privacy and high-quality streaming capabilities. With extensive privacy controls including domain restrictions and password protection, it’s perfect for corporate meetings or exclusive webinars.

Key Features:

  • High-definition streaming support
  • Comprehensive video management tools
  • Customizable player options

Pricing: Plans range from $25/month (Starter) to $65/month (Advanced).

Strengths: No ads during broadcasts; great analytics.

Weaknesses: Limited storage on lower-tier plans.

4. JW Player – Best Private Streaming Platform for Advanced Video Technology

JW Player is renowned for its advanced video technology combined with strong privacy controls. It supports adaptive bitrate streaming and offers robust DRM options essential for safeguarding sensitive content.

Key Features:

  • MPEG-DASH playback support
  • Custom video galleries integration
  • Cloud-based content management platform

Pricing: Custom pricing available based on requirements.

Strengths: Excellent quality HD streaming; user-friendly interface.

Weaknesses: Higher cost compared to competitors for advanced features.

5. Wowza – Best Private Streaming Platform for Scalability

Wowza is a well-established name in the live-streaming industry known for its reliable performance and scalability. Its strong focus on security makes it a top choice for businesses needing secure event broadcasting.

Key Features:

  • Supports up to UHD/4K streaming
  • Cloud management services
  • Powerful API access

Pricing: Pay-as-you-go model starts at $0/month with $2.50/hour of streaming.

Strengths: Highly customizable; excellent technical support.

Weaknesses: Complex setup process may deter beginners.

6. IBM Video Streaming – Best Private Streaming Platform for Enterprises

IBM Video Streaming excels in providing enterprise-grade solutions designed specifically for larger organizations needing meticulous control over their streams. With real-time analytics and advanced security features, this platform meets high-level compliance standards.

Key Features:

  • Comprehensive monetization capabilities
  • Enterprise-grade video workflow
  • Responsive customer service

Pricing: Starts at $137/month (Silver plan).

Strengths: Reliable cloud infrastructure; strong analytics tools.

Weaknesses: Higher price point may not suit smaller businesses.

7. Kaltura – Best Private Streaming Platform for Education

Kaltura offers versatile solutions catering primarily to educational institutions but also suits corporate environments well due to its scalable nature and solid security protocols.

Key Features:

  • Multi-bitrate adaptive streaming
  • Extensive integrations with learning platforms
  • Strong customizability options

Pricing: Pricing varies based on use case; contact sales for quotes.

Strengths: Tailored solutions for educational use; good customer feedback.

Weaknesses: Can be complex due to numerous choices available.

FAQ

1. Which streaming platform pays streamers the most?

These are Qobuz, a French streaming service that offers high-quality lossless audio, and Peloton.

2. What is replacing Twitch?

For gaming creators looking beyond Twitch, platforms like Kick, YouTube Gaming, Facebook Gaming, and Trovo provide alternatives worth exploring

3. Is Streamlabs better than OBS?

Streamlabs is easier to use than OBS, but OBS uses fewer computer processing resources.

Final Thoughts

Choosing the best private streaming platforms for streamers starts with identifying your priorities, like robust security or seamless system integration. Each platform offers unique advantages, catering to diverse needs while safeguarding your content.

These seven platforms combine innovation and privacy to meet modern demands. They ensure your streaming experience stays secure and tailored to your requirements.

How to Backup TikTok Videos Using Eklipse Before the Ban

0

Have you ever felt that sinking feeling of potentially losing your precious TikTok videos? With the looming possibility of TikTok ban in the US on January 19, 2025, many users are scrambling to find ways to safeguard their content. The good news is there’s a solution! Eklipse offers a way to back up your TikTok videos.

Eklipse has introduced a feature to help you back up your content before the potential ban. This tool is not only a backup, but can also help migrate your videos to other platforms, ensuring your creative work isn’t lost, and allows you to expand your audience reach. This guide will show you how to use this feature in Eklipse to secure your TikTok videos.

Ready to take control of your TikTok content? Let’s explore how you can use Eklipse to back up and save your videos, making sure your creativity lives on.

Why Backing Up Your TikTok Videos is Crucial

Why you should backup your TikTok videos before January 19.

The potential ban of TikTok in the US on January 19, 2025, has caused concern among content creators and users alike. For those who have invested time and creativity into their TikTok accounts, the thought of losing those videos is disheartening. This makes backing up your videos not just a good idea, but a necessity.

Eklipse offers a solution that allows you to easily secure your content and make it accessible even if the ban goes into effect. By using Eklipse, you ensure that your hard work and creative endeavors are protected.

Read more: How to Backup TikTok Videos: A Complete Guide for 2025

Introducing Eklipse: Your TikTok Backup Solution

Source: Eklipse

Eklipse is a platform designed with content creators in mind and is equipped with a set of tools to streamline your content management. One of its standout features is the “TikTok Backup” tool, located in the “Time Saving Tools” section.

Eklipse not only backs up your TikTok videos but also provides features to help you view, share, and even download your saved content. The platform aims to make the backup process simple and efficient. It also allows you to migrate your videos to other platforms, so you won’t be limited by the TikTok ban.

Step-by-Step Guide: How to Back Up and Save TikTok Videos Using Eklipse

Time-saving Tools feature in Eklipse to backup TikTok videos. Source: Eklipse

The process of backing up your TikTok videos using Eklipse is straightforward. Follow these steps to ensure your content is safely stored.

  1. Go to Time-saving Tools from the left menu on the Eklipse website.
  2. Select TikTok Backup from the options.
  3. Click the Backup my TikTok Now button to log in.
  4. Enter your TikTok email and password. (Note: This function is only available before the TikTok ban on January 19, 2025).
  5. Select the clips you wish to back up.
  6. Hit confirm to begin the backup.

Once connected, Eklipse will display your TikTok videos, including thumbnails, titles, view counts, likes, and comments. Videos that have not been backed up are selected by default for your convenience. Eklipse supports backing up to 50 clips per batch with a maximum migration time of 2 minutes per clip.

Read more: How to Screen Share on TikTok Live for Gaming, Tutorials, and More

Exploring Additional Features After Backup

After successfully backing up your videos, Eklipse offers several additional features. You can easily view your backed-up videos within the platform. It also provides options to share or download your videos, giving you full control over your content.

If you have more videos to back up, the “Backup TikTok Clips” button will remain available, making it easy to keep your content safe. Eklipse ensures you have multiple ways to access and manage your backed up content, which will be very useful if TikTok gets banned.

Understanding Storage Limitations and Video Deletion

Eklipse has a tiered storage system. For free accounts, videos are stored for 14 days. If you upgrade to a premium account, your videos are stored for up to 90 days. Regardless of your account type, you have the flexibility to delete your backed-up videos at any time. Knowing these storage limitations and deletion options allows you to better manage your content and plan accordingly.

Conclusion

With the potential TikTok ban in the US on January 19, 2025, backing up your videos is more important than ever. Eklipse provides a practical and easy solution for users to save and secure their content.

By following the steps outlined in this guide, you can back up your videos, ensuring they are safe and accessible even if TikTok is banned. Eklipse’s features go beyond backup by letting you view, share, and download your videos, as well as enabling automatic migration to other platforms. Make sure you utilize these features before the deadline to safeguard your hard work and creativity. Visit Eklipse now to get started!