Unlock the Power of Augments in Call of Duty: Black Ops 6 Zombies
If your Zombies loadout isn’t keeping up with the increasing chaos, you’re not alone. Augments in Call of Duty: Black Ops 6 offer a solution, enhancing your perks, ammo mods, and field upgrades to fit your playstyle.
Unlocking and researching these Augments can be a challenge, but this guide will simplify the process. We’ll cover how to unlock them, prioritize impactful upgrades, and ultimately boost your Zombies gameplay.
Director Mode Release in BO6 Zombies – Source: Activision
Augments are the backbone of customization in Black Ops 6 Zombies. They allow you to enhance your perks, ammo mods, and field upgrades, making you more efficient and resilient as you battle through endless waves of the undead. But how do they work, and why should you care?
Understanding the role of Augments is crucial to building a loadout that can adapt to different scenarios. Let’s explore their significance and how they fit into your strategy.
How to Unlock Augments
Unlocking the Augment system is the first step toward enhancing your gameplay. Without access to this feature, you’re limited to basic perks and upgrades, which may not be enough for high-level challenges.
Fortunately, the process is straightforward and rewards you with a whole new level of customization once completed.
Steps to Unlock
Reach Player Level 11: Progress through matches in Zombies mode to level up your account.
Access the Research Menu: Once unlocked, the Augment research system becomes available in the main Zombies menu.
This simple step opens the door to a deeper, more rewarding gameplay experience.
Researching Augments
Researching Augments is where the magic happens. This process allows you to unlock upgrades for perks like Jugger-Nog or Stamin-Up, as well as powerful enhancements for ammo mods and field upgrades.
But researching Augments requires time and XP, so knowing how to optimize the process is essential for efficiency.
How to Research
Select an Augment: Choose from 3 Major and 3 Minor Augments for each upgrade.
Invest XP: Allocate XP earned from matches to begin researching.
Wait for Completion: Each research project takes a set amount of time, so plan accordingly.
Remember, you can only research one Augment at a time, so choose wisely.
Best Augments to Prioritize
Not all Augments are created equal. Some provide game-changing benefits that can significantly improve your survivability and damage output, while others offer more situational advantages.
Here are the Augments you should focus on first to maximize your impact in Zombies mode.
Top Recommendations
Reactive Armor (Jugger-Nog): Adds a temporary shield when your health drops low, perfect for clutch moments.
Stalker (Stamin-Up): Increases sprint duration, giving you the mobility needed to evade large hordes.
Electrostatic Payload (Ammo Mod): Boosts damage against armored zombies, making it a must-have for high rounds.
Tips for Efficient Augment Research
Researching Augments can feel like a grind if you don’t plan ahead. Luckily, there are strategies to speed up the process and make the most of your XP.
Follow these tips to maximize your efficiency and unlock powerful upgrades faster.
Strategies
Use Double XP Tokens: Activate these during matches to double the XP you earn.
Focus on High-XP Activities: Complete Easter eggs, challenges, and high-wave runs to accumulate more XP.
Plan Research Around Playtime: Start research projects before logging off to ensure they progress while you’re away.
Final Thoughts
Augments in Call of Duty: Black Ops 6 Zombies bring a new level of customization and strategic depth to your gameplay. By unlocking the system, researching upgrades, and focusing on the most impactful choices, you can outlast the undead and enhance your performance.
Are you ready to take your loadout to the next level and dominate your enemies? Start mastering Augments today and unlock your full potential in Black Ops 6!
Mouse acceleration can be a challenge for players aiming to enhance their precision in fast-paced games like Marvel Rivals. Understanding how to turn off mouse acceleration in Marvel Rivals is key to improving your gameplay experience.
This feature, while helpful in everyday computer use, often disrupts consistent aiming during intense gaming sessions. In this guide, we’ll walk you through the steps to disable mouse acceleration, ensuring better control and accuracy.
Mouse acceleration adjusts cursor speed based on how quickly you move the mouse. While this can be useful for regular tasks, it can create inconsistency in gaming by altering the distance traveled by the cursor relative to the mouse movement.
This is particularly problematic in Marvel Rivals, where precision aiming is critical. Players commonly experience over-aiming or under-aiming, which can severely impact performance during key battles.
How to Turn Off Mouse Acceleration in Marvel Rivals
Source: Screen Plays Mag
Since the game does not offer a built-in option to disable mouse acceleration, you’ll need to manually edit configuration files. Follow these steps carefully:
Open the Run Window Press Win + R on your keyboard to open the Run window.
Access AppData Type %appdata% into the text field and press Enter. This will take you to the Roaming folder.
Navigate to Local Folder Click on AppData at the top of the window, then select Local from the list.
Locate Marvel Folder Find the folder named Marvel and open it.
Go to Saved Configurations Inside the Marvel folder, open the Saved folder, then navigate to the Config folder.
Access Windows Config In the Config folder, locate and open the Windows folder.
Edit GameUserSettings File Right-click on the GameUserSettings.ini file and open it with Notepad or a similar text editor.
Disable Mouse Acceleration Add the following lines to the end of the document: [/Script/Engine.InputSettings] bEnableMouseSmoothing=False bViewAccelerationEnabled=False
Save Changes and Restart Save the file and restart Marvel Rivals for the changes to take effect.
Additional Tips for Better Precision
In addition to disabling mouse acceleration within Marvel Rivals, consider these steps to further optimize your setup:
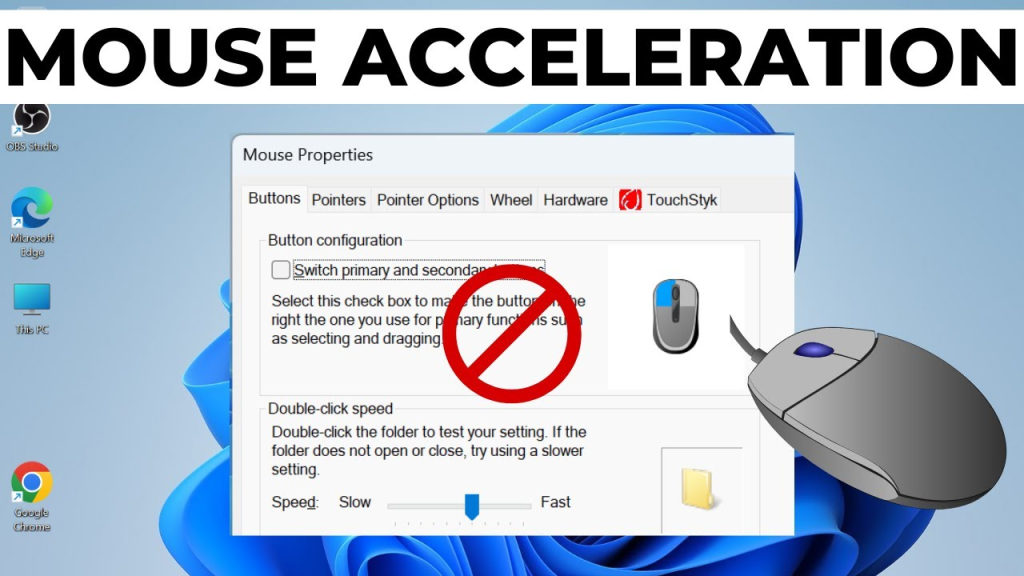
Disable Windows Mouse Acceleration
Go to Control Panel > Mouse > Pointer Options.
Uncheck the box labeled Enhance Pointer Precision.
Use a High-Quality Mouse Invest in a gaming mouse with adjustable DPI settings for more precise control.
Adjust Mouse Polling Rate Many gaming mice allow you to set the polling rate to 500Hz or 1000Hz, ensuring faster response times.
Use a Wired Mouse Switching to a wired mouse can reduce latency and improve responsiveness compared to wireless models.
Final Thoughts
Knowing how to turn off mouse acceleration in Marvel Rivals is a game-changer for players seeking better precision and control. By editing the game’s configuration files and optimizing your setup, you can eliminate inconsistencies caused by mouse acceleration.
Take the time to implement these changes, and enjoy a smoother, more accurate gaming experience in Marvel Rivals.
Maximize your Black Ops 6 rewards—Create highlights from your best gameplay with with Eklipse
Eklipse help streamer improve their social media presence with AI highlights that clip your Twitch / Kick streams automatically & converts them to TikTok / Reels / Shorts
Struggling to fix Twitch stream lag can be frustrating, especially when you’re trying to enjoy your favorite streams or host your own broadcast.
Twitch, as a leading live-streaming platform, is prone to lagging and buffering issues due to various factors like internet speed, streaming settings, and device performance.
This guide breaks down the causes and provides actionable solutions to ensure a smooth streaming experience.
Run a speed test to check your internet’s upload speed. A minimum of 5 Mbps upload speed is required for smooth streaming. If the speed is below the threshold, restart your router or contact your ISP to resolve the issue.
2. Optimize Streaming Settings
Source: MKs Guide
Adjust your streaming platform’s settings to match your internet speed and device capacity:
Lower Bitrate: Set the bitrate to 2500 Kbps or lower if your connection struggles.
Resolution and FPS: Stream at 720p resolution and 30 FPS to reduce strain on your system.
3. Enable Twitch’s Low Latency Mode
Low Latency mode minimizes the delay between streamers and viewers. To activate:
Open your Creator Dashboard on Twitch.
Go to Settings > Stream.
Turn on Low Latency Mode.
This feature is especially helpful for real-time interactions with your audience.
4. Clear Cache and Disable Hardware Acceleration
Browsers accumulate cache over time, which can slow down performance. Clear your browser cache and cookies to resolve this. Additionally, disable hardware acceleration:
Go to Settings in your browser.
Under the System section, toggle off Use hardware acceleration when available.
5. Switch to a Wired Connection
Wi-Fi can be unstable, especially during peak hours. Switching to a wired Ethernet connection provides consistent speed and reduces packet loss, making streaming smoother.
6. Try a Different Browser
If your current browser continues to cause issues, switch to a more efficient one like Firefox or Edge. These browsers often perform better with Twitch streaming.
7. Restart Your Router
Sometimes, all you need is a quick router reboot to refresh your connection. Turn it off for a minute and then back on. Ensure no other devices are hogging bandwidth during your stream.
8. Close Background Applications
Shut down unnecessary programs or apps running in the background that could consume bandwidth or system resources, allowing your device to prioritize Twitch streaming.
Common Causes of Twitch Stream Lag
Twitch lag occurs when your connection to the Twitch server is disrupted or when your device struggles to process the stream. The problem could lie in your internet connection, your streaming settings, or even your browser. Knowing the cause helps in tackling the issue effectively.
Unstable Internet Connection: Slow or fluctuating internet speed often leads to buffering.
High Bitrate Settings: Streaming at a higher bitrate than your internet can handle results in lag.
Browser Performance: Overloaded browsers with too many extensions or outdated versions can worsen the experience.
Device Limitations: Older hardware or insufficient system resources can hinder smooth streaming.
Final Thoughts
To fix Twitch stream lag, understanding the root cause is essential. Whether it’s optimizing your internet connection, tweaking streaming settings, or updating your browser, these steps can significantly improve your Twitch experience.
By following this guide, you’ll enjoy smooth, uninterrupted streams, whether you’re hosting or watching. Take control of your Twitch experience and elevate your streaming journey today!
Many Fortnite players were shocked to discover unauthorized charges due to Epic Games’ misleading billing practices. As a result, the Federal Trade Commission (FTC) intervened to ensure refunds for affected players. If you’ve been impacted, you may be wondering whether you qualify for a Fortnite refund and how to claim it.
The good news is that the process is simple and easy to follow. This guide will walk you through each step to file your claim and receive your refund. Let’s into the details to ensure you don’t miss out on what you’re entitled to.
In a groundbreaking settlement, Epic Games was fined by the FTC for unlawful billing practices that affected millions of Fortnite players. Between January 2017 and September 2022, many players were charged for in-game items they didn’t intentionally purchase. Parents also reported unauthorized transactions made by minors, leaving them with locked accounts if they disputed charges.
To address these issues, the FTC launched a refund program with over $72 million distributed so far, averaging $114 per person. This initiative aims to compensate affected players and promote fairer practices in the gaming industry.
Are You Eligible for a Refund?
The FTC outlined specific criteria for eligibility:
Unintended Charges: If you were charged for unwanted in-game items between January 2017 and September 2022, you qualify.
Unauthorized Transactions by Minors: Parents whose children made purchases without consent between January 2017 and November 2018 can file claims.
Locked Accounts: Players who had their accounts locked after disputing charges are also eligible.
If you fall into one of these categories, you’re likely entitled to a refund.
How to File Your Claim
Filing a claim for your Fortnite refund is a simple process. Follow these steps to ensure a hassle-free experience:
Visit the FTC Refund Page: Head to the official FTC Refund Page.
Verify Eligibility: Check if your circumstances match the outlined criteria.
Fill Out the Form: Provide accurate details, including your contact information and account details related to the purchase.
Submit Supporting Documents: If requested, attach any proof of the disputed charges, such as receipts or screenshots.
Submit Your Claim: Once completed, hit submit and keep the confirmation email for your records.
Deadlines and Additional Information
The deadline to file a claim is January 10, 2025. Ensure you act before this date to avoid missing your refund opportunity. Refunds are processed on a rolling basis, and you can expect updates from the FTC via email or their website.
Tips to Avoid Scams
Only use official FTC channels: Avoid third-party websites or unsolicited offers claiming to process refunds on your behalf.
Verify communications: Legitimate emails will come from FTC.gov.
Final Thoughts
The FTC’s refund program for Fortnite players marks an important move toward holding companies accountable for unfair billing. By following the proper steps, you can easily and securely claim your Fortnite refund.
Whether you’re a parent reclaiming unauthorized purchases or a player disputing unexpected charges, act soon. Submit your claim before January 10, 2025, to ensure you receive the compensation you deserve.
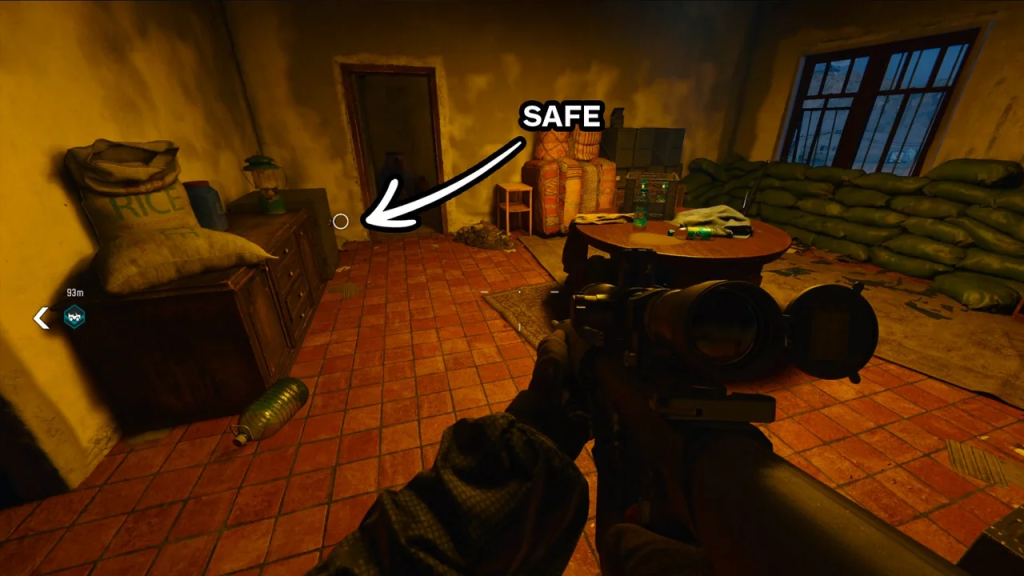
Unlocking the safe in Call of Duty: Black Ops 6 during the “Hunting Season” mission is a rewarding challenge that provides valuable in-game rewards. This Black Ops 6 hunting season safe guide will help you locate and unlock the safe, allowing you to enhance your gameplay and secure valuable resources.
The safe, located in the Village area of the map, is part of an optional but highly rewarding task within the “Hunting Season” mission. With precise steps and careful navigation, you can successfully unlock it and reap the benefits for your campaign progress.
The safe is located in the Village area, found in the bottom-left section of the map near a SAM site. To access it:
Clear the Area: Eliminate all enemy forces in the Village encampment. Depending on your strategy, you can use stealth or direct combat to secure the area.
Locate the Building: The safe is housed inside a main building next to a kitchen area on the second floor. Enter this building once the area is cleared.
How to Unlock the Safe
Source: IGN
Unlocking the safe involves solving a radio puzzle located within the building. Follow these steps to crack the code and access the rewards:
Find the Radio: The radio is located on a balcony near the kitchen area on the second floor. Interact with the radio to begin the puzzle.
Solve the Puzzle:
Adjust the radio’s frequency and amplitude to match the on-screen pattern.
Once correctly tuned, the radio will broadcast a unique four-digit code. Note this code as it will differ for each playthrough.
Enter the Code: Return to the safe located nearby, to the right of the radio. Input the four-digit code you received to unlock the safe.
Rewards for Unlocking the Safe
Once unlocked, the safe provides a reward of $1000 in in-game currency. This can be used for upgrades, equipment enhancements, and other valuable tools to aid in your campaign against Pantheon. The reward not only enhances your resources but also adds a sense of accomplishment to your gameplay.
Final Thoughts
This Black Ops 6 hunting season safe guide offers a straightforward approach to locating and unlocking the safe in the “Hunting Season” mission. By following these steps, players can tackle the challenge efficiently and enjoy the rewards that come with it.
Whether you’re progressing through the campaign or completing optional tasks, this guide ensures you won’t miss out on the valuable resources hidden in the safe. Good luck, and happy gaming!
Maximize your Black Ops 6 rewards—Create highlights from your best gameplay with with Eklipse
Eklipse help streamer improve their social media presence with AI highlights that clip your Twitch / Kick streams automatically & converts them to TikTok / Reels / Shorts
How to save video replay in Mobile Legends on your phone? Mobile Legends: Bang Bang is one of the most popular games this year, and many players are eager to download their best moments in Mobile Legends for various reasons. Saving replays allows you to analyze your team’s or opponents’ strategies, optimizing them for future matches. Additionally, you can share epic highlights on social media to gain more followers and boost engagement.
The good news is that the game now lets you save your videos easily and for free. In this guide, we’ll explore the complete steps to do so, along with extra tips to enhance your gaming clips’ quality for maximum impact. Let’s dive in!
Eklipse gives you everything you need to make streams that pop, grab views, & grow your fandom.
How to Save Video Replay in Mobile Legends without Third-Party App
If you want to relive your epic moments in Mobile Legends, you can easily access your past game replays. Here’s a quick guide to help you navigate to your match replays and save them for future viewing.
1. Log into Mobile Legends using your account.
2. Once you’re in the game lobby, tap on the Account Profile icon.
3. Next, go to the Battlefield section under the Column tab.
4. Then, navigate to the Replay section to view your previous game matches. Mobile Legends allows you to re-watch or save these videos.
Replay Page ML – Source: Esportsku.com
5. To save the clip, just hit the Save Now button and Mobile Legends can automatically save the replay video.
Save Now ML – Source: Mobilelegends.com
6. To download it onto your mobile phone, simply go to the “My Replays” section, find the replay, and tap the down arrow button to start the download.
My Replays on ML – Source: Kaskus.co.id
7. Voilà! The replay video should now be in your phone’s gallery.
This method can also answer the question, “How to save video replays in Mobile Legends on Android?”. However, if the video doesn’t appear in your gallery after downloading, it might indicate that this option isn’t compatible with your device. In that case, using a dedicated app could be the best solution. Check the next section for an alternative way to save the replay on your phone.
How to Save Replays in Mobile Legends Using an App
Some mobile phones might not support the previous method for saving Mobile Legends replay videos. So, how to save ML replay to gallery in this case? Don’t worry, there’s an app that can help you with that: xRecorder.
Follow the steps below to learn how to download ML Replay 2024 with xRecorder:
Install the xRecorder app on your device. It’s available on both the Play Store and the App Store.
Once installed, open the app and adjust the resolution in the Settings menu.
Launch Mobile Legends and follow the same steps to save the replay under the My Replays tab.
Open the saved replay and tap the xRecorder icon hovering next to the screen.
Tap the recording button to start recording your screen.
How to Save ML Replays – Source: Mytecheasier.com
When the app is starting to record the gameplay, tap one of the Mobile Legends renditions and hit OK.
Finally, tap the minute symbol next to the screen and hit the recording button.
There you go. The replay video from Mobile Legends has been successfully downloaded into your phone gallery.
What if you only want to view the Mobile Legends replay rewind? It’s also easy, here’s the step-by-step:
Save the replay of the match you want to watch.
Go to the My Replays section and tap the replay you saved.
Control the playback and switch perspectives as you watch.
That’s how you can view ML replays. You can use this feature to learn from your mistakes, improve your skills, or just enjoy your epic moments.
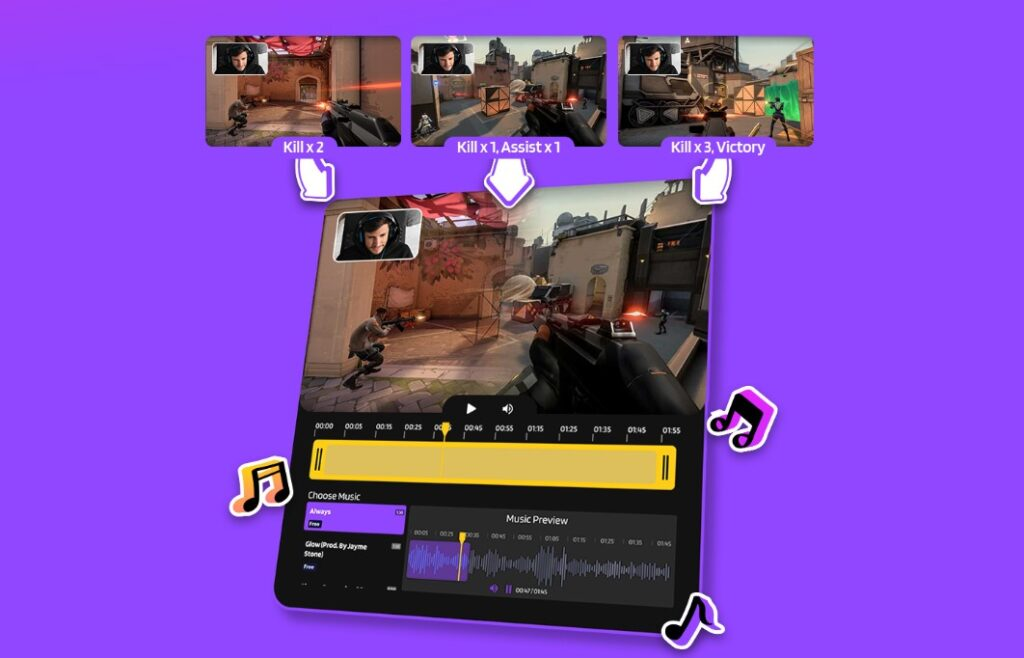
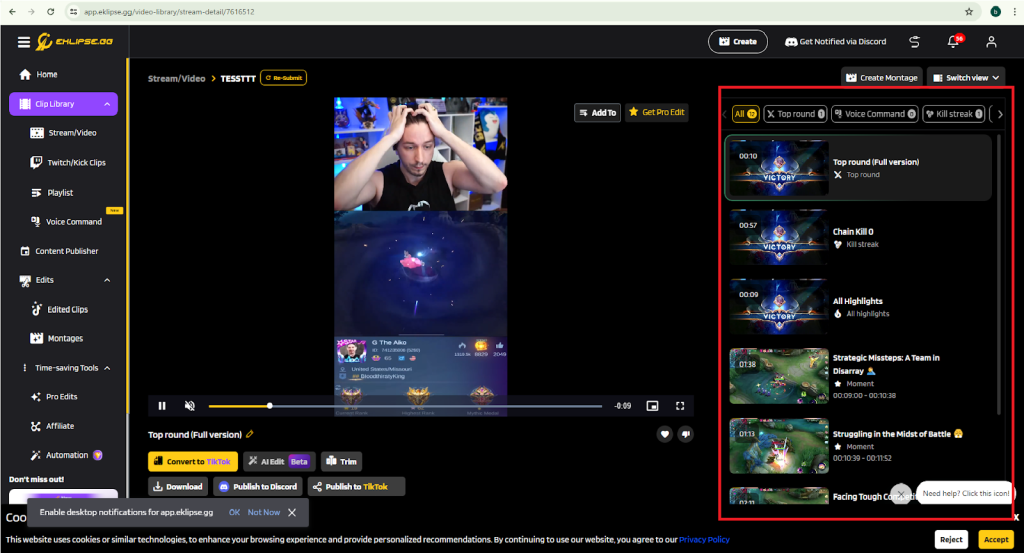
BONUS: Edit Your Mobile Legends Gameplay into Viral Short Clips with Eklipse
Source: Eklipse
Looking to make a splash in the Mobile Legends community? With Eklipse, you can create viral short clips of your gameplay effortlessly!
Eklipse helps you transform your long-form videos into captivating TikTok-ready vertical highlights using advanced AI technology. This tool automatically identifies the most exciting and engaging moments from your videos, saving you time and effort while making sure your content stands out on TikTok, Shorts, and Reels.
Here’s how to download a replay in ML 2024 and turn it into a viral gaming clip quickly and for free using Eklipse:
Tips for Organizing Your Downloaded Mobile Legends Replays
Tips for Organizing Downloaded Replays – Source: blog.unipin.com
Managing and organizing your downloaded replays in ML can help you analyze and improve your gameplay, as well as provide new content opportunities. Here are some best practices for managing and organizing your downloaded replays:
1. Create a Consistent Naming Convention
Develop a consistent naming convention for your replays that makes it easy to identify and sort them. This can include the game mode, hero, or date of the replay in the filename.
2. Categorize Replays by Game Mode or Hero
Categorize your replays by game mode or hero to make it easier to find specific replays when you need them. This can be especially helpful for analyzing your performance with a particular hero or in a specific game mode.
3. Use Tags or Labels
Consider using tags or labels to further categorize and organize your replays. This can help you easily find replays based on specific criteria, such as maps or opponents.
4. Backup Your Replays
Backup your replays regularly to ensure that you don’t lose any valuable data. Consider using a cloud-based storage solution or an external hard drive for easy access and secure storage.
5. Share Your Replays
Sharing your replays with others can help you improve your gameplay and create new content opportunities. Consider sharing your replays with coaches or other players in the ML community for feedback and analysis.
Some successful replay management and organization strategies include creating separate folders for different game modes or heroes, using spreadsheet software to track and categorize replays, and using third-party software to analyze and improve gameplay based on your replays.
FAQ
1. How to record Mobile Legends replay? Launch Mobile Legends and go to the Replays section. Locate the moment you want to capture, then swipe down the notification bar and tap the recorder icon to begin recording the Replay.
2. How do I copy data from Mobile Legends? You cannot directly copy data from Mobile Legends, but you can use screen recording apps like xRecorder to capture and share your gameplay.
3. Can I download ML replay? Yes, you can download Mobile Legends (ML) replays, but only within certain limits of period. To download a replay, go to the Replays section in the game, select the match you want, and look for the Download option.
Final Thoughts
That’s how to save video replay in Mobile Legends on your phone! You can use the game’s built-in tools or additional apps like xRecorder to save your gameplay easily. Keep in mind that saving ML replays is only available for a limited time, so act fast before your match disappears.
After recording, you can enhance your content with Eklipse, an AI tool that creates highlights from key moments like killstreaks or clutch plays. Sign up for Eklipse today to turn your gameplay into stunning, shareable clips!
Dreaming of flaunting the trendiest costumes in Marvel Rivals without spending a penny? You’re in good company. Exclusive skins are a big draw, but their cost can sometimes be discouraging. Luckily, there are clever ways to get these items for free! From utilizing Marvel Rivals Codes to earning Twitch Drops, platform exclusives, and in-game rewards, this guide reveals the secrets to upgrading your look without breaking the bank.
Marvel Rivals, the dynamic strategy game from NetEase, invites players to form a powerful team of Marvel superheroes. While playing is free, most premium skins and costumes usually require in-app purchases. However, various methods exist to unlock these cosmetic upgrades without spending real money. Discover step-by-step instructions to transform your heroes into Marvel’s most stylish champions and take on battles with flair!
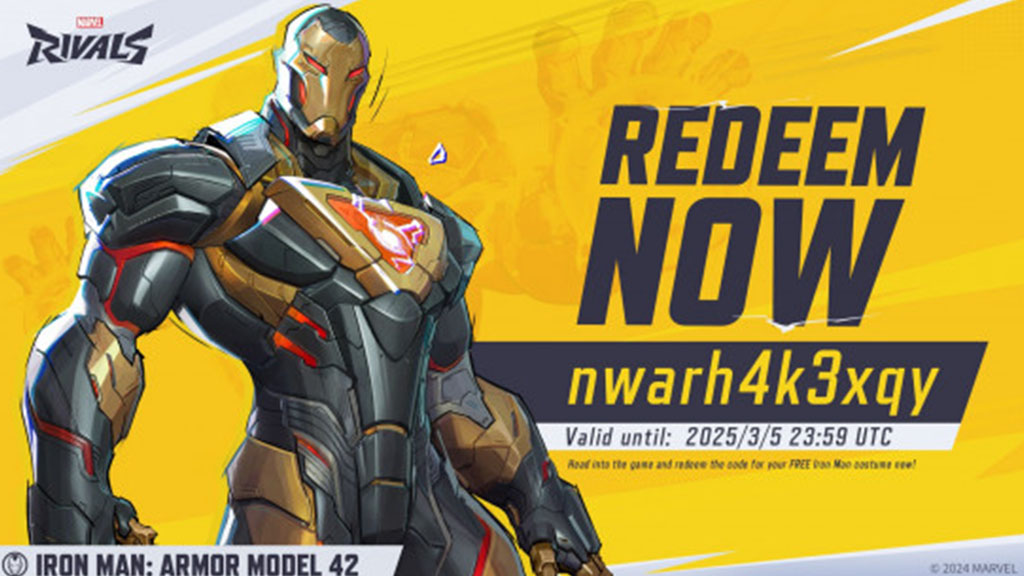
Free skins are often distributed by the developers through limited-time redeem codes. These codes can be entered in-game to unlock exclusive content. Here are the active codes as of December 12, 2024:
NWARH4K3XQY: Unlocks the Iron Man Armor Model 42 skin. This code expires on March 5, 2025, so grab it while you can!
Platform-Exclusive Freebies
Some platforms offer exclusive free content for Marvel Rivals players. Here’s what’s currently available:
PlayStation: Download the free Scarlet Spider costume for Spider-Man from the PlayStation Store.
PlayStation Plus Subscribers: The Season 0 bundle grants you the Peni Parker VEN#m skin, an MVP animation, a spray, a nameplate, and 300 Chrono Tokens.
How to Redeem Marvel Rivals Codes
Redeeming codes in Marvel Rivals is a breeze. Just follow these steps:
Open the Settings menu. (Look for a gear icon or press the ESC key.)
Select “Bundle Code.”
Enter the code and click “Use” or “Redeem.”
More Ways to Get Free Skins
Beyond redeem codes and platform exclusives, here are some additional methods to expand your costume collection without spending any money:
Twitch Drops: Keep an eye out for special Twitch Drops campaigns. Watch participating streamers playing Marvel Rivals to earn free skins, like the Magneto Will of Galacta skin.
Free Season Pass Rewards: Progress through the free tiers of the Season Pass to unlock rewards. The Hela Empress of the Cosmos skin, for example, can be earned this way.
In-Game Achievements: Complete specific achievements in the Heroic Journey to earn unique skins. Star-Lord’s Jovial Star and Storm’s Ivory Breeze costumes are examples of achievement rewards.
Competitive Mode Victories: Rise through the ranks of Competitive Mode. Reaching Gold rank in Season Zero, for instance, unlocks the Moon Knight Golden Moonlight skin.
Final Thoughts
Securing free skins and costumes in Marvel Rivals is simpler than you might expect. By using active Marvel Rivals Codes, exploring platform-exclusive deals, and joining events or challenges, you can expand your cosmetic collection without any expense. New opportunities and codes are frequently introduced, so staying updated is key to maximizing these rewards.
Don’t miss out on the chance to upgrade your heroes’ looks for free. Keep an eye on announcements, redeem codes promptly, and participate in limited-time activities. With consistent effort, you’ll dominate the Marvel Rivals battlefield in style, showcasing your impressive collection of skins and costumes!
A bio on Twitch should speak from your own voice and give potential viewers more information about yourself. Your Twitch bio should explain who you are, what you’re about, and why users should follow you–even pay you. These Twitch bio ideas will help you craft a profile that stands out and attracts viewers
A creative and engaging bio showcases your personality, gaming interests, and the unique vibe you bring. A well-written bio is essential for building a loyal community and growing your audience!
What should I put in my bio on Twitch? Your Twitch bio is prime real estate for showcasing your personality and content. Consider including elements like a concise ‘About Me,’ your streaming schedule, details about your setup, links to your other social media platforms, subscriber benefits (if applicable), a donation button link, and an email for business inquiries. You don’t need to cram everything in, but choose the elements that best represent you and your channel.
Have a unique selling point on why people should watch you
Include stuff like your rough age, broad location, the type of content you like to make, etc. (Make sure not to reveal any information you are not comfortable with being online).
For example, if you play a game like city skylines and work as an architect during the day, this is very interesting information that would entice a viewer. Because you have real-life experience, you can add a unique element to the game.
This applies to your content. Consider what makes you unique. Are you amusing, excellent at the game, and a fast runner? There is always something unique about yourself that distinguishes you from other streamers.
2. Stream Schedule
It is a good idea to include a stream schedule in your Twitch bio so that your audience knows when you will be live. If you go live on the same day and time every week, your audience will learn when you’re going to be on and will be patiently waiting.
People would schedule time in their schedules to watch it when it aired, just like they did with TV shows in the past. Viewers will do the same for your streams if you build a routine.
The Stream Schedule App allows you to add a stream schedule to your stream.
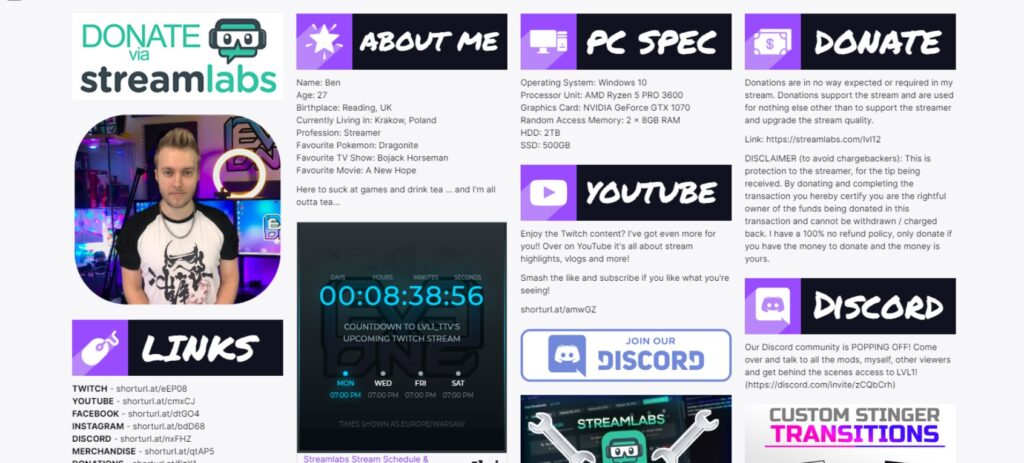
3.One of the Most Important Twitch Bio Ideas: Stream Setup
twitch bio copy and paste
Don’t forget to include your PC specs or stream setup fellas!
People on Twitch are always curious about your setup. People will most likely ask you what you’re using if you have a great stream setup.
By including this in your stream description, your viewers will know exactly what equipment you’re using without having to ask in chat. You can also profit from this list by using affiliate links.
To use affiliate links, you must first join the Amazon Associates program. You can add these links to your Twitch bio once you’ve signed up.
4. Social Media Links
When attempting to establish yourself as a social media personality, you should cross-pollinate your audience across multiple social platforms. On Twitch, you can do this by linking to your YouTube, Instagram, TikTok, and other accounts in your Twitch bio.
The best way to accomplish this is to use Twitch panels. You can make these yourself or buy them from sites like Own3d.tv and customize them.
5. Sub Benefits
If you are a Twitch affiliate or partner, you are probably trying to get as many subscribers to your channel as possible. After all, the more money you make, the better your stream will be.
Giving people incentives to join your channel is the best way to get more subscribers. This could be exclusive emotes or access to a weekly “Play with subs session.” You can create your own incentives, but make it worthwhile for someone to subscribe.
People can see exactly what they will get by listing these benefits in your Twitch bio, which is below your stream.
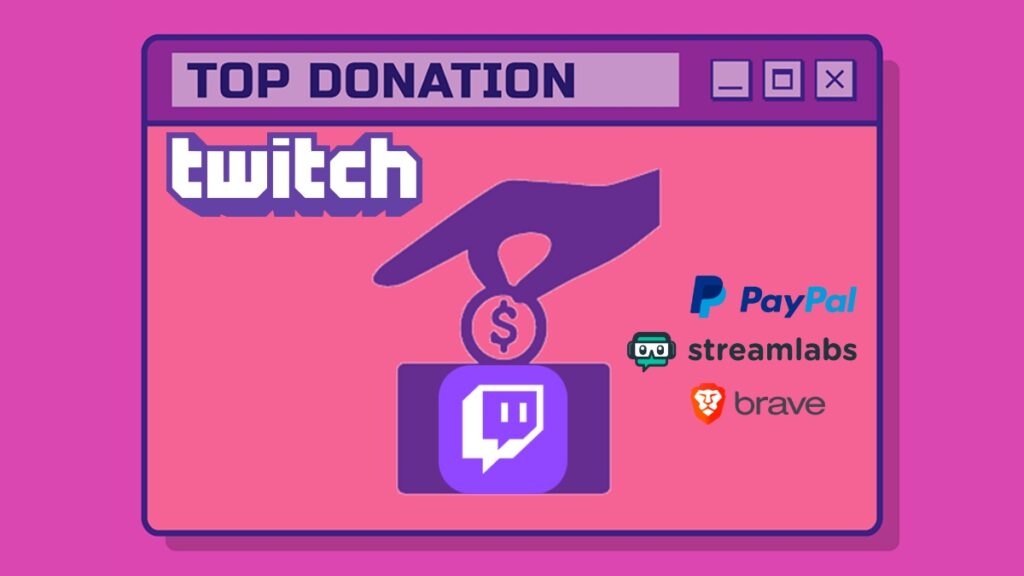
6. Twitch Bio Ideas: Donation Button
If you want to accept donations in addition to bits and subs on Twitch, you can add a donation button to your panels in your bio. The best way to do this is to create a donation page on Streamlabs.
After you’ve created a page, you can add a Donation panel that links to it. Viewers will then be able to donate via Paypal or credit card on your Streamlabs page.
If you want to encourage more donations, you can set up something like Text to Speech, where users can donate a certain amount of money to have a message read out on the stream.
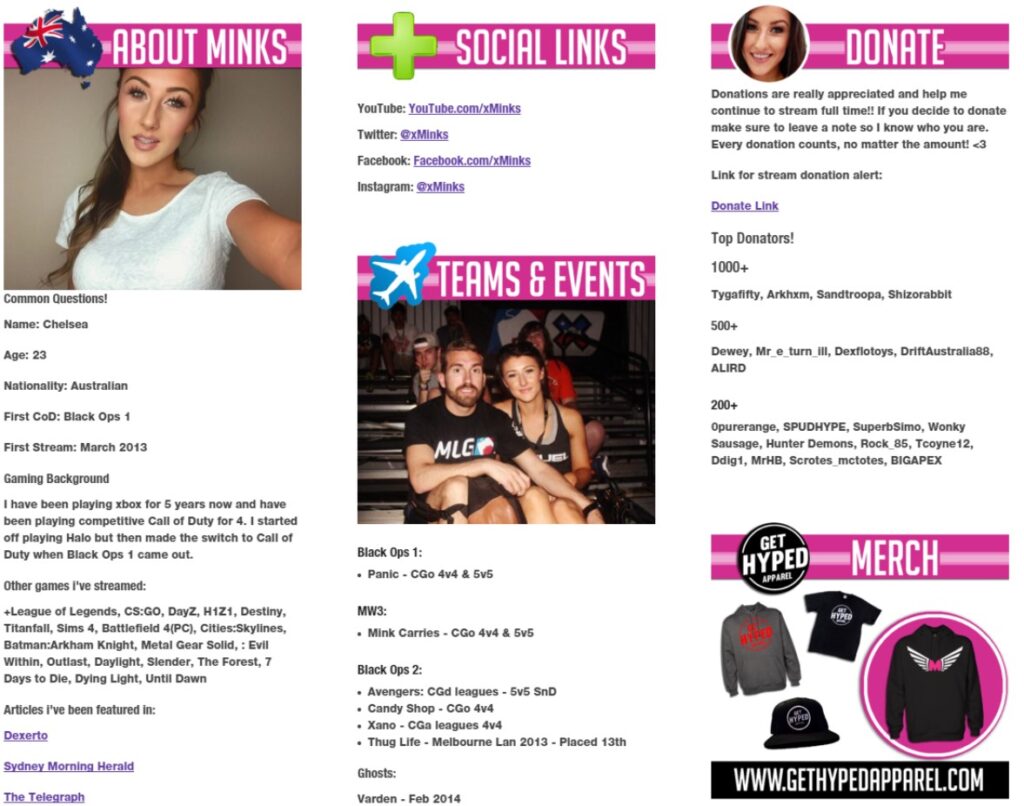
Above is Bateson’s donation button, or “Tip Jar,” as he refers to it. It’s also a good idea to include a similar disclaimer to your donate button, like the one he used above.
7. Email for Collaborations and Business Inquiries
To make it easier for potential sponsors and other streamers to get in touch with you about collaborations and business inquiries, you should include an email address for your channel in your profile.
You may also want to include a Twitch Wishlist and a PO Box so that fans can send you personalized art or small gifts. Make sure to pre-open the items beforehand to make sure everything is appropriate to show on camera.
8. Twitch Bio Template
Creating an engaging Twitch bio is essential for attracting and retaining viewers. Here’s a structured template and some tips to help you craft a compelling bio that reflects your unique personality and streaming style.
9. Twitch Bio Examples Gaming
Here are some creative Twitch bio examples specifically tailored for gaming streamers. These examples can serve as inspiration to help you craft your own unique bio.
The Gamer’s Journey: “Hey there! I’m {Your Name}, a lifelong gamer who started with Mario and never looked back. Join me for epic adventures in {Games} every week!”
The Chill Streamer: “Welcome to my cozy corner of Twitch! I’m {Your Name}, your go-to for relaxing gameplay and good vibes. Let’s unwind together while we explore {Games}.”
The Competitive Edge: “Competitive gamer and strategist! Watch me dominate in {Games} and share tips to level up your game. Join the squad and let’s conquer the leaderboards!”
10. Twitch Bio for Success
To write a successful Twitch bio, it’s essential to clearly communicate who you are, what you do, and why viewers should follow you. Here’s a structured approach based on the search results:
How to Write a Good Twitch Bio
To write a compelling Twitch bio, you’ll want to focus on several key elements that convey who you are, what you do, and why viewers should tune in. Here’s a structured approach based on the search results:
Introduction:
Start with your name or streamer alias.
Include your pronouns for inclusivity.
Content Focus:
Clearly state the types of games you play or the content you create (e.g., FPS, RPGs, variety streaming).
Streaming Schedule:
Mention when viewers can expect to see you live (e.g., specific days and times).
Unique Selling Proposition (USP):
Highlight what makes your channel special. This could be your gaming skills, humor, or community engagement.
Call to Action (CTA):
Encourage viewers to follow your channel or engage with your content.
General Twitch Bio Template
But most of all, the basic template that you could use for your Twitch bio is very simple. Make sure you answer these questions:
Who are you?
What do you do/what value does your Twitch channel add to viewers?
What do you want people reading to do/CTA? (i.e., follow me)
Below is a quick Twitch bio template to get you started:
Welcome to {channel name}! My name is {name} (pronouns), a lover of all things [blank–something related to your niche]. Look forward to seeing a ton [blank] on my channel and the occasional [blank] because I can’t resist. Follow my channel and socials! xX
Twitch About Me Template
canva
Still not sure what to write for your Twitch bio? Don’t worry, we’ve got several Twitch “About Me” template to inspire you:
1. The ‘Informative’ Twitch About Me
Another style of Twitch bio template provides additional insights into what it’s like to experience your Twitch channel. This includes:
How long have you been live streaming?
What genre of content can viewers anticipate?
Here are a couple of illustrations:
I’ve been streaming for nearly two years, offering a diverse range of games with a primary focus on MMOs and shooters (although I do indulge in many other games). Explore my channel for entertaining gameplay experiences.
My channel, “[your channel’s name]” has been live for over 2 years, specializing in Overwatch, RPGs, and Indie titles. I prioritize community engagement, frequently interacting through giveaways. If you enjoy intense gameplay combined with a good time, feel free to check out my stream.
2. The ‘Shock Value’ Twitch About Me
This template allows you to truly stand out by incorporating an element of shock, as gamers often appreciate surprising elements. To craft this kind of bio, remember to add:
A word of caution
Exercise discretion to avoid making your bio seem too ‘sketchy.’
Here are two examples:
Warning: This stream includes graphic content such as blood, violence, gore, and offensive language. Viewer discretion is advised.
An 18-year-old who enjoys discussing topics like politics and exchanging expletives with my cat (who never listens!). Tune in if you want to experience what I mean…
3. The ‘Let’s Get Personal’ Twitch Bio Ideas
This Twitch bio template is highly effective, particularly if you value establishing a personal connection with your community. It will undoubtedly distinguish you from the crowd!
Here are two examples:
I’m DevinD, a full-time college student with a mission to give back and make a positive impact on the world, one person at a time.
Greetings, I’m [your name]! An artist striving to establish a presence in the city (not exactly ‘big,’ but you get the idea). Join me on my journey as I navigate through this chaotic world, trying to carve my path.
The Twitchverse brims with amazing creators, each crafting a unique space through their channel and bio. While copying others wouldn’t do your spirit justice, these stellar examples can spark your own bio-writing journey:
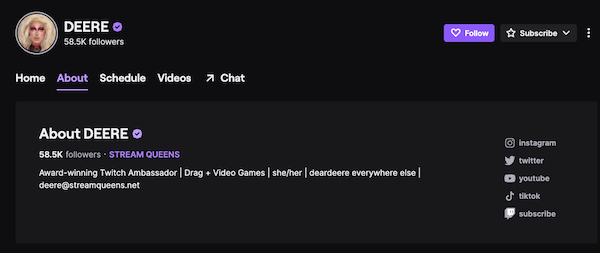
1. DEERE: Drag queen and gamer extraordinaire, DEERE, leaves no room for doubt. Her bio tells you what to expect, drops her socials for extra dose of fabulousness, and even throws in an email for brand collaborations. Werk!
streamlabs
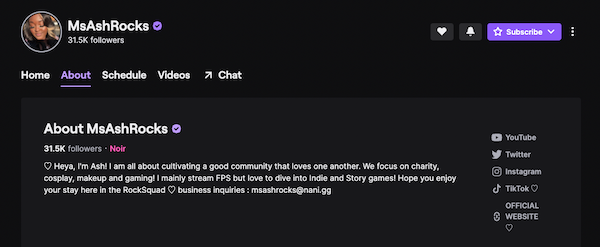
2. MsAshRocks: Like others on this list, MsAshRocks champions values, previews her content, and provides a contact for brands. A bio that rocks just like her streams!
streamlabs
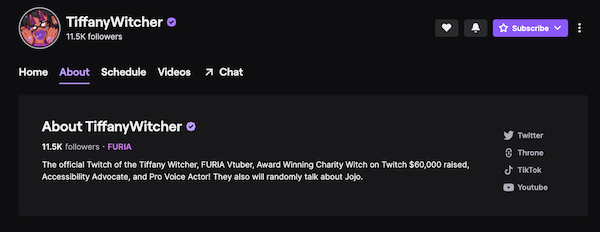
3. TiffanyWitcher: This streamer masterfully blends accolades with a relatable passion. Fans of charity and Jojo’s Bizarre Adventure will likely hit that follow button faster than Dio can say “ZA WARUDO!”
streamlabs
Tips to Write Twitch Bio
In writing your Twitch bio, we must keep in mind some key points we would like to share before showcasing impactful examples. Here are the lists of quick tips that you can jot out.
Keep your bio concise, with a limit of 300 characters
Balance your professional and personal side, while connecting it to your channel’s content to give your viewers an idea of who you are
Don’t be afraid to share your hobbies and interests, as they make you more relatable to your audience
Add your preferred pronouns to show that you value inclusivity and diversity
Inject some humor into your bio to make it more engaging and memorable
Highlight what makes you unique from other streamers in your niche, whether it’s your personality, content, or style
Remember to link your social media profiles, which will be displayed to the right of your bio, to make it easier for your viewers to connect with you.
Elevate your Twitch game with a standout bio! These Twitch bio ideas can help you craft an introduction that reflects your channel’s personality and encourages viewers to follow. To take things further, tools like Eklipse can amplify your content and boost audience engagement.
Beyond writing a great bio, expanding your reach through social platforms like TikTok, Shorts, and Reels is vital. Imagine a tool that clips your Twitch streams automatically. Eklipse.gg does just that! This free, web-based platform simplifies editing. Explore its features today and sign up to start enhancing your content.
Maximize your Black Ops 6 rewards—Create highlights from your best gameplay with with Eklipse
Eklipse help streamer improve their social media presence with AI highlights that clip your Twitch / Kick streams automatically & converts them to TikTok / Reels / Shorts
Climbing the Marvel Rivals Rank System can be tricky, whether you’re a beginner or aiming for the top. The ranking process often feels complex, but with the right plan, you can rise steadily and claim exclusive rewards. Understanding how the system works is key to improving your gameplay and standing out in competitive matches.
This guide will simplify the journey, covering how to unlock ranked mode, decode rank mechanics, and apply winning strategies. By following these steps, you’ll enhance your Marvel Rivals experience and pave your way to competitive success.
Starting your ranked journey begins with gaining access to this competitive mode. Here’s what you need to do:
Reach Account Level 10: Accumulate enough experience by playing 25-40 quick matches.
Complete Placement Matches: Once unlocked, play placement matches to determine your starting rank.
Why It Matters:
Ranked mode isn’t just a way to challenge yourself but a gateway to better rewards and recognition. Unlocking it marks your first milestone in the competitive journey.
Rank Hierarchy and Divisions
Understanding the rank structure is crucial for tracking your progress and setting goals. Marvel Rivals organizes players into these ranks:
Bronze: Perfect for beginners learning the basics.
Silver: A sign of growing competence and improved skills.
Gold: Demonstrates solid gameplay consistency.
Platinum: Reserved for advanced players with refined strategies.
Diamond: A prestigious rank for top-tier competitors.
Grandmaster: For players close to mastering the game.
Eternity: The proving ground for elite skills.
One Above All: The ultimate achievement reserved for the best of the best.
Detail:
Each rank includes three subdivisions, such as Bronze III to Bronze I. Consistent performance is essential to progress through these tiers.
Progression and Demotion Mechanics
Knowing how rank advancement works can help you strategize better and maintain your rank:
Earn Points: Win matches to accumulate points, with extra rewards for defeating higher-ranked opponents.
Demotion Protection: Enjoy a buffer zone that protects you from immediate demotion after a loss.
Rank Decay: Be aware that inactivity in higher ranks like Grandmaster and Eternity can lead to rank decay.
Pro Tip:
Prioritize teamwork and consistency to minimize point losses and ensure steady upward momentum.
Rewards per Rank
Rank progression comes with enticing incentives that motivate players to aim higher:
Bronze to Gold: Collect credits and unlock cosmetic items.
Platinum and Above: Gain access to exclusive skins, including the rare “Golden Moonlight” skin for Moon Knight.
Seasonal Rewards: Enjoy additional end-of-season rewards based on your final placement.
Why It Matters:
These rewards enhance your gameplay experience and allow you to show off your accomplishments in the game.
Tips for Efficient Rank Advancement
Focus on Core Characters: Specialize in a few characters and master their abilities.
Communicate Effectively: Coordinate with teammates via in-game chat for better synergy.
Understand the Map: Familiarize yourself with key areas to control objectives and avoid ambushes.
Time Your Matches Wisely: Off-peak hours often result in quicker matchmaking and less intense competition.
Review and Learn: Analyze match replays to identify mistakes and refine your strategy.
Quick Reminder:
Success in ranked play requires patience and persistence. Focus on learning and improving with every match rather than rushing the climb.
Final Thoughts
Excelling in the Marvel Rivals Rank System is your pathway to earning recognition and dominating the competitive scene. This guide will help you unlock ranked mode, climb efficiently, and claim the exclusive rewards tied to higher ranks.
Are you ready to rise through the ranks? Set your sights on the coveted One Above All rank and leave your mark in Marvel Rivals!
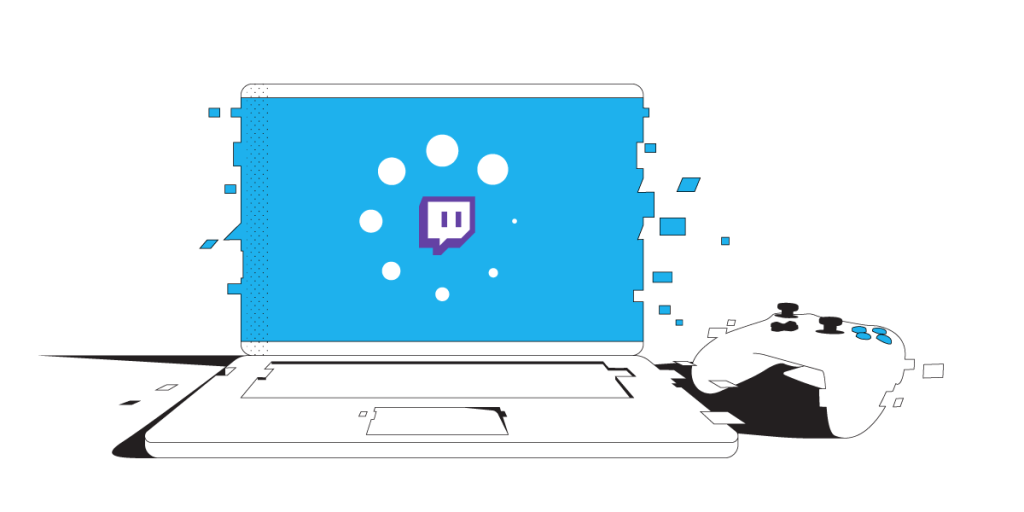
Experiencing issues where Twitch streams aren’t loading can be incredibly frustrating, especially when you’re trying to enjoy your favorite creators or live events. Understanding why are Twitch streams not loading is the first step toward solving the problem. Common reasons include internet connectivity issues, browser glitches, or even Twitch server downtime. Thankfully, there are several solutions to get your streams running smoothly again.
From troubleshooting your internet connection to tweaking browser settings, addressing these issues can significantly enhance your streaming experience. Below, we outline the common causes and practical steps you can take to fix Twitch streams that aren’t loading.
Perform an internet speed test to ensure you meet Twitch’s minimum requirements (at least 3 Mbps for standard quality).
Restart your router or switch to a wired Ethernet connection for better stability.
2. Clear Cache and Cookies
Go to your browser settings and delete cached data and cookies. This simple step often resolves playback errors.
3. Update Your Browser or Twitch App
Ensure that your browser or Twitch app is up to date. Developers frequently release updates to fix bugs and improve performance.
4. Verify Twitch Server Status
Check Twitch’s official status page or social media accounts for updates on server issues. If the problem lies with Twitch, you’ll need to wait for them to resolve it.
5. Adjust Firewall or Network Settings
Temporarily disable your firewall to see if it’s blocking Twitch. You can then configure it to allow Twitch traffic.
If you’re on a restricted network, consider using a VPN to bypass blocks.
6. Use a Wired Connection
For more stable streaming, connect your device directly to your router using an Ethernet cable. This reduces packet loss and buffering.
7. Restart Your Device
A simple reboot can often resolve minor software glitches that may interfere with Twitch streaming.
8. Consider Using a VPN
If you suspect regional restrictions or ISP throttling, a VPN can reroute your connection through servers that provide better access to Twitch.
Common Reasons Twitch Streams Won’t Load
Source: Speedify
Slow or Unstable Internet Connection A poor internet connection is the most frequent cause of streams failing to load. This could result from low bandwidth, temporary ISP outages, or even data throttling by your internet provider. A stable internet connection is critical for smooth Twitch playback.
Browser-Related Issues Outdated browsers, accumulated cache, and cookies can interfere with Twitch streams. Regular browser maintenance, like clearing cache and updating to the latest version, is essential for uninterrupted streaming.
Twitch Server Problems Sometimes, Twitch itself is the issue. Server maintenance or overloads can prevent streams from loading. Checking Twitch’s server status can confirm whether the problem lies with their servers.
Network Restrictions Firewalls, VPN configurations, or workplace and school network settings might block Twitch, making it inaccessible. These restrictions often require adjustments to allow Twitch traffic.
Device-Specific Issues Outdated drivers, conflicting software, or general system glitches on your device can also hinder Twitch playback.
Final Thoughts
Understanding why are Twitch streams not loading and addressing the root causes can transform your streaming experience. Whether it’s resolving connectivity issues, clearing browser data, or checking Twitch server status, these solutions ensure you can get back to enjoying your favorite streams. By following this guide, you can troubleshoot effectively and enhance your Twitch sessions without interruptions.
Ready to level up your content creation? Let Eklipse simplify your workflow with its powerful AI tools that automatically generate highlight clips from your streams. Whether you’re gaming on Twitch, YouTube, or Facebook, Eklipse helps you capture, edit, and share your best moments effortlessly. Transform your streams into engaging TikToks or YouTube Shorts and grow your audience like never before. Try Eklipse today for free and see the difference it makes!
Maximize your Black Ops 6 rewards—Create highlights from your best gameplay with with Eklipse
Eklipse help streamer improve their social media presence with AI highlights that clip your Twitch / Kick streams automatically & converts them to TikTok / Reels / Shorts