Have a lot on your plate but need to create stunning highlight clips ASAP for your content? Well, that’s no longer a big deal, as Eklipse has brought back the Premium Edit feature only for you! Yes, you are not misreading, guys. It’s real!
This feature will enable users to create professional content without even sweating at all. No need to stress over every aspect of your video – our expert team has got you covered. Just tell us your desired content and sit back while we bring it to life. Want to discover the full potential of this helpful feature? Read on to learn more!
What Is Eklipse Premium Edit?
Premium Edit provides everything you might expect while creating highlight clips from your stream. While in the regular editing feature, you can add a template, trim the clip duration, add channel name, auto-caption, and soundtrack manually, the Premium version will handle it all for you. Just chill out, sip your coffee, and bingo! The clips will be ready in 24 hours to 3 days.
There are some points you can request from our team for leveling up your content. Those are as follows:
The clip duration (the long form or the short form).
Get exactly what you want in your video by simply checking the box next to the desired elements. And for added clarity, feel free to leave notes for our editor team in the provided field. Let us bring your ideas to life!
With years of experience in the editing field and a track record of working for major platforms like Facebook, TikTok, YouTube, and Instagram, our team is well-equipped to deliver top-notch results. So, don’t hesitate to give us a chance to showcase our skills!
Remember what Stacey Ryan said in her song “if we never try, how will we know? Baby, how far this thing could go?”. So make sure you don’t miss out on this and we’ll make you fall in love with our latest feature.
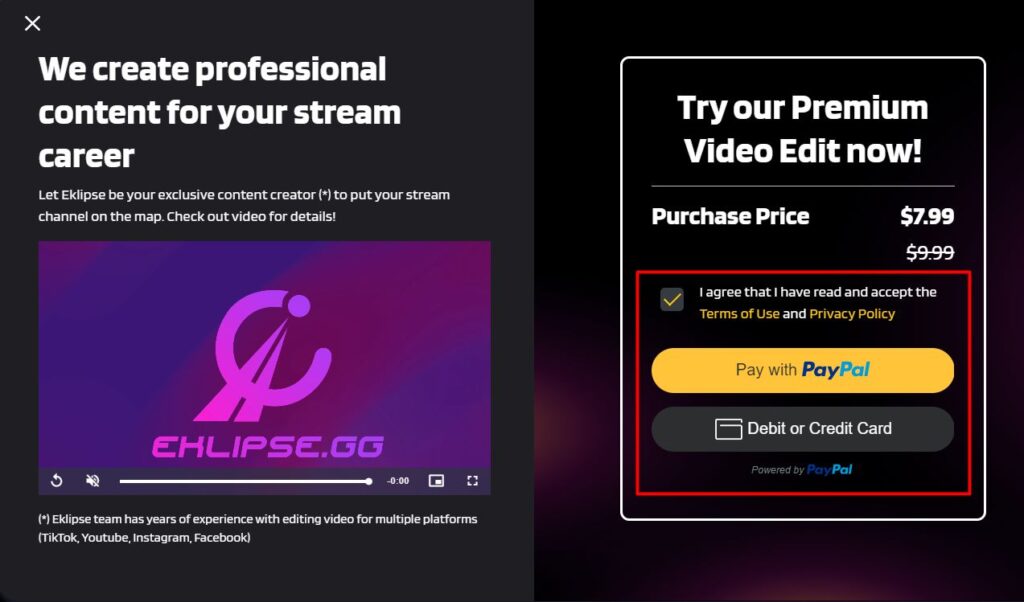
Anyway, to get access to this feature, you’ll need to pay $9.99 per month. But don’t fret, buddies. We’ll give you 20% off for early purchases, so you’ll pay $7.99 only! If you want to try the feature at a cheaper price, make a move and grab it now!
How to Use Eklipse Premium Edit
You won’t want to miss out on the incredible benefits of this feature. Let us show you how to get started:
Starting off by signing in to your Eklipse account. Create a new one if you haven’t.
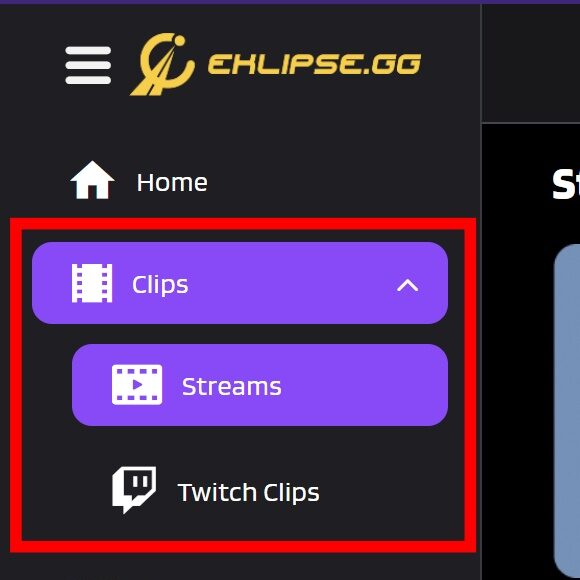
Then, click the Streams menu under the Clips section.
Find the clips you want to edit through the Stream tab
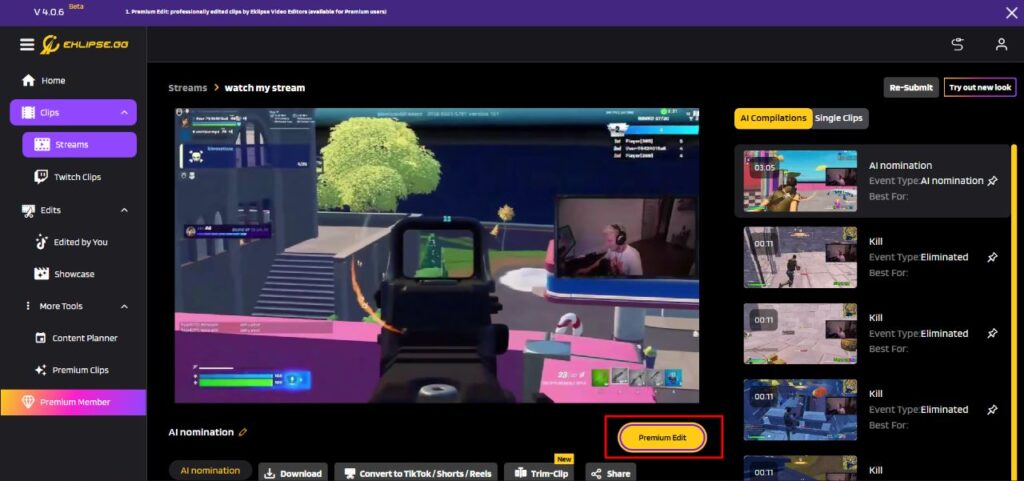
Choose the clips you want us to edit.
Afterward, click the Premium Edit button.
Click the Premium Edit button to let our team take care of your clip
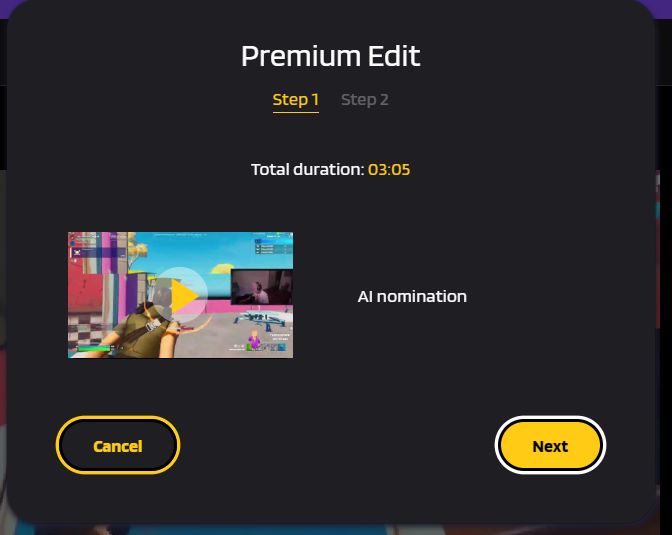
To confirm, hit Next.
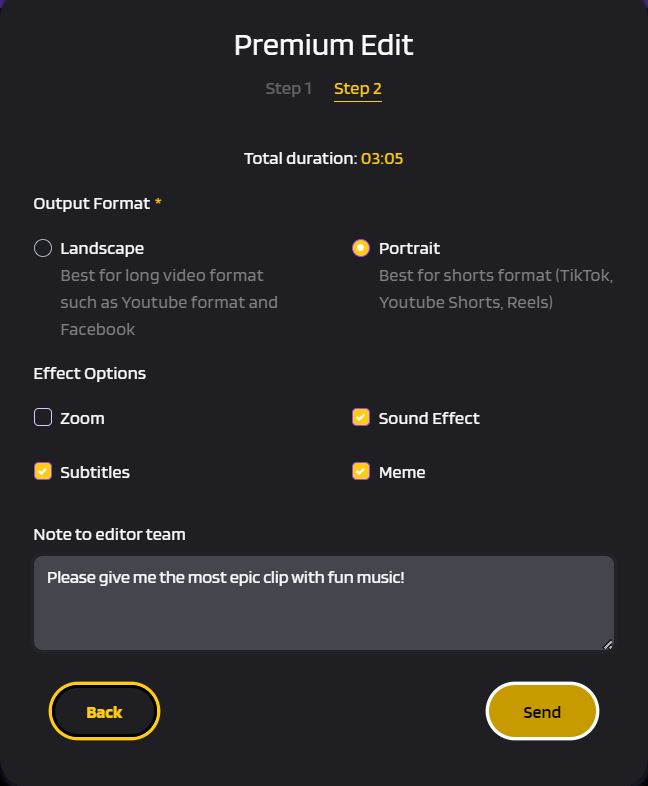
Choose the format and effects you want. You can also give notes to our editors.
choose the format and effect you want and feel free to leave a note
Tap Send if you’re done.
Tick the box and choose your payment method.
select the payment method
Now that you finished all the steps, our team will receive your request and will process it right away. It will take 24 hours to 3 days until the clips are ready. To see if your clips are set, simply go to the Premium Clips section under the More option.
That’s all about our new feature that allows you to produce more clips in less time! The premium Edit feature is currently available to premium users only. However, we hope to make it available to all users at some point in the future. Try it out and let us know what you think in the comments or through Instagram DM. Don’t forget to try our Premium Gift feature as well to support your community. Stay tuned for more updates!
Roku is a digital media player that allows you to access a wide variety of streaming services, such as Netflix, Amazon Prime Video, and even Twitch. But since the official Twitch channel for this platform has been discontinued, can you still stream Twitch on Roku?
Well, the answer is definitely yes. You can still stream your favorite Twitch streamers from Roku with a workaround. Without any more waiting, let’s start!
How to Watch A Twitch Stream On Roku With The Official Channel
Indeed, the Twitch channel is no longer available on Roku now. But you can still revive it if you have ever used it in the past. Here’s how.
To begin with, go to the Roku site using a browser and login if it’s prompted.
Then, hit Add channel with a code.
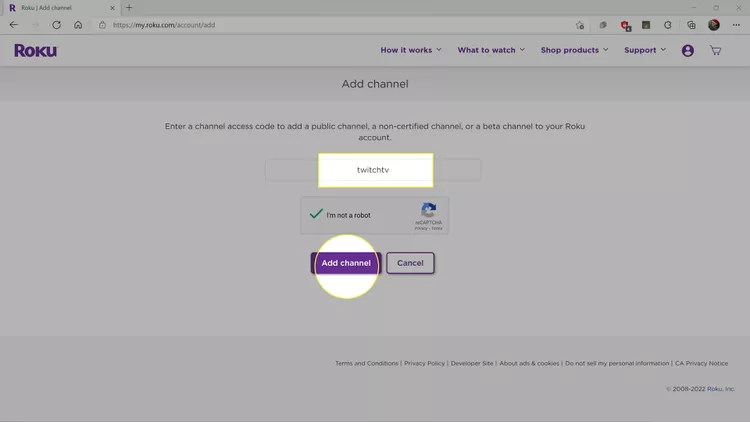
Type “twitchtv” in the box.
Type ‘twitchtv’ in the box | Source: LifeWire
Click Add Channel.
Next up, hit OK while the warning message pops up.
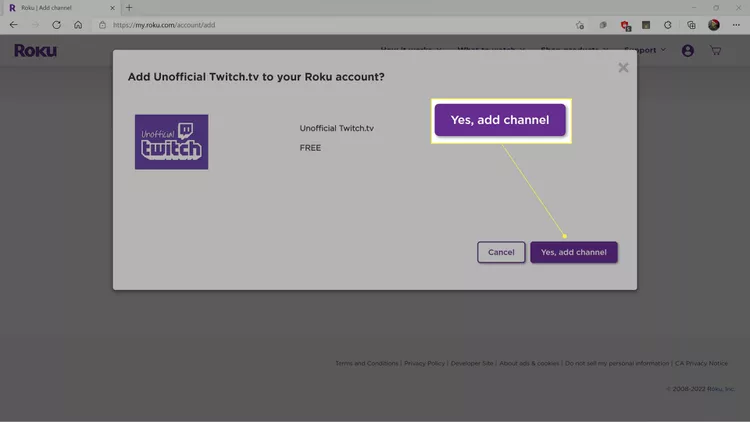
Finally, hit the Yes,Add Channel button to add Twitch to Roku.
Confirm by hitting the “Yes, Add Channel” button | Source: Life Wire
How to Stream Twitch To Roku Using Unofficial Twitch Channel
In case you never have used Roku or never installed Twitch before it was removed from the platform, you cannot access it today. But don’t fret as you can use TWOKU as the alternate option to stream Twitch. Follow these steps to add it to your Roku stream.
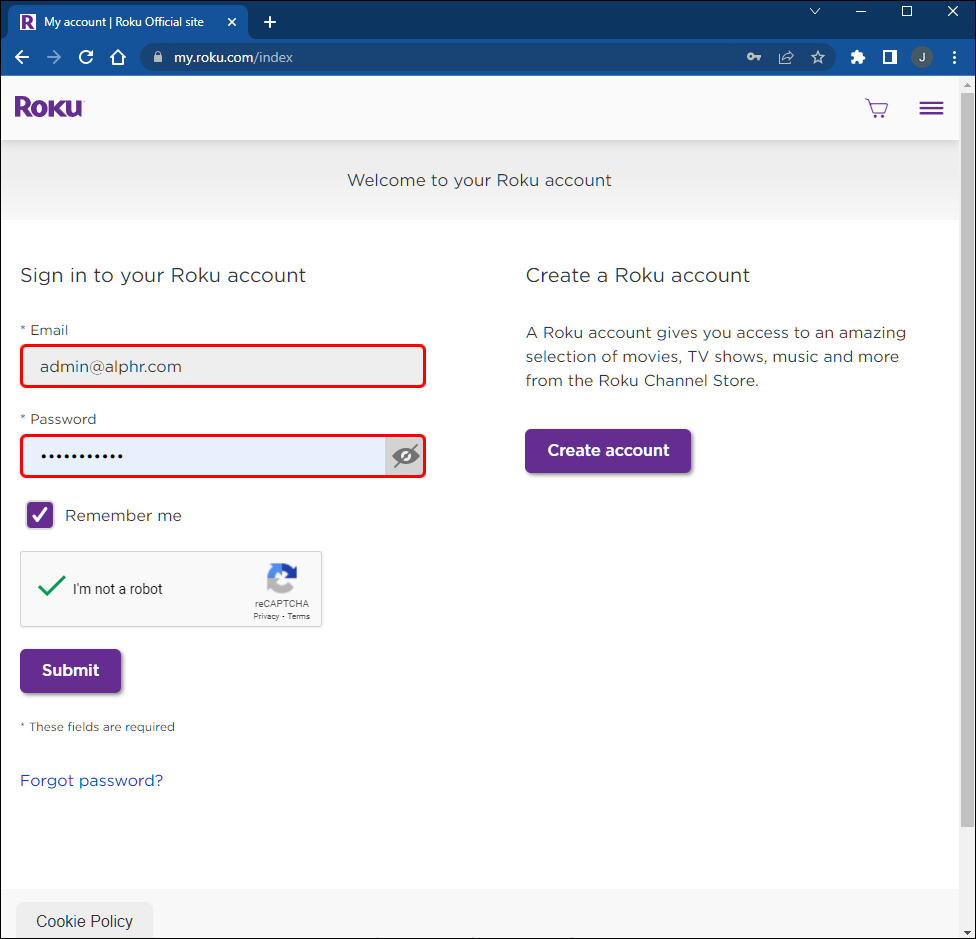
Start over by heading to the Roku site and logging in with your account.
Log in to your Roku account | Source: Alphr
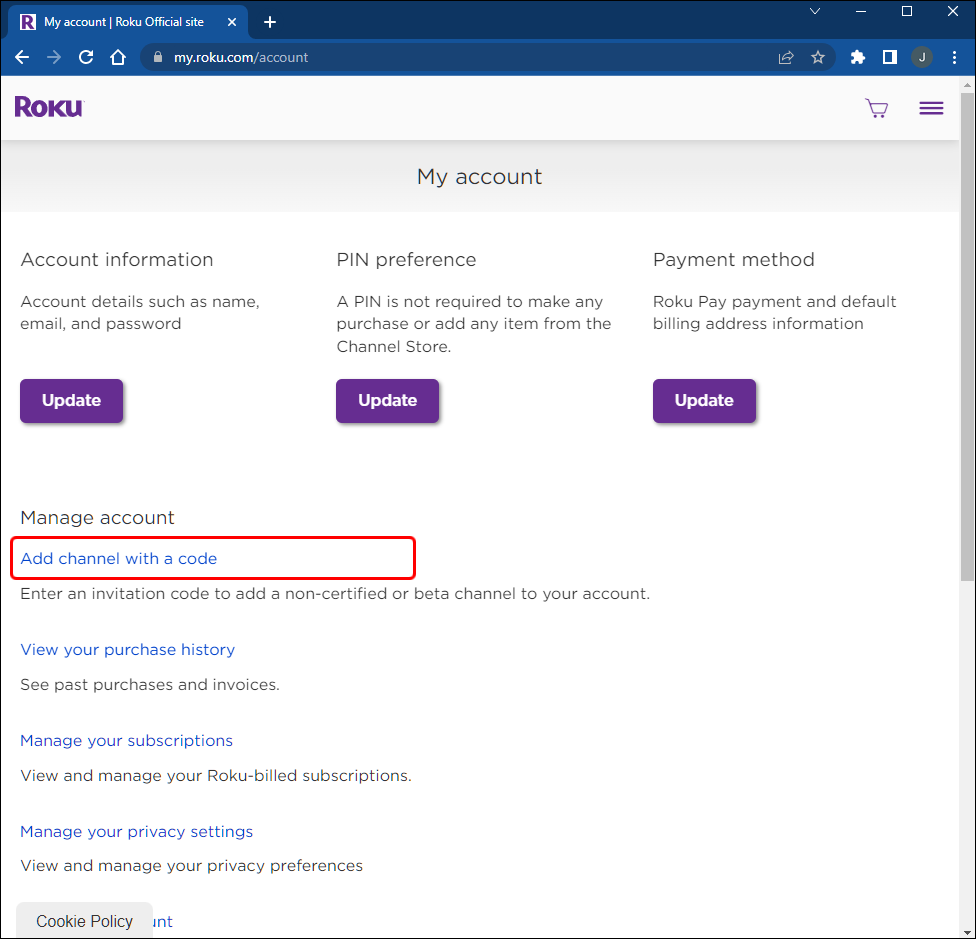
Then, move over to the account settings page.
On the Account page, hit Add Channel with a code.
Hit add channel with a code to submit the code | Source: Alphr
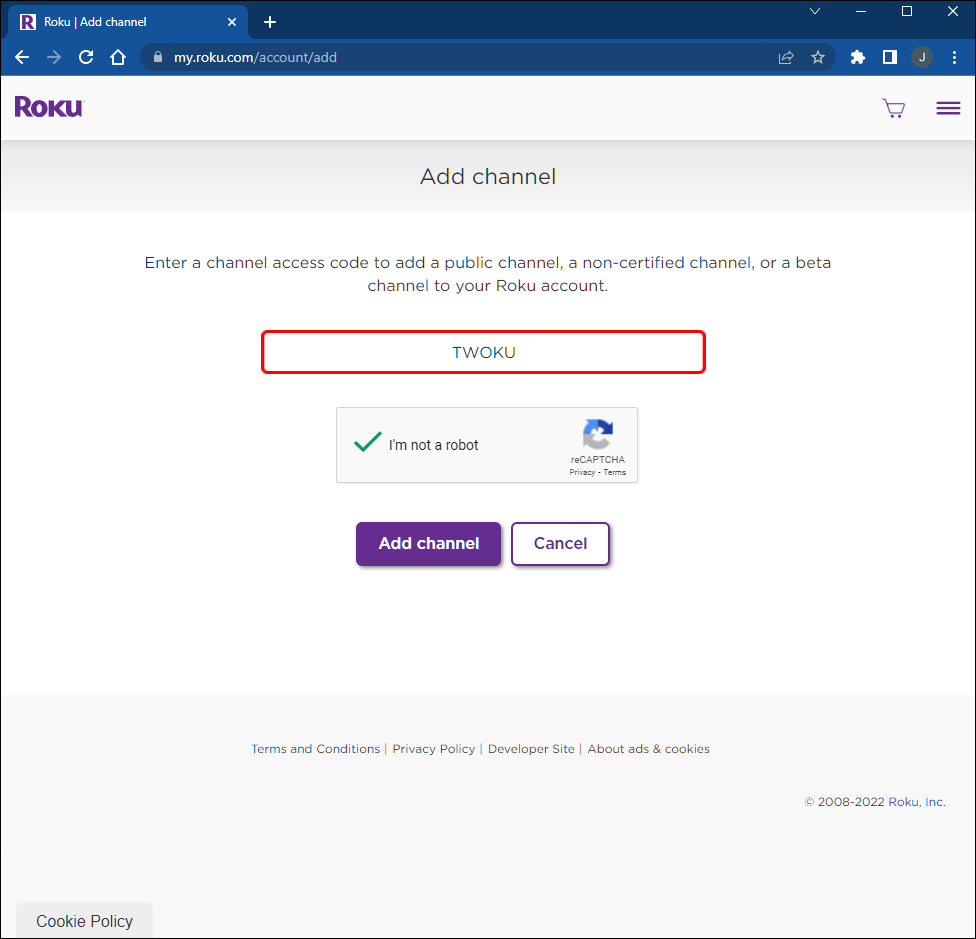
Type “TWOKU” or “C6ZVZD” on the box.
Type TWOKU or the certain code in the box | Source: Alphr
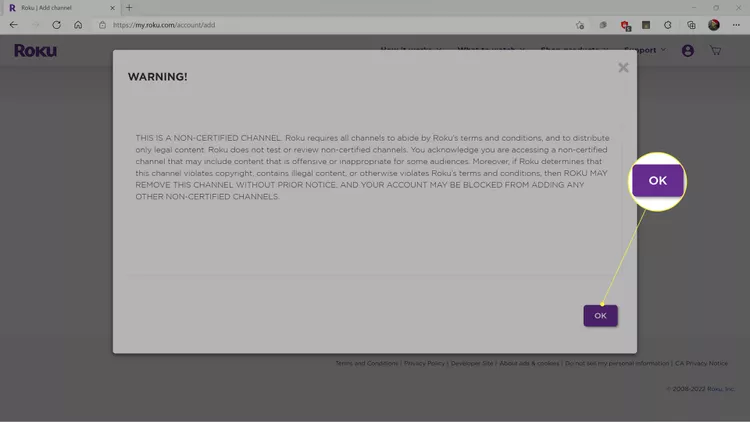
Hit Add Channel and click OK when the popup message appears.
Click on the Yes, Add Channel button to confirm.
Hit this button to confirm your setting | Source: LifeWire
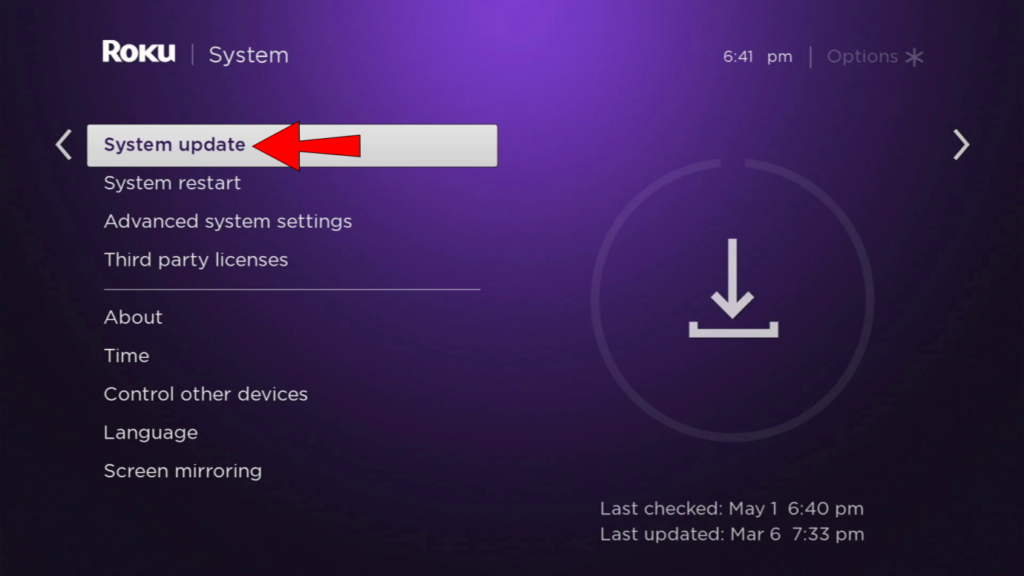
Now, go to Roku’s Settings menu on the home screen.
Select System > System Update.
Click System Update under the System option | Source: Alphr
Afterward, click Check Now.
Once it’s updated, the TWOKU channel will appear on your home screen.
It’s worth highlighting that TWOKU isn’t a verified app, so you’ll need to use it at your own risk while using this channel.
Screen Mirror Twitch to Roku on Android Device
Thinking about watching Twitch on Roku using a mobile device? You certainly can do it, and the steps are actually simple. Here’s how.
Starting off by launching the Twitch app on your device.
Log in to your Twitch account.
Then, find any stream you want to watch.
After that, hop on to the Smart View or Screen Cast option.
Hit the Smart View option | Source: Alphr
Select the Roku device where you will cast the Twitch stream.
Select Roku to stream Twitch on your phone | Source: Alphr
Next up, allow your mobile device to cast Twitch from Roku.
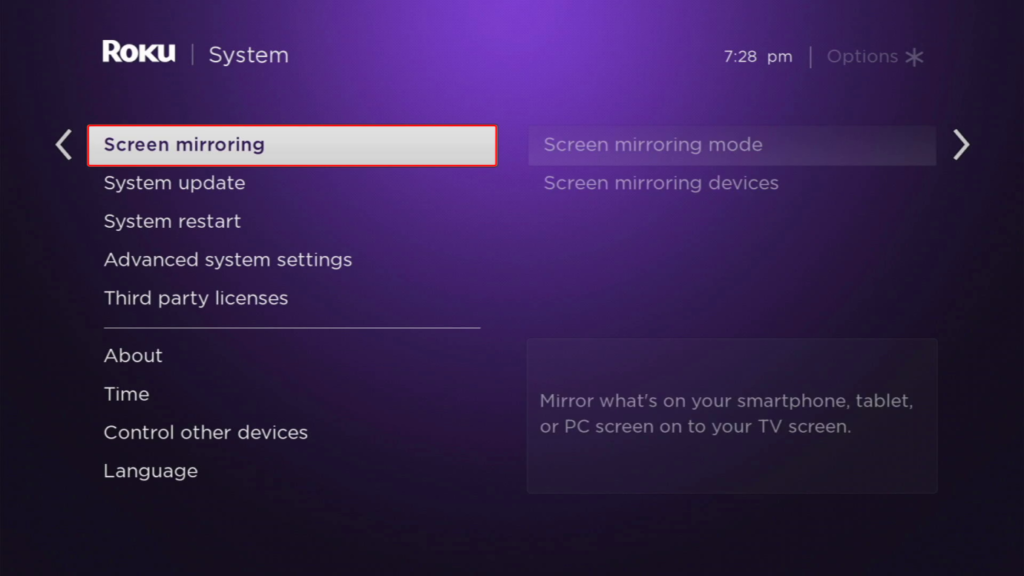
Now, go to Roku and head to Settings.
Click on System > Screen Mirroring.
Under the ‘System’ option, select ‘Screen Mirroring’ | Source: Alphr
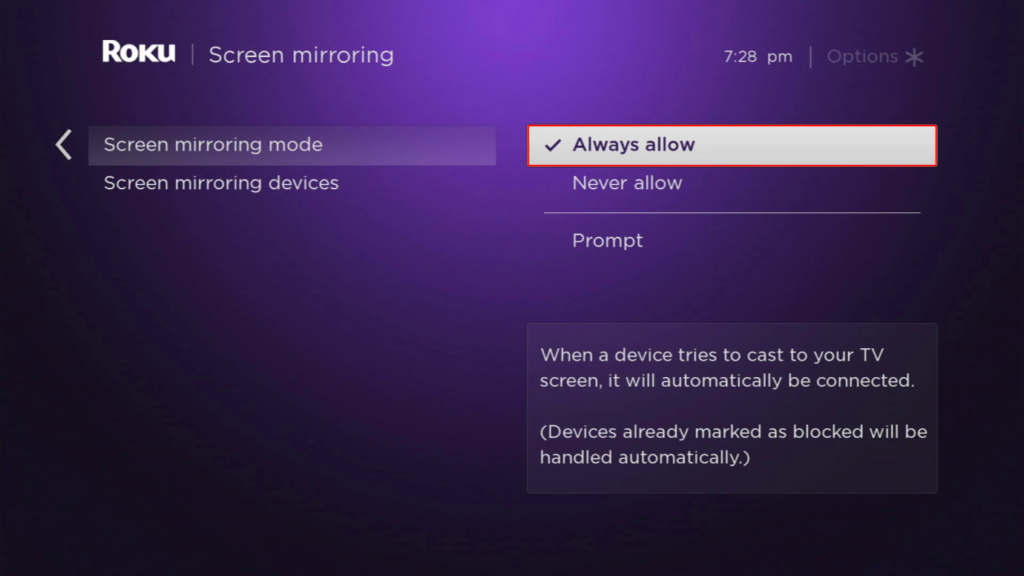
Check the Always allow option for the Screen mirroring mode.
Allow the screen mirror mode | Source: Alphr
Voila! You’re good to go now.
That’s how you can screen mirror Twitch on Roku using an Android device. Additionally, you can also do the same thing on iPhone. However, instead of using Screen Cast or Smart View, you’ll need to use AirPlay. But the steps are pretty similar to the above.
Conclusion
Now that you know how to stream Twitch to Roku, you can start enjoying your favorite streamers anytime at your fingertips. Well, Roku is a kind of platform that allows you to watch Twitch streams without even getting annoyed by ads. But if you prefer to still use the native website to access your preferred streams, you should learn some methods to block the ads through our previous article.
Anyway, aside from watching Twitch streams, Roku also allows users to watch TikTok there. We hope that this article helps to enhance your streaming experience. Don’t forget to share this with your family or friends, and keep an eye on our blog for more interesting tips and updates. Good-bye!
You’ve probably seen creatives and engaging TikTok with split-screen videos, that made you wonder: how to split screen on TikTok? Can you split a TikTok video?
Currently, TikTok has the Split-screen effect that allows users to divide the screen into multiple frames on TikTok. This is the thing that set the Split-Screen feature apart from TikTok Duet. While Duet can only divide the screen into two sections, Split-Screen can create up to nine video sections.
In this article, we will walk you through the process of how to do split screens on TikTok. Well, there are three options you can take to get it done. So, without further ado, let’s dive deeper into the tutorial.
Another easy way to divide your TikTok video is by using the duet feature. It’s a bit different from the previous one. The duet feature requires you to use other users’ content. It may take more steps to do. Let’s just begin the short tutorial.
Find the video you want to go duet with on TikTok.
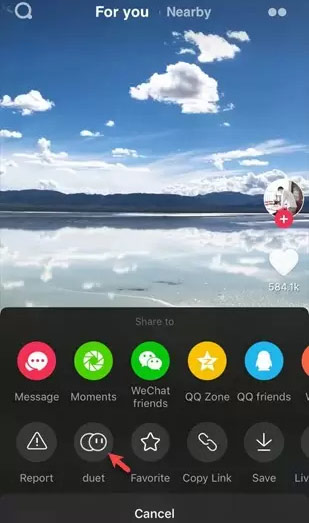
Click the Share icon, then choose Duet.
Choose the Duet icon | Source: Aiseesoft
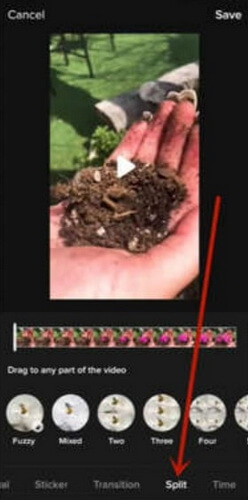
Choose the layout, it can be either side-to-side, set as a green screen, or else.
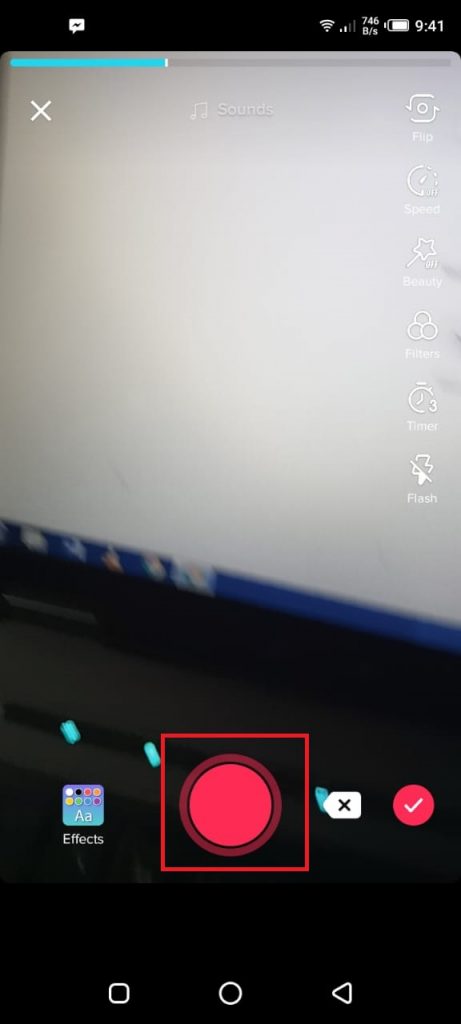
You’ll see the video you want to add to the TikTok reels on your screen.
On another screen, you are able to record the video you want to share.
Tap on the icon (tick) on the right.
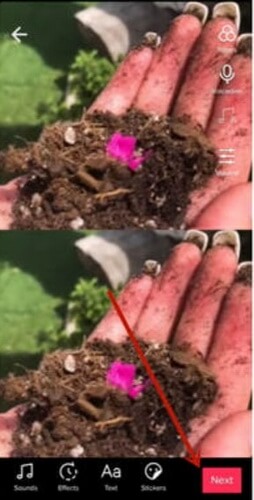
Add some additional effects.
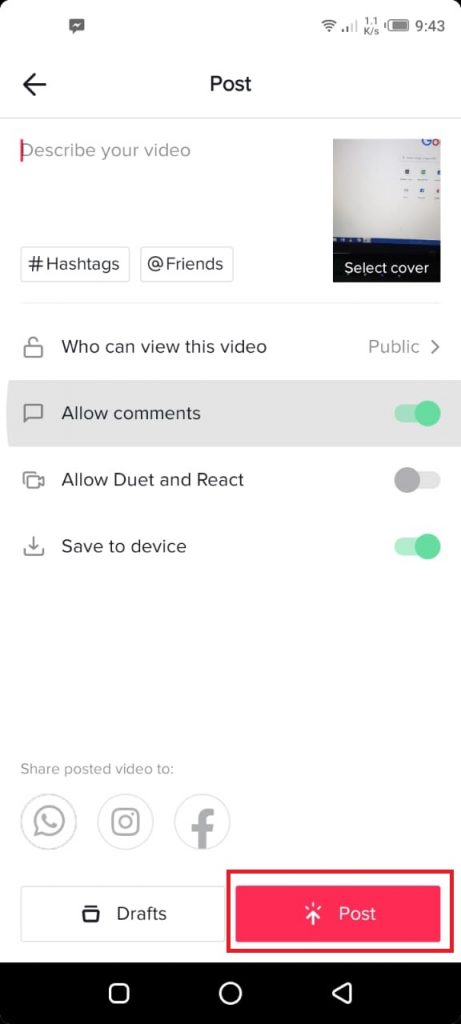
Hit the Post button when you are ready.
Write a description, put hashtags, and post it | Source: Tech Recipes
How Do You Split Screen on TikTok Using Third-Party Software?
Can you divide the TikTok video using any software? Absolutely yes, you can. If you have any software preference that can give you desired editing features, you can go with it.
Using editor software will give you more space to explore your creativity and give you more chances to split a TikTok video into two or more sections. On top of that, editing software will also offer some editing tools you can try to enhance your video quality.
There is actually a lot of editing software available to use. Just pick one app that suits you best. Each editing software has its own settings and features to help you divide the TikTok video.
Conclusion
If somebody’s asking how to split screen on TikTok, you’ve got the best answer here. Splitting TikTok videos is one of the greatest ideas to make your TikTok video more aesthetic and exciting to watch. Just try it out now!
TikTok is a mobile-first platform, so it’s important to create videos that are optimized for vertical viewing. But what if you have a horizontal video that you want to share on TikTok? That’s where Eklipse comes in.
Eklipse is a powerful AI-powered tool that can help you convert horizontal to vertical video in seconds. Just upload your video to Eklipse and it will automatically clip, resize, and crop your video to the perfect vertical format for TikTok.
Maximize your Black Ops 6 rewards—Create highlights from your best gameplay with with Eklipse
Eklipse help streamer improve their social media presence with AI highlights that clip your Twitch / Kick streams automatically & converts them to TikTok / Reels / Shorts
With the widespread popularity of gaming and social media, it’s common for people to share gameplay clips.
However, this can be difficult to do on Xbox One and Series consoles, as the social network integration is limited to Twitter and Facebook only.
Fortunately, Microsoft makes it easy to download your gameplay clips to your phone or tablet. All you need is an Xbox app to access your synced screenshots and clips.
Here’s the walk-through on how to save Xbox One Clips to phone.
How to Save Xbox One Clips to Phone Easily
Source: The Windows Club
Just in case you haven’t known yet, every time you take screenshots or clips of your video game, it will be uploaded immediately to the Xbox Network. Additionally, Xbox Networks is a cloud server you can access from the Xbox app.
So, if you want to open or access the files, you can just open Xbox Network, even from your phone. However, you need to launch the Xbox app first. Here’s the guide on how to save Xbox clips to your phone.
First thing first, make sure you have launched the Xbox app on your phone. Get it from the PlayStore or App Store.
Once it’s downloaded, open the app and sign in using the Microsoft account you use on the console. Don’t forget to sign in to your Xbox too.
After that, find the Library icon next to the profile icon and tap on it.
Now, you can see all of the clips and screenshots you’ve taken from Xbox. You can select the images or clips you wish to save and then hit Download. They will immediately download to your device.
Other than that, you can also share the clips or images to other apps such as Twitter or Facebook immediately without downloading them manually.
Maximize your Black Ops 6 rewards—Create highlights from your best gameplay with with Eklipse
Eklipse help streamer improve their social media presence with AI highlights that clip your Twitch / Kick streams automatically & converts them to TikTok / Reels / Shorts
That’s it. Now, you have known how to save Xbox One clips to phone instantly. No need for fancy skills or complicated steps at all. Additionally, the Xbox app is very helpful in terms of saving and giving access to the captures from Xbox on phone. It will be automatically synced with the Xbox Networks. So, it’s your turn to give it a try.
Adding music to content definitely can improve your audience’s viewing experience, including on Twitch. The content will look more appealing and lively to enjoy. That’s why many streamers are wondering if they can do Twitch streaming with music.
Well, the answer is yes and no. Yes, you are able to play music while streaming, but no, if you don’t have the rights to the music you’ll use. Ever since the wave of DMCA takedown requests in 2020, Twitch has deleted hundreds of content crossing music copyright laws.
Not to mention, many users are not happy with this action, especially those whose bread and butter content are affected. In addition, the DMCA takedowns also lead to confusion about what music streamers can use while broadcasting. Now, let’s jump right into this article to know further about this topic.
There are several music categories you can use while streaming | Source: Kotaku
As previously stated, you are allowed to play music while streaming on Twitch as long as you are not violating the Twitch music rules. To avoid crossing the line, Twitch has announced the three categories of music you can use while streaming. Let’s get a closer look at them.
1. Music Owned by You
It’s safe to use music you created or produced yourself or your recorded performance. It’s also important to see if you have owned the rights to reproduce the music.
2. Music provided in Soundtrack by Twitch
Alternatively, you are able to get the music that will be safely played on stream through the Soundtrack by Twitch. However, you may have a limited choice of tracks, and it’s only available on Twitch.
3. Music licensed to you
In addition, you can also use any copyright-free sound effects on Twitch. You can get them from the Epidemic Sound. Simply subscribe to it, and you’ll be able to play music during broadcast without worrying about DMCA takedowns. What’s more interesting is that Epidemic Sound provides a wider range of the song.
Are You Allowed to Stream Music on Twitch?
You are not allowed to stream the cover song performances | Source: Twitch
You are definitely able to play music while streaming on Twitch. However, keep in mind that streaming music-based content is not allowed. According to Twitch’s Community Guidelines, there are several types of content are prohibited on the platform. Those are as follows:
Karaoke performances
Lip Sync performances
Radio-style music listening shows
DJ Sets
Cover song performances
Visual music depictions
Well, Twitch is quite different from YouTube, now that you see the forbidden content on Twitch. On YouTube, you can stream lip-sync or cover song performances.
What Happens If You Stream Copyrighted Music on Twitch?
The answer is clear: you are violating the Twitch music guidelines which may lead to DMCA takedown. Basically, Twitch applies a three-strike policy for DMCA takedowns.
As for the first offense, you’ll get a 24-hour ban on your channel, then the second strike will grant you with 24-hour to a-week ban. Finally, if you keep violating the music rules, you’ll get a permanent ban from Twitch or channel termination.
Beware of the DMCA takedowns | Source: Ars Technica
The thing that is worth highlighting about DMCA takedowns is it’s different from other rule violations on Twitch. While other bans give you 90-day probation time before it’s fully removed, DMCA ban will remain part of your profile forever.
Therefore, it’s essential to really check out the Community Guidelines, especially about the music rules on Twitch to avoid being banned forever. It’s better safe than sorry.
Conclusion
So that’s everything about Twitch streaming with music. Twitch has always had strict guidelines for streaming music, but the threat of DMCA takedowns has made them even more vigilant. Find out how to stream on the platform without breaking the rules
Now you have got your stream highlights as one whole video. It’s time to export it into the YouTube channel. You can also learn how to connect Twitch to YouTube here.
To start exporting your highlights, look at the following steps below:
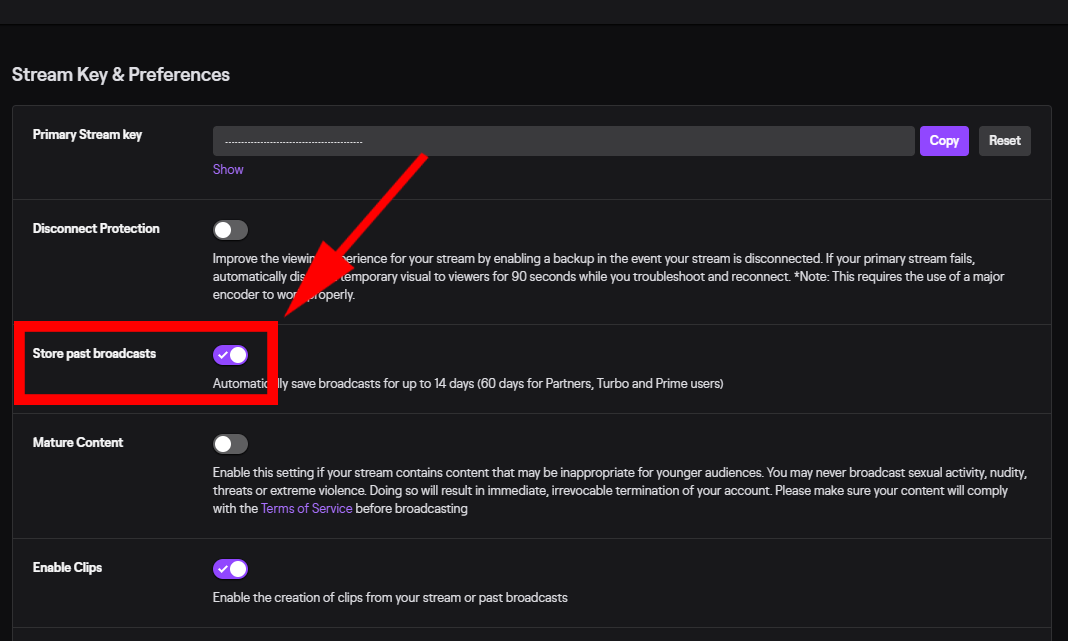
Hit the Creator Dashboard menu > Settings > Stream
Turn on Store Past Broadcasts
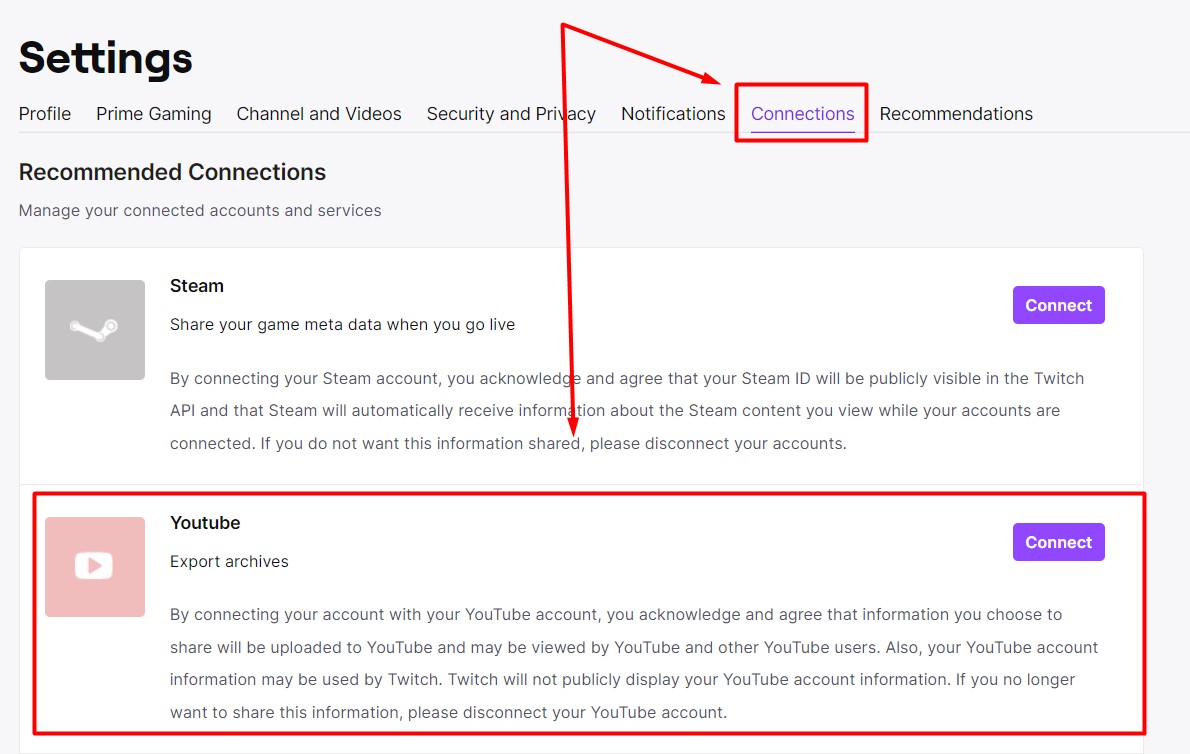
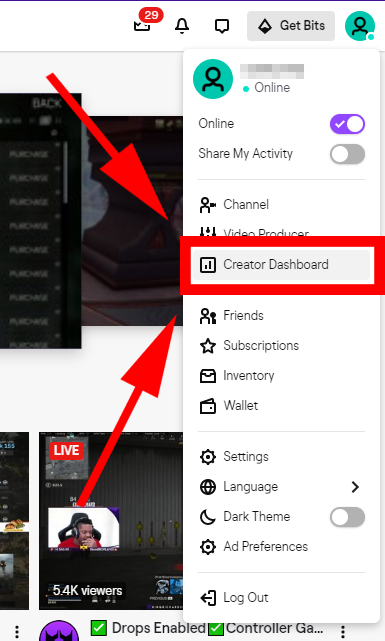
Click the profile icon and hit Settings
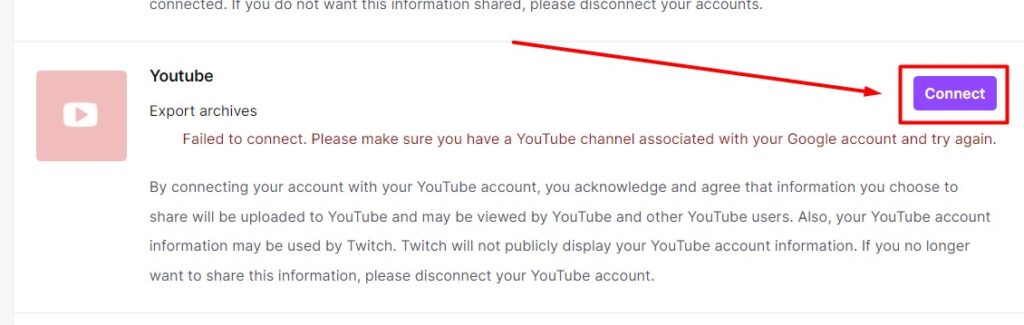
Go to the Connection tab, then click Connect on YouTube section
Back to Creator Dashboard
Click Video Producer menu
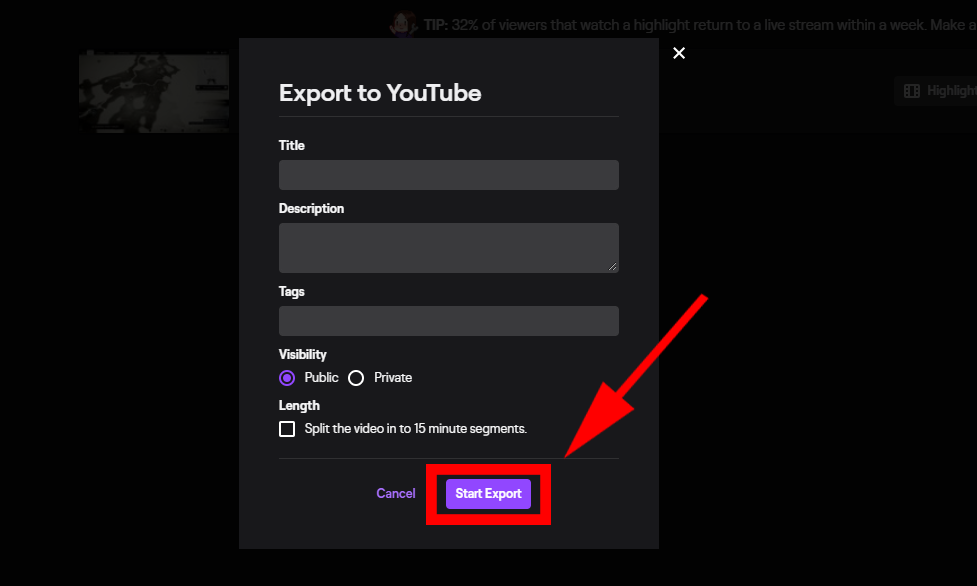
Select the highlights you want to export
After that, click Export on your selected highlight and Start Export
How To Find Archived Stream on Twitch
Every time you finished streaming, your stream will automatically be archived in Twitch. It will last here for 14 days. And before it runs out the time and gone, you need to make highlights from it.
But before we jump there, here are the step to find where your stream saved in temporary time:
Click your profile picture account, then find Creator Dashboard
Source: Flixier
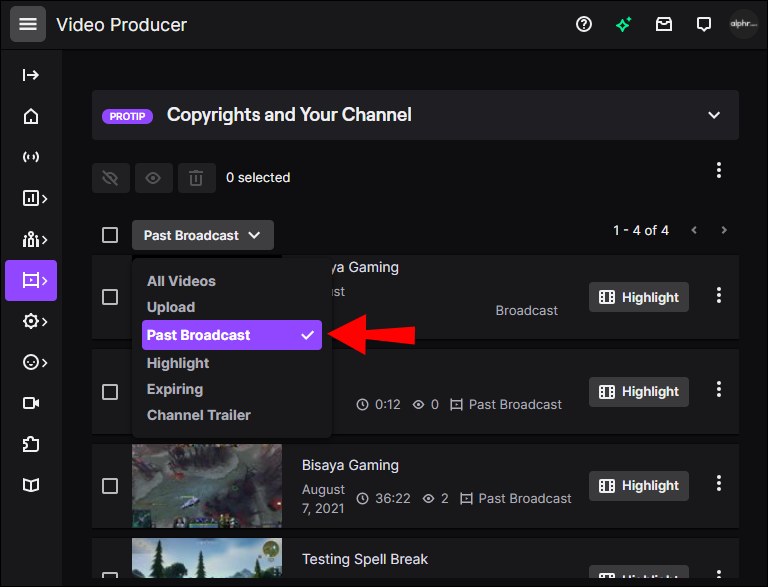
Hit the Video Producer
After that, click the Past Broadcast or All Videos button
Source: Alphr
Then, pick the stream you want to highlight
Click on Highlight and you’ll find a timeline with an edit button on the bottom of the screen
Now, you can start editing and highlighting your stream video whatever you want
Do the same steps to make multiple highlights
If you have satisfied with the result, click Publish Highlights
The rendering process is starting
After it has finished the process, hit Save and Next
Your highlights are saved on Video Producer
How to Link Your YouTube Account to Your Twitch
To start linking your YouTube account to Twitch, you can continue from step 2 and then do as follows
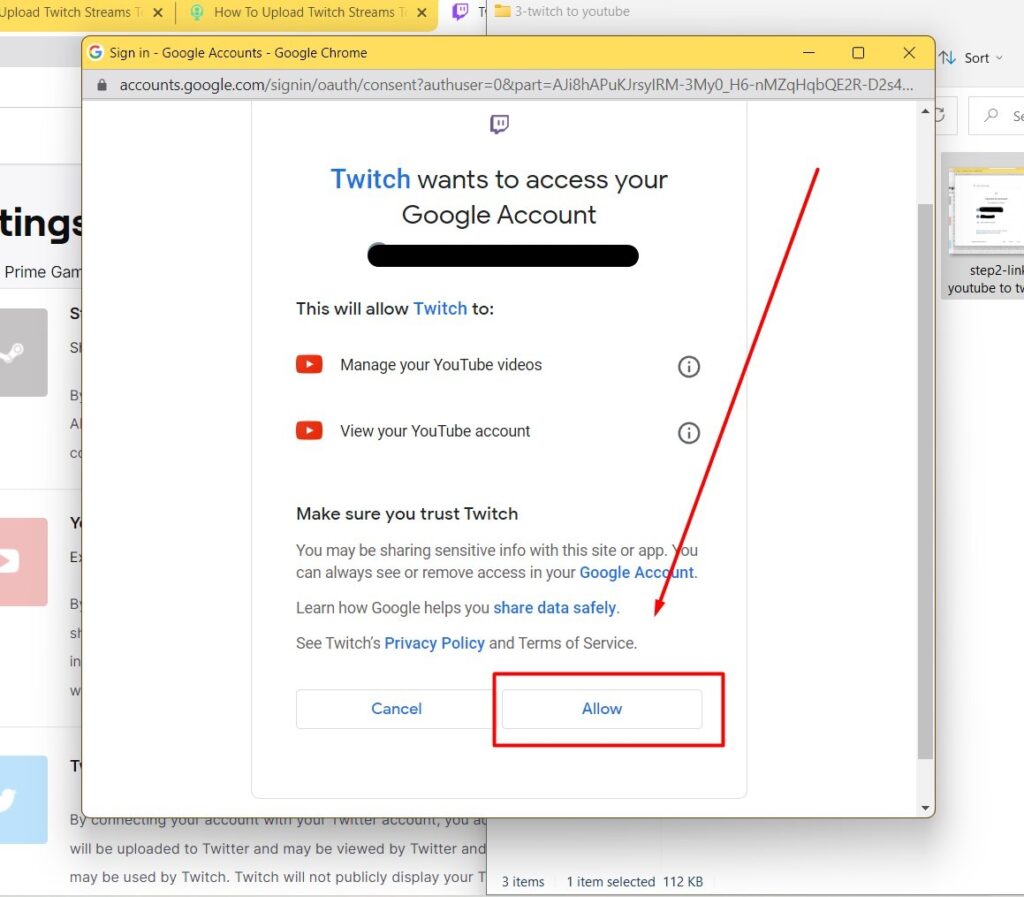
Step 1: Click Connect
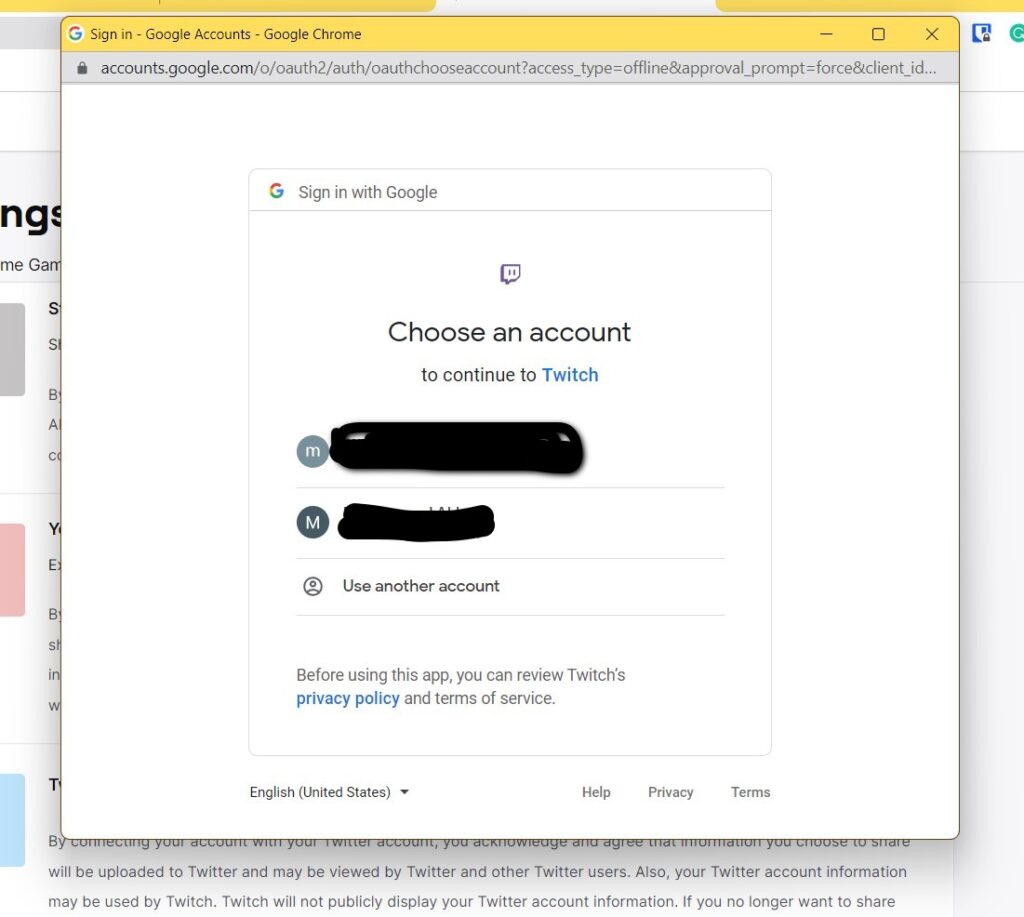
Step 2: Choose your YouTube account
Step 3: Click Allow
Requirement To Upload Twitch Stream To YouTube
To upload the Twitch stream to the YouTube channel is quite simple. But you can’t actually do it instantly. There are several steps you have to do, including preparing the stream before you upload it.
Source: techwiser
It’s not like you upload a video on your Instagram, or even on YouTube itself. Twitch doesn’t provide you with a feature that allows you to save or download your full stream.
Therefore, all you have to do is make highlights multiple times from your stream. If you combine these highlights, you’ll get a full video of your streaming. And once you have done it, then you are ready to upload it to YouTube.
Apart from that, you also need to prepare some sort of things to highlight the stream. They are:
Twitch account
Access to PC
Archived stream
An optional editing tool
How to Publish The Twitch Highlight on YouTube
You can now move on to YouTube to finish the process of exporting your highlights from Twitch.
Go to YouTube and login with your account
Click your profile photo and hit YouTube Studio
Then, click on Content in the left-side menu
Select the video you uploaded from Twitch
See the full detail of the video
Add a proper title, description, etc
Set the visibility to be Public if you’re ready
Now, your Twitch stream video is already shown from your YouTube account. Your viewers can enjoy your stream without having limited time on it.
Can You Make Highlights Using Another Tool?
Absolutely yes. If you are going to make highlights automatically, you can try Eklipse. This is one of the best online sources that allow you to clip the best moment on your stream. Generated with AI, you can easily produce several highlight clips without any difficulties. Here’s how:
Do free sign up with your email, Facebook, or Twitch account
Source: Eklipse Doc
Sync in your Eklipse account to Twitch
Hit Connect Now
Select Twitch as your selected social media, then hit Connect
Move on to Video Library, and select Streams
Source: Eklipse Doc
You can find your video streaming from Twitch
After that, go to Unclipped tab and pick the streaming video you want to clip
Source: Eklipse Doc
Click Submit > OK
Eklipse has automatically made highlight clips to choose
Then, click Single Clips to pick the best highlight clips
Edit the highlight using the Edit Clips feature or Premium Edit if you desire a more simple way to edit
If you have finished your editing, hit Share to share the clips to your YouTube or other social media
Conclusion
Learning how to upload Twitch streams to YouTube is necessary if you want to provide a convenient streaming experience to your viewers. In YouTube, you can make your streaming video more long-lasting and it will be available anytime as well. Good luck!
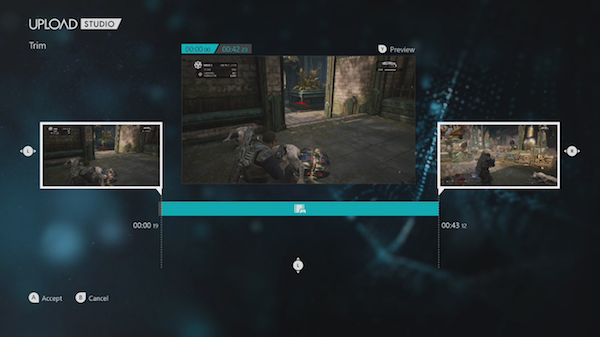
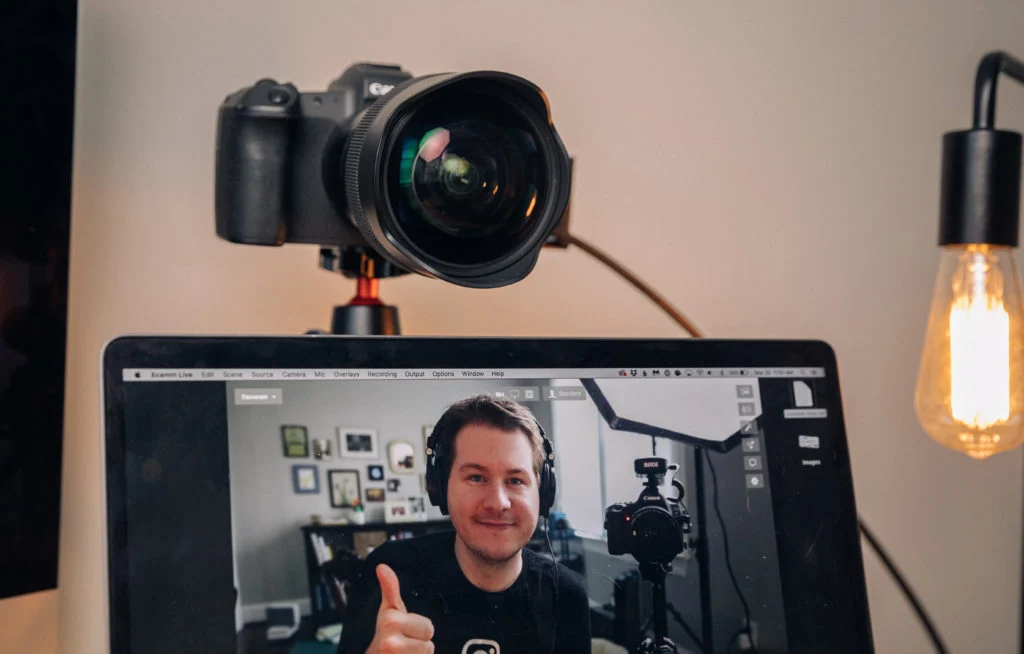
Source: Imagine Edge Sony - how to record commentary over video
Using a mirrorless or DSLR camera for streaming is actually a great idea. Due to its more advanced features (compared to a webcam), it can boost your video quality higher. But, how to connect a video camera to a computer for live streaming?
Well, many people think that setting up a camera for streaming will take more process than using a webcam. It does but doesn’t mean it’s complicated. It’s actually simple to get it done.
If you feel like streaming with a video camera or DSLR, you can follow the guide here.
To be able to stream yourself on social media, you’ll need the following equipment:
A compatible PC or laptop
A camcorder
An installed streaming software
USB to HDMI video capture device for live streaming (not an adapter)
Stable internet connection
HDMI and USB cable
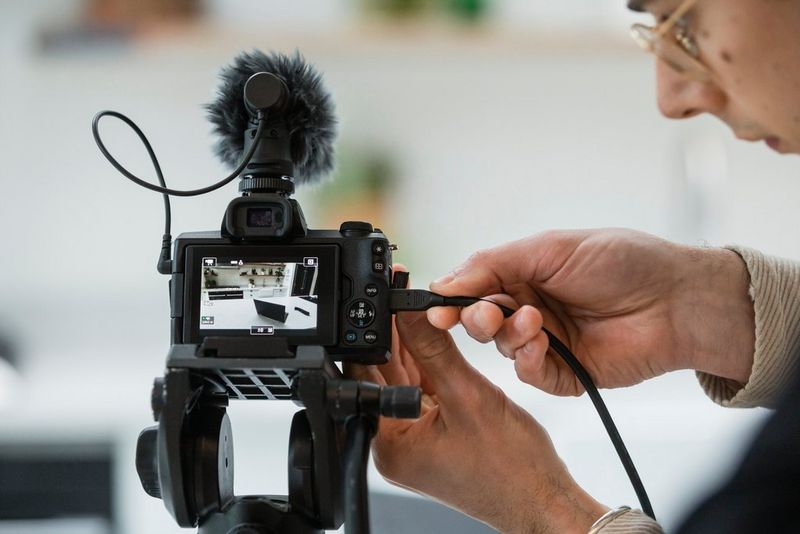
How To Connect Video Camera To Computer For Live Streaming
Source: Canon Europe – how to connect camera to laptop for live shooting
If you’re done preparing the things you need, now we can start the guide to connect the video camera to your PC or laptop. Make sure you have your device on standby and connected to the internet. Let’s just begin.
First, prepare your device and launch the streaming software there.
Second, connect the end of the HDMI cable to the camcorder HDMI output.
Then, plug the other end of the HDMI cable into the HDMI input of the capture device.
Connect the video capture device to your PC using the USB cable.
Next, you can try to turn on the camera.
Open the streaming software on your computer to set the video preview.
Make sure that the software recognizes the video capture device and the camcorder.
If you are using OBS Studio for streaming, you can click the gear icon and choose Capture Device
Set the source with your camcorder
Finally, you are able to go live from the camcorder on your PC display. Additionally, if you want to know how to connect an external video camera to a laptop, you can do the same method above. Now, you can log in to your social media where you wish to go live.
The Benefits of Live Streaming with a Video Camera
Source: Streaming Video Blog – stream video from camera to computer wirelessly
As previously stated, streaming using a camera will improve your video look. But other than that, you can still find a lot of advantages that significantly affect your video. Let’s break the down here.
1. Ability to Capture A Blurred Background
A good webcam might be able to give a clear video, but it can’t put the focus on the subject in front of the camera just like a video camera does. On another side, a video camera allows you to utilize a shallow depth of field that is able to achieve the coveted blurred background effect. Perfect for drawing attention to your subject.
2. Provides Manual Settings and Auto Focus
Having control of your camera is always a good thing. You can set everything in your camera at your disposal to fit your needs in creating content, including the FPS, resolution, contrast, and more.
You’ll have the power to make your footage exactly what you envision. Plus, with a camera that features autofocus, you’ll never have to worry about blurry or out-of-focus shots again.”
3. Perform Better in Low-light
While you’re always needing ring light to help your webcam shoot in better quality, a video camera will be able to capture high-quality footage no matter the lighting conditions.
4. Allows Users to Use Additional accessories
Despite being superb already, you can still use any additional accessories to enhance your video quality. For instance, you can plug the microphone in, the teleprompter, and more.
Live Streaming On Social Media
Source: PNGitem – stream video from camera to computer wirelessly
The next step to streaming yourself to social media is choosing social media and preparing it to be your streaming platform. You can stream using Twitch, TikTok, YouTube, Instagram, or even Facebook.
Do not forget to set your streaming software first to be ready to stream and record yourself on the screen. Every streaming software has its setting. So, you’d better learn how to operate one of them by reading our previous articles on the Eklipse blog.
Conclusion
Making content for your social media is important to gain popularity and audiences. But something more important is preparing the supportive equipment. Now that you know how to connect a video camera to a computer for live streaming, you are one step ahead to having your own streaming content.
Maximize your Black Ops 6 rewards—Create highlights from your best gameplay with with Eklipse
Eklipse help streamer improve their social media presence with AI highlights that clip your Twitch / Kick streams automatically & converts them to TikTok / Reels / Shorts
Warframe has orchestrated several highly successful Twitch drop events previously, piquing players’ interest. These events present an excellent chance for players to discover new streamers and for streamers to expand their communities.
For any Warframe enthusiast who has yet to partake in a Twitch drop event, now is the ideal time to get involved and join the excitement!
There are two types of Warframe drops in October 2023:
Twitch drops: These drops can be obtained by watching Warframe streams on Twitch for 45 consecutive minutes. Each week, there is a new set of Twitch drops available. For the fourth week of October (October 23rd – 29th), the Twitch drops are:
Dais Domestik Drone (Decoration object)
Ki’Teer Domestik Drone (Decoration object)
Liset Domestik Drone (Decoration object)
Styanax Community Display (Decoration object)
Abyss of Dagath drops: The Abyss of Dagath update, which launches on October 18th, will introduce a new Warframe, Dagath, as well as a new Naberus-themed story and a swarm of Quality of Life improvements. Players can earn Abyss of Dagath drops by completing new missions and activities, as well as by participating in the new Naberus-themed event.
In addition to these two types of drops, there may also be other Warframe drops available throughout October, such as login rewards, promotional drops, and event drops. Players should keep an eye on the Warframe website and social media channels for more information on upcoming drops.
How to Claim Warframe Twitch Drops
You can check our other guide for a more general guide on claiming the Twitch drops, the links are as below
But for a more specific guide on claiming the Warframe Twitch Drops, you can do the following instructions:
Go to the Drops & Rewards
Find the Warframe section
Click Connect
A pop-up will show to link your Warframe account to Twitch
Watch any Warframe streams instructed
As you know, you don’t need to stand by all the duration of the stream. You can just set your PC on standby mode, fire up the channel, then just leave it.
Don’t worry though you are not watching, the Twitch drops progress will still be counted.
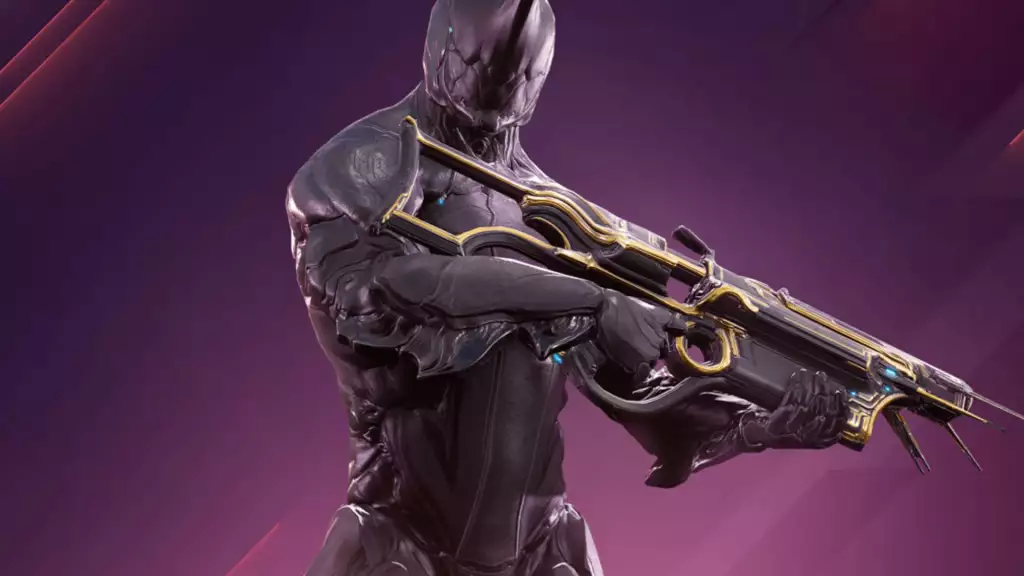
About Warframe
Warframe is a cooperative action role-playing and third-person shooter video game developed and published by Digital Extremes. The game is set in an open world environment and is played in a third-person perspective.
In Warframe, players control members of the Tenno, a race of ancient warriors who have awoken from centuries of cryosleep to find themselves at war with different factions.
Players can choose from a variety of different Warframes (bio suits that grant special abilities) and weapons to customize their gameplay experience.
One of the unique features of Warframe is its focus on cooperative play. Players can team up with others to complete missions and take on tough challenges together.
The game also has a robust trading system, allowing players to exchange weapons and other items with each other.
Looking a game to stream on Twitch? You can consider Warframe! This is one of the best free cross-platform games that are fun to play with friends.
If you wanted to look for more free cross-platform games to try, check out the list by clicking the links below
That’s all you need to know about the Warframe Twitch drops in 2023. So, what do you expect for the next drops?
We’ll update the post when the drop arrives, so make sure you to bookmark this content and check it again when it happens!
Maximize your Black Ops 6 rewards—Create highlights from your best gameplay with with Eklipse
Eklipse help streamer improve their social media presence with AI highlights that clip your Twitch / Kick streams automatically & converts them to TikTok / Reels / Shorts
Creating a montage is one of the best strategies to show off your gaming skills to a larger audience. It’s actually a compilation video that contains epic moments during the game. And to create a stunning montage, you’ll definitely need the best gaming montage maker.
Well, there are plenty of free montage video editors scattered out there. However, many of them are not so beginner-friendly, or even too simple for professional video. But don’t fret since we already listed some of the best editing software that offers complete features yet are still easy to use. Read on below!


")