If you’re facing the frustrating issue of a VALORANT update stuck at 0%, you’re not alone. Many players encounter this problem when Riot Games rolls out frequent updates. This issue can arise from several sources, such as problems with your Windows updates, conflicts with antivirus software, or issues within the Riot Client itself.
If you’re eager to dive into the game but your update won’t budge, this article will explore the potential causes and provide 10 effective solutions to get your update moving again.

The Reason VALORANT Download Update Gets Stuck
There are numerous reasons why VALORANT download updates get stuck:
- Outdated Windows system: If your Windows operating system is not up to date, it might hinder the download process for VALORANT updates.
- Antivirus interference: Your antivirus software could be blocking the download, causing the update to get stuck at 0%.
- Third-party program interference: Certain programs like MSI Afterburner, RivaTuner, or Discord might slow down the download speed or cause interruptions.
- Antivirus software issues: Even popular antivirus programs such as AVG and Avast could potentially cause download problems for VALORANT updates.
10 Ways to Fix When Your Valorant Update Stuck
If you’re facing the frustrating issue of a VALORANT update stuck at 0.1 KB or unable to download, you’re not alone. In this guide, we’ll walk you through 10 effective solutions on how to fix 0.1 KB VALORANT update issues, so you can get back to playing without delays.
1. Restart the Download on the Game Client
Let’s start this with the basics. Sometimes, the updating stuck is caused by a glitch in the VALORANT game client. So you can just close the game client (and kill it through Windows Task Manager if needed) and then open it again. With that, the VALORANT game client will restart your downloading update process.
2. Check the Internet Connection
Weak and unstable internet connection can cause the Riot Client to fail to download the update for VALORANT. So, make sure the internet connection is fast and stable enough. You can ensure that by using an internet speed-checking website like speedtest.net.
3. Change Riot Client Priority to High

VALORANT community says that changing Riot Client priority to high can fix this problem. This is quite a logical answer since higher priority means more internet bandwidth and processing toward the game client.
Here’s how you can do this fix:
- Open the Riot Client, then go to Task Manager (click the start menu or push the “Windows” shortcut button, then type “Task Manager”).
- On the task manager, find out the “Riot Client” process. Right-click on it, then choose Go to details.
- You will see RiotClientService.exe on your task manager. Right-click on it, hover the mouse to the Set Priority option then select High on the expanded menu.
4. Close Applications That Use a Lot of Bandwidth (or Computing Resources)
Sometimes, this solution feels like the elephant in your eyes, especially when your PC is powerful enough to open so many apps. But, opening many applications means that it will affect your PC performance. Some applications also constantly consume the internet which will directly affect the download speed.
So, closing applications to fix your VALORANT update stuck problem could be one of the solutions. Reddit community also says that Discord could be one of the culprits of this problem. So you can try to close your Discord first if this problem happens.
5. Whitelist the Riot Client from the Windows Defender Firewall
Like any other “antivirus” software, Windows Defender Firewall is sometimes over-aggressive and could be blocking one of your Riot Client services. So, you need to allow your Riot Client to go through the Windows Defender Firewall, to make sure it won’t cause any problems.
Here are 4 steps to do it:
- Open the Start Menu, type Firewall and Network protection, and press Enter.
- Click on Allow an app through the firewall.
- Checkmark both Private and Public boxes next to Riot Client.
- Click on OK to save the change.
More on Eklipse Blog >>> Top 5 Entertaining Valorant Streamers to Follow in 2023
6. Use Google DNS Server
Google DNS has become something like the cure for every internet problem ever happening. So, to help your VALORANT update stuck problem, you can try using Google DNS by following this step-by-step guide:
- Open Settings (You could use Win + I hotkeys).
- Choose Network & Internet.
- Click on Wi-Fi > Hardware Properties.
- Click on the Edit button next to the DNS server assignment.
- Click the drop-down icon under the Edit DNS Settings. Choose Manual from the menu.
- As per your DNS provider, you can choose IPv4 or IPv6.
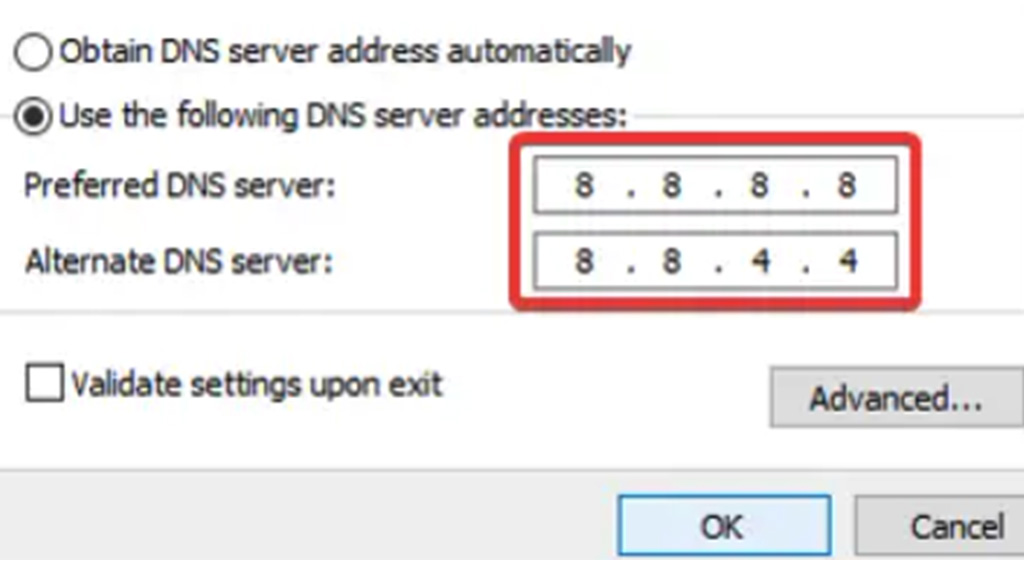
- If you choose IPv4, enter 8.8.8.8 and 8.8.4.4 in Preferred and Alternate DNS servers.
- If you choose IPv6, enter 2001:4860:4860::8888 and 2001:4860:4860::8844 in Preferred and Alternate DNS servers.
7. Disable IPv6 Protocol
In some scenarios, Riot Client can conflict with IPv6 because it does not fully support IPv6 yet. So, to fix the problem you can try to disable IPv6 by following this step:
- Press the Windows key to open the start menu.
- Click on the gear icon to open the settings.
- Navigate to Network and Internet.
- Now click on Change adapter options under the advanced network settings.
- Right-click on your current connections, and select Properties.
- Find the Internet Protocol Version 6 (TCP/IPv6) then uncheck the option.
Don’t forget to turn it on again after you are done updating your VALORANT since disabling the IPv6 protocol can cause several issues while accessing the internet.
As we mentioned before the Riot client can conflict with IPv6 because it does not fully support IPv6 yet. However, if disabling the IPv6 does not work for you then turn it back on because it can cause several issues while accessing resources on the internet.
8. Or you Could Use a VPN as an Alternative
If Google DNS can’t save you from this VALORANT update stuck problem, you could use a VPN as an alternative. Most VPNs are paid services, but most of them offer the free version of the services with some limitations. Even if the VPN has limitations you don’t need to worry.
Sometimes all you need to do is to have the Riot Client download past certain points by using a VPN. After that, you can turn off your VPN and hope that the download stuck problem does not persist.
9. Flush the DNS Cache
DNS cache stores the data of your computer’s DNS queries. Sometimes, it can get corrupt for whatever reason and cause a connection issue.
So, it could be the culprit that is causing your VALORANT updating downloads to be stuck. As the solution, Windows has the flushdns command that could clear all the cache.
To do that, you can simply do these 2 steps:
- Open Command Prompt (Press hotkeys Win + R, type cmd).
- Type ipconfig/flushdns. Press Enter.
- If the Command Prompt shows the message Successfully flushed the DNS Resolver Cache, it means it is done flushing your DNS cache and you can close the Command Prompt.
10. Update Your Network Drivers
If all the solutions we give above are not working, maybe you can use this way as a last resort; by updating your network adapter driver.
You can do that by following these simple 5 steps:
- To get started, press Win + R to open the Run command dialog box.
- Type devmgmt.msc and press Enter to open Device Manager.
- Double-click on Network adapters.
- Right-click on the installed network driver, and choose the Update driver option.
- Click on Search automatically for drivers.
Final Thoughts
Dealing with a VALORANT update stuck at 0% can be frustrating, but there are several ways to resolve the issue. From troubleshooting Windows updates and adjusting antivirus settings to optimizing network configurations and using a VPN, these solutions can help get your update back on track. By following these steps, you’ll be able to enjoy a smooth gaming experience without unnecessary delays.
For streamers and content creators, Eklipse.gg offers an AI-powered video editing tool that simplifies highlight creation. This allows you to focus on gameplay while Eklipse handles the editing, helping you create engaging content and attract more viewers.
Find out more about How to Clip Valorant Using Eklipse in our blog: >>How to Clip Valorant on PC Using Eklipse and Post It To TikTok<<