Are you an aspiring content creator or gaming streamer looking for a reliable Athenascope alternative? Look no further! In this article, we will explore the top alternatives that can help you with live streaming, video editing/conversion, and AI highlight features.
Whether you’re searching for a new tool to enhance your streaming experience or need assistance in creating engaging highlights, we’ve got you covered. Let’s go!

1. Streamlabs OBS
Streamlabs OBS is a popular choice among streamers due to its user-friendly interface and comprehensive features. Developed by Streamlabs, this software offers seamless integration with platforms like Twitch and YouTube. With Streamlabs OBS, you can easily manage your live streams, customize overlays, add alerts and widgets, and optimize your stream settings for the best performance.
- Developer/Organization: Streamlabs
- Price: Free (with optional premium features)
- Key Features: user friendly interface, customizable overlays, alerts and widgets integration, optimized stream settings
More on Eklipse Blog >> An ex-Athenascope User Review on Eklipse.gg, The Good and The Bad
2. Adobe Premiere Pro
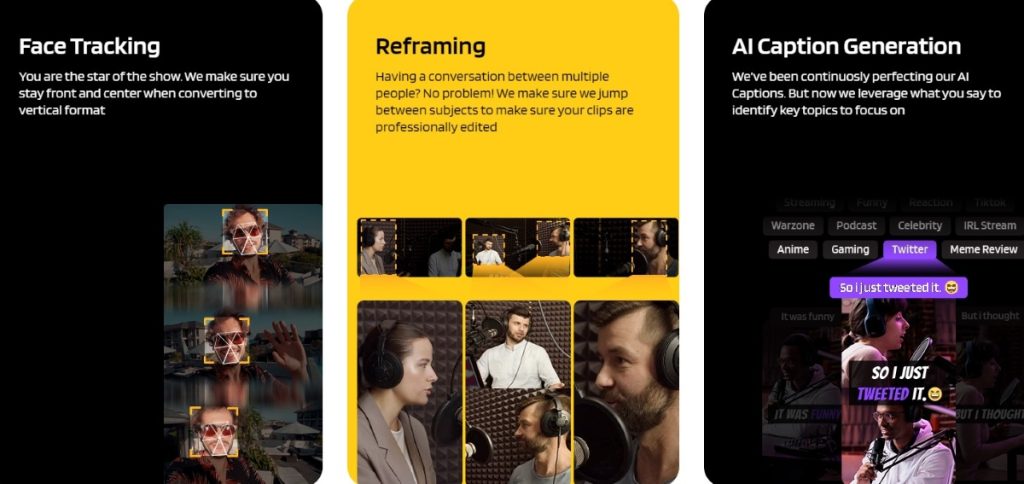
If you’re looking for professional-grade video editing capabilities along with AI-powered features, Adobe Premiere Pro is an excellent choice. Developed by Adobe, this industry-leading software offers a wide range of tools for video editing, including advanced AI features like automatic video highlights generation. With Adobe Premiere Pro, you can edit your videos with precision, apply visual effects, add transitions, and create stunning cinematic experiences.
- Developer/Organization: Adobe
- Price: Subscription-based (various plans available)
- Key Features: professional-grade video editing capabilities, AI-powered automatic video highlights generation, advanced visual effects and transitions, cinematic video editing experience
3. OBS Studio
OBS Studio (Open Broadcaster Software) is a powerful open-source software that provides live streaming and recording functionality. It offers a customizable interface and supports various platforms, making it a versatile option for content creators. OBS Studio allows you to capture and mix multiple sources, apply filters and effects, and stream to popular platforms like Twitch and YouTube.
- Developer/Organization: OBS Project
- Price: Free (open-source)
- Key Features: customizable interface, capture and mix multiple sources, filters and effects application, built-in streaming to popular platforms
More on Eklipse Blog >> Eklipse Highlights — An Athenascope Alternative
Athenascope Alternative Strengths
- Streamlabs OBS offers a user-friendly interface with comprehensive features for live streaming.
- Adobe Premiere Pro provides professional-grade video editing capabilities along with AI-powered automatic video highlights generation
- OBS Studio is a powerful open-source software that supports live streaming and recording, with customizable features.
Athenascope Alternative Weaknesses
- Streamlabs OBS may require additional premium features for advanced functionalities.
- Adobe Premiere Pro is a subscription-based software, which may not be suitable for users on a tight budget.
- OBS Studio’s customization options may require technical expertise to fully utilize its capabilities
FAQ
1. Are there any free alternatives to Athenascope?
Yes, both Streamlabs OBS and OBS Studio offer free versions with robust features for live streaming and video editing.
2. Can I generate AI-powered highlights with these alternatives?
Absolutely! Adobe Premiere Pro incorporates AI technology to automatically generate video highlights based on your footage.
3. Which alternative is the best for beginners?
If you’re new to content creation, Streamlabs OBS provides an intuitive interface and easy-to-use features, making it an ideal choice for beginners.
Conclusion
In conclusion, there are several excellent alternatives to Athenascope that cater to the needs of aspiring content creators and gaming streamers. Whether you’re looking for live streaming tools or advanced video editing capabilities, these alternatives have got you covered. Choose the one that best suits your requirements and take your content creation journey to new heights!
If you’re still looking for the perfect tool to clip, edit, and share your best livestream moments on TikTok/Shorts/Reels, look no further than Eklipse!
Our AI-powered tool is the best way to create viral videos in no time. Click below to try Eklipse for free today and start your journey to becoming a social media star!
Maximize your Black Ops 6 rewards—Create highlights from your best gameplay with with Eklipse
Eklipse help streamer improve their social media presence with AI highlights that clip your Twitch / Kick streams automatically & converts them to TikTok / Reels / Shorts