Effective visual content is the cornerstone of social media engagement. Whether you’re promoting yourself as streamers, your gaming content, sharing news, or just adding some humor with memes, the right image size can make all the difference. Now, let’s keep your social media visuals sharp with these up-to-date social media image sizes guide.
This guide offers the latest social media image sizes and dimensions for various social networks (i.e. Instagram, TikTok, Facebook and YouTube), ensuring your online presence stays on top. Let’s dive in!
In the world of social media, making a good first impression with your images is crucial. Remember there are various social media image sizes rules to follow for making your visuals shine brighter. Keeping up with the latest social media image sizes and optimizing your images helps you grab attention, too. Good luck!
Maximize your Black Ops 6 rewardsโCreate highlights from your best gameplay with with Eklipse
Eklipse help streamer improve their social media presence with AI highlights that clip your Twitch / Kick streams automatically & converts them to TikTok / Reels / Shorts
Setting realistic social marketing goals that align with your overall business goals. Determining how you will measure the success of your social marketing efforts. Integrating emerging trends and best practices into your strategy and content development.
This 30-day social media plan template is designed to help you re-invent your social media management strategy so that what you share aligns with the interests of your community and contributes to overall business value.
Week 1: Establish your goals and define your metrics
Source: Djitugo
Day 1: Establish goals for social
Establish clear social media goals to give purpose to your social efforts. Determine what you want social to achieve, such as driving website traffic, raising brand awareness, or boosting brand engagement.
Day 2: Define your success metrics
Decide which metrics will provide the right data to determine whether or not social is supporting your business goals. Set clear standards for your social campaigns so you know when you achieve success.
Day 3: List out your challenges
Make a list of the challenges you face in social media marketing and how they impact your marketing efforts or overall business success.
Day 4: Brainstorm solutions
Brainstorm possible solutions to the challenges you listed and provide evidence to justify effective solutions.
Day 5: Analyze the competition
Conduct a competitive analysis to determine your brand’s unique positioning and identify what content is resonating with your audience.
Week 2: Optimize your profiles and brand voice on social media
Day 6: Determine your strengths and weaknesses
Take a deep dive into your social strategy and determine where you are successful and where there is room for growth.
Day 7: Audit your content
Run a social media audit to identify your best-performing content and most popular channels. Understand what’s working and why.
Day 8: Create a list of relevant keywords
Use social media listening tools to identify keywords associated with your brand. These keywords can help during content brainstorming and creation.
Day 9: Determine your brand voice and social persona
Create a consistent brand voice and identify a persona to remain consistent across all your social channels.
Day 10: Optimize your social profiles
Optimize your social profiles with consistent profile pictures, complete every section of your profile, and add keywords for SEO.
Week 3: Find and listen to your community to better understand your industry
Day 11: Develop your buyer persona
Revisit or create buyer personas to better understand your current and future customers.
Day 12: Listen to your audience
Use social media listening to gain insight into the minds of your followers and inform a more effective strategy.
Day 13: Research industry trends and topics
Stay up to date with industry trends and topics to create relevant content and establish your brand as an authority.
Day 14: Connect with other departments
Collaborate with other departments within your organization to gain additional insights and create content that addresses their needs.
Day 15: Choose your content types
Determine the types of content that will benefit your brand the most and keep your audience engaged.
Week 4: Fill out your social content calendar to increase reach and engagement
Source: Widya Robotics
Day 16: Develop a posting schedule
Determine your publishing cadence based on factors like your audience, social networks used, and campaign goals.
Day 17: Brainstorm content ideas
Gather inspiration and plan content that will resonate with your audience. Repurpose or reformat older content for different channels.
Day 18: Gather resources
Collect resources needed to bring your content to life, such as creative assets and creative support for visual elements.
Day 19: Draft your social media plan calendar and create your content
Start the content creation process and set reasonable timelines for project completion.
Day 20: Optimize your content
Optimize your content for maximum reach and engagement. Repurpose content for different uses and adapt it for various social channels.
Week 5: Supplement and boost your social media content calendar for the best results
Day 21: Create a call to action
Include clear CTAs on posts that encourage customers to take action and guide them into your sales funnel.
Day 22: Connect to more resources
Establish your brand as an authority by connecting your audience to more resources and inviting them to engage further.
Day 23: Amplify your efforts
Think of ways to amplify your messages and extend the reach of your content, such as leveraging employees, incentivizing customers to share, or using creators.
Day 24: Invest in your best content
Promote high-performing content through paid ads to target a specific audience, attract qualified traffic and leads, and grow your customer base.
Day 25: Engage with your audience
Engage with your audience in a two-way dialogue to build brand trust, add authenticity, and gain valuable insight into the effectiveness of your content.
Week 6: Report on your social media results and celebrate your success
Day 26: Track your content
Use content tracking tools to gauge engagement and track the movement of your content across social channels.
Day 27: Compare results to goals
Think back to the objectives you set at the beginning of these 30 days.
For example, if your objective was to boost brand engagement, you needed to increase the number of likes, shares, mentions, and comments by 20% by the end of the fourth quarter.
Using a social media analytics tool, you can compare month-over-month engagement for all of your social profiles to determine if you are on track to meet your social marketing goals.
Day 28: Report out
Share the results of your social marketing efforts with your marketing team and leadership. If you’re new to reporting or need to brush up on best practices, here’s a suite of resources that can help you create a routine reporting system.
This is your opportunity to showcase the goals you’ve established and your progress toward them. You should use hard evidence, like the data you’ve gathered through listening and analytics, to report on the success of your social marketing efforts.
Day 29: Revisit and readjust your strategy
The most savvy marketers know that marketing strategies are in constant flux. Revisit your strategy, revise your marketing goals, and adapt your strategies based on the data you’ve collected.
Day 30: Celebrate your transformation
Congratulations, you’ve successfully made it through the 30-day social marketing transformation program.
Conclusion
Keep in mind that transforming your social media strategic planning doesn’t end with these 30 daysโcontinue to identify challenges to your social marketing strategy, analyze your competitors, discover ways to optimize your content and social profiles, and remember to always revisit and adjust your strategies as needed.
Did you know that 90% of Instagram users follow at least one brand? This makes Instagram a great platform for growing your audience and reaching the right people.
To optimize your Instagram efforts for your business, it’s important to understand and take advantage of Instagram’s special features. One of the newest features is Instagram Collabs, which allows you to co-author content with a collaborator to increase engagement and reach.
An Instagram Collab post is a co-created Feed Post or Reel that appears on two profiles simultaneously. One person creates the post and invites a second person to collaborate. Once they accept, the post and its comments, likes, and shares are shared by both accounts.
Keep in mind that each post can only have one collaborator (besides yourself), and this feature is not available for Lives and Stories yet.
How do Instagram Collab posts benefit Creators?
Influencers and creators have eagerly adopted Instagram Collab posts, and now more creators are joining in. This is because what benefits one creator often benefits the other as well.
Boosting your reach: Instagram Collabs can help you get into people’s Feeds through the accounts they already follow and engage with regularly. This increases the visibility of your creator account.
Improving engagement: With more people discovering your content, there are more opportunities for them to engage with your posts. Even if you and your collaborator share a similar audience, there will still be a portion of their followers who are new to your content. This means a larger pool of people who can interact with your posts.
Getting more followers: When you collaborate with a fellow creator that your audience already knows, likes, and trusts, they are more likely to click on your profile and follow you. Collaborations help build credibility and trust, leading to more followers on Instagram.
Increasing sales from Instagram shopping: If you’re already using shoppable posts, combining them with Instagram Collabs can increase your chances of converting people who land on your post into buyers.
How to create an Instagram Collab post:
Creating an Instagram Collab post involves two phases. First, the post creator makes the post as they normally would. Then, they invite the collaborator to share it.
Create a Feed Post or Reel.
Customize and add details.
Select “Tag People” from the post details menu.
Choose “Invite Collaborator” from the menu.
Use the search bar to find the user you want to collaborate with and tap “Done.”
Once the post has been created, the collaborator needs to accept the invitation.
Go to your activity page.
Click on the invite notification.
Tap “Review.”
Select “Accept.”
Instagram Collab post ideas for Creators:
Here are some ideas and examples of how you can use Instagram Collab posts:
Partner with other creators: Collaborate with a creator that has a similar audience to cross-promote each other’s content or run a joint sale.
Work with influencers: Collaborate with influencers to leverage their engaged followers and build hype around your content.
Promote your other accounts: Use Instagram Collabs to put the same content in front of your audience simultaneously and increase their interest in following your other accounts.
Support a nonprofit or charity: Showcase your values by collaborating with a nonprofit or charity that aligns with your audience’s values.
New content or product launch: Team up with another creator or influencer to promote your new content or product and reach a wider audience.
Promote a giveaway or discount: Use Instagram Collabs to expand the reach of your giveaway or discount campaign by leveraging the combined influence of two accounts.
Conclusion
Collab Posts are becoming a central part of social media strategy, especially in the growing creator economy. Creators need to adapt their approach to social media and consider incorporating Collab Posts into their ongoing strategy for sustainable growth and success.
Maximize your Black Ops 6 rewardsโCreate highlights from your best gameplay with with Eklipse
Eklipse help streamer improve their social media presence with AI highlights that clip your Twitch / Kick streams automatically & converts them to TikTok / Reels / Shorts
YouTube is a popular website that offers a platform for video content. Content creators can benefit from expanding their reach and building brand loyalty on YouTube. However, it is important for content creators to actively monitor and manage their comments in order to achieve the best results. In this guide, we have explained everything you need to know about moderating and editing your YouTube comments.
Why Content Creators Should Monitor Their YouTube Comments
YouTube comments can help you understand viewer sentiment. By monitoring comments, you can gauge how viewers feel about your content.
YouTube comments provide an opportunity for engagement. Responding quickly to negative comments can improve your image and turn satisfied viewers into loyal subscribers.
YouTube comments can help you develop new content. Pay attention to what users are saying about your content and use their feedback to create new videos that they want to see.
How to See Your Comment Notifications on YouTube
There are three ways to find comments on your YouTube videos. You can sort comments based on metrics and qualities such as whether you have responded to them, if the comment contains specific text, or if the comment contains a question. On mobile, you can download the YouTube Studio app to manage comments.
How to See Your YouTube Comment History
If you want to see how frequently you’ve engaged with your audience, you can view your comment history. YouTube keeps a record of every comment your account has posted. Follow the steps below to find your complete list of comments.
Why Edit YouTube Comments
Image Credit: influencermarketinghub.com
Editing YouTube comments allows you to correct mistakes, improve your tone, or update previous statements. Consider editing a comment if you made a typo, didn’t use the correct tone in your response, or need to update an earlier statement.
There are two ways to edit YouTube comments. The first way is to open the video you commented on and make the necessary changes. Alternatively, you can access your comment history and edit the comment from there.
How to Delete a YouTube Comment
Deleting comments follows the same steps as editing. On desktop and mobile, you can navigate to the comment you want to delete and click on the three vertical dots, then select Delete. On desktop, you can also visit your comment history and delete the comment from there.
How to Disable Comments on YouTube
There may be times when you need to disable comments on YouTube. You can disable comments on a specific video or your entire channel. Consider disabling comments as a temporary measure.
How to Turn On Comments on YouTube
If you have disabled comments, you can turn them back on whenever you’re ready. The process differs depending on whether you disabled comments for your entire channel or a specific video.
Conclusion
Effectively managing and moderating your YouTube comments is crucial for content creators looking to build a strong online presence and engage with their audience. By actively monitoring comments, responding thoughtfully, and using feedback to improve content, content creators can foster a thriving YouTube community.
Maximize your Black Ops 6 rewardsโCreate highlights from your best gameplay with with Eklipse
Eklipse help streamer improve their social media presence with AI highlights that clip your Twitch / Kick streams automatically & converts them to TikTok / Reels / Shorts
Your Facebook cover photo is often the first thing visitors notice when they land on your profile or page. To make a positive impression, it’s crucial to select the right cover photo size and content. Here’s a comprehensive guide to help you choose the perfect Facebook cover photo.
The ideal size for a Facebook cover photo is 820 pixels wide by 312 pixels tall on desktop and 640 pixels wide by 360 pixels tall on mobile. Ensure your cover photo meets these dimensions to display correctly on all devices.
Minimum Size: Your cover photo should have a minimum size of 400 x 150 pixels to prevent distortion.
File Format: For the best results, upload an sRGB JPG file that is less than 100 KB in size. If your image contains a logo or text, consider using a PNG file.
Consistency: The dimensions for Facebook Business Page cover photos are the same as those for personal accounts.
2. Mobile Optimization
Remember that a significant portion of Facebook users access the platform via mobile devices. Ensure your cover photo is optimized for mobile screens, so vital content isn’t cropped out.
3. Consider Using Video
Instead of a static image, you can opt for a video as your cover photo. Video covers can help showcase more about your business. Ensure the video dimensions match those of a standard desktop cover photo.
4. Adhere to Facebook Rules
Always follow Facebook’s guidelines and rules when selecting a cover photo. Your cover should be authentic, appealing to a broad audience, and exclusive to your brand. Avoid using deceptive, misleading, or malicious images.
5. Keep It Simple
A cluttered cover photo can overwhelm visitors. Instead, provide a clean introduction to your company and use the cover photo to reinforce your brand’s identity without distracting from other on-page content and actions.
Your cover photo should represent your brand and engage your audience emotionally. Images are processed faster than text, so ensure your cover photo resonates with your brand and presents a consistent image online.
7. Highlight Brand Highlights
Use your cover photo to highlight brand achievements, news, products, and events. It should act as a storefront to attract potential customers and entice them to learn more. However, maintain visual appeal and avoid overwhelming viewers with excessive information.
8. Avoid Directional Cues
Directional cues like arrows may not display correctly on all devices. Instead, create a cohesive design that naturally guides viewers’ attention to the right elements on the page.
9. Balanced Text
If you include text in your cover photo, ensure it’s relevant, evokes emotion, and aligns with your brand and audience’s interests. However, be cautious not to overload the photo with too much text, as it can detract from its visual appeal.
Conclusion
As you embark on the journey of selecting your next Facebook cover photo, remember that it’s not just an imageโit’s an opportunity to tell your brand’s story, capture your audience’s attention, and make a memorable impression. Make it count, and watch as your online presence flourishes.
Maximize your Black Ops 6 rewardsโCreate highlights from your best gameplay with with Eklipse
Eklipse help streamer improve their social media presence with AI highlights that clip your Twitch / Kick streams automatically & converts them to TikTok / Reels / Shorts
Reels are popular on Instagram right now, but don’t discount the power of Instagram carousels. They can help you sustain engagement and get people to stop and swipe. In this guide, we’ll break down why Instagram carousels are a great idea for your social media strategy and provide tips, examples, and ideas to help you get started.
An Instagram carousel is a post with multiple photos or videos that users can view by swiping left on the app. It’s like a slideshow that users can control manually.
Why use Instagram carousels?
Carousel posts are a great way to engage your audience. They outperform both photo and video posts in terms of engagement rates. According to Socialinsider.io, carousel posts can achieve engagement rates between 1.65% and 5.40%, higher than the platform average of 1.22%.
When to use Instagram carousels
You can use Instagram carousels for various purposes, including:
Maintain a consistent and high-quality feed by using Instagram carousel templates. These templates provide a framework with consistent design elements. You can find stock templates on websites like Canva, PicMonkey, and Adobe Stock, or create your own from scratch to showcase your brand visual identity.
Start engaging your audience with Instagram carousels
Don’t miss out on the opportunity to engage your audience with Instagram carousel posts. Use the tips, ideas, and template resources to design eye-catching carousels that get people to swipe left. Engagement is key to social media success, so make the most of this powerful feature on Instagram.
Conclusion
By following the guidelines outlined in this guide, you can create captivating Instagram carousels that not only stop the scroll but also encourage users to swipe left and dive deeper into your content. From choosing the right content to scheduling your posts and even using templates for a consistent visual identity, you now have the knowledge to leverage this powerful feature on Instagram.
Maximize your Black Ops 6 rewardsโCreate highlights from your best gameplay with with Eklipse
Eklipse help streamer improve their social media presence with AI highlights that clip your Twitch / Kick streams automatically & converts them to TikTok / Reels / Shorts
Incorporating other people’s content into your Instagram feed is a common and effective element of any Instagram marketing strategy. Brands often use user-generated content (UGC) to showcase their customers and influencers.
But to actually bring others’ content into your feed, you need to know how to repost on Instagram, also known as a regram. Learn more guide by reading our article below.
A regram is when you share another account’s Instagram post to your own feed. It’s similar to Twitter’s Retweet feature but requires a few more steps.
Before planning to regram Instagram posts, it’s important to follow best practices for user-generated content. This includes getting permission from the original poster and avoiding significant alterations to the original image.
For feed posts, Instagram does not have a repost or regram button. However, there are creative ways to regram.
You can share posts to other networks like Twitter, Pinterest, Snapchat, LinkedIn, or messaging apps like Slack. But to regram on Instagram itself, you’ll need the help of another app or program.
Another method is to manually regram using a screenshot. Simply take a screenshot of the post you want to repost and then upload it to your own feed. Keep in mind that the quality of the repost may vary depending on your phone’s resolution.
How to Regramming?
Source: Cool Mom Tech
Regramming on Instagram Stories is easier than reposting on the feed. You can reshare interesting posts that don’t match your visuals or highlight someone else’s Story that mentions you. To repost an in-feed post to your Story, simply click the embedded item and it will take viewers directly to the original post.
To repost from someone else’s Story to your own, you can ask for permission and take a screenshot. Instagram also provides an easy way to repost Story mentions within the app itself.
If you want to repost your own Story to your feed, follow these steps:
Open the Instagram Story you want to post.
Select “Share as Post…“
This will take you to the screen where you can start a new post.
Things to Consider
When regramming, it’s important to follow some best practices. First, ask for permission and give credit to the original photographer. Instagram’s policy states that the original photographer owns the rights to the photo. Avoid significant edits to the original work and keep captions in line with the original post. A simple credit line is a great way to give credit to the original post.
Mix up original and regrammed content in your feed. Reposts should be about highlighting your customers’ feedback and uses of your product, rather than solely relying on regrammed content. Make sure the reposted content is on brand and aligns with your brand’s visual style.
Conclusion
Regramming on Instagram may require a few extra steps, but it’s becoming easier with the addition of Stories reposting and apps like Sprout Social. If you want to learn more about creating a high-impact strategy on Instagram, check out our guide for brands on Instagram.
You don’t need to be a fortune teller to know the social media trends that will take off in 2023. All you need is data.
Combining performance and consumer preference data can give you a clear picture of the year ahead. We’re not talking about which TikTok audios will become popular in a few months. We’re talking about what drives audience behavior and how your brand fits in.
If you’re one of the 60% of organizations that rely on social data daily, you’re already on the right track. In this article, we’ll cover the stats that drive new social media trends in 2023.
Edutainment content is no longer just for kids. In 2023, everyone will join in on creating entertaining and informative content. Short-form videos are becoming popular, creating the perfect platform for educational content to thrive.
2. Businesses will invest more in video production
Video is here to stay. Businesses will invest more in video production equipment and staff to stand out in the social media landscape.
3. Businesses will experiment with emerging networks
Keep an eye on emerging platforms as they gain popularity. Networks like Mastodon, Tumblr, Hive, and Discord are rising stars in the social media landscape. Brands can identify passing trends and what’s sticking around by experimenting with these new platforms.
4. The creator economy will continue to grow
Influencer viewership is set to hit 10 trillion views per month in 2023. Collaborating with creators can help brands generate engagement, reach new audiences, and strengthen communities.
5. Employee advocacy will be a major trend
Brands will tap into their workforce to become creators. Employee advocacy programs can increase brand awareness, attract qualified job applicants, and give brands more control over messaging.
6. Brands will change how they talk about sustainability
Source: Pure Blue
Brands are shifting to a quieter approach when discussing their environmental sustainability goals to avoid accusations of greenwashing. It’s important to vet and verify claims to avoid any potential risks.
7. Social customer care will become a marketing tool
Brands are raising the bar for customer care on social media. Going above and beyond in responding to customer messages can create a delightful experience and drive personal connections.
8. Social and legal teams will work together
Social media trends in 2023 will require a strong relationship between social and legal teams. Legal teams play a crucial role in mitigating risks, especially with copyright infringement.
9. Social commerce will make a comeback
Despite economic uncertainties, people are still shopping on social media. Brands should optimize their profiles for social commerce features to provide a seamless checkout experience.
10. Exciting metaverse brand activations will emerge
Metaverse technology will be a hot trend in 2023. Brands will invest in metaverse/AR/VR social strategies, providing learnings for those new to the frontier.
Conclusion
What social media trends are you most excited about? Trends keep social media interesting and ever-changing. Use these trends to develop a solid social media marketing strategy that will bring you success in 2023 and beyond.
You’ve probably seen it many times – your favorite Instagram account posts a photo about something interesting and ends the caption with “link in bio to read more.”
If you’re running a brand Instagram account, you know the links in your bio are essential for driving audiences to your site from Instagram. In this post, we show you how to get the most out of your links in your bio on Instagram.
“Links in bio” refer to the clickable URLs that you can add to your profile section. Most social media platforms give you the option to add a link in your bio to take followers to your website, product page, content, or some other important page.
On platforms like Facebook and Twitter, adding a link to the homepage of your website may be more than enough since you can share clickable links to individual pages, products, or content in your posts.
But it’s a little different with Instagram. Accounts with 10,000+ followers do have the option to share links through their Stories, but those that are still building their following have to leverage up to five links in bio to direct followers to a product page or a piece of content. Plus, outside of Stories highlights, Stories links are ephemeral and not ideal for an account of any size to highlight the most important URLs to drive social media traffic to.
Instagram’s link in bio can feel limiting when you want to highlight more than five important products, posts, and pages. Fortunately, there are several link in bio tools that will let you put together all these key link destinations and share them via a single URL. This will lead to a custom landing page with all the relevant links you want to share.
How to Put a Link in Your Instagram Bio
It’s easy to add or update the link in your Instagram bio. You can use either the mobile app or the Instagram website on your desktop. Follow the steps below:
Go to your profile and tap on the “Edit Profile” button.
In the “Website” field, enter the URL you want to add to your bio.
Tap on “Done” and that’s it – you now have a link in your Instagram bio.
Link in Bio Tools
Source: Tech Crunch
If you want to share links to more than five pages and products, you can also use a link in bio tool. This tool will let you create a custom landing page that houses all the links you want to share. And you can just add the URL of this landing page in your Instagram bio. Here are a few link in bio tools you can use:
SproutLink SproutLink is a stand-out link in bio offering that allows your audience to access a replica of your Instagram grid and visit the unique link associated with each of your Instagram posts.
Linktree Linktree is an affordable link in bio solution that lets you add unlimited links and customize them with images and icons.
Feedlink Feedlink is a powerful link in bio tool that comes with mobile-optimized landing pages and allows you to track click stats for each link.
Lnk. Bio Lnk. Bio lets you add unlimited links even with the free plan and offers additional features with paid plans starting from $0.99/month.
Conclusion
Now that you know how to set up a link in bio landing page, let’s take a look at some of the ways you can use links in your Instagram bio to promote your business.
With the right approach, adding links to your bio can be a great way to attract quality leads and move them along the conversion funnel. So make the most of the ideas and tips above to start leveraging this feature for your business.
Social media has a significant impact on our well-being, mental health, and self-perception. One study found that Instagram likes can have a negative effect on adolescents. Comparing ourselves to popular influencers and celebrities and basing our self-worth on the number of likes we receive can be harmful. That’s why Instagram has introduced the option to hide likes.
In this article, we will discuss why you might want to hide likes on Instagram and provide a step-by-step guide on how to do it.
Why would you want to turn off likes on Instagram?
Source: Allstars.id
Research shows that receiving few likes on Instagram can have a negative impact on a user’s mental health, especially for those more susceptible to feedback. Likes are a vanity metric and don’t hold much importance when measuring the overall performance of your Instagram marketing efforts. Instead, focus on metrics like comments and shares, which show that your post resonated with users.
How to hide likes on Instagram
Source: 01 Social
You can hide likes on both your own Instagram posts and posts from accounts you follow.
1. How to hide likes on others’ Instagram posts:
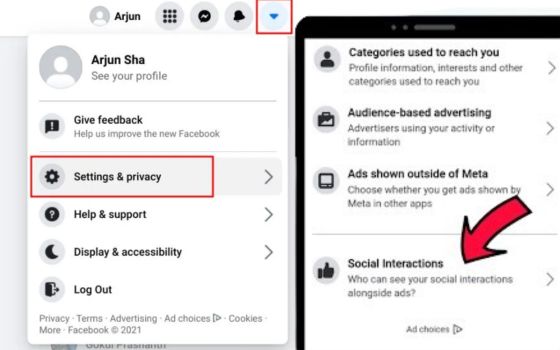
Tap the hamburger menu on your profile and go to Settings.
In the Settings menu, tap Privacy.
In the Privacy menu, tap Posts.
Toggle the Hide Like and View Counts option on.
2. How to hide likes on your own Instagram posts before publishing:
Create your Instagram post as usual.
When you get to the section to write your caption, tag products, or add a location, tap Advanced Settings.
Toggle the Hide Like and View Counts on this post option to hide your post’s likes.
3. How to hide likes on your Instagram posts after publishing:
Go to the post you want to update and tap the three dots menu icon.
Tap Hide Like Count to hide the number of likes on your post.
How to see your likes on Instagram even if they’re hidden
Although likes will be hidden from the public, you can still track them internally to measure your account’s growth. You can access your likes data within Instagram Insights or use a social media management tool like Sprout Social to check your analytics.
Conclusion
In conclusion, hiding likes on Instagram can have positive effects on mental health and help shift the focus to more meaningful engagement metrics. Consider the impact on your brand and audience before deciding to hide likes.