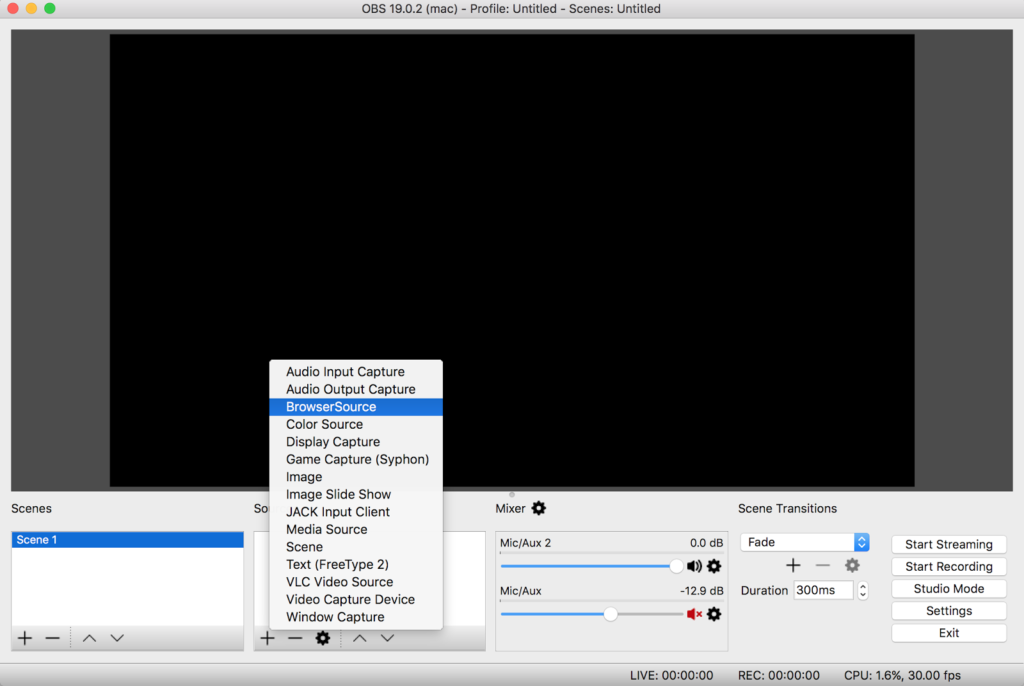
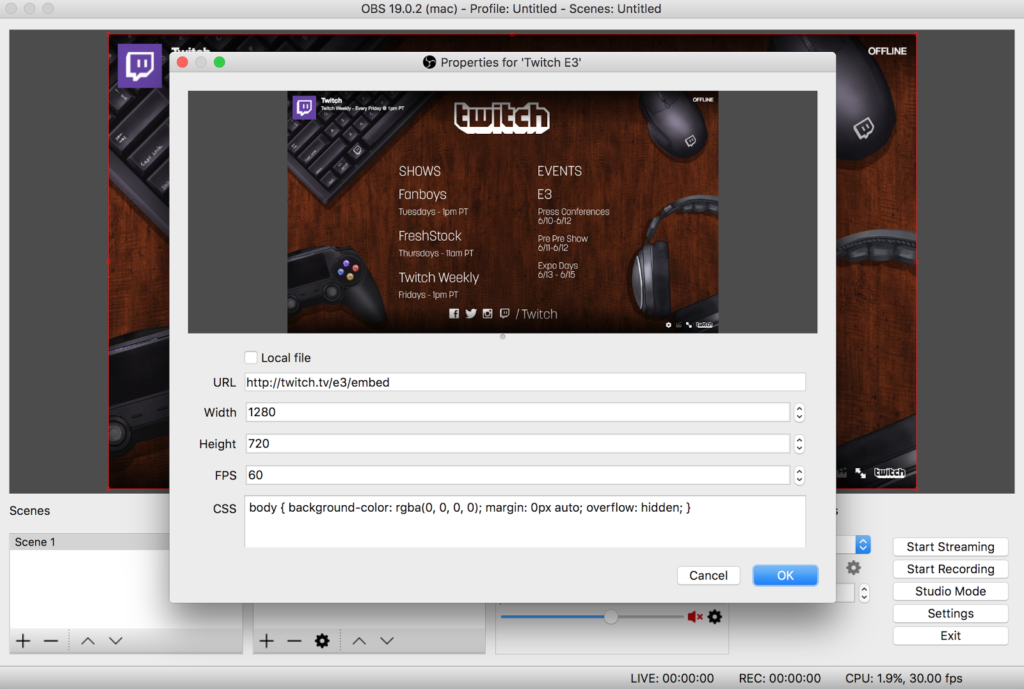
Home Blog Page 230

How To Add Q&A on TikTok: 5 Simple Steps To Do

0
how to add Q&A on TikTok
Source: ScreenRant

If you are a content creator on TikTok, you might know that TikTok has launched a Q&A option on their platform. This new feature allows content creators to respond directly to the questions their viewers have. Aside from that, it is available to every content creator regardless of their geographical location. Luckily, this article will tell you how to add Q&A on TikTok.

Additionally, this feature allows creators to easily respond to the audience’s questions via text or videos. They are also able to post links to their Q&A in the bio so the audience can reach them there.

Aside from that, all the questions are stored on this page and you can visit it whenever you feel like replying to your audience. Well, now let’s take a look at how you can enable this feature.

What Is TikTok Q&A and How Does It Work?

The Q&A feature on TikTok is a way for users to interact and engage with each other by asking and answering questions. This feature allows users to see questions suggested by other users and have the option to provide their own answers.

They can also ask their own questions and invite other users to answer them. This feature also allows users to save their questions and answers in specific tabs for later reference.

how to do q&a on tiktok live
Q&A feature enables creators to respond directly to the questions from the viewers | Source: Newsroom

Additionally, this feature is basically great to help creators engage with their viewers as well. Viewers can ask questions and get to know the creator better, and creators can share more information about themselves by responding to questions in a separate video or the comments section of the original video.

One quick note this feature is currently only available for users with a TikTok Creator account. And to be able to switch your account to TikTok Creator, you’ll need to have at least 10k followers and 100k video views in the past 30 days.

More on Eklipse Blog>>> Top 6 TikTok Video Editor Apps – Pick Your Favorite Ones!

How to add Q&A on TikTok: Step-by-step guide

To enable the Q&A feature on TikTok, you have to manually turn it on. Here’s how you can do that.

  1. Start with ap the three horizontal lines in the top-right corner of the app to open a menu.
  2. Now tap “creator tools” in that menu.
how to put q&a in your tiktok bio iphone
Source: Adweek
  1. Go to the Q & A option in the creator tools section.
how to put q&a in your tiktok bio android
Select the Q&A option | Source: makeuseof
  1. You can now click “turn on Q&A” at the bottom of the app to enable the Q&A feature.
  2. Now, you can use the Q&A feature to respond to your viewer’s questions. A link to the  Q&A will also be added to your TikTok profile.

Benefits of Using Q&A TikTok

Doc. Online Marketing

The Q&A feature on TikTok has several benefits for both creators and viewers. Some of the benefits include:

  1. Increased engagement and building trust: The Q&A feature allows for a more interactive experience between creators and viewers, which can lead to increased engagement and a more loyal audience.
  2. Provides a variety of fresh perspectives on different subjects: It’s like having your own personal focus group. It provides crowd-sourced answers where you can get real-time feedback and perspectives on any subject you can think of.
  3. A better understanding of the audience: Creators can use the Q&A feature to get to know their audience better by learning what topics they are interested in and what questions they have.
  4. Perfect opportunity for businesses or influencers: Using the Q&A feature, users can showcase their expertise and provide value to their audience. Through this feature, users can also build trust and credibility with their audience, which can lead to increased conversions and sales.

Conclusion

So that’s how you can enable the Q&A feature on your profile. It’s a short and simple procedure. All of you have to do is visit the creator tools menu and turn on Q&A. Hopefully you find this article helpful to grow your TikTok channel.

If you’re a TikTok creator, you know how important it is to create engaging and visually appealing content. But creating high-quality TikTok videos can be time-consuming and challenging, especially if you’re working with long video footage.

That’s where Eklipse comes in. Eklipse is an AI-powered tool that can help you convert long videos into short, vertical TikTok highlights in seconds. Simply upload your video to Eklipse and it will automatically identify the best moments and create a highlight clip for you.

Sign up for Eklipse today and start creating amazing TikTok highlights from your long videos!


Maximize your Black Ops 6 rewards—Create highlights from your best gameplay with with Eklipse

Eklipse help streamer improve their social media presence with AI highlights that clip your Twitch / Kick streams automatically & converts them to TikTok / Reels / Shorts


Best Video Editing Software for YouTube Gaming

0
Youtube

Thinking of getting into YouTube gaming? You’ve probably realized the need to produce high-quality content.

Choosing the best video editing software for YouTube gaming may seem to be a daunting task, but we’re here to make it easy for you!

Spend less time worrying, and more time creating! If you’re doing walkthroughs or live streams, you will need a powerful video editor. Here are our top picks;

1. Eklipse.gg

You may have heard of Eklipse being THE highlight maker for Twitch streamers. But did you know it has other features as well? Eklipse offers highly advanced video editing capabilities, rivaling any professional video editor.

You can use our A.I tool to clip your streams and extract your best moments, thus giving you the perfect fuel to grow your YouTube Gaming channel!

Curious to try? Try Eklipse for free now and start becoming a viral sensation on social media!


Maximize your Black Ops 6 rewards—Create highlights from your best gameplay with with Eklipse

Eklipse help streamer improve their social media presence with AI highlights that clip your Twitch / Kick streams automatically & converts them to TikTok / Reels / Shorts


2. Wondershare Filmora  

Filmora offers a free download for your video editing needs, whether on Mac or PC.

With the ability to edit with effects, voiceovers, text overlay as well as all the other editing goodies, you’re in luck. Splice together sections of your walkthrough, insert seamless transitions and make your content go viral! But wouldn’t this be a tad…complex?

Never fear! Filmora boasts an easy-to-use interface that can appeal to both beginners and pros alike!

More on Eklipse Blog >> Top 6 TikTok Video Editor Apps – Pick Your Favorite Ones!

3. Kapwing

Source: YouTube

If you’re looking for a quick, free, online video editor, Kapwing is an easy choice!

Featuring an entire suite of tools for cropping, splicing, combining and effects, Kapwing can elevate your simple video into something grand. The best part? It’s free! Of course, you ARE relegated to 720p exports on the free plan, but the paid version is nominal.

The biggest perk Kapwing offers is that you can work on your videos from anywhere due to it being online. As long as you have the source file, you never need to download additional software!

For a detailed review of Kapwing, you can click this link to the article.

4. Adobe Premiere Pro

Step into the world of video editing with Adobe Premiere Pro, a familiar choice for Windows users. It stands out in the Adobe Creative Suite, providing a palette-based interface that ensures your video elements are easily accessible. The recent touch-friendly update allows for precision using tools like light pens and touch-screens.

5. Final Cut Pro X

Regarded as the ultimate video editing tool, Final Cut Pro X is favored by professional content creators. Apple’s creation boasts user-friendly features suitable for both beginners and experts.

With recent updates, it revolutionizes the video crafting process by reimagining the traditional timeline-track panel and optimizing for newer hardware. Simplifying asset management, it offers the option to copy elements seamlessly between projects.

More on Eklipse Blog >> How Much RAM is Needed for Video Editing in 2023: A Comprehensive Guide

Conclusion

Now that you’ve locked down which editor to use for your gaming exploits, why not check out some of our other guides on YouTube Gaming? Learn how to edit YouTube videos via Eklipse, and learn how to make gaming shorts for YouTube on PC!

How To Add Pictures On TikTok Video Without Slideshow: 2 Easy Ways

0
How To Add Pictures On TikTok Video Without Slideshow
Source: CNET

Ever wondered how to add pictures on TikTok video without slideshow? It’s just a piece of cake actually. Thankfully, TikTok provides a feature that allows you to add some images into your video easily. So, you will not need any third-party applications or tools to help you out.

Sometimes you need some piece of photos as footage to make an excellent TikTok video. It basically help you build up the emotions and the memory of the audience. However, many people only know one way to do it: by creating a slideshow on TikTok.

It only gives you more tasks actually. Moreover, it’ll need third-party tools as well. No worries, because you can get a comprehensive guide on how to add multiple pictures to TikTok video after recording. Here we go.

Things You Need to Prepare

Alright, so here’s the deal. To add some pics to your TikTok video without using the built-in slideshow feature, you’ll need a few things:

  1. The TikTok app on your phone or tablet
  2. The pictures you want to add saved on your device
  3. A video editing app or software to add the pictures to your video
  4. A device that can record video
  5. A good internet connection to upload your final product to TikTok

How To Add Pictures on TikTok Video Without Slideshow Easily (No App)

Before we go in there, be sure that you have prepared the existing pictures you want to add to your video and put them in a specific folder. Then, you can use a green screen to attach your images. And to know how to add pictures to TikTok green screen, you can follow the steps below.

  • Start over by opening the TikTok app on your mobile and log in to your active account.
  • Then, you’ll see the homepage, and hit the plus ‘+’ button at the bottom of the screen.
  • You can either record a new video or use the existing video from your gallery.
  • Once you have your video, tap on Effects.
Screenshot showing where to find the green screen filter on TikTok.
Source: BacklightBlog – add picture to tiktok video
  • Next, find the green screen with the down arrow icon, and tap on it
Screenshot showing how to use the green screen effect on TikTok with a photo background.
Source: BacklightBlog – how to stop tiktok from zooming in on photos reddit
  • Rotate the camera and then select the photo you are going to add.
  • Then, press the record button for a few seconds to have it.
  • Press the Effects icon one more time.
  • Tap on the stop icon to go back to the camera.
  • After that, record another new video again, and whenever you’re done just tap on the checkmark.
  • You can hit Adjust Clips to make some changes to your video.
how to make a TikTok video with pictures and text
Source: flme.imyfone – tiktok photo slideshow not working
  • Adjust the length of the pictures and the video, or you can also reorder your TikTok video as you wish, tap Save.
  • In the next step, you can make some editings such as adding effects, text, sounds, filters, or any stuff you think it’s necessary.
  • After you’re done, tap Next to proceed to the next step.
  • Finally, write a caption and add hashtags, then hit Post.

How To Add Pictures on TikTok Video Without Slideshow Using CapCut

CapCut is another fantastic app that allows you to add pictures to your TikTok videos without creating a slideshow. Here’s how:

  1. Download and install CapCut from your device’s app store (available for both Android and iOS).
  2. Open CapCut and import the video clip where you want to add pictures.
  3. Tap on “Media” at the bottom of the screen and select “Image.”
  4. Choose multiple pictures from your gallery that you want to insert into the video.
  5. Adjust the duration and position of each picture by dragging them on the timeline.
  6. Customize transitions or effects between each picture for a seamless integration.
  7. Preview your edited video to ensure it looks just the way you want.
  8. Export the video and save it to your device.
  9. Open TikTok, tap on the “+” button, and select the edited video from CapCut.
  10. Add any additional edits or effects within TikTok if desired, and post your final creation.

Tips To Make Your TikTok Video Looks Nicer

how to add pictures on tiktok video with slideshow
Source: BBC – how to add pictures on tiktok video with swipe

Additionally, you can actually add pictures from the TikTok Template located beneath the video. There are many images that are available to use if you’re interested.

And as previously mentioned, you are also able to add music or text to your video. But if you still don’t get it, just learn how to make a TikTok video with music and pictures through our previous article on our blog.

Adding music or some beautiful words will help you to increase the look of your video. It can add a little touch of aesthetic stuff. As the result, your video will be nicer to enjoy. Speaking of soundtrack, Eklipse has an excellent feature that will let you to add cool music background to your video just in a few clicks. Sign up today, and try all Eklipse features now!

Conclusion

So, that’s the simplest guide about how to add pictures on TikTok video without slideshow. It’s your turn now to do it yourself. Adding some pictures to the video can increase the engagement of your audience. However, you need to consider and prepare about other factors too that will help you improve your TikTok channel.

As TikTok is the world’s most popular short-form video app, and it’s only getting bigger. But creating TikTok videos can be time-consuming, especially if you’re used to creating horizontal videos for other platforms like YouTube or Twitch.

That’s where Eklipse comes in. Eklipse is a powerful tool that uses advanced AI to automatically convert horizontal videos to vertical videos in seconds. So, if you have a library of horizontal videos that you want to share on TikTok, Eklipse can help you save a ton of time and effort.

Sign up for a free trial of Eklipse today and start converting your horizontal videos to vertical videos for TikTok automatically with our advanced AI.

5 Best Live Streaming Software for Mac Users

0
best streaming software for mag
Source: Digital Trends

Considering live streaming from your Mac? Picking the right software is crucial for a smooth and successful broadcast. Luckily, there are many great options to choose from, both downloadable applications and web-based solutions. 

Let’s dive into some of the best live-streaming software picks specifically designed for Mac users.

How To Choose The Best Live Streaming Software for Mac

how to choose the best live streaming software on mac
Image credits: 9to5mac.com

When starting with streaming software, it can be difficult to determine which one is the best fit for you. Our recommendation is to consider three main factors when making your decision. These include the price, the specific features you need, and compatibility with your equipment.

Start by assessing your budget and eliminating options that are too expensive.

Then, consider the types of video sources, effects, and filters that you need support for and eliminate options that do not include those features.

Finally, ensure that the software is compatible with your Mac, camera, audio mixer, and any other hardware you use.

Best Live Streaming Software Option for Mac

There are so many live-streaming software options for Mac on the internet. In this post, we listed down 5 of the best that you can consider.

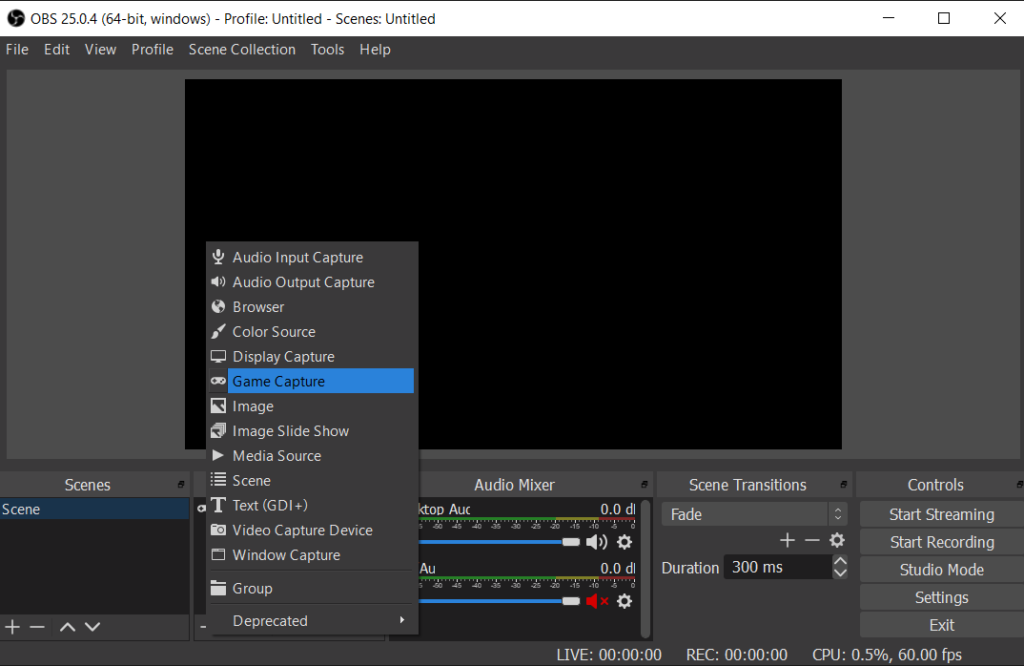
1. OBS Studio – The Best Live Streaming Software for Mac Users

Best Live Streaming Software for Mac Users
Source: It’s FOSS News

Thinking about jumping into the world of live streaming? If you’re a gamer or creative using Windows or Linux, then OBS Studio is a fantastic option for you. 

This free and open-source software is popular for a reason – it’s packed with features to make streaming a breeze. 

Not only can you broadcast live in high quality, but you can also record your sessions and add creative effects to polish them up. 

Let’s see why OBS Studio is considered the go-to choice for many professional streamers.

Key Features:

  • Combine video sources like your webcam, screen capture, and images into a single scene for your stream or recording.
  • Scene switching and transitions
  • Audio mixing and filters
  • Offers tons of customization options
  • Powerful API

Pros:

  • Low CPU usage
  • Offers comprehensive tools
  • Supports every streaming platform
  • Available for all operating system
  • Open source code

Cons:

  • Doesn’t equipped with editing features
  • A bit challenging for beginners
  • Unable to link audio files as sources

Pricing: Free

Availability: Windows, macOS, Linux

2. Wirecast – Best for Professional Live Streaming

Source: Glints

Gamers, looking to up your streaming game? Wirecast might be the tool you need. It’s known for its user-friendly interface and offers a bunch of cool features.  

There are two versions to choose from: Studio and Pro. Studio caters to streamers who want a solid foundation with features like unlimited sources, audio and syncing tools, and even Twitter integration.

Now, if you’re aiming for that pro streamer look and feel, the Pro version goes above and beyond. It lets you record high-quality footage with ISO recording and even use virtual sets!

These fancy sets are perfect for streamers who take their content creation seriously and want to impress their audience.

Key Features:

  • Capture video and audio from cameras, microphones, webcams, IP cameras, and even your computer screen
  • Automated Production Tools
  • Stream seamlessly to multiple social media platforms like Facebook Live, Twitter, and YouTube Live, all at once
  • Chroma Key and Overlays
  • ISO Recording

Pros:

  • Unlimited input support
  • Layer-based compositing
  • Offers automation tools for professional production
  • Provides many editing tools

Cons:

  • Steeper learning curve for advanced features
  • Has a paid subscription model.
  • Requires a powerful computer for smooth operation.

Pricing:

  • Studio 7 version: $495.00
  • Pro 7 with version: $995.00

Availability: Windows, macOS

3. CamTwist Studio – Best for Multi-Camera Live Streaming on Mac

best live streaming software for mac free
Source: YouTube

CamTwist Studio is a powerful application for Mac that will transform your video calls and live streams. It acts as a virtual webcam, allowing you to combine multiple video sources, add special effects, and create professional-looking broadcasts. 

CamTwist Studio goes beyond simply switching between cameras. You can add text overlays, images, and even slideshows to your stream. 

It also supports Flash Media Live Encoder for high-quality streaming and integrates seamlessly with popular platforms like YouTube, Skype, and Zoom.

Key Features:

  • Multi-camera switching
  • Live editing
  • Apply filters and effects to enhance your visuals.
  • Virtual webcam output
  • Control and mix audio from different sources.
  • Customizable layouts

Pros:

  • Free basic version
  • Easy to use
  • Supports multiple video and audio sources.
  • Enhances live streams
  • Integrates seamlessly with major streaming and video conferencing services

Cons:

  • Limited features in the free version
  • The learning curve for advanced features
  • Not available for Windows users.

Pricing:

  • Basic: Free
  • Standard License: $39 
  • Developer License: $79

Availability: macOS

More on Eklipse Blog>>> 7 Best Twitch Chatbots Recommendation to Level Up Your Streams

4. Mimolive – Best Streaming Software for Mac Users

Source: MacUpdate

Calling all Mac streamers! If you’re looking for an easy-to-use app with tons of features, then Mimolive is definitely worth checking out. 

Mimolive lets you connect multiple devices and cameras to your Mac, giving you tons of flexibility for your streams.  

Mimolive’s interface is packed with tools to help you customize your stream exactly how you want it, from cropping the video and adjusting the frame rate to rotating and scaling it. 

Plus, you can connect directly to your favorite social media platforms like Twitch chat, Twitter, and Facebook Live, all without ever leaving the app.

Key Features:

  • Seamlessly switch between various video sources like webcams, capture cards, and screen recordings.
  • Live editing
  • Green screen support
  • Broadcast your live stream to multiple platforms like YouTube, Facebook Live, Twitch, and more, simultaneously.
  • ISO recording
  • NDI® workflow support

Pros:

  • Enables users to do direct streaming
  • Produce high-quality video
  • Easy to use
  • Offers excellent tools

Cons:

  • Mac only
  • Limited free version
  • While user-friendly, mastering advanced features might require some learning time.

Pricing: License for $89

Availability: macOS

5. Adobe Flash Media Live Encoder – Best for Real-Time Video Broadcasting

Source: Bleeping Computer

Looking to livestream like a pro?  Adobe Flash Media Live Encoder (FMLE) is a powerful tool that can help you achieve high-quality broadcasts.  

FMLE packs a ton of features into an easy-to-use interface, so even beginners can get started quickly.  

Whether you want to connect your microphone and camera or leverage FMLE’s built-in encoding, this software has you covered.

Key Features:

  • ABS adjusts video or audio quality based on your internet speed. It ensures smooth playback without buffering by automatically switching between different quality levels
  • You can adjust things like volume, bass, and surround sound to suit your preferences.
  • Multi-camera support lets you watch events from different angles. For example, in sports or concerts, you can switch between cameras for a better view.
  • Real-time analytics give instant data about how many people are watching, where they’re from, and what they like

Pros:

  • Free and cross-platform
  • Simultaneous broadcast
  • Easy to learn
  • Quick launch
  • This software is an official Adobe program that can deal with multiple streams simultaneously

Cons:

  • Limited source functionality
  • No game source capture
  • Requires Flash Player

Pricing: Free

Availability: Windows, macOS

Final Thoughts

These were some of the best live-streaming software for Mac users. Whether you like OBS Studio’s simplicity or Mimolive user interface, you can choose the one that best fits your needs and preferences. 

But if you’re looking for the best AI tool to create gameplay highlights, look no further than Eklipse. With its powerful advanced features, you can generate many viral social media clips to boost your engagement online. Try Eklipse for free here and watch your channel flourish!

How Much Are Bits on Twitch? Quick Guide to the Donation System

0
how much are bits on Twitch
Source: Gamepur

Twitch has become a top destination for streamers looking to make a fortune.

One of the reasons is that Twitch offers creators various ways to monetize their stream, and Bits is one of them.

Twitch Bits are a virtual currency that viewers can use to support their favorite streamers. They can be used to purchase emotes or to support streamers through donations.

This piece will delve into all aspects of monetizing on Twitch, specifically focusing on the value of Twitch bits. Let’s dive right in!

How Much Are Bits on Twitch?

How Much Are Bits on Twitch
Source: Press Start Australia

The value of one Twitch Bit is equivalent to one penny in US currency. Therefore, 100 Twitch Bits are equal to one dollar. To determine the dollar value of a bits donation, simply add a decimal point before the last two numbers of the bits amount. For example, 100 bits would equal $1.

For a more detailed price, you can look at the comparison table below:

BitsCost (In USD)
100$1.40
500$7.00
1,500$19.95
5,000$64.40
10,000$126.00
25,000$308.00

Maximize your Black Ops 6 rewards—Create highlights from your best gameplay with with Eklipse

Eklipse help streamer improve their social media presence with AI highlights that clip your Twitch / Kick streams automatically & converts them to TikTok / Reels / Shorts


What are Twitch Bits?

Bits are basically the virtual currency to support Twitch creators.

For comparison, you can think about Facebook stars. It is a virtual currency and the audience can award you bits through the cheering mechanic.

They can send you Twitch bits in thousands if they wish to. In addition, viewers can also add a particular animation to their cheering message.

Viewers send these bits to their favorite streamers when they find the gameplay or the commentary entertaining.

Bits basically translate to an important source of revenue for dedicated streamers on Twitch.

How to Enable Bits on Twitch?

how much is 1000 bits on twitch
Source: TopTwitchStreamers

You need to keep in mind that you can’t use all the monetization features on Twitch when you start out in the beginning. To fully utilize all the Twitch monetization features, you’ll need to become a Twitch Affiliate or partner. To do so, you need to meet the following requirements:

  • Stream for 25 hours in the last 30 days.
  • Stream for 12 days in the last 30 days.
  • Receive at least 75 viewers on your streams in the last 30 days.

When you meet the above requirements, Twitch will allow you to apply for the affiliate program. To become an affiliate partner at Twitch, you are required to meet some more requirements. Though completing those is much easier, especially considering the fact that by this point, you have developed a fan base. Those requirements are:

how to get bits on twitch
Source: Jump Street
  • Gain 50 followers.
  • Stream for 8 hours in the last 30 days.
  • Stream for 7 days in the last 30 days.
  • Get three viewers on average on your streams

After achieving these, you can finally qualify for the Twitch affiliate program. Once you are an affiliate, you can enable bits by doing this:

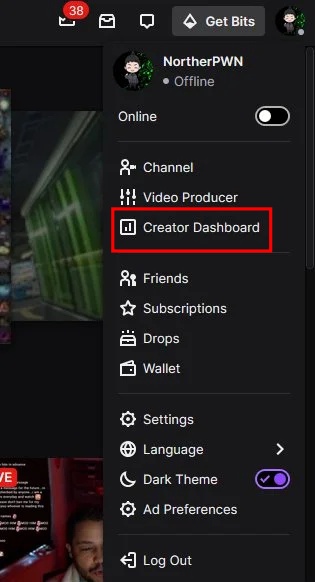
  1. First, click on your profile icon.
  2. Then, select the Creator Dashboard from the drop-down menu.
Source: StreamersPlaybook
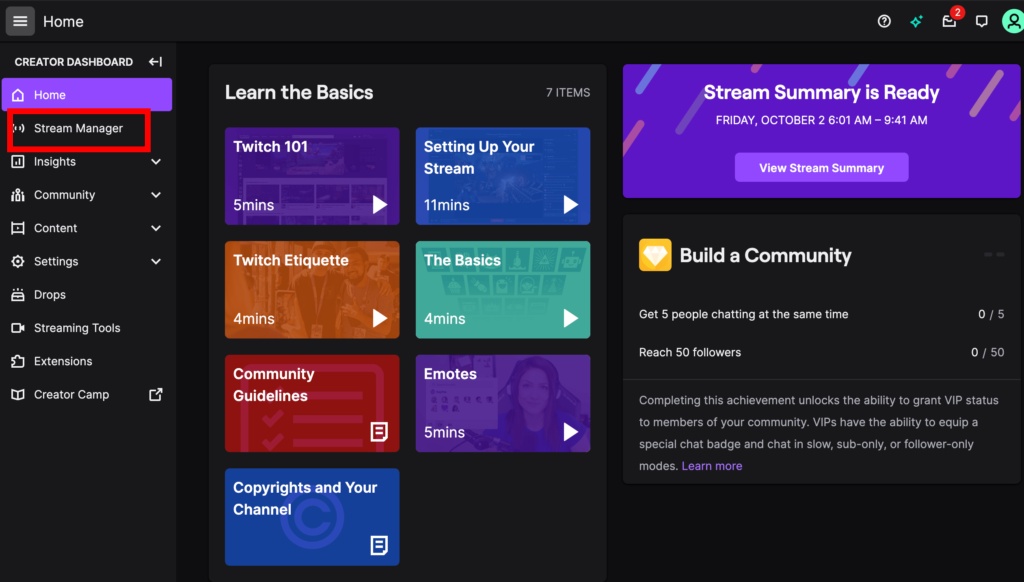
  1. Now click on affiliate or partner settings.
Source: Alphr
  1. Finally, you can now enable bits and cheering by toggling it.

How Do Bits Support Streamers?

This system supports streamers through donation-like systems. It means that by sending bits, you are supporting the Twitch streamers directly.

Though it works like a donation system, Twitch trying its best so bits can be engaging and will make the viewers feel rewarded for every donation.

So, when you are sending bits, you can choose Cheermotes and emotes will be shown on the chat.

Creators even get creative with the Bits donations with some doing a challenge, some allowing viewers to take control of something on the stream, and many more.

Sources said that creators are taking the donation fully. But, Twitch does take cuts from the initial purchase.

Conclusion

So that’s everything all you need to know about bits on Twitch. So, have you ever tried to donate your favorite streamers with this?
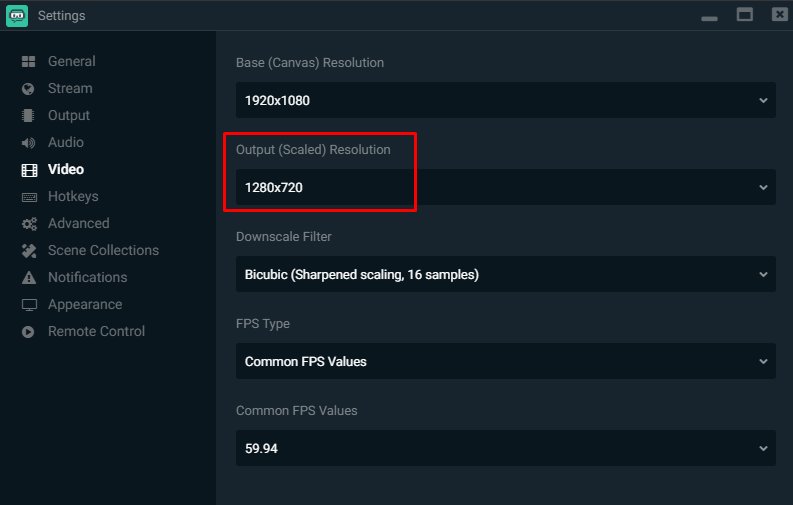
How to Live Streaming on YouTube: 3 Ways You Can Try

0
how to livestream on youtube featured image on Eklipse blog

When you thinking about broadcasting your game to the internet, YouTube can be platform of your choice.

One of the reasons is that YouTube has many options of monetization for a streamer, like the Super Chat, Super Stickers, Membership, and many more.

So, if you are looking to stream on YouTube and don’t know where to start, no worries we got you covered!

Here is the guide on how to live stream on YouTube.

3 Ways to Livestream on YouTube

YouTube allows you to live stream via 3 methods, first through a PC, second through the mobile app, and alternatively via a 3rd-party mobile app.

Streaming via YouTube mobile app requires you to have at least 50 subscribers first. So as an alternative, we got the third way so you can live stream to YouTube via your mobile even without a subscriber.

Read on for a more detailed guide

1. Livestream on YouTube via PC

youtube studio to start live stream on PC

To live stream via PC, you’ll need a broadcaster app.

There are several options available, like the OBS, Streamlabs, and many more.

But, for the basic, let’s go to the guide to live stream on using the OBS.

  1. Go to the YouTube site
  2. Click Create (On the top-right, the camcorder icon with “+” in the center)
  3. Choose Go live
    • You’ll be brought to YouTube studio
  4. Click stream icon (the first icon in the left)
  5. On the Stream Settings tab, you’ll see Stream key section, click the Copy button

Now you are done on YouTube studio, time to go to your broadcaster app. We assume you already setup your OBS screen setup.

But, if you don’t know how to set up your OBS for live stream, you can check our tutorial about that by clicking this link >> The Best OBS Settings for Low-end PC to Maximize Your Content

how to update obs studio
  1. Open OBS, click File, then Settings
  2. Choose Stream menu on your left side
  3. Choose YouTube – RTMPS on the service dropdown menu
  4. . Click Use Stream Key (advanced)
  5. Paste your stream key under the Server menu
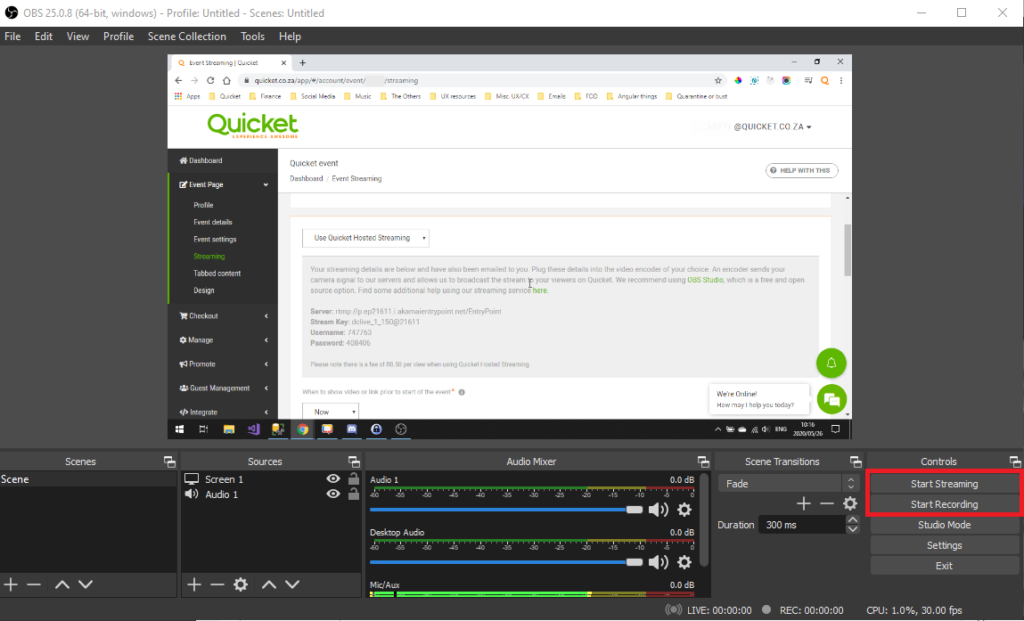
  6. Save your settings, click Start Streaming on the bottom-right of the interface

All done, now your live stream on YouTube is up! Time to show your talent and the best gameplay you’ve had!


Maximize your Black Ops 6 rewards—Create highlights from your best gameplay with with Eklipse

Eklipse help streamer improve their social media presence with AI highlights that clip your Twitch / Kick streams automatically & converts them to TikTok / Reels / Shorts


2. Live stream on YouTube via Mobile App

YouTube mobile app for live stream

To start a live stream on YouTube mobile app, you need to have 50 subscribers.

Can you livestream on YouTube via mobile without 50 subscribers? The answer is yes you can, but you’ll need a 3rd party app like Streamlabs.

We cover that on the next part of this guide, so make sure you keep reading on.

For now, here is the tutorial so live stream via YouTube mobile app:

  1. Open YouTube app on your phone
  2. Tap the (+) button, choose Go live
  3. Customize your stream
    • Add title and description
    • You can schedule your live stream here
    • If you are a game live streamer and want to stream your screen, tap Create channel then Share screen 
  4. When you are done, tap Go live

More on Eklipse Blog >> How to Edit YouTube Videos Using Eklipse

3. Livestream to YouTube on Mobile Without 50 Subscribers with 3rd Party App

An alternative way to stream on mobile is via 3rd party app like Streamlabs mobile app.

Using the 3rd party app allows you to pass through the “50 subscribers” rule. So you can start live stream on YouTube even though you has zero-subscriber.

This is the step-by-step tutorial on how to stream with 3rd party app:

  1. Open Streamlabs app, connect your YouTube account
  2. Choose what you plan on using Streamlabs for. If you want to stream your gameplay to YouTube, choose Stream your games
  3. Set up your Scenes layout
    • You can customize the position of the chat box, alert, and more
  4. Tap Go live, choose YouTube
  5. Write your Livestream title, and done now you are Livestream on YouTube

More on Eklipse Blog >> 20 Best YouTube Shorts Ideas in 2023 You Must Try

Can You Monetize YouTube Livestream?

Super chat is one of the way to monetize YouTube live stream
Image credit: YouTube Official

When you consistently live stream, create content, and start to attract viewers/subscribers, you’ll be allowed to monetize your YouTube channel.

The basic monetization of YouTube live stream is through ads.

However, YouTube has been actively adding a new way to monetize a live stream like the Super Chat and Super Stickers and membership option.

How to Monetize your YouTube Livestream

Requirement to monetize your YouTube livestream
Image credit: YouTube Official

To start monetizing your YouTube live stream, you’ll need to fulfill the requirements so you can be part of the YouTube Partner Program.

The requirements are as follows

  • 1000 Subscribers
  • 4000 Watch Hours

When you reach that requirement, then you’ll be allowed to monetize your YouTube live stream through the ads, Super Chat, Super Stickers, Membership, and more.

More on Eklipse Blog >> How to Multistream to Twitch, YouTube, and Facebook

Conclusion

It’s a wrap! That’s all you need to know about how to live stream on YouTube, plus the monetization opportunity you’ll have after you reach certain points on your channel. One quick note, in order to produce high-quality streams, make sure you pick the right streaming software that suits your needs. You can find out the best software for YouTube through this article: Best 10 Streaming Software for YouTube in 2023.

After knowing how to do live stream on the platform, you would need to know how to record live stream on YouTube. Let us guide you by giving this article a read: How To Record Live Streaming Video on YouTube for Multiple Devices.

So what are you waiting for!? Start your live stream on YouTube now, and create your content with Eklipse!


Maximize your Black Ops 6 rewards—Create highlights from your best gameplay with with Eklipse

Eklipse help streamer improve their social media presence with AI highlights that clip your Twitch / Kick streams automatically & converts them to TikTok / Reels / Shorts


How to Fix Twitch ‘Could Not Access the Specified Channel or Stream Key’ Error? 4 Easy Ways

0
twitch stream key not working
Source: PC Streak

If you regularly stream on Twitch, you may sometimes get stuck on the “could not access the specific channel or stream key” error, right? Well, this issue is basically common on this platform. It often happens due to the connectivity hiccup. But how to fix the Twitch stream key not working then?

Fret not as there are still a few things you can check and do to get back on track and start streaming. You don’t need to go anywhere looking for the answer as we will give you some hints to get rid of the error. Let’s get into the points.

How To Fix Stream Key Twitch Not Working

We’ve got you covered with a variety of tried and true methods to solve this pesky Twitch streaming key issue. Give them a whirl and find the one that works best for you. Here are your options.

1. Reset The Stream Key

Before thinking about other methods to fix the error, the first thing you have to do is to reset the stream key. Additionally, you’ll need to reset the stream key on both Twitch and your preferred streaming software (OBS or Streamlabs). To do so, follow the steps below

  1. Head over to the Twitch website and log in to your account.
  2. Navigate to the avatar icon and select Creator Dashboard under the drop-down menu.
How To Fix Stream Key Twitch Not Working
Source: Streamlabs – how to reset stream key twitch
  1. Then, hit Settings.
  2. After that, click Reset next to the stream key bar.
  how to use twitch stream key
Source: Upcomer – could not access the specified channel or stream key please double-check your stream key
  1. Now that the new stream key appear, you can use it right away.
  2. Copy the new stream key and paste it into the streaming software.

2. Try Different Browser

One of the most possible culprits of stream key issues on Twitch is the unstable connection. However, browser cache, cookies, or bugs can make your error as well. So, the best thing you can do to escape this problem is to try other different browsers.

More on Eklipse Blog>>> 10 Things to Do When Your Twitch VODs Are Not Showing Up

3. Set Up The 2FA (Two-Factor Authentication)

If the solutions above still didn’t work, you can try to set up the 2FA. Activating the 2FA will grant you an extra layer of security which is important to protect your account from hackers. Here’s how to set it up.

  1. Go to Twitch and log in to your account.
  2. Click the profile icon and select Settings under the drop-down menu.
Twitch stream key not working reddit
Source: HowToTwitch – Could not access the specified channel or stream key OBS
  1. Then, hit the Security & Privacy section.
  2. Scroll a bit to find the Two- factor authentication option and enable it.
Enable the 2FA to give you double protection | Source: HowToTwitch
  1. Submit your phone number and click continue.
  2. After that, enter the code you received from SMS.
  3. Once done, restart your PC and log in again to your account.

4. Connect Streaming Software Directly to Twitch

Could not access the specified channel or stream key YouTube
Source: Yoguidrogui – Could not access the specified channel or stream key Streamlabs

Other than enabling 2FA and other methods above, you can fix the stream key issue by linking the streaming software to your Twitch account. However, it’s worth highlighting that not all streaming software comes with this option. Fortunately, OBS and Streamlabs have built-in options to get it done.

How To Connect OBS to Twitch

  1. Launch the OBS app.
  2. Navigate to File > Settings.
  3. Select Streaming.
  4. Then, hit Connect account.
  5. Lastly, log into your account, and enter the confirmation code from your email.

How To Connect Streamlabs to Twitch

  1. First, open Streamlabs.
  2. Hop on to Settings.
  3. Select Stream.
  4. Hit Connect next to Twitch on the stream destination page.
  5. Afterward, sign in to your account and enter the confirmation code.

5. Check The Firewall Settings to Fix The Twitch Stream Key Not Working

The next thing you’ll need to do is to check the firewall settings. This often becomes another culprit of the stream key issue. To check if this is the case, you can follow these steps.

  1. To begin with, type Windows Firewall into your taskbar.
  2. Then, select “Allow an app or feature through the Windows Defender Firewall link”.
  3. Hit Change Settings.
  4. Next up, click the “Allow another app” button.
  5. Now, find your streaming software .exe
  6. Finally, hit Add.

Conclusion

So that’s all the methods you can try to resolve the Twitch stream key not working issue. If sometimes you’re facing the same issue, just go back to this post, try one of the solutions, and see if it works for you. We hope that this article will be helpful to increase your streaming experience.

Turn your Twitch streams into captivating highlights effortlessly with Eklipse! Say goodbye to the complexities of manual editing and tedious clip creation. Eklipse, our cutting-edge AI-powered tool, takes the hassle out of content creation, allowing you to focus on what matters – your content. Seamlessly transform your best moments into TikTok-ready highlights with just a few clicks.

Don’t let technical glitches hold you back – register and subscribe to Eklipse today. Elevate your streaming experience, and let your highlights shine. Your audience is waiting – make every stream count!


Maximize your Black Ops 6 rewards—Create highlights from your best gameplay with with Eklipse

Eklipse help streamer improve their social media presence with AI highlights that clip your Twitch / Kick streams automatically & converts them to TikTok / Reels / Shorts


How To Make Video Montage: An Eklipse Guide

0
How To Make A Montage

If you are a beginner in streaming universe and want to figure out how to make video montage, you are in the right place now. Basically, a photo and video montage is a series of images or videos that are edited to create a sequence. In another word, it’s more like a photo or video compilation in one package.

However, in a montage, the videos or photos are not randomly arranged. It should have a nice sequence to add more value to the video. Through a montage, you can connect better with your audiences.

The good news is that Eklipse has various tools that can assist you to create cool montage videos. Therefore, we are going to give you a clear guide on how to make a video montage with Eklipse through this article.

You don’t have to be an expert editor to create amazing montages because our AI can generate some cool clips automatically. You can get anything you want with just a few clicks. So, without further ado, let’s begin the tutorial.

How to Make a Gaming Montage Using Eklipse

Eklipse has an awesome AI showcase maker that will help you to create excellent montages, including gaming montages.

You can create your own gaming montage by following these instruction below:

Step 1. Register and log in with your account

Start off by clicking the following button to direct you to Eklipse’s official website. If you already have an account, just hit the Sign In button at the top-right corner of the page. But if you don’t, register yourself with your email, Twitch, or Facebook account, then set the password.

Step 2. Link your account with Eklipse

After logging in, you can start to link your Twitch, YouTube, and or Facebook account with Eklipse. You can do it by clicking the cable icon at the top right side of the screen, and toggling on to any option you like. If you have done this, now you can start learning how to make a video montage free in Eklipse.

How To Make A Montage

Step 3. Select your video

Now, it’s time to select the video from your platforms. The A.I will generate your videos automatically. You can see them through the Streams tab under the Video Library, and click the All Streams tab. Sort the video by the game, platforms, or the time to find the video easier.

 how to make a Fortnite montage

Step 4. Capture the best highlight

Next up, you can start to clip the best streaming moments. Additionally, Eklipse provides you with automatic services to make montage videos. Without doing anything, you can find some ready stocks of shot video in the Short Clips tab. You’ll find several compilation video options there.

Each video will be around 3 minutes to 10 minutes in length. Now, you already knew how to make a Fortnite montage or other games using Eklipse, didn’t you?

how to make a montage of photos

Step 5. Trim your video
Eklipse offered you the newest feature called Trim-clip. As how it’s called, it allows you to trim or clip your video duration manually. Just click the Trim-clip button underneath the video then adjust the bar to select the duration lengths as you wish. Once you’re sure about it, just hit Compile button at the right bottom of the page. Wait until your trim request has proceeded.

how to make a montage on pc

Step 6. Convert to TikTok/Reels

Wondering how to make a video montage on TikTok using our tool? We got you! All you need to do is hit the Convert to TikTok/Reels button underneath the video. Then, select a specific template, such as Blur, Split, Full Screen, and two other templates.

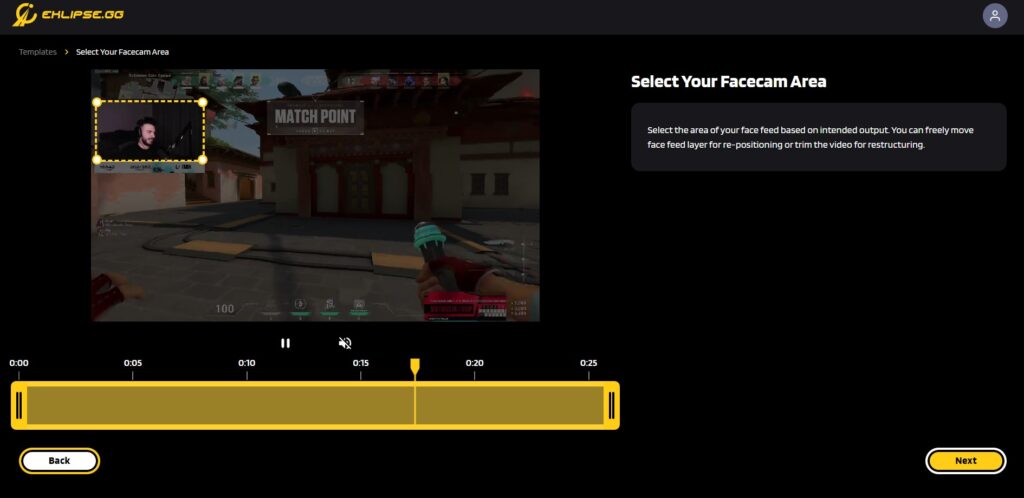
Then, you can adjust the duration bar to crop the length of your video and adjust the gameplay area you’d like to select. After that, click Next.

Step 7.  How to make a video montage with music with Eklipse

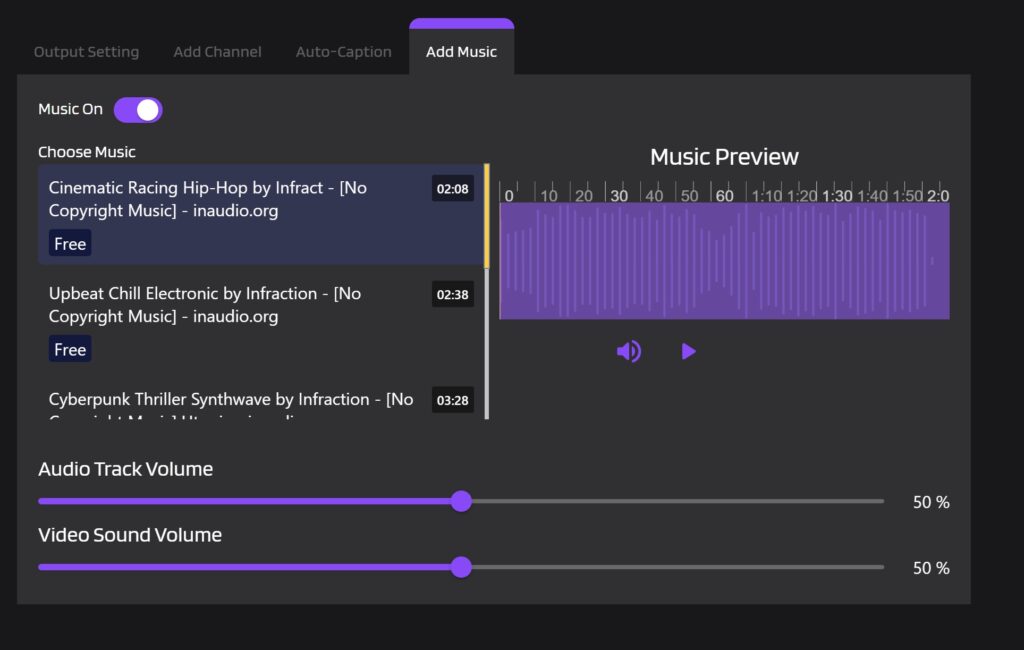
Make your montage cooler by adding a slappin’ soundtrack. Eklipse’s new feature now lets you do that. After selecting the gameplay area and the video length, now you’ll be brought to the next editing studio. You can select the best music on the box under the Add Music part.

You have several music options there. Click anything you like, set the music length you’re going to use, and then hit the Select Music button. Next, you can adjust the part of your music background to fit with your video. Play around with the audio track and the video volume as well. Then, hit Confirm button.

Step 8. Find your edited clip

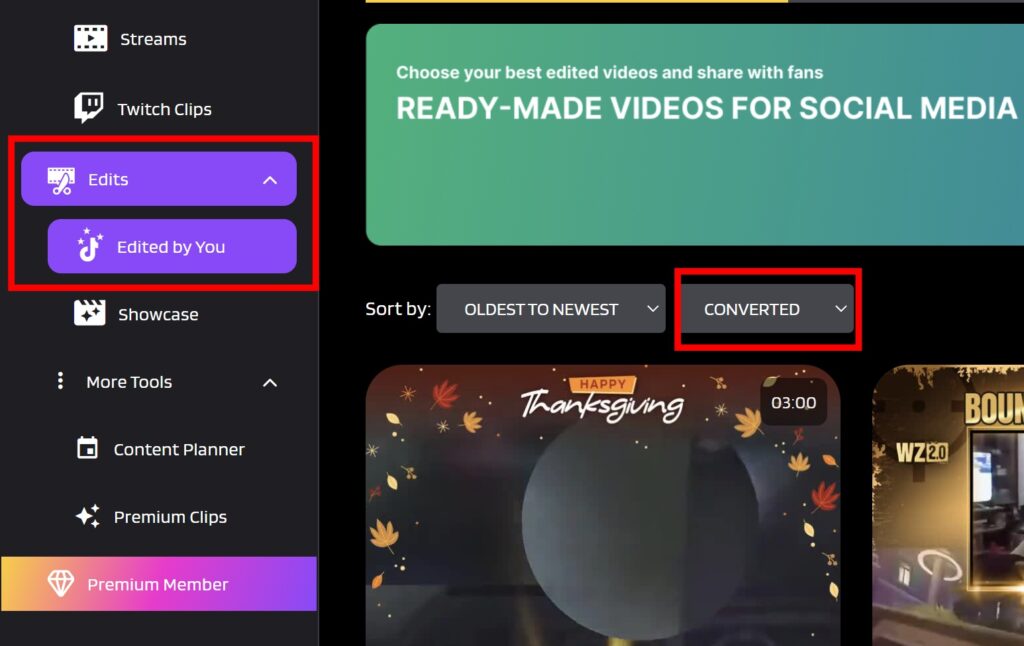
If you think you’re done with your project, now you can see the edited clips on the Edited Clips tab on the left-side menu. To be able to watch the converted ones, click the Convert to TikTok/Reels option. Meanwhile, for the trimmed video, check them in the Trim-clip option.

Step 9. Share or save your clips

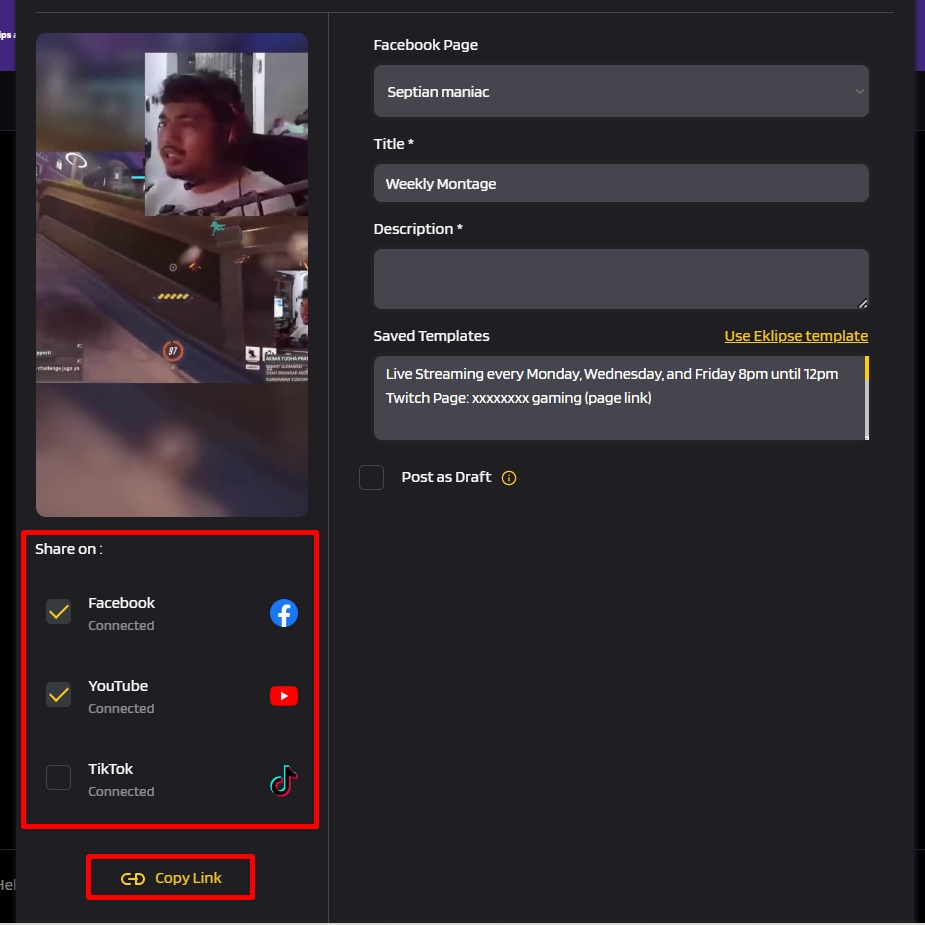
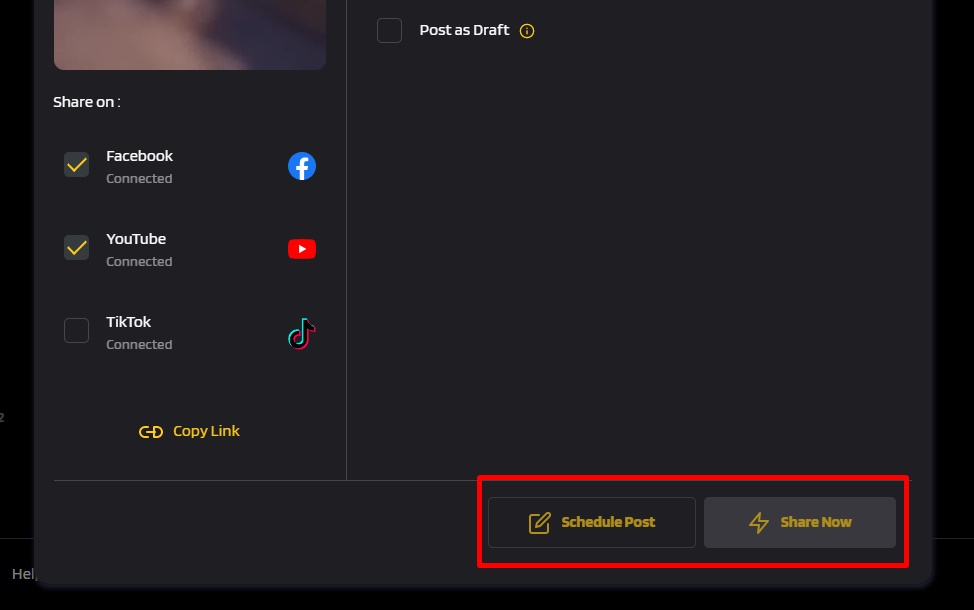
The last step in making exciting montages is to share or save them. Click on your edited clip, click on the Share button under the video, and then check the small square beside the platform options you are going to share. It’s either YouTube, Facebook, or TikTok. Give it a title and write the description, then hit Share Now button.

Other than that, if you want to save it to your device, you can click on the Download button, and your montage will be automatically saved to your device.

how to make a video montage free

Conclusion

That’s all about how to make a montage using Eklipse. In addition to its user-friendly interface and the ease of use, all of its features are free of charge! There’s no such thing as a planning mechanism which will require you to pay eventually. Now, you can grow your channel by sharing the montages you have created. Good luck in your streaming career!

How To Start Live Streaming On Instagram: 1 Minute Beginner Guide

0
how to start live streaming on instagram
Source: Dusty Porter YouTube

Going live on Instagram is one of the best strategies to grow your business or even your career as an influencer. However, if you are new to this platform, you may not know yet how to start live streaming on Instagram.

Luckily, it’s quite easy to do, especially if you follow our guide here. Alright, at this very minute, we’re gonna learn together how to do live streaming on Instagram.

Unlock the Power of Short-Form Magic! Eklipse Transforms Long Videos into Viral Bites.

How To Start Live Streaming on Instagram

instagram live producer

Before going to the tutorial about going live on Instagram, it’s a good idea to adjust your Instagram Live settings first. It’s essential to make sure that you produce nice output for your viewers so you can make them stay longer on your streaming session. Here are the steps.

  1. First thing first, open the Instagram Live mode view.
  2. Navigate to the gear icon on the upper side to access Camera Settings.
  3. After that, tap on the Live option.
  4. You can select if you want to hide your Live from specific people and set whether your Live will be saved to archive after finished.
  5. Other than that, you can also set which camera you want to start with, and more.
  6. Once done setting up your camera, then hit Done.
  7. In case you want to filter any offensive comments, go to Instagram Settings.
How To Start Live Streaming on Instagram
  1. Then, scroll down until you find the Privacy option.
how to do live streaming on Instagram
  1. Hit the Hidden Words > toggle the Hide Comments button to the On position.
how to go Instagram live on iPhone
  1. Alternatively, you are also able to use the Advanced comment filtering option.
  1. If you have set all of that stuff, now you’re ready to broadcast!

How To Go Live On Instagram On the Phone

It’s time to stream yourself on Instagram! Are you excited? Well, if so, let’s just take a look at the tutorial below, and follow every step-by-step. Here we go!

  1. To begin with, make sure you have installed the Instagram app on your device.
  2. Then, launch the app and log in to your account.
  3. Hop on to the plus ‘+’ icon in the upper-side corner.
How To Go Live On Instagram On the Phone
Tap on the plus icon to open the Live mode | Source: Business Insider
  1. Alternatively, swipe right to open the New Post page.
  2. Now on the New Post page, swipe all the way to the left in the menu bar at the bottom corner of the page to access Live.
swipe left until your reach the Live option | Source: Business Insider
  1. Next up, a camera screen will show up.
  2. Hit the four lines icon on the left side to add the video title.
  3. In case you want to make your video for fundraising, tap on the ‘circle with a heart in it’ icon.
hit the four lines icon to write a title | Source: Business Insider
  1. Now when you’re ready to go live, tap the circle icon at the bottom corner of the screen.
Tap the circle icon to start streaming | Source: Business Insider
  1. To end the live session, simply tap on the X icon on the upper-right side.
The X icon to stop the Live session | Source: Business Insider
  1. Finally, hit End Now option from the pop-up message.

After ended the Live session, Instagram will allow you to share the video for the next 24 hours on Instagram Stories. Otherwise, you can also choose to Delete it.

In addition, Instagram will give a notification to all your followers when you’re Live and it also shows how many people watched your video.

How To Start Instagram Live Video With A Guest

Instagram allows you to conduct Live streaming along with other users as well, or let’s say a guest. The method is pretty much the same as the previous one but with some more steps to do. Here’s how.

  1. Log in to your Instagram account.
  2. Navigate to the plus ‘+’ icon or simply swipe right to access the Live mode.
How To Start Instagram Live Video With A Guest
Tap on the plus icon to access the Live mode | Source: Business Insider
  1. Swipe right all the way until you reach the Live screen.
swipe left until your reach the Live option | Source: Business Insider
  1. When you saw the camera screen, tap on the four lines icon to write a title.
  2. Optionally, hit the ‘circle with a heart in it’ icon to make your video a fundraiser.
  3. Then, hit the circle icon to start going live.
  4. Once you’re live, hit the video camera icon at the bottom side of the screen.
Navigate to the video camera icon to invite other user | Source: Business Insider
  1. Type any username of someone you want to go live with.
  2. After that, tick the circle button next to their and tap Send Request.
Source: Business Insider
  1. Alternatively, you can also find someone to broadcast together in the list of viewers.
  2. After inviting them to join your live, their video will appear alongside your video.
  3. In case you want to remove a friend from your Instagram Live, simply tap X at the top-right corner of their screen.
Doc. Kumparan

How To Request To Join Someone Else’s Live

Do you want to join someone’s Live on Instagram? That’s definitely doable even when you aren’t being invited first. You can simply send a request to join their live. Check the tutorial below to help you go live with your friend.

  1. Starting off by opening another user’s live session.
  2. Then, tap Request to join.
  3. Hit the Send request option to request to be in their Instagram live.
  4. There will be a notification for you to let you know if your request has been accepted or denied.

BONUS: Grow Your Instagram with Eklipse!

Instagram Reels are the hottest trend on the platform, and for good reason. They’re short, engaging, and perfect for showcasing your creativity and personality. But with so much competition, it can be tough to get your Reels noticed.

That’s where Eklipse comes in. Eklipse is an AI-powered tool that can help you automatically create high-quality Reels from your Twitch streams. No more spending hours editing and piecing together clips! Eklipse does the hard work for you, so you can focus on what you do best: being awesome on camera.

Here are some tips to use Eklipse to grow your Instagram Reels:

  • Repurpose your Twitch content: Don’t let your Twitch streams go to waste! Eklipse can turn your best moments into Reels that will captivate your Instagram audience.
  • Use trending audio and hashtags: Keep your Reels relevant by using popular audio and hashtags. Eklipse can even suggest trending hashtags for you.
  • Get creative with captions: Write engaging captions that tell a story and encourage viewers to interact.
  • Post consistently: The more you post, the more likely you are to be seen by new people. Aim to post at least one Reel per day.
  • Engage with your audience: Respond to comments and messages, and participate in Reels challenges.

Bonus tip: Sign up for Eklipse Pro and get access to even more features, like premium templates, auto-captions, and the ability to schedule your Reels in advance.

With Eklipse and these tips, you’ll be on your way to Instagram Reels stardom in no time!

Ready to take your Instagram Reels to the next level? Sign up for Eklipse today for free!


Maximize your Black Ops 6 rewards—Create highlights from your best gameplay with with Eklipse

Eklipse help streamer improve their social media presence with AI highlights that clip your Twitch / Kick streams automatically & converts them to TikTok / Reels / Shorts


Conclusion

There you have it, how to start live streaming on Instagram. Isn’t it easy? Some quick steps to make your live session attractive are to make sure you are communicative enough with your audience, engage with them, and bring nice, informative, or entertaining content.

In case you want to do Instagram live streaming on PC, you can learn from our previous article: How To Stream Computer To Instagram With OBS, and Do Facebook and Instagram Live Simultaneously if you wish to stream your Facebook and Instagram at the same time.

Hopefully, you’ll find this article useful to help you grow on Instagram and develop your business. Enjoy the Live!

How to Avoid Copyright on YouTube

0
Source: Medium

Copyright laws on YouTube prohibit users from uploading content that infringes on the copyright of others. This includes uploading videos that use copyrighted music, TV shows, movies, and other forms of media without permission. It’s important to avoid copyright infringement on YouTube as it can result in the removal of your video, legal action, and even termination of your account.

Additionally, using copyrighted material can also limit the potential reach and monetization of your content. Therefore, it’s important to only use content that you have the rights to use or to obtain permission from the copyright holder before uploading to YouTube.

So, how to avoid copyright on YouTube? I will explain that to you today.

While copyright laws on YouTube might appear complicated on the surface, they are really straightforward. You need to make sure that the content you use comes under fair use. As for music, you can use royalty-free tracks on your channel. Keep reading the blog to learn more about DMCA-free background music.

How Copyright Works on YouTube?

how to edit video to avoid copyright
Source:Tubefilter

A copyright claim on YouTube is when the owner of a copyrighted work, such as a song, movie, or TV show, informs YouTube that a user has uploaded content that infringes on their copyright. When a copyright claim is filed, YouTube will review the content in question and determine whether or not it violates the company’s copyright policies.

If YouTube determines that the content does infringe on the copyright, it may take a number of actions such as disabling the audio on the video, blocking the video from being viewed in certain countries, or removing the video entirely. Additionally, if you repeatedly upload content that infringes on copyright, your account may be terminated.

Basically, copyright claims are like a big “hands off” sign for other people’s creative work. Like, imagine you’re a musician, and you don’t want people using your songs without asking first. That’s where copyright claims come in – they give you control over how your stuff is being used on YouTube. And let’s be real, with so many videos being uploaded every day, it can be tough to keep track of everything.

More on Eklipse Blog >> Is Video Game Music Copyrighted – 4 Things Must-Know

Checklist to Avoid Content ID Claims on YouTube

how to get rid of copyright claim on youtube
Source:LegalZoom

Now that you know what a copyright claim on YouTube is, it’s important to learn how to avoid how to get rid of copyright claim on YouTube . This guide will provide you with different strategies and tactics you can use to ensure that your videos don’t infringe on any copyrighted material.

Keep it short

There’s no hard and fast rule about how long you can use copyrighted material in your videos. But let me tell you, the shorter the better. Like, if you can make it just a couple seconds, even better. But if you gotta use like 30 seconds, that’s cool too, just as long as you follow the tips in this guide. That way, you’ll keep yourself out of hot water.

Leave comments in the copyrighted work

Many YouTubers have a tendency to use copyrighted videos or audio without really doing anything with them. A common example is when a YouTuber is having a conversation or an argument on camera and they include a clip from a movie or another video. To avoid getting a copyright strike, the YouTuber should engage with the clip and make it their own.

Credit the artist correctly

When you use someone else’s music in your video, it’s important to give credit where credit is due. Even if you have permission to use a song, you can still get a copyright claim if you don’t properly attribute the music. So make sure you’re doing it right. It’s usually a simple process, like adding the credit in the video description.

Modify the original content

To avoid copyright claims on YouTube, you can modify the content in your video, such as adding your own commentary or remixing a copyrighted song to make it unique. This can make it less likely to be flagged for copyright infringement.

Avoid Copyright on YouTube When Using Footage

To avoid copyright on the footage you are using in your videos, you’ll need to alter the footage in some way. According to YouTube’s fair use guidelines, you need to add commentary to the footage you are using so they come under fair use. You can also edit the footage by removing any copyrighted tracks that might be in the original footage.

Modifying the original goes a long way. Add your own music to the footage or edit it in a way that it comes under fair use. For instance, if you are making a funny commentary-style video you can insert memes in the original footage to modify it. That will take care of the copyright issue.

Conclusion

So that’s how you can avoid copyright on YouTube. Bottom line, don’t steal content on YouTube or you could get in trouble. Make sure you’re using stuff you have permission to use, or find stuff that’s free to use. If you’re not sure, it’s better to play it safe and not use it. That way, you can keep making awesome videos without any worries.

On the other hand, you can try using Eklipse to edit video without worrying about copyright claim. We offer a bunch of customization and even manual edit for your convenience. Click the button below and see it for yourself!


Maximize your Black Ops 6 rewards—Create highlights from your best gameplay with with Eklipse

Eklipse help streamer improve their social media presence with AI highlights that clip your Twitch / Kick streams automatically & converts them to TikTok / Reels / Shorts