Call for all gamers! Are you ready to put your gaming skills to the test and win big? Look no further! The Eklipse Weekly Clip Challenge is here and it’s time to show off your best moves!
This event is the ultimate chance to prove your best moves and take home the ultimate prize. And trust us, you don’t want to miss out on this opportunity. So, are you ready to join the party and start raking in the rewards? Keep reading for all the juicy details!
About Eklipse Weekly Clip Challenge and How To Participate
The Weekly Clip Challenge is an event where you can show your stunning clip that you created with Eklipse every week to get a reward. Each week, we will pick one lucky winner that will receive a one-month premium plan, absolutely free!
Here’s what you need to do:
Edit your best gaming moment with the help of Eklipse templates.
Share your masterpiece on social media – Instagram, Twitter, TikTok, you name it!
That’s it! The applicant with the best clip will win. Additionally, the verdict of the judges is final and cannot be questioned or disputed. So why wait? Start creating your winning clip now!
Get ready for an exciting four-week challenge! Dive into the schedule below for all the details.
Challenge week 1: 1st-7th Feb
Challenge week 2: 8th-14th Feb
Challenge week 3: 15th-21st Feb
Challenge week 4: 22nd-28th Feb
Don’t miss out on this chance to take your video editing to the next level. Sign up now and let your creativity soar!
Conclusion
Well, folks, that’s a wrap for the Eklipse Weekly Clip Challenge! We hope you all are having a blast flexing your video editing muscles and showcasing your skills to the world.
It’s always a treat to see the amazing entries and the unique perspectives each of you brings to the table. Until next time, keep on creating and never stop improving your craft!
Stay tuned to our blog for more updates about Eklipse. In case you want to take part in this event, using the Fortnite TikTok theme or Warzone 2 template could be a good idea. Happy clipping!
Maximize your Black Ops 6 rewards—Create highlights from your best gameplay with with Eklipse
Eklipse help streamer improve their social media presence with AI highlights that clip your Twitch / Kick streams automatically & converts them to TikTok / Reels / Shorts
Have you ever created a nice and smooth video using iPhone, but turned out there are pesky background sounds and you wanted to remove them? No worries, you can get rid of them easily using iPhone’s in-built video editor. In addition, this guide will show you how to remove audio from iPhone video quickly.
No more ruining your precious memories with unwanted noise. With just two simple steps, you can enjoy peaceful, sound-free moments with iPhone’s user-friendly features. Keep reading for all the details!
How To Remove Audio From Video on iPhone Using Photos App
Apple’s native Photos App allows you to remove video sound conveniently. Here’s how to use this app.
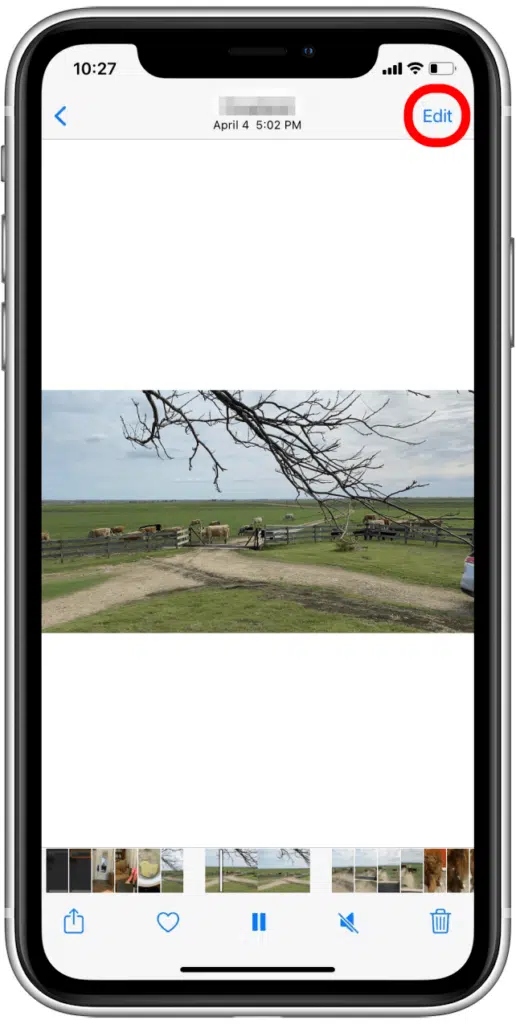
First, launch the Photos App on your iPhone.
Then, select the video you want to remove audio from.
Hit the Edit option in the upper-right corner.
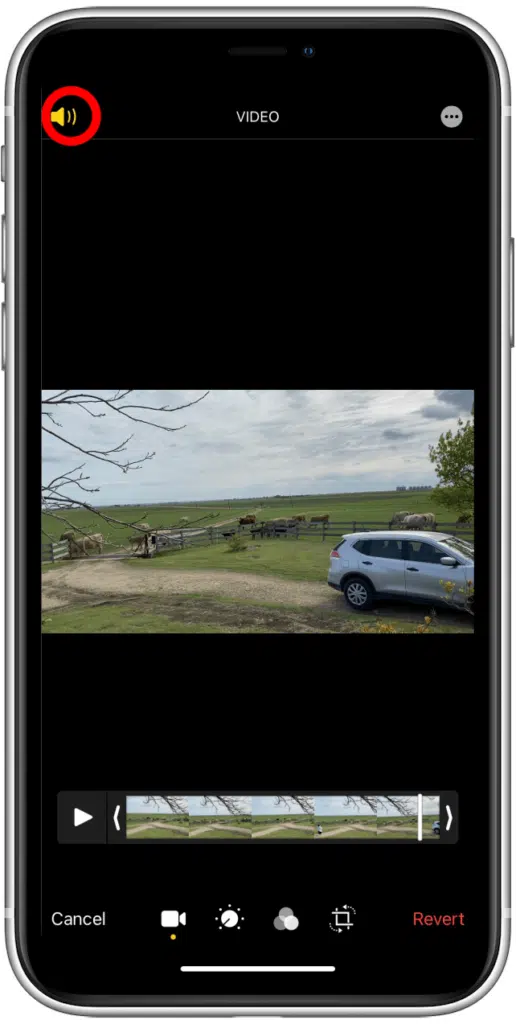
After that, tap the speaker icon in the upper-left corner.
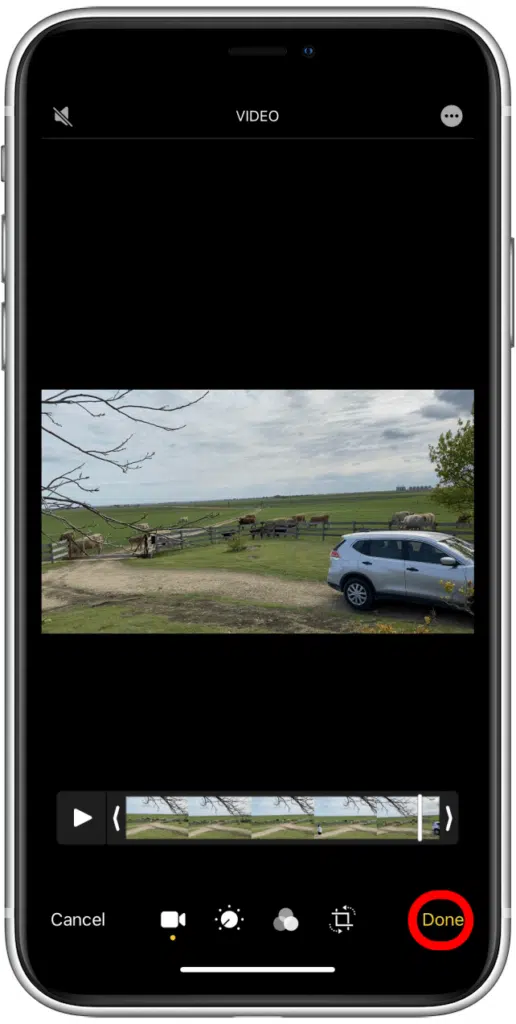
Finally, tap Done.
Bingo! Your video has now been muted.
How To Remove Sound From iPhone Video iMovie
Another way to mute sound on iPhone is by using iMovie. iMovie is basically a built-in video editor for Apple devices. It’s easy to use and provides pretty decent features for editing stuff. Let’s learn how to use it here.
Open the iMovie app and create a new movie project.
Select the video you want to edit.
Hold down the audio clip in the timeline until it pops off.
Then drag it up and drop it when you see a puff of smoke in the corner.
Tap on the audio clip in the timeline and the inspector will show up at the bottom.
After that hit Delete or if you don’t see it, tap the Actions button and it’s gone!
Conclusion
That’s all about how to remove audio from video on iPhone. With just a few taps and drags, you can now silence any unwanted background noise from your iPhone videos. Whether you’re using the built-in editor app or a third-party option, removing audio from your videos has never been easier.
So, go ahead and take your video editing skills to the next level, and create stunning and sound-free memories with your iPhone. Happy editing!
Maximize your Black Ops 6 rewards—Create highlights from your best gameplay with with Eklipse
Eklipse help streamer improve their social media presence with AI highlights that clip your Twitch / Kick streams automatically & converts them to TikTok / Reels / Shorts
Have you ever created tutorial videos on TikTok that turn out to be too long and tedious? That’s when you need a guide to learn how to speed up video on TikTok. Luckily, the app has a simple feature that allows you to adjust the speed of any video to your liking.
Whether you’re trying to save time or just want to add some extra pizzazz to your TikTok content, this simple trick is a game-changer. So let’s dive in and learn how to speed up or slow down your favorite TikTok videos in just a few simple steps!
Basically, speeding up video on TikTok can be done in two different methods: during recording and after recording. In this section, we’re gonna walk you through the step-by-step on how to speed up the video while recording. Let’s go!
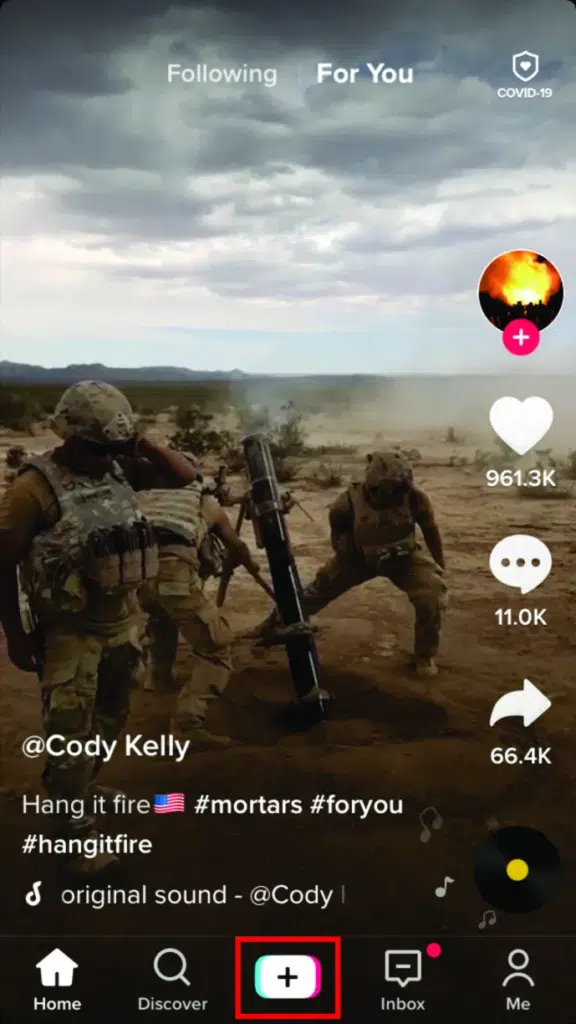
First, launch the TikTok app on your phone and log in to your account.
Tap the plus ‘+’ button to open the Video Recording screen.
Hit the plus button to open the video recording screen | Source: Alphr
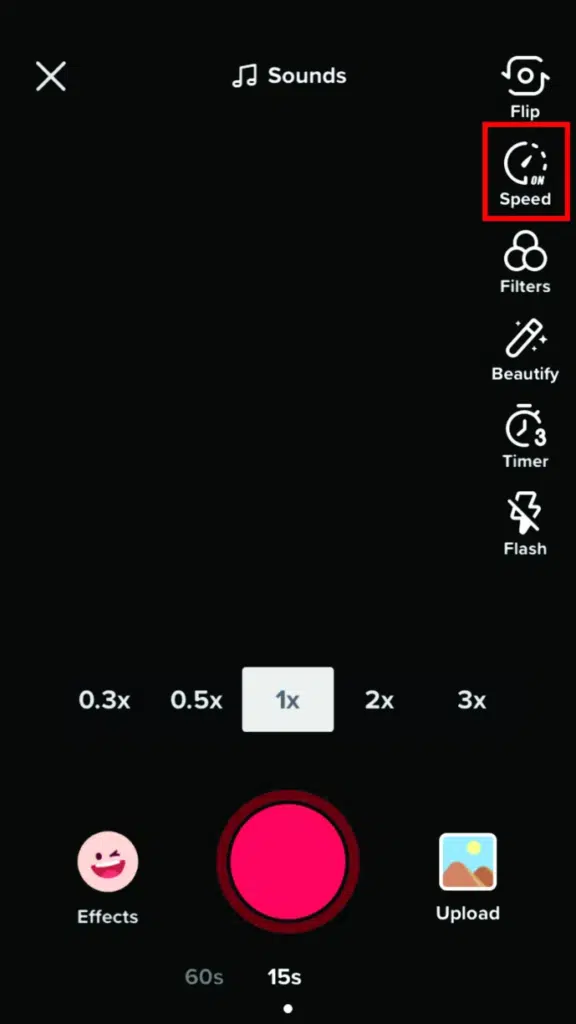
Hit the Speed icon in the right-side options.
Select the Speed icon to speed up the video | Source: Alphr
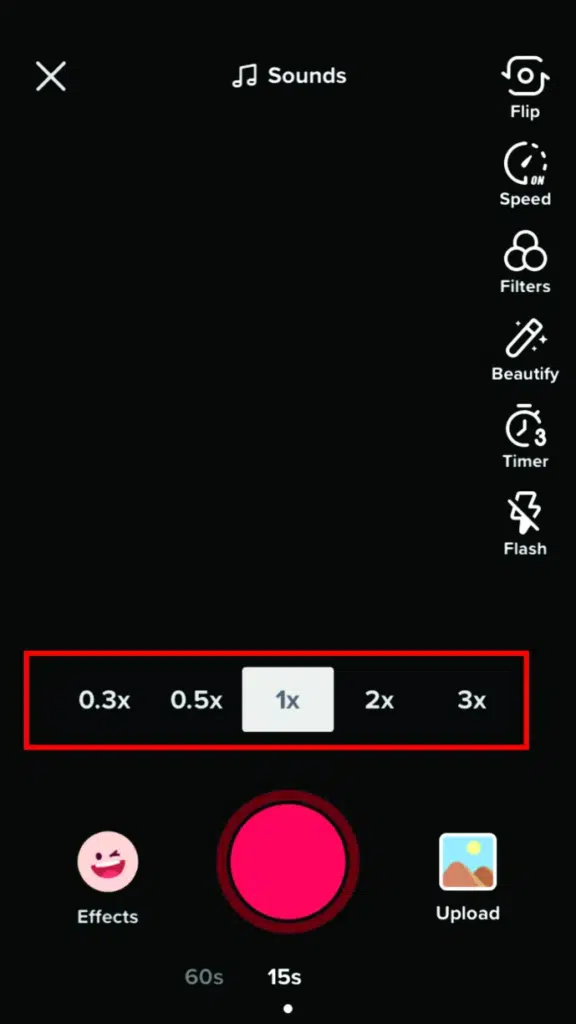
Then, select the desired speed you want to record.
Pick the desired speed | Source: Alphr
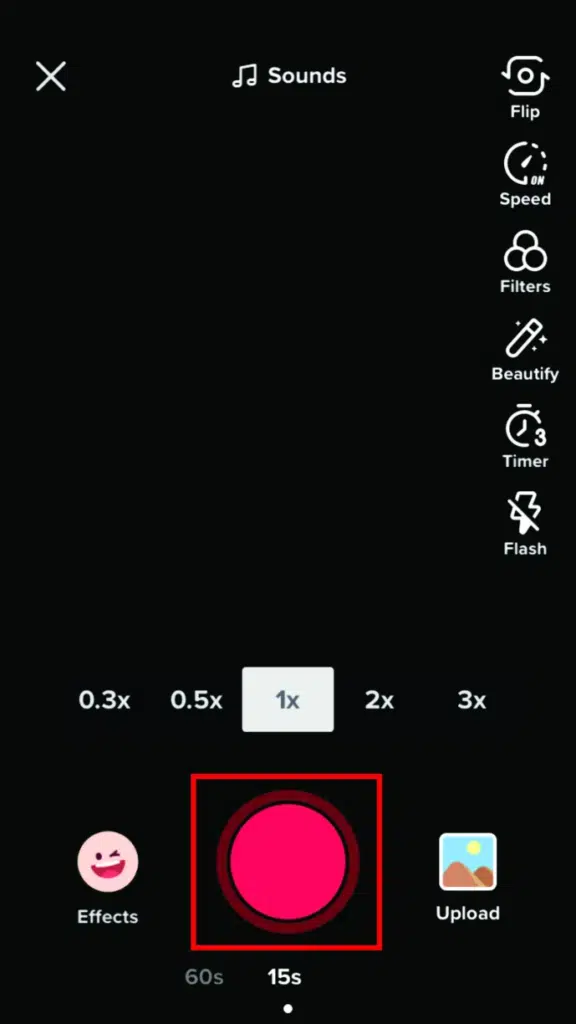
Now, you can start recording a new video by pressing the recording button.
If you are happy with the result, just proceed to the publish section.
Write a caption and put hashtags, and hit Post.
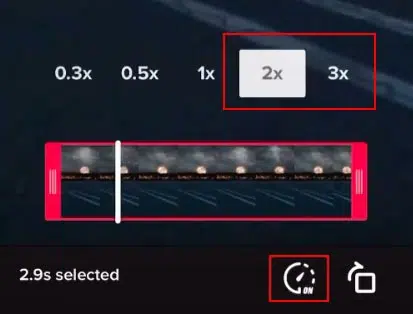
Keep in mind that you can select 2x or 3x to speed up your video. Other than that, you can also select the TikTok duration from 15 seconds, 60 seconds, or 3 minutes.
How To Speed Up Pre-Recorded Video On TikTok
The steps to speed up the pre-recorded video on TikTok are pretty similar to when you do it during recording. Let’s see and follow the guide below to get it done.
Open the TikTok app and log in to your account.
Hit the plus ‘+’ button to open the Video Recording section.
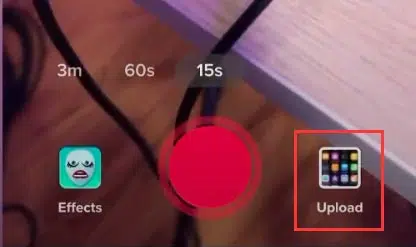
Then, instead of recording a new video, navigate to the Upload icon next to the recording button.
Hit the Upload icon to open the camera roll | Source: FlexClip
Now, select the video you want to edit and post on TikTok.
Tap Next.
After that, tap the speedometer button, pick your desired speed: 2x, 3x, and hit Next.
Proceed to add effects, sounds, stickers, and other editing options and hit Post to publish the TikTok video.
Conclusion
There you have it, how to speed up video on TikTok after recording and during the recording process. Go ahead and start experimenting with different speeds and see what kind of unique and creative content you can come up with.
Remember, TikTok is all about having fun and being creative, so don’t be afraid to play around and try new things! See you in the next article and happy TikToking!
A BRB screen is not only an informative tool, but it can also be an entertaining one. The problem is that customizing a BRB screen can be quite technical, especially for beginners. That’s where Eklipse’s new BRB Screen Feature comes in. Yes, we’re thrilled to announce our brand-new feature that can bring your streaming experience to the next level.
With Eklipse’s new feature, you can now create an engaging BRB screen with just a few clicks. No more technical headaches, this new feature makes it easy to keep your viewers entertained while you’re away. Here’s what you need to know!
The “Be Right Back” (BRB) screen is a way for streamers to let their viewers know that they’re taking a quick break, but it’s usually just a static image with a message. Eklipse, on the other side, takes it a step further by allowing users to automatically play your amazing clips.
With Eklipse, you can show off your best highlight clips from your Eklipse Playlist while you’re away from the keyboard. This means you can serve your audience with your excellent gaming skills while waiting for your comeback on the screen.
Getting started is easy. Simply get the BRB code from Eklipse, paste it into your streaming software, and you’re all set!
Currently, this BRB screen feature is only offered for some of the biggest games like Call of Duty, Apex Legends, Fortnite, Overwatch, and Valorant. But don’t worry, we’re working on bringing it to even more games in the future. So, are you curious to give it a go?
Maximize your Black Ops 6 rewards—Create highlights from your best gameplay with with Eklipse
Eklipse help streamer improve their social media presence with AI highlights that clip your Twitch / Kick streams automatically & converts them to TikTok / Reels / Shorts
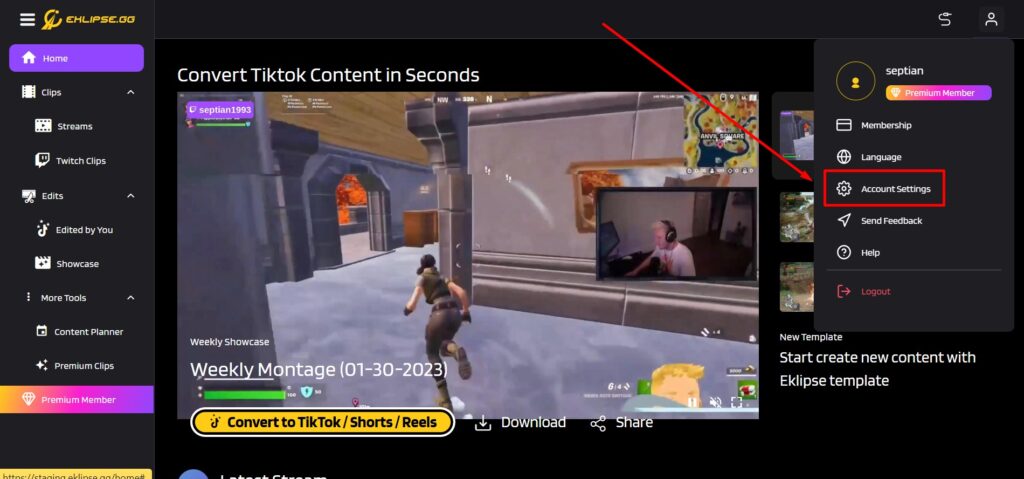
Navigate to Account Settings from the drop-down menu under the Profile Icon.
Select ‘Account Settings’ from the drop-down menu
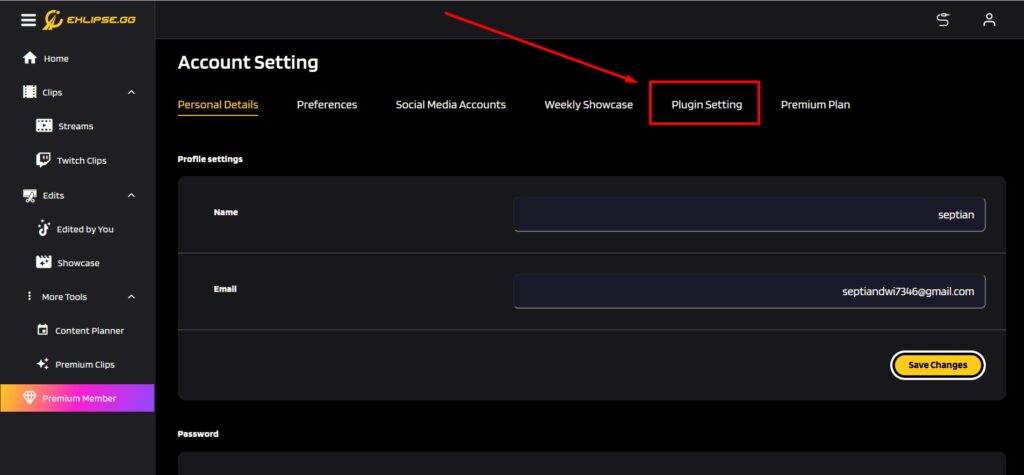
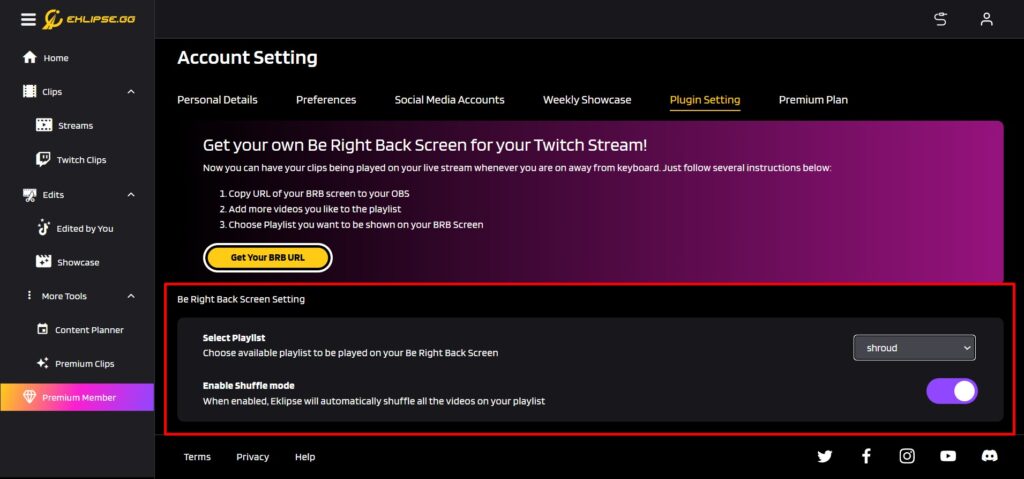
Click on the Plugin Setting tab in the Account Settings section.
Navigate to the ‘Plugin Setting’ tab
Choose the playlist you want to show on your BRB screen and make sure you already have it created on Eklipse.
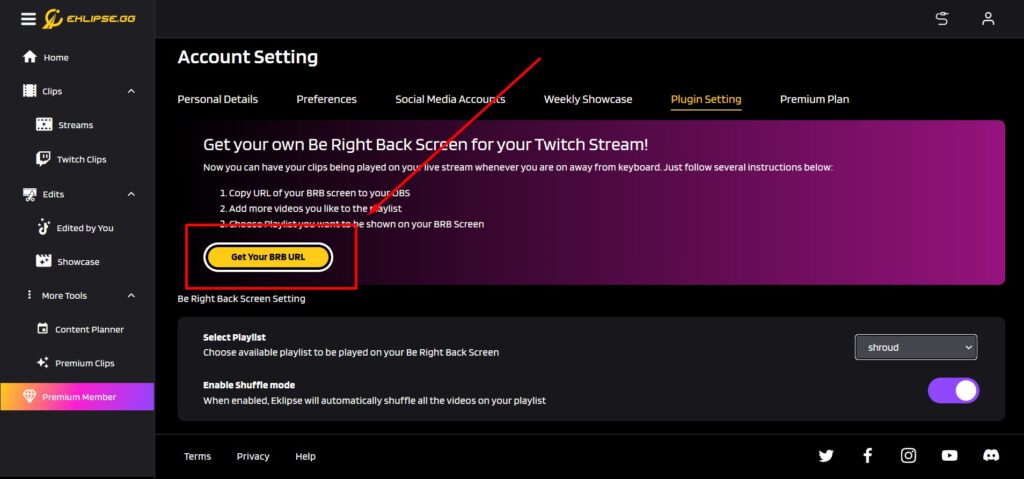
Click on the Get Your BRB URL button to copy the code.
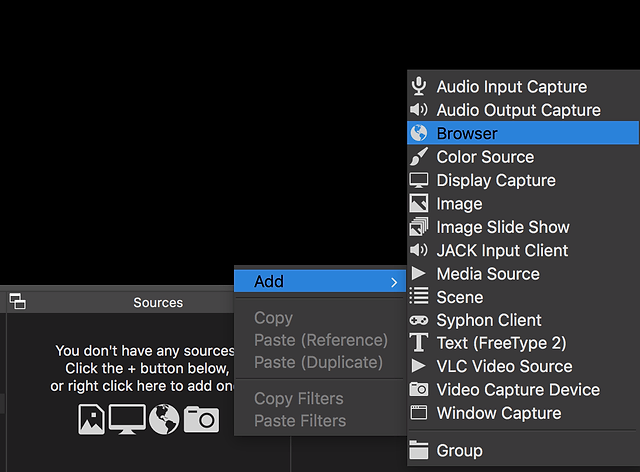
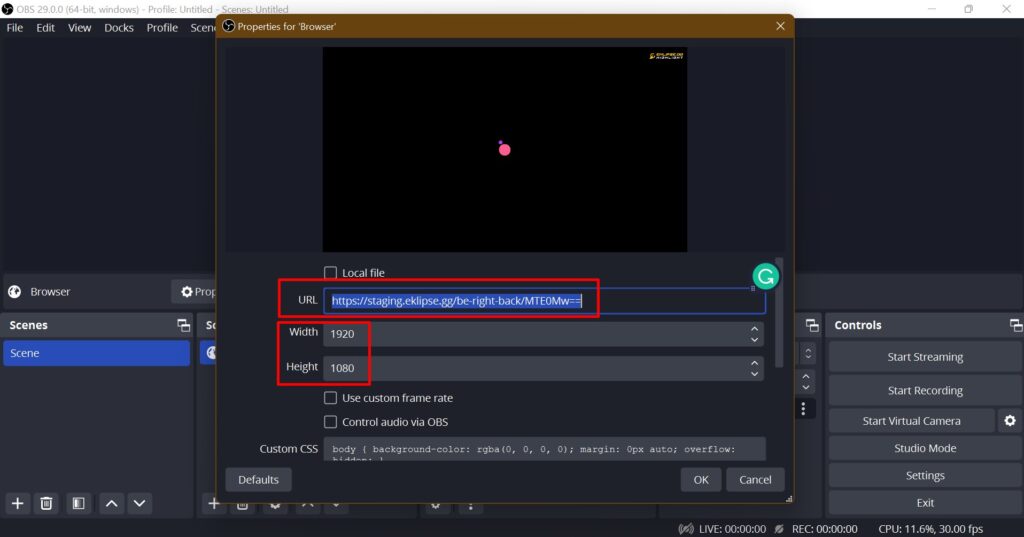
Open OBS Studio.
Click the “+” button or right-click on the project page and select Add.
Select Browse.
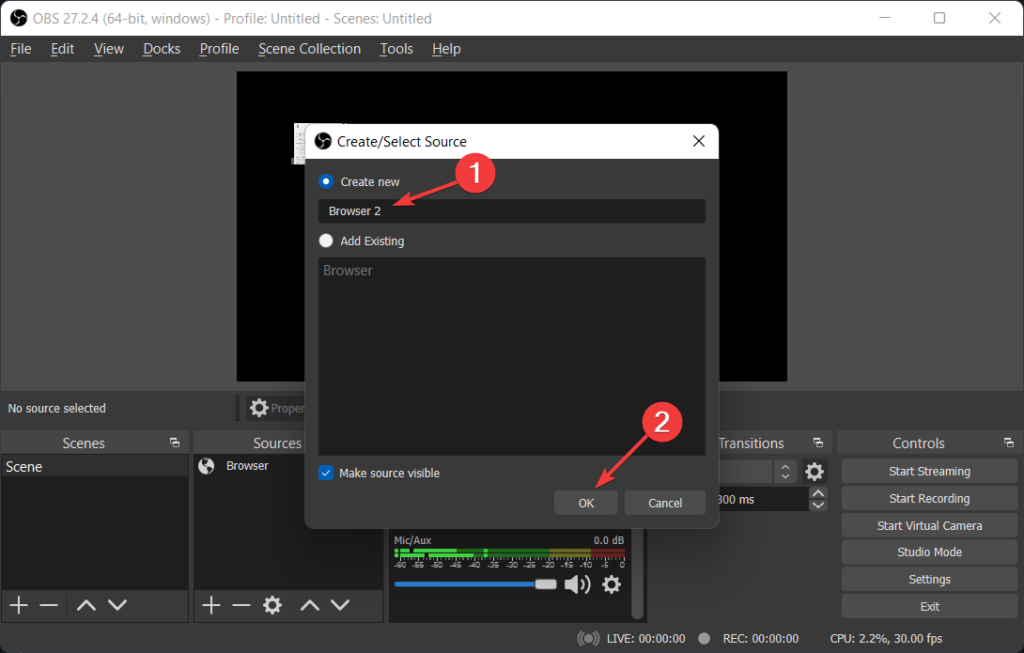
Give the project a title and hit OK.
Paste the URL link from Eklipse, change the resolution, and click OK.
Your BRB screen is now ready!
How to Access the Eklipse BRB Screen Feature in Streamlabs
Different software requires different steps to use it. To be able to access the BRB screen from Eklipse on Streamlabs, you can follow the guide below.
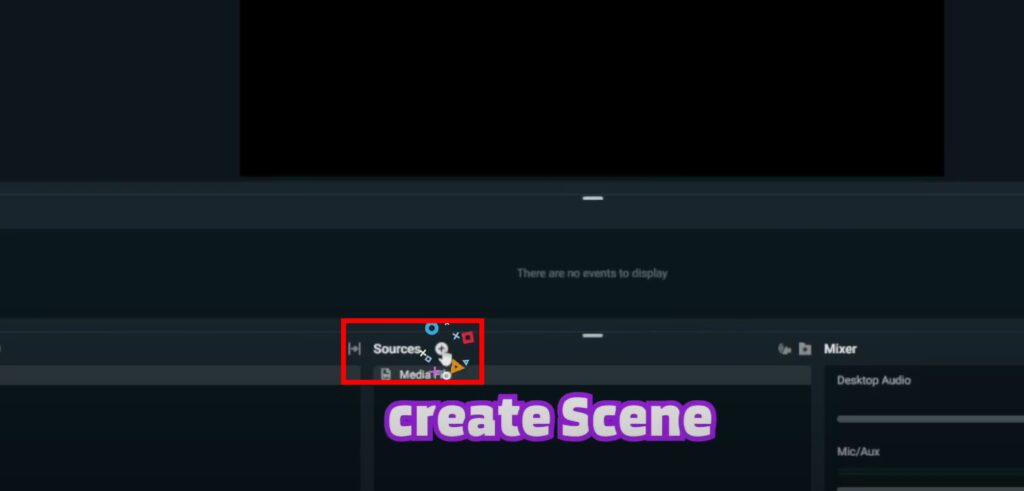
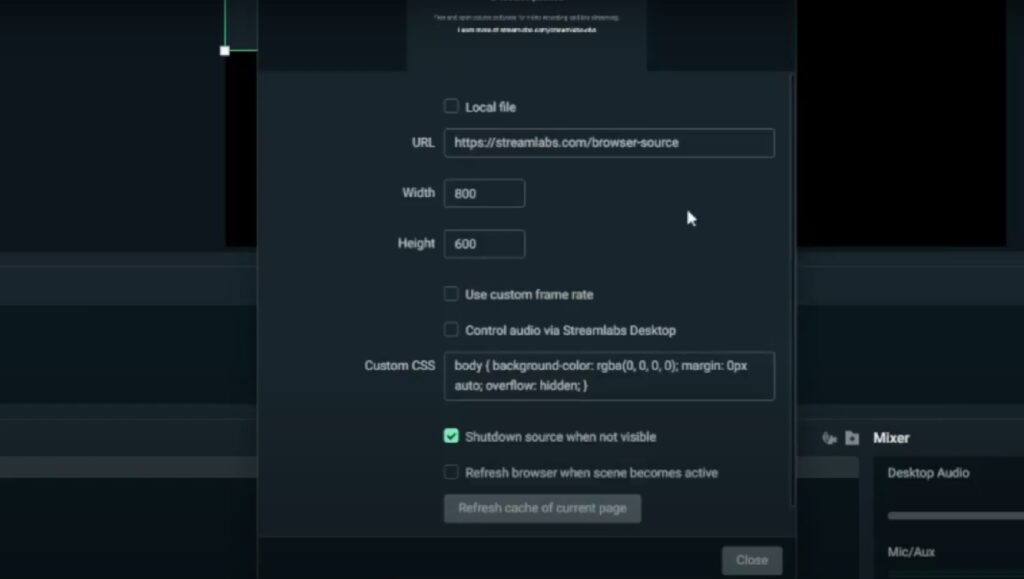
First, open the Streamlabs app on your device.
Then, create a new scene by hitting the Plus button next to Sources.
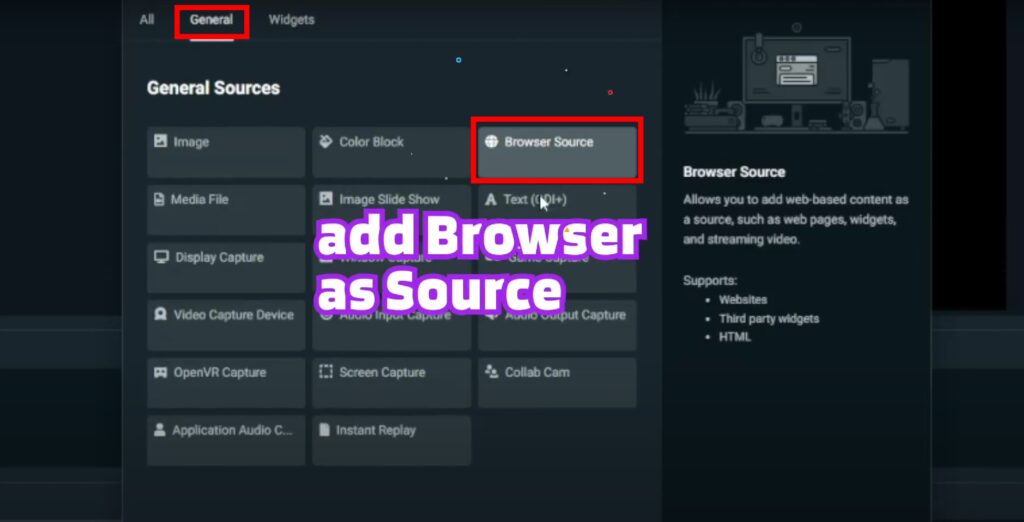
Navigate to the General section > Browser Source > Add Source.
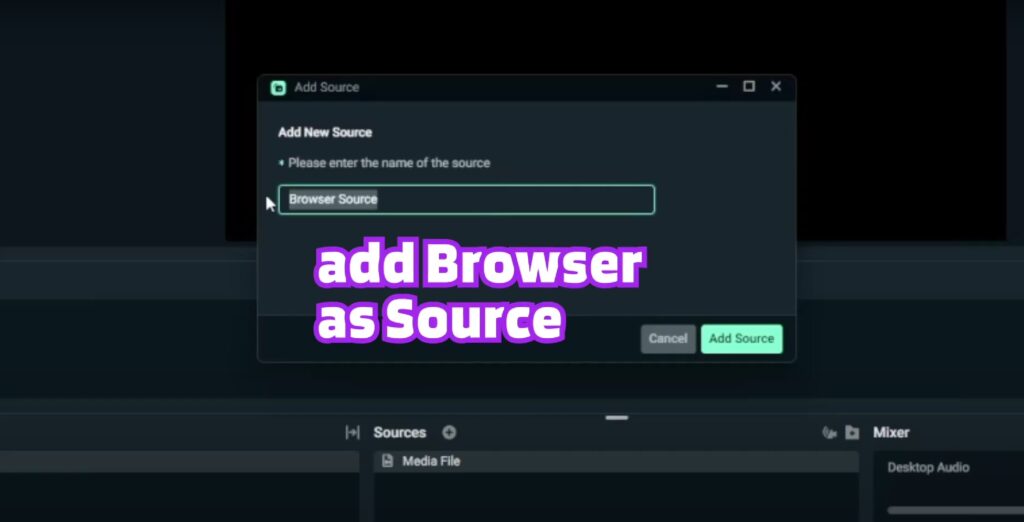
Create a name for the new project and click Add Source.
Next up, paste the URL link in the URL section in Browser > Close.
Once the BRB screen is ready, you can adjust the resolution and let it air!
Conclusion
That’s all you need to know about the brand-new Eklipse BRB Screen Feature. With Eklipse’s automated service, creating a BRB screen has never been easier. And the best part? It’s free! Our team is still working on making the feature available, so be sure to keep an eye on our website, Eklipse.gg, to see when it’s ready for you.
Take your streaming show to the next level with the Eklipse BRB Screen. In case you want to try creating clips from your streaming without taking so much time, you can try the Eklipse Premium Edit feature. All you need is to make a request and let our professional editor team do the rest. Read more about it here:Level Up Your Clips with Eklipse Premium Edit: Say Bye to Hours of Editing!
Maximize your Black Ops 6 rewards—Create highlights from your best gameplay with with Eklipse
Eklipse help streamer improve their social media presence with AI highlights that clip your Twitch / Kick streams automatically & converts them to TikTok / Reels / Shorts
The moderator on Twitch has an essential role in managing the Twitch channel. They can help you maintain a chat environment respectful and friendly. That’s why every streamer should learn how to make someone a mod on Twitch.
A mod has the ability to remove comments, ban users, and carry out other moderation tasks to keep. This vital position means you must be very careful when choosing your mods. It is important that you determine whether they are trustworthy enough to serve as your sidekick.
In today’s article, we’re gonna walk you through the process of making someone a Twitch moderator. Check this out!
Method 1. How To Make Someone A Mod on Twitch Through Their Profile
Select the silhouette icon to make a user as a mod | Source: Business Insider
The first route you can take to choose someone as your Twitch moderator is by visiting their Twitch profile. Now, let’s see the step-by-step below to see how it works.
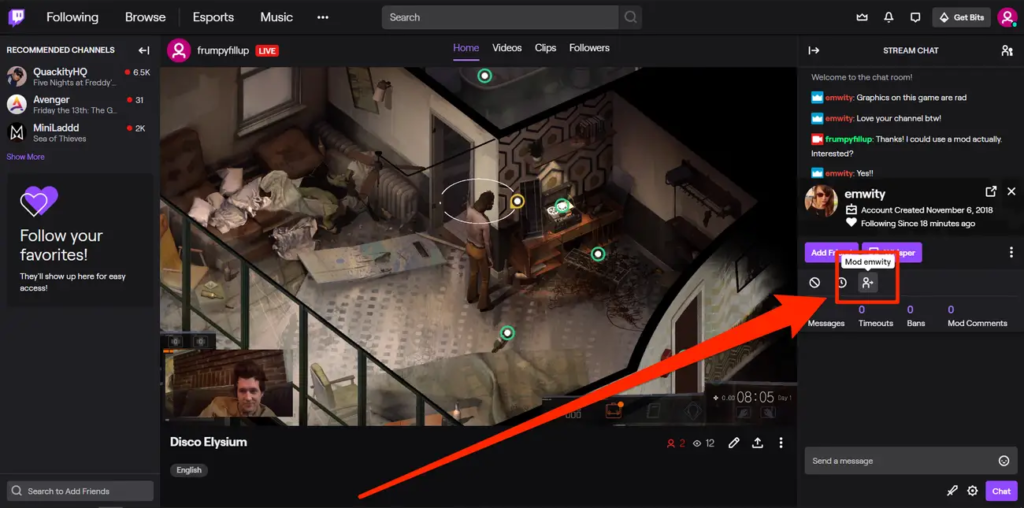
While you’re going live on Twitch, don’t forget to observe the chatroom to see if there’s a person you want to mod is there.
Once you see their username in the stream chat, hit the username to go to their profile.
Then, under their profile overview, hit the silhouette icon to add them as a moderator.
That’s it. It’s worth noting that if you click the silhouette icon once again, you’ll remove the moderator status.
Method 2. Make Someone A Mod on Twitch Using /mod Command
insert the /mod command, and you’ll be good | Source: Business Insider
An alternative way to pick someone as a mod on Twitch is by using the /mod command. Here’s how to do it.
To begin with, go live on Twitch and navigate to your channel to see the streaming chatroom.
Observe the chatroom to see if there are any prospective Twitch users to be a mod.
Once you found it, enter the command /mod (username). For example: /mod Eklipse_highlights.
Method 3. Add A Twitch Moderator Through Creator Dashboard
When you’re busy streaming, it can be a hassle to add moderators. So, just add ’em later when you have time. Thankfully, Twitch allows you to do it through the Creator Dashboard. Follow the steps below.
Log in to your Twitch account.
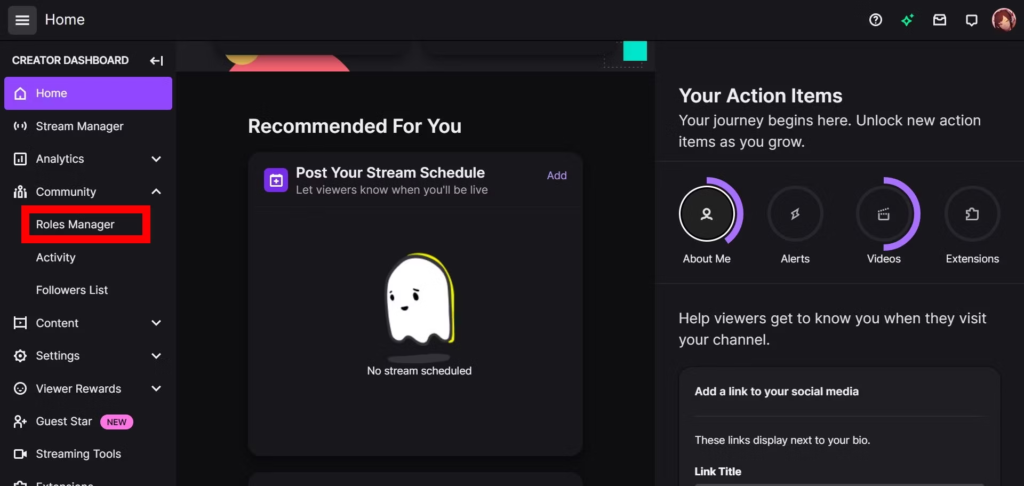
After that, navigate to the Profile icon and select Creator Dashboard.
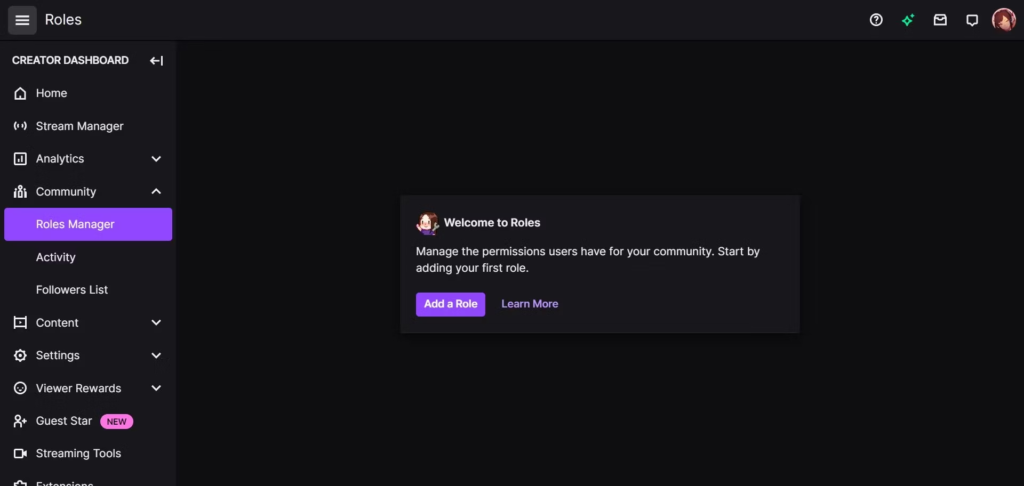
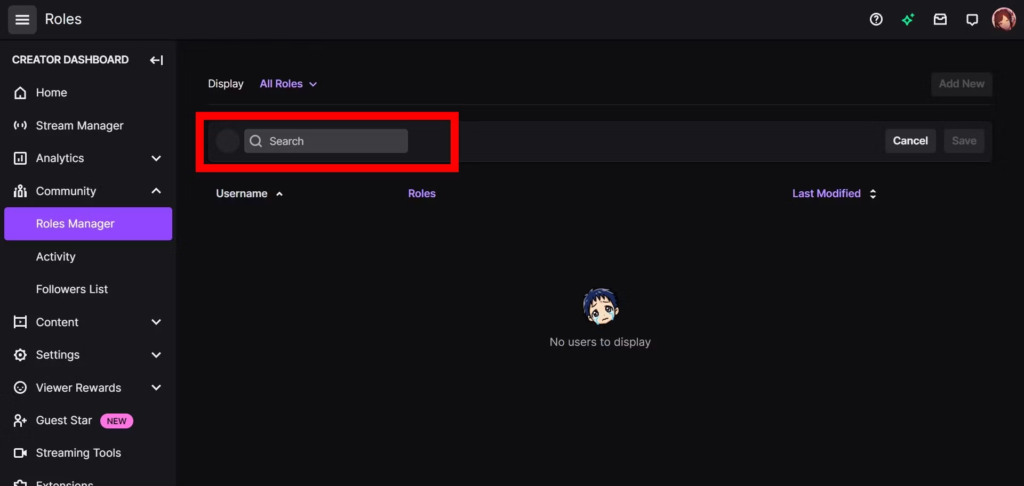
Then, click Community > Roles Manager.
Select ‘Role Manager’ under the Community section | Source: Android Police
Hit Add a Role.
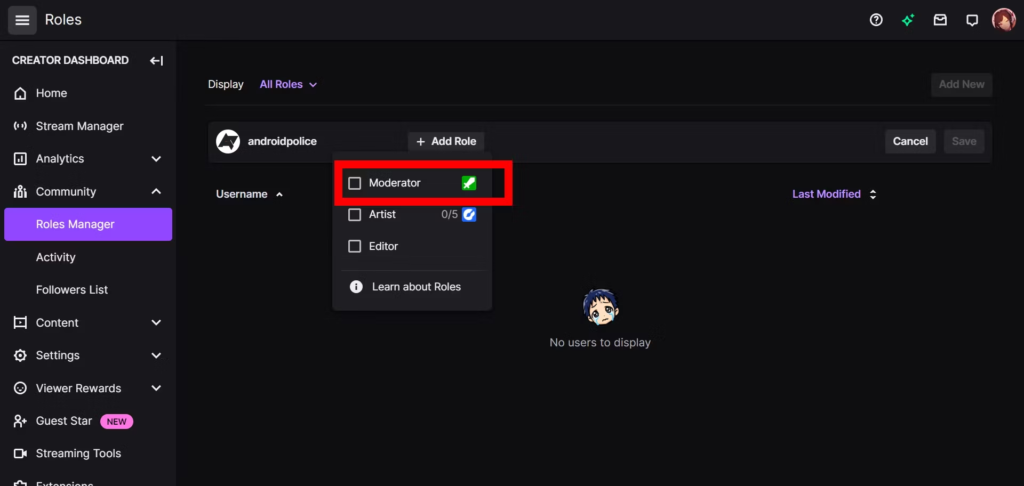
Next up, enter and select the Twitch username you want to make as a mod on the search box.
find the protective username to be assigned as mod | Source: Android Police
Click the box next to Moderator.
Finally, hit Save and you’re all set.
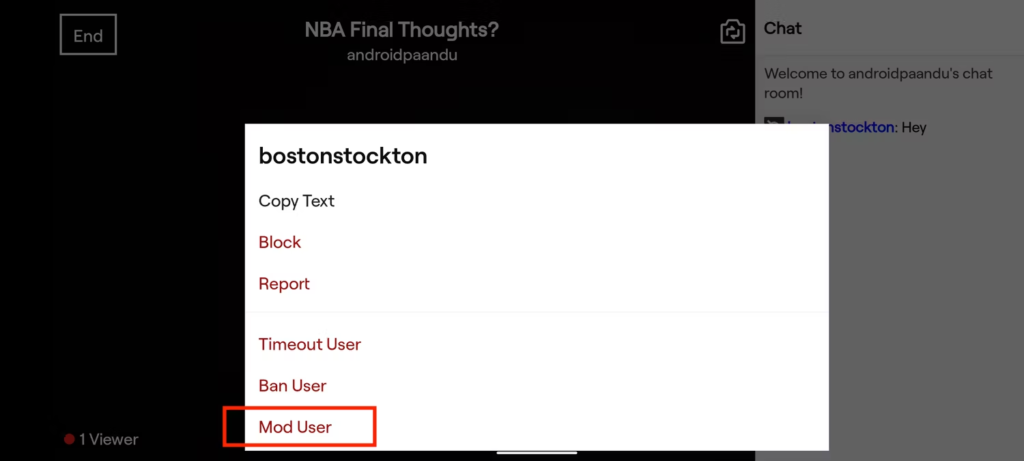
Method 4. How To Make Someone A Mod on Twitch Mobile
Streaming on the go just got even better with the Twitch mobile app! You can quickly add moderators to your live stream with ease. Check out the simple steps we’ve laid out for you.
Starting off by downloading and installing the Twitch app.
Go to the streaming chat once you’ve done streaming on the app.
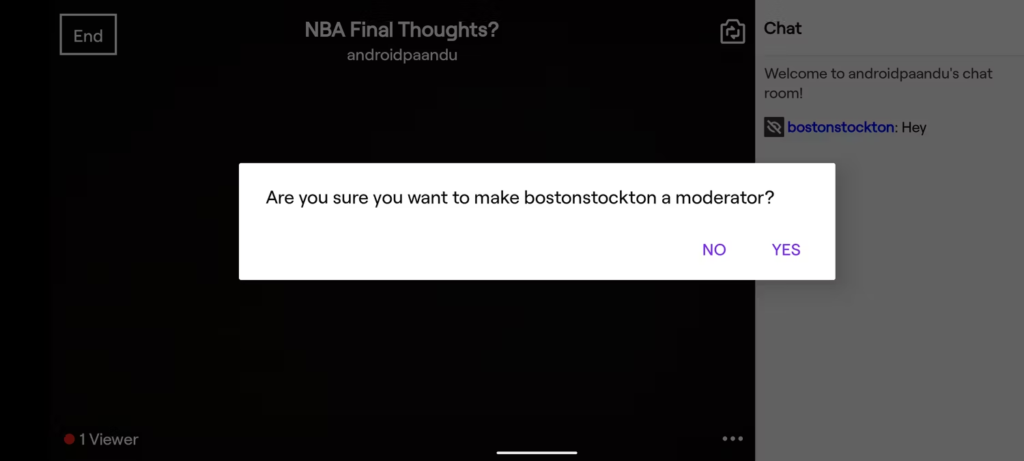
Hit the Twitch username and tap Mod User.
Tap Yes to confirm.
Conclusion
That’s the method on how to make someone a mod on Twitch. Making someone a mod is a great way to give back to your community and delegate some of the responsibilities that come with being a streamer.
Whether you’re new to the platform or have been streaming for a while, by following these simple steps, you’ll be able to make someone a mod in no time. Just remember to choose someone who is trustworthy, responsible, and has your best interests at heart. Happy streaming!
Maximize your Black Ops 6 rewards—Create highlights from your best gameplay with with Eklipse
Eklipse help streamer improve their social media presence with AI highlights that clip your Twitch / Kick streams automatically & converts them to TikTok / Reels / Shorts
Well, if you follow TikTokers who post cooking recipes or DIY tutorials, it becomes a huge pain when you miss a crucial step or point and have to wait for the whole video to play again from the start. Rinse and repeat. Again, and again. So, to counter this annoying trait, TikTok introduced a fast-forwarding option, so you can now know how to fast-forward on TikTok, and we must say that this is a much-needed feature.
In this article, you will be able to learn how to forward and rewind the video easily. So without any more ado, let’s get started!
However, this feature is not available worldwide and not on all the videos either. If you are curious to find out how to fast-forward on TikTok, we have come up with an easy-to-understand guide. The first way is for those who are lucky enough to have this feature installed in their mobile application.
Just follow these steps:
First off, know that this feature is available for videos that are long; they can be up to 3 minutes long.
There is no limit to how many times you can fast-forward the video to see a particular shot or scene.
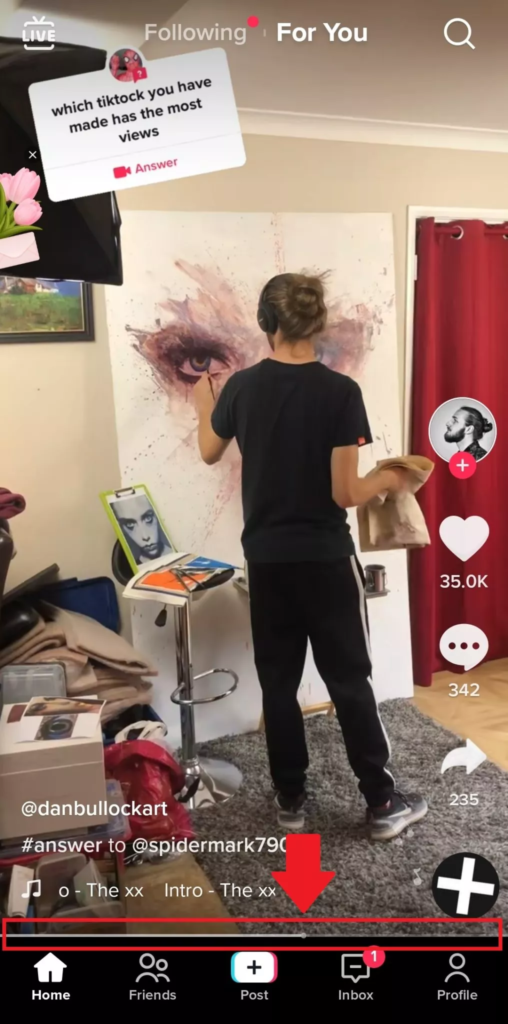
When a video is played, you should see a faint line at the bottom, white in color.
As the video proceeds, so does that white line.
You should touch the line and see a white ball moving, which tells you how far the video has progressed.
Now push the white ball and drag it to move left or right.
Moving it to the left will result in rewinding the video.
Moving it to the right will result in forwarding the video.
Now for all those who do not have this feature introduced in their regions and are wondering how to fast forward on TikTok, don’t fret. We’ve got you covered as well. Just follow these simple steps and everything will be resolved.
Select the video you want to fast forward or rewind to listen to or see something that you have missed.
Choose the arrow button that is pointing outward. This is the share button.
You should see the “save” option among the list of other options.
Select “Save” and the video will download onto your device.
Then go to your phone’s storage to access the video and open it on a video player of your choice.
Finally, you can now fast forward and backward to the moment in the video that you want without any hassle.
How to Rewind on TikTok
Did you miss a certain part of the video and want to replay it? No worries, you can do it in just three steps.
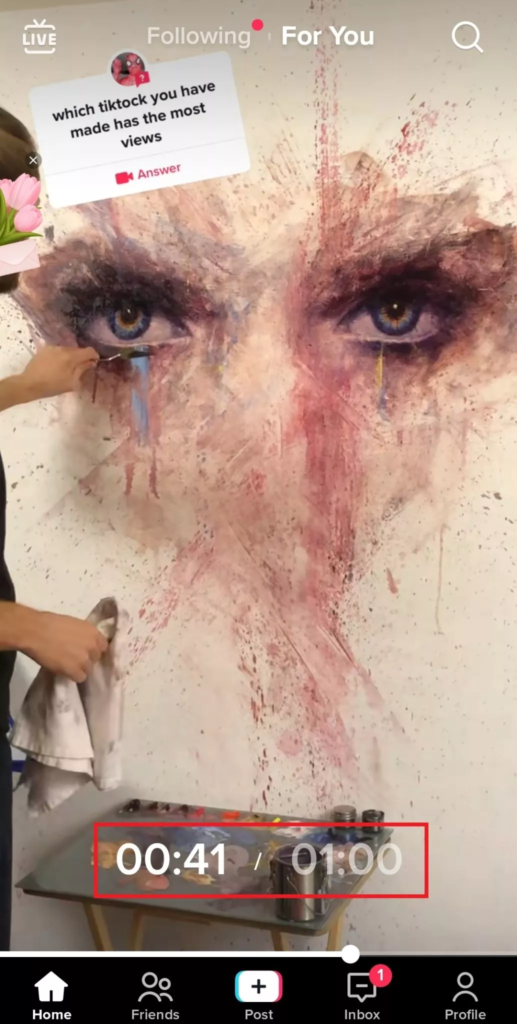
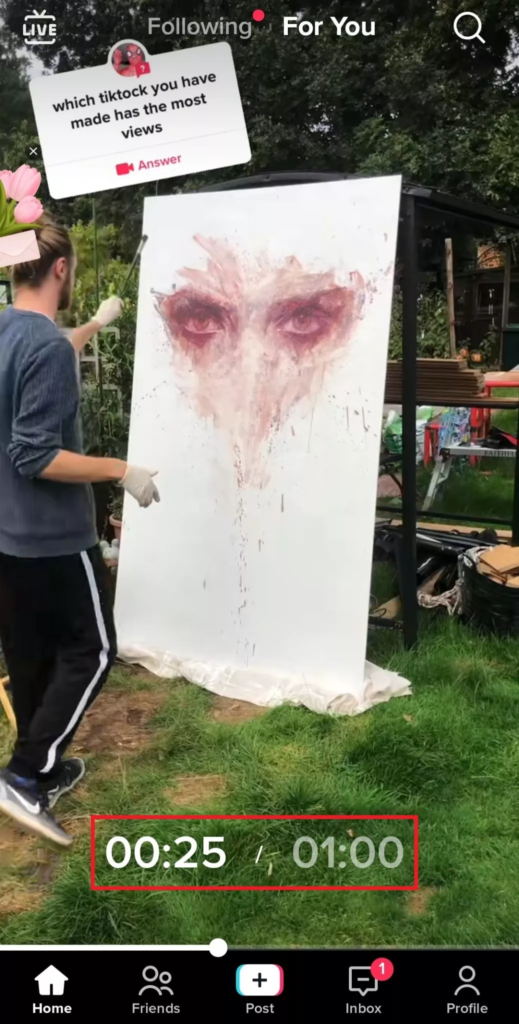
Tap and hold the cute white dot on the bar and drag it to your desired spot in the timeline.
The timecode will show up in a smaller size above the progress bar, making it super easy to track your journey.
Then, let go when you’re ready to re-watch the video.
Edit A TikTok Using Eklipse Studio
If you are a streamer who is looking to make and edit videos on TikTok, try Eklipse. It offers a super convenient feature for all the gamers out there that can be very helpful to turn them into captivating videos. You can make automatic highlights from your streams and then convert those highlights into TikTok videos. To give a little spark to your TikTok video, Eklipse even provides a huge scoop of interesting and game-dedicated templates to choose from. You can also forward, reverse or reset a video however you please in the Eklipse studio.
If you want to know further about this tool and are curious to give it a shot, you can read our article about the step-by-step to edit the TikTok video using Eklipse here: How To Edit Video TikTok Online Using Eklipse.
Maximize your Black Ops 6 rewards—Create highlights from your best gameplay with with Eklipse
Eklipse help streamer improve their social media presence with AI highlights that clip your Twitch / Kick streams automatically & converts them to TikTok / Reels / Shorts
Now that you understand how to fast-forward a video on TikTok as well as rewind it, you don’t need to worry about missing out on a certain part of a TikTok video anymore. Check out Eklipse’s blog for more TikTok-related content.
Source: How To Create A Poll In Zoom? | TechBriefly
Wondering how to edit Zoom recording? You’ve come to the right place. Making sure that you get the most out of your Zoom footage sometimes requires you to do some video editing. Luckily, you can easily trim your footage and make more changes using various digital video editing platforms.
In this article, we’ll give you step-by-step instructions on how to edit your Zoom footage using several different programs.
Google has developed an AI tool called MusicLM that can turn text, whistling, and humming into music.
The AI creates songs that can last up to five minutes. Also, Google says this system outperforms the previous generation in terms of audio quality and how closely the music adheres to the text description.
So, do you want to know more about Google MusicLM AI Music Generator? The Eklipse Blog team sums up all the information regarding the latest Google AI music generator, so check this out to learn more!
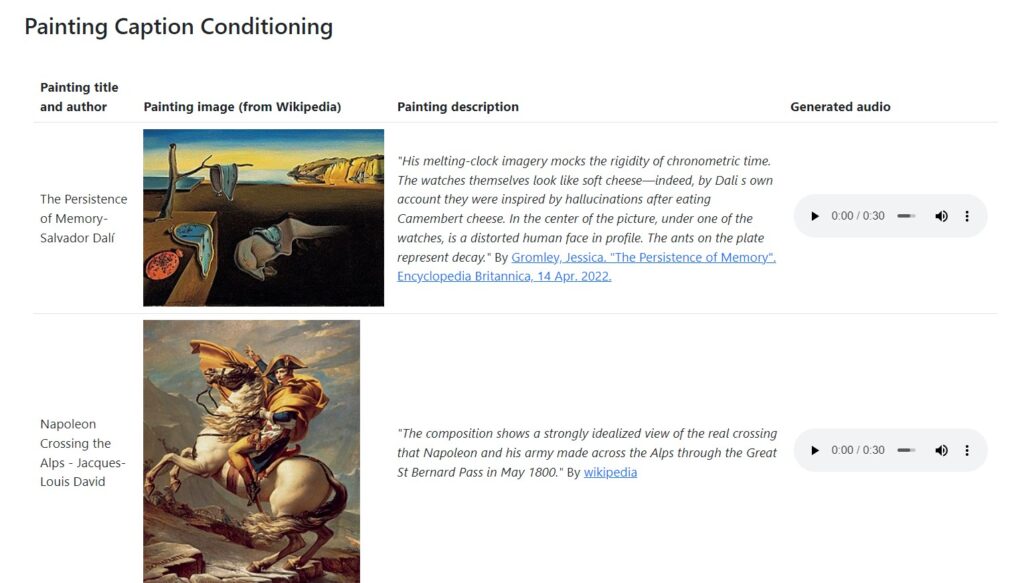
MusicLM is Google’s new AI tool that can turn text, whistling, humming, and even a painting into actual music.
Currently, Google has just introduced MusicLM as a showcase of what an AI can do to generate music from a text prompt or even a painting description.
What MusicLM AI Music Generator Can Do?
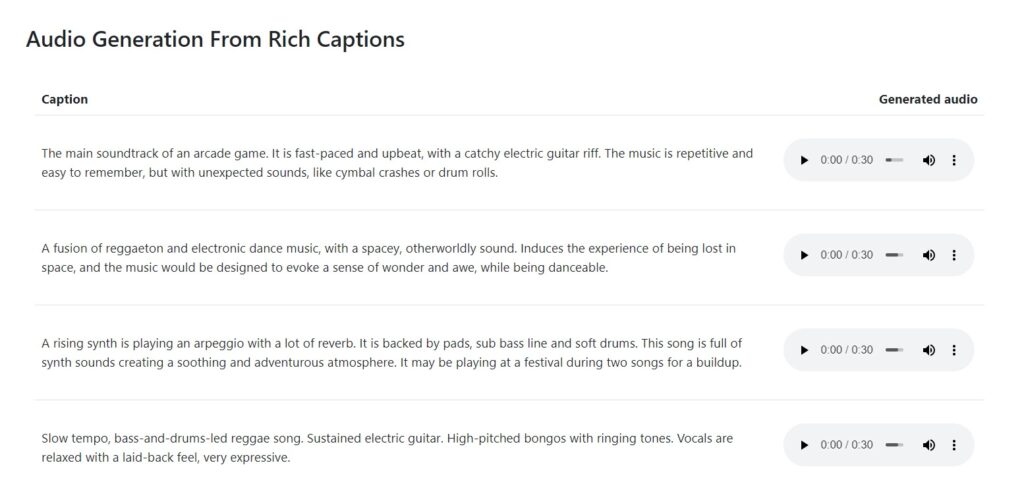
On the MusicLM official Github, Google exhibit how the AI can create a piece of music from the text prompt. Since this is still in research and development, MusicLM gives 30-second snippets of the songs as an from their caption example such as:
“The main soundtrack of an arcade game. It is fast-paced and upbeat, with a catchy electric guitar riff. The music is repetitive and easy to remember, but with unexpected sounds, like cymbal crashes or drum rolls”.
“A fusion of reggaeton and electronic dance music, with a spacey, otherworldly sound. Induces the experience of being lost in space, and the music would be designed to evoke a sense of wonder and awe, while being danceable”.
“A rising synth is playing an arpeggio with a lot of reverb. It is backed by pads, sub bass line and soft drums. This song is full of synth sounds creating a soothing and adventurous atmosphere. It may be playing at a festival during two songs for a buildup”.
You can look up their website at google-research.github.io/seanet/musiclm/examples/ to hear how the music they create from the prompt above.
According to Google researchers, MusicLM outperforms previous systems in audio quality and how closely it follows the text description.
Google MusicLM AI Music Generator using a “hierarchical sequence-to-sequence model for music generation” and uses machine learning to generate different parts of a song, like the structure, melody, and individual sounds.
The AI training with a large dataset of unlabeled music and a music caption dataset of over 5,500 examples created by musicians. Google publishes the dataset so it can support future research.
One of the challenges in AI music generation is that music exists over time, making it harder to capture its intent with a text description. MusicLM is a step in overcoming this challenge.
Not only the text prompt, MusicLM allows you to use audio input as prompt, such as whistling or humming. Audio prompt help the AI learn the song’s melody to generate the style described by the text prompt.
When MusicLM Will Release to Public?
The authors of MusicLM have not made it available to the public yet due to concerns about the potential misappropriation of creative content. One of Google’s concerns is that the generated song is not distinct enough from the source material used to train the model.
That’s all you need to know about Google MusicLM, the latest AI work that can generate music from text prompt.
What do you think about this latest work from Google? Do you think this will be the future for streamers or content creators to make background music for their content?
Nintendo has announced the newest installment of Pokémon: Scarlet and Violet along with the Gen 9 starters. There are Sprigatito, Fuecoco, and Quaxly. And after a long wait wondering about them, now you’ll finally know what type of them and witness the final Pokémon Scarlet Gen 9 starters’ evolutions. Who’s excited?
If we look back on the previous version of the game, the last Pokémon starter evolutions are more human-looking. Therefore, many people expect that Pokémon will put new upgrades for the final evolution of Sprigatito, Fuecoco, and Quaxly to be more monstrous-looking.
Well, to see if Nintendo really hears their fans about the evolution of these adorable creatures, let’s look no further than this Pokémon: Scarlet and Violet guide!
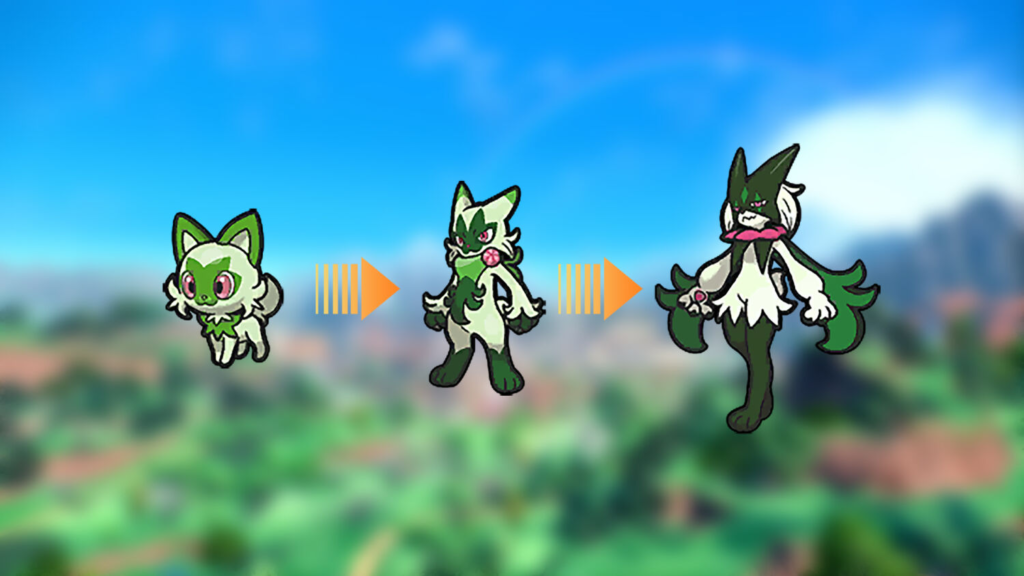
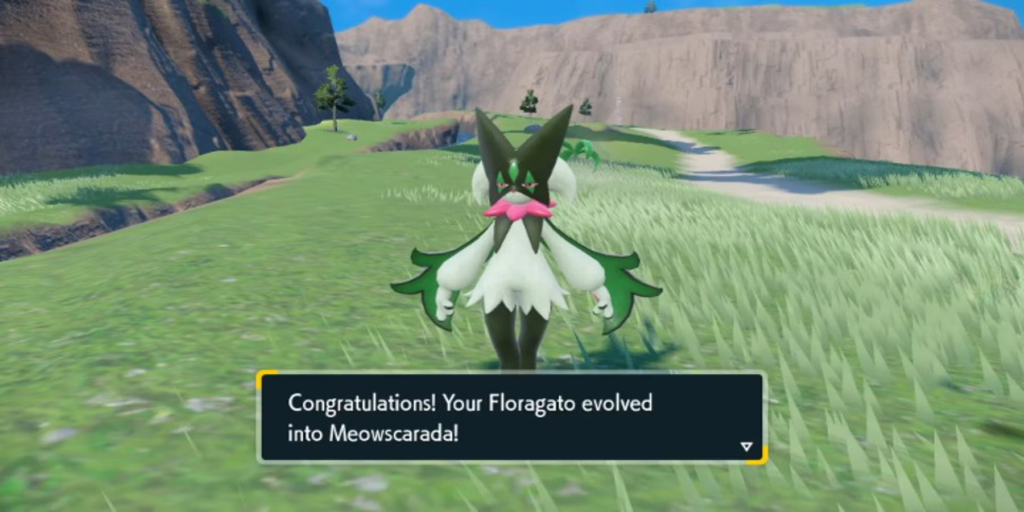
The first Pokémon starter is Sprigatito. Its name was actually inspired by the Spanish language. It’s a portmanteau of the words Sprig and Gatito which refers to kitten in Spanish.
When it comes to its appearance, Sprigatito looks like a Grass Cat Pokémon. It’s green with a little touch of leafy accent on its face and neck. And based on the appearance, it’s expected that Sprigatito is a grass-type Pokémon. Yes, it is.
Additionally, Sprigatito’s ability is Overgrow. This ability allows it to increase the power of its physical and special grass-type moves by 50% in its low health level. So, this could be so much useful while it’s in critical health during the battles. Other than that, this Pokémon is also great in Speed and Attack.
Once you’ve reached level 16, your Sprigatito can evolve into Floragato and will turn into Meowscarada, the final evolution, in level 36. Meowscarada is basically a Grass/Dark Pokémon that has Flower Trick as its signature move. This move is undoubtedly deadly and will never miss landing a critical hit to your opponents. Besides that, the speed has also increased from when it was in its basic form.
Source: Game Rant
Despite its amazing speed and attack, Sprigatito is weak against flying and bug-type Pokémon. But when it comes to beating water and rock-type ones, leave it to this Pokémon.
Gen 9 Final Evolutions: Fuecoco
Source: Gaming Intel
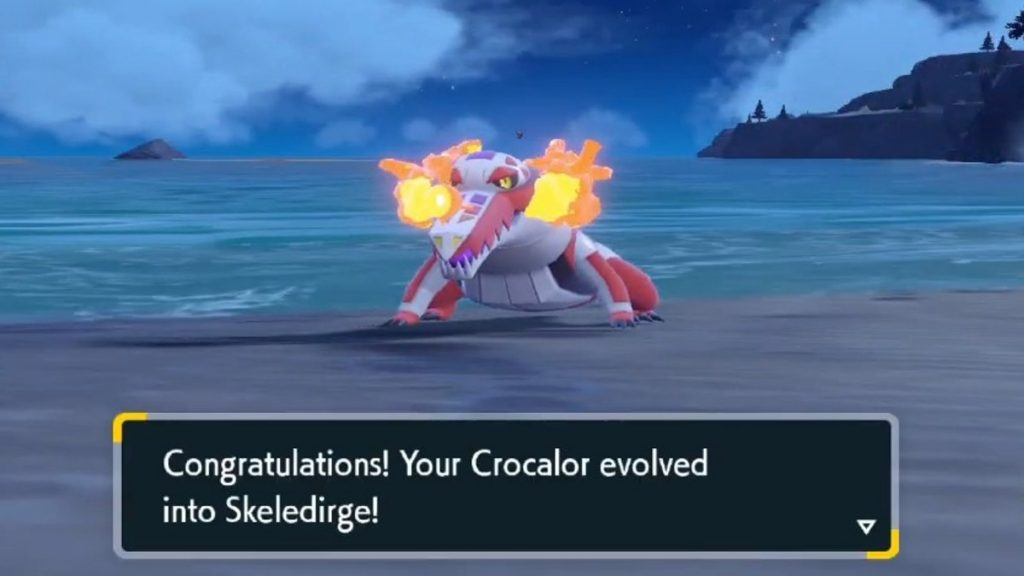
The next Pokémon is Fuecoco. Judging from its appearance, this Pokémon looks like a little dinosaur yet there’s a touch of the dragon as well. But turned out it’s a form of a crocodile, according to its Spanish-inspired name, Fuego (fire) and coco/cocodrilo (crocodile). Additionally, Fuecoco is the Fire-type starter Pokémon, and it’s classified as the Fire Croc Pokémon.
Compared to two other Pokémon gen 9 starters, Fuecoco is claimed as the strongest. Its basic ability, like other fire-type Pokémon’s, is Blaze. This ability enables Fuecoco to boost physical and special fire-type moves by 50% in its low-level health. In addition, He has 338 HP for maximum starts and 247 Special Attacks.
Source: Gaming Intel
Fuecoco will evolve into Crocalor when you have got level 16. In level 36, it will be able to transform into Skeledirge, the final evolution, which will gain a Torch Song ability, with 100% accuracy. This ability powers up the user’s special attack stat as well as the ability to deal with Fire damage.
Unlike Sprigatito, Fuecoco is weak to water and rock-type Pokémon. On the contrary, it’s strong when it comes to facing grass and bug-type Pokémon.
The Final Form of Quaxly
Source: Distractify
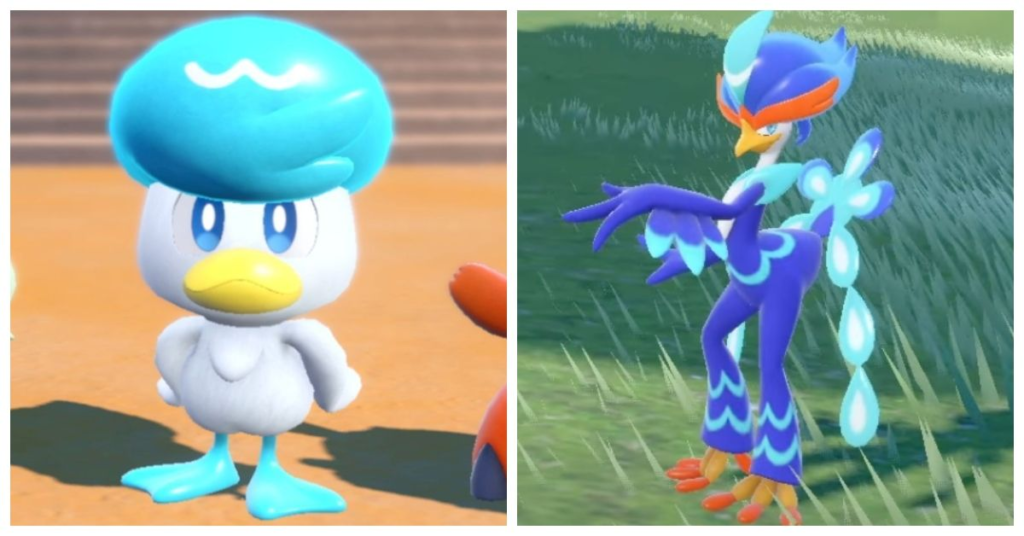
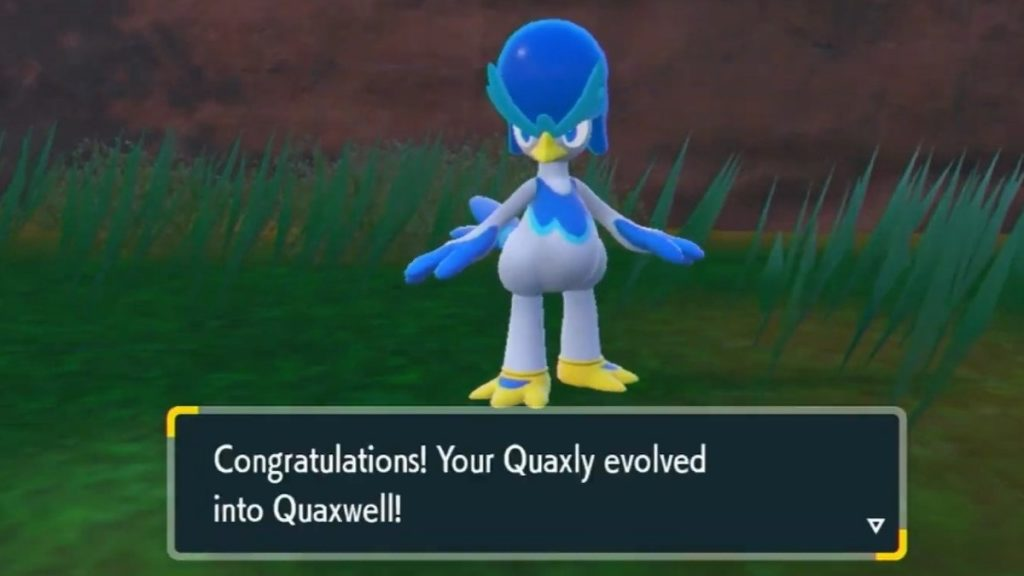
The last starter in Pokémon Gen 9 is Quaxly. This Pokémon actually has a pretty match name and form. Indeed, Quaxly is a Pokémon with a duck-like form as it is translated from Japanese as the Baby Duck Pokémon. Due to its appearance, Quaxly is a water-type Pokémon and it has Torrent as its basic ability.
Just like Sprigatito’s Overgrow and Fuecoco’s Blaze, this Torrent ability can power up its physical and special water-type moves by 50% if its health is low. So when this Pokémon is in critical health during the battles, it always can hit the enemies back.
At level 16, Quaxly will evolve into Quaxwell, and its final evolution will be Quaquaval. Quaquaval is a dual water/fighting Pokémon that has Aqua Step as its signature move, which can give you a very high water attack stat. On top of that, this signature ability can also boost the speed stat by 1 stage. That’s amazing!
Source: Starfield
Anyway, grass-type Pokémon will always be a kind of problem for water-type Pokémon, and it applies to Quaxly as well. But fret not, because it’s strong against the rock-type Pokémon.
Other Pokémon Scarlet and Violet Updates
Source: Gamepur.com
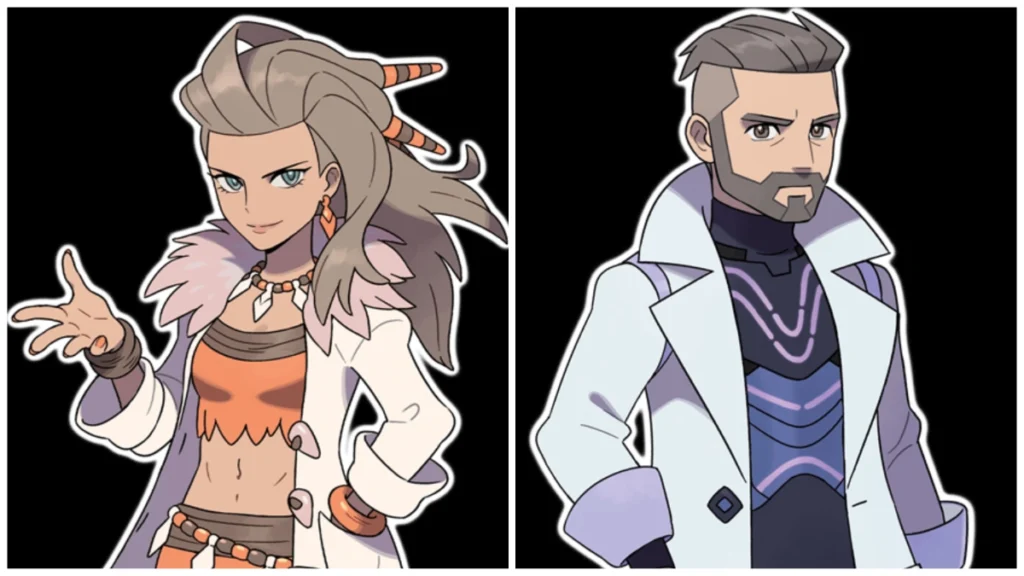
In addition to those three new Pokémon, you can find other new characters. One of the characters that may appear in the latest Pokémon installment is Professor Sada and Turo. No, you didn’t hear it wrong. Scarlet and Violet now have two professors.
Other than that, there is also a Pokémon trainer named Grusha who looks kinda cute and lovely (until you find out that Grusha is a man, LOL), Mr. Jacq the Biology teacher, and more! You’ll see them in November, so keep an eye out!
Which One is The Best?
If you are asking which are the best Pokemon Gen 9 starters, the answers to this can be relative.
Fuecoco might be the slowest among all. But, he has the highest damage on the special attack, so you can obliterate the enemy easier.
Sprigatito is the fastest Pokemon, but the stats is pretty much mediocre and balanced. With moves like Leafage, Seed Bomb, making it is suitable for fast fighting scenarios.
Quaxly has the best Attack stat among all. He also has a mix of Water / Flying-type attacks like Water Gun and Wing Attack that proves usable in many fighting scenarios.
So which one is the best? It’s up to your choice and which gameplay strategy you favor.
Conclusion
So, what do you guys think about the Pokémon Gen 9 starters evolutions above? Do they meet your expectations? You should play them directly within the game to know how powerful they are.
Ever scrolled through TikTok and stumbled upon a video of someone staring blankly, repeating the same phrase over and over, and reacting to virtual coins with robotic movements? No, you haven’t fallen into a fever dream, it’s just the latest bizarre trend: NPC streams. But what exactly does NPC mean on TikTok, and why are people pretending to be them on TikTok?
Buckle up, fellow internet explorers, because we’re about to dive into the weird and wonderful world of TikTok NPCs, where the lines between reality and video game simulation blur faster than you can say “level up.” Prepare for nonsensical dialogue, robotic dance moves, and a whole lot of questions about the future of human interaction, all served up with a generous sprinkle of viral entertainment.
So, hit that scroll button and get ready to unlock the secrets of TikTok’s latest digital enigma – the NPC!
NPC is actually an abbreviation of a sentence. It means a Non-playable character. If you belong to the gaming world, this term sounds pretty common.
NPC is the system-defined character who can only move to the specified pattern. When it comes to TikTok, NPC represents people who act as if they are told by someone to do certain manner although they’re not.
In another word, TikTok users use this term to call someone who acts in a particular way that’s not called for. This is basically a term for joking. Therefore, you can use NPC term not only for gaming content, but also for comedic, fitness, or any other content you think does make sense.
Additionally, people on TikTok use this term as a hashtag like #NPC. And until today, this hashtag has garnered 1.2 billion views and counting. That’s just amazing.
Recently, the term has been used online to describe people who seem to follow a script or ideology blindly, without much thought or independent thought.
Here’s a quick list of characteristics often associated with NPC behavior:
Repeat catchphrases or talking points they hear from authority figures or media without much critical thinking
Lack of independent thought and original ideas
Quick to conform to groupthink and suppress dissenting opinions
Tend to be very polarized in their views and unwilling to have a dialogue or consider other perspectives.
Although it’s fun to watch and follow, it’s worth noting that using the term “NPC” to describe someone’s behavior can be seen as dismissive or insulting, so it’s best to use it carefully.
How To Explore Popular NPC TikToks
In case you want to see any TikTok video related to NPC, you can just search for the NPC hashtag by typing #NPC in the search bar.
There will be a lot of NPC TikTok videos you can watch. Most of them are funny videos. In addition to that, the videos below are several examples of the NPC video on TikTok.
You can see from the videos above that the people within do certain unnecessary acts as if they are told to. Moreover, they are actually not. This is a fun thing to see, isn’t it?
Conclusion
So, there you have it, folks! The mystery of the TikTok NPC, unraveled like a pixelated quest scroll. Whether you find these robotic reenactments hilarious, unsettling, or just plain baffling, there’s no denying they’ve sparked a conversation about our own digital behaviors and the ever-thinning line between virtual and real-world personas.
Tired of having slow growth on your gaming channel or social media? Try Eklipse now!
Use Eklipse to easily make captivating TikTok/Reels/Shorts video clips from your gaming live streams with just one click. Your viewers will be mesmerized, and you can share the content effortlessly across various platforms.
So what are you waiting for? Sign up on Eklipse.gg or click below to try Eklipse’s exclusive features for free today.
Maximize your Black Ops 6 rewards—Create highlights from your best gameplay with with Eklipse
Eklipse help streamer improve their social media presence with AI highlights that clip your Twitch / Kick streams automatically & converts them to TikTok / Reels / Shorts