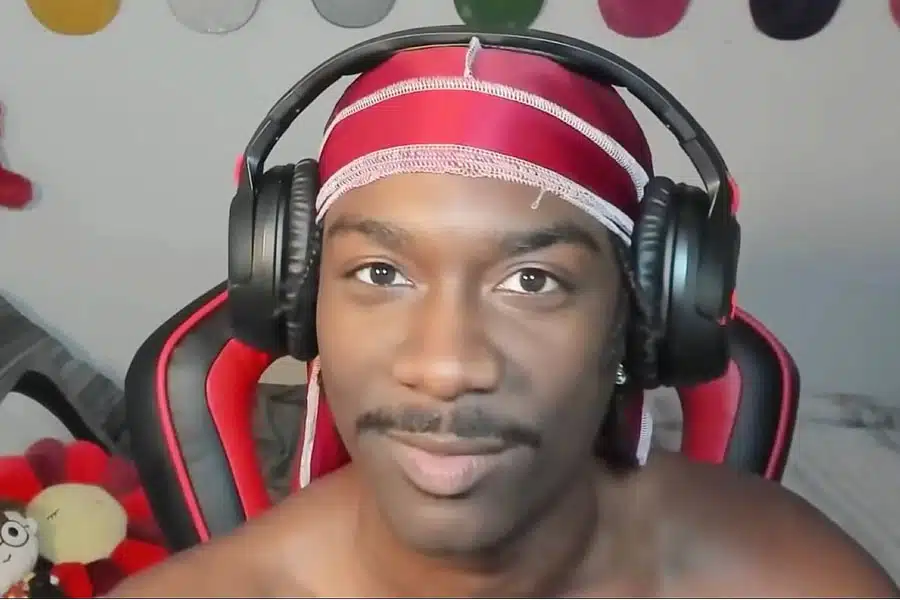
BruceDropEmOff has gained immense popularity and success in his career as a Twitch Star. Many people are curious about BruceDropEmOff’s net worth, and in this article, we will provide you with all the information you need. Dive into the details to discover more about BruceDropEmOff’s financial status.
BruceDropEmOff is a renowned Twitch Star who was born on September 23, 2000. With his captivating streams and engaging content, he has amassed a significant following on Twitch.
BruceDropEmOff’s real name is Bruce Ray Condones. He is best known for his live streams on Twitch, where he plays a variety of games, including Roblox, Fortnite, Fall Guys: Ultimate Knockout, and Grand Theft Auto.
Bruce started streaming in 2016, and quickly gained a following for his entertaining and engaging personality. He is known for his sense of humor, his interactions with his viewers, and his high-level gameplay.
In addition to his Twitch channel, Bruce also has a successful YouTube channel, where he uploads highlights from his streams, as well as other gaming and lifestyle content. He also has a popular social media presence, with over 1.2 million followers on Twitter and over 860,000 followers on Instagram.
In 2023, Bruce left the esports and entertainment organization One True King (OTK), following a spat with co-founder Mizkif. He has not yet joined another organization, but he continues to stream independently on Twitch.
Bruce is a popular and respected figure in the gaming community. He is known for his positive attitude, his willingness to help others, and his dedication to his fans.
How Much is BruceDropEmOff Net Worth?
Source: MEAWW
BruceDropEmOff’s net worth is estimated to be $2 Million. This substantial wealth is a testament to his success as a Twitch streamer and content creator. It showcases the value he brings to the platform and his ability to monetize his passion for gaming.
How He Achieved That?
Successful Twitch Career: BruceDropEmOff has built a successful career on Twitch, attracting a large audience with his entertaining streams.
Lucrative Sponsorships and Partnerships: With his popularity, BruceDropEmOff has secured lucrative sponsorships and partnerships that contribute significantly to his net worth.
Diversified Income Streams: Apart from streaming on Twitch, BruceDropEmOff may earn income through merchandise sales, brand collaborations, donations from viewers, and ad revenue.
Conclusion
In conclusion, BruceDropEmOff has achieved remarkable success as a Twitch Star, reflected in his estimated net worth of $2 Million. His captivating streams and engaging content have earned him a loyal fanbase and lucrative opportunities. However, it’s important to acknowledge the volatility of the streaming industry and the reliance on viewer support that streamers like BruceDropEmOff face. Aspiring content creators can draw inspiration from his journey while being aware of the challenges that come with building a successful career in live streaming.
Maximize your Black Ops 6 rewards—Create highlights from your best gameplay with with Eklipse
Eklipse help streamer improve their social media presence with AI highlights that clip your Twitch / Kick streams automatically & converts them to TikTok / Reels / Shorts
If you’ve been active on social media or engaged in Twitch chats, you might have come across the terms “KEK” or “KEKW.” While these expressions may seem perplexing if you’re not well-versed in geek culture, they hold significant meaning within the gaming community. In this article, we will delve into the origins and usage of KEK, explore its connection to World of Warcraft (WoW), and shed light on the popular Twitch emote known as KEKW!
In World of Warcraft (WoW), when players from opposing teams communicate via chat messages, their words appear cryptically to one another. Interestingly, when one team sends “LOL,” it is displayed as “KEK” to the enemy team. Over time, this WoW-specific term seeped into wider internet culture and found its way onto platforms like Reddit, Twitter, and eventually Twitch.
What is Twitch Emotes?
Emotes serve as expressive icons or images used in Twitch chat to convey specific emotions or reactions. Users can access these emotes through drop-down menus or by using unique codes associated with each emote. While some emotes are universally available to all users, others may be exclusive to certain chats or require additional browser add-ons for activation.
“KEKW” on Twitch Chat Meaning
Source: Player Bros
“KEKW” is an evolution of the original “KEK” term and has become a beloved emote among Twitch users. When someone types “KEKW” in a chat message, it triggers an image of a laughing man to appear alongside their text. However, it’s important to note that this emote is only accessible to users who have installed the BTTV or FrankerFaceZ add-ons on their browsers, as these extensions enhance Twitch’s features and emote library.
The Laughing Man Behind “KEKW”
The laughing man depicted in the “KEKW” emote is none other than the late Spanish comedian El Risitas. Known for his infectious laughter, El Risitas gained international fame through a television segment where he hilariously chuckled at various anecdotes. His laughter has since become a symbol of amusement and joy within the Twitch community.
Conclusion
To sum up, “KEK” turning into “KEKW” shows how internet culture changes, especially in gaming circles. Knowing these terms helps you connect with gamers on Twitch. When you see “KEK” or “KEKW,” you’ll get the joke and be part of the fun!
Maximize your Black Ops 6 rewards—Create highlights from your best gameplay with with Eklipse
Eklipse help streamer improve their social media presence with AI highlights that clip your Twitch / Kick streams automatically & converts them to TikTok / Reels / Shorts
In today’s digital age, Instagram has become a powerful platform for content creators and influencers to showcase their work and connect with their audience. Aspiring streamers and video editors often strive to gain a substantial following on Instagram to boost their online presence. However, it’s essential to focus on organic growth rather than resorting to unethical practices like buying fake followers or using instant follower services. In this article, we will explore five effective strategies that can help you gain 1,000 genuine followers on Instagram in just 5 minutes.
One of the key factors in attracting followers on Instagram is maintaining a consistent posting schedule. Regularly sharing high-quality content not only keeps your existing followers engaged but also encourages new users to follow your account. Aim for at least one post per day, ensuring that each post is visually appealing and relevant to your niche.
2. Optimize Your Posts
To maximize the visibility of your posts and attract more followers, it’s crucial to optimize them effectively. Start by using relevant hashtags that are popular within your niche. Research trending hashtags and incorporate them into your captions strategically. Additionally, make use of geotags to target specific locations and increase the chances of being discovered by local users.
3. Utilize Instagram Stories
Instagram Stories provide an excellent opportunity for engagement and attracting new followers. Take advantage of features like polls, quizzes, and interactive stickers to encourage user participation. Engaging with your audience through stories helps build a personal connection and increases the likelihood of gaining new followers.
4. Create Interactive Content
Source: Single Grain
Interactive content is highly engaging and can significantly impact follower growth. Consider incorporating features like contests, giveaways, or challenges into your posts or stories. Encourage users to tag their friends or share your content for a chance to win prizes or be featured on your account. This not only increases engagement but also exposes your account to new potential followers.
5. Understand Your Target Audience
To attract the right kind of followers, it’s essential to understand your target audience. Conduct thorough research on the demographics, interests, and preferences of your ideal followers. Tailor your content accordingly to cater to their needs and desires. By creating content that resonates with your target audience, you increase the chances of gaining genuine and engaged followers.
Conclusion
In conclusion, gaining 1k followers on Instagram in just 5 minutes is an ambitious goal that requires a strategic approach. By consistently posting high-quality content, optimizing posts with relevant hashtags, utilizing Instagram Stories effectively, creating interactive content, and understanding your target audience, you can attract genuine followers who are genuinely interested in your work. Remember to prioritize organic growth over shortcuts for long-term success on Instagram as a content creator or gaming streamer.
Maximize your Black Ops 6 rewards—Create highlights from your best gameplay with with Eklipse
Eklipse help streamer improve their social media presence with AI highlights that clip your Twitch / Kick streams automatically & converts them to TikTok / Reels / Shorts
Have you ever wanted to play a random clip from a streamer on Twitch? Maybe you want to show your viewers a funny moment from a recent stream, or maybe you want to surprise them with a clip from a streamer they don’t know about yet.
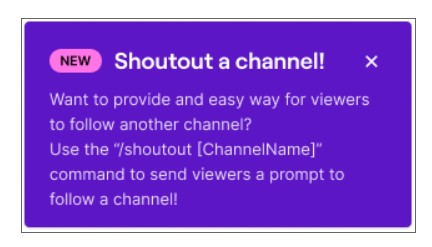
Twitch fosters interaction and community via features like raiding and shoutout commands with clips, enabling streamers to highlight others and give kudos to raiders. But how to play a random clip from a streamer on Twitch?
Luckily, it’s very simple! Now you can play a random clip from a raider using Twitch’s Shoutout command. Check this guide to learn how.
Step by Step Guide to Play Random Clip When Raided on Twitch
clip player download
There are three steps that need to be taken to play a random clip when raided on Twitch:
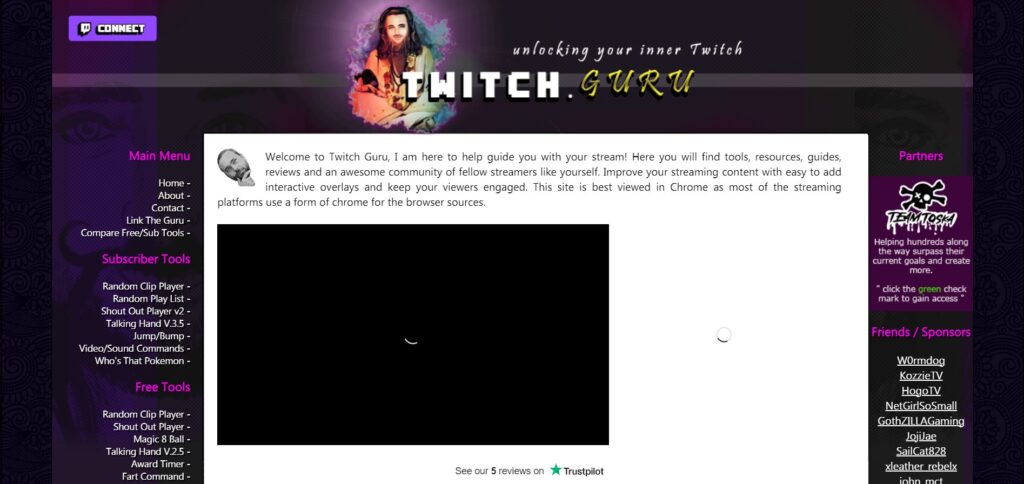
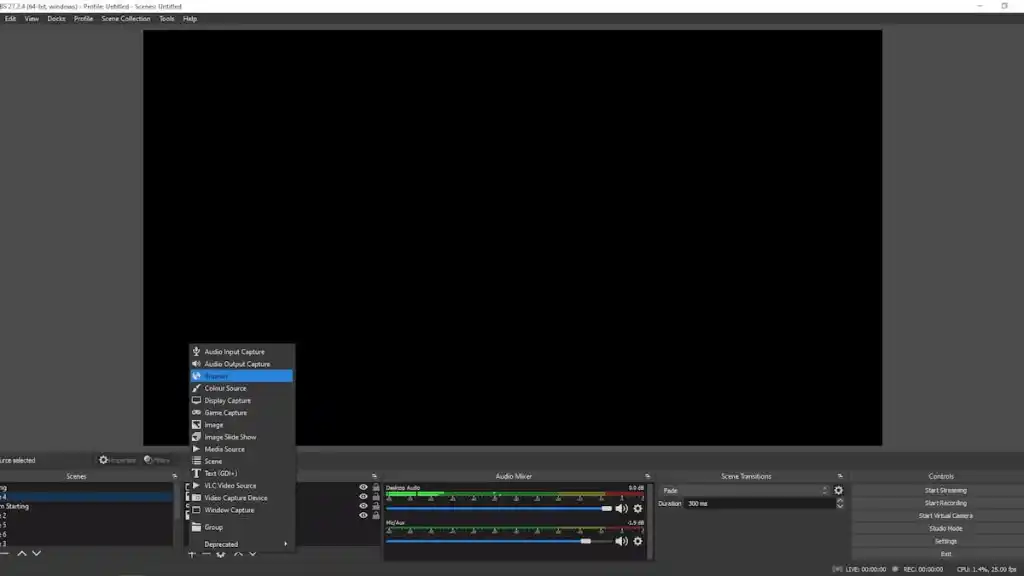
First step: Find a third-party tool like Twitch Guru.
Second step: Copy and paste the link from Twitch Guru into your broadcasting software, such as OBS or Streamlabs OBS, using the browser source.
Third step: Once all the setup is complete, you can try using the /shoutout command in your Twitch chat.
Now, let’s delve into the detailed instructions.
Step 1: Use Twitch.Guru to Upgrade your “Shout Out” Command
twitch guru shoutout not working
There are many tools to play a random clip from a streamer when raided on Twitch. One free and easy-to-use tool is Twitch.guru. It has a random clip player feature that you can use by following this guide.
Why Playing Random Clip From Streamer when Raided?
Playing a random clip from a streamer when raided serves several valuable purposes.
Firstly, it introduces diversity and excitement to the raiding experience. By showcasing different content creators and their unique highlights, it keeps the audience engaged and intrigued.
Secondly, it fosters a sense of community and collaboration among streamers. Featuring clips from other creators acknowledges their work and encourages reciprocal support.
Moreover, it offers recognition to raiders, who often appreciate seeing their contributions acknowledged. Overall, playing random clips during raids enriches the streaming ecosystem by promoting interaction, sharing content, and enhancing viewer experience.
Conclusions
That’s all you need to do when you want to play a random clip from a streamer when raided on Twitch. It’s as easy as 1-2-3!
Have you ever dreamed of experiencing Twitch raid moments on your stream? To achieve this, you’ll need to boost your channel’s visibility by creating highlight clips and sharing them on social media platforms like TikTok.
Let’s try AI-clipping tool from Eklipse.gg to boost your streaming presence in social media! Click banner below to learn more about it.
Maximize your Black Ops 6 rewards—Create highlights from your best gameplay with with Eklipse
Eklipse help streamer improve their social media presence with AI highlights that clip your Twitch / Kick streams automatically & converts them to TikTok / Reels / Shorts
How do you play a random clip from streamer when raided?
Use a chat bot command like “!clip” or “!random” to play a random clip from the streamer’s channel during a raid.
How do you watch streamers clips?
Visit the streamer’s channel and look for the “Clips” tab, or use the Twitch Clips website to search for clips by streamer or game.
How do you get a clip from a Twitch stream?
Visit the streamer’s channel and look for the “Clips” tab, or use the Twitch Clips website to search for clips by streamer or game.
How do you show random clips on Twitch?
Use a chat bot command like “!clip” or “!random” to display a random clip from the streamer’s channel during a stream
How to download someones Twitch clip?
Use a third-party tool or browser extension to download the clip from the streamer’s channel, or use the Twitch Clips feature to download the clip as an MP4 file.
Is there a clip command on Twitch?
Yes, many chat bots offer a clip command that allows viewers to create and play clips from the streamer’s channel.
With the ubiquity of AI technology, it’s no surprise that even our video editors are getting smarter. In fact, there is now a number of best AI video editor on the market that can help you create better videos, faster.
If you’re looking for a video editor that can give you a competitive edge, here are the top 6 best AI video editors to try in 2023.
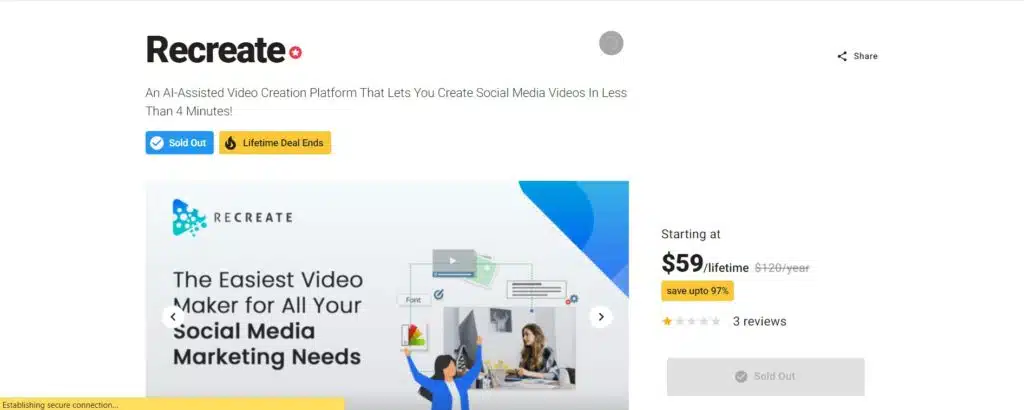
Recreate.ai tool can enrich your recordings video with colors, textual styles, activities, video advances, and inventive overlays. Furthermore, you can make content for any web-based media effortlessly.
Pros
Helpful elements
Free for projects under 3 min/50 MB
One of the most straightforward AI Video editors
Cons
Adds watermark to free projects
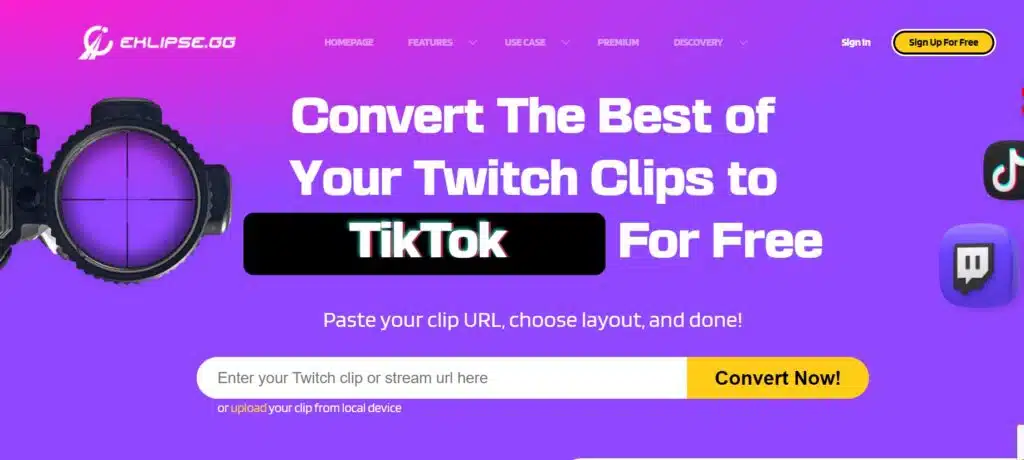
2. Eklipse.gg – Best AI Video Editor (Pro Choice)
Another AI-powered video editor that is worth trying is Eklipse.gg. This app actually has a more specific use case compared to others, since it’s targeting streamers to help them create more content.
Maximize your Black Ops 6 rewards—Create highlights from your best gameplay with with Eklipse
Eklipse help streamer improve their social media presence with AI highlights that clip your Twitch / Kick streams automatically & converts them to TikTok / Reels / Shorts
Web-based app (don’t need to download any software)
Can convert short videos to TikTok format
Can automatically create clips from streaming
Got many features available for free
Cons
This tool might have a specific use case for streamers
3. Glia Studio – AI Video Editor
GliaStudio by Gliacloud is an AI video editor that is packed with possibilities! They can edit a video with the quality of something you’d watch on the news.
If you want to make videos but don’t want to spend hours creating them, (or pay $1,000 per video), GliaStudio is a great choice for you.
Unfortunately, this AI video editor doesn’t have any free plan, and with only custom plan available to use.
Pros
Freeform accessible
Productive fundamental features like harvest, resize, and change
Quick working with cloud-based registering
Cons:
Freeform restricted to 1GB transfer and distributed storage
4. AIVO
AIVO, an AI video proofreader, takes all the tedious work to change content into a narrating video. Furthermore, it improves the work process and has capacities like changing, rethinking, and inserting outlines.
It has a large of free-copyright images from Unsplash and Pixabay, which allows you to have more flexibility to your creation.
Pros
Free to download
Admittance to Shutterstock, Unsplash, and Pixabay
Upgraded work process
Cons
You’ll need to pay around $15 for full version of the app
5. YouCam Video
Meet YouCam Video, a revolutionary AI video editing app designed to transform your videos with cutting-edge features.
Leveraging the potential of AI, this app offers a range of exceptional capabilities, including AI-driven effects, background blur, motion tracking, object recognition, and seamless integration with popular social media platforms such as YouTube and TikTok.
Pros
Advanced AI portrait detection, ideal for social media videos
Real-time skin beautification and AR effects for creative enhancements Cons:
Limited advanced editing features compared to professional video editors.
Empowering users with its advanced AI video generator feature, Synthesia facilitates the creation of professional-looking videos, producing realistic and engaging visuals effortlessly.
The app provides robust editing tools, including color correction and cropping, along with advanced effects like motion tracking and 3D rendering.
Pros
Specializes in creating music videos using MIDI files and AI-driven animations
Allows users to create visually engaging content without the need for advanced animation skills
Cons
Limited customization, not suitable for general video editing.
That’s all the best AI video editor that you can try to use in 2022. Have you tried one of it? Don’t forget to check Eklipse blog from time to time for more software list recommendations!
Every content creator now has to know how to make a horizontal video into vertical for TikTok. This is essential for maximizing your audience’s convenience and boosting your popularity.
When creating TikTok content, it’s crucial to shoot videos that perfectly fit various screen sizes. Numerous studies have found that vertical videos are the best for this, as they seamlessly fit screens and allow easy content consumption on smartphones.
In today’s post, we will provide you with some tips on how to convert a horizontal video into a vertical format for TikTok. Without further ado, let’s dive in!
There are many options you can do to make a vertical video for TikTok.
The basic thing you can do is shoot your videos vertically, or you might want to use tools if you are looking to repurpose your landscape video to TikTok. Otherwise, you can stack two landscape videos into one so it becomes a vertical format.
Let’s breakdown those tips one by one!
1. Shoot your videos vertically
One of the basic things to make vertical videos for TikTok is by shooting your video vertically.
This way, you won’t have to worry about changing the format of your video once you are done. Vertical videos are much easier to edit and afford you a lot of flexibility. Here’s how you can do that:
Open the TikTok app.
Press (+) button in the main interface.
Hold your phone in a vertical position.
Choose the duration of videos (15s, 60s, or 3m).
Press the red button to start recording.
After you’re done, you can apply all the effects and transitions then save your video.
2. Using auto-reframing tools
If you’ve already created a content but it’s in the landscape format like the one on YouTube, you might want to convert it into a TikTok vertical format.
To make horizontal video vertical for TikTok online, you can use auto-reframing tools – something like Eklipse.gg!
Maximize your Black Ops 6 rewards—Create highlights from your best gameplay with with Eklipse
Eklipse help streamer improve their social media presence with AI highlights that clip your Twitch / Kick streams automatically & converts them to TikTok / Reels / Shorts
Other than being an AI highlights generator from a stream, Eklipse now provides TikTok converter tool. With this tool, you can make any horizontal video become vertical easily!
Plus, you can edit the video as you want in Eklipse.gg. Add channel name stickers or copyright-free music with a plethora of layouts and overlay templates to choose!
All are available for free, and you can use the tools with your browser only! Try Eklipse now by clicking the link on the button above!
3. Stack photos and clips on top of each other
Another way to turn a landscape video into a vertical one is to stack clips on each other. This is great when you are collaborating with another creator on TikTok or want to make a comparison video. With the right editing, you can make the video look very aesthetic. You can do the same with photos, and stack them on top of each other.
Why Do You Need To Make a Horizontal Video Vertical for TikTok?
Maybe you are now wondering why you need to convert horizontal videos to vertical? Here’s some benefit of creating vertical TikTok content:
Maximizing Audience’s Convenience
Everyone is basically holding their smartphone vertically. It has become the default orientation for most tasks in this gadget. Therefore, the majority of audience prefer not to bother with rotating the screen horizontally.
Preferred Across Social Media Platforms
The 9:16 vertical aspect ratio stands out as the optimal format for short-form video platforms such as TikTok and Instagram Reels. Interestingly, even traditional social media platforms like Facebook, Snapchat, and YouTube now support vertical videos.
FAQ
Q1. Is it more advantageous to shoot videos in vertical or horizontal format for TikTok?
Vertical videos are becoming increasingly popular on mobile-centric platforms like TikTok, where users predominantly consume content on their smartphones. This format aligns with the natural way users hold their devices, providing a more accessible and engaging viewing experience.
Q2. What is the recommended format for TikTok horizontal videos?
The recommended dimensions for TikTok videos are 1080×1920, with an aspect ratio mirroring that of a standard smartphone screen, which is 9:16.
Q3. How can you rotate videos on TikTok?
On the editing page, locate the “Rotate” icon positioned above the trimming bar. Simply click it to rotate your TikTok videos by 90, 180, or 270 degrees. Afterward, tap on the “Next” button to upload your rotated TikTok video.
So these are some ways you can use to modify the orientation of your TikTok videos. Your first choice should be to record videos in a vertical mode. If you have already recorded a video in horizontal mode, you can try applying the methods we talked about. Stay tuned for Eklipse’s video editing updates if you want to give your TikTok videos a professional look!
As a Kick streamer, creating engaging content that retains your viewers’ interest is crucial. Making a Kick highlight from your stream that shows your best moments is an excellent way to achieve this.
In this article, we will guide you on how to make Kick highlight from stream. Keep reading and let’s learn how to do it!
Creating a kick stream highlight is a great way to showcase your best moments and attract more viewers to your content.
A highlight reel can help you stand out from the crowd and give potential viewers a taste of what they can expect from your streams. In addition, you can share highlights to social media to reach a wider audience and build your persona.
To start creating highlight from your Kick stream, you can follow this step-by-step guide:
Step 1: Live Stream to Kick
The first step is to live stream your content on the Kick platform. Whether you’re playing a game, doing a talk show, or just chatting with your viewers, make sure to capture the best moments of your stream.
The easiest way to stream your content to Kick is by using Open Broadcasting Software (OBS). For a more detailed guide on setting up OBS for Kick streaming, check out our article on “How to Stream on Kick Using OBS Studio”.
Step 2: Download Your Kick VOD
After you’ve finished streaming, download your VOD (Video on Demand) from Kick. To do this, you’ll need to set your VOD to public. After that, you can use a Chrome extension to extract your Kick stream VOD URL. Don’t forget to copy and paste it into VLC media player for downloading it.
Next, after you’re done downloading your Kick VOD, you’ll need to upload it to Google Drive, and set the link to be public. This will allow you to easily access and allow tools like Eklipse.gg to access your content.
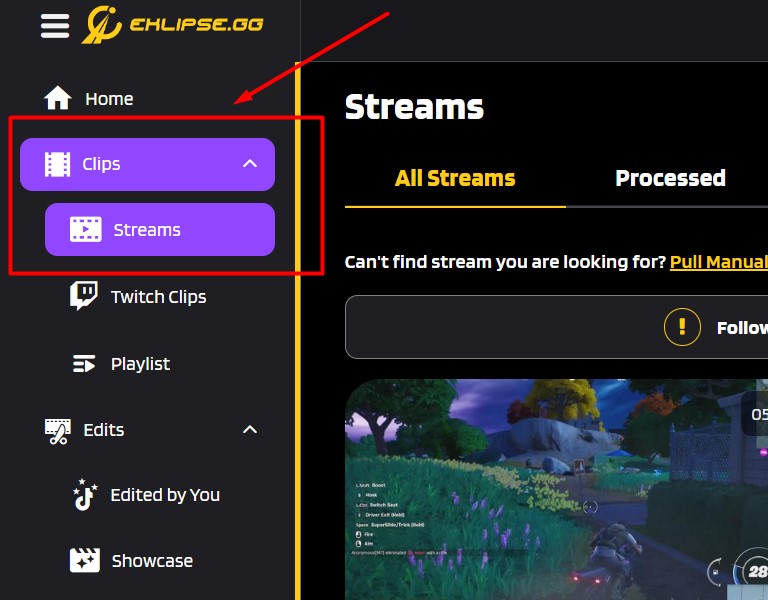
Step 4: Use Eklipse to Create the Highlight
Once your VOD is uploaded, the next step is to use an AI highlight generator tool like Eklipse.gg to create your highlights. This tool can automatically create highlights from your stream, so there’s no need to scroll through hours of your VOD anymore.
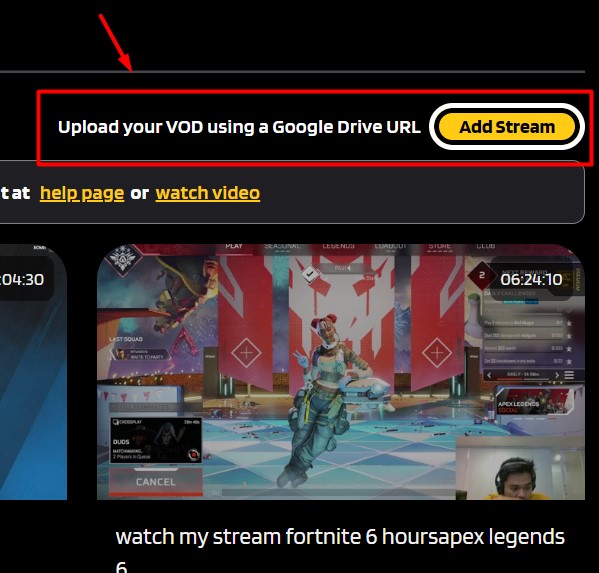
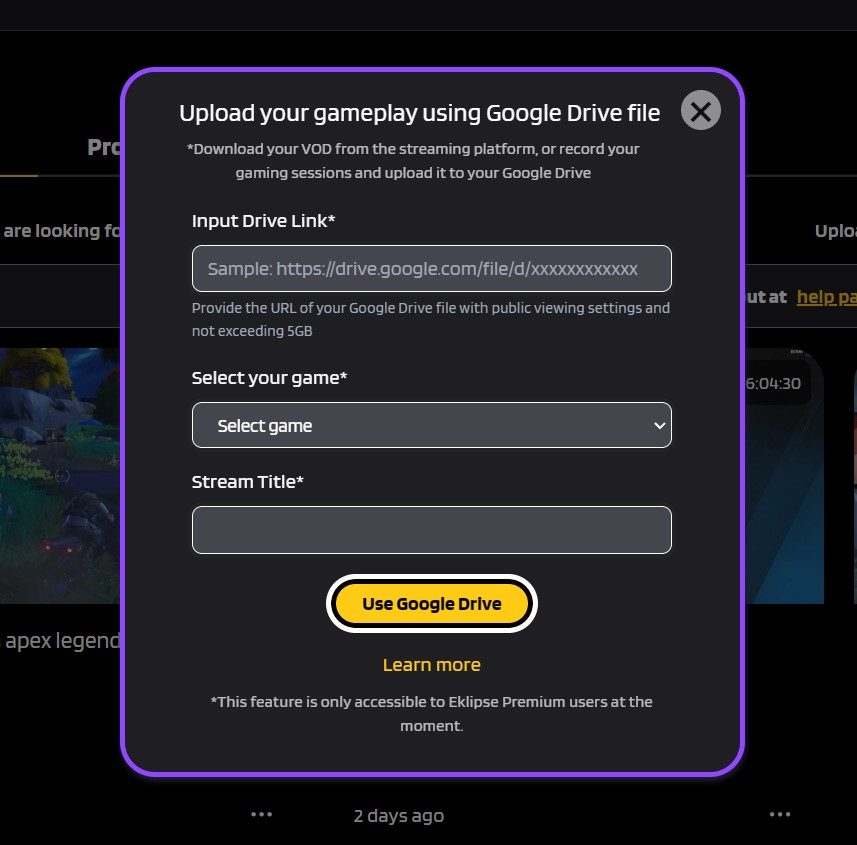
To use Eklipse for creating your stream highlights automatically, all you need to do is paste your Google Drive link to Eklipse and hit the “Add Stream” button. Here are the step-by-step instructions:
The menu is on the the left side of Eklipse Dashboard
Click the “Add Stream” .
The button is on the right side of your interface
Paste your Google Drive link in the designated box.
Select the game that you played on your Kick VOD and write your “Stream Title.”
After that, hit the “Use Google Drive” button.
Eklipse will process your stream for a while. When it’s done, Eklipse will give you the most exciting and funny highlights from your Kick VOD content so you can easily share it on social media or use it to create compilation content!
Step 5: Share to Social Media!
Finally, share your kick highlight on social media platforms like TikTok, Facebook Reels, or YouTube Shorts. Eklipse also has a “Convert to TikTok” tool that has simple drag-and-drop video editor workflow.
Make sure to use relevant hashtags and tag your streaming friends and communities to get maximum exposure. You can also upload your highlight to YouTube or other video-sharing platforms to reach a wider audience.
FAQ
Q1. What are Kick Clips, and how are they generated?
Kick Clips are short videos, up to 60 seconds in length, generated from a Kick livestream. These clips can be created by any logged-in user watching your stream or by the streamer themselves.
Q2. Does Eklipse GG integrate with Kick for stream clipping?
Absolutely! Eklipse AI now seamlessly integrates with Kick, allowing you to have your streams automatically clipped. Connect your Kick account to Eklipse for effortless stream highlights.
Q3. Can I clip from Kick VODs (Video on Demand)?
Navigate to the desired stream, hover your mouse over the video player, and look for the “Clip” button. Currently, it appears that clips can only be created for livestreams that are currently happening, not for previous streams.
Q4. Is Eklipse GG a free service?
Yes, Eklipse is 100% free, setting it apart from other Convert to TikTok tools. Enjoy a comprehensive suite of features, including templates, channel name stickers, auto-captions, and custom text. Enhance your online presence and attract more viewers effortlessly. Try Now!
Conclusion
Creating a kick highlight from your stream is a fun and effective way to showcase your best moments and attract more viewers to your content. By following these simple steps, you can create a polished and engaging highlight that will leave a lasting impression on your audience.
So why wait? Start making kick highlights today and take your streaming game to the next level!
Maximize your Black Ops 6 rewards—Create highlights from your best gameplay with with Eklipse
Eklipse help streamer improve their social media presence with AI highlights that clip your Twitch / Kick streams automatically & converts them to TikTok / Reels / Shorts
Adding pictures to your TikTok videos without the slideshow effect is a great way to break up your content and make your videos more visually appealing. It can also be a good way to add humor or commentary to your videos.
There are a few different ways to add pictures to your TikTok videos without the slideshow effect. One way is to use the Green Screen effect. Another way is to use a video editing app like CapCut or InShot.
In this article, we will show you how to add pictures to your TikTok videos without the slideshow effect using both the Green Screen effect and a video editing app. We will also provide some tips on how to make your videos look their best.
Source: CNET
Whether you’re using an Android, iPhone, or iPad, these techniques will help you customize your TikTok content and make it stand out from the crowd.
CapCut is another fantastic TikTok video editor app that allows you to add pictures to your TikTok videos without creating a slideshow. Here’s how:
Download and install CapCut from your device’s app store (available for both Android and iOS).
Open CapCut and import the video clip where you want to add pictures.
Tap on “Media” at the bottom of the screen and select “Image.”
Choose multiple pictures from your gallery that you want to insert into the video.
Adjust the duration and position of each picture by dragging them on the timeline.
Customize transitions or effects between each picture for a seamless integration.
Preview your edited video to ensure it looks just the way you want.
Export the video and save it to your device.
Open TikTok, tap on the “+” button, and select the edited video from CapCut.
Add any additional edits or effects within TikTok if desired, and post your final creation.
Expert Q&A:
Q: Can I add captions or stickers to my pictures using these methods?
A: Yes! Both Green Screen with Multiple Pictures and CapCut allow you to add captions, stickers, and other overlays to enhance your TikTok videos further.
Tips:
Experiment with different transitions or effects to make your pictures blend seamlessly into your videos.
Use high-quality images for better visual impact on TikTok.
Consider adding background music or sound effects to complement your pictures.
Conclusion:
Adding pictures to your TikTok videos without creating a slideshow is easier than you might think. By using either the Green Screen effect with multiple pictures or CapCut app, you can customize each photo’s appearance and create unique content that stands out on TikTok. Remember to experiment with different techniques, transitions, and effects to unleash your creativity fully.
Now that you have learned these two methods, go ahead and start adding captivating pictures to elevate your TikTok game!
TikTok is the world’s most popular short-form video app, and it’s only getting bigger. But creating TikTok videos can be time-consuming, especially if you’re used to creating horizontal videos for other platforms like YouTube or Twitch.
That’s where Eklipse comes in. Eklipse is a powerful tool that uses advanced AI to automatically convert horizontal videos to vertical videos in seconds. So, if you have a library of horizontal videos that you want to share on TikTok, Eklipse can help you save a ton of time and effort.
Sign up for a free trial of Eklipse today and start converting your horizontal videos to vertical videos for TikTok automatically with our advanced AI.
Maximize your Black Ops 6 rewards—Create highlights from your best gameplay with with Eklipse
Eklipse help streamer improve their social media presence with AI highlights that clip your Twitch / Kick streams automatically & converts them to TikTok / Reels / Shorts
Are you looking for ways to improve your Kick stream viewer engagement? Whether you’re an experienced streamer or just starting out, there are a few strategies that can help you attract and retain more viewers.
In this article, we’ll share some tips to help you increase your Kick stream viewer engagement. Let’s dive in!
The title of your stream is the first thing viewers will see, so it’s essential to make it catchy and attention-grabbing.
Use action words, exciting phrases, and keywords that describe your content to create a title that stands out. Your title should be clear and descriptive, but also engaging and compelling.
Respond to comments, ask questions, and encourage interaction during your stream. Make your viewers feel like they’re a part of the experience, and they’ll be more likely to stick around and come back for more.
In addition to responding to comments, you can also create polls, quizzes, create a play-together session or even open a media share donation session to engage with your audience.
You can try different interactive strategies between you and your viewers, and then focus on one or two successful sessions per week to keep your audience engaged.
3. Be authentic
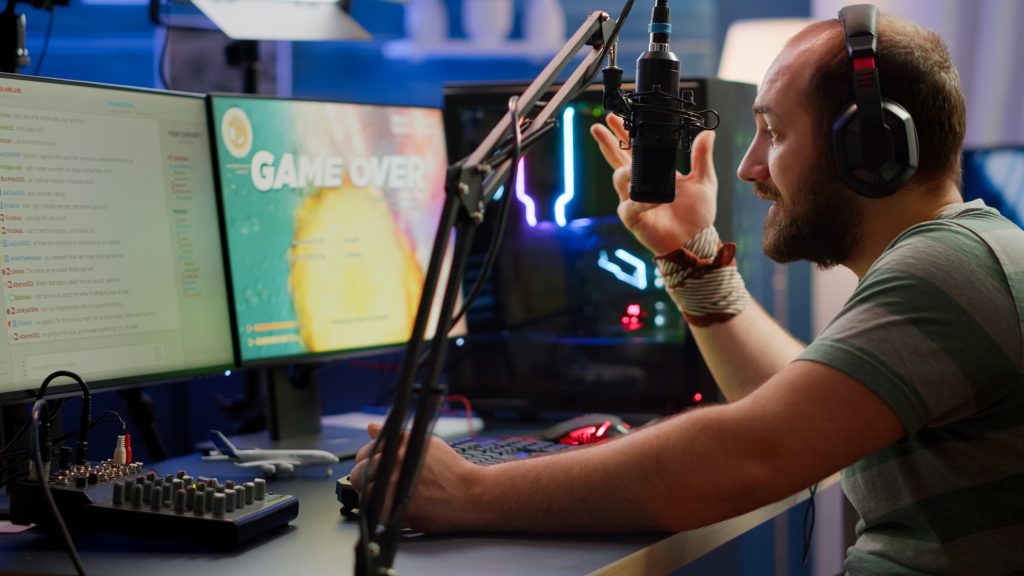
Nevous streamer losing videogame, game over for man cyber playing online space shooter games with headset. Player performing on powerful computer talking with players on chat in gaming competition
Viewers can tell when you’re being fake, so it’s essential to be authentic during your Kick streams.
Be yourself, and don’t try to put on a persona that doesn’t feel natural. Your viewers will appreciate your honesty and be more likely to connect with you on a deeper level.
While a wacky and funny persona may be more favorable for viewers, you shouldn’t blatantly fake that persona just because it’s popular. The key is to strike a balance between being yourself and presenting the best version of yourself that is friendly and engaging.
4. Offer giveaways and rewards
Everyone loves free stuff, and giveaways can be an effective way to boost viewer engagement.
Consider offering prizes, exclusive content, or other rewards to viewers who engage with your stream. This can motivate your viewers to participate and keep them coming back for more.
Remember to keep interactivity while doing giveaways. Instead of just doing a random raffle with no interaction, you can call on your viewers and ask them questions or do quizzes.
Another idea could be to have a play-together session and set rules that allow your viewers to win a prize when they meet the game objective.
Collaborating with other streamers is a great way to expand your audience and boost viewer engagement on Kick. Collaboration adds freshness to your stream content and creates a special event that may happen only once.
To collaborate, you can look for other streamers who create similar content and consider streaming together or hosting each other’s streams. This can help you reach a new audience and build relationships with other creators in your community.
6. Use high-quality visuals and sound
The quality of your stream’s visuals and sound can have a significant impact on viewer engagement.
Make sure your stream is visually appealing and easy to watch, with clear audio and high-quality visuals. Invest in good equipment and software to ensure your stream looks and sounds professional.
Share your stream on your social media profiles, and consider joining online communities and groups related to your content. This can help you connect with new viewers and increase engagement with your existing audience.
Other than that, you should consider creating highlights of clips from your live stream session.
You can try tools like Eklipse.gg, an AI highlights generator that automatically creates highlight moments from your stream. Additionally, it has a “Convert to TikTok” feature so that you can easily edit any of your highlights into a vertical format that is currently trending.
By sharing your highlights content on social media platforms like TikTok, Reels, or YouTube Shorts, you can expand your discoverability and ultimately increase your viewership while boosting engagement through the daily digest of your content. Try it now!
Conclusion
In conclusion, increasing your Kick stream viewer engagement is all about creating a fun, engaging experience for your viewers.
Use these tips to attract and retain more viewers, and don’t be afraid to experiment with different strategies until you find what works best for you. With time and effort, you can build a loyal following on Kick and create content that resonates with your audience.
Maximize your Black Ops 6 rewards—Create highlights from your best gameplay with with Eklipse
Eklipse help streamer improve their social media presence with AI highlights that clip your Twitch / Kick streams automatically & converts them to TikTok / Reels / Shorts
Watching our beloved Twitch streamers is always a delight, but now and then, those pesky ads can intrude upon the fun. If you are in such a predicament, why not delve into the realm of the top 10 Twitch ad blockers of 2024?
We recognize the significance of ads in helping streamers earn their livelihood, yet their abrupt interruptions can dampen the viewing experience. Nevertheless, it’s important to remember that employing Twitch ad blockers isn’t the ideal route if you wish to support your favorite streamer. Donating or subscribing to them serves as a more effective demonstration of your backing.
However, for those inquisitive souls seeking the ultimate Twitch AdBlock solution, let’s continue scrolling to uncover the answer!
You may be aware of the importance of having a good ad-blocker if you want to stream without annoying commercials showing up on your screen. Thankfully, we have TwiBlocker.
TwiBlocker is a Chrome extension that will help you get rid of Twitch quickly. The interesting thing about this tool is it won’t require you to use a VPN, any external proxy, or even third-party scripts.
You can instantly say goodbye to all Twitch ads with only a single click on the toggle button. Sounds interesting, doesn’t it?
In addition to that, TwiBlocker can also block any ads from your Twitch stream without reducing the quality of your streaming. So, you can still enjoy high-quality streams without hassle.
Key Features:
Blocks video ads on Twitch
High-quality streaming without compromising video quality
Easy toggle ON/OFF for ad blocking
Displays a message after blocking ads
No external proxy, VPN, or third-party scripts used
Pros:
Effective at blocking preroll ads
Blocks ads on Twitch
Easy to use and install
Does not require any technical knowledge
Can be used on multiple devices
Cons:
Does not work consistently
Causes the stream to freeze or stop playing
Requires manual adjustments to the ream quality
Best For: Users who primarily watch Twitch and want to block video ads without compromising their streaming experience.
Price: Free
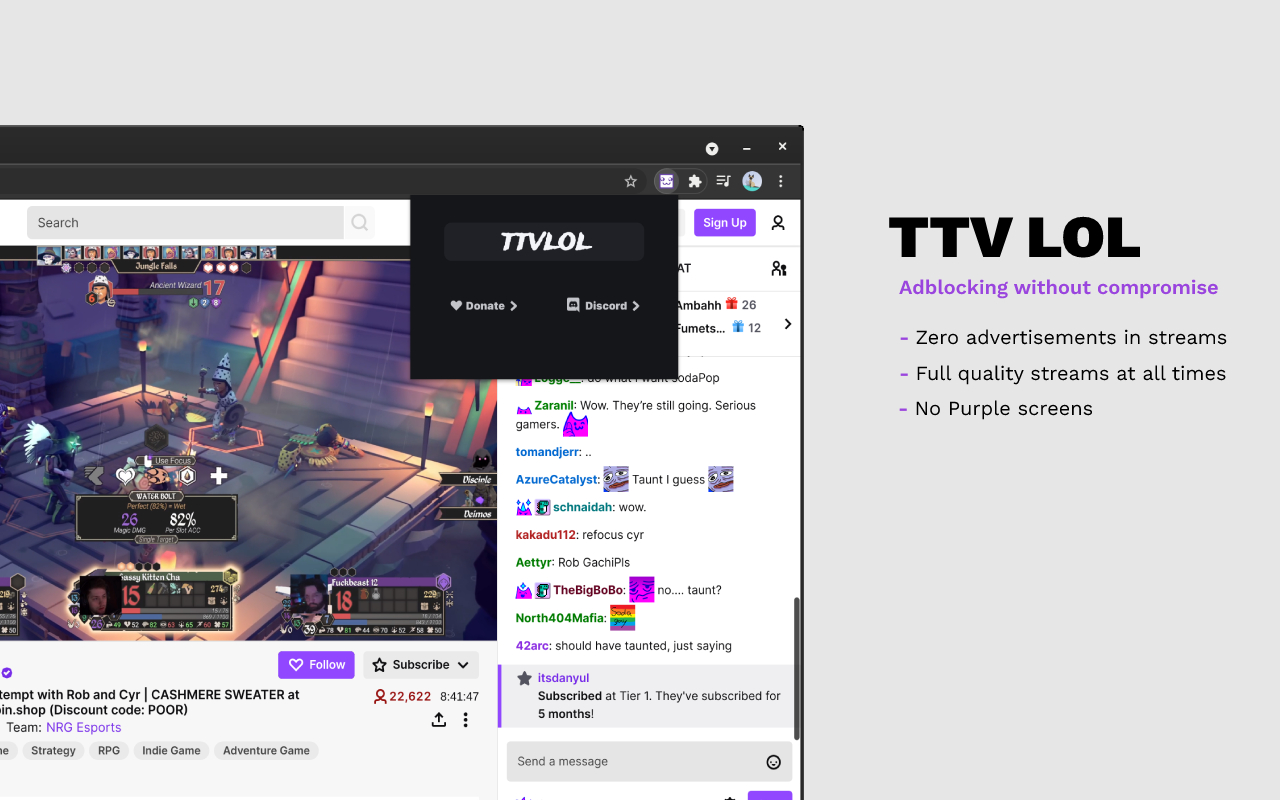
2. TTV LOL: Best Custom Proxy Twitch AdBlock
Source: ttv.lol
Another extension to try to get ad-free streaming is TTV LOL. TTV LOL is a popular Twitch ad blocker that many people recommend. It has been downloaded over 30,000 times with 4 stars from the Chrome store.
You can put this extension both on Google Chrome or Firefox. Additionally, TTV LOL promises to block livestream ads without affecting video quality nor causing purple screens of death like other extensions might do so check out all your favorite streams guilt-free.
Key Features:
Blocks video ads on Twitch
Improved ad-blocking method
Uses standard HTTP proxies for better proxy command-blocking and privacy
Stream status widget in the popup
Whitelisting channels and custom proxy support
Do not remove banner ads or ads from VODs
Recommended to use TTV LOL uBlock Origin for the best experience
Pros:
Effective at blocking video ads
Improved ad-blocking method
Better proxy compatibility and privacy
Stream ad-blocking for enhanced user experience
Custom proxy support for users who want to use their proxies
Cons:
Do not remove banner ads or ads from VODs
May work inconsistently across all streams
The extension is not updated frequently, which may lead to compatibility issues
Best For: Users who want to use a custom proxy for enhanced privacy and security.
Price: Free
3. uBlock Origin: Best Customizable Twitch AdBlock
Source: Make Tech Easier
uBlock Origin could be your alternative if you are looking for a tool that can quickly block any annoying commercials while enjoying your favorite stream.
What’s so special about this tool is that uBlock doesn’t take up too much space in your memory. So, it will be a lot more efficient for your storage. As with other previous tools, uBlock Origin won’t affect the quality of the stream while blocking the ads.
Key Features:
Blocks ads, trackers, coin miners, popups, and other unwanted content
CPU and memory efficient
Supports multiple browsers including Chrome, Chromium, MS Edge, Opera, Firefox, and Safari
Available for desktop and Android versions
Includes various filter lists such as EasyList, EasyPrivacy, Peter Lowe’s Blocklist, Online Malicious URL Blocklist, and uBO filter lists
Allows users to select additional lists and create custom rules
Supports host files for blocking specific domains
Open-source with public license (GPLv3)
Pros:
Supports multiple browsers and platforms
Highly customizable with various filter lists and rules
Open-source and free
Efficient on CPU and memory
Supports host files for blocking specific domains
Cons:
Users need to manually select and configure filter lists and rules
May require additional technical knowledge for advanced features
Some users may experience issues with compatibility or performance
Best For: Users who want to customize their ad-blocking experience with various filter lists and rules
Price: Free
4. Purple Ad-Block: Twitch AdBlocker to Improve Speed and Privacy
Source: Comparitech
The next Twitch AdBlock option that should be on the list is Purple Ad-block. It is one of the most popular ad-blocking tools available for Twitch users. You can install it in both Chrome and Firefox.
However, you may want to consider getting it from Github if that’s your preference. This tool works by proxy M3U8 playlist files so videos don’t have annoying advertisements playing during them.
Only working on the official Twitch Adblock site means there are fewer chances of tripped triggers from malware or other unwanted software trying to get through.
Key Features:
Blocks ads on websites, including Twitch
Simple and attractive user interface
Supports multiple browsers including Chrome
Offers filter lists and custom filters
Allows website whitelisting
Blocks specific elements on a web page
Supports local caching for improved website speed and privacy
Pros:
Effective at blocking ads
Simple and easy to use
Supports multiple browsers
Offers customization options through filter lists and whitelisting
Supports local caching for improved website speed and privacy
Cons:
No information on script-blocking capabilities
No information on pop-up blocking capabilities
No information on the effectiveness of blocking specific elements on a web page
Best For: Users who want to improve their website speed and privacy through local caching.
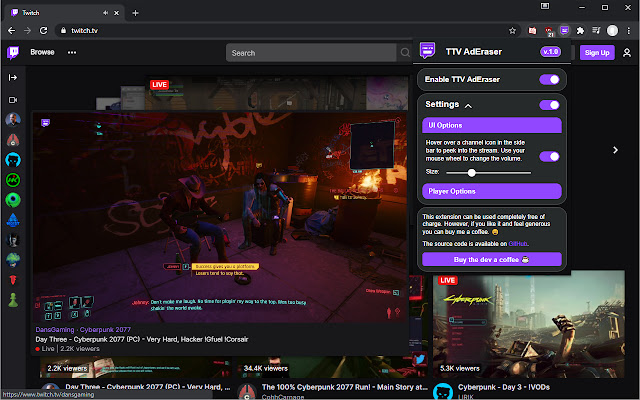
5. TTV AdEraser: Best Twitch AdBlock to Enhance Watching Experience
Source: TTV AdEraser
Users on Reddit have begun doubting the ability of this ad block to cope with purple screen errors. But V1.2 has fixed them. The developer promises that they will continue working hard to make sure these problems don’t come back in future updates.
Anyway, TTV AdEraser seems to be unique since it’s capable of muting any ads in Twitch without actually blocking them. It will turn the ads into a small mini-player in the bottom left corner of the page when they appear.
Then, it will hide again once the ad is over. So, you can still support your favorite streamers while not bothering to watch the ads themselves.
Key Features:
Blocks ads on Twitch live streams
Displays muted ads in a mini-player in the lower left corner of the page
Allows users to choose whether to display the mini ad player or not
Supports channel points
Detects and reloads the stream player if it encounters an error
Prevents streams from lowering their quality when in the background
Available on the Chrome Web Store
Open-source with an MIT license
Pros:
Effective at blocking ads
Offers a unique mini ad player feature
Supports channel points
Detects and reloads stream player errors
Prevents quality degradation when in the background
Available on the Chrome Web Store
Open-source with an MIT license
Cons:
May not work consistently across all streams
Users have reported issues with the extension not blocking ads effectively
The extension is still in development and may be buggy
Best For: Users who want to enhance their Twitch experience with features like channel points and stream player error detection
Price: Free
6. AdBlock Plus: Popular Twitch AdBlock
Source: Firefox adds-on Mozilla
AdBlock Plus is a popular browser extension that effectively blocks ads on various platforms, including Twitch, Facebook, and YouTube. It uses a combination of filters and algorithms to identify and block ads, ensuring that you don’t see any unwanted content.
Additionally, AdBlock Plus is available for both PC and mobile devices, allowing you to access it on multiple platforms without any issues. This means you can use it on your desktop computer, laptop, tablet, or smartphone without worrying about compatibility issues.
Key Features:
Blocks ads on websites
Supports multiple browsers including Chrome, Firefox, Safari, and Internet Explorer
Offers customizable filter lists
Allows users to whitelist specific websites or elements
Includes features like Acceptable Ads, which allows non-intrusive ads to be displayed
Supports tracking protection
Available for desktop and mobile devices
Pros:
Customizable filter lists for tailored ad-blocking
Supports multiple browsers
Offers Acceptable Ads feature for non-intrusive ads
Tracks and blocks tracking scripts
Available for both desktop and mobile devices
Cons:
Some users may find the advanced features and options confusing
Some users may not like the fact that Adblock Plus accepts money from companies to whitelist their ads
Some users may experience issues with compatibility or performance
Best For: Users who want a reliable and widely supported ad blocker for both desktop and mobile devices.
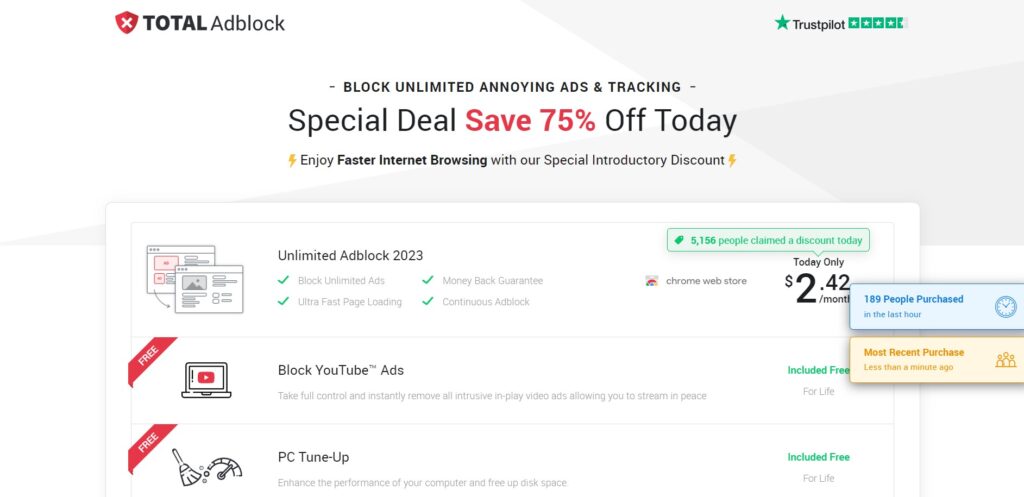
Total Adblock is one of the apps that can successfully eliminate all ads, pop-ups, notifications, and trackers on Twitch. It has a customization option, that allows you to whitelist some sites that you want/don’t mind seeing ads. It also comes with antivirus in the pack, so you’ll be protected from malware or spyware on the internet.
Key Features:
Blocks ads on websites, including YouTube video ads
Blocks third-party trackers to protect privacy and information
Improves page load times and enables faster browsing
Available as a browser extension and mobile app
Offers a free version with decent ad-blocking and tracker-blocking features
Premium plan includes TotalAV antivirus protection
Supports Android and iOS devices
Pros:
Easy to set up and use
The premium plan includes antivirus protection
Supports multiple platforms
Blocks trackers to protect privacy
Improves page load times
Cons:
The free version excludes the top 15,000 websites
Some users reported difficulty canceling payments
Annoying pop-ups prompt users to upgrade to premium
Best For: Users who prefer a premium ad blocker with various features and antivirus protection
Price: US$29 per year (promotional price, might change)
8. AdLock: Best Twitch AdBlock App
AdLock is a popular ad blocker that effectively blocks ads on various platforms, including Twitch, Facebook, and YouTube. It offers a range of features such as whitelisting, blacklisting, and blocking of different types of ads like pop-up ads, tracking, and video ads. AdLock is available for both PC and mobile devices and provides 24/7 customer support through email, phone, and a knowledge base. It is considered a good ad blocker, although it may not be the best available, and is particularly effective for blocking social media ads.
Key Features:
Blocks ads on websites, including YouTube video ads
Blocks third-party trackers to protect privacy and information
Improves page load times and enables faster browsing
Available as a browser extension and mobile app
Offers a free version with decent ad-blocking capabilities
The premium plan includes additional features like anti-malware and social media ad-blocking
Supports multiple platforms including Windows, macOS, Android, and iOS
Offers 24/7 customer support
Pros:
Easy to set up and use
The premium plan includes additional features like anti-malware and social media ad-blocking
Supports multiple platforms
Blocks trackers to protect privacy
Improves page load times
Cons:
Some users reported difficulty canceling payments
Not as effective as some premium ad blockers
Limited customization options
Best For: Users who prefer an adblocker app rather than just an extension
NordVPN’s Threat Protection is an additional layer of security that actively scans and blocks risky or malicious sites, files, and applications without requiring a VPN connection.
This feature is included in all NordVPN plans and is available for different operating systems. It offers users an extra layer of security beyond the standard VPN protection, making it a valuable feature for those who want enhanced online security.
Key Features:
Blocks ads, including pop-ups, YouTube ads, and more
Blocks malicious websites and trackers
Scans downloaded files for malware and viruses
Offers DNS filtering for mobile devices
Available on Windows, macOS, Android, and iOS
Includes antivirus capabilities
Provides real-time protection against malware and viruses
Blocks phishing domains and links
Supports multiple devices and operating systems
Pros:
Comprehensive security features, which include antivirus capabilities and real-time protection against malware and viruses
Best For: Users who want a comprehensive adblocker with antivirus, security, and privacy protection
Price:
NordVPN Threat Protection is included in the NordVPN subscription package, so the price listed is for the NordVPN subscription.
Basic plan US$12.99 per month (monthly billing)
Plus plan US$13.99 per month (monthly billing)
Complete plan US$14.99 per month (monthly billing)
10. Surfshark CleanWeb
Source: Surfshark
Surfshark’s CleanWeb is an ad-blocking feature that works on web browsers and across apps. It alerts users to sites that pose potential risks for malware exposure, providing an additional layer of protection against malicious content. CleanWeb is included in all Surfshark plans, making it a standard feature for users who want a secure VPN and powerful ad blocker.
Key Features:
Blocks ads and trackers across multiple platforms, including browsers and apps
Includes features like a pop-up blocker, data breach alert, and malware alert
Available as a browser extension for Chrome, Firefox, and Edge, as well as a feature within the Surfshark VPN app
Offers DNS filtering and a list of known malicious ads and websites to block intrusive ads and trackers
Compatible with all major devices and browsers
Included in all Surfshark VPN subscription packages at no extra cost
Pros:
Offers a range of features beyond basic ad blocking, including pop-up blocking and data breach alerts
Easy to use and set up
Compatible with multiple platforms and devices
Included in all Surfshark VPN subscriptions
Offers robust protection against online threats
Cons:
Some users may find the additional features overwhelming or unnecessary
Limited customization options for the ad-blocking settings
May not be as effective against certain types of ads or trackers
Best For: Users who are already using Surfshark VPN and want to enhance their browsing experience with CleanWeb
Price:
Free with limited features
Surfshark Starter US$15.45 per month (monthly billing, including Surfshark VPN)
Surfshark One US$15.95 per month (monthly billing, including Surfshark VPN)
Surfshark One+ US$17.95 per month (monthly billing, including Surfshark VPN)
Choosing the Ideal Twitch AdBlocker: What to Consider
Selecting the best ad blocker for Twitch can be overwhelming with numerous providers available. To make an informed decision, focus on these key criteria:
1. Considerations for Devices and Browsers
Verify compatibility of adblocker with your preferred browser for Twitch streaming and your device’s operating system.
2. Additional Features
Beyond ad blocking, seek features like an included VPN or antivirus for enhanced data and device security.
Ensure the chosen ad blocker effectively handles Twitch video ads and trackers. Look for top-rated blockers that also combat various malicious ads and online threats.
3. Price
Choose an ad blocker based on the value it offers. Higher cost doesn’t guarantee suitability; prioritize features aligning with your needs.
Why Block Twitch Ads?
Blocking Twitch ads offers more than just resisting corporate intrusion; there are compelling reasons to opt for a reliable Twitch ad blocker:
Seamless Streaming: Prevent interruptions and create a smooth, ad-free streaming experience.
Stop Subscription Ads: Even with a paid subscription, ads may persist; an ad blocker ensures an ad-free experience.
Avoid Loud Ads: Sidestep jarring video ads that can disrupt your experience, ensuring a more enjoyable viewing session.
Final Thoughts
Choosing the right ad blocker for Twitch is crucial to improve your viewing experience and keep those annoying ads at bay. When selecting an ad blocker, consider its compatibility with your devices and any additional features it may offer, such as antivirus protection.
After reviewing several options, TwiBlocker stands out as a reliable choice. This Chrome extension effectively blocks ads without the need for additional tools like VPNs. It’s easy to use, allowing you to quickly enable or disable it, and it excels at blocking video ads, ensuring a seamless Twitch experience.
If you are streamers who produce content on Twitch, consider enhancing your content with tools like Eklipse. Eklipse helps you generate bite-sized clips from your long-form videos, making it easier to engage your audience and grow your following. Try Eklipse now to know more!