Have you ever used Windows Media Player for more than just playing videos and audio? Did you know that with the help of plugins, you can even trim and edit videos using the media player?
It may not have editing features by default, but you can install a video trimmer plugin like SolveigMM WMP Trimmer for free.
Need help editing videos on Windows Media Player? Check out our tutorial for step-by-step instructions. Get started now!
How To Trim Video In Windows Media Player Easily
Source: AnyMP4
Microsoft Windows Media Player does not allow you to trim, crop, or edit videos directly. Nonetheless, you can do it using an additional tool you need to install first. So, without any further ado, let’s see what you should do.
First of all, download the SolveigMM WMP Trimmer plug-in
Secondly, install the downloaded plug-in on your device
Once it’s successfully installed, open the Windows Media Player app
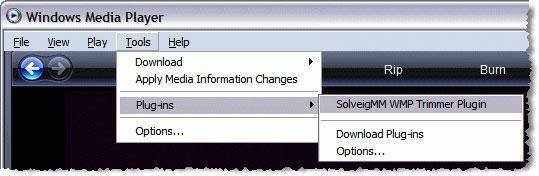
Then, find the Tool tab on the main menu bar and click Plug-ins under the Tool tab
Select the SolveigMM WMP Trimmer option to activate it
After the plug-in is activated, now you can start to edit your video using this tool
Find and open the video you want to trim using Windows Media Player
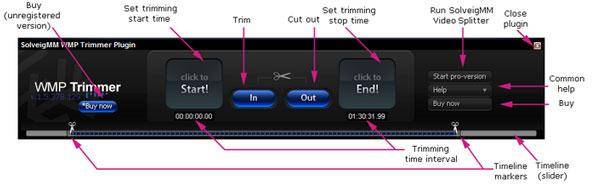
Next, play the video and while playing the video, move the blue slider to select the part of the video you wish to trim
In case you find it hard to use the slider, go to the Start box and you can manually type the time of your video that you want to start selecting
Once you selected the part of the video you desire to trim, you can click the In button to trim the part
Then, click the Out button to cut the selected part out of the original video.
Source: Wondershare Repairit
Finally, save and rename the trimmed video to your download folder
Now, you have known how to edit a video on Windows Media Player for free. However, you can only cut or trim the video. You cannot add filters, play with the colour editor or do more advanced editing stuff. In addition to that, you can find many great video editors on the internet that you can also use for free.
That’s all about how to trim video in Windows Media Player. Though it’s never made for editing any video or audio, you can still trim or cut the video. Thanks to the plug-in feature. Now, you can try it out at home. Good luck!
If you are an Apple user and looking for an easy editing tool that works for your devices, you can try iMovie. iMovie is a built-in feature that will cover all your editing needs. Learn how to use it through our article: How To Trim A Video in iMovie on Mac, iPhone, and iPad.
If you are an Apple user and looking for an easy and packed editing tool, you’re going to love iMovie. It’s a tool that can take care of your editing needs. You can add transitions, effects, stickers, and filters, and even learn how to trim a video in iMovie.
In this article, we’re going to tell you how to edit your video on Mac, iPhone, and iPad using this tool. So without further ado, let’s just get started.
If you are an iPhone user, you can follow these steps to trim a video on your iPhone using iMovie. Here’s how.
Open the iMovie app on your iPhone.
Select the video you want to edit.
You will see an edit option at the top right corner of your screen, click on it.
This will open a new window. You will see yellow window arrows.
Move the arrows to any side to edit the video.
To trim the ending, move the arrow to the center from the right.
To trim the beginning, move the arrow to the center from the left.
Once done, you can save the video.
Additionally, the iMovie app on your iPad works the same way so you can use the same steps to edit your videos using the iPad.
How To Trim A Video in iMovie on Mac
As previously mentioned, you can also use iMovie on your Mac. Follow these steps to trim a video on your iPhone using Mac.
First of all, launch the iMovie app on your Mac.
Double-click the editing panel from the Projects tab.
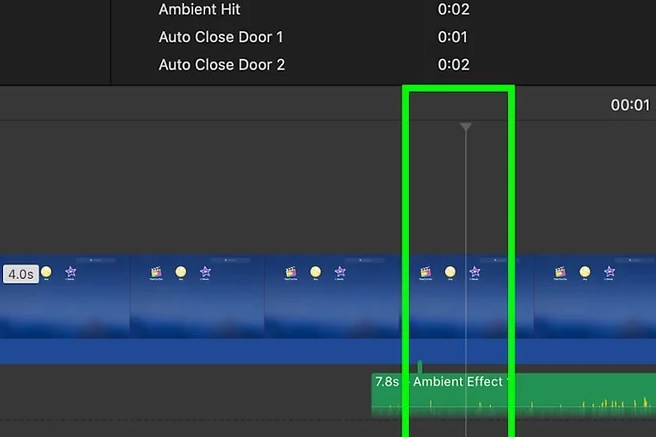
Open the video on Mac and find the exact moment of the video parts you want to trim.
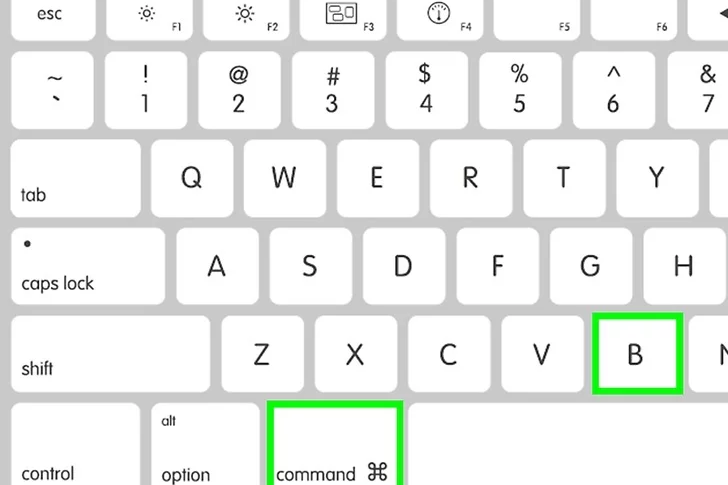
Hit the Press ⌘ Command + B on your keyboard to automatically split the area into two sections.
Now, you can delete the part you don’t want to include.
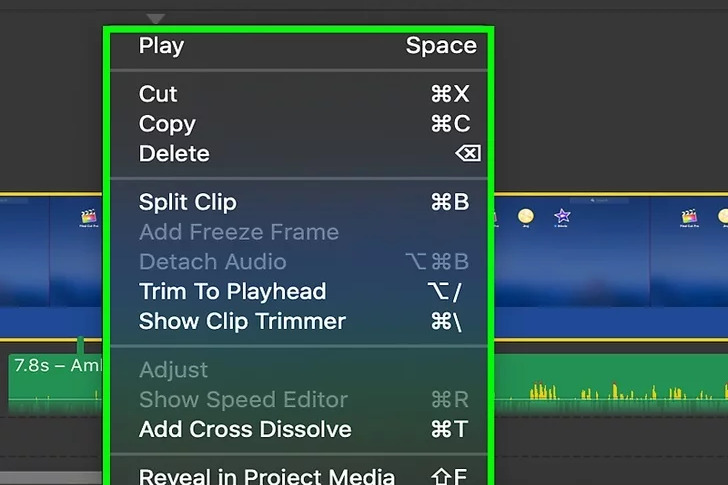
Alternatively, you can hover over the video clip in the bottom editor, then right-click at the desired cut point for a seamless editing experience.
Then, you can right-click and select the Split Clip option under the popup menu.
Once done, you can go ahead and save the video.
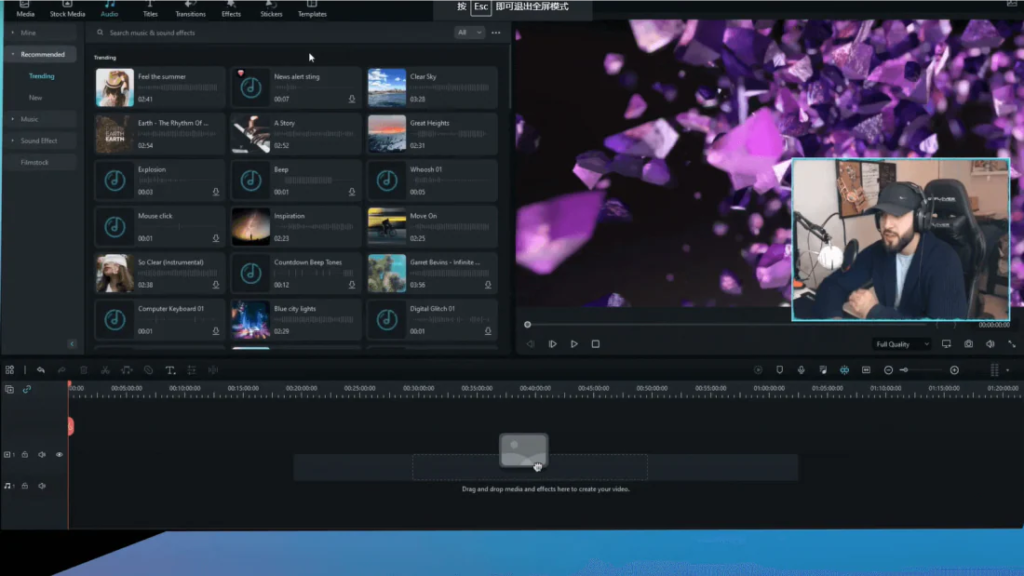
How to Trim A Video in Eklipse for iPhone and Mac Users
Another alternative way to trim the video duration is using Eklipse. Eklipse is an easy-to-use yet powerful clip maker that can help you turn the video into smaller parts, even transform it to be a TikTok video. Generated by AI, Eklipse requires no manual editing to get things done. Here’s how to use the Trim-Clip feature.
Starting off by heading over to the Eklipse official website in the browser.
Log in to your account or create a new one.
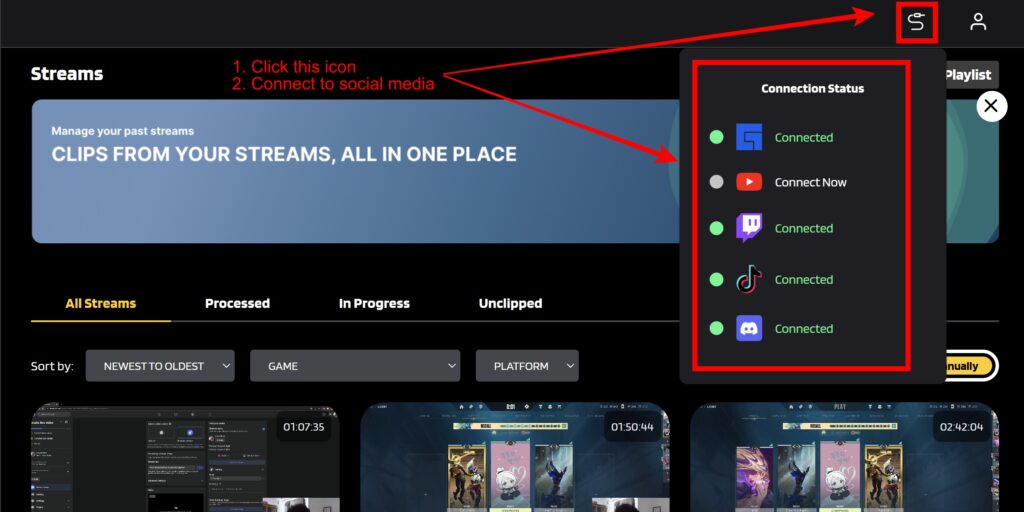
After that, connect your Eklipse account with your social media account (Twitch, YouTube, TikTok, FB, Discord).
Let the AI automatically load the streams.
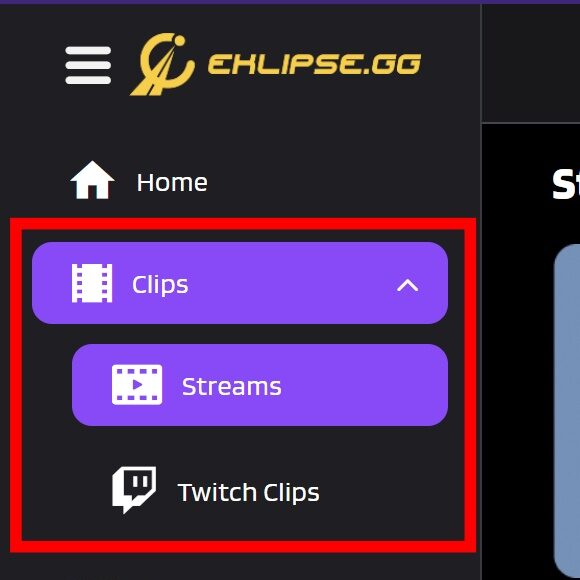
Choose the stream you want to trim from the Clips option in the left-side menu.
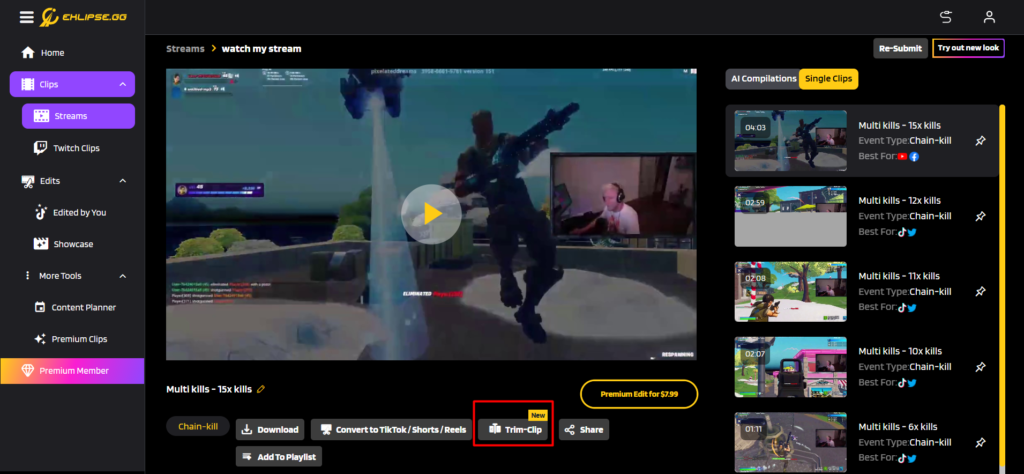
Under the video preview, hit the Trim-clip option.
Adjust the bar in the beginning and the end of the duration bar to select the part you want to preserve.
Once done, write a name and hit Complete.
Additionally, you can also take different route on Eklipse by turning it into TikTok video. The steps are actually simpler. Here’s how.
Log in to your account.
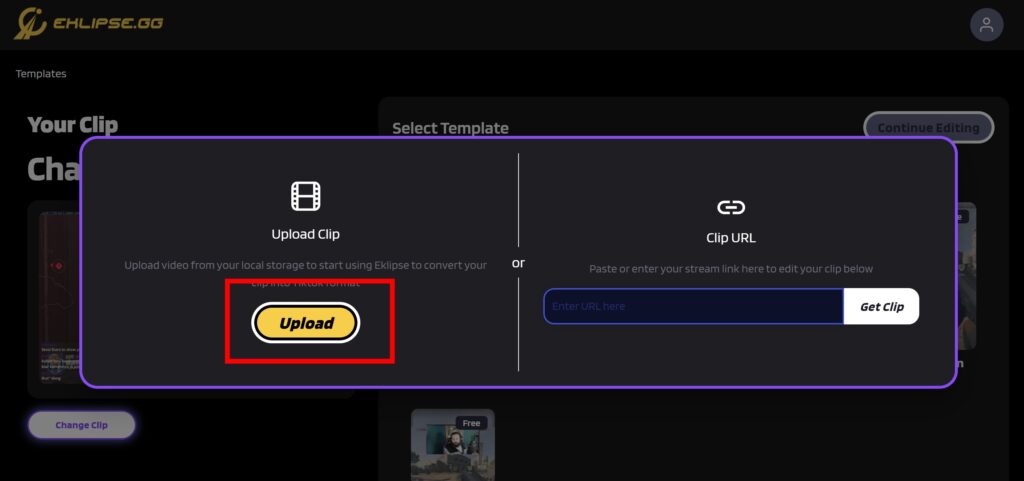
Upload the video you want to cut, or simply copy-paste the URL link.
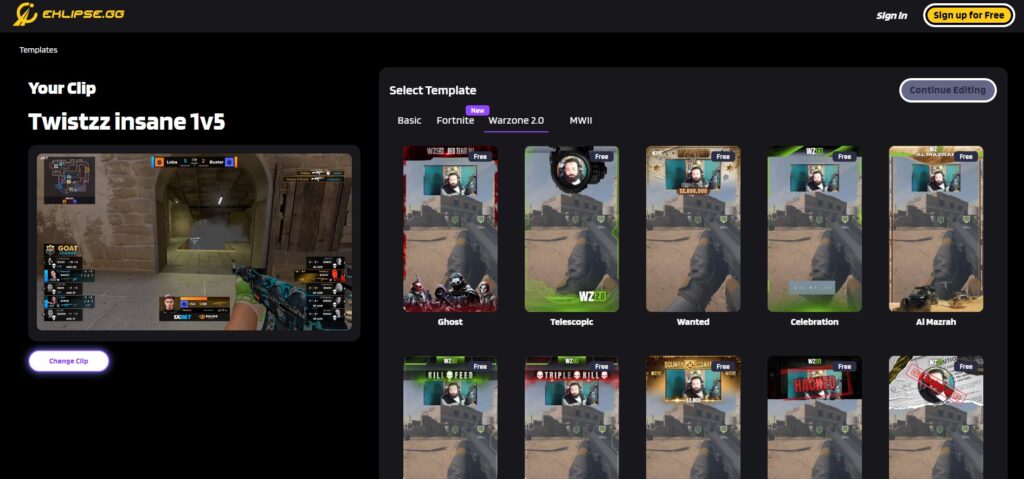
Then, select your favorite template and hit Continue Editing.
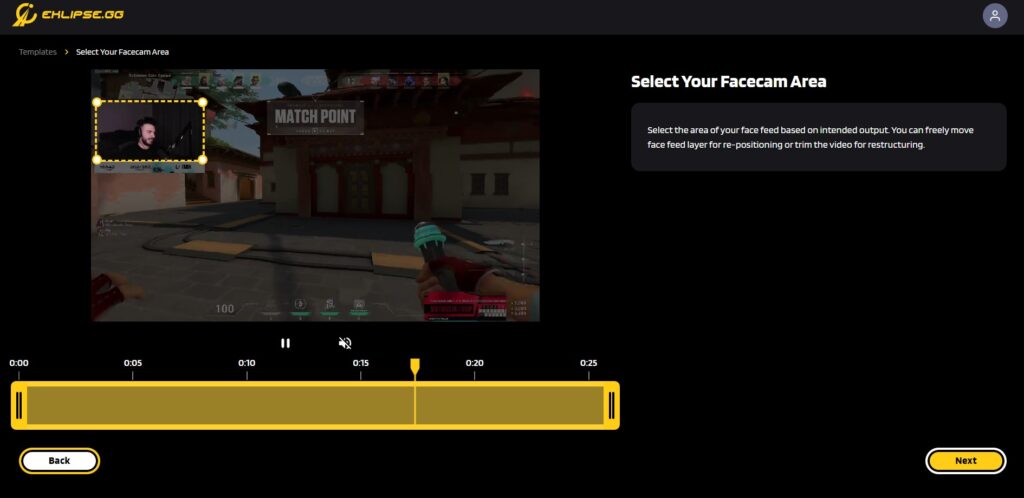
Now, you can adjust the facecam and the gameplay area, as well as trimming the length of your video.
After that, hit Next.
Write a title, pick the resolution, and add channel name, auto-caption, and music.
Click Confirm.
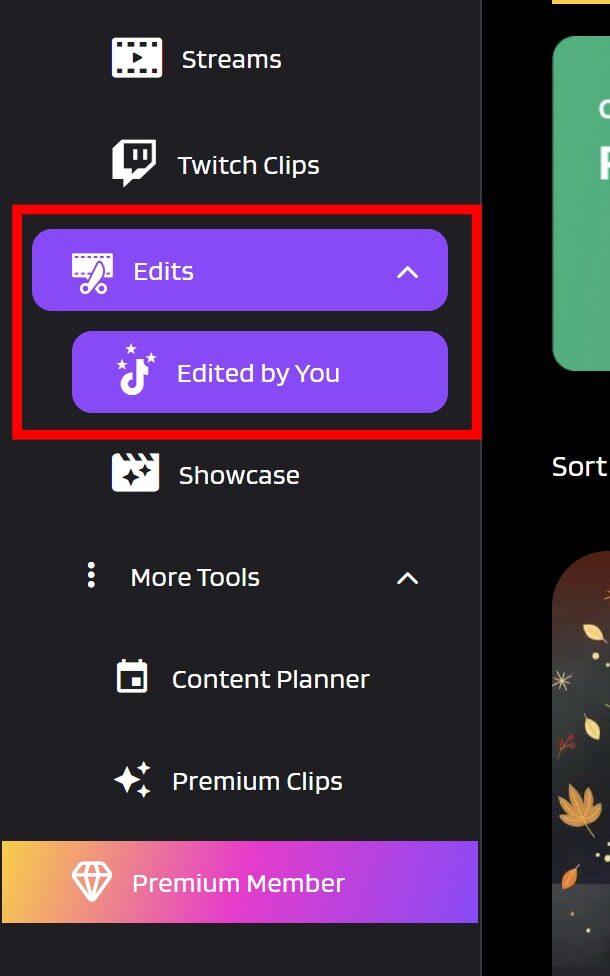
Bingo! You’re all set. To find your edited video, you can go to Edits in the left side menu and hit Edited by you. Now, you can immediately share your clip on your social media. in case you want to learn more about the Eklipse Trim-Clip feature, you can visit our article: How to Trim TikTok Video Using Eklipse. Dare to give it a try?
Conclusion
So that’s how to trim a video in iMovie app on your iPad, iPhone, and Mac to edit the length of your videos. In case you want to use another alternative video editing for Mac or iPad, you can definitely go to our article to pick your favorite software: 8 Best Free Video Editing Software To Try.
Maximize your Black Ops 6 rewards—Create highlights from your best gameplay with with Eklipse
Eklipse help streamer improve their social media presence with AI highlights that clip your Twitch / Kick streams automatically & converts them to TikTok / Reels / Shorts
Who doesn’t know about TikTok in today’s day and age? This video-based social app has become very popular among young people due to its engaging features. You can find unique content on TikTok such as educational videos, skits, dance clips, and music videos. In today’s guide, we will teach you how to make a TikTok video.
TikTok allows content creators to express themselves in a way other platforms can’t. You can easily go viral on TikTok if you play your cards right. It’s not hard to learn to make top-notch TikTok videos. So, without any more ado, let’s begin the guide.
Basically, making a TikTok video is pretty simple. You’ll only need to do several fundamental steps to make an eye-catching masterpiece. Here’s how to start creating a TikTok clip.
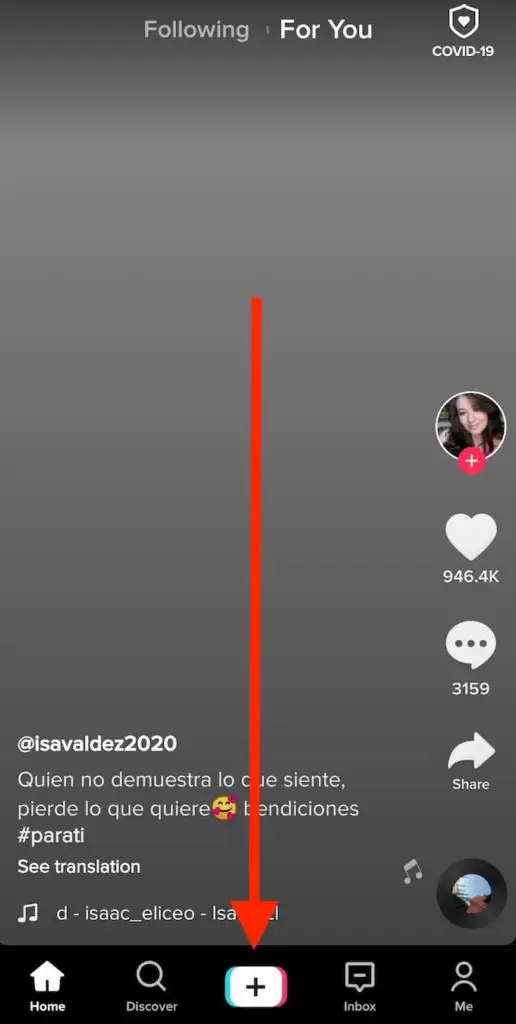
To begin with, launch the TikTok app and log in to your account.
Tap the plus ‘+’ button at the bottom of your screen.
tap the plus button to start making a TikTok video
Alternatively, you can tap the Create Video option on your profile page.
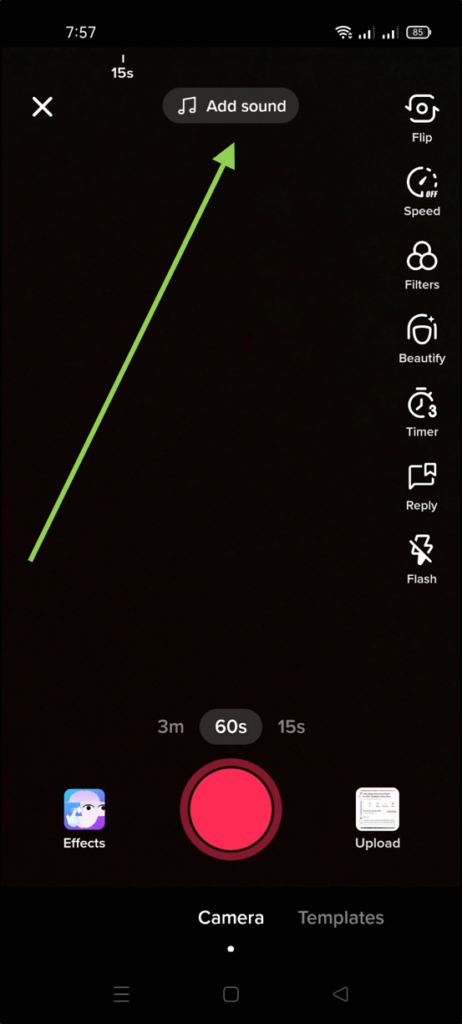
If you want to record a new video, just hold the big red button to start recording.
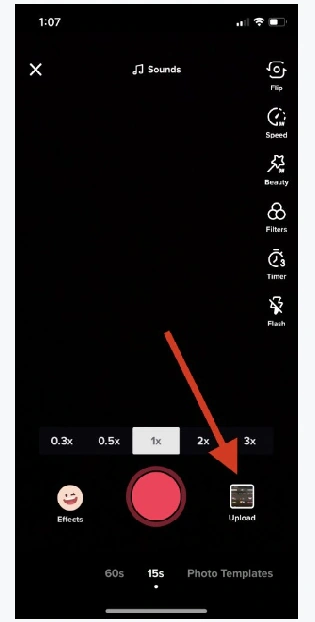
To use a pre-existing video from your Camera Roll, simply hit the Upload icon next to the Record button.
navigate to the Upload icon to open your Camera roll
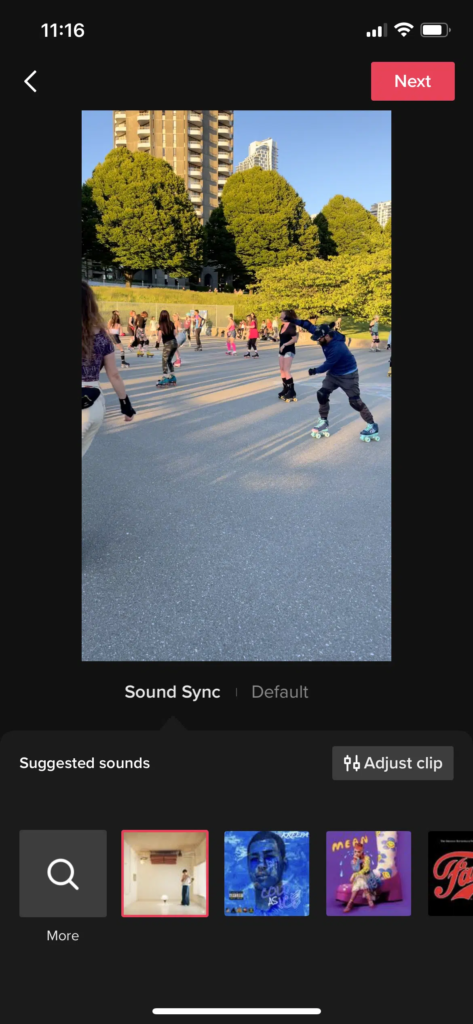
After recording or importing the existing video, you can start editing the video.
To trim the length of the video, hit the Adjust Clips option.
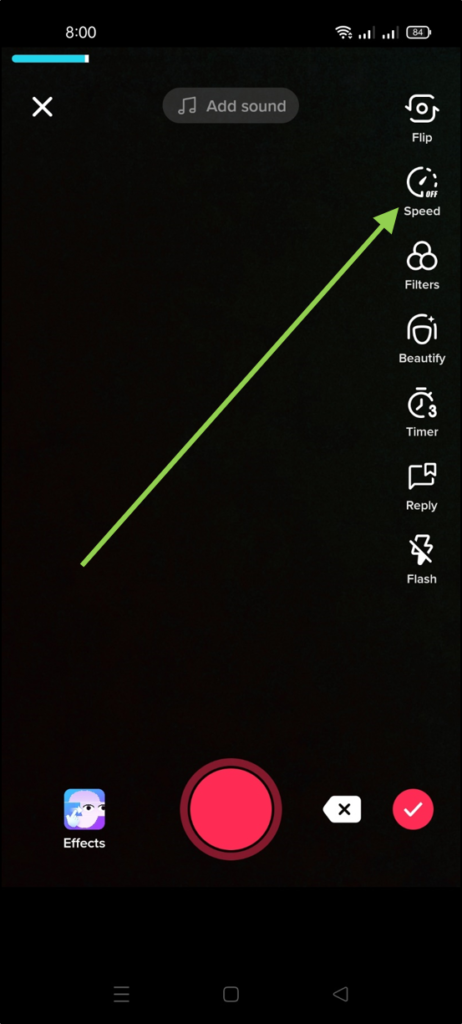
Then, if you want to add music, hit the Add Sound button at the top of the screen.
Hit this button to add music or sound
Next up, you are able to add stickers, texts, and effects by choosing the options on the right-side menu.
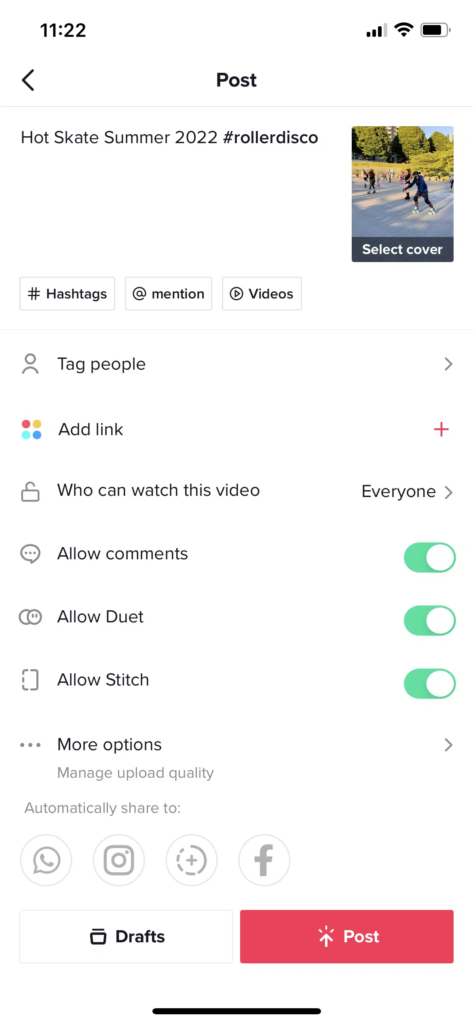
Once done editing, tap on the Next button.
Finally, add a caption and proper hashtags.
Hit Post to start publishing the video.
It’s worth noting that TikTok enables users to upload videos from 15 seconds to 3 minutes in length. Currently, you can even upload up to 10 minutes. Feel free to head over to this post if you want to know the detailed guide: How To Add Clips To TikTok and Create More Exciting Videos.
How To Make a TikTok With Multiple Videos
Did you know that TikTok allows you to mix up to 35 videos from your Camera Roll? Wanna know how? Follow the steps below.
Log in to your account.
Tap on the plus button to open the camera section.
Navigate to the gallery icon to open the Camera Roll.
After that, select the videos you want to mix.
Once done, tap Next to continue.
Then, to reorder your video, hit Adjust Clip.
reorder the video
If you’re happy with the result, tap Next.
Now you can add music, effects, stickers, and other editing stuff.
After making some edits, hit Next.
Now write a description (including hashtags) and hit Post.
How To Add Pictures on TikTok Video With Slideshow
Do you want to add photos to make a more appealing TikTok video? TikTok has got you covered. The steps to do it are basically similar as you make a TikTok with multiple videos. Additionally, you can add up to 35 photos.
select the pics in the perfect sequence as you desire
However, you should pick wisely from the camera roll and arrange them in the perfect sequence as you desire, as, unlike video clips, their order can’t be changed in post-production.
Once you’ve done arranging the photos and videos for your TikTok video, you can make some edits just like you did in the previous tutorial.
Here are some tips for making TikTok videos that go viral:
Keep it concise – It will be helpful if you go straight to the point. Dragging the video longer than it needs to will make people bored.
Use trending music and songs – More people with watch your video if your video has popular tracks and sounds. This will help you connect with the audience.
Use trending hashtags – Another thing to do is pick trending hashtags relevant to your video. This will engage more people
Make videos on popular topics – Find trends that suit you and jump on the bandwagon. Videos go viral when they involve something already popular on TikTok and social media.
Tell people stories – While music videos and vines do get popular on TikTok, you can say the same about stories. People love hearing stories and an engaging story can easily go viral on TikTok.
Keep the audience engaged by leaving some mystery – Don’t give away everything in just one video! Keep the audience engaged by leaving a bit of mystery. This way, your audience will look forward to your future content.
Conclusion
Now that you know how to make a TikTok video, you can get ready to take your TikTok game to the next level! With your newfound video-making skills, unleash your imagination and create a viral hit that’ll top the “For You” page. Wishing you all the success and admiration from TikTok viewers.
If you’re a streamer on Twitch, it’s always great to know who’s following you and supporting your channel. That’s why today we’re going to talk about how to see who follows you on Twitch. Knowing who your followers are is important for building a community, reaching out to your supporters, and keeping track of your growth. It’s also a great way to interact with your followers and show appreciation for their support.
Knowing your followers can also be helpful for streamers looking to monetize their content. Twitch offers various monetization options, such as ads, subscriptions, and bits, and having a clear understanding of your followers can help you better understand your earning potential and grow your channel.
So, if you’re ready to learn more about who follows you on Twitch, keep reading and let’s dive into the world of Twitch followers!
If you are a Twitch streamer you must want to know how to see who follows you on twitch. Reasons could be many, you may want to know if you have any famous person following you? You may simply want to know the total count. Any social media platform grows when you gain a bigger following.
If there is no one to see what you post why post anyway? So we are going to tell you how to see who follows you on Twitch in 2022.
How to See Who Follows You on Twitch on PC
There was a time when it was much easier for any Twitch user to see who follows you on the platform but later after 2020 updates, there was a drastic change in the app design. It was more of a redesign update. Due to this update, many ask how can they see who follows them on twitch?
It’s not the same as before but it is still fairly simple. Here are the few steps you need to follow:
Source: Eklipse
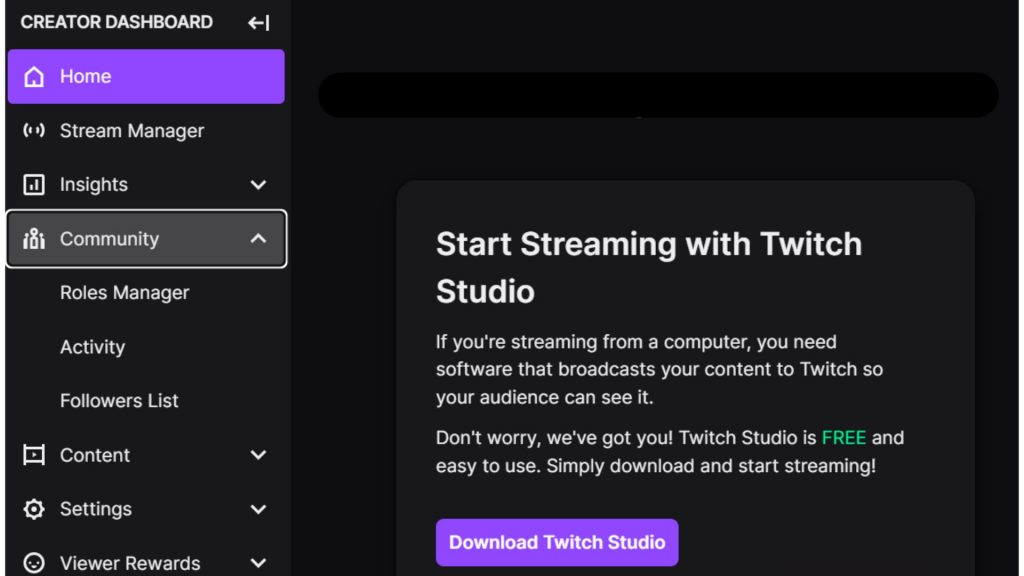
Click your profile icon on the right hand corner
Go to Creator Dashboard
In the Creator Dashboard, you will see Community tab
Expand it and select Followers List
You can see the list of your followers with their names and other information
How to See Who Follows You on Twitch on Any Mobile Device
Some people also wonder how to see who follows you on the twitch mobile app.
And honestly, the answer to this question is that you cannot. This feature that you can use on your laptop or desktop screen is currently not available on a mobile device. Right now it’s simply not possible to see any list of your followers over a smartphone.
You can only see that if someone is following you or not by going to their profile. We know it’s pretty frustrating to learn because many beginners get really excited about their follower count. You need to have it to track your progress or to just see if any of your favorites are following you back.
Source: Esports
Hopefully, in the future, this feature will be available on mobile app too. But we got you for now, here is a simple trick you can use to see at least a total count.
Launch the twitch mobile app
Sign in to your Twitch account
Click on your profile
Tap your profile picture two times
This will show profile view
You will now be able to see the number of current followers under your profile picture
There is a minor difference in the Twitch mobile app, so here comes another query on how to see who are your new followers on twitch mobile app. Just follow the steps mentioned below and you’ll see them:
After logging into the Twitch account through the mobile app, you’ll see the profile icon.
By clicking that you’ll see stream manager under my channel
Click it and see activity feed showing the list of the recent flowers.
To see the whole followers list, log in through the Twitch website directly.
Twitch mobile app notifies you of the recent activities and followers. This way you can recognize and manage the recent activity on your channel better.
How to See the Oldest/Newest Follower on My Twitch Account?
Twitch is the easiest platform for any age group. Checking out your followers has been made easy on this platform, just go to the creator dashboard and in the community section, you’ll get your latest to oldest followers. Hover to the bottom with you cursor and there you go.
There is a minor difference in the Twitch mobile app, so here comes another query on how to see who are your new followers on twitch mobile app. Just follow the steps mentioned below and you’ll see them:
After logging into the Twitch account through the mobile app, you’ll see the profile icon.
By clicking that you’ll see stream manager under my channel
Click it and see activity feed showing the list of the recent flowers.
To see the whole followers list, log in through the Twitch website directly.
Twitch mobile appnotifies you of the recent activities and followers. This way you can recognize and manage the recent activity on your channel better.
Is it Necessary to Keep a Check on Twitch Follower Count?
Social media accounts are basically grow through followers. They are as essential as fuel in the car. Without fuel, the car will not move. So, keeping an eye over who is following you, from where and since when, etc. is of immense importance.
Source: YTECHB
As a new streamer, you need to take care of each follower individually and interact with them as much as possible. Follow the content they like to curate yours better. As soon as you see an increase in the followers’ list you’ll not be able to look for every single one.
But you will remember your oldest followers always. It is a way to remain humble. You can still reach out to them and offer them a special something every now and then. Live-stream chat is a way better option for popular or bigger streamers.
Likewise, you can check out who unfollowed you and find out why. This may motivate you to make even better content and interact more. Other than that, you can track your progress bar by measuring the amount of followers you gain and lose on a monthly or bi-monthly bases.
How to Attract New followers on Twitch
Having the right techniques will help you work easily and effectively on your growth strategy. Therefore, we have these few tips that will answer your question of how to attract new followers on Twitch.
Take advantage of social networks
One of the advantages of using social networks is that it allows you to expose your brand to new potential followers. However, you must know how to use them. Do not implement them as a simple notification services for your new content. Users are more attracted to those who use their social accounts as a way to market themselves and promote their brand.
Watch and interact with other streamers
Another thing that can help you gain new followers on Twitch is to meet other streamers. The idea is to watch other streams and actively participate in their chats. This interaction will allow you to get their attention and the attention of viewers. Make more connections to ultimately gain more followers.
Streaming time
Do you want to get more followers on Twitch? So you have to start booking several hours a day to stream. Few users will find out about your channel if you are online for only an hour a day. We recommend that you dedicate somewhere around 3-4 of hours, this will allow you to accumulate more viewers.
It will also earn you a higher position in Twitch search results and greater exposure to a large proportion of audience. There is a reason why popular Twitch streamers spend between 5 and 10 hours a day streaming, and in some cases even more.
View-bots or follow-bots are a trending way to increase followers or viewers and fake reality on Twitch accounts. Manipulate the viewers to increase the traffic and popularity of the channel. As a streamer, you can check if someone is faking the identity in different ways.
You can check if the chats are empty or small vs viewers are plenty.
Ambiguous and meaningless chats such as, “what S U P”. The real chats can never match with the bot chats.
In the viewer list, you can manage to see the unregistered accounts.
Source: VentureBeat
If you find such an account, report them. Search the account, click on report account, fill the form with detailed information and it’s done. Moreover, Twitch also bans such streamers so you can help the platform with it. This will make your life easier too.
How to Increase the Followers on Twitch without Bots?
You don’t need to fake the followers and put your account in danger. There are other ways to make your channel the best in the line.
Quality content: make your content related to the trend so that it may attract people. Live streams with humoristic touch may grab followers’ attention.
Growth strategies: Twitch channels can be grown by sharing your content on other social media accounts such as YouTube, Tiktok, Facebook, Twitter, etc.
Meetups: video calls, gaming sessions are the best way to meet with your followers. The interaction with people will increase the traffic of the channel.
Appealing styles: Customize the layouts of your Twitch account with the help of different software. There are many overlays and templates provided by Twitch interactive studio.
Take it as a full-time job: the more you stream the more the channel gets viewed. Keep your stream time the same so that the audience may know. Moreover, several hours a week will make your Twitch channel the best.
Promotion: You can use different software to edit your content better and promote it across different platforms. Try Eklipse for making highlights from your twitch stream and use them to cross promote your channel.
FAQs
How to see who follows you with twitch notifications?
The creator dashboard shows an option of the community just clicks on that. You’ll see the follower list. In the mobile app, recent followers shall appear under your recent activity. You can also turn on and off the notifications of Twitch through AlertBox options.
Is it cool to use the Mod view for the Twitch channel?
You can use mod view to channelize and customize your account and make it even cooler to use. There are different options like widgets, chat options, activity mods, whispers and AutoMod queue, etc.
Is it ok to buy followers for your channel?
Buying fake views, followers or ask real people to follow you with a payment is all cheating. You may not get caught immediately but Twitch will quick action against if you ever get caught. So try to grow gradually with time.
After how many followers does a Twitch account get?
There is no specific number, however above 90 followers account is expected to be in a good position.
Can you see who follows you on twitch during live streaming?
During streaming, you can easily see the current viewers and even you can open their profile to check if they are your followers or not. You can also chat with them.
Conclusion
That’s all we have for you on how to see who follows you on Twitch. If you need more twitch related content do not forget to visit our blog. Happy Streaming!
Becoming a Prime member could give a lot of benefits to Twitch users. But to get access to the goodies and other exciting perks, you’ll need either Prime Video or an Amazon Prime account. If you have created an Amazon Prime account, now let’s learn how to link Amazon Prime to Twitch.
Connecting the Amazon Prime account with your Twitch account is quite straightforward. You’ll only need four simple steps to do and boom! It’s all done. Let’s take a look at the tutorial.
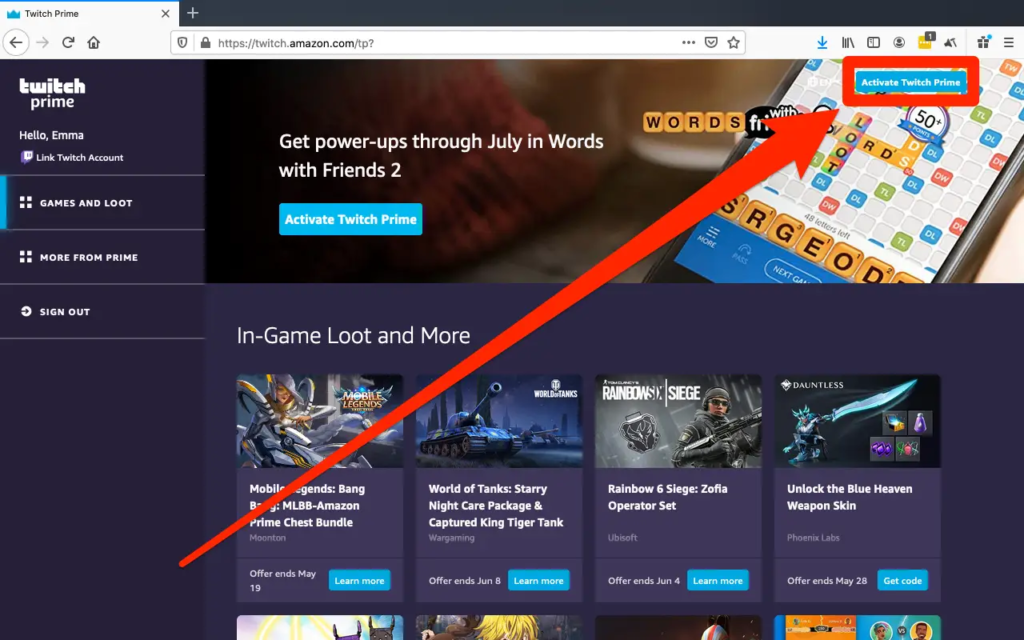
Once there, hit the Sign in link in the top-right corner to sign in to your account.
Then, click Activate Twitch Prime once you drove back to the homepage.
Hit this button | Source: Business Insider
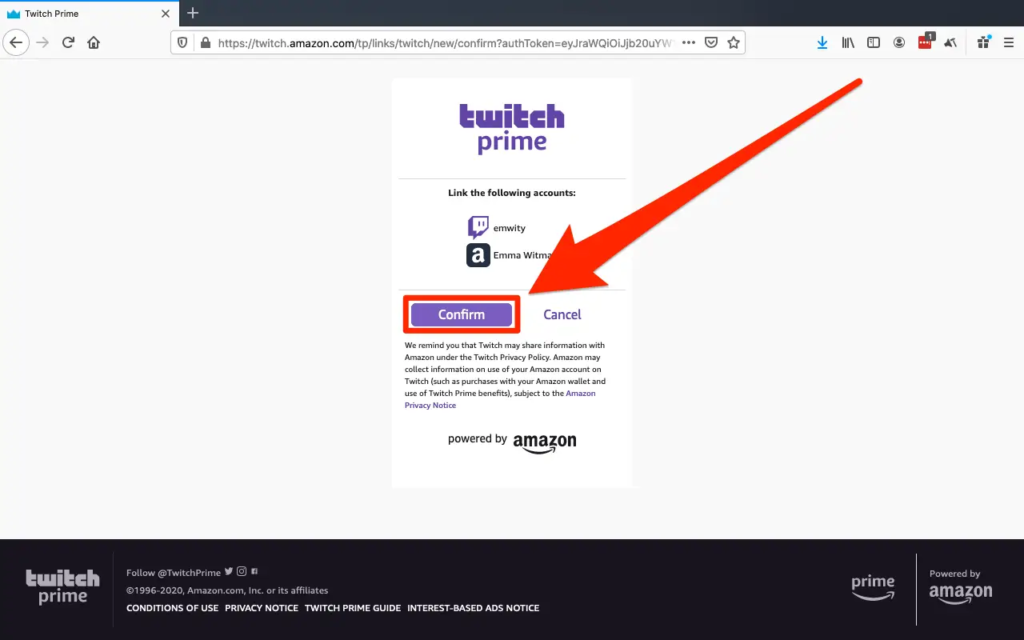
Make sure the Amazon and Twitch accounts displayed are the right ones.
After that, simply click the Confirm button to seal the deal.
Confrim your choice to continue linking your Amazon Prime and Twitch account | Source: Business Insider
How To Link Amazon Prime To Twitch On Mobile
In addition to PC, you can also link your Amazon Prime account to Twitch through your mobile phone. Here’s how to do it.
Starting off by opening the mobile browser.
Open the Prime Gaming site.
Next up, log in to your Amazing Prime account by hitting the Sign-in button.
In case you are not a Prime member, click the Try Prime option.
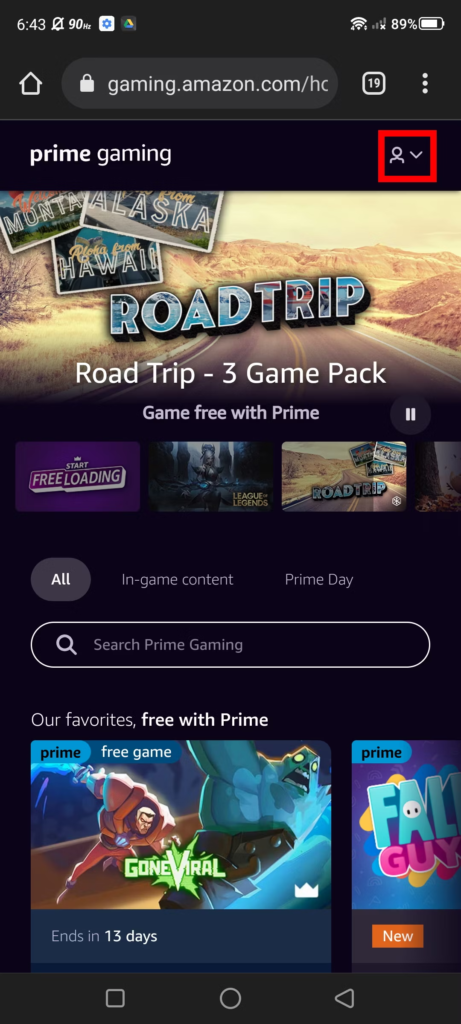
Navigate to the profile icon.
Hit the profile icon to open the drop-down menu | Source: Android Police
Tap on Connect a Twitch account under the drop-down menu.
Tap on this link to connect both account | Source: Android Police
You’ll be redirected to enter the Twitch details you want to link.
Finally, once you’re logged in, your accounts are now linked!
Conclusion
So that’s how to link your Amazon Prime to Twitch via PC or mobile. Now that your Amazon Prime account has been linked to your Twitch, you can start claiming and enjoying the freebies!
Twitch Channel Points is the ultimate loyalty program for Twitch streamers and viewers alike. With Twitch Channel Points, streamers can reward their most dedicated followers with exclusive perks and incentives, while viewers can earn points for engaging with their favorite channels – yep, from watching streams to participating in chat, every action is rewarded. That is why the question of how to get channel Points on Twitch is looked for by people.
Channel Points is useful both for streamers and viewers in term of interaction. That is why you should know how to get and use them in this article. Keep reading!
What Are Channel Points on Twitch and How To Get It?
Channel Points on Twitch is a loyalty program that rewards viewers for their engagement on the platform. By performing certain actions like watching streams, following channels, or participating in chat, viewers can earn points that they can redeem for exclusive rewards offered by the streamer. These rewards can range from custom emotes, shoutouts, or even game keys.
To get Channel Points on Twitch, all you need to do is tune in to your favorite streamers and start participating. Every time you perform an action that’s eligible for points, you’ll earn them. You can then use those points to redeem rewards offered by the streamer. It’s that simple!
Source: Webaround
In conclusion, Channel Points on Twitch is a great way for streamers to build a stronger connection with their audience and incentivize viewers to stay longer, while also providing subscribers with exclusive rewards for simply engaging with their favorite channels. Whether you’re a seasoned streamer looking to take your channel to the next level or a viewer looking to make the most of your time on Twitch, Channel Points is a must-have tool.
From time to time, you earn channel points by watching videos and streams on channels. In addition, you will receive notifications at regular intervals at the bottom of the chat window. Click on them to get more points.
To get them, click on the notification. Your balance will be updated.
By subscribing to the channel, you get twice as many points per view.
Channel points for views and participation in the raid are automatically credited to your account.
Points are assigned to each registered channel and can be earned via multiple activities like watching, subscribing, and participating in raids. Performing these actions on the appropriate channel generates points.
Points can be checked at the bottom of the chat window on registered channels.
What Do Streamers Get From Twitch Channel Points?
Source: Twitch
Twitch Channel Points are a valuable tool for streamers looking to strengthen their connection with their audience. By offering rewards for various actions, such as watching streams or participating in chat, streamers can encourage viewers to stay longer and engage more with their channel. While channel points are not transferable to real-world money, they serve a greater purpose of engaging viewers and keeping them interested in the stream.
In fact, if streamers have enticing channel point redemptions, it’s more likely that viewers will stick around and actively participate in the chat. The more interactive the chat is, the more attractive the stream becomes to new viewers, which can lead to more growth for the channel. While streamers don’t earn any cash from the use of channel points, the enhanced engagement from viewers will help grow their channel and make for a more enjoyable experience for both streamer and viewer.
Twitch is a platform where the real supporters are the passion about video games, art, programming, and music, which often see creators at work for the pure spirit of sharing, without seeking an economic advantage. However, many channels manage to earn thanks to Twitch, especially in the gaming field, and the numbers confirm this. Over 21% of the total views on Twitch concern eSports, or professional players who train and fight in preparation for or during tournaments.
Around Twitch there is a billionaire turnover. In 2019 the revenues were 1.54 billion dollars, of which only 300 million came in the form of advertising, or companies interested in sponsoring their products and services on the platform. As well as on YouTube, companies are also looking for channels that can “influence” the choices and purchases of viewers and subscribers, and the high rate of trust and loyalty that fans show towards Twitch streamers creates significant earning opportunities.
Advertising, however, is not the only way in which content creators can support themselves financially, even earning considerable amounts, which become very high if we look at the most followed channels. The most popular streamer seen and loved on Twitch, with over 16 million active followers before the announcement of his move to competing platform Microsoft Mixer.
How to Set Up Channel Point Redemptions on Twitch
Source: Twitch
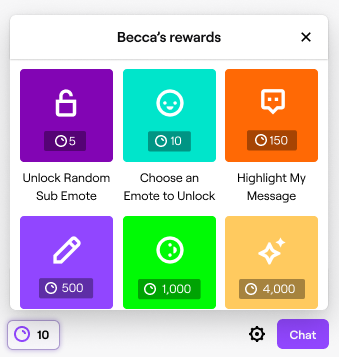
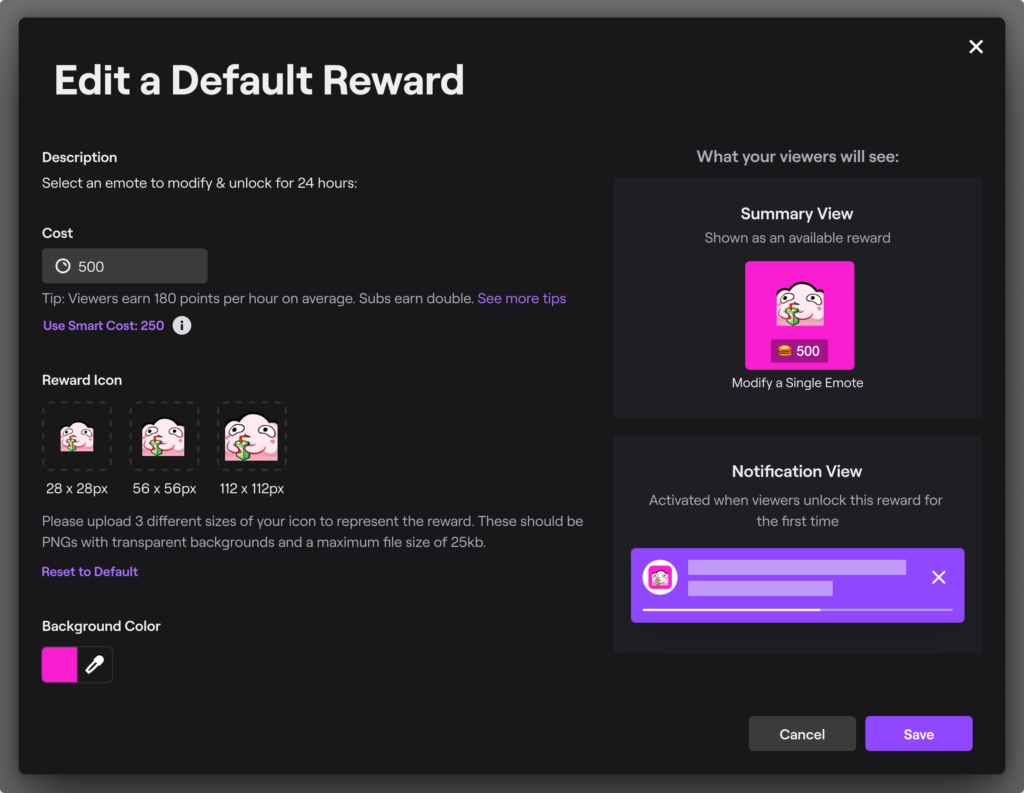
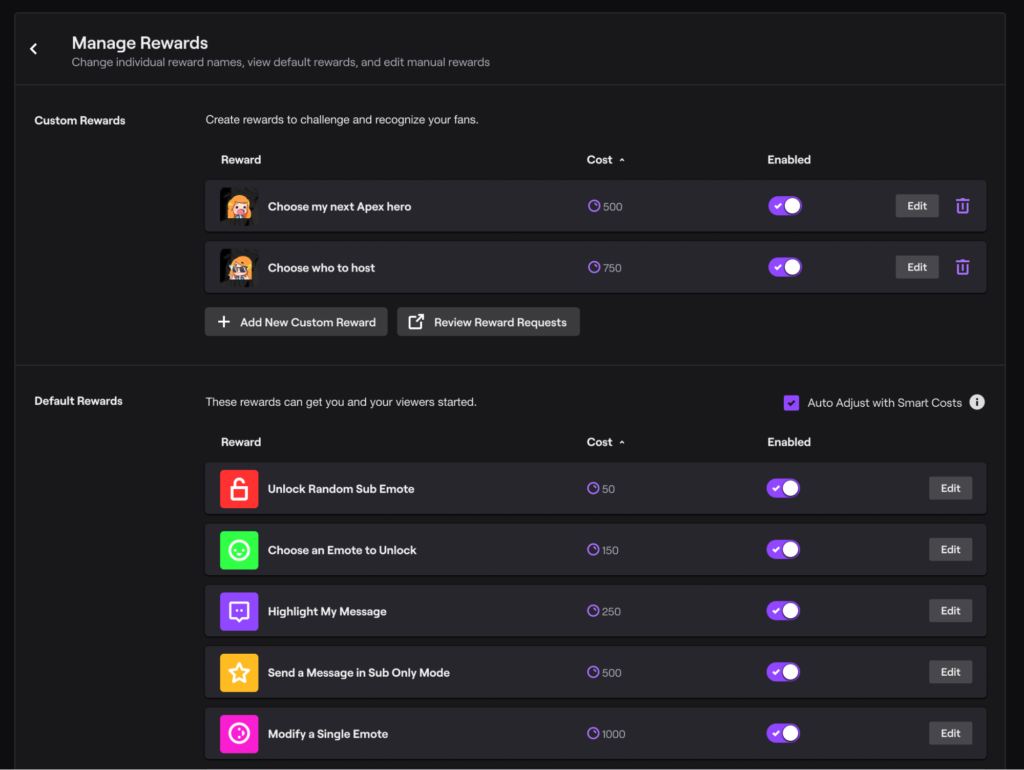
Twitch allows streamers to set up custom rewards that viewers can redeem using the channel points they earn from watching and interacting with the streamer’s channel. These rewards can be pre-made or custom made by the streamer and can range from in-stream shoutouts to physical prizes. Streamers can also personalize the appearance and name of their channel points.
To set up and personalize channel point redemptions as a streamer, follow these steps:
Go to Creator Dashboard through the user icon drop-down menu.
Select Viewer Rewards and then Channel Points.
Enable channel points if not already.
Customize icon and name under Customize Points Display.
Set up redemptions through Manage Rewards & Challenges.
Choose from default rewards or create custom ones by adding a name, description, cost, icons, and redeemability options.
Use redemptions for audience engagement like giveaways or game play choices.
Tips to Get Channel Points on Twitch
On Twitch, you can earn channel points by interacting with streams, either through chatting or just watching. You’ll earn more points faster by being active in chat, watching multiple consecutive streams, participating in raids, etc. Some points are automatically added, others appear as a pop-up for you to accept. The following lists the actions that earn points and how many:
Watching Channel: 10 points every 5 minutes of live watch time.
Actively Watching Channel: 50 points every 15 minutes of live watch time for those who chat.
Participating in Raid: 250 points.
Following Channel: 300 points.
Watch Streak 2: 300 points for returning to two consecutive streams of at least 10 minutes each with a 30-minute gap.
Watch Streak 3: 350 points.
Watch Streak 4: 400 points.
Watch Streak 5+: 450 points.
1st Cheer: 350 points for first cheer in 30 days (not anonymous).
1st Gifted Subscription: 500 points for gifting first sub in 30 days (not anonymous).
Questions About Twitch Channel Points
How do I know when the challenge will be available on my channel?
You will receive a notification from Twitch in the Creator Dashboard and your activity feed. Upon launch, the challenge will remain available to your community for 2 days. This may change as Twitch tests are done to find what works best.
How many channel points will it cost to complete this challenge?
It varies by channel and is set automatically by Twitch. The goal is for the power-ups to provide a valuable opportunity for all streamers. Factors such as the average size of your channel and the number of viewers you have that day are taken into account.
How to get unlimited channel points on Twitch hack?
No, it is not possible to get unlimited channel points on Twitch and neither is there any hack.
Conclusion
Twitch channel points is a viewer reward program that allows streamers to reward community members, usually subscribers. The program is available to all partners and affiliates. We hope you find helpful above-mentioned easy ways onhow to get channel points on Twitch. If you like our strategies do let us know in the comment section. Your feedback matters to us.
Don’t forget to check our article about Twitch Drops so you can collect not only Channel Points, but also Drops. Click here: How to Claim Twitch Drops: 2022 Guide.
If you decide to dip your toe into the great lake of Twitch, either as a streamer or a regular viewer, there will be a lot of things to learn, including Subs on Twitch.
Unfamiliar with a common term on the platform? Don’t worry, our comprehensive post has got you covered. Get ready to dive into the details of how it functions and its impact on both streamers and viewers. Let’s go!
What are subs on Twitch? Subs or Subscriptions on Twitch are actually a brilliant method for viewers to support their favorite streamers. It is one of the most sought-after ways to monetize streamers’ presence on Twitch.
For every membership, the subscriptions get paid from Twitch and assuming that a channel gets an adequate number of memberships.
Aside from that, Subs aren’t only beneficial for streamers as they can be useful to monetize their presence on Twitch. Furthermore, it can also be beneficial for viewers as they can receive an array of premium perks, including exclusive emoticons (emotes) to spice up a stream’s chat room.
Additionally, the subscribers will also get some exciting benefit, including:
Advertisement Free Viewing – being an endorser implies that you will not need to watch promotions during the transmission. There are a couple of special cases that Twitch has instituted. However, promotions are enormously diminished.
Sub-Badges – these identifications are, for the most part, altered by the decoration and change intermittently dependent on your membership’s streak. You get going with the 1-month identification and get new identifications for 90 days, a half year, 9-months, and one year.
Sub-Only Chat/Streams – Occasionally, a decoration will have a sub-just stream. No one but supporters can see the substance on the channels in these occurrences. Decorations can likewise set their talk to “supporters just.”
Sub Tiers Twitch
Speaking of Twitch Subscription or Subs, there are three tiers; Tier 1, Tier 2, and Tier 3. The higher the tier, the more perks you’ll receive. The specifics of each tier will differ depending on the streamer, but it’s easy to find out what’s in store for you. Just head over to their About page.
In addition, the higher the tier, the more money streamers can get.
How to Set Up Subs on Twitch
Source: StreamDiag
As a prerequisite for getting and setting up the Sub button on Twitch, streamers will need to become a Twitch Affiliate. But to qualify as an Affiliate, there are some criteria you should meet. Those are as follows:
Generated 50 followers.
An average of 3 concurrent viewers in the last 30 days.
At least 500 minutes of streaming in the last 30 days.
Streaming for a minimum of 7 days in the last 30 days.
Once you’re qualified as Twitch Affiliate, the Subs button will appear in the streamers’ profile and they can immediately spot put the button to subscribe. You can check our article to know more details about it: How To Get A Subscribe Button On Twitch.
How to Get Subs on Twitch?
To be able to generate Twitch subs, you can try these tips below.
1. Give A New Game A Shot
Doc. the New York Times
Streaming a new and popular game is a good idea. Audiences will tune in to witness the unveiling of a fresh game. The most sought-after games to stream on Twitch tend to generate a balanced buzz, leading to high audience interaction and just the right amount of competition.
Playing the more popular and hype game will also be fine. However, you’ll be facing a lot of competitors that will make it more difficult to stand out from the crowd.
But if you are a super-talented gamer who can serve different shows to your audiences by playing with the unusual type of characters for a lot of hours playing at a time, then you can try your luck.
2. Try Prime Sub and Loot Reminder Extension
Maximize your stream’s potential with the Prime Sub and Loot Reminder Extension – a smart tool designed to remind viewers of their Prime Gaming subscription status. Whether they have Prime or not, they’ll be greeted with a crown icon that clearly explains the benefits of Prime Gaming.
This little-known extension can help you earn a few extra subs each month as many viewers often overlook their Prime subscription and are more likely to sub to you when they’re reminded of it. After all, earning the same amount from a Prime sub is just as good as a regular one.
3. Show the Twitch Subs Perks in Profile
As previously mentioned, every Twitch sub will get certain perks from the streamers, including emotes, an ads-free streaming experience, and personal benefits like merchandise, discount, and more. Therefore, it’s a great idea to state what your viewers will get for subscribing to your channel.
In addition, show your supporters how much their loyalty means to you by including a thoughtful thank you note in your channel’s profile. This impactful move will not only boost morale but also inspire new viewers to become subscribers of your channel.
4. Do An Exciting Cosplay
Add some flair to your stream by embracing your inner superhero or game character with creative cosplay. This bold move will grab the attention of viewers, who will be impressed by your commitment to your craft. Not only will cosplay fans appreciate the extra effort, but it might just bring in a whole new group of subscribers who are drawn to your unique and entertaining content. So why not make the costume assembly a part of your show and let your personality shine through?
How Much Are 100 Subs on Twitch?
Twitch streamers can earn big bucks from subs, with rates of $2.50, $5.00, or a whopping $12.50 per subscription. So, when it comes to 100 subs, a streamer will earn $100.
Actually, getting a free Twitch subscription can be done by becoming a member of Amazon Prime. However, the regular subscription will cost $4.99 per month. But don’t fret as Twitch will give you a chance to be free subscribing if you meet certain requirements.
Yep, you can get a free subscription option in your first subscription. Other than that, it’s also available for one channel. Learn about How to Subscribe for Free Twitch Prime in our blog.
Other than using the free sibs promotion, you can participate in streamers’ contests or giveaways and win a prize, receive a gifted sub from another viewer, or become a part of a community server that offers subs to its members.
How to Subscribe to a Twitch Channel from Desktop
The steps to subscribe to a Twitch channel are quite straightforward. Here’s how to do it.
First, head over to your preferred Partnered or Affiliated channel.
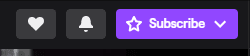
Then, hit the Subscribe button at the top right corner of the video player.
Press this button to start subscribing a streamer | Source: StreamScheme
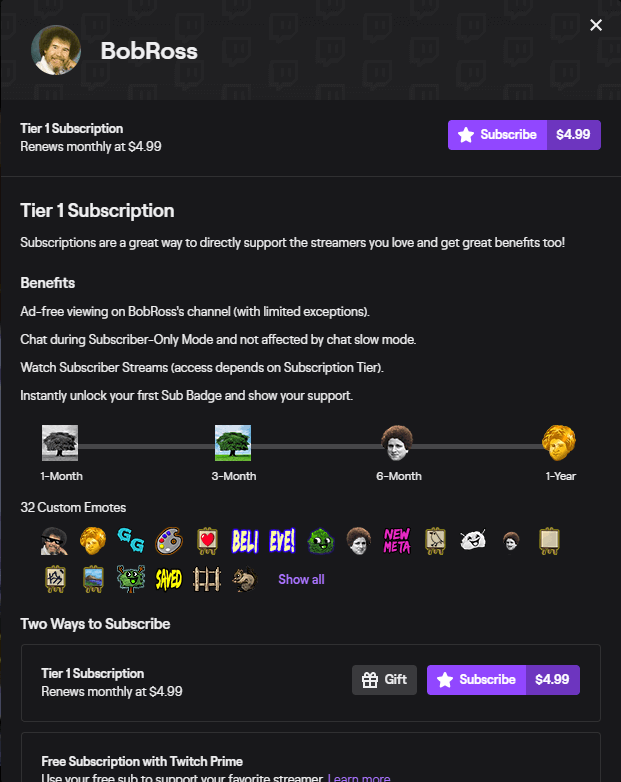
Click the Subscribe button in the pop-up message to continue.
Confirm your subscription | Source: StreamScheme
It’s worth noting that the pop-up box will show the perks of a tier-one subscription.
In case you want to subscribe for tier 2 or 3, scroll down until you find the appropriate option.
Now, you’ll be directed to the payment page.
You can either pay with PayPal or Credit Card.
Alternatively, hit More Methods for extra installment types or to choose a more drawn-out membership time (3 or a half years).
Bingo! Your membership will start when the installment is handled.
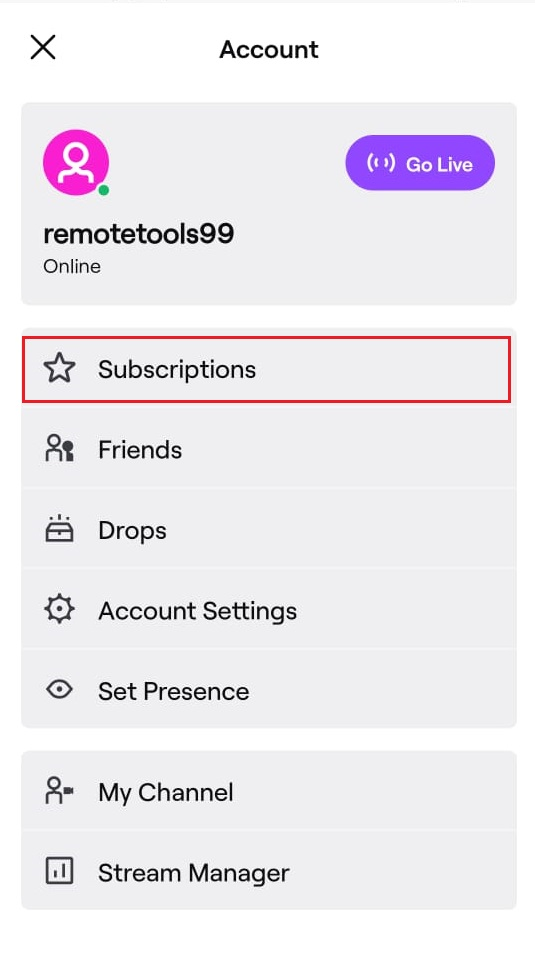
How to Cancel Your Subs on Twitch
Do you want to cancel the Twitch Subscription for certain reasons? We got you. Follow the guide below to stop your subscription.
To begin with, go to Twitch.tv and log in to your account.
Navigate to the Profile icon in the upper-right corner.
Hit Subscription from the drop-down menu.
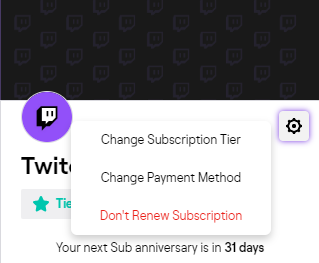
Select the subscription you want to cancel from the list.
Then, click don’t renew subscription.
Hit this option to end your subscription | Source: Twitch Help
Your subscription will stop on the last day of your subscription period. To keep your streak going, make sure to renew within 30 days. And if there’s anything specific that led to your decision to cancel, you’ll have the opportunity to share your thoughts through a message.
That’s everything to know about subs on Twitch. Subscriptions on Twitch are a win-win situation for both the streamer and the viewers. The financial support from subscribers allows streamers to improve their content, and as their subscriber count grows, they unlock access to creating even more unique emotes.
Maximize your Black Ops 6 rewards—Create highlights from your best gameplay with with Eklipse
Eklipse help streamer improve their social media presence with AI highlights that clip your Twitch / Kick streams automatically & converts them to TikTok / Reels / Shorts
If you’ve ever had bad luck shooting a video, it will most likely be because of background noise. How to remove background noise from a video can either be a very technical, or a straightforward endeavor. There is no point in having a beautiful video in 4K if your audio is full of background noise.
Today we’re going to give you some handy tips on lessening or removing background noise from your video using Windows or Mac. These tips should work to eliminate noise during the recording process or in post-production. Whether you’re a streamer, podcaster, or making general videos, you can benefit from this guide!
You can have the best camera, the best-looking lighting, and the most professional-grade post-production tools. But if your audio is sub-par, your content will be unlistenable. While you can tweak audio using a multitude of software, you will be better off recording clear audio at the source. Here are some tips to help you remove background noise from a video.
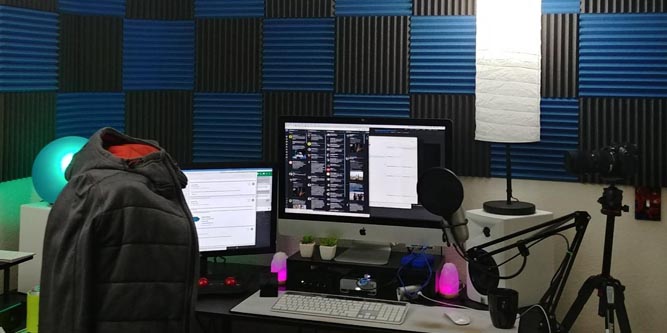
Ensure Proper Microphone Setup
Setting your microphone properly will affect the sound of your video | Source: Nasi Lemak Tech
Make sure your mic is setup up and connected properly. Use proper cabling with little to no interference to avoid that dreaded background hiss or buzz. A good quality microphone may set you back in terms of cash, but will most likely have better noise cancellation.
Do A Test Recording
Do testing is necessary to ensure the quality of your video sound | Source: StockSnap.io
The easiest way to tell whether or not there will be background noise in your video is to do a recording test. Nothing hurts more than recording the perfect video, and playing it back to find out the audio is illegible. A quick 20-30 second recording with your setup will be enough to find and eliminate sources of noise
Remove Sources of Noise
Source: Adobe Stock
Your test recording may reveal sources of noise. These may be traffic, clamoring neighbors, noisy appliances or other people in proximity to you. Some ways around this are to record at a time when traffic is at a minimum, turn off noisy appliances and request a certain period of quiet from people.
Room Muffling
Source: Nerd Techy – Remove background noise from a video online free
How you record is just as important as where you record. A large room with hard, reflective surfaces will most likely result in bad audio. Ensure your setup is in a quiet room, with enough soft surfaces to absorb ambient sound. If you still can’t get the desired result, use foam padding on your walls and carpeting on the floor. Wall padding is a game changer for epic audio, and there are plenty of DIY solutions on the Internet.
2. Use Software To Remove Background Noise
But what if you’ve already recorded your audio and there is no option to re-do it. What then? There are certain options available on the Internet to de-noise your videos. They may not work as well as eliminating the noise at the source, but they’re handy in a pinch.
VEED.IO
Veed is an easy-to-use tool to help you clear the background noise | Source: VEED.IO
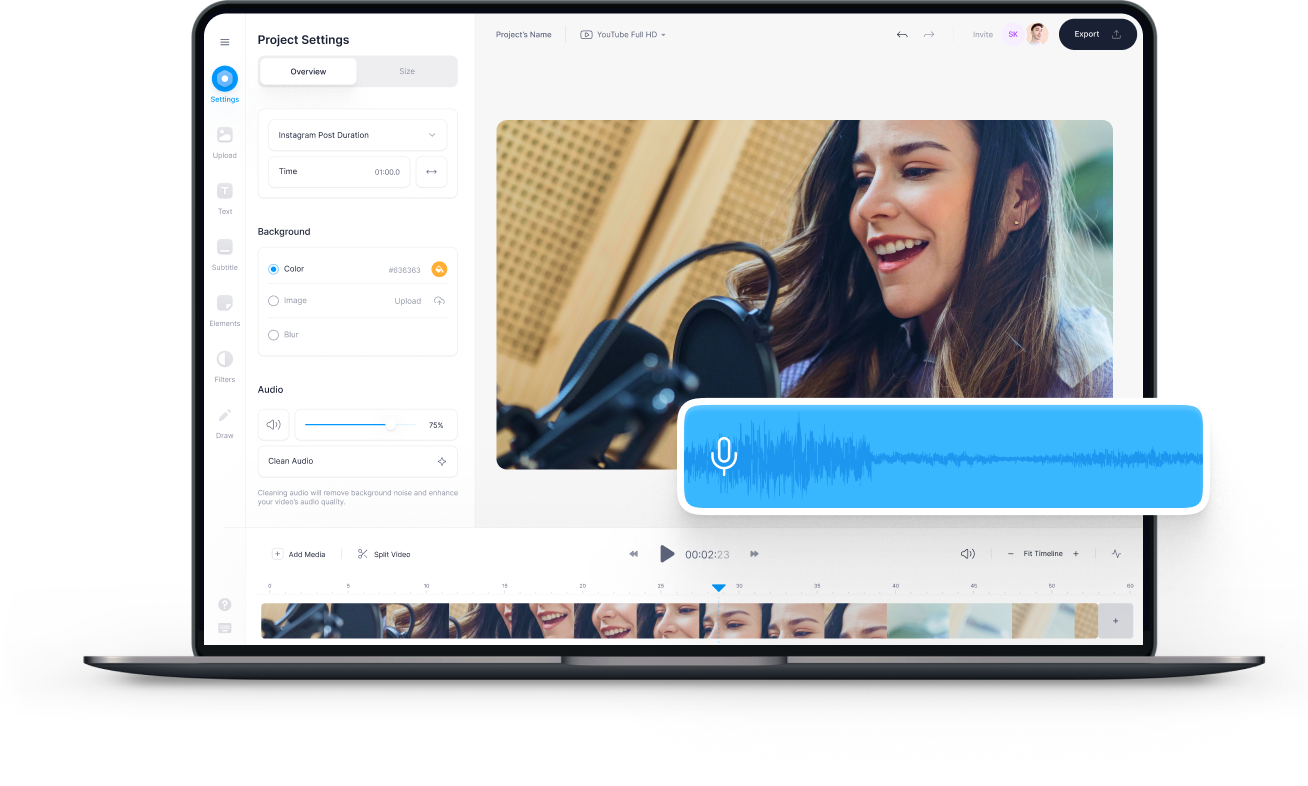
Our first choice of software is VEED.IO. This is an online tool for many facets of video editing, the most relevant of which is background noise removal. Simply Upload the video, wait for it to load, and press the Clean Audio button. Once the audio is cleaned up, Export your video as an MP4 and you’re all set!
Another option is Filmora. Filmora suite boasts a user-friendly drag-and-drop interface, which guides users through a timeline, preview window, and a comprehensive effects library. Whether you’re using a Windows or macOS computer, Filmora’s software library can be easily accessed. If you’re on the fence about purchasing the program, take advantage of the free trial options available on the official Filmora website. You can also find pricing information for each program on the website.
3. How To Remove The Background Noise From A Video Using Online Tools
There are some routes you can take to clear the unwanted noise from your video. The methods vary due to the software you choose. Now, let’s take a look at these guides to make your video sound better.
Using VEED.io
VEED.io offers easy steps to clear the background noise. Here’s how.
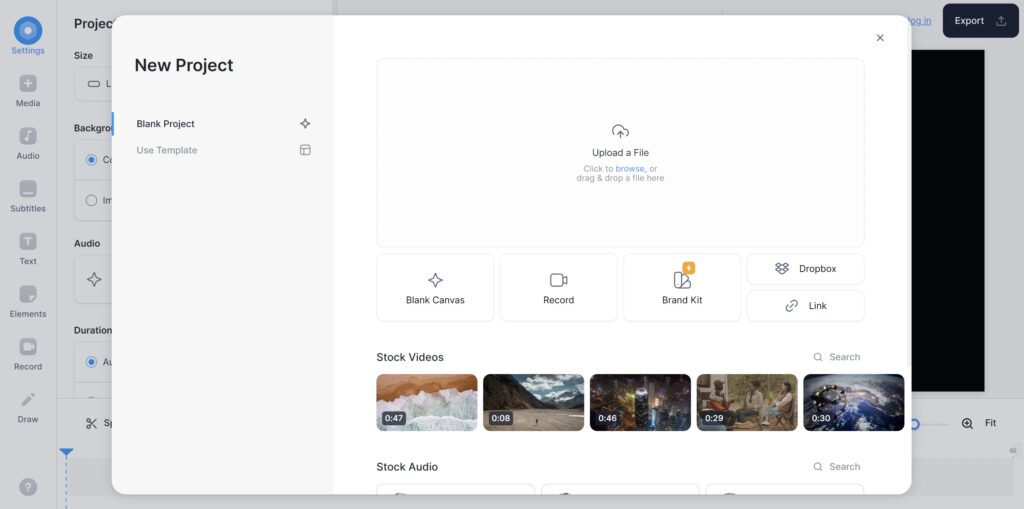
First, go to VEED.io and log in to your account (or create a new account).
Then, click on the New Project button in the upper-right corner.
Upload the video you want to edit.
upload the video you want to edit – remove background noise from video ai
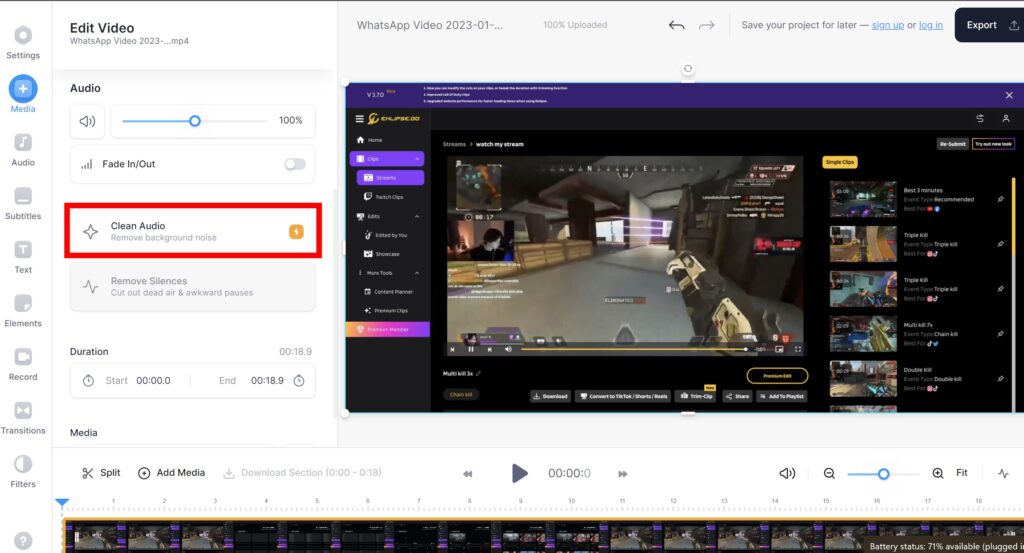
Afterward, click the audio track to navigate to the Media option.
In the Audio section, click and enable Clear Audio.
remove background noise from audio free
Bingo! Your video voice is now cleaner!
Using Filmora Video Editor
Now, we’ll see how Filmora works in removing the background noise. Here we go.
Starting off by heading over to Filmora.
Import the video you want to edit.
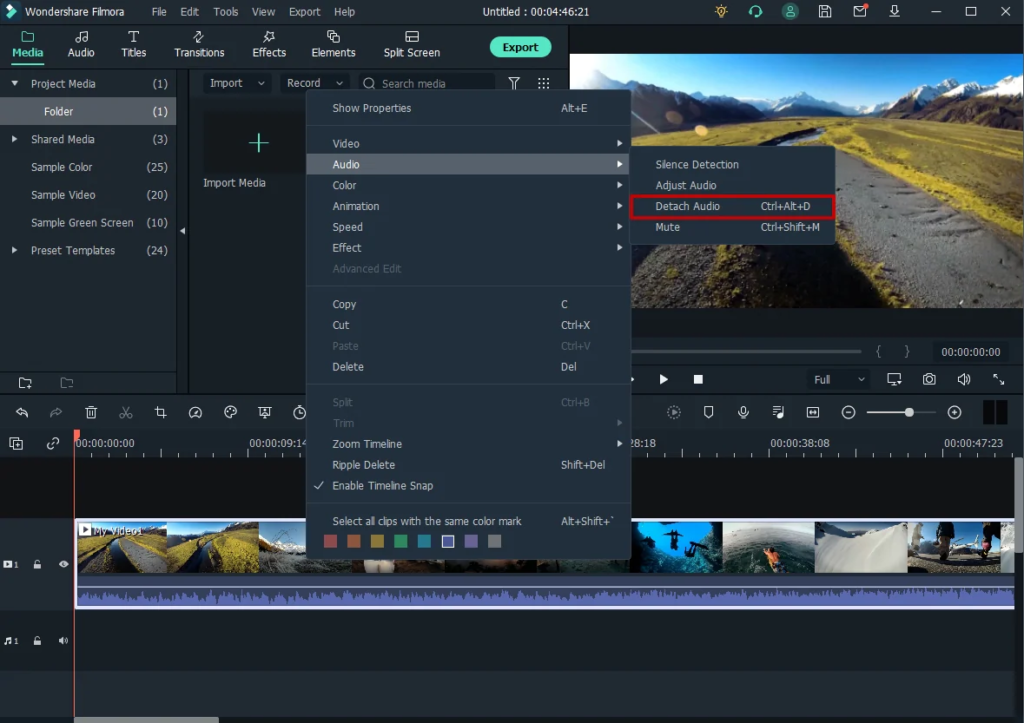
Next up, right-click the video’s timeline, and hover over the Audio option.
Hit Audio Detach to separate the audio track from the video.
Remove background noise from video online free without watermark
After that, double-click on the audio track > and hit Remove Background Noise.
remove noise from audio online free
Alternatively, you can directly edit the audio without separating the audio track from the video.
How to Remove Background Noise From a Video on iPhone
Want to reduce the background noise from your iPhone? That’s simple. Since iPhone has iMovie, a built-in editing app, the process of cleaning the noise is straightforward. Here’s how.
Launch the iMovie app.
Navigate to the Effects tab > Audio Filters.
Hit the Noise Reduction tool and drag the slider to the right to reduce the noise.
Alternatively, you can also try an equalizer to remove the noise.
Conclusion
Now that we’ve gone over both the practical and technological ways to remove background noise from your videos, you’re all set! This will be particularly useful for game streaming, where bad audio will not be a distraction from your epic highlights.
If you notice poor audio in your highlight clips, you now know what to do to fix it! You can even make your clips using Eklipse, our A. I tool, which selects the best moments of your gameplay.
Say goodbye to distracting background noise, and say hello to pristine, engaging content. Our user-friendly tool simplifies the process of crafting exceptional clips, allowing you to focus on what truly matters – your message. Whether you’re a content creator, streamer, or video enthusiast,
Eklipse is your ticket to professional, polished results. Don’t let background noise hold you back – take the leap and register with Eklipse today. Elevate your content, impress your viewers, and make your mark in the world of live streaming.
Maximize your Black Ops 6 rewards—Create highlights from your best gameplay with with Eklipse
Eklipse help streamer improve their social media presence with AI highlights that clip your Twitch / Kick streams automatically & converts them to TikTok / Reels / Shorts
Adding music to TikTok videos is always a good idea to enliven the moment in each scene. Luckily, TikTok allows users to do that. However, TikTok’s three-minute limit requires editing full-length songs to fit. That is why it’s necessary to learn how to clip sounds on TikTok.
Basically, you can trim a sound before or after you record a new video on TikTok. Both have slightly different steps. But don’t fret as they can be done within minutes. Stick to this article to learn how to trim sound on TikTok Android or other devices.
Clipping the sounds in TikTok is extremely easy. It’s similar to editing videos. You don’t need any third-party app or online service to do so. We’ll start with the guide below.
Then, tap the ‘+’ button at the bottom of the screen.
Tap the plus button to start recording a new video | Source: flexclip.com
Hit Add a Sound on top to add music or sounds you desire.
Tap on the ‘Add a Sound’ to pick the right music | Source: flexclip.com
After that, trim the length of the music by clicking the Musical note icon with scissors on the right menu.
Source: flexclip.com
You can either trim or select the best part of the music to apply to your video.
Trim the song length | Source: flexclip.com
Next, if you’re finished, just tap the red checkbutton.
Finally, you can start recording your video as usual.
How To Trim a Sound Clip On TikTok After Recording
Did you just record a new video but forgot to add the sounds? Don’t worry, you can do it after you’ve done the recording. Here’s what you need to do:
Go to the TikTok app and use your account.
Tap the ‘+’ button to create a new video.
Then, click the Sounds icon to find the sound you wish to add to your video.
Tap on the Sound icon | Source: Alphr
You can choose either TikTok’s library or your own gallery to find the right music.
Pick a sound and trim it freely by pressing the scissors symbol.
Start trimming the sounds by dragging the sound wave.
Once you’ve finished it you can click the red-check button.
Source: Alphr
Next, you can continue to edit your video (apply effects, stickers, etc)
Now, you have found out how to adjust the sound on the TikTok slideshow. It’s pretty easy to do, right? When you’ve finished editing the video with sounds, you can proceed to the next step until you’re ready to post it.
Conclusion
Now that you know how to clip sounds on TikTok, you can definitely create a captivating video that will generate a thousand eyeballs. Make sure you choose the right song that fits your video so it can enhance your audience’s viewing experience. Now is your turn to do it.
Anyway, when it comes to adding music to TikTok, you can always use your own music as your TikTok sound. Be it creating your own music or making your voiceover. Here’s an article about How To Make a Mashup of Songs for TikTok.
You probably have encountered the “file too large error” when sending videos to your friends. This can be quite irritating especially when you put your heart and soul into making the video. Compressing the video file could be the best solution for that. But when it comes to compressing files, there’s a risk of losing quality. In this guide, we will tell you how to compress video without losing quality.
Compressing your files reduces the bandwidth and upload time. The viewer won’t have to deal with the high buffering rate either. Today, we will talk about some ways you can effectively compress the file without sacrificing the quality of the video. So without further ado, let’s begin.
One way to reduce the size of your video file without compromising quality is by compressing it into a zip format. The video quality of the file will remain the same using this method. Keep in mind that the size won’t be reduced significantly. However, this method is still worth it due to its effectiveness and practicality.
Best Free Video Compressors
There are many ways to compress video. Here are the list of best free video compressors apps that you can use to reduce your file size.
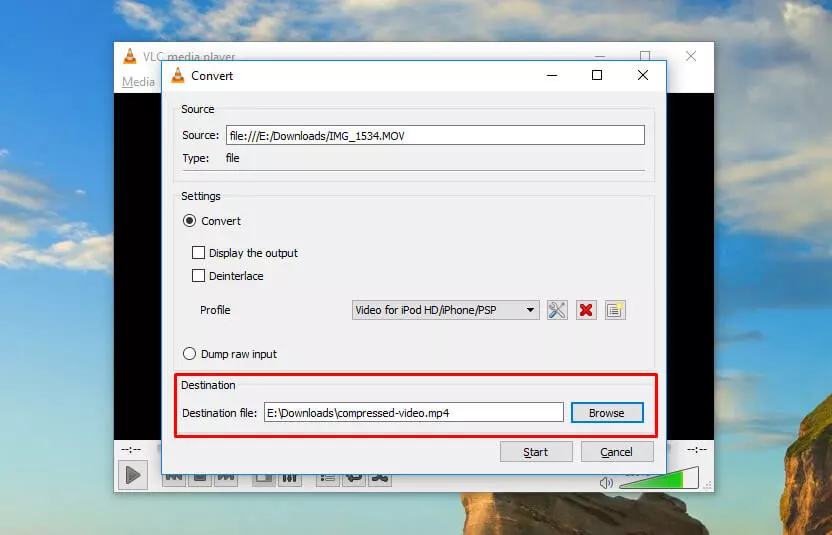
1. Compress Video on Windows with VLC
If you want to compress your videos from Windows, you should download and install the VLC app first. Once it has installed on your device, you can start to follow the steps below.
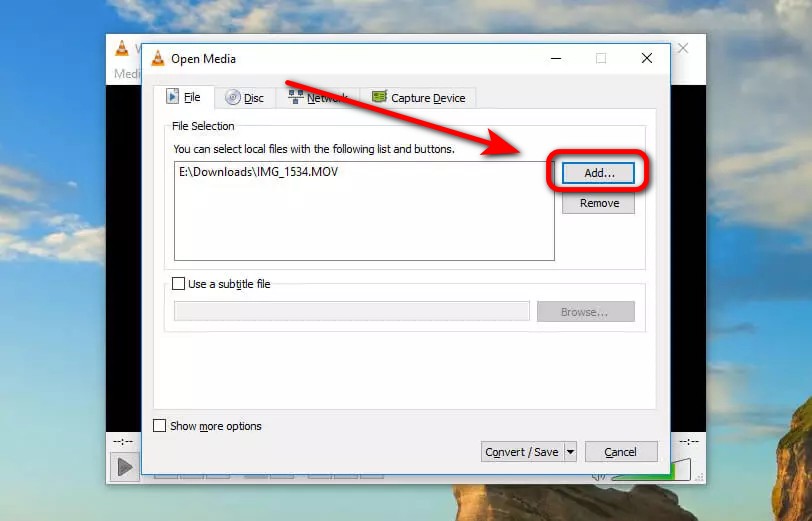
Open the VLC Media
Go to Media option > Convert/Save.
Then, click Add
Select your video file from your device library.
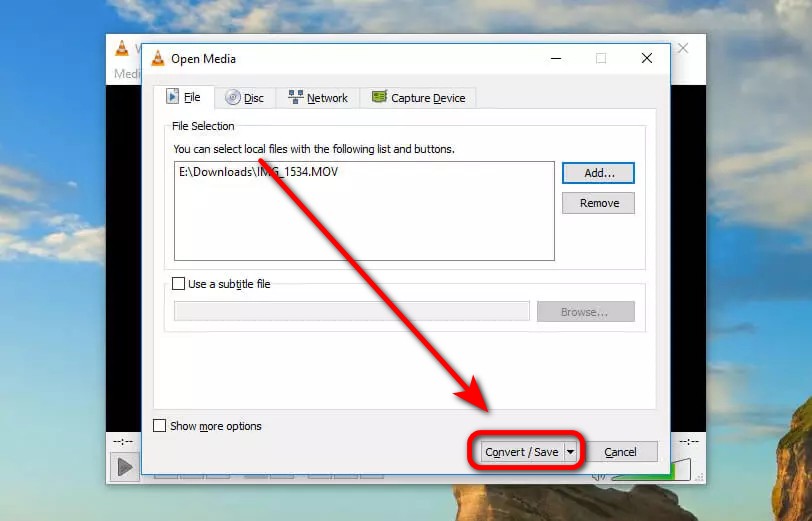
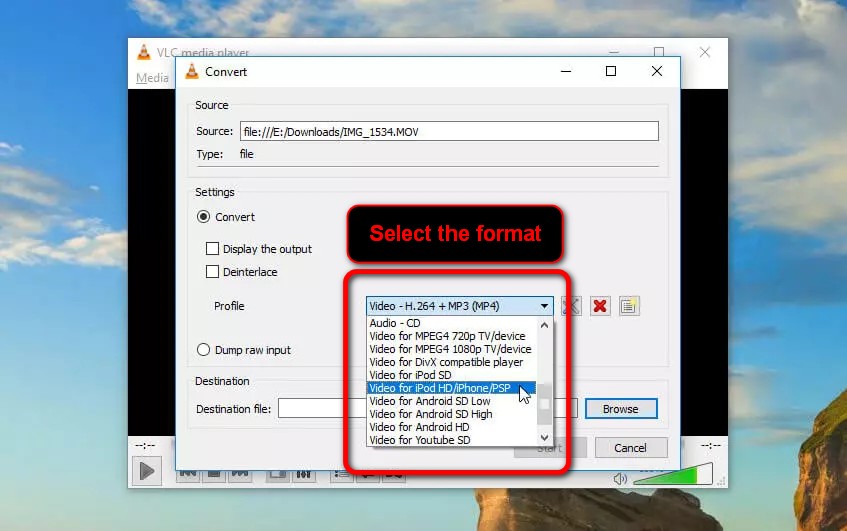
Hit “Convert/Save“, then you’ll see the list of conversion options.
Select the conversion option.
Hit Save, choose the location, and click “Start”
Wait for a few moments and you’re all set.
2. Compress Video on Mac with QuickTime Player
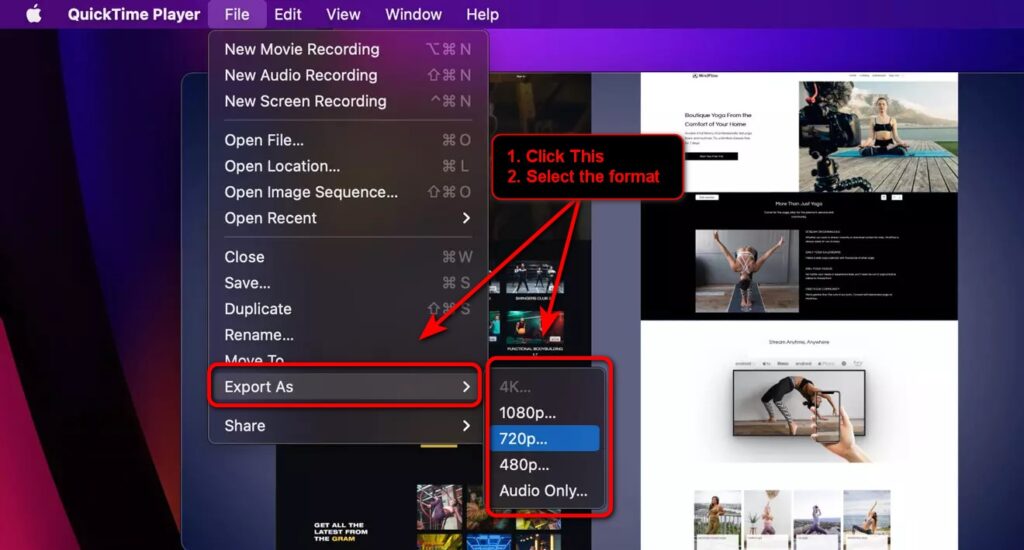
Additionally, you can also compress a video on Mac. There are several tools you can use to help you, but Quicktime is the simplest one since it’s a default installation on your Mac. Though it doesn’t feature with the complete tool, but it’s still worth trying. Follow these steps to compress your video using Quicktime:
First, open the video and go to the File option.
Then, click the export as and pick an option you like.
Finally, choose the resolution.
Voila! Now you have reduced your video size without reducing the quality. You can send them to other people and say be to large-file!
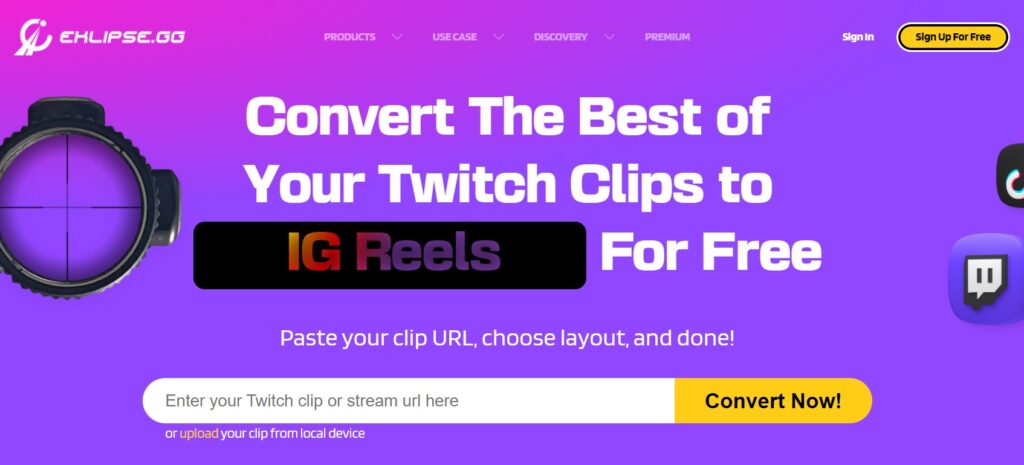
3. Trimming the Video To Reduce File Size with Eklipse
Alternatively, if you want to compress a video without sacrificing the quality, you can trim the irrelevant parts and only keep the relevant parts. There are many video editing tools you can use for this. Eklipse is one of the best tools to help you trim the video.
Eklipse is not only able to capture the best moment of the video, but it’s also able to let you trim your video manually with its Trim-clip feature. If you are interested to try this feature, you can click here to see the step-by-step trimming a video using Eklipse tool. Just follow the instruction and own the high-resolution video.
Maximize your Black Ops 6 rewards—Create highlights from your best gameplay with with Eklipse
Eklipse help streamer improve their social media presence with AI highlights that clip your Twitch / Kick streams automatically & converts them to TikTok / Reels / Shorts
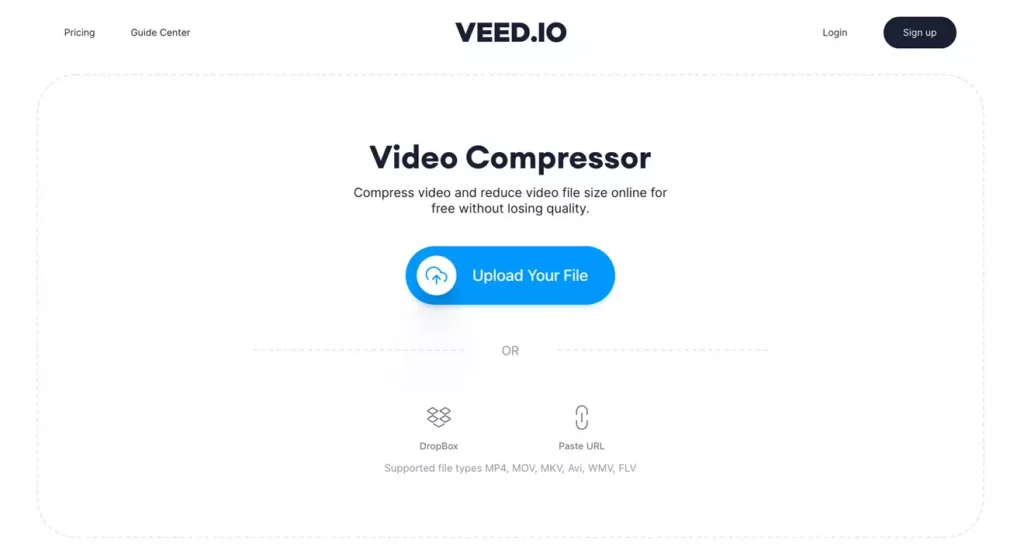
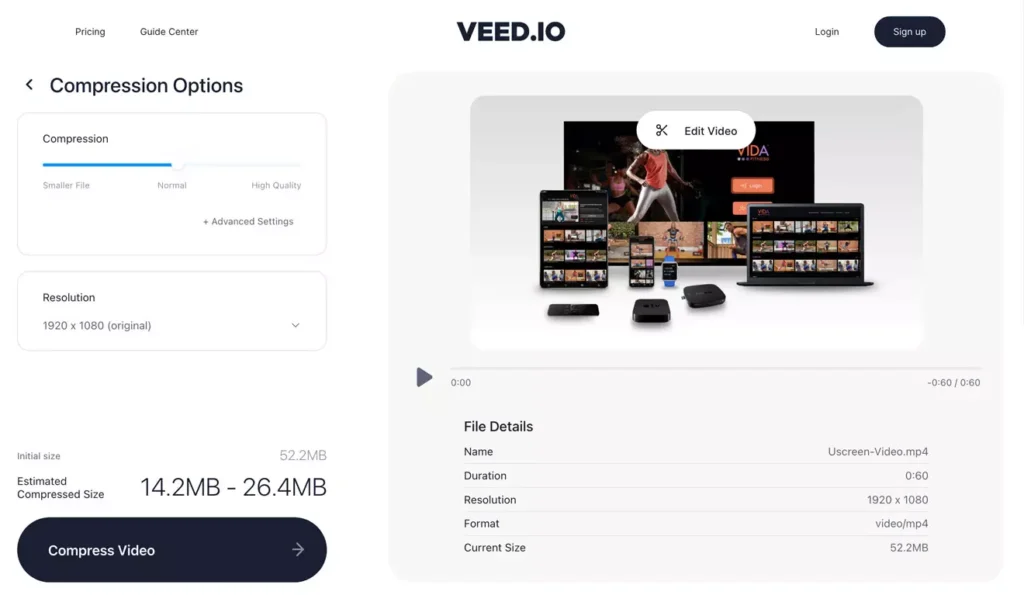
If you don’t want to download or use an app on your computer, there are many websites that allow you to upload a video and compress it for you. Some of these services require an account, some require a monthly fee, and others are completely free.
One such service is VEED.IO, which offers a free, easy-to-use video compression tool that works with both Windows and Mac, and within your browser.
To compress video with VEED you can simply upload and choose a result like this
Step 1: Open VEED video compressor, upload your video to itStep 2: Select your compression option, the click Compress Video
Additionally, it gives you an estimate of the file size before you compress, which is useful if you’re looking to compress videos to be added as an email attachment.
Conclusion
So that’s how to compress video without losing quality. You can choose the simplest method that can produce high-quality video. After successfully compress your video, now you don’t need to worry about another error while sending the video to other.