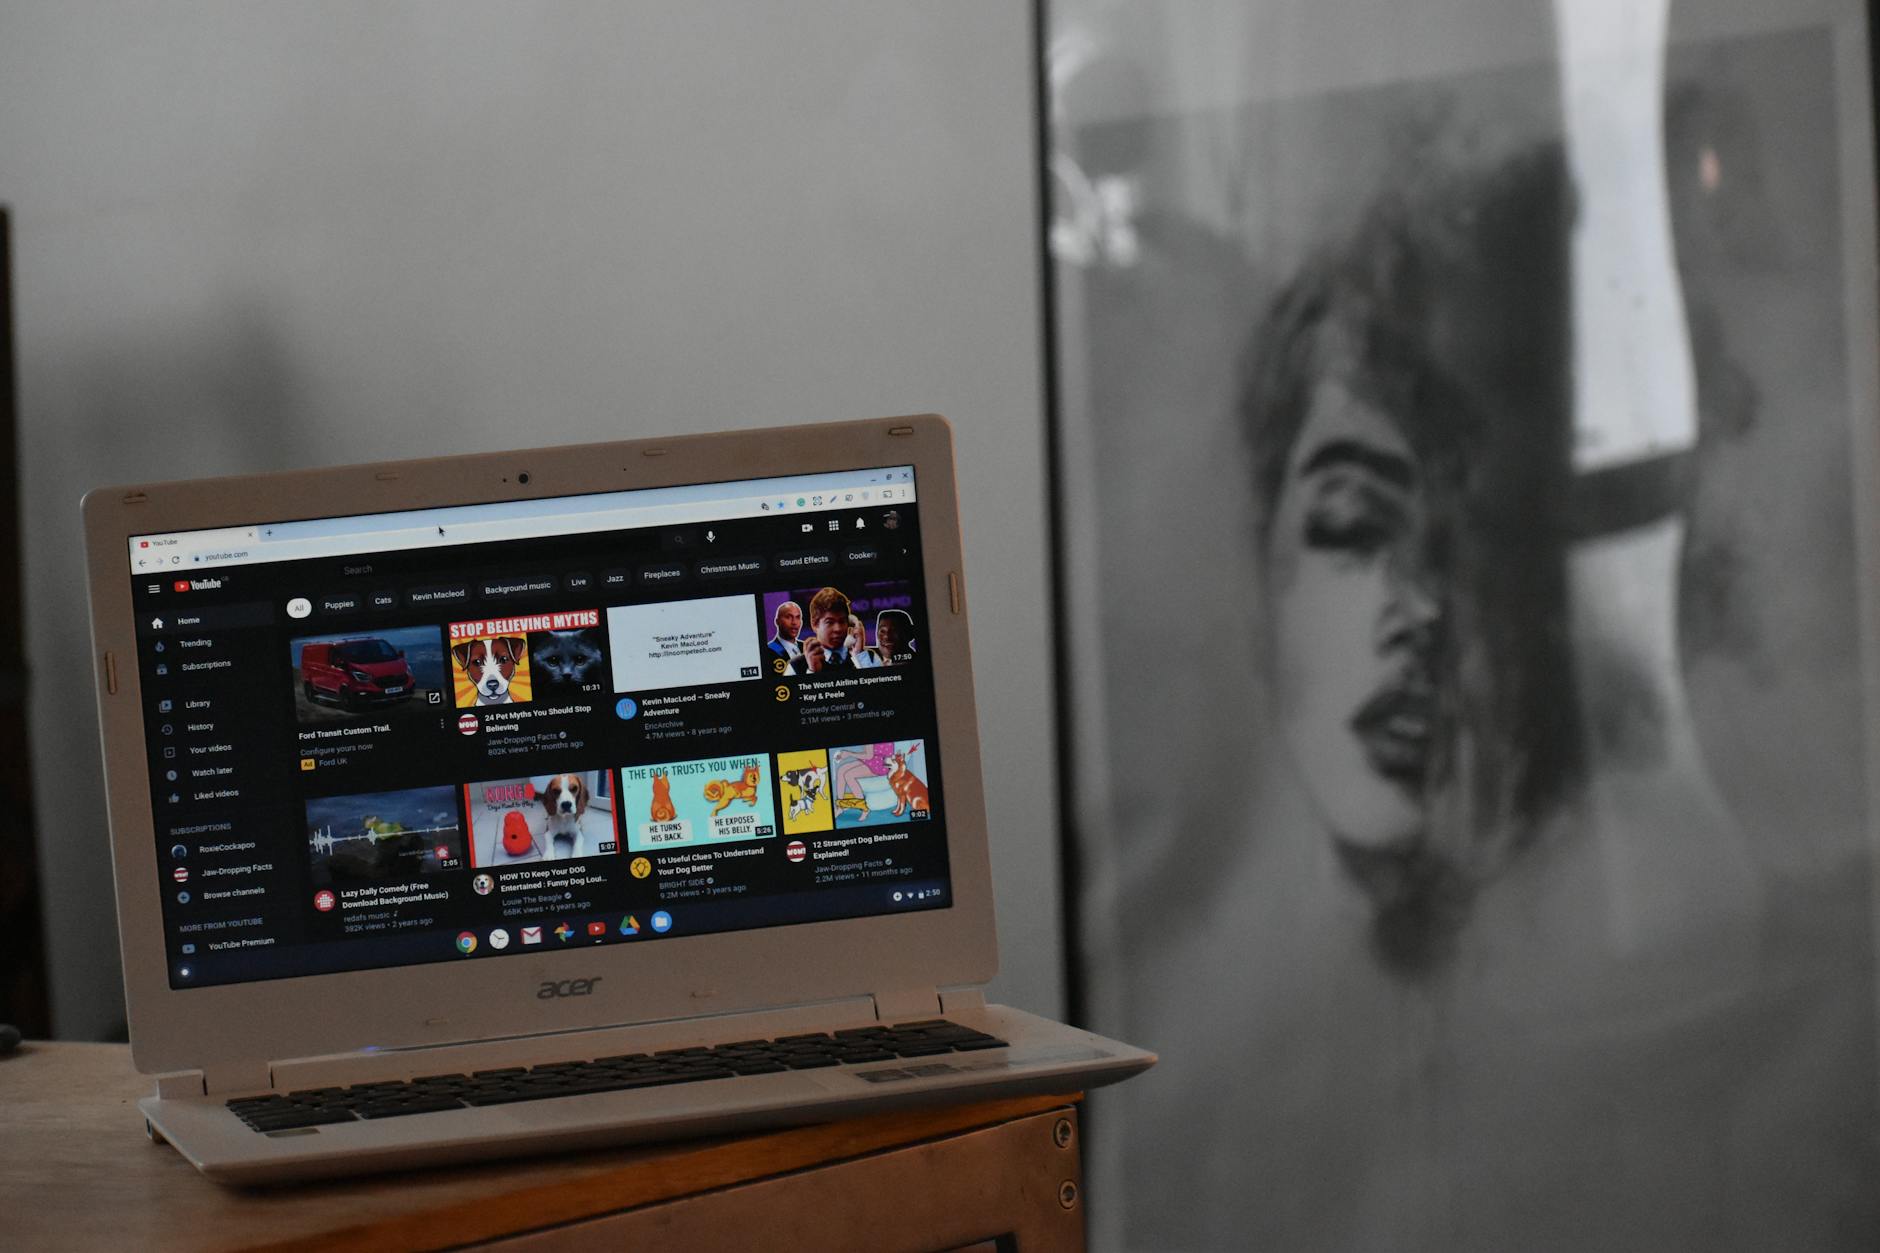
Getting a video to go viral on YouTube isn’t just about luck—it’s about strategy and timing. By understanding how the platform works and applying the right techniques, you can increase the chances of your video being shared widely. Here’s a guide to help you make a video that has viral potential.
According to Simplilearn, videos that evoke strong emotions or are connected to trending topics have a higher chance of being shared widely.
Steps to Make a YouTube Video Go Viral
1. Start Strong in the First Few Seconds
Viewers decide whether to keep watching within the first 10-15 seconds. A compelling opening, such as a bold statement or a striking visual, is key to grabbing attention right away.
2. Create Content People Care About
Make videos that people can relate to or find interesting. Whether it’s humor, a how-to, or inspirational content, your video needs to give viewers a reason to engage with it emotionally.
3. Use Trends to Your Advantage
Check out YouTube’s trending page or use tools like Google Trends to find out what people are currently searching for. By creating content that ties into popular trends or challenges, you can get more attention.
4. Optimize for Search (SEO)
Make sure your video is easy to find by using keywords in the title, description, and tags. Tools like VidIQ can help you find relevant keywords that will improve your chances of showing up in YouTube search results.
5. Engage Your Audience
Encourage viewers to like, comment, and share your video. The more engagement your video gets, the more likely YouTube’s algorithm will push it to a broader audience.
Key Factors for YouTube Virality
Capture Attention Quickly
The first 15 seconds are crucial. Descript emphasizes that keeping viewers interested during this time can significantly boost your chances of retaining their attention throughout the video.
High-Quality Production
Good audio and visuals matter. While you don’t need Hollywood-level production, clear sound and a visually appealing video make people more likely to watch and share.
Consistency is Key
Posting videos consistently builds an audience and improves the chances that your content will get noticed. According to Planoly, having a regular posting schedule helps build momentum and keeps your audience engaged.
Tips for Editing and Content Creation
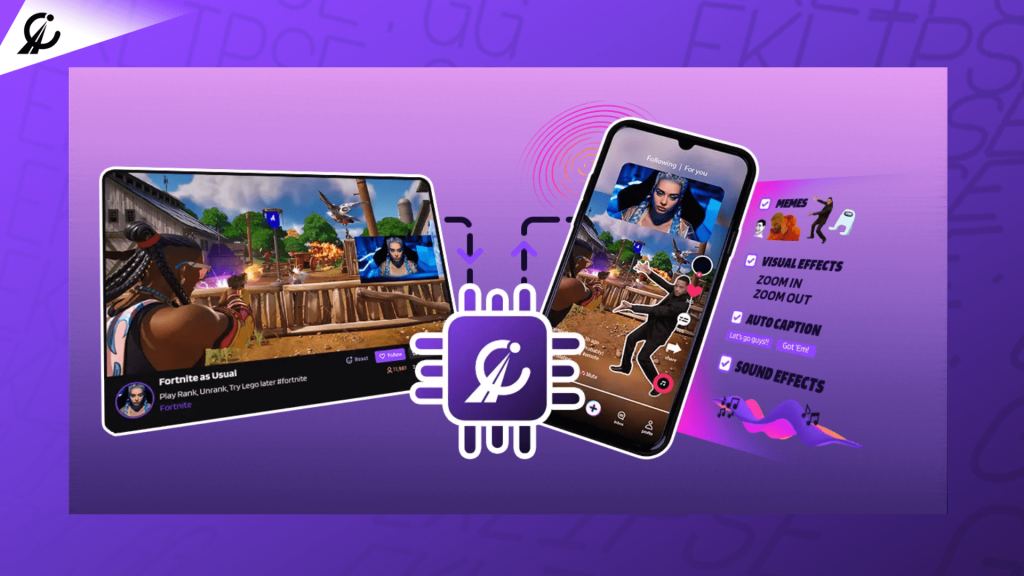
AI-Edit can edit videos using AI for virality – Source: Eklipse.GG
Keep It Concise: Most viral videos are short and to the point. Trim any unnecessary parts of your video to keep viewers engaged.
Edit for Impact: Use quick cuts, catchy visuals, and on-screen text to highlight key points. Using tools like Eklipse’s AI can help you quickly edit your content and focus on the best moments.
Catchy Thumbnails and Titles: Your video thumbnail and title are the first things people see. Make them interesting and clickable to draw more attention.
Promote Your Video for Maximum Reach
Here are some promotion strategies:
Share on Social Media: Post your video on Twitter, Instagram, TikTok, and Facebook to drive more views.
Collaborate with Other YouTubers: Cross-promotions or guest appearances on other channels can expose your content to new audiences.
Use YouTube Ads: If you want a quick boost in visibility, consider using YouTube ads to reach a wider audience.
Conclusion
Creating viral content on YouTube isn’t a guarantee, but with the right approach, you can greatly improve your chances. Start by making content that resonates with viewers, optimize your videos for search, and promote them across different platforms.
Unlock the potential of passive income by automating your YouTube channel. In this guide, we’ll explore what YouTube automation is, the benefits it offers, and how you can start your own automated YouTube channel.
YouTube automation refers to the process of delegating various tasks involved in running a YouTube channel to others or automating them using tools and software. This includes content creation, video editing, voiceovers, and even channel management.
Select a niche that has high demand and monetization potential. Research trending topics and consider niches like technology reviews, top 10 lists, or educational content.
2. Conduct Keyword Research
Use tools like VidIQ or TubeBuddy to identify popular keywords and topics within your chosen niche. This will help your videos rank higher in search results.
3. Plan Your Content
Create a content calendar outlining video topics, upload schedules, and deadlines. Consistency is key to growing your channel.
4. Automate Content Creation
Scriptwriting: Hire freelance writers or use AI writing tools to generate scripts for your videos.
Voiceovers: Utilize AI-powered text-to-speech tools like Fliki AI to create voiceovers without the need for recording equipment.
Video Editing: Outsource editing to freelancers or use automated video creation software.
5. Optimize Video SEO
Ensure your videos are optimized with relevant titles, descriptions, tags, and thumbnails. Tools like VidIQ can assist with SEO optimization.
6. Upload and Schedule Videos
Use YouTube’s scheduling feature to upload videos ahead of time. This keeps your channel active even when you’re not manually uploading content.
7. Monetize Your Channel
Once you meet YouTube’s Partner Program requirements (1,000 subscribers and 4,000 watch hours), you can start monetizing through ads. Additionally, explore affiliate marketing, sponsorships, and merchandise sales.
Tools Used for YouTube Automation
source: Eklipse.GG
Fliki AI: An AI tool for generating natural-sounding voiceovers from text.
VidIQ: Provides keyword research, SEO optimization, and competitor analysis.
TubeBuddy: Assists with channel management and optimization tasks.
Eklipse GG: Automate your gaming clips and effortlessly create YouTube content, perfect for growing an automation channel.
Content Creation Platforms: Websites like Upwork or Fiverr to find freelancers for scriptwriting and editing.
Tips for Success in YouTube Automation
Maintain Quality: Automated does not mean low-quality. Ensure scripts, voiceovers, and editing meet high standards to retain viewer engagement.
Understand Your Audience: Tailor content to the preferences and interests of your target audience.
Stay Compliant with YouTube Policies: Avoid copyrighted material and adhere to community guidelines to prevent strikes or demonetization.
Monitor Analytics: Regularly review your channel’s performance to make data-driven decisions for improvement.
Invest in Thumbnails: Eye-catching thumbnails increase click-through rates and are essential for attracting viewers.
Conclusion
YouTube automation is a powerful strategy for building a scalable and profitable online business. By leveraging automation tools and outsourcing, you can create consistent, high-quality content that attracts viewers and generates revenue—all while minimizing your personal workload.
If you’re looking to streamline the process of managing a gaming channel on YouTube, Eklipse GG is a game-changer. With its AI-powered tools, Eklipse GG automates the capture and editing of your best gaming moments, making it easier than ever to post high-quality content to YouTube—without manual effort.
Kick streaming is gaining popularity as a platform for live streamers who want to build an audience and make money doing what they love.
Whether you’re just starting out or are a seasoned content creator, here’s how you can grow your Kick channel, earn money, and become a Kick Affiliate.
Kick is a streaming platform designed for creators to live stream content, interact with their audience, and make money through various monetization methods.
Kick streaming via Kick.com
It has become a rising competitor to platforms like Twitch due to its user-friendly affiliate program and multiple monetization options.
How to Earn Money on Kick Streaming
1. Donations
One of the easiest ways to earn money on Kick is through direct donations from viewers. Viewers can support their favorite streamers by donating directly during live streams. The donation process on Kick is simple, and streamers often incentivize donations with shoutouts or special content.
2. Subscriptions
Kick allows streamers to earn money through paid subscriptions. Viewers can subscribe to their favorite channels for exclusive perks like ad-free viewing or special chat privileges. As a streamer, you can encourage more subscriptions by offering unique content available only to subscribers.
3. Sponsorships and Affiliate Links
Like other platforms, Kick streamers can earn money by partnering with brands or promoting products through affiliate links. For example, including links to gaming gear, merchandise, or tools in your stream can bring in commission-based earnings when your viewers make a purchase using your link.
Kick Affiliate Program: How to Become a Streamer Affiliate
Becoming an affiliate on Kick is easier compared to other platforms like Twitch. To qualify, you’ll need to meet a few basic requirements:
Gain 75 followers on your Kick channel.
Maintain a regular streaming schedule.
Once you meet these thresholds, you can apply for the Kick Affiliate program. As an affiliate, you’ll unlock additional monetization features, including ads, subscriptions, and even more exposure for your streams.
Multiple revenue streams, including ad revenue, direct donations, and paid subscriptions.
Higher revenue share, 95% to the creator, with only 5% going to Kick.
Tips to Boost Your Kick Income
1. Promote Your Kick Streams
To build your Kick audience, promote your streams on social media platforms like Twitter, Instagram, and TikTok. This will help you attract new viewers who may not be familiar with Kick.
2. Optimize Your Content for Short Video Platforms
If you have long-form content or streams, consider using tools like Eklipse to convert your streams into short, TikTok-optimized videos. This is an excellent way to grab attention on platforms like TikTok and Instagram Reels, driving new viewers back to your Kick channel.
3. Engage with Your Audience
The most successful streamers keep their audience engaged by actively interacting with them. Read and respond to comments, encourage audience participation, and build a community around your content.
Monetization Features to Know
Kick offers several built-in monetization features for affiliates:
Direct Donations: Viewers can support you instantly during streams.
Subscription Tiers: Offer unique perks to your subscribers, such as exclusive content or badges.
Ad Revenue: Kick allows affiliates to earn revenue from ads played during streams.
Conclusion
Earning money on Kick streaming is achievable with the right strategy. Focus on growing your audience, staying consistent, and utilizing the platform’s monetization features. Becoming a Kick Affiliate is a great way to unlock even more opportunities, and with tools like Eklipse, you can expand your reach by converting your streams into viral-ready short videos for platforms like TikTok.
Ready to take your Kick channel to the next level? Start by building your audience and exploring Kick’s affiliate program to grow your income!
Recording party or game chat audio on Xbox has been a challenge due to privacy settings and Xbox’s built-in limitations. However, with the right setup and external tools, you can capture both game and chat audio.
Here’s how you can do it, whether you’re using the Xbox Series X/S or Xbox One.
By default, Xbox Series X/S and Xbox One do not support party chat recording due to privacy concerns. Microsoft prioritizes user privacy, which is why direct recording of party chat audio isn’t natively supported.
Source: Xbox
However, there are several workarounds that allow you to capture the chat audio along with your game audio using external devices or adjustments in the Xbox settings.
Steps to Record Party Chat on Xbox Series X/S
Set Party Chat Audio to Speakers:
Navigate to the Settings menu on your Xbox console.
Go to Volume & audio output under General.
Set Party chat output to Speakers or Headset and Speakers. This allows the party chat to be played through the speakers, enabling external capture devices to record both game and chat audio.
Use Xbox’s Game DVR for Gameplay
While Xbox’s Game DVR captures in-game footage, it does not capture party chat by default. Ensure that the game footage recording is properly set up before integrating external methods for chat capture.
Capturing Party Chat Using External Devices (Elgato)
One of the most reliable methods for capturing party chat audio on Xbox is using a capture card like the Elgato HD60 S in combination with the Elgato Chat Link Cable.
Xbox Dashboard settings – source: Elgato
Step-by-Step with Elgato:
Connect Your Xbox to the Elgato Capture Card:
Connect the HDMI output from your Xbox to the HDMI input on the Elgato capture card.
Connect the HDMI output from the Elgato to your TV or monitor to display the game.
Add the Chat Link Cable:
Plug the Elgato Chat Link Cable into your controller’s 3.5mm headset jack.
Connect your headset and the Chat Link to the capture card via a splitter. This allows the capture card to record both your game audio and party chat.
Configure Your Audio Settings:
In your Xbox audio settings, ensure that the Party chat output is set to Headset and Speakers.
Use software like OBS Studio to capture the video and audio, including the party chat, for recording or streaming.
Workarounds and Tips for Better Audio Recording
Use a Second Device for Recording
If you don’t want to use an external capture card, another method is to use a separate device to capture the party chat. You can connect your Xbox to a PC via the Xbox Console Companion app, route the audio to your PC speakers, and record the audio separately using OBS or another recording software.
Ensure Consent from Party Members
It’s important to ensure that everyone in your party is aware and consents to being recorded. Many regions have laws requiring consent for audio recordings, and Xbox adheres to these privacy regulations.
Additional Considerations
Privacy Concerns
As mentioned, Xbox’s privacy settings are strict regarding chat recording, and using third-party tools circumvents these restrictions. Always be transparent with your party members if you intend to record conversations.
Comparison of Capture Cards
If you’re looking to invest in a capture card, consider factors like budget, recording quality, and compatibility with other software. Cards like Elgato HD60 S, AverMedia Live Gamer Portable 2 Plus, and Razer Ripsaw HD are popular options with varying features and price points.
Conclusion
Recording game and party chat audio on Xbox Series X/S and Xbox One may not be straightforward due to Xbox’s privacy-focused restrictions. However, by adjusting audio settings and using external devices like Elgato capture cards or alternative methods like the Xbox Console Companion app, you can capture both game and chat audio for your recordings or streams.
Are you a streamer, gamer, or content creator looking to monetize your platform? The Eklipse.gg Affiliate Program offers you a seamless way to earn passive income while promoting a cutting-edge content creation tool designed to simplify and enhance your workflow.
With generous commissions, easy payouts, and exclusive perks, this program is perfect for anyone in the content creation space.
The Eklipse.gg Affiliate Program allows you to generate income by sharing a tool that automates the process of clipping and editing content from streams.
Whether you’re on Twitch, YouTube, or other platforms, Eklipse’s AI-powered technology simplifies content creation, making it easier to share highlights on TikTok, Instagram Reels, and YouTube Shorts.
As an affiliate, you earn commissions by promoting Eklipse to your audience, enabling them to improve their content creation experience.
Key Benefits:
Earn passive income effortlessly.
Ideal for streamers, gamers, podcasters, and content creators.
Promote a tool that makes content creation faster and easier.
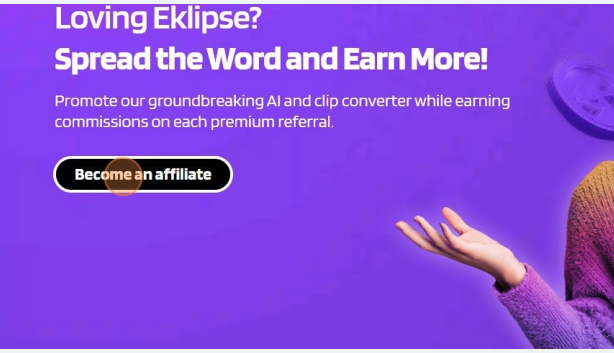
How to Sign Up for Eklipse Affiliate Program
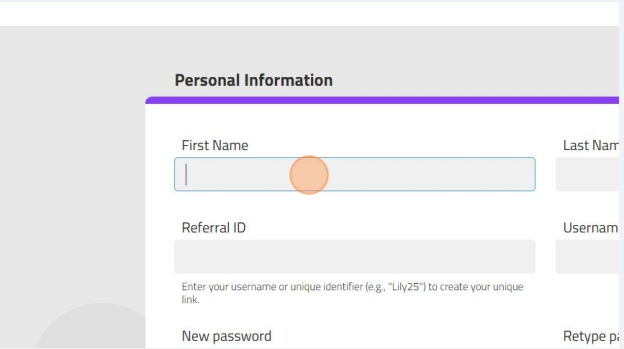
Follow these simple steps to sign up for the Eklipse Affiliate Program. Start by visiting the affiliate page, fill out the required details, and complete your registration to begin earning.
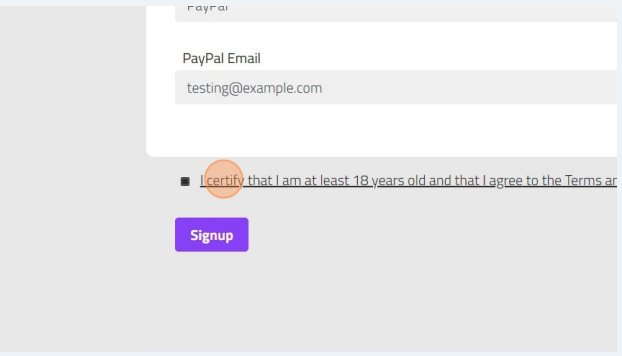
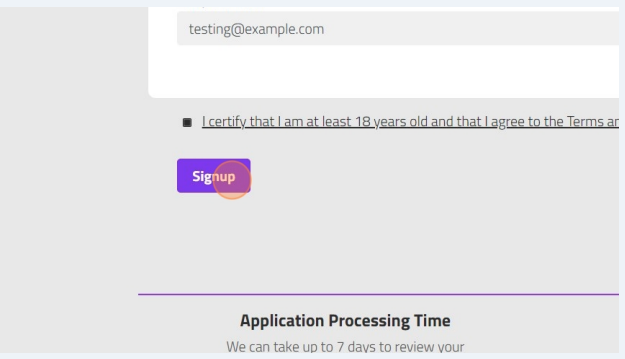
Begin filling out the sign-up form with your personal information.
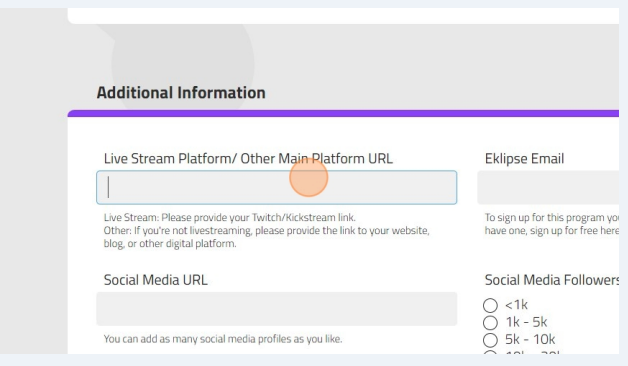
Provide additional information about your stream and social accounts.
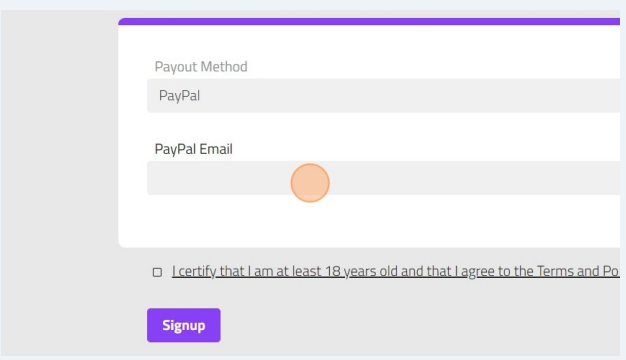
Enter your PayPal email for payment processing.
Check the box to agree to the Terms and Privacy Policy.
Click ‘Sign Up’ to confirm registration and expect a confirmation email within 7 days.
Commission Structure
Eklipse offers a highly competitive commission structure that makes it easy for affiliates to earn substantial income:
10% commission on monthly premium referrals.
15% commission on annual premium referrals.
This means the more people you bring on board, especially with annual plans, the more you earn. For content creators and streamers, this presents a low-effort way to monetize your existing audience by promoting a tool you likely already use.
Payout Threshold & Process
Earnings can be withdrawn once they reach a minimum threshold of $50. Payouts are processed through PayPal and are typically released on the 25th of each month. This means affiliates can reliably count on timely payments once they meet the payout requirement.
Promotional Materials
To help you promote Eklipse effectively, affiliates receive access to a range of promotional assets:
Unique referral link for tracking conversions.
Custom promo codes to offer discounts to your audience.
Banners, logos, and overlays designed for streaming platforms, making it easier to visually integrate Eklipse into your content.
These materials ensure that affiliates can maintain brand consistency while promoting Eklipse on their social media or during live streams.
Affiliate Requirements
The Eklipse Affiliate Program is open to a wide range of creators, but there are a few key requirements:
You must be at least 18 years old.
You need an Eklipse account to participate.
You must provide accurate and original personal information during sign-up.
These straightforward requirements make it accessible for any content creator to join and start promoting.
Discounts for Referrals
Affiliates can provide additional value to their audience by offering exclusive discounts:
10% off the annual Eklipse Premium Plan for users who sign up using your referral code.
This makes it easier to encourage sign-ups, as your audience gets a direct financial benefit from using your referral code.
Bonuses & Incentives
In addition to commissions, Eklipse provides extra incentives for high-performing affiliates:
Free 7-day trial of the Eklipse Premium Plan for all new affiliates.
If you generate at least three sales per month, you’ll receive a free upgrade to a Premium account:
Three annual referrals in one month = Premium upgrade for a whole year.
A combination of three monthly and annual referrals = Premium upgrade for a month.
This bonus structure encourages affiliates to remain active and perform well each month.
Do’s and Don’ts
To ensure compliance and maintain the integrity of the program, Eklipse outlines a few simple rules for affiliates:
Do’s:
Use Eklipse’s promotional assets (banners, codes) appropriately on your platform.
Promote weekly using your unique promo code.
Collaborate with other affiliates to share promotion strategies.
Join Eklipse’s Discord community for event updates and exclusive offers.
Don’ts:
Avoid providing incorrect information or using misleading promotions.
Do not use bots or other automated methods for promotion.
Don’t send spam or unsolicited emails.
Affiliates are expected to maintain ethical promotional practices to ensure the longevity of their partnership with Eklipse.
Once signed up, affiliates can monitor their performance through the Post Affiliate Pro dashboard, where they’ll have access to metrics such as:
Clicks
Conversions
Commissions earned
Withdrawal options
This transparency allows affiliates to adjust their strategies based on real-time data and optimize their earnings potential.
Why Choose Eklipse.gg?
The Eklipse Affiliate Program stands out for several reasons:
Higher commission rates compared to competitors (up to 15% for annual referrals).
Extensive promotional resources tailored specifically for content creators.
Low payout thresholds and easy withdrawal options.
Access to a supportive Discord community where affiliates can exchange tips and strategies.
By promoting Eklipse, you’ll earn passive income while helping your audience enhance their content creation journey with AI-powered tools.
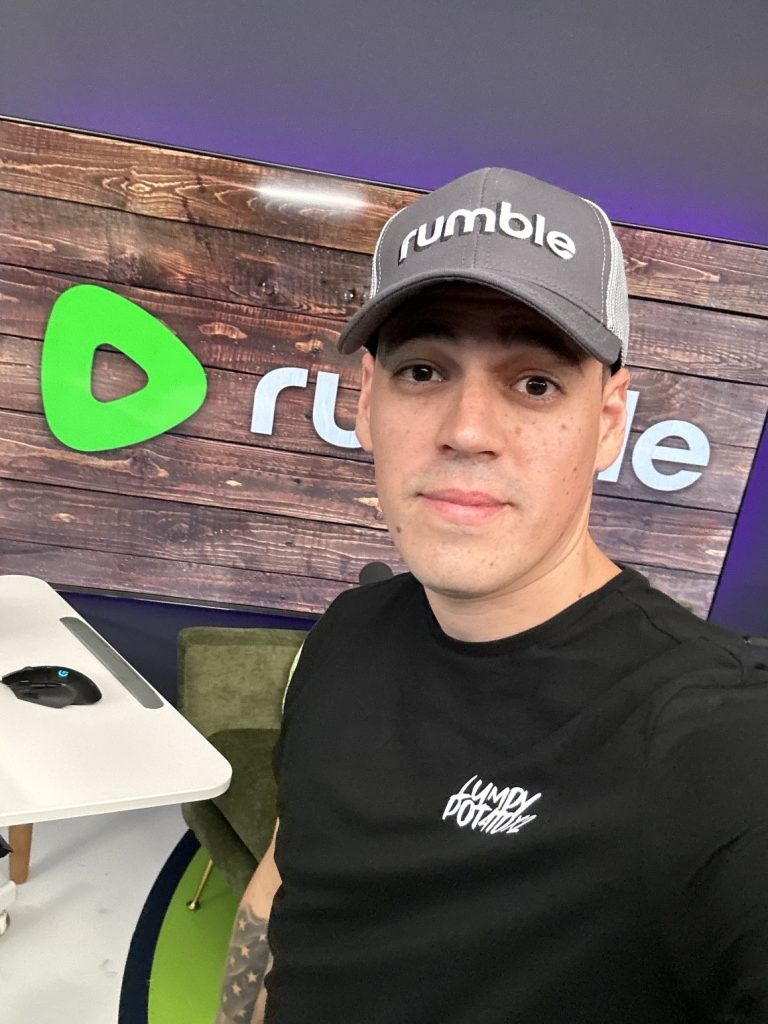
Case Study: LumpypotatoX2’s Success
One of the top-performing affiliates, LumpypotatoX2, has earned over $100 through the Eklipse Affiliate Program by consistently promoting Eklipse during his Rumble gaming streams.
He regularly demonstrates how Eklipse simplifies the process of creating clips, which has resonated strongly with his audience. He has successfully driven multiple sign-ups by showcasing live tutorials and offering discount codes.
LumpypotatoX2 is one of many Eklipse affiliator – Source: LumpypotatoX2
LumpypotatoX2’s success shows how effective it can be to promote Eklipse by providing value through tutorials and engaging directly with your audience.
Conclusion
The Eklipse.gg Affiliate Program is a lucrative opportunity for content creators, streamers, and gamers to earn passive income by promoting a tool that enhances their own content creation. With generous commissions, easy payouts, and plenty of promotional support, this affiliate program is perfect for anyone looking to monetize their platform with minimal effort.
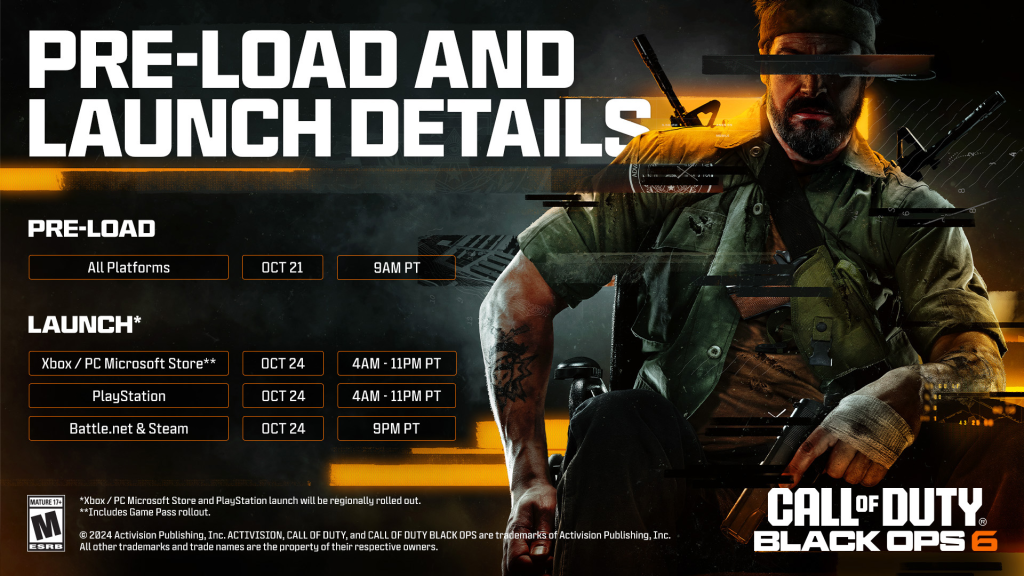
The countdown is over! Call of Duty: Black Ops 6 has finally launched, and fans can now immerse themselves in the thrilling combat that Black Ops is known for. With global preloading starting on October 21 and the official release on October 25, 2024, Black Ops 6 introduces fresh innovations that enhance both single-player and multiplayer modes.
Black Ops 6 introduces several innovations, including the Omnimovement system, allowing players to slide, dive, and sprint in any direction, adding dynamic fluidity to combat. The game features 16 launch maps—12 core 6v6 maps and 4 Strike maps.
CoD Black Ops 6 release date – Source: Call of Duty
Additionally, the Zombies mode makes a return with fresh challenges, while the game’s support for 4K graphics and ultrawide monitors takes the visual experience to new heights.
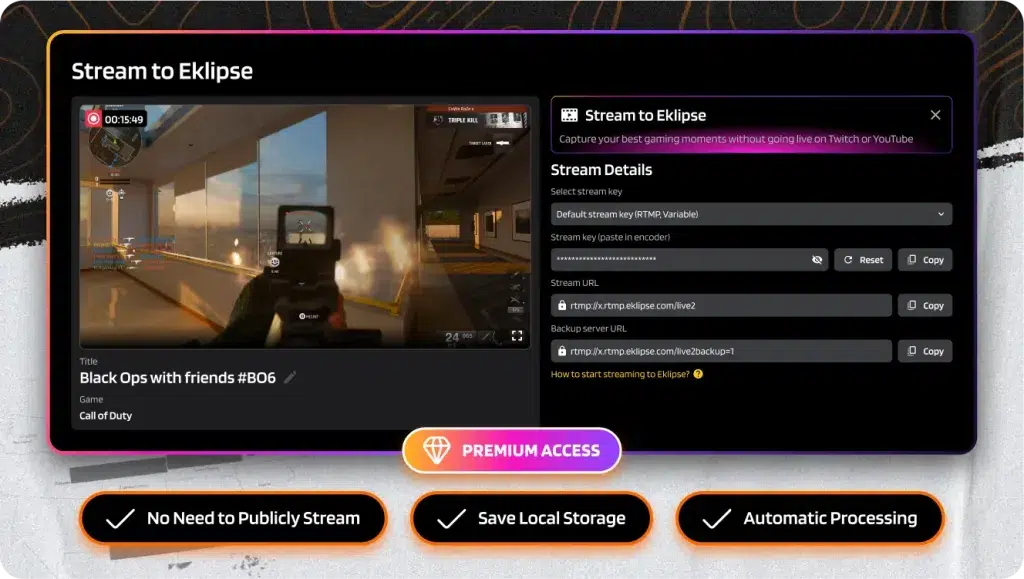
Capture Your Best Moments with AI Highlights
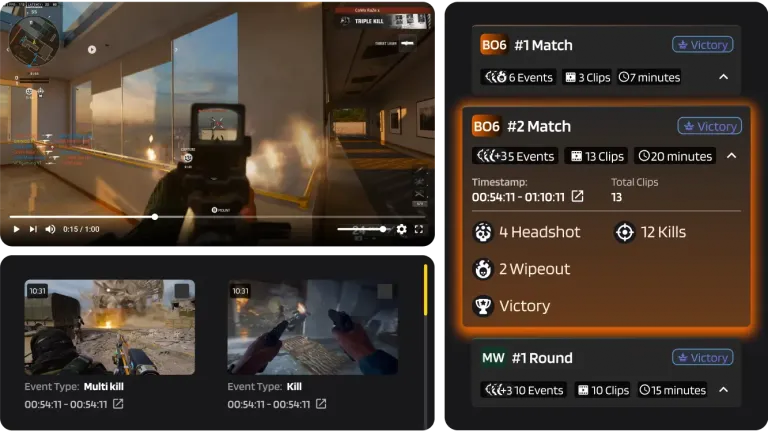
With Black Ops 6, every moment is an opportunity for glory, and Eklipse GG makes capturing those moments easier than ever. Our AI gaming Highlights feature will automatically identify and clip your most exciting BO6 moments, whether you’re playing on Twitch, Youtube, Kick, and Rumble.
Generate clip automatically with our ai gaming highlight – Source: Eklipse
Say goodbye to manual editing—let the AI do the work while you focus on dominating the battlefield.
Take It Further with AI-Powered Edits
Once you’ve captured your highlight-worthy moments, why stop there? Eklipse’s AI Edit feature adds the finishing touches with funny memes, seamless transitions, sound effects, and music. This AI-powered editing tool turns raw gameplay clips into polished content, making your videos ready to share across platforms.
Edit clip automatically with Eklipse AI – Source: Eklipse
Whether you’re enhancing your kills or adding cinematic flair to your clips, AI Edit ensures your gameplay looks professional without the hassle of manual editing.
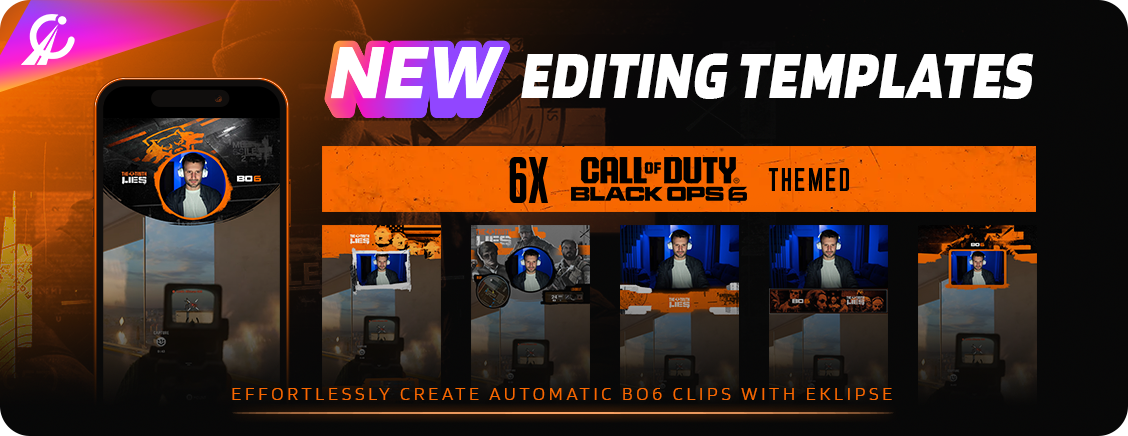
Enhance Your Black Ops 6 Clips with Custom Templates
We know you’re grinding hard, unlocking guns, and climbing the ranks day and night—but don’t forget to share those epic moments! With Eklipse, you can make your Black Ops 6 clips stand out like never before using our Black Ops 6-themed templates. Choose from six unique designs, each crafted to showcase your best moments.
Use Eklipse’s COD BO6 template to celebrate the release – Source: Eklipse
Simply head to our Convert to TikTok Studio, select the COD section, and enhance your clips in minutes:
✅ Available for free
✅ 6 unique designs
✅ Perfect for showing off your best moments
Start sharing your highlights today!
Join Our Black Ops 6 Giveaway!
To celebrate the launch of Black Ops 6, we’re hosting an exciting giveaway! Head over to our official X (formerly Twitter) post and join the fun for a chance to win exclusive prizes. Don’t miss out—share your best CoD moments and grab your rewards today!
📣 2x BLACK OPS 6 VAULT EDITION GIVEAWAY 📣
Get hyped for the launch! Eklipse auto-clips & edits your best BO6 gameplay, and we’re celebrating with a giveaway:
💜 Follow us on X and TikTok @eklipsegg 💬 Quote RT, share what you think about Eklipse
The release of Black Ops 6 is a moment to celebrate, and Eklipse GG is here to help you capture and share your finest moments. Whether you’re using AI Highlights to instantly create clips or taking advantage of AI Edit to enhance them with style, Eklipse GG has everything you need to make your gameplay shine.
Try it today and take your content to the next level!
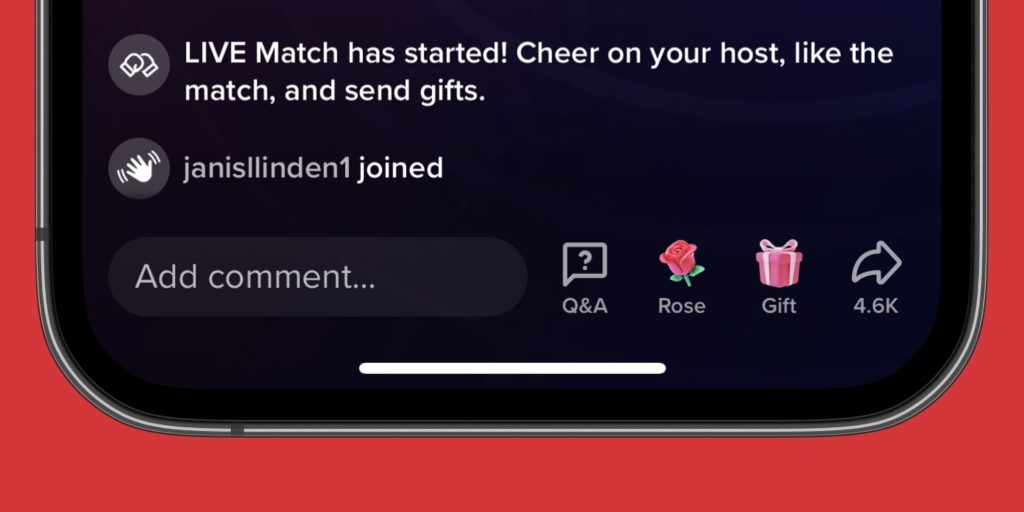
Roses are red, violets are blue, and a rose on TikTok costs just a single coin or two! Indeed, the rose is one of the most common and budget-friendly gifts available on TikTok. But how much is a rose on TikTok in real money?
Roses are a popular choice during TikTok Live sessions, with each gift priced in TikTok coins. In this article, we’ll break down the value of a rose and answer all your questions about its cost.
A TikTok Rose is valued at 1 TikTok coin. In the U.S., purchasing 1 TikTok coin typically costs about 1.4 cents. Therefore, a single TikTok Rose is approximately 1.4 cents.
Now, let’s calculate the price for larger quantities. If you’re considering sending 500 roses, that would amount to about $6.49. For those interested in sending 1,000 roses, the cost would be around $12.98.
What Are TikTok Roses and How Do They Function?
On TikTok, sending roses goes beyond just liking or commenting on videos; it’s a way for viewers to express their appreciation using the platform’s virtual currency. Similar to Twitch’s Bits or YouTube’s Super Chat, roses offer a means to directly support your favorite creators, acting like virtual tips that can be converted into real money.
When viewers send roses, they contribute to a creator’s visibility and success, helping them reach a broader audience. Creators can utilize these roses in various ways—rewarding participants in challenges, sharing exclusive content with top rose supporters, or even fundraising for charitable causes.
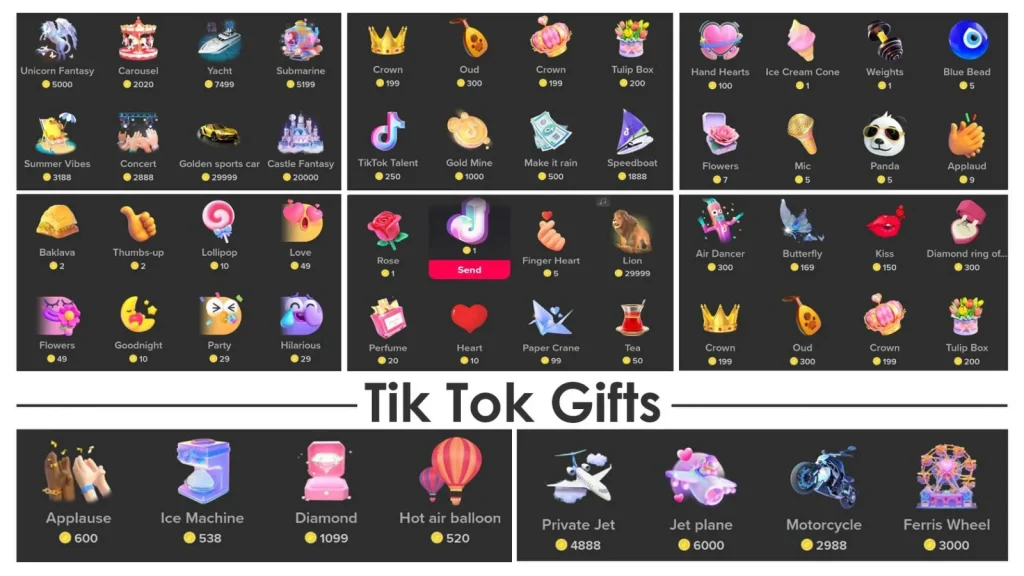
What is the value of each gift on Tiktok live? Let’s see the summary of the value of Tiktok live gift coins from the lowest to the highest or most expensive below:
Tennis: 1
Love Latter: 1
Football: 1
GG: 1
Mini Speaker: 1
Coffee: 1
Ice Cream Cone: 1
Barbell: 1
Rose: 1
TikTok: 1
Pandas: 5
Heart Finger: 5
Mic: 5
Hi: 5
Magic Letter: 7
Hand Waving: 7
Bottle of Hope: 9
Snowboard: 9
Gamepads: 10
Lollipops: 10
Perfume: 20
Mirror: 30
Donuts: 30
Origami: 99
Hat: 99
Crown: 99
Heart: 100
Confetti: 100
Butterfly: 169
Musical Notes: 169
Witch’s Hat: 177
Heart: 199
Glasses: 199
Ski Goggles: 199
Padlock and key: 199
Glasses: 199
Rock n’ roll: 299
Bridal Veil: 299
Boxing Gloves: 299
Balloon Joget: 300
Tumpeng Rice: 300
Campfire: 388
Sweet Dreams: 399
Swing: 399
Necklace: 400
Marine trap: 400
Coral: 499
Money Rain: 500
Ice Machine: 538
Record Player: 600
Love Balloon: 699
Goose: 699
Shoes: 700
Pearl: 800
Train: 899
Gold Mine: 1000
Mirror Flower: 1000
Fireworks: 1088
Gaming Chair: 1200
Bombom Car: 1288
Flower Arrangement: 1500
Champion: 1500
Drinking Time: 1777
Tree House: 1799
Fast Boat: 1888
Magic Album: 1999
Makeup Box: 1999
Autumn Candle: 1999
South Korea: 2020
Music Box: 2399
Travel: 2888
Motorcycle: 2988
Old Famous Car: 2999
Superstars: 2999
Ringworm: 3000
Spilled Flowers: 4000
Pirate Ship: 4888
Private Jet: 4888
Pool Party: 4999
Submarine: 5199
Airplane: 6000
Race Car: 7000
Match Trophy: 7999
Yachts: 9888
Aquarius: 9999
Interstellar: 10000
Planets: 15000
Rocket: 20000
Lion: 29999
TikTok Universe: 34999
In addition to coins, the reactions given by the live audience also have a coin value. They are as follows.
Laugh: 19
Amazing: 19
Party: 29
Cute: 29
How Much is The Price of TikTok Coins in Gift TikTok Live?
How much is 1 lion on TikTok worth?
Then how much is the TikTok gift. This is the price of dollar coins for Tiktok Live:
100 coins – $1.29
500 coins – $6.49
2,000 coins – $26.99
5,000 coins – $66.99
10,000 coins – $134.99
According to the price list above, we can calculate how many roses you will get for $100 on TikTok. With this amount of money, you’ll be able to obtain about 7,000 coins, or in other words, it brings you 7,000 roses. More or less.
FAQs
1. How much are gifts worth on TikTok?
The prices of TikTok gifts vary, ranging from as low as $0.012 to as high as $500.
2. How much is 1 lion on TikTok worth?
On TikTok, the lion gift costs 29,999 coins, which equates to about $400 US dollars.
3. How much do you get paid for TikTok live gifts?
With these gifts, the creator gets a cut of the amount they cost, with a daily limit of a $1,000 withdrawal, though some creators can make thousands during just one TikTok Live.
4. What are roses for on TikTok?
The Rose stands out as a popular choice among TikTok viewers who wish to express their appreciation to live stream creators. Each Rose gift comes with a specific in-app coin price, with one coin equivalent to an estimated 1.4 US cents.
5. How to earn money from TikTok?
There are several ways to earn money from TikTok, such as:
Enroll in the TikTok Creativity Program.
Market and sell merchandise.
Engage with viewers during live sessions to receive virtual gifts.
Establish affiliate partnerships.
Develop in-feed advertisements.
Fund projects through crowdfunding.
Gather tips from your audience.
Offer subscription services through platforms like Patreon.
Final Thoughts
Watching TikTok is undeniably fun, but if you’re looking to become a creator yourself, it’s easier than ever to get started. To enhance your TikTok video production, consider using Eklipse.
Eklipse is an AI-powered tool that quickly converts horizontal videos into the perfect vertical format for TikTok. Whether you’re a seasoned creator or just beginning, Eklipse makes it easy to create content that captivates your audience, regardless of the original video format.
Beyond video creation, there’s also an exciting way to earn money online as a creator—by joining the Eklipse Affiliate Program. As an affiliate, you can earn commissions by promoting the tool to other creators. You can join by signing up here or learn more about the program here.
Sign up for Eklipse today and start converting horizontal to vertical video for TikTok easily and quickly!
In recent months, iShowSpeed, one of YouTube’s most prominent streamers, completed a highly publicized tour across Southeast Asia. His stops in countries like Thailand, Indonesia, the Philippines, Malaysia, and Cambodia were filled with record-breaking streams, massive fan engagements, and significant financial implications.
Buckle up, folks! We’re about to dive into the whirlwind adventure that was iShowSpeed’s Southeast Asian tour. This isn’t just another story about a streamer going abroad – it’s a tale of record-breaking streams, fan frenzies, and yes, some serious financial fireworks.
1. Sponsorships and Partnerships: The Golden Ticket
Imagine sponsors lining up faster than fans at a meet-and-greet. That’s basically what happened to our boy Speed. We’re talking gaming giants, tech wizards, and even local hotshots all wanting a piece of the Speed pie.
IShowSpeed in Singapore – Source: Robert Sim via Wikimedia
When it comes to types of sponsors, think big-name gaming gear brands, streaming platforms dying to host him, and regional companies eager to get that sweet, sweet Gen Z exposure. It was like a who’s who of the gaming and tech world, all vying for a chance to be associated with the Speed brand.
As for deal structures, it was a mixed bag of goodies. Some sponsors probably went for the one-hit wonder approach, like branded content for a single epic stream. Others might have signed up for the long haul, seeing the potential in Speed’s rocket-like trajectory. And get this – some deals might’ve been performance-based. The more views and interactions Speed got, the more cha-ching in his pocket! It’s like getting paid extra for being extra entertaining, which, let’s face it, is Speed’s specialty.
Estimated sponsor payouts? Anywhere from a cool $30,000 to a jaw-dropping $100,000 per deal. Not too shabby for playing games and being yourself, right? It’s enough to make you wonder if you chose the wrong career path!
2. Platform-Specific Revenue: YouTube’s Not the Only Game in Town
YouTube: The Main Money Maker
YouTube might take a hefty 45% cut of ad revenue (ouch!), but Speed is still laughing all the way to the bank. With an estimated 12 million monetized views and a $2 CPM (that’s Cost Per Mille, or thousand views, for you non-techies), we’re looking at some serious cash.
Source: elyarm from Wallpapers.com
The gross ad revenue comes in at a sweet $24,000. After YouTube takes its slice of the pie, Speed’s left with $13,200. Now, that might not sound like much compared to those sponsorship deals, but remember – this is just from people watching ads. Speed’s literally making money while he sleeps, as fans around the world tune in to his content.
Other Platforms: The Side Hustles
While YouTube is Speed’s main stage, he’s not putting all his eggs in one basket. TikTok might’ve been more about the exposure than the dollars (their ad rates are lower than my chances of beating Speed in a game). But in the long run, that exposure could translate into more followers, more views, and ultimately, more revenue across all platforms.
Twitch could’ve been a nice bonus with subscriptions and donations. While it’s not Speed’s primary platform, any seasoned streamer knows not to neglect any potential revenue stream. Every little bit adds up, and in the streaming world, diversification is key.
3. Extra Revenue Streams: Because Why Stop at One?
Memberships and Subscriptions
YouTube memberships are like the gift that keeps on giving. Imagine this: if 10,000 die-hard fans are dropping $5 a month, Speed could be pocketing around $35,000 monthly (after YouTube’s 30% cut). That’s a steady income that most people would dream of, and it’s just one part of Speed’s earnings!
During the tour? Those numbers probably shot up faster than Speed’s heart rate during a jump scare. With all the extra attention and excitement, it wouldn’t be surprising if Speed saw a significant boost in memberships. After all, who wouldn’t want exclusive access to behind-the-scenes content from this epic tour?
Affiliate Marketing
While Speed was busy entertaining millions, his affiliate links were working overtime. We’re talking an estimated $5,000 to $10,000 just from fans clicking on links to buy gaming gear or other goodies. It’s like having a silent salesperson, constantly promoting products to an eager audience. And the best part? Speed doesn’t have to do much extra work for this income. It’s all about leveraging his influence and the trust he’s built with his audience.
The beauty of affiliate marketing is that it can continue to generate income long after the initial promotion. A fan might click on a link to a gaming chair during a stream, but not make the purchase until weeks later. Speed still gets that commission, making it a fantastic long-term strategy for passive income.
4. Long-Term Financial Impacts
Subscriber and Fanbase Growth
Speed’s YouTube family grew faster than a Minecraft village during this tour. In Malaysia alone, he gained over 120,000 new subscribers. To put it in perspective, that’s more people than the entire population of Cambridge, England, all clicking that subscribe button.
But Malaysia was just one stop on this tour. Across Southeast Asia? We’re looking at a potential 300,000+ new subscribers. That’s not just a number – it’s a massive community of fans who are likely to stick around, watch more content, and engage with Speed’s brand long after the tour ends.
More subscribers doesn’t just mean more bragging rights (although let’s be real, it’s pretty cool). It translates directly into higher future ad revenue. It’s like planting a money tree, but instead of leaves, it grows views. Each new subscriber is a potential long-term viewer, which means more ad impressions, more potential members, and more fans to purchase future merchandise or attend events.
Brand Value and Equity
This tour didn’t just boost Speed’s subscriber count – it catapulted his entire brand to new heights. He’s not just a streamer anymore; he’s a global phenomenon. This kind of international recognition opens doors that were previously locked tight.
We’re talking potential collaborations with big-name brands, not just in gaming but across various industries. Speed-branded energy drinks? Gaming peripherals? Clothing lines? The possibilities are endless. Companies are likely drooling over the chance to tap into Speed’s young, engaged, and now international audience.
5. The Price of Fame: Because Nothing’s Free, Not Even Fun
Taxes and Legal Fees
Now, let’s talk about everyone’s favorite topic: taxes! Just kidding, but they’re an unavoidable part of the equation. The taxman cometh, even in Southeast Asia. We’re looking at a potential 30% tax rate on earnings. That means for every $100,000 Speed made, about $30,000 is going straight to the government.
But wait, there’s more! Legal fees for all those fancy sponsorship contracts aren’t cheap. We’re probably looking at $5,000 to $10,000 just to make sure all the i’s are dotted and t’s are crossed. It might seem like a lot, but when you’re dealing with international contracts and potentially millions in revenue, it’s a necessary expense to keep everything above board.
Revenue Sharing with the Behind-the-Scenes Squad
Speed might be the face of the operation, but there’s a whole team working behind the scenes to make the magic happen. His management team isn’t working for high-fives and the chance to bask in Speed’s reflected glory (although we’re sure that’s a nice perk). They’re likely taking a 10-20% cut of the total earnings.
This might sound like a big chunk, but good management can easily pay for itself. They’re the ones negotiating those juicy sponsorship deals, handling the logistical nightmares of an international tour, and making sure Speed can focus on what he does best – entertaining his fans.
Marketing and Promotion Costs
As the saying goes, you’ve got to spend money to make money. Even someone as naturally entertaining as Speed needs a bit of promotional boost, especially when entering new markets. Social media promotions, collaborations with local influencers, maybe even some good old-fashioned advertising – it all adds up.
We’re probably looking at around $5,000 to $10,000 in marketing and promotion costs. But consider this money well spent. Every dollar put into promotion potentially brings in many more in revenue, not to mention the priceless expansion of Speed’s global fanbase.
Oops, I Did It Again: Unexpected Expenses
Add in potential medical emergencies, last-minute travel changes, or any other surprise costs, and we’re looking at an extra $1,000 to $3,000 in the “oopsie” category. It’s like in any good RPG – you always need to keep some coins in reserve for those unexpected side quests!
6. How Does Speed Stack Up?
In the world of high-profile streamers doing international tours, Speed’s financial performance is like a speed run with all achievements unlocked. We’re talking a potential 30-40% profit margin. To put that in perspective, many businesses would be thrilled with a 10% margin.
What makes this even more impressive is the potential for long-term growth. Unlike a traditional entertainment tour that might see a spike in album sales or movie tickets, Speed’s tour is building a foundation for sustained growth in viewership, engagement, and future earnings.
7. The Future’s So Bright, Speed’s Gotta Wear Shades
Expansion Plans
Speed’s Southeast Asian success? That’s just the tutorial level. Now that he’s proven he can conquer an international market, the possibilities are endless. Next up could be East Asia, tapping into the massive gaming cultures of Japan, South Korea, and China. Or perhaps he’ll set his sights on South America, bringing his unique brand of entertainment to a whole new continent.
The Speed train shows no signs of slowing down, and why should it? Each new market brings new fans, new sponsorship opportunities, and new chances to grow the Speed brand. It’s like unlocking new levels in a game, each one more exciting than the last.
Investment in Content Creation
With all this new cash flow, Speed has the opportunity to level up his entire operation. We might see him investing in top-of-the-line equipment, ensuring his streams are the highest possible quality. He could expand his team, bringing in editors, writers, and producers to create even more engaging content.
And let’s not forget about merchandise. Speed-branded gaming chairs, custom keyboards, maybe even his own line of energy drinks – the potential for physical products is huge. It’s not just about making money (although that’s certainly part of it). It’s about creating a lifestyle brand that his fans can engage with beyond just watching streams.
The Bottom Line
So, was iShowSpeed’s Southeast Asian tour worth it? If we’re talking pure numbers, we’re looking at potential earnings between $80,000 to $160,000, with costs likely between $21,400 to $36,700. But focusing solely on these figures would be like watching a Speed stream on mute – you’d be missing out on all the excitement.
The real value of this tour goes far beyond the immediate financial gains. It’s in the connections made, the memories created, and the groundwork laid for future adventures. Speed didn’t just tour Southeast Asia; he blazed a trail for content creators everywhere, showing what’s possible when you take your content global.
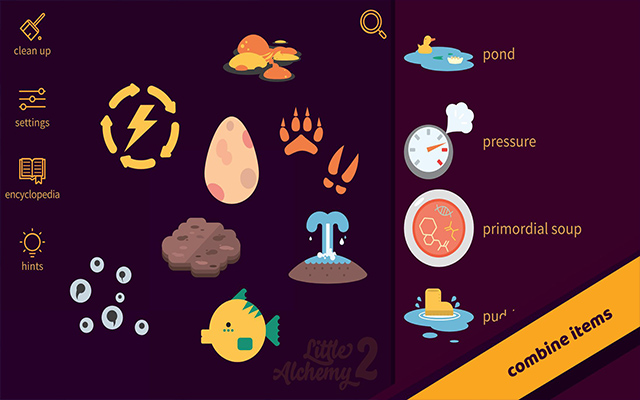
Little Alchemy 2 cheats can add an extra layer of fun to the game! While discovering new items on your own can be both challenging and exciting, sometimes you might hit a roadblock and need a little nudge in the right direction.
That’s where cheats come in handy, giving you the combinations you need to create every item in the game. With nearly 700 ingredient and element combinations available, our list below will guide you through how to make everything in Little Alchemy 2. Ready to unlock all the possibilities? Let’s get started!
Source: Google Chrome – little alchemy 2 cheats beginner
Little Alchemy 2 is a popular web-based puzzle game available on iOS, Android, and Chrome. It’s an exciting sequel to the original Little Alchemy, offering an enhanced experience for players who love creative experimentation.
In this game, you’re given the opportunity to mix and match different elements to create new ones. You’ll start with a few basic elements like fire, water, air, earth, metal, big, small, motion, and time.
From there, it’s up to you to experiment by combining these basics with more unusual elements. Some combinations will work, while others won’t, so the challenge lies in finding the perfect mixes to unlock new items.
Little Alchemy 2 Cheats A-C
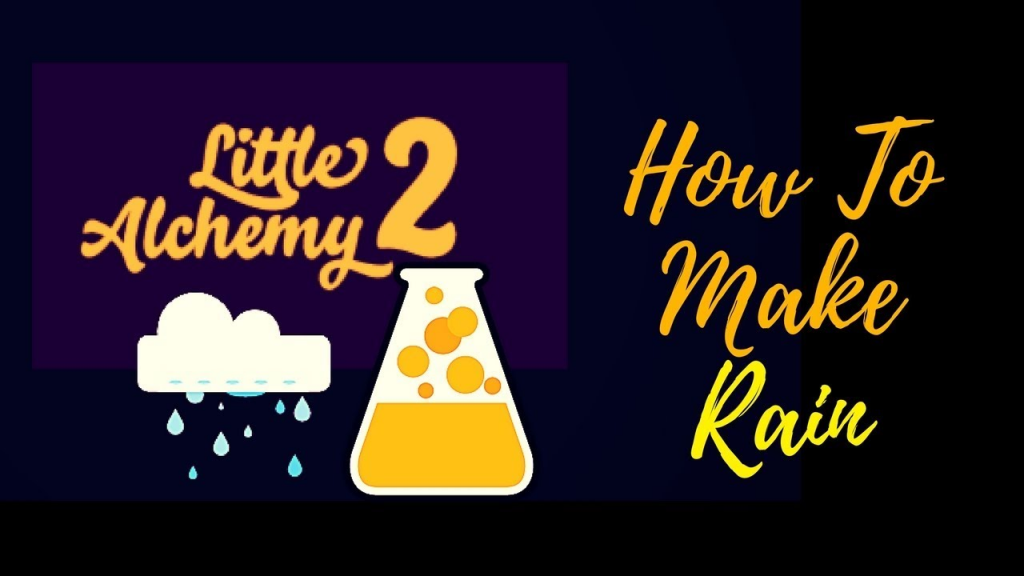
Acid Rain: Rain/Cloud + Smoke/Smog/Sickness, Rain + City
Airplane: Bird + Metal/Machine
Alarm Clock: Clock/Watch + Sound/Dawn/Bell
Alchemist: Human + Gold, Gold + Pilosophy
Alcohol: Time/Wheat + Juice, Wheat + Fruit, Fruit + Sun
Algae: Plant/Grass + Water/Pond/Lake
Alien: Life + Galaxy/Galaxy Cluster/Solar System/Mercury/Mars/Venus/Jupiter/Saturn
Yeti: Mountain/Glacier/Antarctic + Story, Story + Mountain, Mountain + Legend
Zombie: Life + Corpse, Corpse + Story/Bacteria
Zoo: Animal + Village/Container
Tips To Find New Cheats Combinations
littlealchemy2.com – how to make life in little alchemy 2
With over 700 elements waiting to be discovered, it’s easy to hit a roadblock and feel a bit stuck along the way. That’s why we’ve put together a handy list of cheats and tips to help you speed up your gameplay and uncover new combinations with ease, keeping the fun going without the frustration!
1. Start with the Basics
When starting the game, it’s important to begin with the basics. Combine earth, air, fire, and water to create the four basic elements. From there, try combining two basic elements to create new ones. For example, earth and fire make lava, while air and water make mist.
2. Use Hints Sparingly
If you’re struggling to find new combinations, Little Alchemy 2 offers a hint system that can suggest possible elements to create. However, using hints too often can take away the fun and challenge of the game. Instead, try experimenting with different combinations and see what works.
3. Pay Attention to Groups and Categories
Elements in Little Alchemy 2 are grouped into categories such as animals, plants, and tools. Paying attention to these categories can help you predict what elements might combine to create new ones. For example, combining tree and fruit makes apple, while combining bird and metal makes airplane.
4. Think Outside the Box
Sometimes, the most unexpected combinations can lead to the most exciting discoveries. Don’t be afraid to think outside the box and try combining elements that may seem unrelated. Who knows, you might stumble upon a rare combination that nobody else has found yet.
5. Avoid Common Mistakes
Finally, be aware of common mistakes or misconceptions that players may have when playing Little Alchemy 2. For example, some players may think that combining two of the same elements will create a new one, but this is not always the case. Additionally, some elements may have multiple combinations, so be sure to try combining them with different elements to see what works.
Facts About Little Alchemy 2
Source: YouTube – little alchemy 2 human
These are just a glimpse of the hundreds of items you can create in Little Alchemy 2. Feel free to explore and experiment with different combinations at your own pace.
The beauty of the game lies in its freedom—you can mix and match elements without any penalties for mistakes. So don’t hesitate to try out new combinations! Keep experimenting and discover exciting new items along the way. The possibilities are endless, so get creative and enjoy the process!
Final Thoughts
So, that’s all about Little Alchemy 2 cheats. No more got stuck on discovering new items in the game. These cheats can assist you in making your gameplay easier. Enjoy the game!
As a streamer, you know the importance of captivating your audience and keeping them engaged. But with hours of footage to sift through, creating highlight reels can be a time-consuming task. Eklipse, the AI-powered highlight generator, is here to revolutionize your streaming experience by automatically selecting and editing the best moments from your streams.
Eklipse’s cutting-edge AI algorithms intelligently scan your streams, identifying key moments of gameplay, hilarious bloopers, and chat interactions that will resonate with your viewers. It’s like having an expert editor at your fingertips, working tirelessly to curate the most exciting and engaging content from your streams.
Maximize your Black Ops 6 rewards—Create highlights from your best gameplay with with Eklipse
Eklipse help streamer improve their social media presence with AI highlights that clip your Twitch / Kick streams automatically & converts them to TikTok / Reels / Shorts
Tyler1, whose real name is Tyler Steinkamp, is a professional League of Legends player and a renowned Twitch streamer who has captivated a massive audience with his exceptional gaming skills and energetic personality. Known for his boisterous and entertaining streaming style, Tyler1 has become a household name in the gaming community.
He has 5.3 million Twitch followers and 2.74 million YouTube subscribers, and his YouTube videos have been viewed more than 555 million times. In 2020, tyler1 signed a contract to create content for T1, a South Korean esports organization that has won several “League of Legends” World Championships.
Despite his widespread popularity and success, one question that often arises in the minds of his followers is the source of Tyler1’s net worth. Fans and observers alike are curious about how he has built such significant wealth through his gaming career.
In this article, we will delve into the origins of Tyler1’s wealth and explore the various avenues through which he has acquired it. Read on to discover the secrets behind Tyler1’s financial success and learn how he turned his passion for gaming into a thriving career.
Tyler1 makes most of his money from streaming games on Twitch. Apart from streaming, Tyler1 also makes money from winning tournaments and having sponsors. He has even earned some money from selling merchandise. In total, Tyler1 net worth is over $12 million. Additionally,he makes money from his Twitch subscribers through donations.
Competitions
Tyler1 is known for his competitive spirit and determination in the League of Legends scene. He has participated in various tournaments, showcasing his skills against some of the top players in the game. His participation in the Tyler1 Championship Series (TCS) is particularly notable, as it highlights his ability to compete and entertain.
Despite stiff competition from seasoned professionals, Tyler1 has managed to hold his own and make a name for himself. His drive to improve and his relentless practice regimen have contributed to his success in high-stakes matches. Tyler1’s competitive journey is a testament to his dedication and passion for esports.
In November 2017, he hosted the Tyler1 Championship Series, an online “League of Legends” tournament that peaked at 200,000+ concurrent viewers on Twitch. Tyler1 funded the $10,000 prize that was awarded to the winners, and in 2018, the prize was increased to $50,000.
Social Media Content
Tyler1 joined YouTube on May 18, 2014, where he began uploading content related to his gaming experiences and personal life. Over the years, his channel has grown exponentially, attracting a large audience with his entertaining and high-energy videos. As of now, Tyler1’s YouTube channel boasts over 2.8 million subscribers.
Tyler1’s content mostly focuses on giving tips and tricks to improve gameplay. He also provides entertaining commentary. If you are interested in learning more about League of Legends and want some helpful advice, check out Tyler1’s YouTube channel. Besides gaming, Tyler1 also posts vlogs, comedy sketches, and other entertaining videos.
Merchandise
Tyler1 has successfully expanded its brand beyond streaming by launching its line of merchandise. His store features a variety of products, including clothing items like t-shirts, hoodies, and hats. The merchandise appeals to his dedicated fanbase, who enjoy showing their support and connection to Tyler1 through these items.
He regularly promotes his merchandise on his Twitch streams and social media platforms, further driving sales and brand visibility. By offering high-quality and unique designs, Tyler1 has created a strong merchandise business that significantly contributes to his overall income.
Tyler1 Age, Height and Social Media
Tyler1 is an American full-time streamer, content creator, and internet personality. He was born on March 7th, 1995 (now 28 years). Also, multiple sources claim that Tyler1’s height is 5 feet 6 inches. He has garnered a large following on the streaming platform Twitch, where people tune in to watch him showcase his gaming abilities.
Tyler1 maintains an active social media presence. He has a substantial following on his Twitter account, @loltyler1, with approximately 654.6K followers. Through his social media platforms, he interacts with his fans, sharing updates about his gaming adventures, personal life, and future projects.
Tyler1 Career Journey
Source: RiftFeed
Tyler1 gained fame through playing “League of Legends” online. His brother, Eric, also shares his love for video games and often plays with him. Tyler Steinkamp attended Mark Twain Senior School, an independent high school.
While studying computer science at Central Methodist University, he did not complete his education. He also played on the university’s football team. Although his interest in soccer persisted during college, he left to pursue his dream of streaming video games online. In 2010, his streaming career began to flourish.
In May 2014, Tyler launched a YouTube channel called Loltyler. On this channel, he started uploading video clips of himself playing various video games. In 2016, Tyler1 gained a large following on his streaming website. He quickly became popular and had around 200,000 followers. He earned a decent salary, ranging from $25,000 to $500,000 per year.
But, he has earned a reputation as one of North America’s most notorious players due to his offensive and inflammatory comments during gameplay. Furthermore, he faced a suspension from playing “League of Legends” for nearly a year, from April 2016 to January 2018, as a result of his toxic behavior.
Final Thoughts
Tyler1 has built an impressive fortune, solidifying his position as a major player in the streaming world. Known for his dynamic content and loyal fanbase, he has capitalized on key partnerships to elevate his career. Today, Tyler1 stands as a prominent figure in the industry.
For those looking to follow a similar path, his journey serves as a powerful example. Aspiring streamers can learn from his experience, recognizing that with dedication, creativity, and smart strategy, financial success and lasting influence are within reach.
Platforms like the Eclipse Affiliate Program provide opportunities for creators to monetize their content, making it easier to transform passion into profit. Tyler1’s success highlights the potential of consistent effort and excellence in streaming. You can join by signing up here or learn more about the program here.
Maximize your Black Ops 6 rewards—Create highlights from your best gameplay with with Eklipse
Eklipse help streamer improve their social media presence with AI highlights that clip your Twitch / Kick streams automatically & converts them to TikTok / Reels / Shorts