Knowing how to crop a video on TikTok is one of the fundamental aspects of using the uber-popular app! Knowing how to adjust the length, crop, and resize videos, will go a long way in making your videos better. From straightforward to slightly more technical, let’s jump in!
TikTok is less than handy when it comes to resizing and cropping videos directly within the app. However, there are easy ways around this issue! The easiest way is to use your phone’s in-built editor.
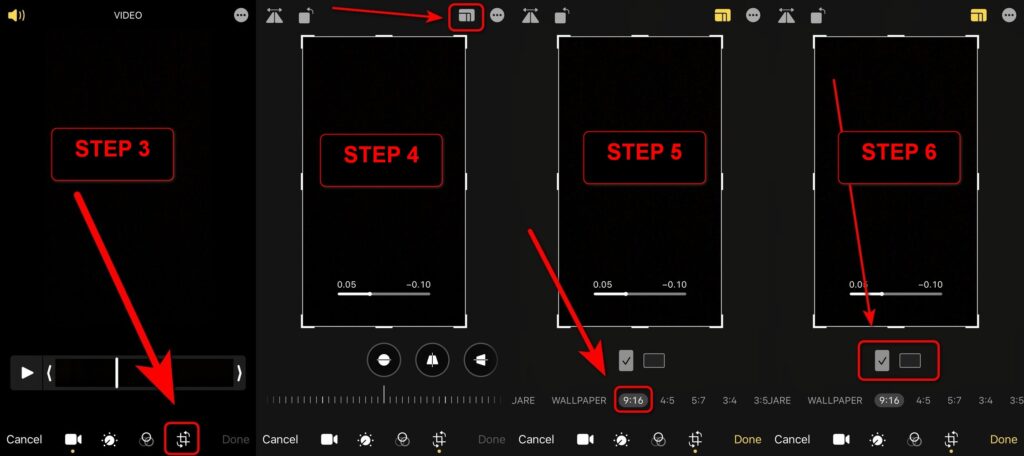
iOS built-in video editor is pretty much powerful that allows you to easily crop any landscape video into the vertical format. Follow these instructions, to do that.
Instruction
Open Camera app, shoot your video
Tap your Camera roll to see the result
Tap Edit, then choose the crop icon (the one in the bottom-right of your screen)
Tap the icon next to the three-dots icon on the top right
Slide left, till you find 16:9 option, and choose it
Choose the vertical option under the video preview
You can customize the crop position. When you are finished, tap Done
How To Crop A Video on TikTok on Android
Cropping video for TikTok on Android will need some extra steps. The reason for this is because Android comes with various of UI modification, that not all of them equipped with powerful video editor.
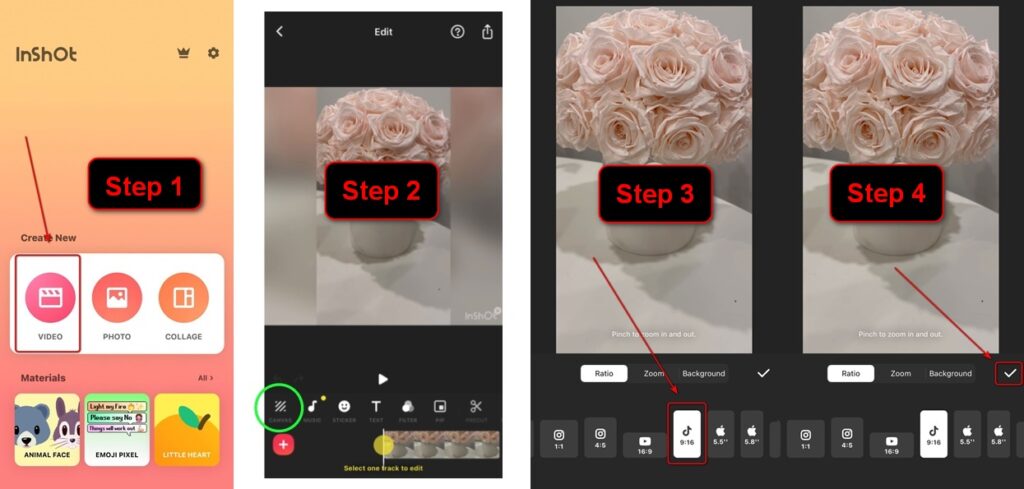
So for more relevant tutorial, we’re going to share you a guide on cropping video on TikTok using the 3rd party app like InShot. Here are the instructions to do that.
Instruction
Open Inshot app, select Video
Tap the canvas option
Select the 9:16 ratio with the TikTok icon on it
When you are done editing, tap the check icon
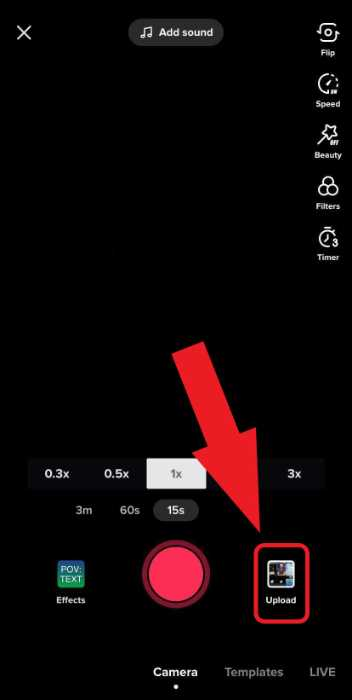
Cropping and Resizing Videos on Online Editor
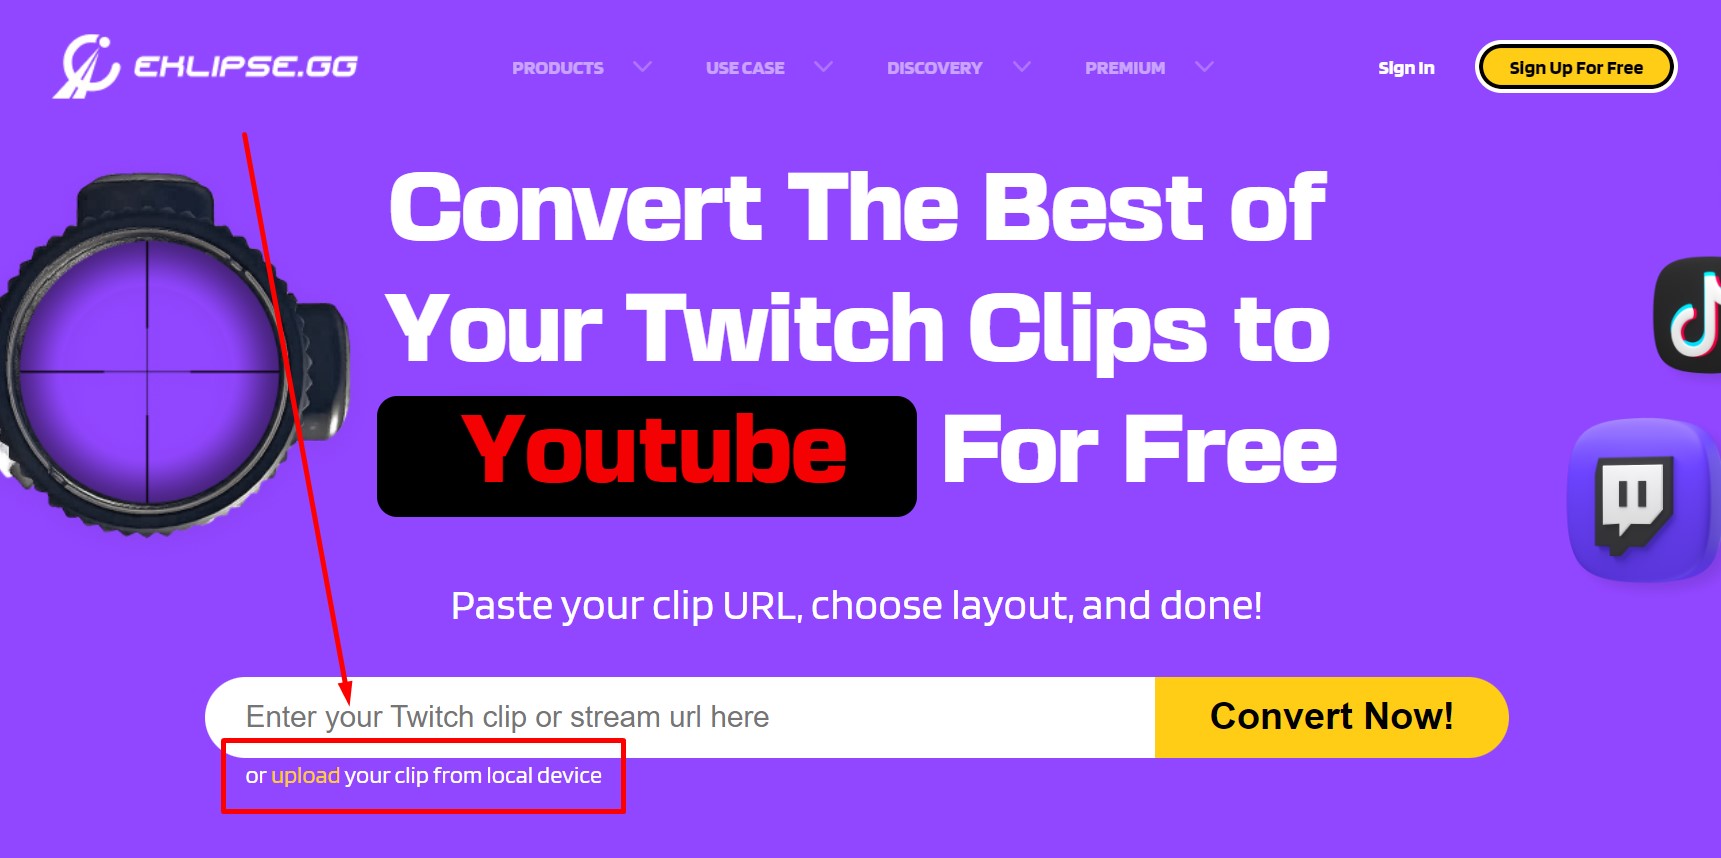
The third alternative to crop a video for TikTok is by using an online editor or a web-based app. Eklipse is one of the online editor / web-based app that has the ability to crop a horizontal video into the vertical format.
Cropping TikTok videos with Eklipse is easy. You can simply upload your video or using a Twitch clip content. Here are the tutorial to do that.
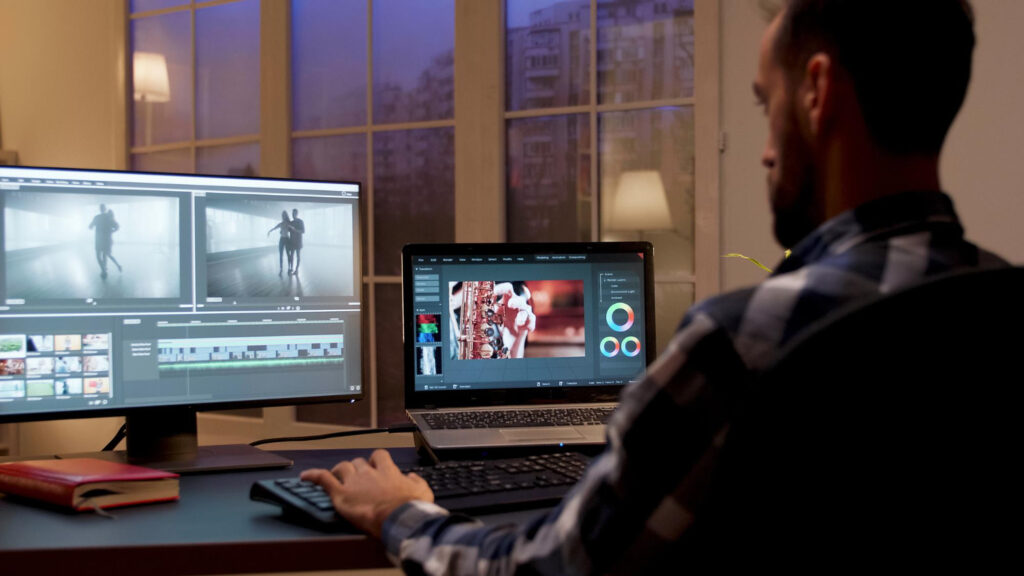
Editing TikTok videos on a PC offers advanced tools, precision, and special effects, making your videos more engaging. It also allows for faster editing and saves time with keyboard shortcuts. That’s why learning how to edit TikTok videos on a PC is essential.
Thankfully, the internet is filled with a variety of editing software that can help you make your TikTok videos stand out, without even having to download an app. In this article, we will show you several easy methods for editing your TikTok videos on your PC, so you can start creating truly mesmerizing content in no time! Let’s begin.
Method 1. How To Edit TikTok Videos On PC Using Eklipse
One of the best content for TikTok is gaming clips. You can simply make it from the streaming video using Eklipse. With powerful AI, Eklipse is capable of analyzing the best part of your streaming video and capturing it as short videos. On top of that, it can also convert the clips into TikTok format automatically. Here’s how to use it.
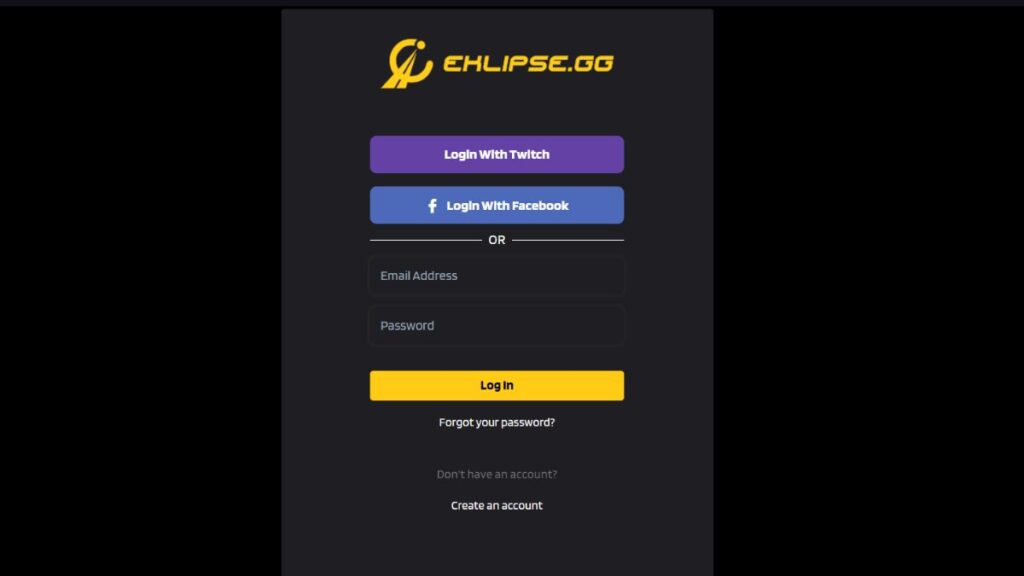
log in with Facebook or Twitch account, or create a new account
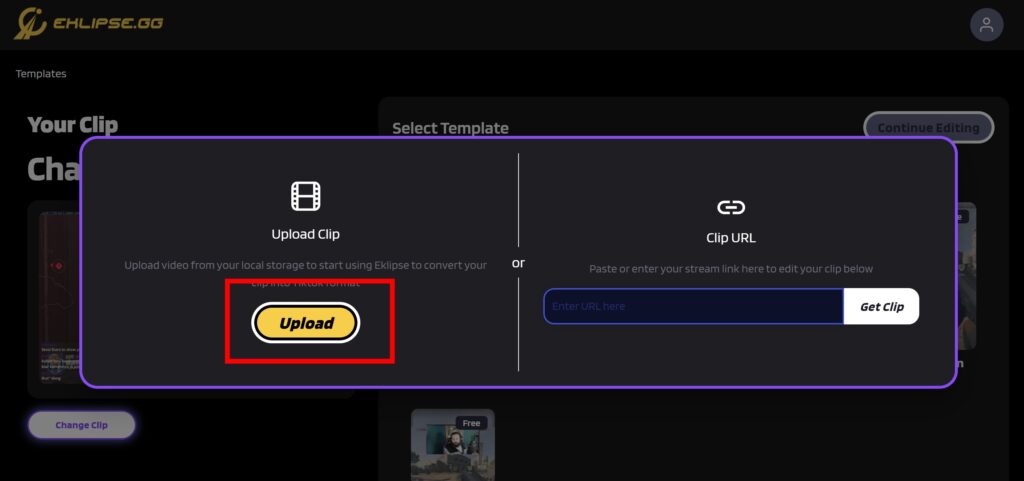
Hit the Upload Clip option to import the existing video.
Alternatively, you can copy-paste the URL link of the stream you want to clip.
Upload the existing file from local device or copy-paste the URL link
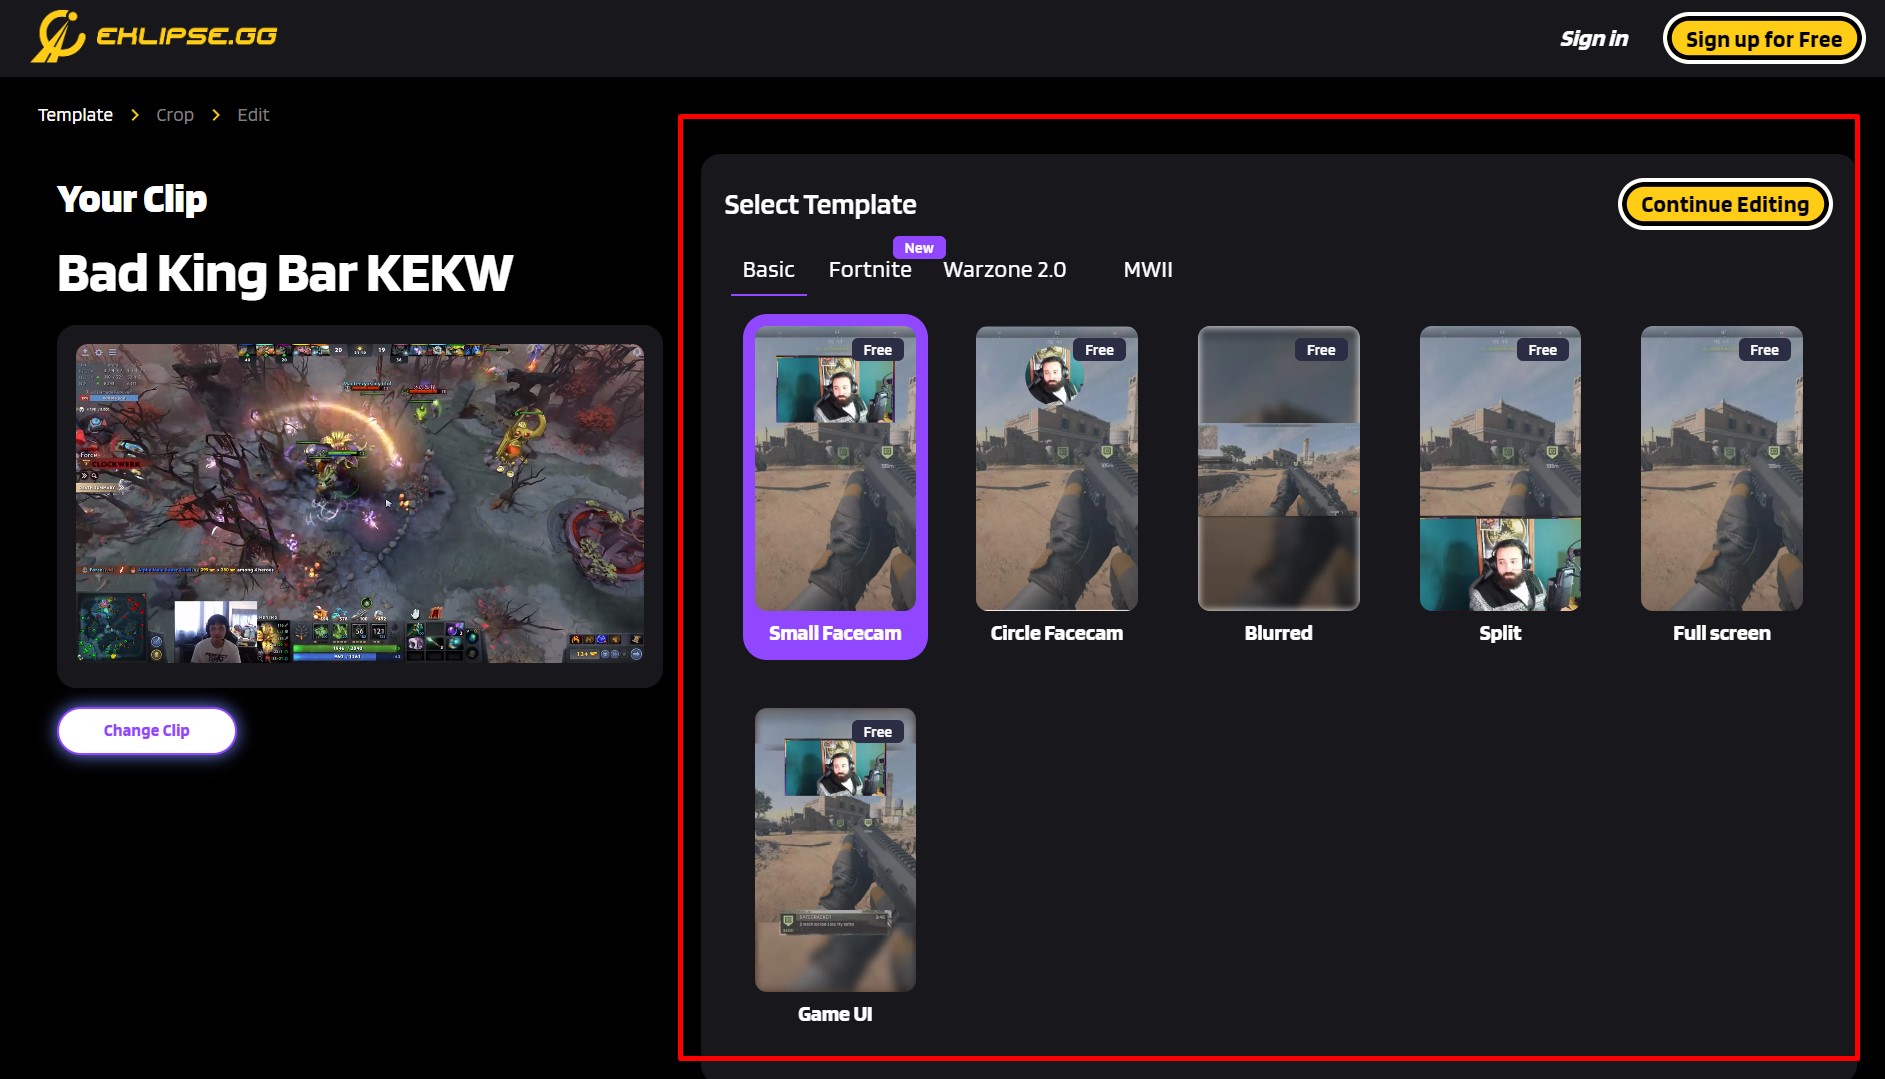
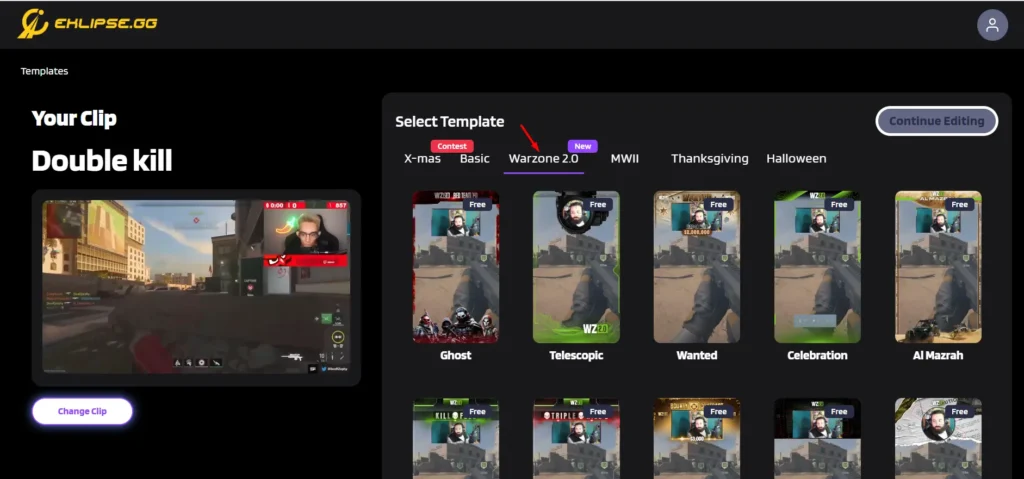
Next up, pick your favorite TikTok template and hit Continue Editing.
Select your favorite TikTok template
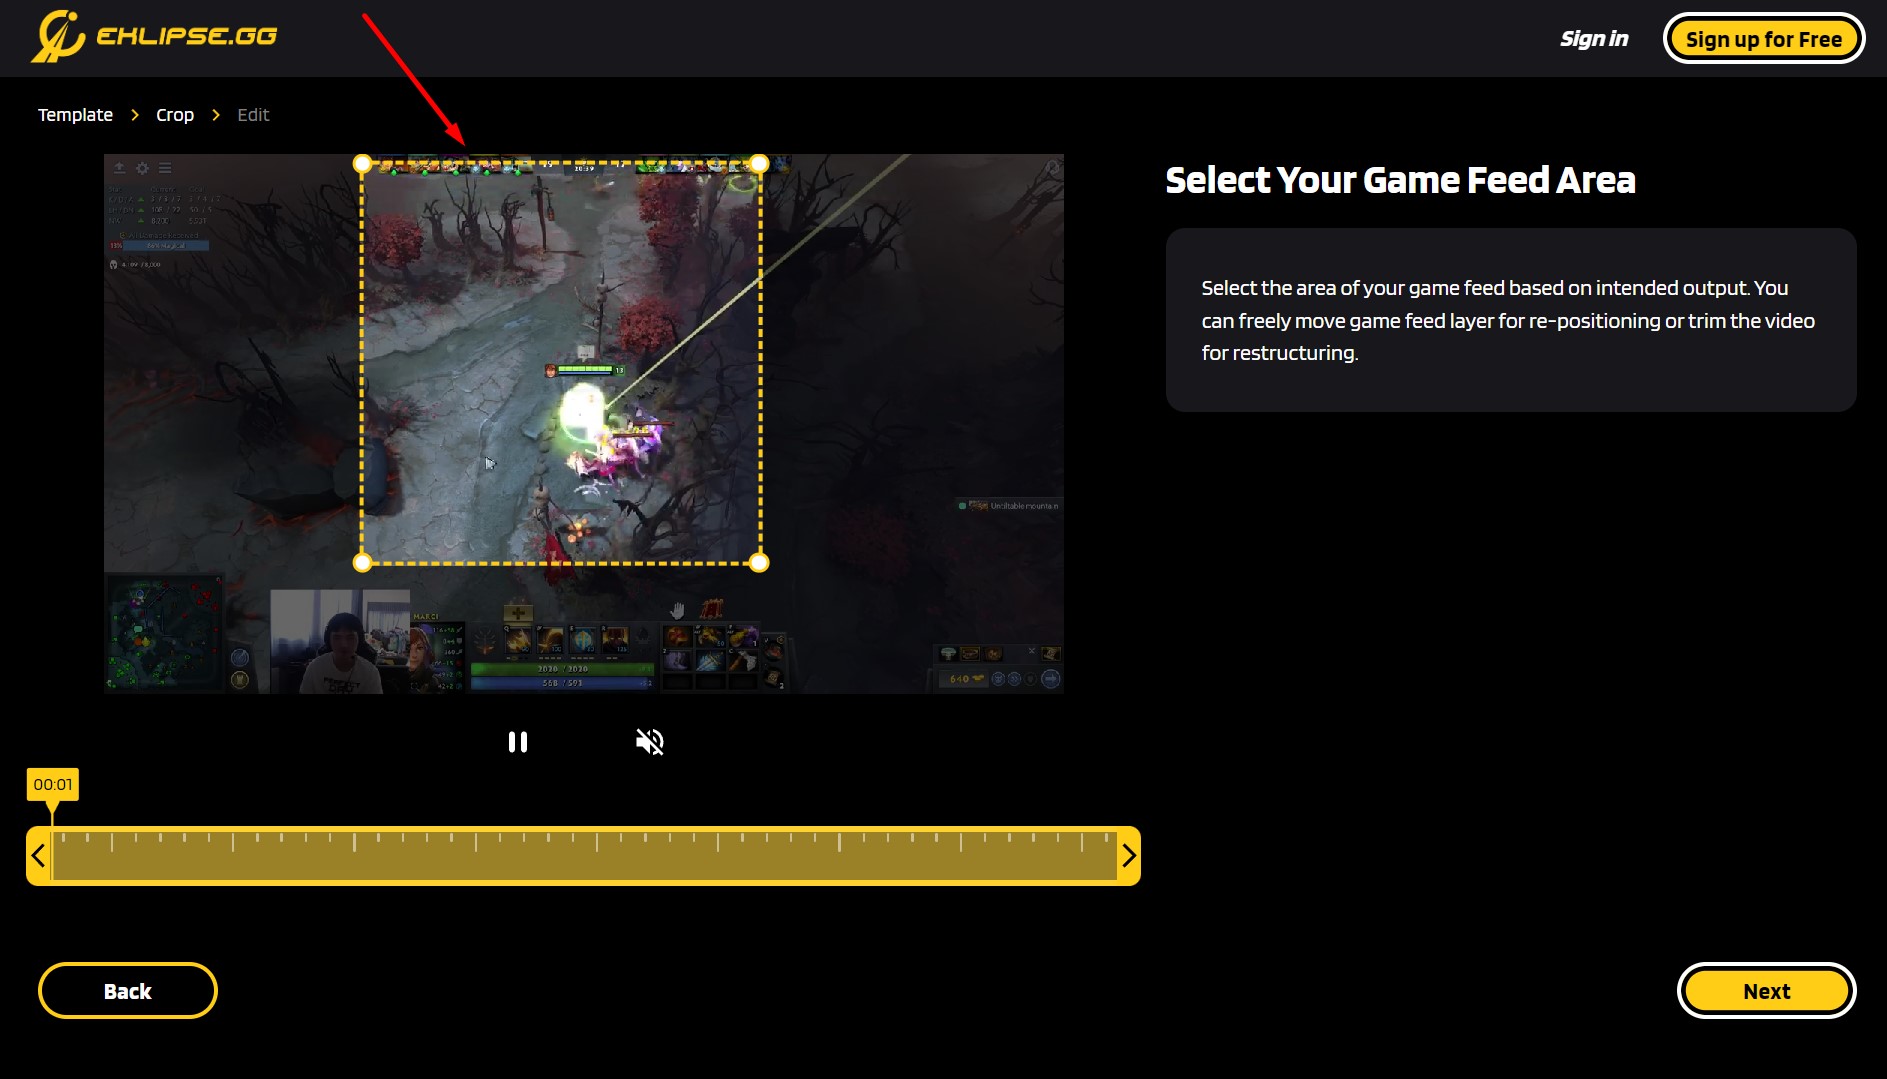
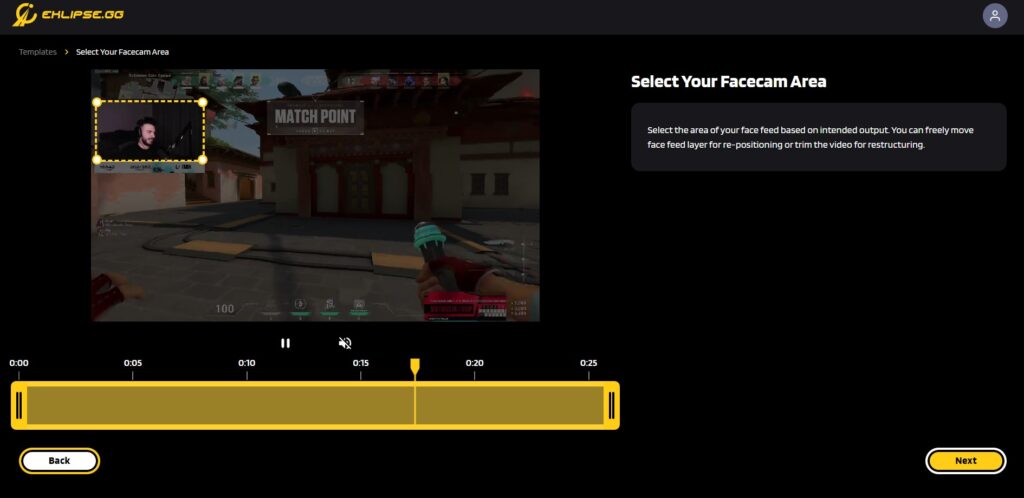
Adjust the facecam, the feed area, and the video length then hit Next.
Adjust the facecam and gameplay area, and trim the duration if needed
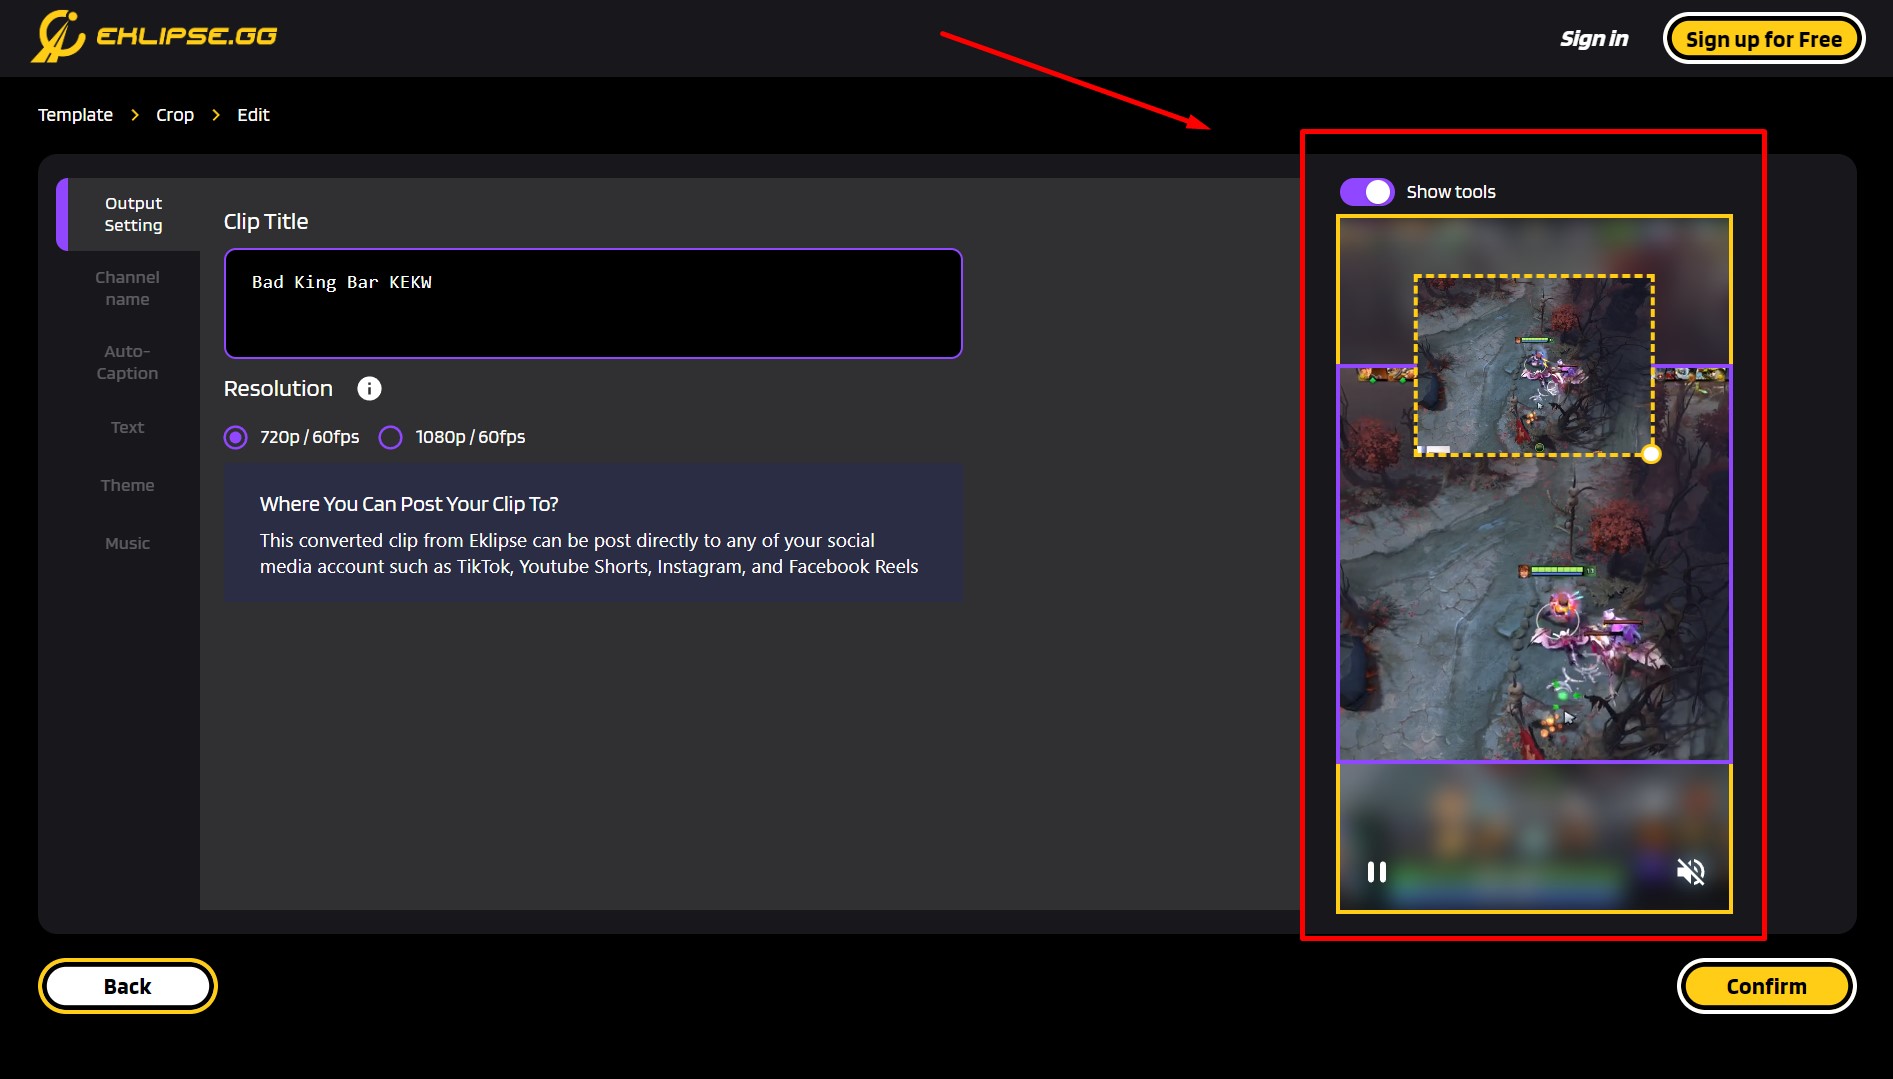
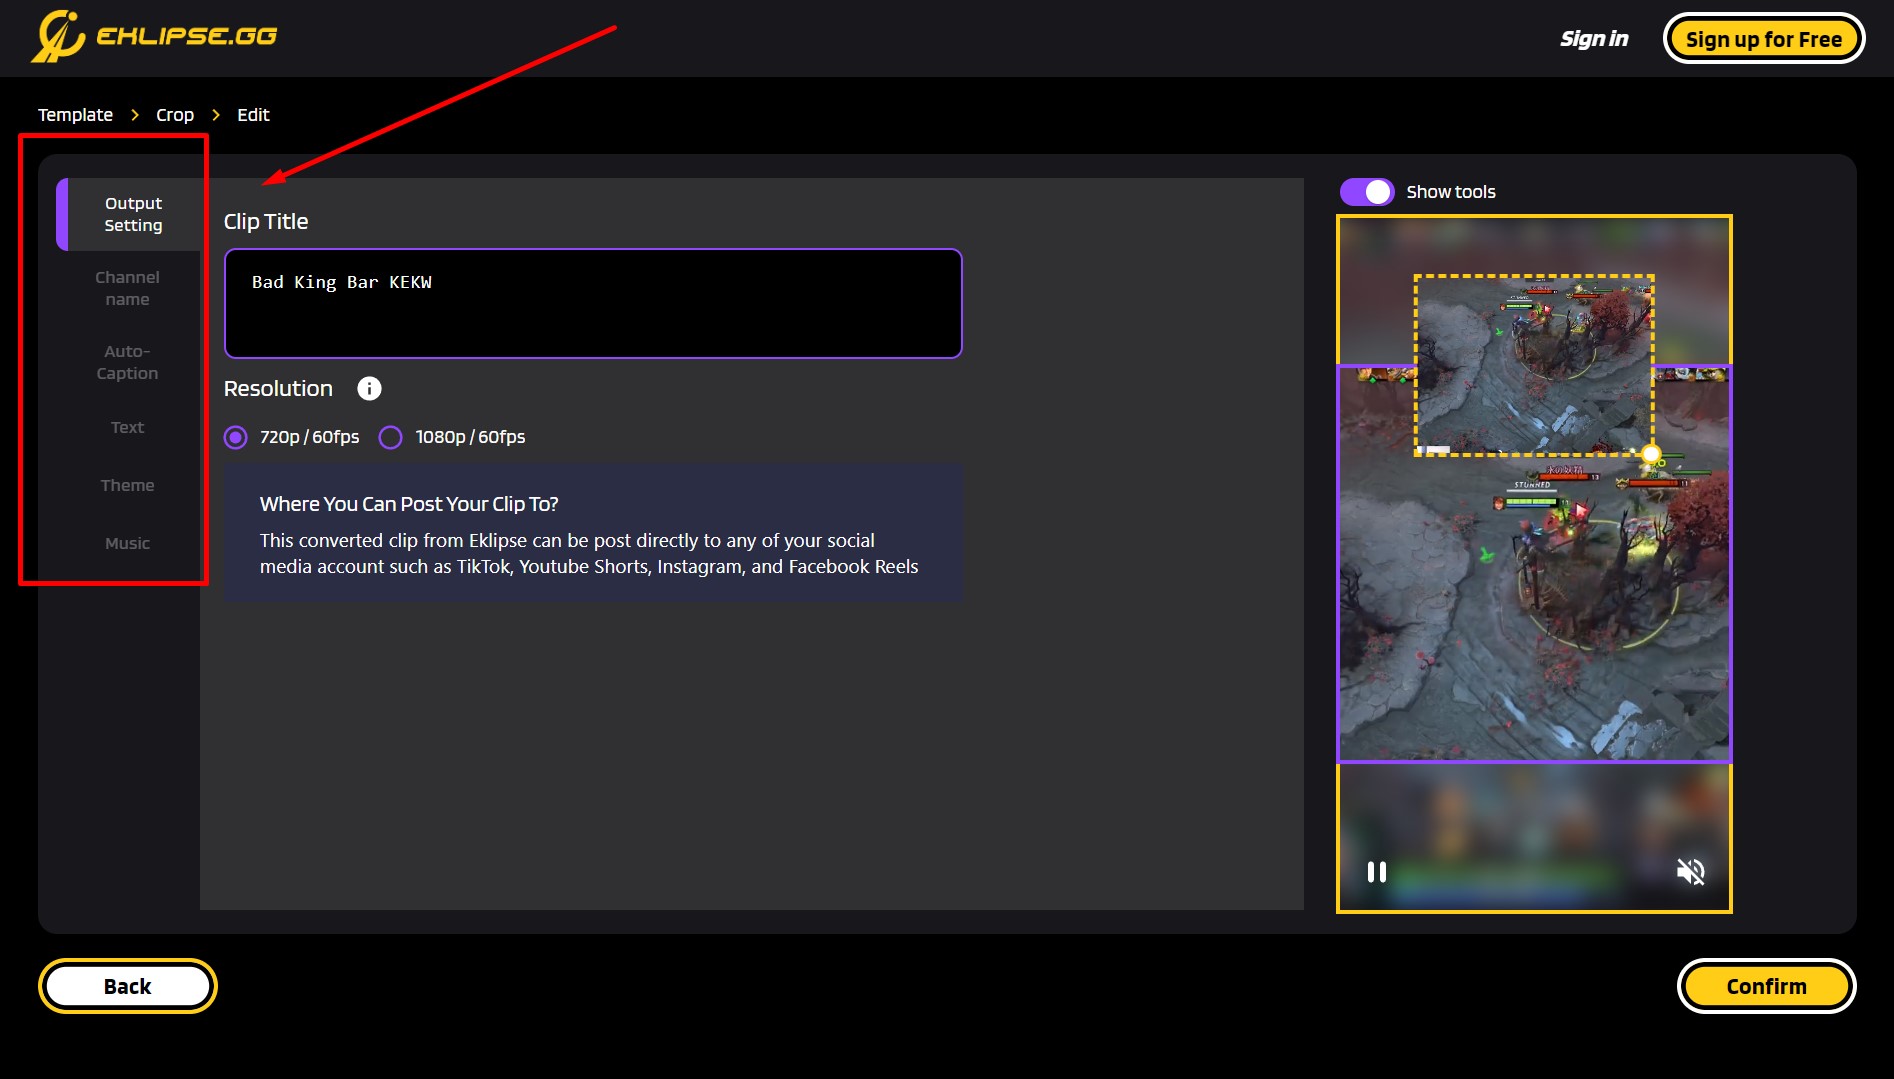
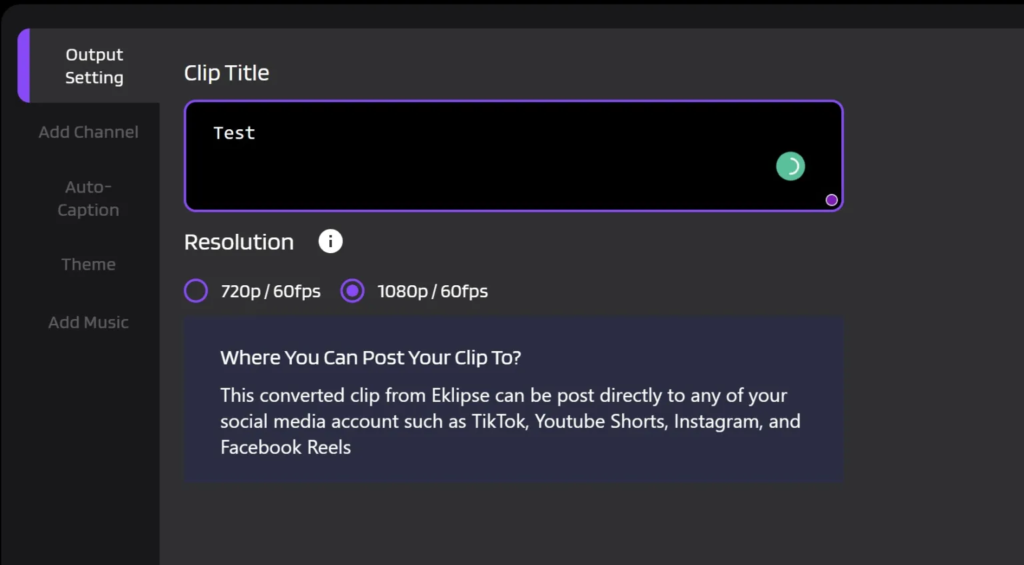
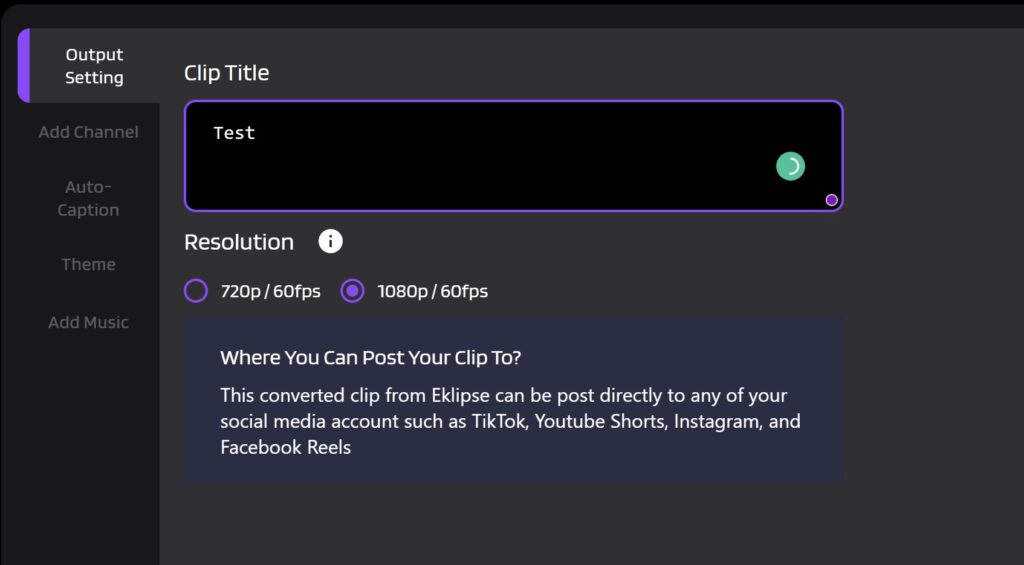
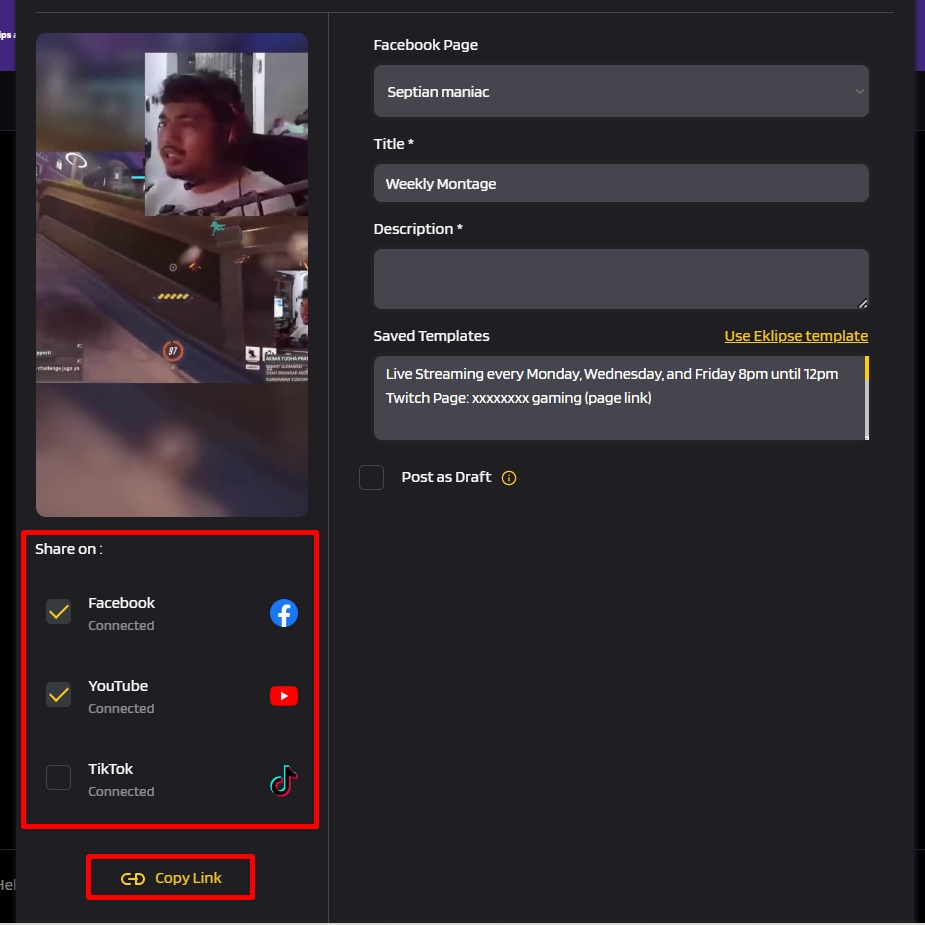
Afterward, write a title and select the video resolution.
To add extra spice to your video, you can add a channel name, auto-caption, and soundtrack.
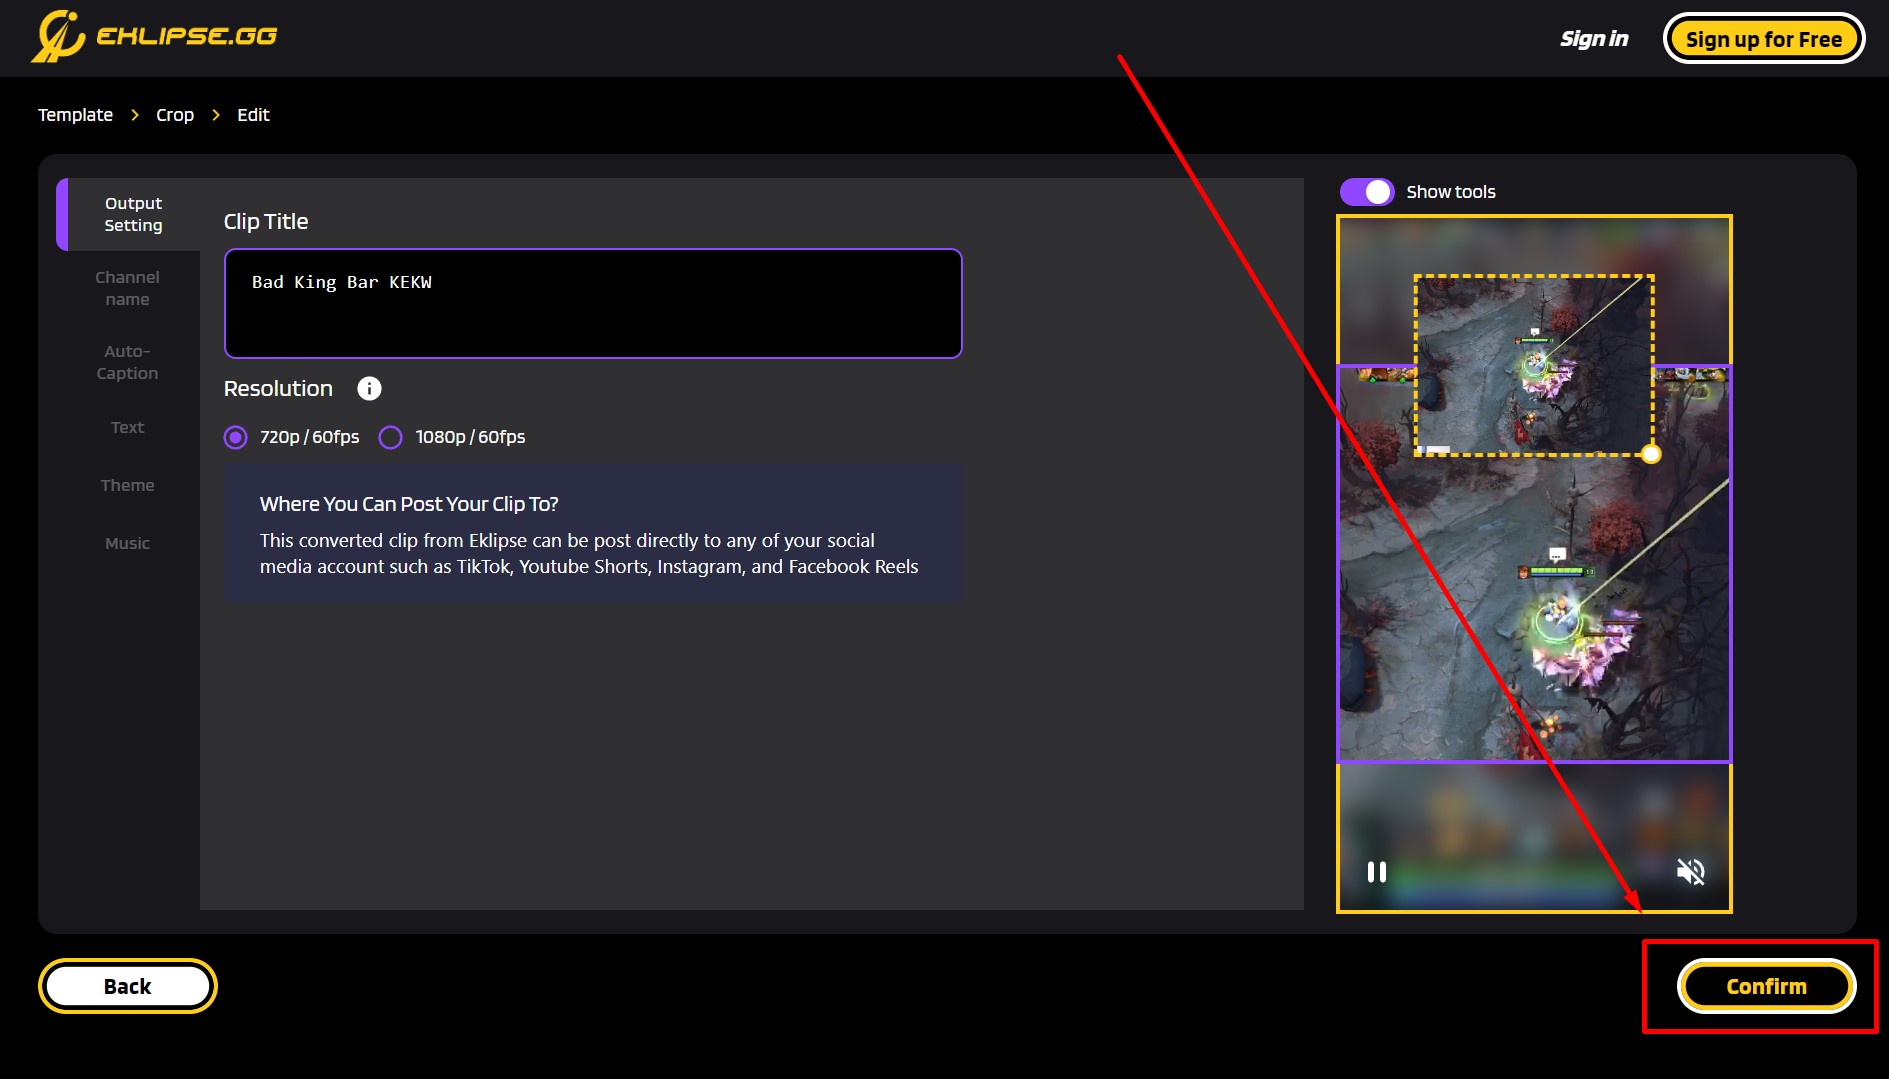
Once you’ve satisfied with the result, just click Confirm.
write a title and set the resolution
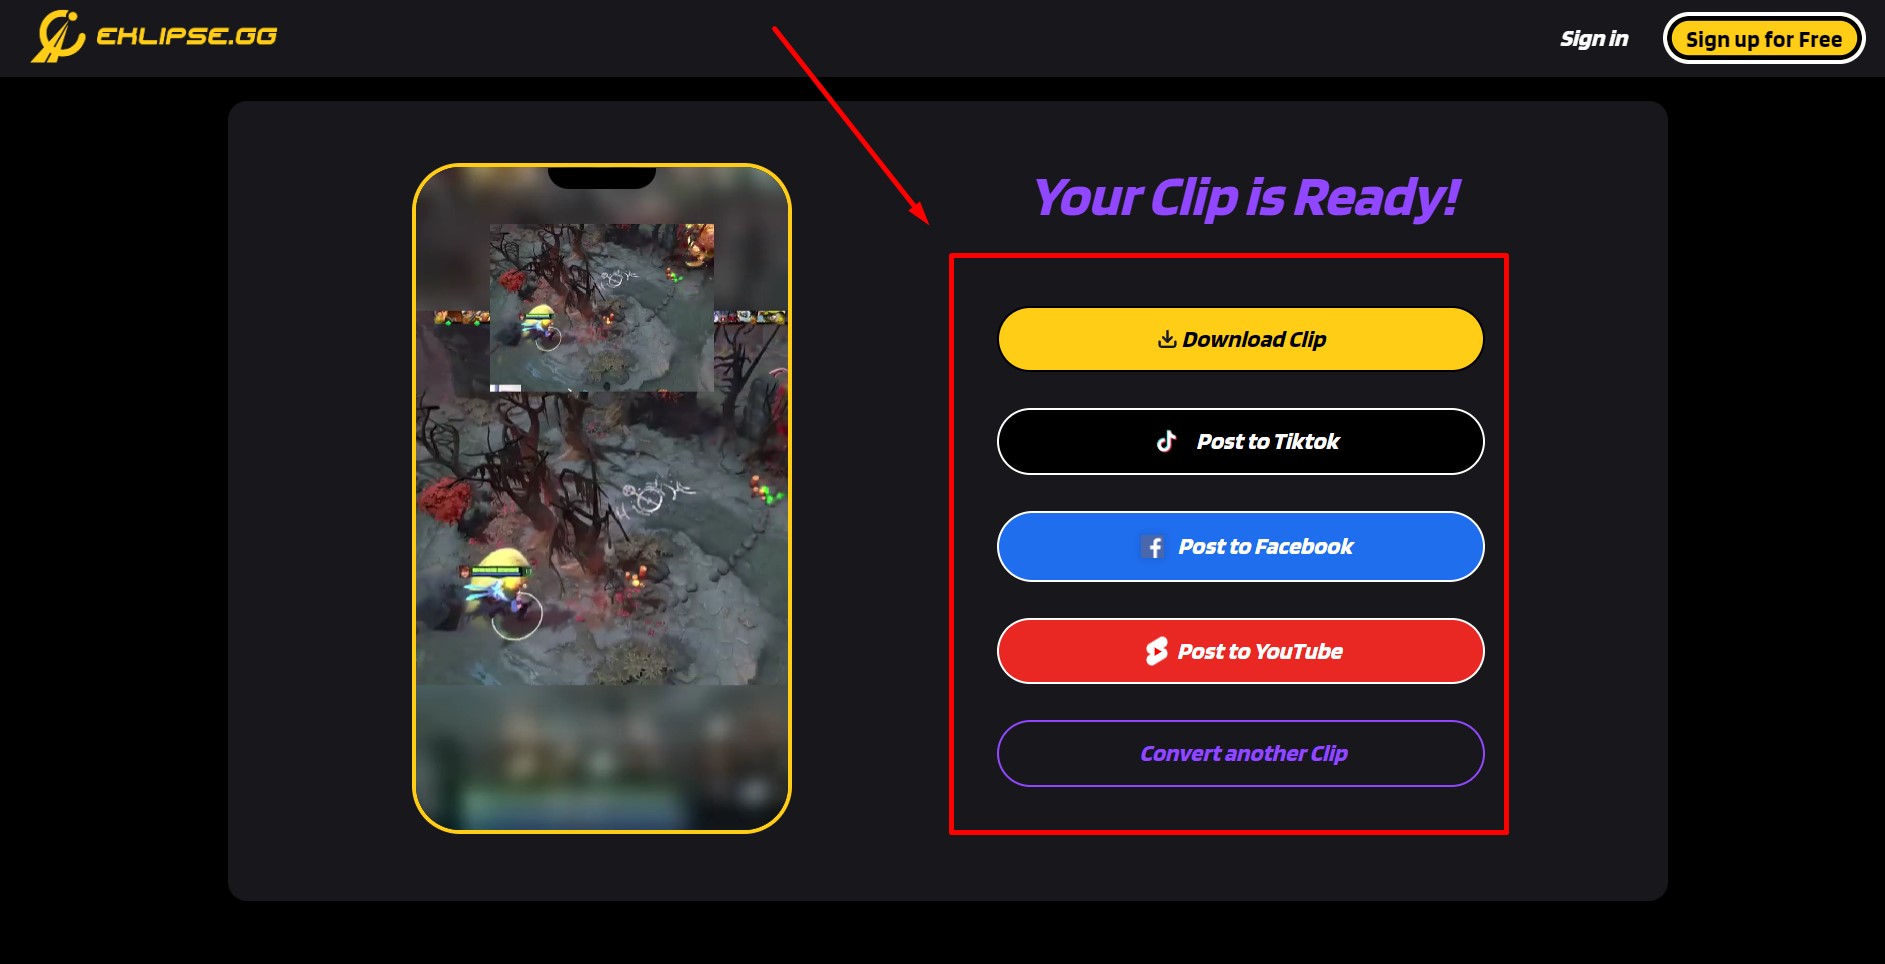
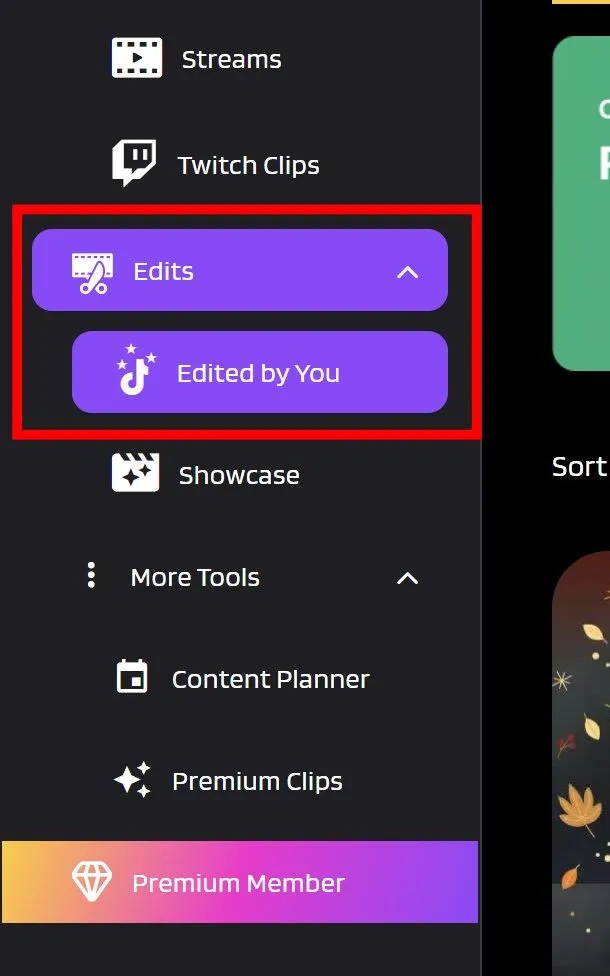
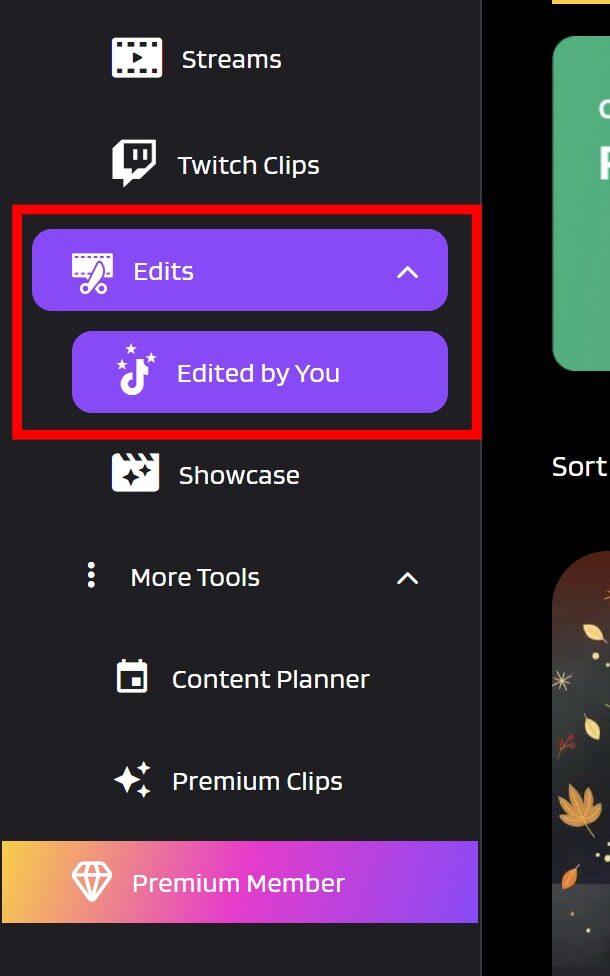
Now, find your edited video in the Edits > Edited by You section.
Find your edited video
Pick the edited video, and hit the Share option.
Tick the small box beside the TikTok option.
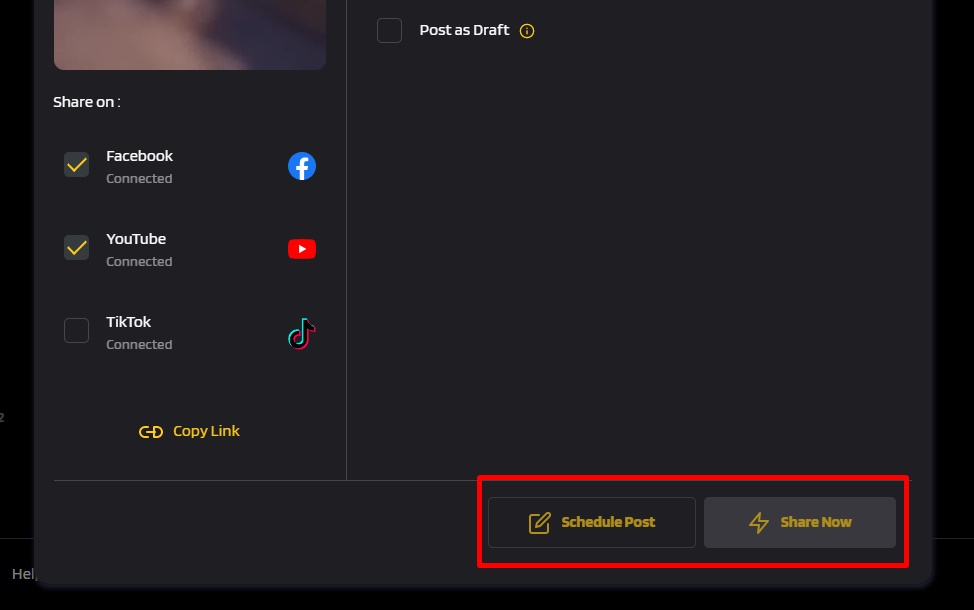
Write the description, and hit Share Now.
Additionally, you can click Schedule Post to post the video at a certain time.
Keep in mind that Eklipse focuses on offering automatic services to its users. So, for those who like a feature-rich and efficient tool that can serve time-saving processes, you’re gonna love it.
Maximize your Black Ops 6 rewards—Create highlights from your best gameplay with with Eklipse
Eklipse help streamer improve their social media presence with AI highlights that clip your Twitch / Kick streams automatically & converts them to TikTok / Reels / Shorts
Method 2. How To Edit TikTok Videos on A Computer Using VEED.io
An alternative way to make your TikTok videos stand out is by using VEED.io. If you like to explore your creativity and play with your editing skills, you may like this editing tool. Follow this guide to know how it works.
To begin with, go to the VEED site.
Then, log in with your Google account or create a new one.
Upload the video to VEED (make sure you have the file ready on your local device).
Upload file to Veed
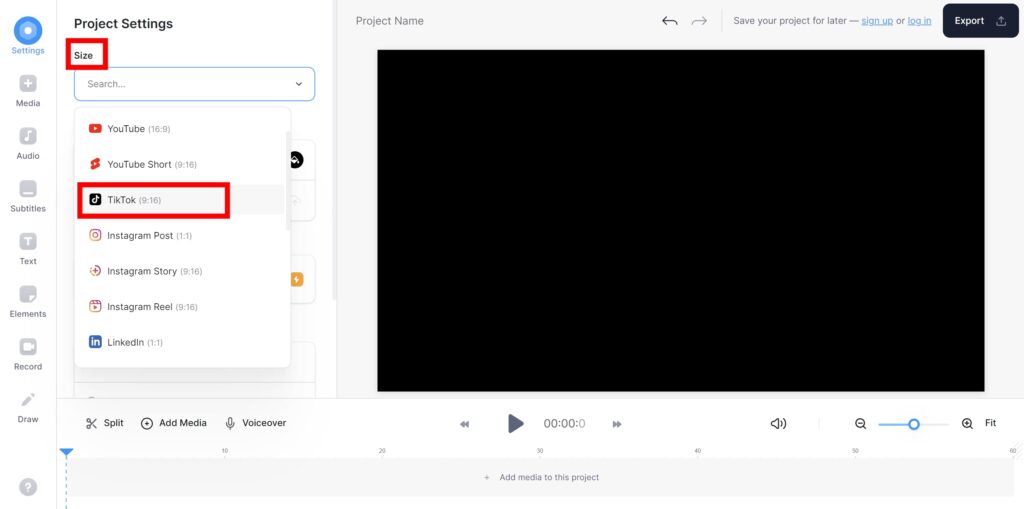
Click on Settings > Size > select the TikTok option.
Select the TikTok ratio
Now, make some edits (merge, rotate, trim, add music, texts, and more).
Once you’re happy with the result, hit Export.
Export once it’s ready
Finally, share the TikTok video to your account or other social media.
Share to other social media
Before proceeding to the next method, we would like to suggest you to try making video collage. Find the best method to do it here: How to Make a Video Collage?
Method 3. Make Changes To TikTok Videos Using Animotica
In addition to Eklipse and VEED.io, you can try Animotica as your editing software. However, it may slightly differ from the previous tools as it requires a download to use. Here are the step-by-step to using Animotica.
Download and install the Animotica app on your PC.
Launch the app and upload the video you want to edit.
Import the video file to edit | Source: Animotica
After that, set the aspect ratio. Make sure it fits the TikTok format.
Select the ratio | Source: Animotica
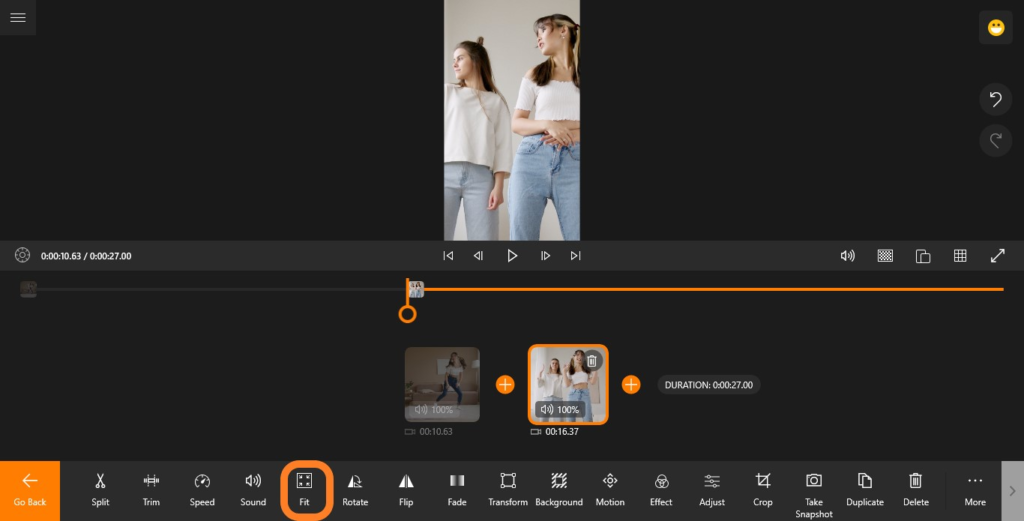
Click on the Fit icon to make all parts of the video appear on the frame.
Source: Animotica
Now you can make some other changes (add effects, flip, add sound, stickers, captions, or more).
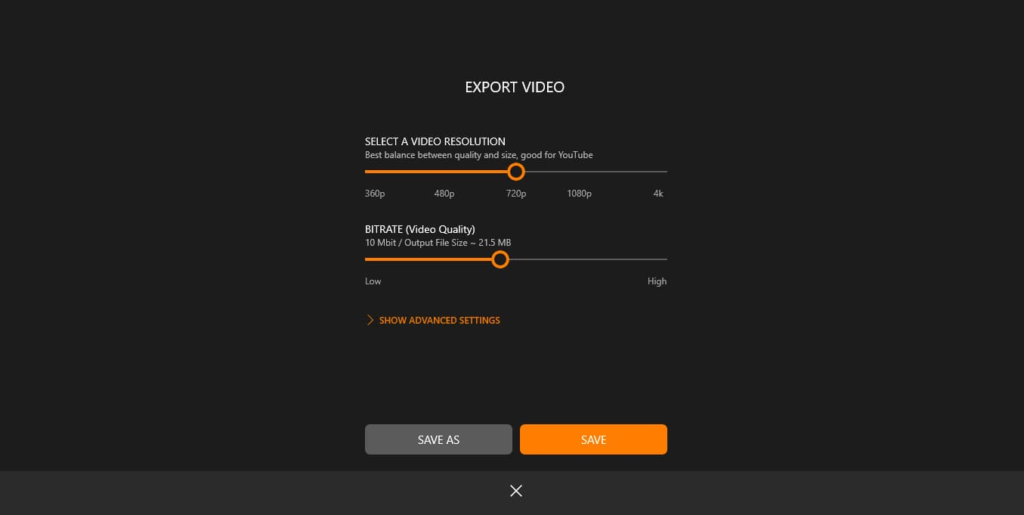
Once done, hit the Save button to save the file on your local device.
Save your edited video to your device | Source: Animotica
Bingo! Now you’re ready to post it on your TikTok account.
Additionally, Animotica doesn’t offer a direct-sharing feature just like Eklipse and VEED do. So, if you want to publish the video on TikTok, you should do it manually from the native app.
Conclusion
That’s the various ways how to edit TikTok videos on a PC. By using video editing software, you can add various elements such as text, music, and effects to your videos.
Additionally, you can also trim and cut your videos to create the perfect length and content. Remember to save your edited videos in a format compatible with TikTok, and you’re ready to upload and share your new creations. So, give it a try and see the difference it can make on your TikTok videos.
In case you want to edit your TikTok video on your mobile phone, you can take a look at the list of the best TikTok editor in our article: 8 Best Video Editors for TikTok in 2022.
Dreaming of becoming a YouTube star? Start your journey by choosing the perfect streaming software for YouTube. With various options available, ranging from free and basic programs to more advanced and expensive ones, it can be challenging to figure out which streaming software suits your needs best.
In this article, we’ll look at some widely used streaming software, discussing their features and capabilities. With the right software, you’ll create great content for your channel. Whether you’re new to streaming or an experienced content creator, this information will be essential. Let’s get started!
Live streaming software is like a behind-the-scenes director for your online broadcasts. Imagine you have a camera, a microphone, and even a screen capture you want to share with the world. This software takes all those different elements and turns them into a polished, live stream.
The best live streaming software can record your video and audio, add titles and graphics, and even let you switch between different cameras or screens on the fly. It allows you to create a professional-looking live stream without any fancy setups, just like how you see streamers and broadcasters do online!
How to Choose Live Streaming Software for YouTube?
Choosing the perfect live streaming software for YouTube depends on your experience and what you aim to achieve with your stream. If you’re new, look for user-friendly interfaces that are easy to set up. Some options offer drag-and-drop features and a seamless connection to YouTube.
For those experienced and seeking more control over elements like camera angles and graphics, there are powerful (and free!) software options, though they may require some learning time. Ultimately, the best software aligns with your comfort level and stream complexity. Consider whether you’ll focus on chatting or full production with multiple cameras and fancy visuals.
1. OBS Studio — Best for Versatility
Source: Dacast
OBS Studio is highly popular among streamers because it’s free and offers extensive features for live streaming and video editing. It works well with various devices and streaming platforms, making it a top choice for many.
While it may take some time to learn, OBS is beginner-friendly. It allows you to easily integrate additional tools like Discord, webcam, and microphone to enhance your streams. Whether you’re a professional or just starting, OBS is a great fit for all levels.
Wirecast is one of the oldest live video streaming production tools. Its advanced features are helpful for users who want to go live or broadcast on any platform. One of the best things about this software is its ability to control real-time switching between two or more live video cameras.
Additionally, Wirecast offers basic unique features such as 3D graphics on videos, screen transitions, keynote integration, and support for QuickTime streaming servers. These features make it perfect for entrepreneurs, content creators, or marketers. Moreover, Wirecast is compatible with various capture cards, devices, and cameras.
Pros:
Professional production features
Easy integration with YouTube
User-friendly interface
Multiple destinations (YouTube and other platforms)
Recording capabilities to create VOD content
Cons:
Paid software
Steeper learning curve
Resource intensive
3. XSplit—Best for Professional Streamers
Source: exsplit.com
If you are a professional streamer or content creator, you can try this one of the best software in the world. XSplits provides you with many advanced features. ExSplit comes with two kinds of plans: the free and the premium version. The premium version offers more advanced tools that will help you to produce the best video you have ever had.
The special thing about this software is you can combine or connect any apps or third-party plugins to XSplit. You cannot find these incredible features in other streaming software. In addition to that, XSplit also offers you many feature updates routinely.
Pros:
Built-in editing tools
Integrated green screen
Easier to use
Wide range of features
Optimized recording
Cons:
Paid subscription
Paywalled features
No mobile app
4. Lightstream—Best for Cloud-Based Streaming
Source: Shacknews
Imagine a powerful streaming studio that runs entirely on your web browser. That’s Lightstream in a nutshell. It’s a cloud-based software designed to make creating professional-looking broadcasts on YouTube a breeze. Unlike traditional options, Lightstream runs in your browser, so no downloads are needed.
It offers a user-friendly experience with powerful features like guest invites, customizable layouts, and console integration (for gamers). Lightstream lets you broadcast to YouTube and other platforms, making it a versatile tool for anyone who wants to stream professionally without the hassle.
Pros:
Cloud-based
User-friendly
Guest invitations
Console integration (Gamer Plan)
Third-party integrations
Cons:
Limited free plan
Reliance on internet connection
Less established compared to some competitors
5. OneStream—Best for Multiplatform Support
Source: one stream.live
OneStream Live is a powerful streaming software for YouTube that allows you to streamline your live streams, pre-recorded content, and multi-platform distribution. It caters to both beginner and advanced streamers, making it a versatile tool for anyone looking to up their YouTube game.
It lets you stream simultaneously to over 45 destinations, including YouTube Live, Facebook Live, Twitch, and Instagram. Add overlays, customize backgrounds, and even include breaks with intervals and animations to keep your viewers engaged. You can invite guests to join your live streams for interviews or collaborations.
Pros:
Multiplatform support
Streamlined workflow
Enhanced production
User-friendly interface
Advanced features
Cons:
Focus on business use
Lack of mobile functionality
Limited customization
6. Restream—Best for Multi-streaming
Source: Restream.io
If you are a blogger, content creator, or influencer, you can try this streaming software to produce the best live-stream video. It allows you to go live to multiple sites at once. You can live stream on Facebook, YouTube, and Twitch simultaneously. Moreover, Restream also supports more than 30 streaming sites.
Aside from that, it features an extensive array of video management tools. The users can optimize the live-streaming video quality by tweaking the frame drops, bit rate, and frames per second. Restream caters to a wide range of users, from individual creators to businesses looking to expand their online presence.
Pros:
Scheduling feature
Multistreaming
Customization
User-friendly interface
Unified Chat
Cons:
Limited free plan features
Reliance on internet connection
Potential performance issues
7. vMix—Best for Flexibility
Source: vmix.com
Searching for a good and flexible streaming platform? We got you. Go try vMix to get a better live-streaming experience. vMix is supported in almost every device and streaming platform. There will be no issues if you are going to go live on YouTube, Facebook, Twitch, or even Instagram. This also features multi-bitrate streaming.
It provides channel streams for the audiences. In addition, it can be synchronized between the video quality and internet connection on their devices. Its built-in-titling tool also features animation and a slow-motion setting.
Pros:
Cost-effective
Powerful and feature-rich
Multiplatform streaming
Easy to use
Great for beginners
Cons:
Limited seat count
Resource intensive
Limited platform support
8. Streamyard—Best for Customization
Source: Streamyard.com
Streamyard is a versatile streaming software for YouTube and Twitch that caters to everyone from content creators to businesses. It’s easy to add your personal touch to your live streams by customizing the colors, overlays, logos, and even background using a green screen.
The free version of this streaming software is quite impressive, with features like screen sharing, banners, on-screen comments, brand colors, a green screen, and the ability to have 6 on-screen participants. Even though there is a streaming limit of 20 hours per month, it is still manageable.
Pros:
Free plan available
Various production features
Guest management
Multiplatform streaming
Easy to use
Cons:
Occasional audio issues
Not visually appealing
Limited streaming destinations (free plan)
9. Streamlabs—Best for Monetization
Source: HD-Technologia.com
Are you looking for software that does not only help in editing stuff but also in monetization? If so, Streamlabs will be a great pick for you. With monetization widgets like Goals, Tip Jar, Stream Boss, Tip Ticker, and Sponsor Banner, Streamlabs is perfect for businesses looking for an open-source solution.
Using this tool can also assist you in setting up and customizing your stream with professional overlays and themes. In addition, Streamlabs comes with an app store and 46 apps that help stream to multiple platforms at the same time, add automation, and more. To ensure that everything is on the line before going live, you can try its test feature.
10. Ecamm Live—Best for Mac Users
Source: Ecamm.com
Ecamm Live is the ultimate streaming solution for Mac, iPad, and iPhone. With its versatile features, you can easily cater to all your YouTube and Twitch needs, including adding custom animations and overlays, sharing your screen, and monitoring bandwidth stats in real-time.
With a wide range of input options like DSLR camera connection, HDMI capture, and Blackmagic DeckLink, the possibilities are endless. Plus, Ecamm Live makes it easy to roll video playback into a live stream without any extra formatting or cloud uploading. Upgrade your streaming game with Ecamm Live.
Pros:
Reliable performance
Excellent customer support
Customization
Powerful features
Easy to use
Cons:
Mac only
Limited free trial
Limited live editing
Final Thoughts
Picking the right streaming software is crucial for YouTube creators. There are different options, some easier to use and others with more features. Popular choices include OBS Studio, Wirecast, and XSplit. With the right software, creators can make better videos and connect with their audience. It’s like having the perfect tool for the job.
After discovering the best streaming software for YouTube, you can create highlights effortlessly by utilizing Eklipse. This tool will help you curate the most engaging moments from your streams, making it easier for your audience to enjoy and share the best parts of your content. Sign up for Eklipse now!
When you upload a video to TikTok, the servers process and analyze your video before making it public. This entire process can take a little while, depending on the length and quality of a video. Once the processing finishes, your video is available to watch on TikTok.
Usually, while you attempt to upload a video, a message shows up that says your video is being processed on TikTok. This happens when a video is being reviewed to examine it for any possible breaches of the community rules so that no one can interact with the video before it is approved.
While the message is expected. Sometimes TikTok users are left clueless when it shows up for an indefinite period, possibly because of:
A server outage on TikTok in your region.
Technical problems with your phone.
Internet connectivity issues with your network.
How to Fix Video is Being Processed Bug on Tiktok?
Assuming you’re stuck with the same message as many other TikTok users, we’d like to help you detect what’s causing the issue, hoping that in the process, we’d make it easier for you to fix the problem. So here is what we suggest you do:
1. Check Your Internet Connection
A potential reason for the “Video is being processed” error is a poor internet connection. If you’re using TikTok over cellular data, try switching to a WiFi connection and see if that solves the problem. Or vice versa – if you’re on WiFi, try using your phone’s data instead.
In case switching your network isn’t possible, try testing your network speed. Go to the website speedtest.net and check if your internet is running slow. If it is, then you may need to contact your internet service provider to try and fix the problem.
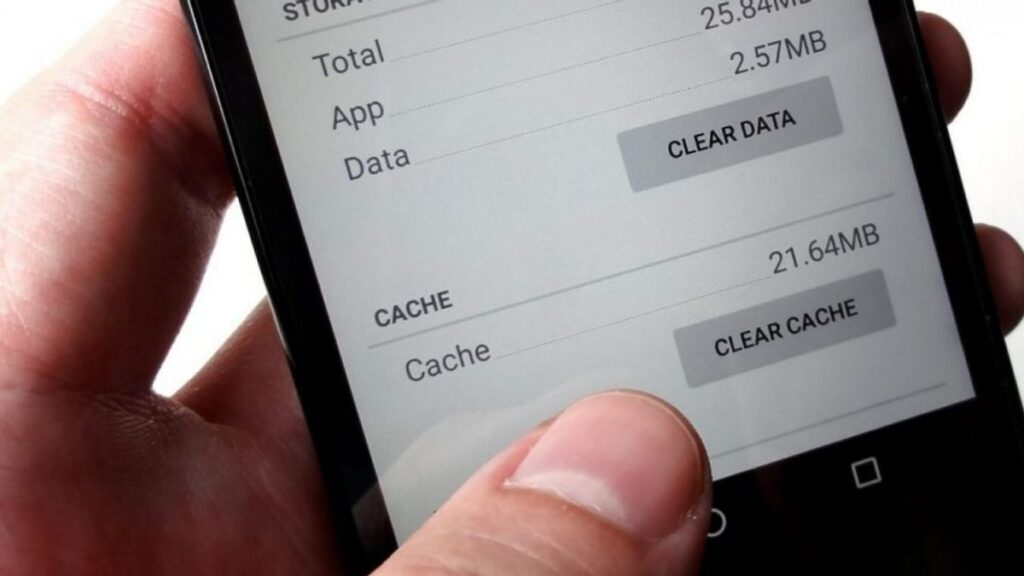
2. Clear TikTok App Cache
One potential fix for the “Video is being processed” error is to delete TikTok’s cache. That’s because often the build-up of cache can badly impact an app’s performance, which is why cleaning its cache might fix the problem.
To delete the TikTok cache, go to your phone’s Settings > Apps > TikTok and tap on Clear Cache. Alternatively, you can also clean the cache from within the TikTok app by going to Settings > Privacy and Safety > Clear Cache.
3. Check your Account Status
It could be that your account may have been temporarily banned from uploading new videos if any of your recent posts were reported or flagged for inappropriate content. Depending on the severity of a violation against the community rules, TikTok imposes different levels of bans and restrictions on users to prevent such activity.
This is also one of the reasons that cause the “Video is being processed” error message, so you should check your account status to ensure that your account is not restricted. To check this, open the TikTok app and go to Me > Account Privacy > Restrictions and see if there are any restrictions placed on your account.
4. Restart the TikTok App
When trying this method, make sure that the video you were trying to upload is saved in your gallery. Go to your recent apps menu, and close the TikTok app. Then, restart TikTok, and attempt to upload the video again.
Hopefully, restarting the app should solve the problem, as sometimes doing this can help clear any glitches or bugs that may be temporarily causing the app to malfunction.
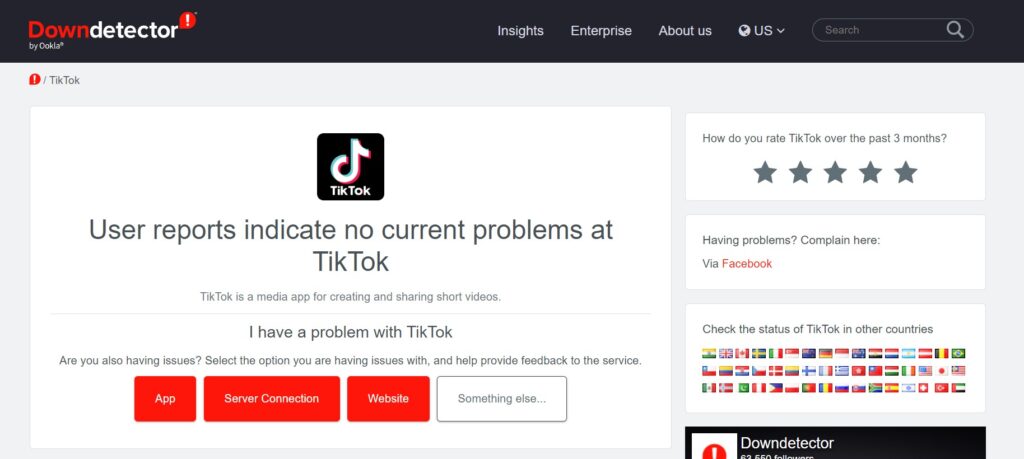
5. Check if the TikTok Server is Down
If you’re still having problems uploading videos, the TikTok servers could be down. This isn’t too uncommon, as any app or website can experience technical difficulties from time to time.
To check if this is the case, you can visit sites like downdetector.com to check for any reported problems with TikTok. If there are, then all you can do is wait until TikTok fixes the problem.
Final Thoughts
Hopefully, one of these methods will help answer your query on what video is being processed means on TikTok. If not, then as a last resort, you should report the problem to TikTok’s support team in the app, and they may be able to help you resolve the issue.
Stickers are a fun way to respond to chats on Discord. Not only can it become a way to express yourself, but sometimes stickers also say louder than words. Luckily, Discord has this kind of feature. For those who want to know how to add and use, even how to make stickers on Discord, you’ve stopped in the right place.
There may be a time when you want to use your own sticker simply because it represents you a lot. Discord enables you to customize your stickers as long as you have emoji permissions in a server that’s been boosted to Level 1. Let’s dive in and discover how!
Twitch and YouTube have different subscription systems. Unlike YouTube, Twitch will charge you a monthly payment for each subscription. So it’s normal when someone wants to cancel the subscription for a certain reason. But how to unsubscribe on Twitch mobile?
Well, Twitch mobile and PC may show a little different interface, and it could be a bit confusing sometimes. But don’t fret as this post will walk you through the process of unsubscribing channels via mobile phone. So let’s see how you can get things done on Twitch mobile. Here we go.
To be able to cancel your Twitch subscription on Android, make sure you have installed the Twitch app on your device. After that, you can follow the steps below.
To begin with, launch the Twitch app and log in to your account.
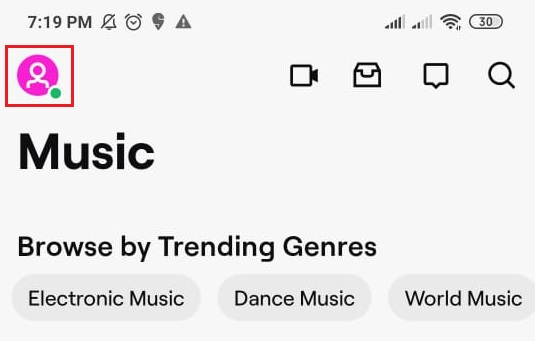
Navigate to the profile icon at the top left corner.
Navigate to the profile picture icon | Source: remote.tools
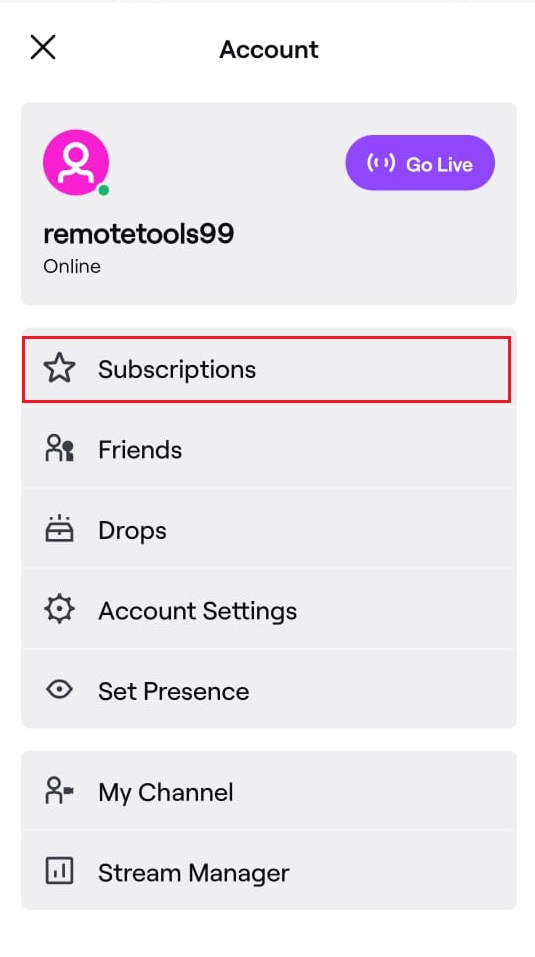
Then, select the Subscriptions option on the drop-down menu.
Select ‘Subscriptions’ | Source: remote.tools
Tap on the specific channel you want to unsubscribe from.
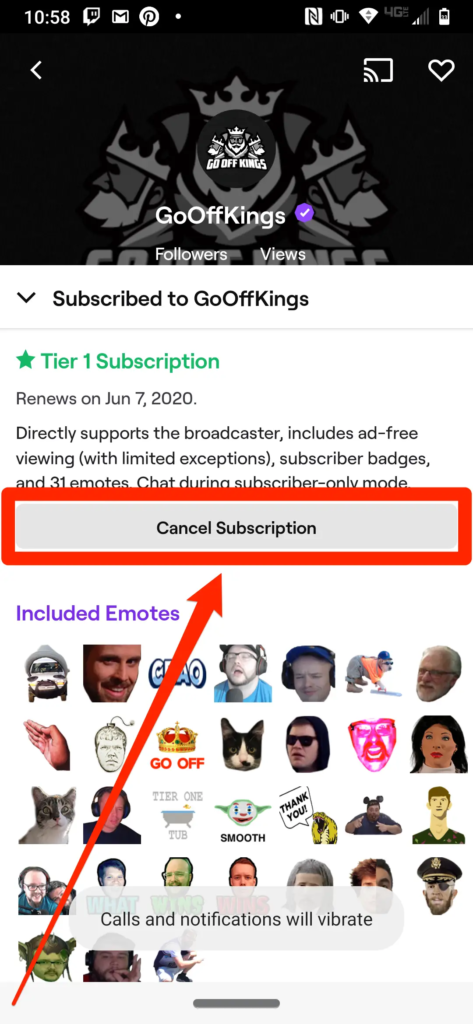
Afterward, hit Cancel Subscription.
Cancel subscription | Source: Business Insider
That’s it. Now you don’t have to pay for next month’s subscription as you have canceled the subscription to this channel.
How To Cancel Twitch Subscription on iPhone
iPhone users may wonder how to unsubscribe the streamers on this Apple device. Are the steps similar to Android? The answer is fortunately yes, it’s exactly the same. But to make it clearer, here’s how to unsub from iPhone.
Hop on to the profile picture icon at the top left corner.
Go to your profile icon | Source: remote.tools
Hit the Subscriptions option under the menu.
Tap on Subscription | Source: remote.tools
Pick the specific streamer you wish to unsub from.
Then, hit the Cancel Subscription.
Cancel subscription | Source: Business Insider
Bingo! You’re all set.
Conclusion
That’s how to unsubscribe on Twitch mobile on Android or iPhone. The steps are basically the same. In case you want to re-subscribe or subscribe to other Twitch streamers, you can do similar steps as above. But instead of hitting Cancel Subscription, you’ll need to click Subscribe.
In addition to a subscription, you can support your favorite streamers by doing another thing such as donating bits.
Are you a streaming newbie and trying to discover how to get more viewers on Facebook gaming? We got you. Through this article, we’re going to give you some tips to increase your viewership on your Facebook Gaming account.
Gaining more audiences and maintaining them to stay on your account is quite tricky. It’s important to develop strategies to create and manage your content and build a relationship with your viewers.
So, without further ado, let’s get to know how to gain more viewers on Facebook live or other content and be famous. Read our tips below.
10 Steps To Attract More Viewers on Facebook Gaming
There are 9 main things you really have to do if you want to get more audiences for your content. If you can consistently do it, you’ll have a bigger chance to be a successful streamer. Here you go.
1. Think About Content Variation
In order to make your content look interesting and well-received by your audience, try to diversify your product. Since Facebook Gaming allows you to go live, then make a fantastic live stream. Play a specific game properly and show your skills to them.
Additionally, you can also create VoD to post on your Facebook Gaming Page. It could be your streaming video you have saved after going live or some amusing gaming clips. VoDs and clips are considered enough to be evergreen content. So, everyone can enjoy and re-watch it even while you’re offline.
Other than producing several kinds of videos, you can also improve your content by categorizing it. You can make videos only on a special occasion, adapted content, or anything else.
2. Produce Attracting Contents
The most important thing you should make sure to be on your Facebook Gaming account is your content. Additionally, content is your most powerful weapon to live up to your Facebook account. The more you create attractive content, the more people are interested in your account.
However, every content you wish to make needs serious consideration, strong concept, and strategy. Avoid making random content or your viewers won’t stay on your account. Furthermore, here are the tips to produce great content.
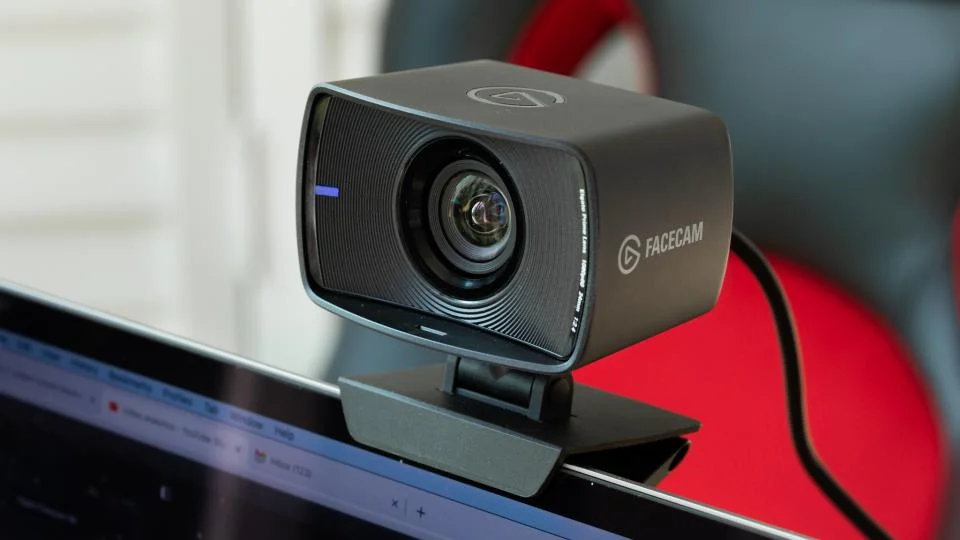
3. Use Webcam to Improve Facebook Gaming Video Quality
As we know that not all game streaming requires a webcam. Some streamers feel more comfortable with only recording their gameplay. Meanwhile, some other streamers think that showing their face while playing a game is also necessary to give a real-time reaction to anything that appeared in the game.
Therefore, a webcam may be one of the streaming gear you need to use. If you decided to use a webcam to improve your, make sure that you pick the best recording camera that can produce a clear picture.
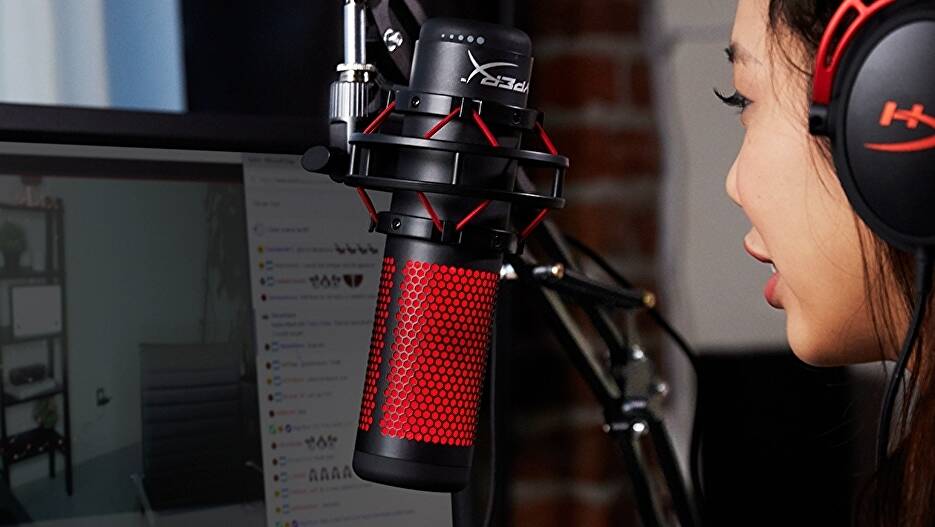
4. Use Proper Lighting and a Microphone
For some streamers, a webcam may not be always necessary. But you can’t miss out on a proper microphone to produce high-quality audio. A microphone is important whenever you want to go live or make a good VoD. Poor audio will make everyone click away from your content. Therefore, you need to find the best microphone that will produce clear and loud audio for the viewers.
In addition to the microphone, you also need to improve your lighting if you want to show yourself from the camera. You can even make elegance or dramatic effects by putting the right lighting.
5. Produce Eye-catching Stream Graphic
Source: Coco solution
Appearance is what people expect while watching the video. It’s not always about how you cover your face using make-up, or how great you’re playing the game, but it’s more about the whole video.
In addition to your outfit and gameplay (if you decide to record yourself), you should also consider every little detail of your video, including the graphics. You can make stunning intro and outro using cool overlays. To do this, you can either create yourself or find any copyright-free overlay for your video.
6. Add a Music Background to Enhance Your Video Quality
The last thing to create an awesome video for increasing Facebook Gaming Growth is adding a slappin’ soundtrack to your video. Music is important to establish the tone of the story being told within the video. Besides, it can also control the audience’s emotions.
In addition to that, it’s a good idea to find any copyright-free music background to be added to your video. Or, if you are looking for more convenient way to do it, you can try Eklipse’s new feature that will allow you to add music background easily.
7. Connect With Your Audience
Source: Healthy Gamer
To gain more viewers and keep them staying for your content, creating great videos isn’t enough. It’s necessary to improve your social skill to be able to build a good relationship with your viewers. The thing that is worth noting, every viewer wants to be acknowledged by their star.
Start the chat with every viewer by asking a random question, saying thank you, warm greeting, etc. If you’re doing this, it will make them get closer to you. Psychologically, they can give the support you needed while being a streamer.
8. Networking With Other Streamers and Do A Collab!
In addition to connecting with your audience, it’s also important to network with other streamers. It will be a great idea if you collaborate with them. The more you engage with them, the more you’ll get any great opportunities to keep growing.
In order to build a good relationship with other streamers, it would be better to connect with them through email, Discord, instant messaging, or even communities on social media. Don’t miss a chance to learn more things from them.
9. Share Your Stream to Relevant FB Groups and Social Media
There are many ways you can do to promote your Facebook Gaming content, such as TikTok and YouTube. Everyone knows that TikTok has become a very popular sharing platform lately. That’s why it is very potential to increase your Facebook growth. Additionally, you can share your gaming clips on TikTok and encourage them to watch your live streaming on your Facebook account.
For stunning gaming clips on TikTok, you can use Eklipse as the best AI-powered highlight clipper. With Eklipse, you can automatically clip the best gaming moment and convert it into TikTok or Reel in just a few clicks! You don’t need any fancy skill to make it, just let the A.I do its magic.
Maximize your Black Ops 6 rewards—Create highlights from your best gameplay with with Eklipse
Eklipse help streamer improve their social media presence with AI highlights that clip your Twitch / Kick streams automatically & converts them to TikTok / Reels / Shorts
Other than TikTok, you can also use YouTube to share your gaming video. Don’t let your audience miss out on your exciting show. Therefore, you need to save your streaming, add some edits, and post it on YouTube to help you promote your Facebook account and content. For another option, you can create a montage to post on YouTube. You can use Eklipse as well to help you get it done. Click the following button to start using Eklipse.
10. Stick With Your Persona
One important thing to create a persona is simply having the ability to communicate and relate your knowledge to your audience.
Use techniques that you find effective on other streams and incorporate them into your own. Don’t be afraid to ask for help from other streamers and your community and to listen to their feedback.
When you feel the persona resonates and is relatable to your viewers, then you’ll need to stick with that. Sticking with one persona make your stream unique, and ultimately will attract new viewers to your Facebook Gaming channel.
Conclusion
So that’s all the tips you’ll need to do to ultimately grow your viewers on Facebook Gaming. So to sum it up, the first and foremost you need to think about is your stream equipment; like the microphone, webcam, lighting, and more.
Then don’t forget to start creating content and share it on social media! Networking with other streamers, and doing a collab is also a healthy way to grow your Facebook gaming viewers.
Lastly, stick to your persona so you can stand out from other streamers while getting more retention from your old viewers.
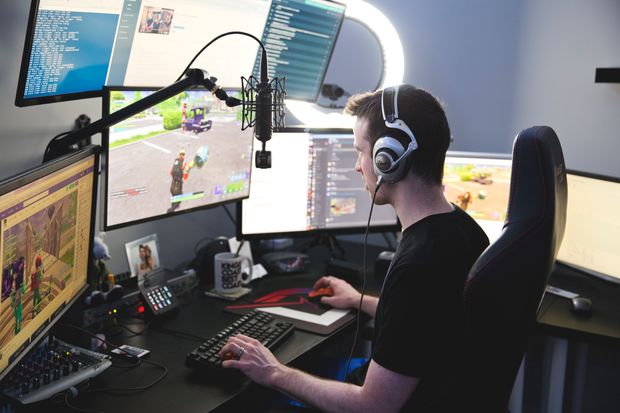
Streaming is like the ultimate way to level up your gaming experience. Imagine being able to watch other people play the hottest games, or even stream your own gameplay live to the world. It’s like having your own personal gaming theater, but online. But, if you’re new to the streaming world, we are here to give you some streaming tips for beginner.
Many thousands of people have taken to broadcasting their live gameplay live for millions of online viewers in recent years. This resulted in a handful of streamers that managed to find regular audiences. After all, it’s a fun thing to do that can earn you money wherever you are! As a gamer, who wouldn’t want to be paid playing their favorite games, right?
Setting up the right content and gaining followers does take effort. However, it doesn’t mean that it’s an impossible thing to do. By applying the right strategies and tips, you will be able to stream and build your community easily.
Whether you are a beginner or someone who is looking to expand their streaming reach, our guide will surely assist you.
As a content creator, you may want to merge multiple clips into one TikTok video so people can see many of your incredible moments in one video. But how to add clips to TikTok? Well luckily, the steps are undoubtedly easy.
TikTok natively allows users to add more than a clip. So you don’t need to use any additional software to help you out. Now, let’s jump right into the tutorial.
For instance, you can try to create a mini TikTok vlog that contains multiple footage. Despite having a short duration, your TikTok video cover complete information about your journey.
How To Add Multiple Clips To TikTok
Before starting the tutorial, be sure that you have the clips you’re going to add ready on your camera roll. Once you’ve managed that, follow the guide below.
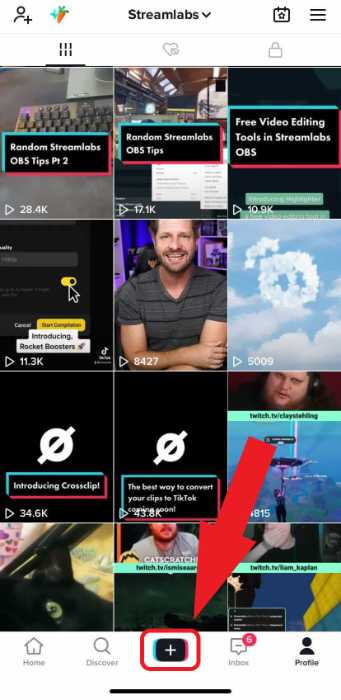
First, launch the TikTok app and log in to your account.
Then, hit the plus ‘+’ button at the bottom corner of the screen.
tap on the plus button to start making a new video on TikTok | Source: blog.crossclip
Instead of recording a new video, navigate to the Upload icon.
Navigate to the ‘Upload’ icon to open the camera roll | Source: blog.crossclip
Now, you’ll be brought up into your camera roll.
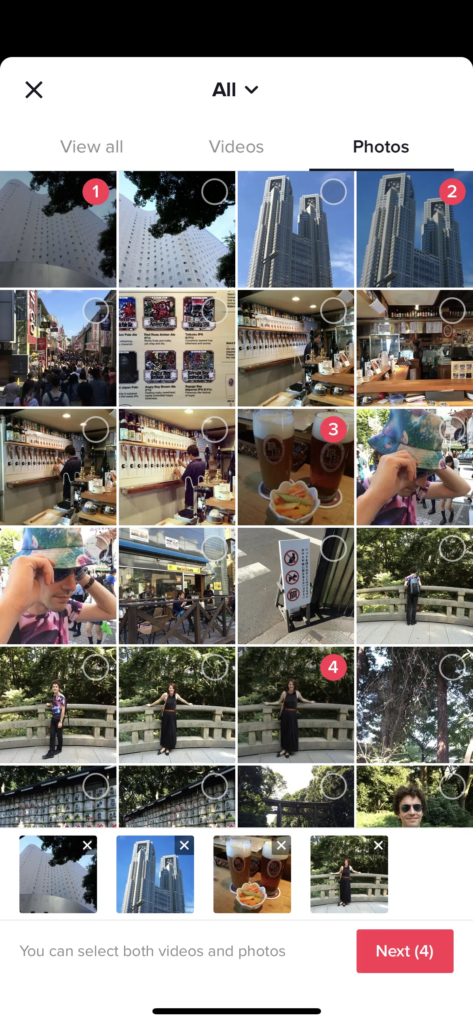
Select any videos you’re going to merge and hit Next.
Select the videos you want to merge from your camera roll | Source: blog.hootsuite
Now that your videos are combined you can reorder the video.
Spice up your video with filters, stickers, texts, or sounds on TikTok.
Once ready, tap on the Next button.
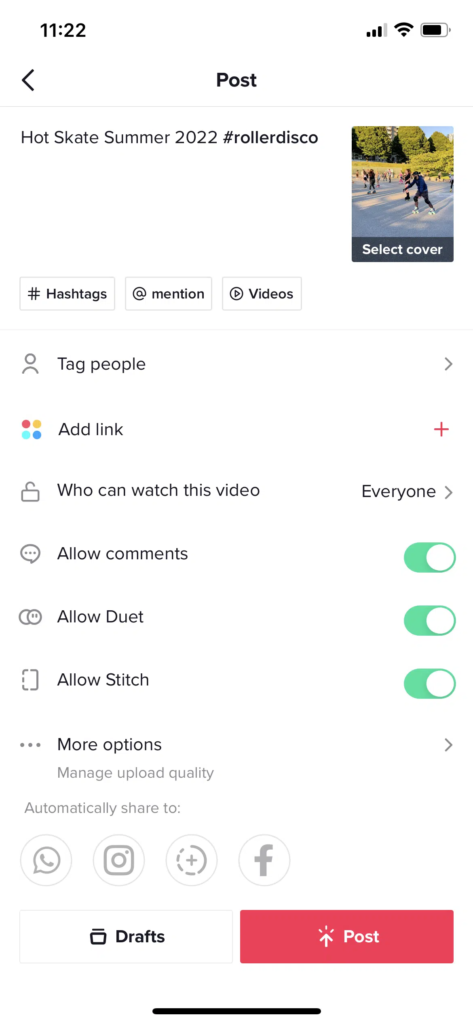
Next up, write a caption, add hashtags, and manage the Video Settings.
Finally, click the Post button to let it go live.
Hit ‘Post’ to start publishing your video | Source: blog.hootsuite
It’s worth highlighting that TikTok enables users to combine up to 35 videos. In addition, you can also mix the videos with some photos. And bingo! Your TikTok with multiple clips is ready to net everybody’s eyeballs.
how to add clips to TikTok Using Eklipse
Another way to add clips to TikTok is by using Eklipse. Eklipse is actually an AI-based clip maker that will help you capture any cool moments from your stream video.
Not only clip the best scene of your live stream, but Eklipse is also capable of changing the landscape mode of the video into the vertical format, so it’ll fit TikTok. On top of that, Eklipse will get it all done automatically. No need for manual editing at all. Here’s how to use it.
Log in to your account using Facebook or Twitch account or create a new one.
Drag and drop the recorded stream video from your device into Eklipse by hitting the Upload button.
Alternatively, you can copy-paste the URL link of your streaming video.
import the existing file or copy-paste the URL link
Then, choose your favorite TikTok template and hit Continue Editing.
choose your favorite template and continue the process
Adjust the facecam and the gameplay area, then click Next.
adjust the video length, the facecam and gameplay area
Write a title, set the video resolution, and add the channel name, auto-caption, and soundtrack.
Afterward, hop on to the Confirm button.
Give some little details
Now, find your edited clip under the Edits section > Edited by You.
find your edited clips and share it
Click the Share button, and tick the small square next to the TikTok option.
Complete the information section such as the title and description.
Finally, click on the Post Now button or Schedule Post if you want to post it later.
It probably takes longer road than using the native app. However, Eklipse enables the automatic editing process. So you don’t need to do a manual editing process at all. More importantly, you can share it directly from Eklipse in no time.
Conclusion
Well, that’s all about how to add clips to TikTok. Both ways offer different benefits. If you like to explore your creativity for your video, using the native app feature will be good. Conversely, if efficiency is more of your cup of tea, Eklipse will be a great choice.
By the way, if you’re looking for another way to enhance your TikTok video and increase the number of views, you can try TikTok’s Stitch feature. Learn about it here and give it a shot! How To Add A Pre-recorded Video To The TikTok Stitch.
We hope this article is helpful to support your TikTok journey. Don’t forget to keep your eyes on our blog for more updates.
Maximize your Black Ops 6 rewards—Create highlights from your best gameplay with with Eklipse
Eklipse help streamer improve their social media presence with AI highlights that clip your Twitch / Kick streams automatically & converts them to TikTok / Reels / Shorts
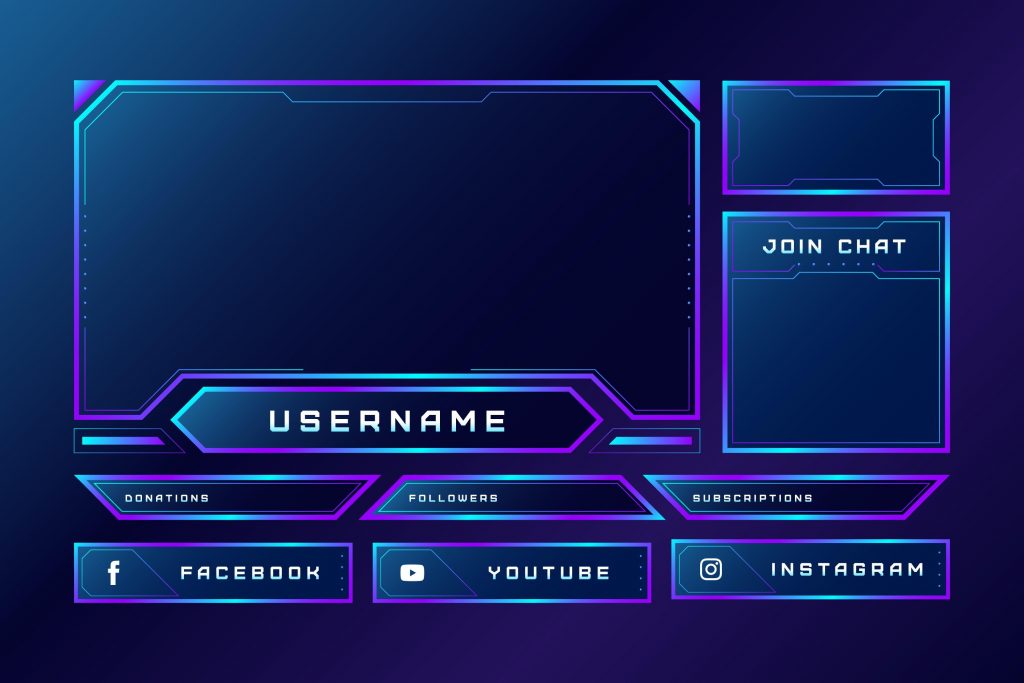
Personalizing the panel section on Twitch is actually essential to make your channel more visible and appealing to viewers. You can start customizing it once you are at your channel. Still not sure where to begin? This post will explain step-by-step how to add panels on Twitch.
Additionally, Twitch panels refer to graphics that cover information about who you are and what your Twitch channel is about. Not only should it be informative, but the panel should look creative as well to attract new audiences. So, without more ado, let’s get to the point.
Twitch panels can be a useful tool for streamers to provide important information to viewers about who you are and what your Twitch channel is about. You can display information such as the streamer’s social media links, schedule, and donation information there. In another word, Twitch panels are important to promote your channel.
However, the panel should not only be informative, but it also needs to be visually appealing. So it can create a consistent and professional-looking brand for the channel.
How to Add Panels on Twitch Profile
Before adding panels to your profile, make sure that you have created your own, or find some you can customize. To be able to create them, you can try any panel services all around the internet. Once you’ve managed that, let’s attach them.
To begin with, open Twitch and log in with your account.
Then, click on your profile icon in the upper right corner.
HIt the Channel option from the drop-down menu.
Hit the ‘Channel’ option under the drop-down menu| Source: Streamlabs
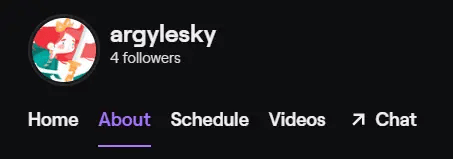
On your channel page, hit the About tab.
Go to the ‘About’ tab | Source: StreamScheme
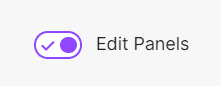
After that, scroll down to find the Edit Panels option and toggle the button to be in a position to enable you to customize your ‘about me’ section.
Toggle the ‘Edit Panels’ button into on position | Source: Streamlabs
On a panel box, hit the Add Image button. Do a drag and drop to upload a panel image from your PC.
Finally, add a description and URL you want the image to link to, and press Submit.
Upload the image and fill the information section| Source: StreamScheme
Voila! You have succeeded to add a panel on your Twitch page. If you want to add and customize the Twitch panel, follow the same steps above.
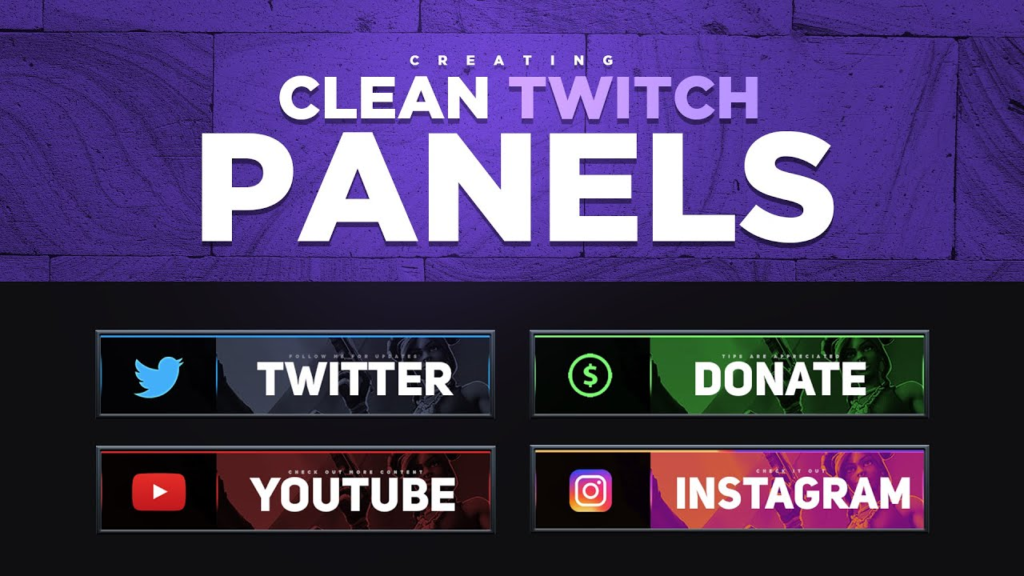
Which Panels Should You Add to Your Twitch Profile?
Source: YouTube
Basically, you can add any panels to your profile if you really try to attract more viewers. But there are some panels you should prioritize. Have a look at the list below.
1. Streaming Schedule
The panel that should be on your top list is stream time. Adding this information will let your viewers know when you will stream on Twitch so that they can manage time to visit your page.
2. About Me
Keep your viewers informed about who you are. Try to give them a glimpse of yourself. For instance, who you are on Twitch, what game you stream, and more.
3. Social Media
By letting them know about your social media, you can passively build your influence over time and increase the engagement of your viewers. Just make the image link as panels for each network.
Conclusion
That’s all about how to add panels on Twitch. Isn’t it simple as ABC? Actually, creating panels for your Twitch profile is one of the strategies to promote your channel. Giving a quick explanation of yourself and your work can attract more viewers with similar interests. So make sure to put more effort to make your incredible panels.