If you’re a fan of Twitch, you’ve probably seen the PepeLaugh emote. But do you know what it means and where it came from? In this article, we’ll break down all the details about this popular laugh emote.
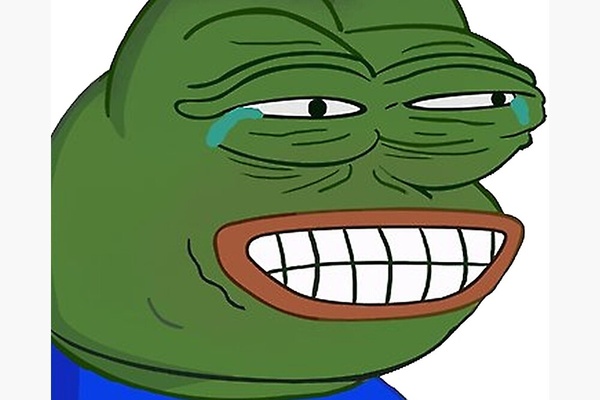
PepeLaugh is an emote used to express laughter on Twitch, similar to the LUL or the crying laughter emoji. The image features Pepe the Frog with teary eyes, making it all the more amusing.
It’s often accompanied by the phrase “Here it comes” in moments where laughter is anticipated.
The Origin
PepeLaugh is actually part of a larger “Pepe emote” family, which is based on the comic character Pepe the Frog. It was first used on 4chan in 2014 before being uploaded to FrankerFaceZ in 2017. From there, it grew into a popular emote on Twitch and is now widely used by streamers and viewers alike.
How to Use PepeLaugh Emote on Twitch
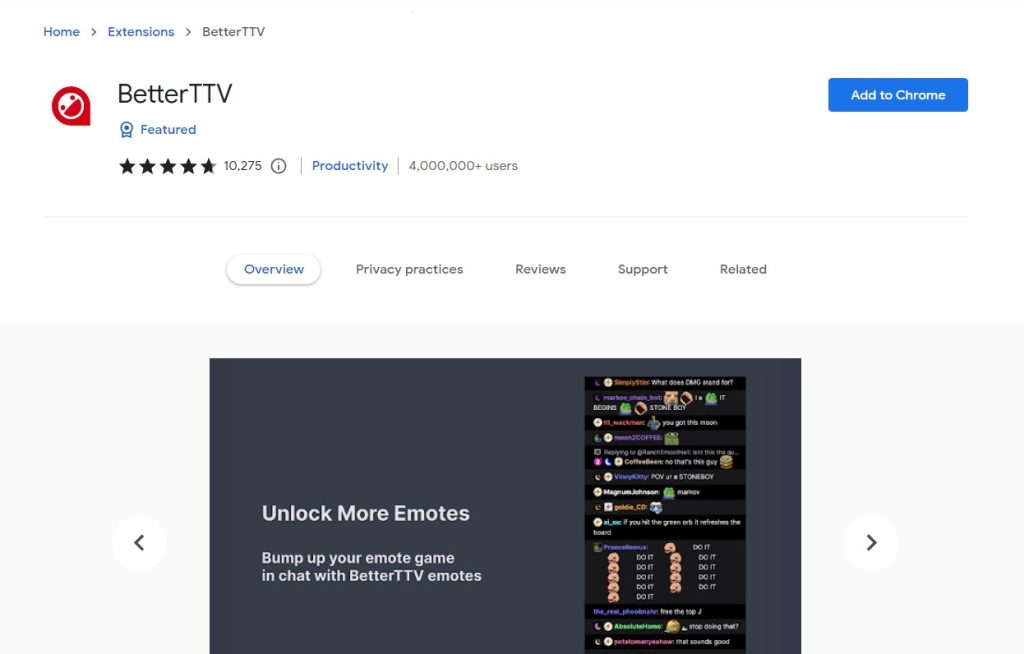
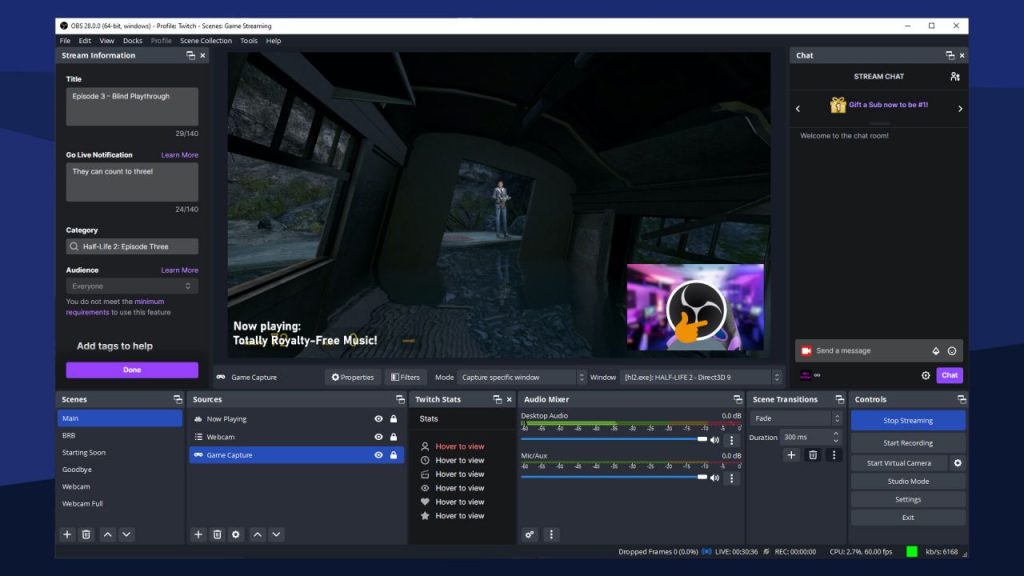
To use PepeLaugh on Twitch, you’ll need to have the BTTV extension installed. Here’s how you can add the extension to your account:
Go to the BTTV website and click on the “Install on Chrome” button.
Or you can choose your browser respectively.
Once you have the extension installed, refresh your Twitch page.
You should now be able to use PepeLaugh and other BTTV emotes in your chats by simply type “:PepeLaugh”
Can you Use it on Discord?
The answer is, it depends on the Discord server where you are chit-chatting. This is because PepeLaugh is not the default Discord emote. Therefore, the Discord server owner needs to connect their account to the BTTV extension.
If you are just a server member, make sure to check if the server has enabled the PepeLaugh emote by typing :PepeLaugh.
If you are a Discord server owner and want to enable the emote on your server, make sure to connect your account to the BTTV extension.
Conclusion
In conclusion, PepeLaugh is a popular laugh emote on Twitch that’s been around since 2017. Whether you’re a streamer or a viewer, adding PepeLaugh to your arsenal of emotes is sure to bring some laughter to your Twitch experience.
Maximize your Black Ops 6 rewards—Create highlights from your best gameplay with with Eklipse
Eklipse help streamer improve their social media presence with AI highlights that clip your Twitch / Kick streams automatically & converts them to TikTok / Reels / Shorts
Subathons are a well-known concept on Twitch. Essentially, they are live streaming events in which the streamer increases their broadcast time for every new subscriber they receive.
Streamers sometimes offer unique rewards and challenges based on subscription numbers to create an enjoyable and interactive experience for their community.
This article will explain all you need to know about subathons on Twitch, including how to set one up and best practices for success.
When a streamer hosts a subathon, they essentially choose to trade action for subs. The actions will vary from stream to stream.
For instance, a streamer may add a set amount of time to the stream or do something special after receiving a set amount of subs. Examples will include dancing on stream or playing a specific game.
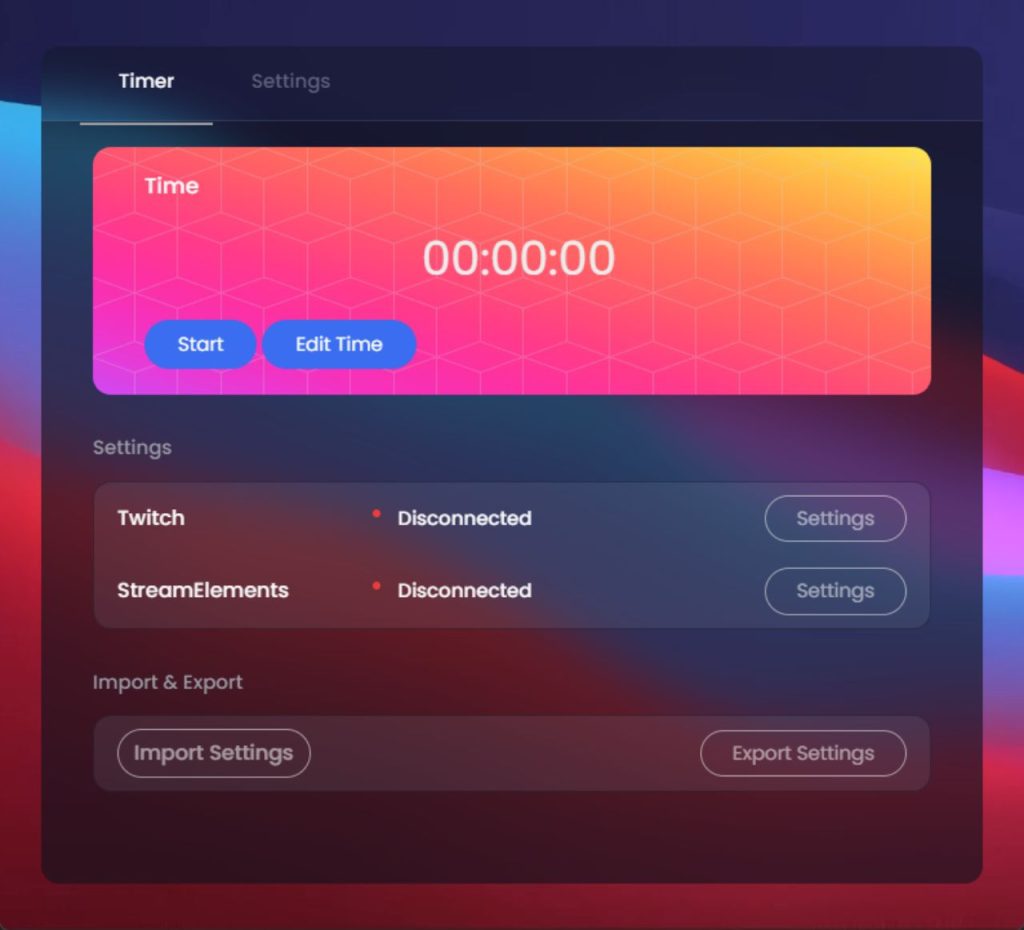
A streamer often sets up a marathon timer that can be viewed on screen. As people sub or donate, the timer will be extended to a pre-determined maximum time.
The current record for the longest subathon is Ludwig’s subathon on Twitch. It ran for 31 consecutive days – from March 14 – April 13, 2021. He spent time talking about his personal life, sleeping, and playing games.
While a subathon marathon is typically about length of time, there have been other creative ways to entice people to subscribe or donate to a channel, such as completing a set amount of tasks (such as saying “Mario” 1 million times).
How to Do a Subathon on Twitch
There are several things you will need to do to prepare for a Twitch subathon. Not only should you have clear goals set in place, but you will need to bring your mods on board to help you with the process.
Here’s how to do a subathon on Twitch:
1. Plan out the details
Decide on the date and time for your subathon, how long it will last, and what rewards you’ll offer for reaching different subscriber milestones.
Make sure to promote the event on your social media channels and let your viewers know about it during your regular streams.
2. Use a countdown timer
Display a countdown timer on your stream overlay or in your chat to build excitement and remind viewers of the event’s start time. There are plenty of free countdown timer tools available online, such as Snaz or Wondershare Filmora.
3. Set up sub alerts
When someone subscribes during your subathon, make sure to have a special alert that plays on your stream to celebrate and encourage more people to subscribe. You can use a tool like Streamlabs OBS to set up custom sub alerts.
4. Keep track of subscriber milestones
As viewers subscribe to your channel, keep track of how many subscribers you’ve gained and what rewards you’ve promised for reaching different milestones.
Subathons are a great way to build community and engage with your viewers. Make sure to interact with chat, answer questions, and play games with your viewers during breaks in the subathon.
Conclusion
Overall, setting up a subathon on Twitch can be an excellent way to grow your channel and build a strong community of loyal viewers. With careful planning and attention to detail, you can make your subathon a fun and memorable event that keeps your viewers coming back for more.
Maximize your Black Ops 6 rewards—Create highlights from your best gameplay with with Eklipse
Eklipse help streamer improve their social media presence with AI highlights that clip your Twitch / Kick streams automatically & converts them to TikTok / Reels / Shorts
Discord is a popular communication platform for gamers and online communities like Twitch. It offers a variety of features, including the ability to create custom emotes. Emotes are a fun way to express emotions and reactions in a chat room. Interested to learn how to make Discord emotes?
While standard emojis are great for expressing emotions and adding personality to your conversations, Discord takes it a step further by allowing you to create your own custom emojis, or emotes.
From understanding the guidelines to uploading and using your emotes, we’ll equip you with the knowledge and tools to transform your Discord chats into a visual feast.
Discord emotes are small images or animations that can be used in chat rooms.
They are similar to emojis, but they are custom-made and unique to each Discord server. Emotes can be used to express emotions, reactions, and inside jokes within a community.
Some servers using integrate their Twitch emotes or BTTV emotes into their Discord server. So you’ll see familiar face like Sadge, a Pepe the Frog emote that express sadness or depression.
How to make Discord emotes
To create your own Discord emotes, you will need to follow these steps:
Step 1: Choose an image or animation
The first step in creating a Discord emote is to choose an image or animation.
This can be a picture of your favorite character, a custom design, or an animation that you created yourself. The image should be in PNG format and have a transparent background.
This will ensure that the emote looks clean and crisp when it is uploaded to Discord.
Step 2: Resize and crop the image
Once you have chosen your image, you will need to resize and crop it to fit the Discord emote requirements.
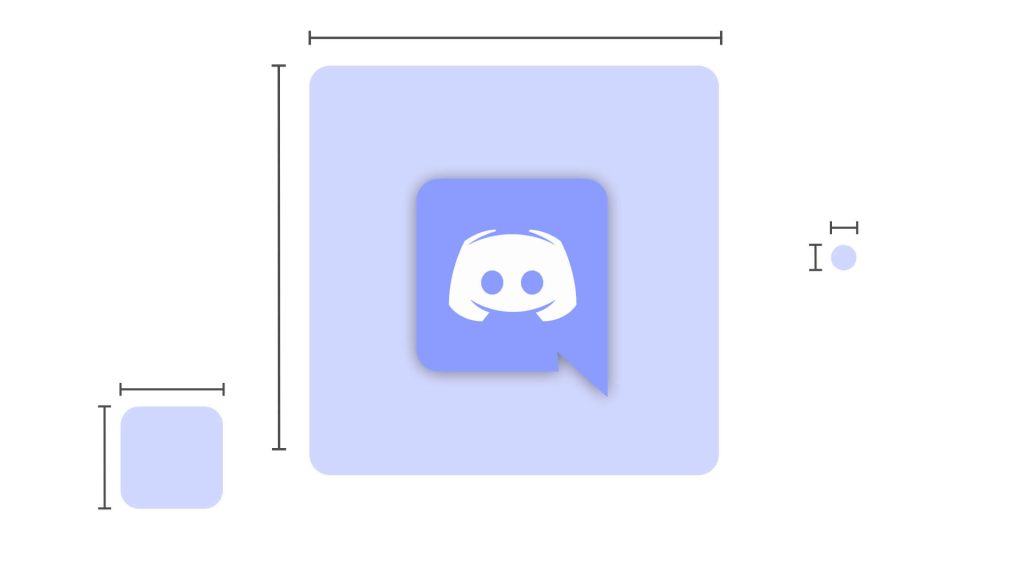
Emotes on Discord must be 128×128 pixels in size and under 256KB in file size. You can use an image editing software like Adobe Photoshop or GIMP to resize and crop your image to the correct dimensions.
Step 3: Upload the emote to Discord
discord animated emoji maker
After you have resized and cropped your image, it is time to upload it to Discord.
To do this, go to your Discord server and click on the server settings. Then, select the “Emojis” tab and click on “Upload Emoji”. Select your resized and cropped image and give it a name. Your new emote will now be available for use within the server.
Step 4: Test your emote
how to make discord emotes on procreate
Once you have uploaded your emote, it is important to test it out.
You can do this by typing the emote name in a chat room and seeing if it appears. If it does not appear, check that the file size is under 256KB and that the image is in PNG format with a transparent background.
Discord Emote Size
how to make emojis on discord mobile
Your Discord emotes will be resized to 32×32, though you can upload a larger image.
It is recommended that you create an emote at 128 by 128 for the best results. For best results, use thicker lines around the emote to help it stand out. Try to use a GIF, JPG, or a PNG as your emoji file type.
If you want to make the image background transparent, you can import it into Adobe Photoshop and use the lasso tool or the magic wand tool on the left sidebar to remove it.
Alternatively, you can use an online tool like remove.bg to create a transparent background on both a static Discord emoji and animated emotes.
Best Discord Emote Makers 2023
Here is some information about the best Discord emoji makers in 2023:
Fiverr: This is an online marketplace that connects freelancers with clients. You can find Discord emoji designers and makers on Fiverr. You can browse portfolios and read reviews to find a creator that suits your needs. You can also get custom orders on Fiverr, starting from $5.
Own3D: Primarily creates emotes for Twitch streamers, but they also cater to other platforms. They provide entertaining packages of emojis that are inspired by games, animals, beer, flowers, and more. Additionally, Own3D has a Twitch Emote Generator that enables users to create custom Discord emojis.
Kapwing: An editing tool that can be used as a Discord emoji creator. You can add both still shots and video media to the editor to start the creative process. Kapwing offers numerous designs, elements, and tools to make it easy to create Discord emojis. Their record feature also allows you to create custom emojis of your face or anything else.
Etsy: Online marketplace for crafters and designers. You can find multiple emoji creators on Etsy. Search for “best Discord emoji” to find someone to work with. You can purchase custom emojis for your community, including stickers and avatars of your mods.
Bitmoji: This is a mobile app that allows you to customize your own emoji. This feature is free and can be used on almost any social site, including Discord. You can create your own avatar that will then be used as a template for hundreds of other emojis.
Conclusion
Discord emotes are a fun way to express emotions and reactions within a chat room.
By following these steps, you can create your own custom emotes and add a unique touch to your Discord server. We hope this guide has been helpful in teaching you how to make Discord emotes.
As a streamer, you know the importance of captivating your audience and keeping them engaged. But with hours of footage to sift through, creating highlight reels can be a time-consuming task. Eklipse, the AI-powered highlight generator, is here to revolutionize your streaming experience by automatically selecting and editing the best moments from your streams.
Eklipse‘s cutting-edge AI algorithms intelligently scan your streams, identifying key moments of gameplay, hilarious bloopers, and chat interactions that will resonate with your viewers. It’s like having an expert editor at your fingertips, working tirelessly to curate the most exciting and engaging content from your streams.
Maximize your Black Ops 6 rewards—Create highlights from your best gameplay with with Eklipse
Eklipse help streamer improve their social media presence with AI highlights that clip your Twitch / Kick streams automatically & converts them to TikTok / Reels / Shorts
As with most features on Discord, you can set up commands that are specific to roles to minimize spam and keep things working efficiently.
This post will cover the various types of commands you can use on Discord including those that come with two very popular bots; the MEE6 bot and the Dyno bot.
There are at least four Discord commands commonly used by the community. The first set are the basic commands that come with the Discord app by default. The second set are 3rd-party commands that can be used by adding Discord bots like MEE6 or Dyno Bot.
Basic Discord Chat Commands
MEE6 Discord Commands
Dyno Bot Discord Commands
1. Basic Discord Chat Commands
Command
Function
/giphy [word or term]
Searches for animated GIFs from Giphy’s site depending on the search term you type after the command. The GIFs will appear above your text so that you can select the one you want.
/tenor [word or term]
Searches for animated GIFs from Tenor’s site depending on the search term you type after the command. The GIFs will appear above your text so that you can select the one you want.
/tts [word or phrase]
Reads your message aloud (text to speech) to all users who are currently viewing the channel.
/me [word or phrase]
Emphasizes the text that you type after the command so that it stands out in the channel.
/tableflip
Inputs this emote into the channel: (╯°□°)╯︵ ┻━┻
/unflip
Inputs this emote into the channel: ┬─┬ ノ( ゜-゜ノ)
/shrug
Inputs this emote into the channel: ¯\(ツ)/¯
/spoiler [word or phrase]
Marks your message as a spoiler by blacking it out in the chat. Users must click on the message to view it.
/nick
Allows you to change your nickname in a specific server.
Basic Discord commands can be used in your Discord chat without the use of a bot.
These commands are used to make your chat experience on the platform more fun and engaging. The best part about these chat commands is that you can easily see them on the program just by typing in the / symbol.
Here is the list of Discord chat commands:
MEE6 Commands List
MEE6 provides many helpful tools for Discord servers, such as the ability to set up react roles, listen to music, record mp3 files of your voice, and more. The bot also gives you the opportunity to use your own custom commands, moderation commands, and search commands.
We will cover all three kinds of commands here:
1. How to Create MEE6 Custom Commands
To create custom commands with MEE6, you will need to complete the following:
Log in to your MEE6 dashboard.
Select the Discord server that you want to make custom commands for by clicking the “Go to Dashboard” button.
Click on the “Custom Commands” tab from the menu.
Click “Create a Command” from the next menu.
Enter a command name after the exclamation point in the provided field. Keep these short and simple to make them easy to use.
Enter response into the provided field. When someone inputs the command, the bot should respond with this text.
Optionally input a command description, allowed/banned roles, banned channels, or cooldowns on how often they can be used.
Click the “Add” button at the bottom of the screen.
Test the custom command in your Discord server.
2. MEE6 Moderation Commands
Here are some of the MEE6 moderation commands you can use in your Discord server:
Command
Function
!ban [member] [optional reason]
Used to ban a specific member from the Discord server.
!tempban [member] [duration] [optional reason]
Used to temporarily ban a member from a server for a specific amount of time.
!mute [member] [optional reason]
Used to mute a member so that they can’t speak or type in the whole server.
!tempmute [member] [duration] [optional reason]
Used to temporarily mute a member so that they can neither speak nor type in the whole server.
!unmute [member]
Used to unmute a member in chat.
!slowmode [optional timeout] [optional off]
Used to enable (or disable) slow mode in a specific channel.
!kick [member] [optional reason]
Used to kick a Discord member from the server.
!infractions [member]
Used to show how many infractions a specific user has in the server.
!warn [member] [optional reason]
Used to warn a member for rule breaking or other infractions.
!clear [optional member] [optional count]
Used to clear messages in a specific channel.
These commands can help you maintain a well-behaved Discord community by enforcing the rules and keeping conversations organized.
3. MEE6 Search Commands:
These are the different commands that can be used with MEE6 to search for different types of content:
Command
Function
!youtube [search]
Used to search for a specific YouTube video.
!twitch [search]
Used to search for a specific stream channel on Twitch.
!imgur [search]
Used to search for memes on Imgur.
!urban [search]
Used to search for slang from the Urban Dictionary.
!anime [search]
Used to search Kitsu for anime.
!manga [search]
Used to search Kitsu for manga.
!pokemon [search]
Used to search the Pokeapi Pokedex for pokemon.
Dyno Bot Discord Commands
Dyno Bot is one of the best Discord bots for the platform. It comes with dozens of commands that you can use for moderation and fun. From managing the server to playing rock-paper-scissors, these commands will elevate your chat experience on the platform.
This list covers our favorite moderation, fun, and miscellaneous commands from Dyno’s full command list:
1. Dyno Bot Moderation Commands
Here is a list of the best Dyno Bot moderation commands:
Command
Function
?addmod [role]
Add a moderator role.
?ban [user] [limit] [reason]
Ban another member, with an optional time limit.
?unban [user or id] [optional reason]
Unban a previously banned member.
?softban [user] [reason]
Ban, then immediately unban a user to delete their messages.
?kick [user] [reason]
Kick a member from the server.
?mute [user] [limit] [reason]
Disallow a user to speak or type for a specific amount of time.
?unmute [user] (optional reason)
Unmute a Discord user.
?lock [channel] (time) (message)
Lock a channel with a timer and message.
?unlock [channel] (message)
Unlock a channel in your Discord server.
?announce everyone [channel] [message]
Send an announcement to @everyone in a specific channel.
?members [role]
List up to 90 members of a specific role.
?warn [user] [reason]
Warn a member for breaking the rules.
?warnings [user]
View warnings given to a specific user.
?note [user] [text]
Create a note about a user.
?notes [user]
View notes previously written about a user.
?clearnotes [user]
Clear all notes for a specific Discord member.
?deafen [user]
Deafen a user.
?undeafen [user]
Undeafen a user.
?modlogs [user]
Get a list of moderation logs for a specific user.
?clean (optional number)
Clear the Dyno responses from the server.
2. Dyno Bot Fun Commands
Here is a list of the best Dyno Bot fun commands:
Command
Function
?cat
Generate a cute cat picture from the internet.
?dog
Generate a cute dog picture from the internet.
?pug
Generate a cute pug picture from the internet.
?itunes [song name]
Get basic song info about a song, including the artist and the album name.
?pokemon [name]
Get information about a Pokemon character, including abilities, type, weight, and height.
?roll [dice size number – ie d20, or number of dice]
Roll a dice or multiple dice in a channel.
?rps [choice]
Play rock-paper-scissors with the bot.
?country [country code]
Check the stats of a specific country including population, capital city, area, and main currency.
?space
Get information about the space station.
?flip
Flip a coin between heads and tails.
?dadjoke
Generate a random dad joke that is posted within the Discord channel.
?norris
Generate a random Chuck Norris fact.
?poll “[message]” “[choice1]” “[choice2]”
Create a poll in chat that other users can vote on.
?github [repository name]
Generate information about a Github repository.
3. Dyno Bot Miscellaneous Commands
Here is a list of the best Dyno Bot misc commands:
Command
Function
?afk
Used to set up an AFK status that can be displayed when you are mentioned.
?afk set [status]
Used to show an AFK status when you are mentioned and also display it in your nickname.
?afk ignore [channel]
Used to not return from AFK when talking in a channel.
?color [hex number]
Used to find information about a specific hex number.
?randomcolor
Generates a random hex color that you can look at in the channel.
?remindme [time] [reminder]
Used to create a reminder in a specific channel.
?avatar [user]
Used to produce a larger version of a user’s avatar in the chat.
?dynoav
Used to generate a Dyno-like avatar.
?whois [user mention]
Used to give information about a specific user in the server, including when they joined the server, signed up for Discord, and what roles they have in the server.
?distance [coords] [coords]
Used to tell the distance between two sets of coordinates.
?discrim [4 numbers]
Used to generate a list of users who has a specific Discord discriminator number.
?membercount
Used to tell the number of users in a specific server.
?serverinfo
Used to explain the info about the server including the number of members, channels, and current number of people online.
?emotes
Used to show a full list of server-specific emotes.
Conclusion
Discord chat commands are a great way to improve your chatting experience on the platform. You can limit certain commands to specific roles to ensure that nobody abuses the system or spams chat.
Maximize your Black Ops 6 rewards—Create highlights from your best gameplay with with Eklipse
Eklipse help streamer improve their social media presence with AI highlights that clip your Twitch / Kick streams automatically & converts them to TikTok / Reels / Shorts
When it comes to live streaming, choosing the right software is crucial for a smooth and successful stream. Streamlabs OBS and OBS Studio are two of the most popular options available, but which one is better?
In this guide, we will compare Streamlabs and OBS Studio to help you make an informed decision.
Custom transitions, multi-source audio mixing, plugin support
Ease of Use
Easy to use
Requires technical knowledge
Customization
Limited customization
Highly customizable
Performance
High-performance streaming
Slightly better stability and reliability
The table above summarizes the key differences between Streamlabs OBS and OBS Studio in terms of user interface, features, ease of use, customization, and performance.
Streamlabs OBS is known for being user-friendly and easy to use, with limited customization options. It’s suitable for beginners who require a software that’s easy to navigate and comes with a range of features such as stream alerts, overlays, widgets, and chatbot.
On the other hand, OBS Studio is highly customizable, making it suitable for experienced users who require more control over their live streams.
It offers advanced features such as custom transitions, multi-source audio mixing, and plugin support. However, OBS Studio requires technical knowledge and may not be suitable for beginners who are new to live streaming.
1. What is Streamlabs OBS?
Image credit: Streamlabs.com
Streamlabs OBS is a free and easy-to-use live streaming software that is designed for streamers.
It is a complete solution that includes all the necessary tools to set up and stream your content on platforms like Twitch, YouTube, Facebook, and more.
Streamlabs OBS comes with a user-friendly interface and a range of features such as:
Stream alerts and notifications
Customizable overlays and widgets
Chatbot integration
Integrated donation system
Automatic optimization for streaming
2. What is OBS Studio?
Image credit: obsproject.com
OBS Studio, short for Open Broadcaster Software, is another popular live streaming software that is free and open-source.
It is a powerful and flexible software that can be customized according to your needs. OBS Studio is ideal for advanced users who want more control over their live stream. Some of the key features of OBS Studio include:
Customizable transitions and effects
Multi-source audio mixing
Scene preview editor
Support for multiple platforms and services
Plugin support for additional features
Comparison of Streamlabs OBS vs OBS Studio
Now that we have a brief overview of both Streamlabs OBS and OBS Studio, let’s compare them side by side.
1. User Interface
Streamlabs OBS has a user-friendly interface that is easy to navigate and understand, even for beginners. OBS Studio, on the other hand, has a more complex and customizable interface that may require some time to get used to.
2. Features:
Streamlabs OBS comes with a range of features such as stream alerts, overlays, widgets, and a built-in chatbot. OBS Studio, on the other hand, offers more advanced features such as custom transitions, multi-source audio mixing, and plugin support.
3. Ease of Use:
Streamlabs OBS is designed to be easy to use, even for those with no prior experience in live streaming. OBS Studio, on the other hand, requires more technical knowledge and may not be suitable for beginners.
4. Customization:
OBS Studio is highly customizable, allowing users to create custom transitions, effects, and more. Streamlabs OBS, on the other hand, has a limited degree of customization, but it is still sufficient for most users.
5. Performance:
Both Streamlabs OBS and OBS Studio offer high-performance streaming capabilities, but OBS Studio has a slight edge in terms of stability and reliability.
Conclusion
Choosing between Streamlabs OBS and OBS Studio ultimately depends on your personal preferences and requirements.
If you are a beginner or looking for a simple and easy-to-use live streaming software, Streamlabs OBS is a great choice. However, if you are an advanced user and require more customization options and features, OBS Studio is the way to go.
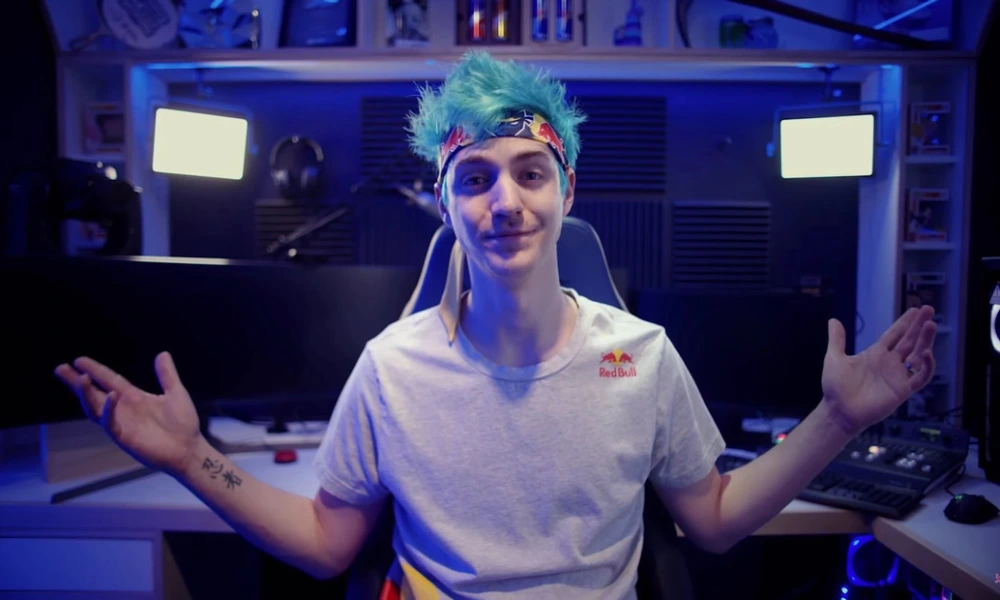
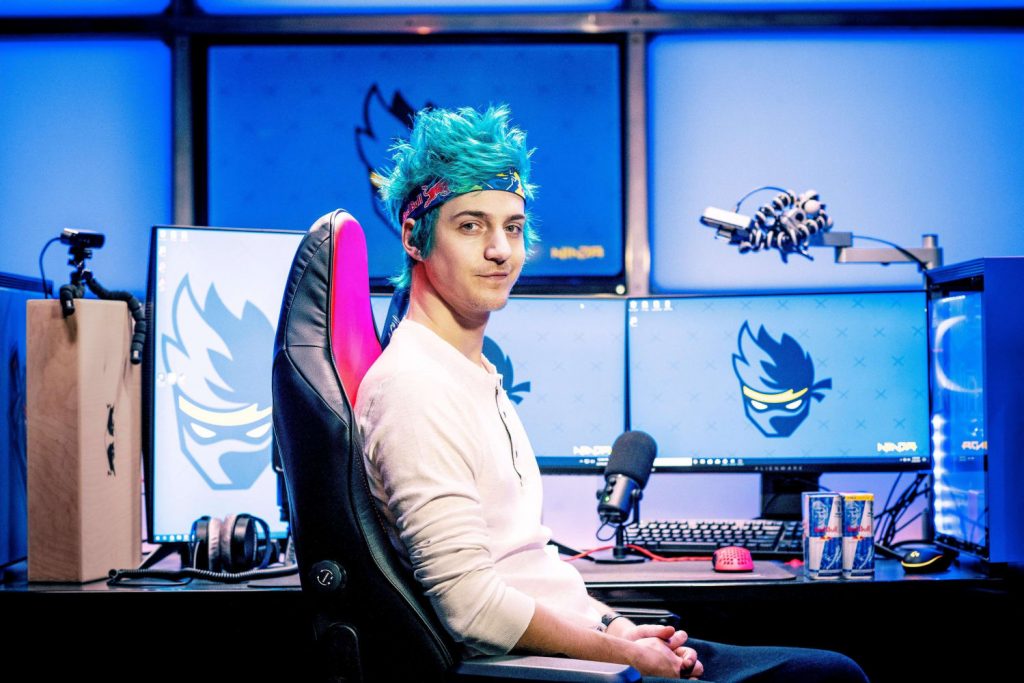
Richard Tyler Blevins, better known as Tyler Ninja Blevins, was born on June 5, 1991, in Detroit, Michigan, to parents Chuck and Cynthia Blevins.
He grew up in the Chicago suburbs and attended Grayslake Central High School, where he played soccer for some time. His father introduced him to online gaming at a young age, and Tyler started playing games in tournaments and signed up for professional teams while in college.
Love and Marriage
In 2017, Ninja married his long-term partner Jessica Goch. He is very protective of his wife-turned-manager and doesn’t stream with women (unless they’re streaming as a group) to avoid rumors from spreading.
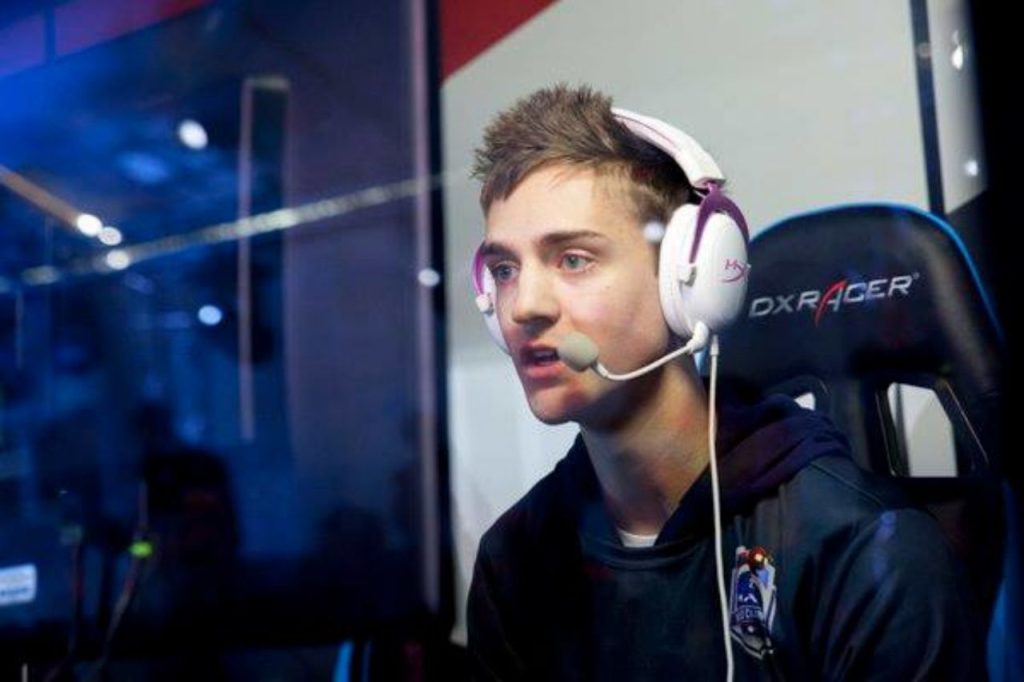
Streaming Career
Before becoming a Twitch superstar, Ninja started streaming in 2017 on his YouTube channel playing H1Z1 and PUBG. In 2018, he became the most followed streamer on Twitch and even set a world record for the most-watched live stream views. Aside from Twitch, he also streams online via YouTube and Facebook Gaming.
Epic Games that Ninja Plays
Ninja is primarily known for his Fortnite Battle Royale Twitch stream, but he is also a popular streamer known for playing games of many sorts other than Fortnite. Here’s a list of games that Ninja plays:
Fortnite Battle Royale (Epic Games)
Apex Legends (Electronic Arts)
PlayerUnknown’s Battlegrounds (PUBG)
H1Z1
Valorant
League of Legends
Final Fantasy XI Online
Halo
Call of Duty: Black Ops 4
In his gaming career, Ninja played for a couple of professional teams and organizations. This including Final Boss, TL, Renegades, Cloud9, and Evil Geniuses. Afterward, he joined Luminosity Gaming in 2017 playing Halo, H1Z1, and PUBG. Inside the team he won at the latter’s GamesCon Invitational Squads classification in the same year.
Game Awards
Fortnite was the golden ticket for Ninja’s rise to fame. In fact, this game received quite a number of awards, and for Ninja, it helped him gain a lot of recognition in the industry. Some of the awards he garnered include:
Streamy Awards (2018) – he won the Gaming and Live Streamer Awards respectively
Esports Awards (2018) – Esports Personality of the Year
The Game Awards 2018 – Content Creator of the Year
Shorty Awards (2019) – Twitch Streamer of the Year
Streamy Awards (2019) – Live Streamer
Charity Works
Even with his growing fame, Ninja uses this opportunity to raise money and awareness for charity works and aids them in building their communities. For a single stream, he was able to raise an enormous amount of $325,000 for St. Jude Children’s Research Hospital. Some of his charity works also include MrBeast’s Team Trees Campaign, Wounded Warriors Project, and Feeding America.
Ninja’s Net Worth
Online gamer-streamers earn money mostly through gaming, live streaming, paid subscriptions, sponsorships, and donations. No one knows the exact figures of Ninja’s net worth, but judging from the revenue streams he earns from different streaming platforms, it is without a doubt that Ninja’s net worth is top-grossing.
How Much Does Ninja Earn From Twitch?
While Ninja’s exact earnings from Twitch are not publicly available, it’s estimated that he earns several million dollars per year from the platform. This includes revenue from ads, subscriptions, donations, and sponsorships.
At the peak of his popularity on Twitch, Ninja had over 200,000 subscribers, which would have generated over $500,000 in monthly subscription revenue alone.
Additionally, he has worked with several high-profile brands such as Red Bull and Samsung, further adding to his income. It’s worth noting that Ninja’s earnings have likely fluctuated over time as his popularity on the platform has waxed and waned.
However, there’s no denying that his success on Twitch has made him one of the wealthiest streamers in the world.
Conclusion
In conclusion, Ninja’s success as a Twitch streamer has brought him great financial rewards.
His hard work, dedication, and talent have helped him become one of the most popular and highest-earning streamers on the platform. With a net worth of over $25 million, he has become an icon in the gaming industry, inspiring many aspiring streamers to pursue their passion for gaming and create content on Twitch.
While the amount of money he earns from Twitch may vary based on several factors, including his number of viewers, subscribers, and sponsorships, his success serves as an example of how much a successful Twitch streamer can potentially earn.
Maximize your Black Ops 6 rewards—Create highlights from your best gameplay with with Eklipse
Eklipse help streamer improve their social media presence with AI highlights that clip your Twitch / Kick streams automatically & converts them to TikTok / Reels / Shorts
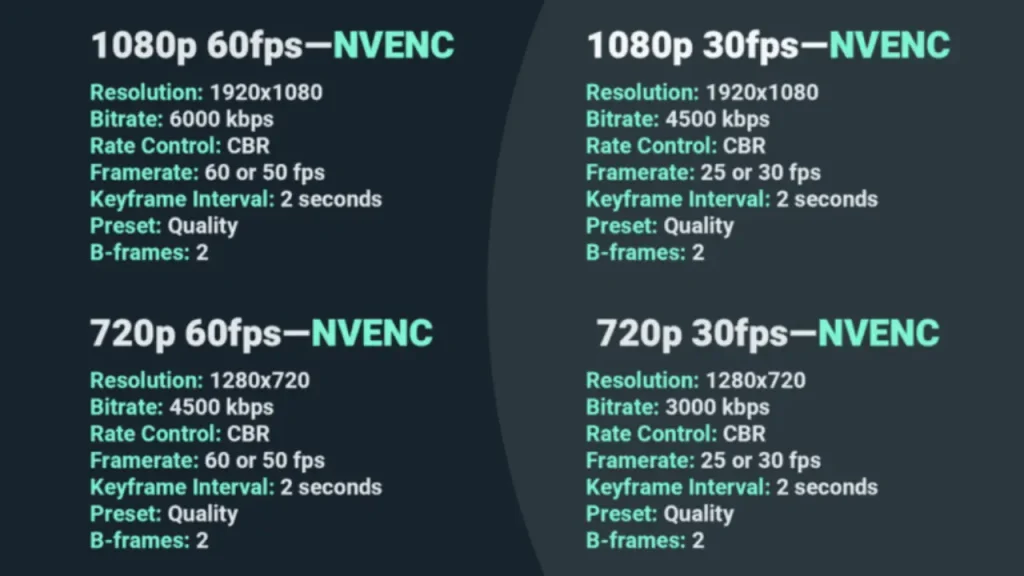
Twitch bitrate refers to the amount of data that is transferred per second when streaming on the platform. The higher your bitrate, the better your audio and video quality will be.
Twitch recommends an upload speed of at least 1.6 Mbps for streaming. If you want to broadcast in HD, you will need at least 3-8 Mbps. It is best to avoid using more than half of your available bandwidth on any line.
The recommended bitrate settings for Twitch streaming are dependent on the streamer’s internet upload speed and how well their PC can handle the task.
The general guideline is to go for 3,000 – 5,000 Kbps for 720p at 30 fps settings. But, if you are streaming for 1080p at 60 fps, aim for at least 4,000 to 6,000 Kbps.
To find the best streaming bitrate for you, adjust it according to your internet upload speed and device.
Adjusting the Bitrate
Higher internet speed means better stream quality. If you cannot upgrade your internet connection, you can improve your stream quality by adjusting your settings, especially your bitrate.
Depending on your bitrate, you may need to sacrifice either framerate or resolution. Either will typically decrease the amount of bitrate you use by a similar amount.
It is best to limit the framerate if you are playing a game where things need to be clear or there is action that happens “in the distance.”
On the other hand, if you are playing a game with fast action, you will want to show your viewers the best framerate possible and can lower the video resolution to make room for faster framerates.
The maximum bitrate for Twitch video is 6,000 Kbps, while for audio, it is 320 Kbps. It is not recommended to go up to 8,000 Kbps, as numbers fluctuate all the time, and going for the unofficial maximum might affect your stream.
Conclusion
In conclusion, to get the best video quality possible for your Twitch stream, adjust your bitrate settings according to your internet upload speed and PC capacity.
Higher bitrate means better quality, but you may need to sacrifice either framerate or resolution depending on your available bitrate. Keep in mind that Twitch has set limits on bitrate, and it is not recommended to exceed these limits.
Maximize your Black Ops 6 rewards—Create highlights from your best gameplay with with Eklipse
Eklipse help streamer improve their social media presence with AI highlights that clip your Twitch / Kick streams automatically & converts them to TikTok / Reels / Shorts
Young gamer celebrating video games championship win on online live stream, feeling happy at desk with neon lights. Female streamer winning shooter gaming tournament on computer.
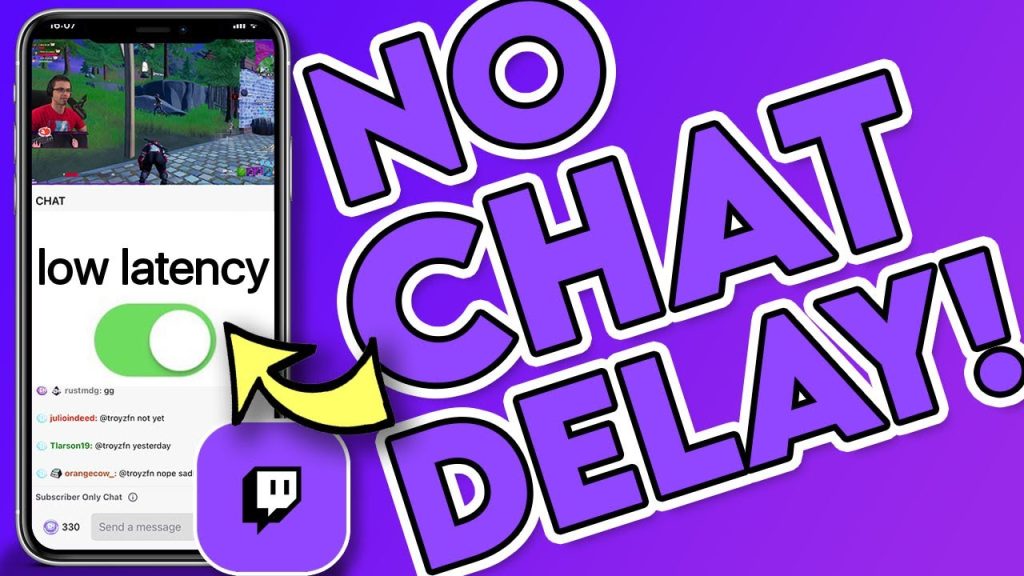
Low latency mode is a critical feature for any streamer looking to improve the quality of their live streams on Twitch. It helps to reduce the time it takes for data to travel from the streamer to the audience, resulting in smoother and high-quality streams.
In this article, we will delve deeper into what low latency mode is and why it’s an essential function for streaming.
We will also explore how to toggle it on and off, as well as how to check the latency settings of a stream.
So if you’re a streamer or a viewer on Twitch, read on to discover the benefits of low latency mode.
Latency refers to the amount of time it takes for data to travel from its source to its destination.
When streaming on Twitch, the lower the latency, the smoother and higher quality the stream will be.
What Does Low Latency Mode Do?
Low latency mode reduces the time it takes for the live stream to travel from the streamer to the audience.
This mode helps streamers to produce smoother live streams for their viewers and allows them to react quickly to comments, forming stronger social relationships with their followers.
Since March 2019, low latency mode has become a feature that both streamers and viewers can turn on and off depending on their preferences.
Most channels have low latency mode enabled by default, resulting in faster upload speeds for Twitch streams. However, some streamers may turn it off if their channel focuses more on gaming than on talking with their audience.
When Is Low Latency Important?
While a short delay may be unnoticeable, low latency is essential for streamers who want to have real-time conversations with their viewers.
Even if you don’t interact with your audience often, your viewers will still appreciate a low-latency stream.
Should You Use Low Latency on Twitch?
Twitch is all about interaction between the audience and the streamer.
Streamers should be attentive and responsive to their chat to keep it engaging. Lowering latency is one of the most effective ways to increase interaction and allow your viewers to communicate in real-time.
Are There Downsides to Using Low Latency Mode?
While most Twitch viewers prefer low latency, it may not always be necessary.
Although it can enhance the level of engagement with your audience, live streaming carries the risk of stream sniping. This practice involves viewers deliberately disrupting your gameplay by targeting or even trolling you.
But, according to a Streamscheme Discord poll, the majority of broadcasters dealt with latency in the 3-45 second range, which most Twitch viewers were fine with.
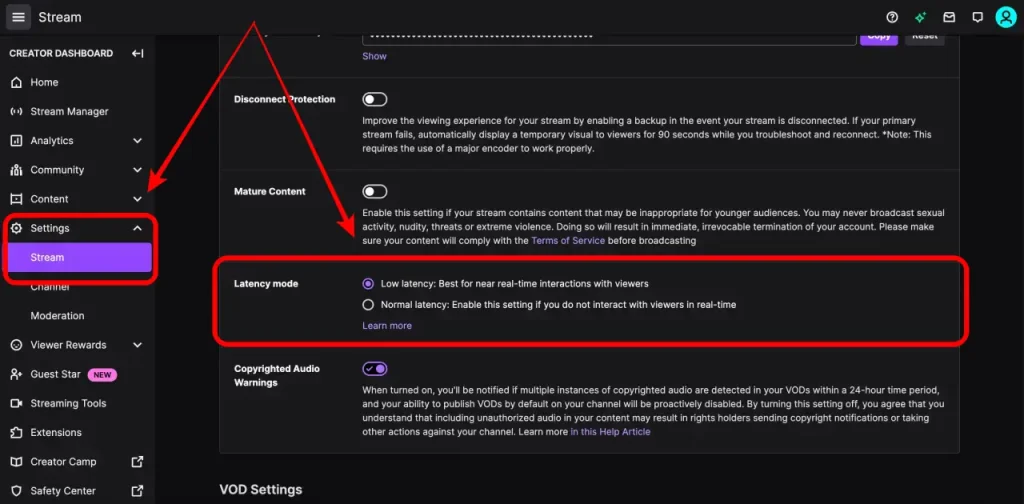
How to Toggle Low Latency Mode on and Off
You have two options for latency settings: normal or low latency. Here’s how to change the latency settings:
Open the Twitch homepage.
Click on your profile picture icon in the top right corner.
Go to Creator Dashboard and click on the three horizontal lines in the top left corner.
Under the Settings page, go to Stream.
Under Stream Key & Preferences, look for Latency Mode.
To turn on Low Latency Mode, click on the circle beside it. To turn off, click on the circle beside Normal Latency.
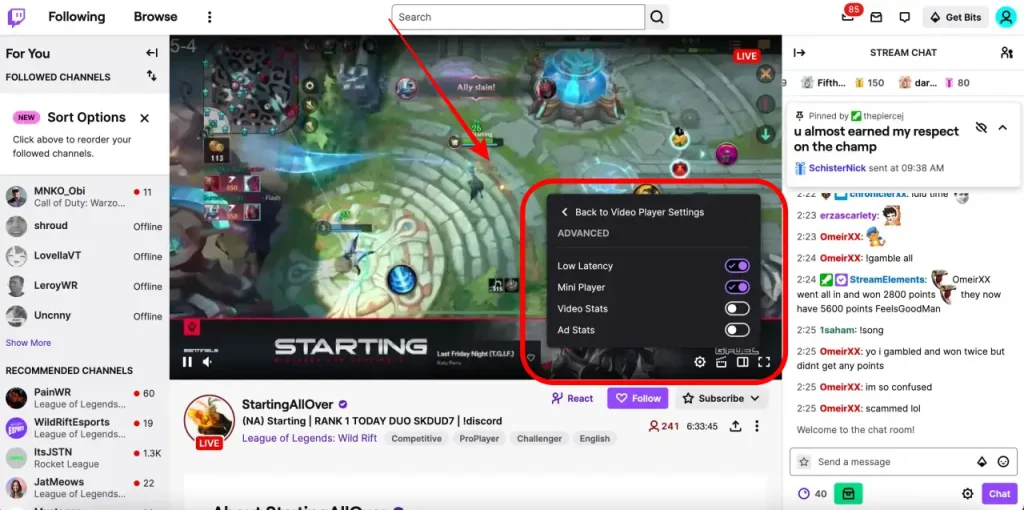
How to Check the Latency Setting of a Stream
As a viewer, you can check the latency settings of a streamer and choose to turn it on or off. Here are the steps to do so:
Go to the live stream.
On the screen, look for the settings icon on the bottom right corner of the stream.
Go to the Advanced tab.
From there, you’ll see Low Latency, Mini Player, Video Stats, Ad Stats. You can toggle these settings on or off, depending on your preference.
If you’re looking to make your Twitch alerts stand out, adding unique and attention-grabbing sounds can help you achieve that goal.
In this article, we’ll cover the basics of the Sound Alerts Extension, where to find free Twitch sound clips, and what to consider when choosing the perfect sound for your alerts.
One of the easiest ways to create your own Twitch sound alerts is by pulling sounds from your past streams. If you had a strong reaction or laughed heartily, take that sound and reuse it on future streams by adding it as an alert. You can also use your own voice or sound effects to make the alerts uniquely yours.
Where to Find Free Twitch Sound Alerts
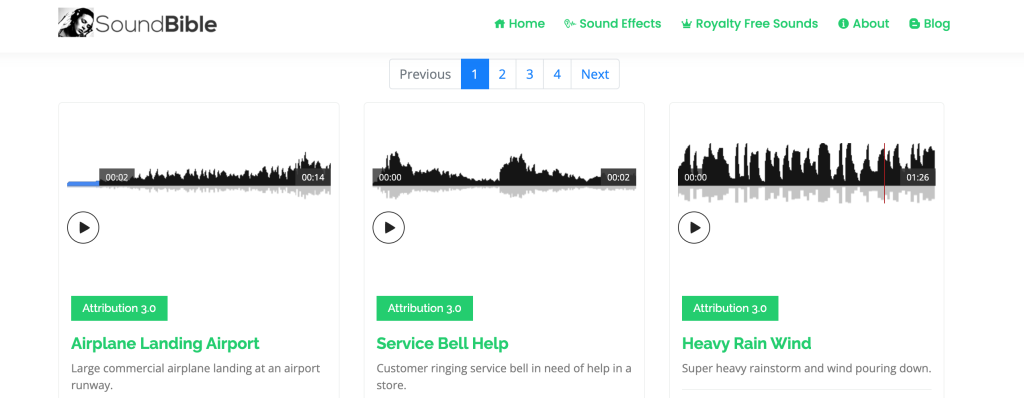
There are many sites where you can find free Twitch sound alerts, including Freesound and SoundBible.
1. SoundBible
SoundBible is a platform that offers a wide range of free sound effects that can be used in content creation.
They have a specific section dedicated to Twitch alerts, offering a variety of sounds for follows, subscribers, and donations. While the quality of sound effects on this platform may not be as high as other paid platforms, it’s a great option for those on a budget.
2. Freesound
Freesound is a platform that provides a large library of free sound effects that can be used in content creation. While not specifically designed for Twitch alerts, there are still many sounds on this platform that can be used for alerts.
You can search for sounds based on specific keywords or browse through categories to find the perfect sound for your needs.
Premium Twitch Sounds Alerts
If you’re willing to spend some money, there are also paid sites such as Epidemic Sound, Own3D, AudioMicro, and SoundSnap that offer high-quality sound clips and music.
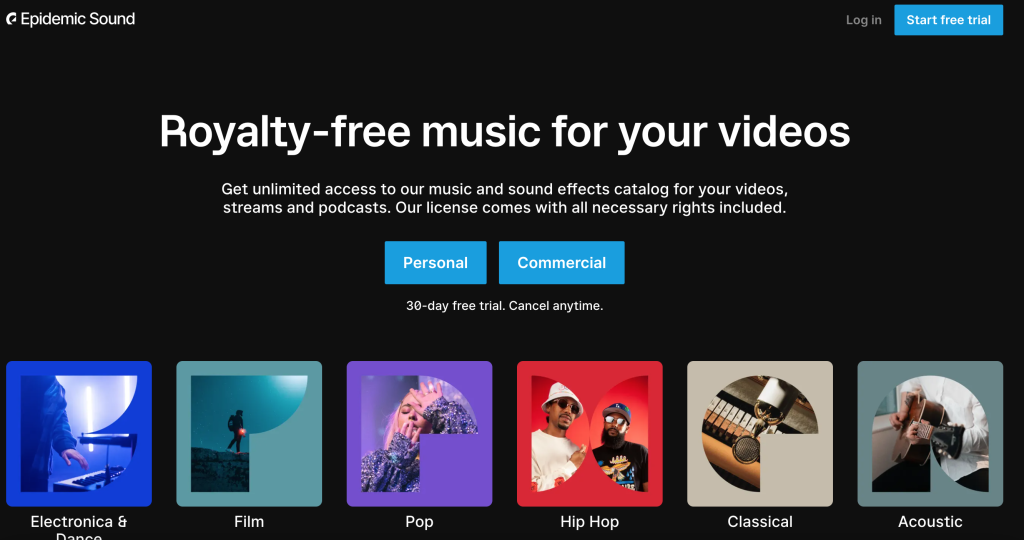
3. Epidemic Sound
Epidemic Sound is a music and sound effects platform that provides a vast library of royalty-free music and sound effects for use in content creation. They offer a variety of sound effects that are perfect for Twitch alerts, including alerts for follows, subscriptions, donations, and more.
You can search for sounds based on specific keywords, making it easy to find the perfect sound for your needs.
4. Own3D
Own3D is a platform that specializes in creating content for streamers, including graphics, overlays, and sound effects. They offer a variety of sound effects that are specifically designed for Twitch alerts, including alerts for followers, subscribers, donations, and more.
You can choose from a range of sound effects, from simple chimes to more complex and attention-grabbing sounds.
5. AudioMicro
AudioMicro is a platform that provides a vast library of royalty-free music and sound effects for use in content creation.
They offer a variety of sound effects that are perfect for Twitch alerts, including alerts for follows, subscriptions, donations, and more. You can search for sounds based on specific keywords, making it easy to find the perfect sound for your needs.
6. SoundSnap
SoundSnap is a platform that offers a vast library of royalty-free sound effects and music for content creators.
They have a specific section dedicated to Twitch alerts, offering a variety of sounds for followers, subscribers, and donations. You can use the search fucntion to find the perfect sound for your alerts. You can search it either based on specific keywords or browse through categories.
Using Twitch’s Sound Alerts Extension
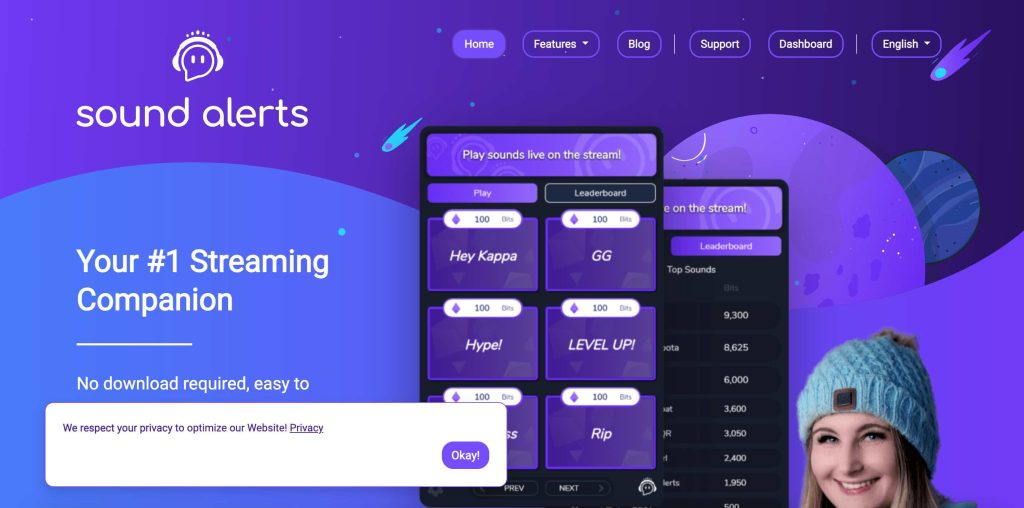
If you stream on Twitch, there are interesting tools to try. Setting up the Sound Alerts extension, it allows your viewers to use specific sound alerts in exchange for Bits. You can customize the number of bits required to activate a sound alert. You’ll share 20% of the Bits earned with the extension creator.
Tips for Choosing the Perfect Sound for Your Twitch Alerts
Pair the sound with animation or a GIF that matches your branding.
Choose a sound that captures your viewers’ attention and doesn’t blend in with the rest of your stream.
Consider using your own voice or sound effects to make the alerts unique.
Be mindful of copyright laws and avoid using sounds that may result in DMCA strikes.
Conclusion
Having the right sound effects for your Twitch alerts can make a big difference in engaging your viewers and keeping them entertained.
Whether you choose to use a paid platform like Epidemic Sound or SoundSnap or a free platform like SoundBible or Freesound, there are plenty of options out there to find the perfect sound for your alerts.
Maximize your Black Ops 6 rewards—Create highlights from your best gameplay with with Eklipse
Eklipse help streamer improve their social media presence with AI highlights that clip your Twitch / Kick streams automatically & converts them to TikTok / Reels / Shorts
If you want to watch Twitch without ads, you can sign up for Twitch Turbo, a monthly subscription that offers several perks when you watch live streams from your Twitch account.
This post will answer the question, “What is Twitch Turbo?” and also “How Much the Price?”
It will also go over the great platform-wide benefits you will receive as a Twitch Turbo subscriber and compare the package to Prime Gaming to determine the best option for you on Twitch.
Twitch users who are willing to pay the monthly subscription program for Twitch Turbo can expect the following benefits:
Ad-free viewing on all channels, eliminating pre-roll, mid-roll, and other ads
Extended broadcast storage for streamers, with VODs saved for 60 days instead of 14
Expanded emote options, including standard, monkey, and chat/glitch emotes
Exclusive chat badge for Twitch Turbo subscribers
Custom chat username colors with the ability to choose any hex color
Priority customer support for faster assistance from Twitch
How Much is Twitch Turbo Price?
As of this writing, the Twitch Turbo subscription plan costs $8.99 per month, gives you chat customization perks, and allows you to watch channels without ads. You can sign up for it on the Turbo page on Twitch.
Twitch Turbo vs. Prime Gaming
While there are many similarities between Twitch Turbo and Prime Gaming (which people receive for free when if they connect their Amazon Prime Subscriptions), there are a couple of main differences. Twitch Turbo allows viewers to watch any channel on the platform without ads. Prime Gaming allows a viewer to subscribe to any channel for free.
1. Extended Broadcast Storage
In addition to the benefits mentioned above, Twitch Turbo also offers extended broadcast storage for streamers, allowing them to save their VoDs on Twitch for 60 days instead of the usual 14 days.
This gives viewers and subscribers more time to catch up on past broadcasts, while giving streamers extra time to download their Twitch videos for storage.
2. Expanded Emote Set
Another advantage of Twitch Turbo is the expanded emote set. Subscribers can choose between three different basic emote options – the standard emotes, the monkey emotes, or the chat/glitch emotes.
They can change their choice at any time. Additionally, Twitch Turbo users are given an exclusive chat badge alongside their username in chat and can customize their chat username colors to any hex color they choose.
3. Priority Customer Support
As a Twitch Turbo subscriber, you will also receive priority customer support, with your support questions pushed to the front of the line, allowing you to quickly get the information you need. Twitch Turbo also allows you to change your visual settings, including chat color and the type of emoticons you wish to use.
4. Twitch Turbo vs Prime Gaming Subscription Cost
At the time of writing, the Twitch Turbo subscription plan costs $8.99 per month and can be accessed through the Turbo page on Twitch.
While there are many similarities between Twitch Turbo and Prime Gaming (which is received for free when connecting an Amazon Prime subscription), Twitch Turbo allows viewers to watch any channel on the platform without ads, while Prime Gaming allows a viewer to subscribe to any channel for free once per month.
Conclusion
In conclusion, Twitch Turbo is a monthly subscription that offers several benefits, including ad-free viewing, extended broadcast storage, an expanded emote set, a custom chat username, and priority customer support. While it may not be for everyone, it is a tempting offer for most Twitch users who want to enjoy the platform without ads.
Maximize your Black Ops 6 rewards—Create highlights from your best gameplay with with Eklipse
Eklipse help streamer improve their social media presence with AI highlights that clip your Twitch / Kick streams automatically & converts them to TikTok / Reels / Shorts