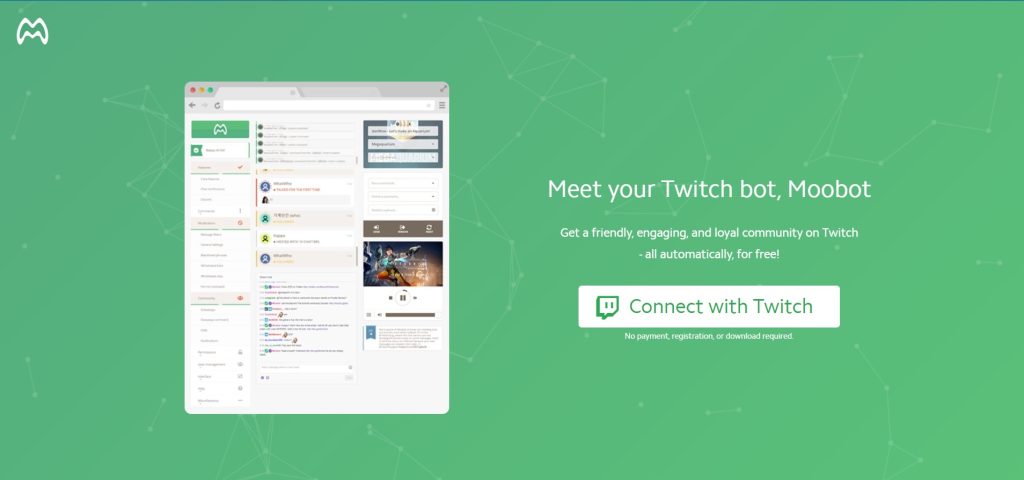
Setting up Moobot on Twitch is quick and easy, taking less than five minutes to complete. Follow these simple steps to get started:
Visit the Moobot homepage and click the “Connect to Twitch” button.
Sign in with your Twitch account and authorize the chatbot.
On the dashboard, click the wand button near “Moobot is not sent to your chat.”
Head to Twitch and type /mod Moobot in your channel’s chat.
Congratulations! You’re now ready to use Moobot on your channel.
Best Moobot Features
Moobot offers a variety of features that can help make your stream more engaging and interactive. Here are some of the best features:
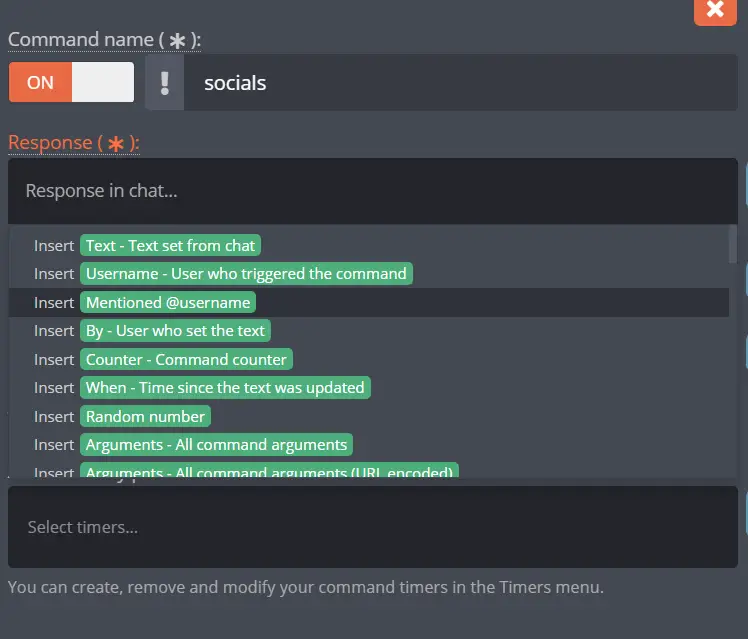
1. Commands
Like other chatbots, Moobot allows users to create their own custom commands and has numerous built-in commands. Streamers, mods, and viewers can use these commands by typing ![commandphrase]. Some of Moobot’s built-in commands include:
!uptime: Shows how long the stream has been live.
!song: Displays the current song.
!discord: Shares a link to the streamer’s Discord server.
2. Custom Bot Name
Not a fan of the name ? No problem! You can easily change your chatbot’s name to something that fits your channel’s theme or inside jokes.
3. Loyalty Rewards
This chatbot can help you recognize and reward your regular viewers for their loyalty.
By tracking time watched, it can reward your regular viewers through additional entries into giveaway drawings, gentler chat rules, and extra votes in polls. Please note that some of these features may require a MoobotPlus subscription.
Conclusion
While there are many chatbots available for Twitch, Moobot stands out for its user-friendly interface and loyalty rewards.
If you’re just starting out, Moobot’s built-in commands and ease of use make it a great option for your channel. However, if you’re looking for more advanced features, you may need to consider upgrading to MoobotPlus.
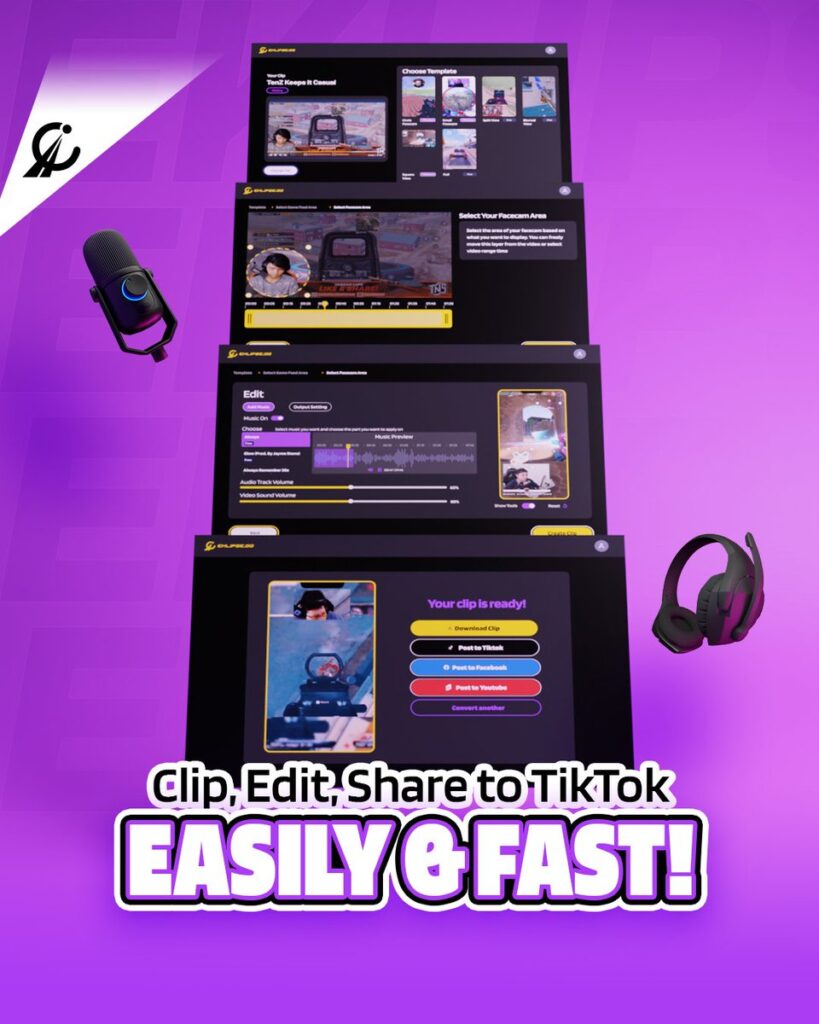
Maximize your Black Ops 6 rewards—Create highlights from your best gameplay with with Eklipse
Eklipse help streamer improve their social media presence with AI highlights that clip your Twitch / Kick streams automatically & converts them to TikTok / Reels / Shorts
Hosting another channel on your Twitch account could be the solution! In this guide, we’ll walk you through how to host on Twitch, from the basics to the various methods you can use.
Twitch hosting is when you broadcast another streamer’s channel on your own, allowing your audience to watch fresh content while you’re offline.
This benefits both you and the streamer you’re hosting, as you’ll be able to keep your audience entertained while also promoting your peers’ channels.
Why Host on Twitch?
Hosting other channels is a great way to receive free shoutouts and cross-promote your channel, which can help elevate your reach within the online live-streaming community.
Additionally, Twitch’s Auto Host feature lets you host other channels even when you’re offline, which helps keep your audience engaged with your channel.
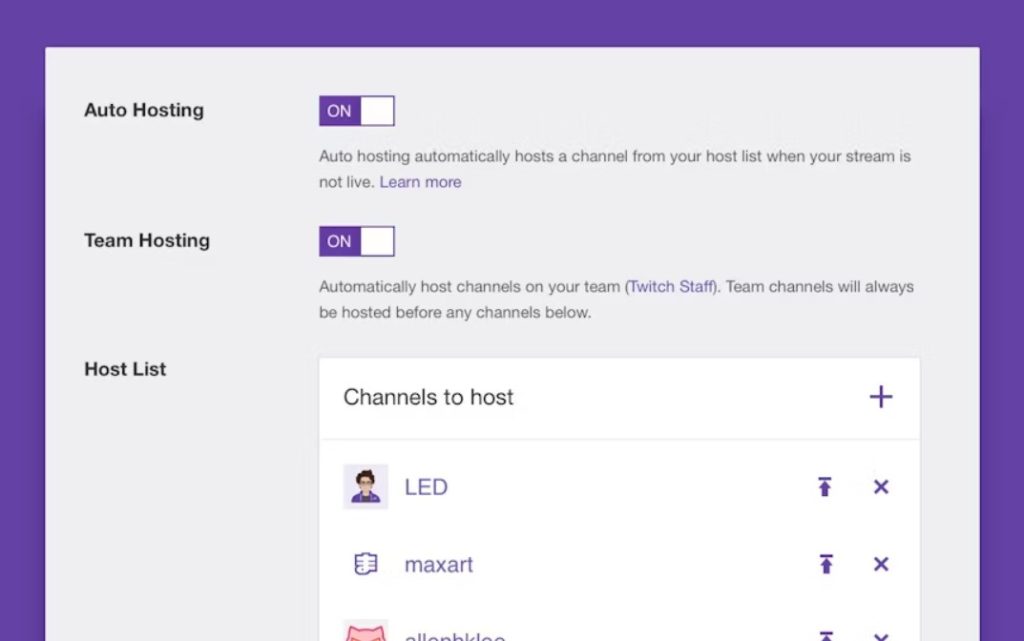
How to Host on Twitch: Auto Hosting
Auto Hosting is a feature that allows you to host other channels while you’re offline. You can add a list of channels in order of preference or randomized to host on your channel. Here’s how to set it up:
Open your browser and go to Twitch. Log in to your account and click on the profile icon in the top-right corner of the screen.
Select Creator Dashboard > Settings > Channel > Featured Content. Under the Auto Hosting feature, click on Host List to add or manage the relevant hosted channels.
Select your Hosting Priority, and finally, click on the Auto Host Channels option to switch it on.
And that’s it – you’re all set to automatically host other channels on your Twitch account!
How to Host on Twitch: Desktop
Hosting on desktop is simple, but there are a few things to keep in mind:
Unlike other social networking platforms like YouTube or Instagram, Twitch doesn’t have an autofill option, so make sure you enter the intended channel’s username correctly.
Once you get the username correct, your audience can view the stream from your channel itself.
Here’s how to host from your desktop on Twitch:
Open your browser and go to Twitch. Log in to your account and click on the profile icon in the top-right corner of the screen.
Click on the Channel option in the drop-down menu, which will redirect you to your personal Twitch channel.
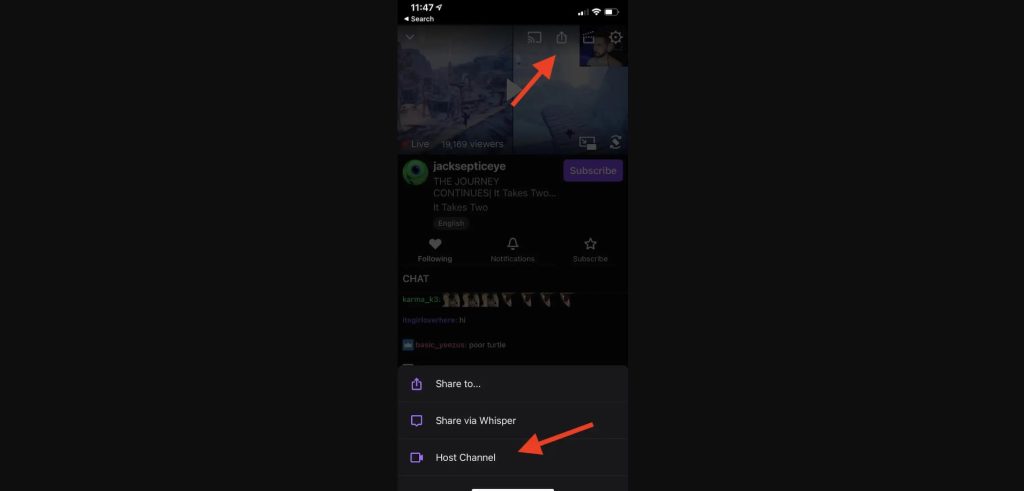
Click on the Chat option. A chat pop-up window appears, where you type the command: /host . Example: /host Ninja.
Once you finish hosting, simply head back to the chat window and enter /unhost.
How to Host on Twitch: Mobile
If you’re using an Android mobile device, you can download the Twitch application from the Google Play Store.
Here’s how to host from your mobile device:
Open the Twitch app and log in to your account.
Search for the channel you want to host and click on it.
Click on the three-dot icon on the top-right corner of the screen and select Host.
Select the option to host the channel immediately or add it to your auto host list.
Why You Can’t Host on Twitch in 2023?
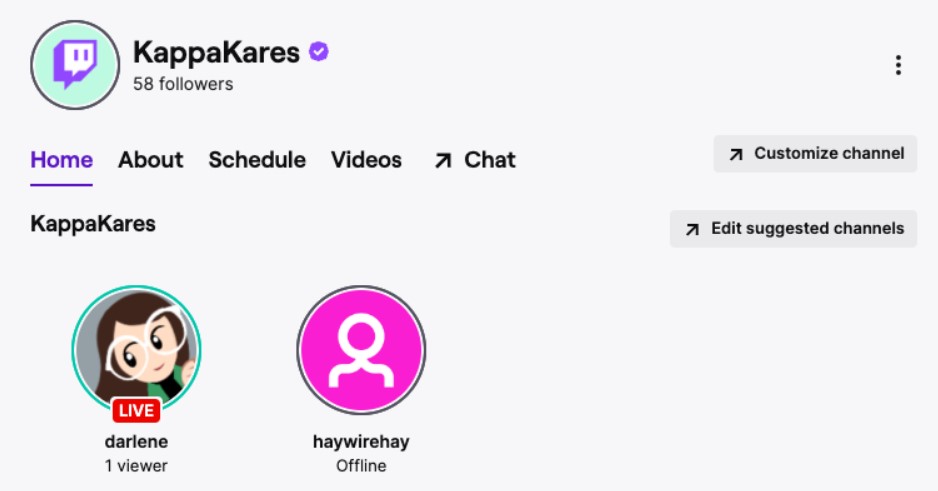
Unfortunately, Twitch shut down the /host command in October 2022, which means that hosting channels on Twitch in 2023 is no longer possible. However, Twitch has introduced a new feature called “Suggested Channels” to replace it.
Suggested Channels works similarly to hosting on Twitch. All you need to do is choose the channel you want to suggest, and it will be displayed on your profile. Moreover, this feature works like the “Auto Host” mode, so whenever the channel you suggest goes live, it will automatically be hosted on your own channel.
How to Use Suggested Channels on Twitch
Go to your “Creator Dashboard”.
Click on “Settings.”
Click on “Channel,” then select “Featured Content.”
Choose “Suggested Channels.”
Conclusion
Hosting on Twitch is a great way to keep your audience engaged and promote your peers’ channels.
With Twitch’s Auto Host feature and various hosting methods, you can easily set up hosting on your account. So, what are you waiting for? Start hosting on Twitch and keep your audience entertained even when you’re not streaming!
Maximize your Black Ops 6 rewards—Create highlights from your best gameplay with with Eklipse
Eklipse help streamer improve their social media presence with AI highlights that clip your Twitch / Kick streams automatically & converts them to TikTok / Reels / Shorts
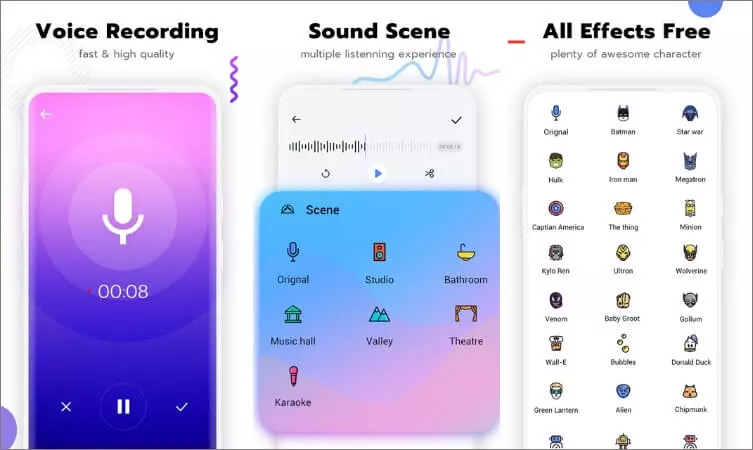
A voice changer for Discord is a software that can modify your voice in real-time during voice conversations.
There are various voice changers available on the market, but it can be difficult to determine which one is the best for Discord. In this article, we’ll explore some of the top voice changers for Discord and their features to help you make an informed decision.
So, let’s dive into the list of 10 best voice changers for Discord and their features.
Offers a wide range of voice changing options, including custom effects for specific contacts
Paid software, may have a steep learning curve for some users
Clownfish
Free to use, offers a variety of voice effects and additional tools such as a music player and voice assistant
May have compatibility issues with some operating systems or Discord versions
VoiceMeeter
Versatile virtual audio mixer that can modify your voice in real-time by adjusting EQ, pitch, and other settings
Not specifically designed as a voice changer, may require some technical knowledge to use
SuperVoice Changer
Easy-to-use, offers several built-in effects and allows users to record their changed voice and save it as an audio file
Limited range of effects compared to other options
Discord Voice Changer
Specifically designed for use with Discord, offers various voice effects and settings
Limited customization options compared to other options
Voxal Voice Changer
Offers a range of effects, including real-time voice changing, and can apply effects to pre-recorded audio files
Free version has limited features, may be prone to crashing or freezing
Voice Changer
Simple and easy-to-use app that allows users to record their voice and apply various effects
Limited range of effects and customization options
MorphVOX
Offers a range of voice effects, including custom effects, and can modify your voice in real-time while using Discord
Paid software, may have compatibility issues with some operating systems or Discord versions
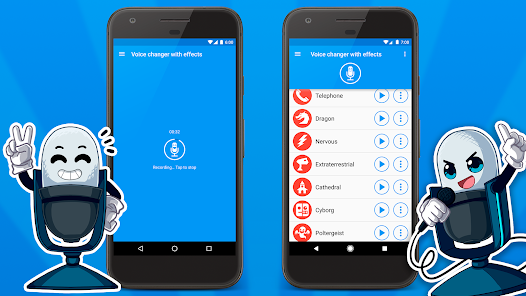
Voice Changer with Effects
Allows users to apply various effects, adjust pitch and speed, and record their changed voice as an audio file
Limited range of effects compared to other options
VoiceMod
Popular voice changer app that offers a wide range of voice effects and customization options
Free version has limited features, may have compatibility issues with some operating systems or Discord versions
1. AV Voice Changer Software Diamond
AV Voice Changer Software Diamond is a premium voice changer that offers a range of voice changing options.
It allows you to change the pitch and timbre of your voice, add sound effects and background noises, and even create custom voice effects. You can also apply different effects to specific contacts, making it a great option for prank calls and online gaming.
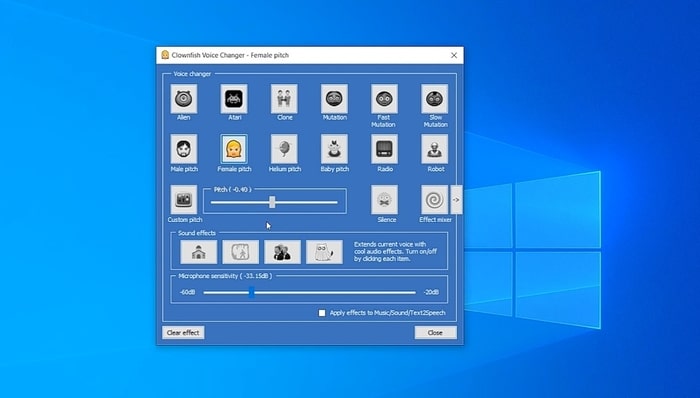
2. Clownfish
Clownfish is a free voice changer that offers a variety of voice effects. With Clownfish, you can sound like a robot, a male or female, or even like you inhaled helium.
In addition to voice effects, it also has a music player, voice assistant, and translation tool. The software is easy to use and integrates seamlessly with Discord.
3. VoiceMeeter
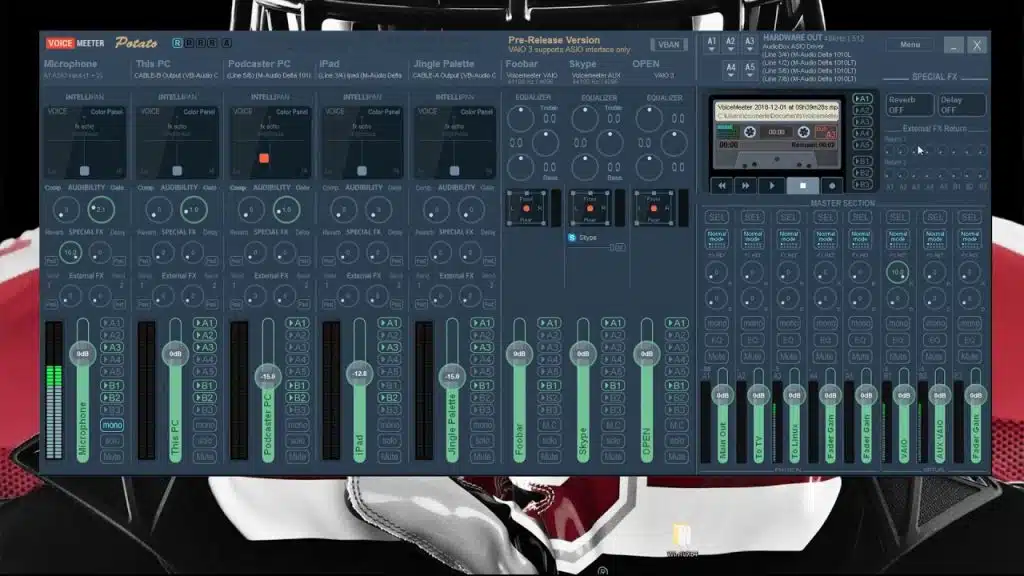
While not specifically a voice changer, VoiceMeeter is a virtual audio mixer that can be used to modify your voice in real-time.
By adjusting the EQ, pitch, and other audio settings, you can enhance your voice quality and make it sound more interesting. VoiceMeeter is a versatile tool that can also be used for streaming and recording.
4. SuperVoice Changer
SuperVoice Changer is an easy-to-use voice changer that offers several built-in effects like echo, reverb, and chorus. It also allows you to record your changed voice and save it as an audio file.
SuperVoice Changer is a great option if you’re looking for a simple and straightforward voice changer for Discord.
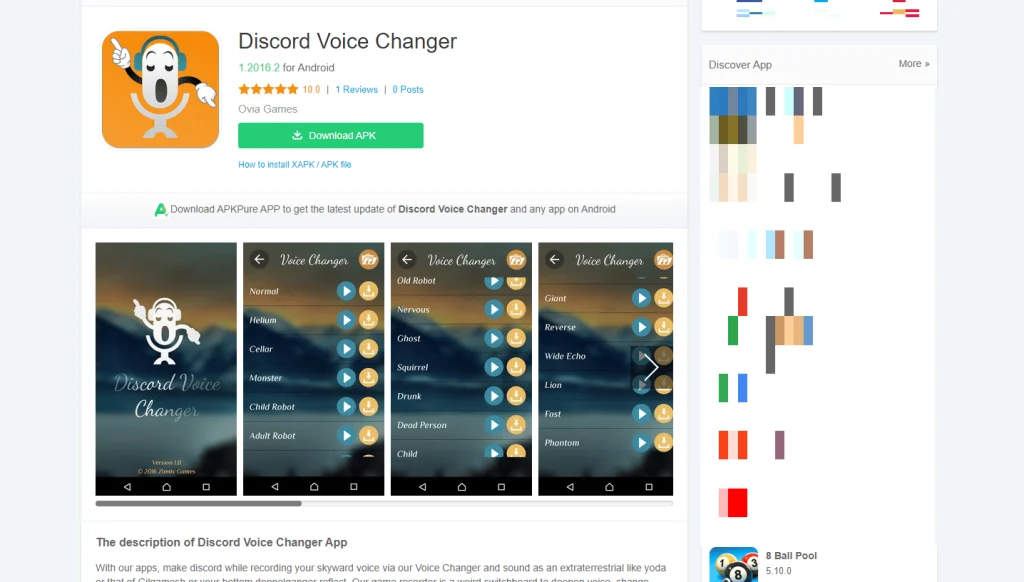
5. Discord Voice Changer
As the name suggests, Discord Voice Changer is designed specifically for use with Discord.
It offers various voice effects like echo, robot, and pitch shift, and allows you to adjust settings like volume, tempo, and key. The software is easy to use and integrates seamlessly with Discord, making it a popular choice among gamers and pranksters alike.
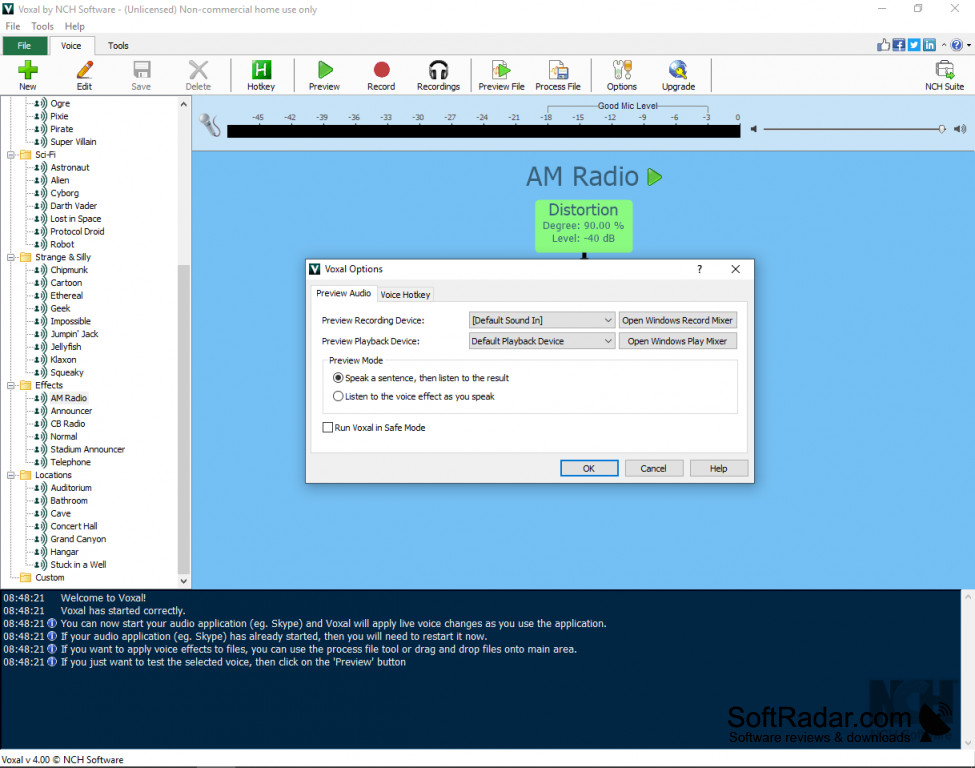
6. Voxal Voice Changer
Voxal Voice Changer is a real-time voice changing software that allows you to modify your voice while chatting on Discord or recording audio files.
It offers a range of effects such as chipmunk, deep voice, and alien. You can also apply effects to pre-recorded audio files. Voxal Voice Changer is compatible with all major applications and games and can be used on Windows and Mac devices.
It also allows you to create custom voice effects and save them for future use.
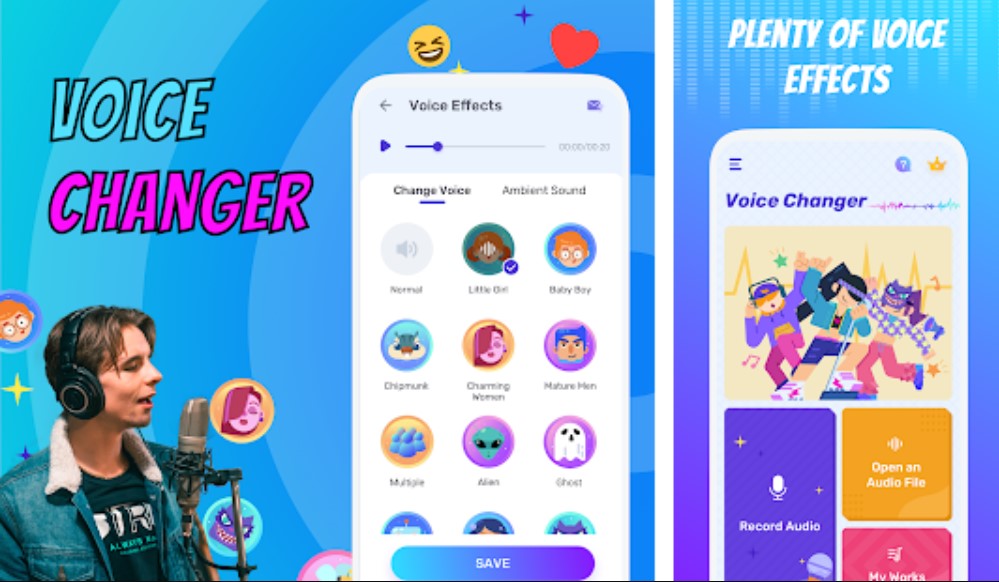
7. Voice Changer
Voice Changer is a simple voice changer app that allows you to record your voice and apply various effects, including robot, deep voice, and helium.
You can also adjust the pitch, speed, and volume of your voice. Voice Changer is compatible with all major operating systems such as Windows, Mac, and Linux.
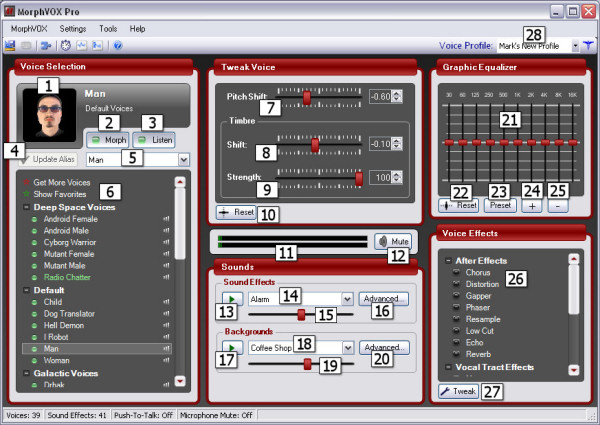
8. MorphVOX
MorphVOX is a real-time voice changer software that lets you modify your voice while using Discord.
It offers a range of effects such as male, female, robot, and monster. You can also create custom voice effects and save them for future use. MorphVOX can be used on Windows and Mac devices, and it’s compatible with all major chat and gaming applications.
9. Voice Changer with Effects
Voice Changer with Effects is an app that allows you to apply various effects to your voice, including echo, chorus, and distortion.
You can also adjust the pitch and speed of your voice and record your changed voice as an audio file. Voice Changer with Effects is available on both iOS and Android devices.
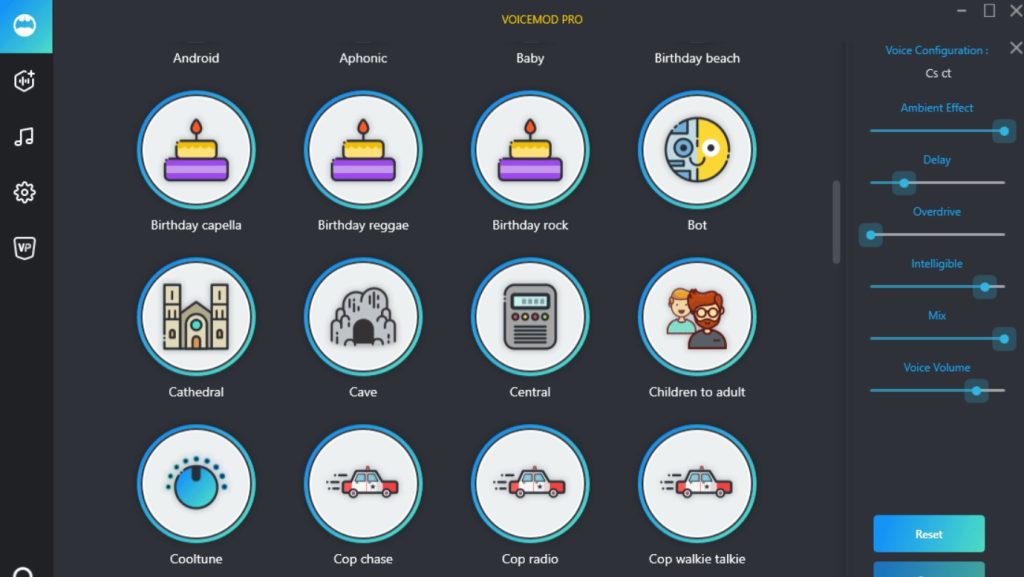
10. VoiceMod
VoiceMod is a popular voice changer app that offers a wide range of voice effects, including celebrity impressions, robot, and alien.
It integrates seamlessly with Discord and other chat apps, and allows you to customize your voice effects and save them as presets. VoiceMod is compatible with Windows and Mac devices, and it also offers a real-time voice changer for gaming applications.
Conclusion
In conclusion, there are many voice changer options available for Discord users, each offering different features and effects.
Whether you’re looking for a simple voice changer app or a more advanced software, there’s something out there for everyone. It’s important to choose a voice changer that is compatible with your operating system and meets your specific needs.
With these tools, you can have fun and enhance your online communication experience on Discord.
Maximize your Black Ops 6 rewards—Create highlights from your best gameplay with with Eklipse
Eklipse help streamer improve their social media presence with AI highlights that clip your Twitch / Kick streams automatically & converts them to TikTok / Reels / Shorts
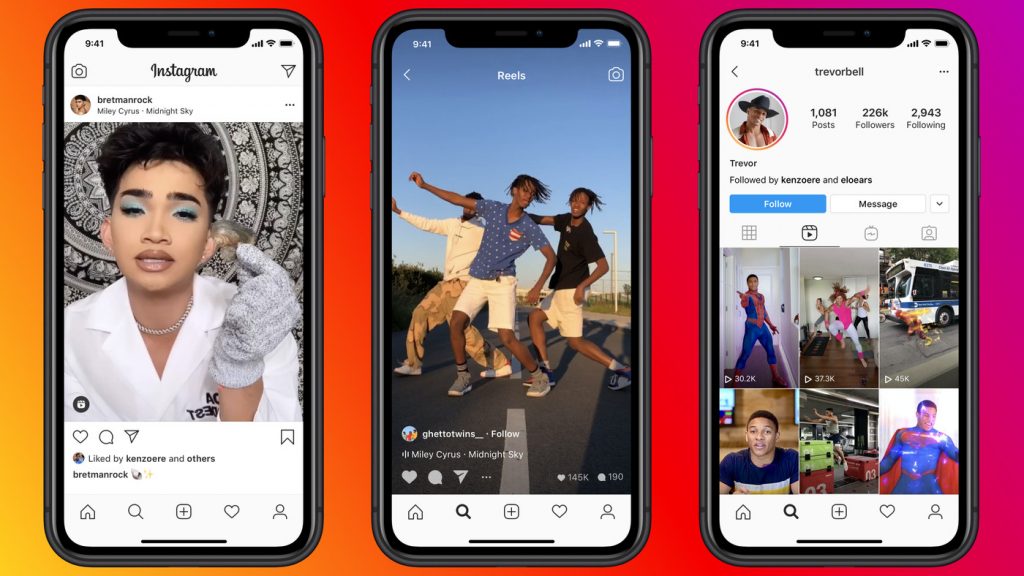
Are you looking for an easy way to find your saved Reels on Instagram? Or wondering where are saved reels on instagram?
With a 60 second duration and songs of a user’s choosing, Reels are Instagram’s response to TikTok videos. Through endless scrolling, users are able to discover content similar to what they’ve either liked, or saved. Essentially, the user ends up with a personalized, long list of videos that were funny, weird, or useful saved somewhere in the app.
Source: Later
Reels offer a diverse roster of uploaded videos, there’s no doubt about that. But what if you, the user, want to show a friend or two a Reel you saved on Instagram? Unlike its competitor TikTok, Instagram doesn’t make it clear where you’re supposed to find your liked and saved Reels.
Before we begin, it’s important to note the differences between Saved Reels and Liked Reels. The Like feature works similarly to Facebook; you “like” the post to show your appreciation. So, when you like a post, the creator automatically receives a notification. However, when you save a reel, you’re essentially bookmarking it to view later.
Saving a reel doesn’t send a notification to the creator, and they’re easier to find than Liked Reels. However, we definitely recommend doing both to boost the post’s analytics and give it traction.
Now that that’s settled, let’s dive in.
Finding Saved Reels On Your Phone
To access saved Reels on your phone, tap your profile tab on the bottom right of the screen. Once on your profile, you can tap the menu icon in the top right which is in the shape of three straight lines.
Source: The Verge
Now, tap “Saved,” and you’ll be directed to a page which contains albums of posts you have saved. “All Posts” contain everything you’ve saved throughout your time on Instagram. However, if you’ve already created custom albums of saved posts, those will also be available to view here.
Click on “All Posts” and scroll through all your saved posts until you reach the one you’d like to view again, or show to your friends.
Unfortunately, you can’t sort the posts by any specific type but with the help of the displayed thumbnails, your search will definitely be a whole lot easier. An easy identifier in these thumbnails is the overlaid Reels logo, which looks like a film clapperboard. Regular videos will show the play button instead.
Our general advice in this case would be to categorize your saved material as you save to make things easier to find!
Finding Saved Reels On Your PC
To access your Saved Reels on your PC, open Instagram in your browser of choice and sign in.
This step mimics the step used to access Saved Reels on your phone. Click on your profile picture on the upper right corner of the screen to access the menu.
Here, select the “Saved” option; the icon resembles a bookmark.
Once you’ve clicked on Saved, you’ll be directed to a page where you’ll be able to find all of your saved Reels and Images.
Additionally, in case you want to find the saved Reels on your local device, you’ll need to download them first. No worries, you can learn about it through our previous article: How to download Instagram Reels. Visit our post and save your favorite Reels for later viewing!
Benefits of Saving Reels on Instagram
Instagram reels are a great way to discover and engage with new content, but did you know that saving your favorite reels can provide several benefits? Here are three benefits of saving reels on Instagram:
A. Easier Access to Favorite Content
By saving reels on Instagram, you can easily access your favorite content anytime you want. Instead of scrolling through your feed or searching for specific accounts, saved reels can be found in a dedicated “Saved” tab on your profile. This makes it simple to revisit and enjoy your favorite reels without the hassle of searching for them.
B. Inspiration for Future Content Creation
Saved reels can also serve as a source of inspiration for your own content creation. By saving reels that resonate with your niche or style, you can gather ideas and inspiration for your own reels or posts. This can help you stay current with trends and engage with your audience in new and exciting ways.
C. Increased Engagement and Visibility for Creators
When you save a reel on Instagram, the creator of that reel is notified. This can help to increase engagement and visibility for creators, as they are aware that their content is resonating with their audience. Additionally, saving reels can help to boost the algorithmic performance of the reel, increasing its reach and visibility on the platform.
Conclusion
Unfortunately, due to Instagram’s Mobile-first features, there’s no way to access or store them separately by creating collections. However, you can still scroll through your Saved posts to pull up your desired Reel and replay to your heart’s content! If you’re interested in making your Reels reach their A-game, follow our guides such as how to get more views on Reels!
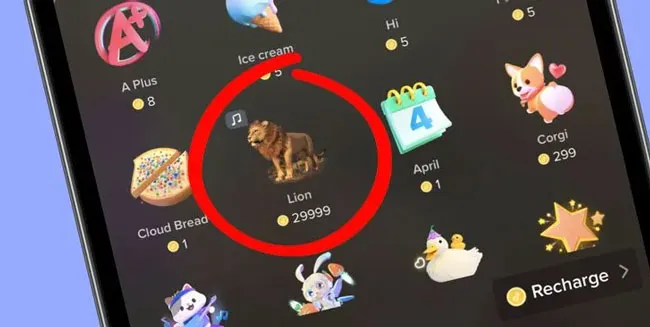
TikTok has found many ways for creators to monetize their content on the platform. Now, users can send their favorite TikTokers gifts, one of which is lion. That may spark some questions in you, how much is lion on tiktok?
After answering your question about how much is a rose on TikTok, now let’s talk more about this expensive gift!
TikTok the lion gift has a staggering cost of 29,999 coins, which is around $400 US dollars.
It is definitely one of the most expensive TikTok Live gifts to buy. This gift also gives you a stunning effect, with a virtual lion that walks up to the screen and roars after you send it.
Since this is an expensive TikTok gift, you’ll know it needs a substantial amount of money to make it happen on TikTok live.
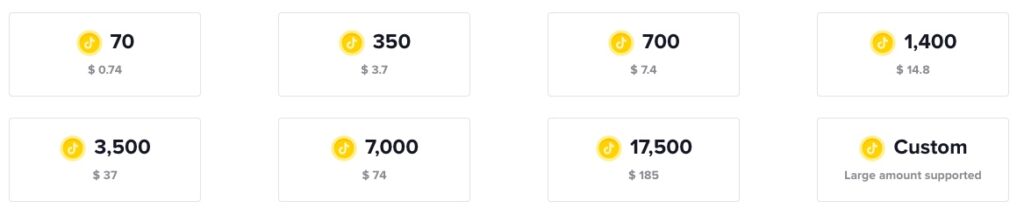
How Much Are 1,000 Coins on TikTok?
Current value of one TikTok coin is around 1.3 cents, which is subject to change. That current conversion value is counted from the price of 1,000 TikTok coins that cost $13.5. Things that you need to know, the value of TikTok coins can vary on a day-to-day basis.
You can check the comparison below to see the conversion value of TikTok coin, quoted from their official site.
70 TikTok Coins – $0.74
350 TikTok Coins – $3.7
700 TikTok Coins – $7.4
1,400 TikTok Coins – $14.8
3,500 TikTok Coins – $37
7,000 TikTok Coins – $74
17,500 TikTok Coins – $185
How to Start Earning TikTok Coins as a Creator
Just like most social media platforms, you need to meet some requirements before you can start receiving gifts from your audiences. As for the TikTok coins you need to meet these criteria
Have 1000 views reached on a post in the past month,
Age 18 or above,
For the age requirement, TikTok needs you to be above 18 to send or receive TikTok gifts like the lion. Aside from the requirement above, other creators at some locations sometimes also need 1,000 followers to start earning gifts from their viewers.
Tips for Maximizing TikTok Gifts Value
To maximize the value of TikTok gifts, content creators must focus on building a loyal fan base and creating engaging and high-quality content. Here are some tips for achieving this:
A. Building a loyal fan base
Consistency is key: Regularly posting content at a consistent time and frequency can help to build a loyal fan base that anticipates your content.
Interact with your audience: Engage with your audience by responding to comments and direct messages. This shows that you care about your fans and can help to build a stronger relationship.
Use relevant hashtags: Including relevant hashtags in your posts can help to reach a wider audience and attract more fans.
B. Creating engaging and high-quality content
Keep it short and sweet: Shorter videos tend to perform better on TikTok. Aim to keep your videos between 15 to 60 seconds.
Make it visually appealing: Use eye-catching visuals, effects, and filters to make your content stand out.
Use music: Incorporate popular music into your videos to make them more engaging and increase their chances of going viral.
C. Collaborating with other content creators and brands
Reach out to other creators: Collaborating with other creators in your niche can help to grow your audience and increase your visibility on the platform.
Partner with brands: Partnering with brands can provide an opportunity to earn additional income and provide your audience with new and exciting content.
Offer exclusive content: Offering exclusive content to your fans can help to build loyalty and increase the value of your TikTok gifts.
By following these tips, content creators can maximize the value of TikTok gifts and increase their visibility on the platform. Remember to experiment and find what works best for your niche and audience. With dedication and hard work, you can build a loyal fan base and turn your passion for gaming into a successful career on TikTok.
How to Get 1,000 Followers on TikTok in a Month?
For all of you who just started your content creator career journey, you don’t need to worry. There are many ways you and strategies you can do, also, you can check out our tips on how to get more followers on TikTok.
Other than that, if you want to gather more followers faster, you need to be more efficient in the content-making process. Especially for streamers, you gotta try doing it using Eklipse!
Even if you are not a streamer you don’t need to worry, you can still use Eklipse Studio to edit your video to the TikTok format.
Conclusions
The lion is definitely the most expensive gift to earn as a creator on TikTok live. When will you get your lion when doing TikTok live? You don’t need to worry too much, keep focus on your creation process, and *finger-crossed* wished everyone can get their own lion sometime in the future!
There are various ways to make an eye-catching reel on Instagram. You can record a new video, or combine several videos you took in the past. If you have no idea how to make reels with existing video, this article will give you clear directions.
Knowing about how to make a reel with multiple videos is indeed necessary. It’s because most people still don’t know that they can combine a few videos into one. This is a good idea to make your reel looks catchy and valuable. So, let’s just move on to the tutorial.
How To Make Reels With Existing Reel Video: Preparation
How can you make a reel from existing reels in your gallery? Here’s the answer. Those existing reels are the footages you need to make a reel video.
You don’t need to record a new reel but just mix the reels you had in the gallery instead. These are the steps you need to do:
Gather all the video footages you wish to make a reel from your gallery
Choose the video wisely to make fun and aesthetic video
Prepare the best and match song to make feeling to your video
This preparation sounds simple but indeed necessary to do if you are going to create a fun and aesthetic video on a reel. The better you gather the footage, the easier you’ll make the reel.
Additionally, preparing the right song for your video will help you to put that footage in the right place and at the right time. You’re gonna have a perfect reel video.
How To Make An Instagram Reel With Multiple Videos: The Making Process
Done preparing the materials for a great Instagram reel? Now, we move to the making process. But before you start it, make sure you’ve launched the Instagram app on your phone.
After getting it ready, you can just go in there and just do these steps:
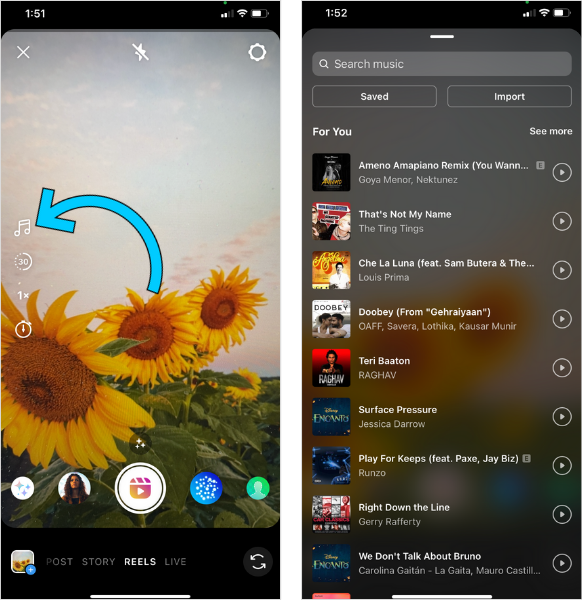
On the Instagram homepage, go to the ‘+’ icon and choose Reel
After that, hit the musicicon to add a song. You can find the right music from the Instagram default gallery, or your phone music library
Source: later.com
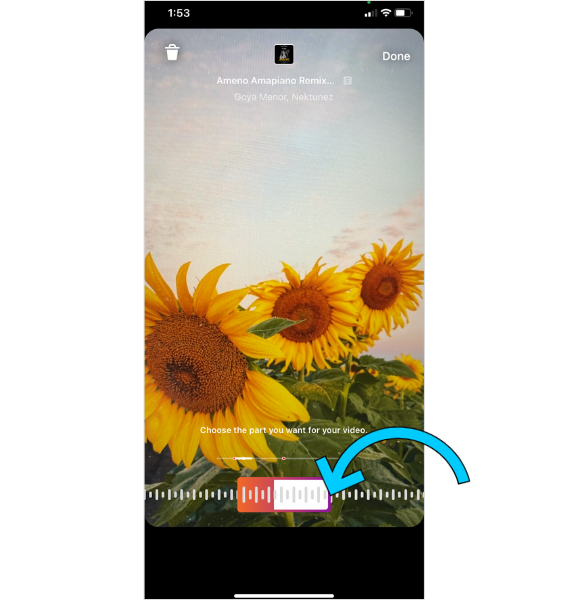
Select the best part of the song you want to use by sliding the bar right and left
Source: later.com
Then, tap Done
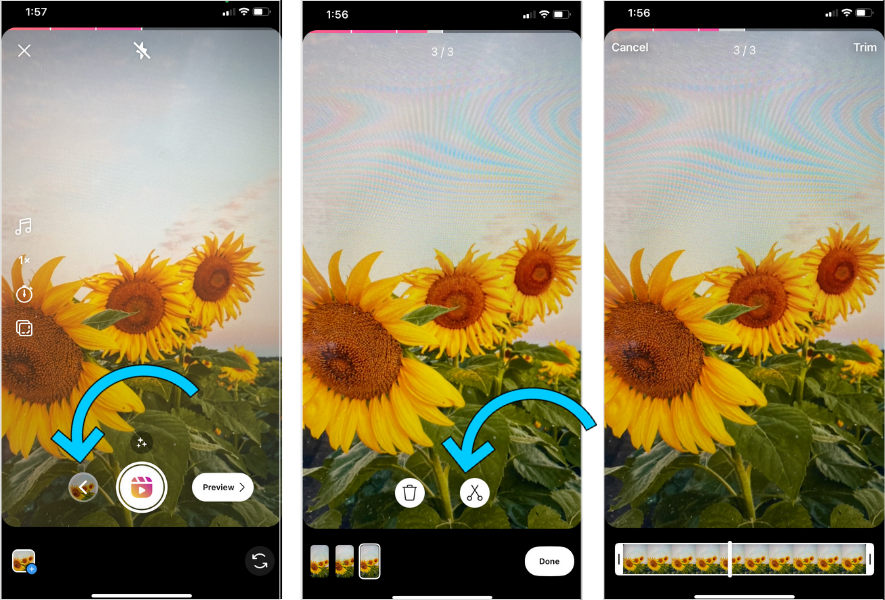
Swipe up the screen to go to your gallery
Pick the clips you want to use for the reel (that you’ve prepared before)
Next, trim the video as freely as you wish
Tap Add at the top-right corner of the screen
Do the same thing to add more clips on it
Source: Later.com
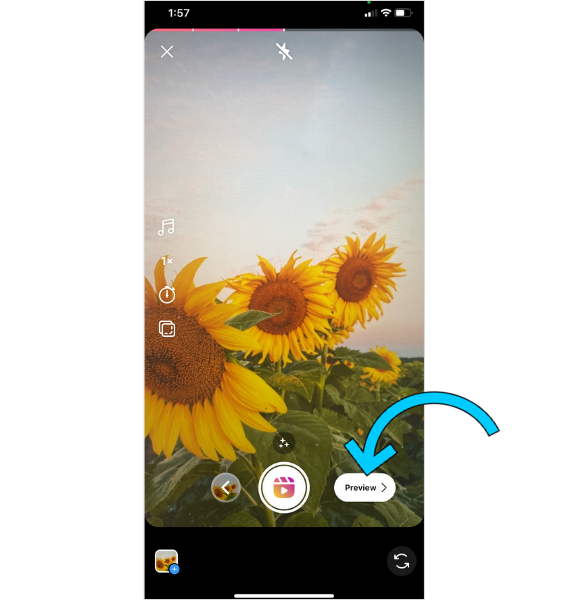
Then, hit the Preview button to go to the editing section
Source: later.com
Add any text, stickers, draw something with a pen-like feature, or use other editing tools
If you’re done editing, tap Next
Hit tap the Video photos to choose the best cover video
You can choose the image cover from your video by picking the nice part or tap Add from Gallery if you’ve prepared the cover photo
Then, tap Done
Add the image cover and write a caption or hashtags
You are also able to crop the profile image, tag people, or add your location
Source: later.com
Finally, hit Share to post it in your account
There you have it. It’s pretty easy how to edit a pre-recorded video on reels, isn’t it? Now, you can try it yourself.
In order to make an appealing reel video, you can put effort into it as much as you can. Not stopping trimming the video, adding great music that could bring more value, or typing some text. You can access effects too to make your video looks nice.
But have you known yet how to do it? We are here to give you a simple tutorial about adding effects to your video. Let’s just move on to the steps:
Follow the same steps as before
But before going to Preview, tap the Stars icon above the recording button
Choose the effect you think suits well to your video
Source: later.com
Tap the Back button, and click Preview to continue the steps
You can also add effect in the editing section by pressing the Stars icon on the top-right corner of the screen
How To Speed Up Existing Video For Instagram Reels
Do you want to make your video more interesting? Speed up or making it slower could be a good idea. You can adjust the speed of your video with the feature in it. Here’s what you can do:
Before adding the existing video from the gallery, tap the Clock icon on the Reel menu
You’ll have the option to choose the speed of your video (the default is .3x, .5x, 1x, 2x, or 3x)
Source: later.com
Not only can you speed up the video, but this is also the direction of how to make reels with existing video slow motion. Isn’t it interesting?
Bonus: Making Reel Clips With Eklipse
Source: Doc. Eklipse
One of the great ideas of making Instagram reels is by showing off some streaming clips from other streaming platforms. To have the clips, you can use Eklipse features to help you generate reels.
There is no need to worry since this AI-enhanced editing tool comes with a very intuitive interface. So even the beginner can also use Eklipse Tool.
Tips for Optimizing Reels for Maximum Impact
A. Choosing the Right Content for Reels
Picking the perfect content for your Reels is the first step towards making a massive impact on your audience. With Eklipse.gg, you can easily transform your Twitch clips into engaging Reels that’ll keep viewers glued to their screens. To make your Reels stand out, focus on these three aspects:
Highlight Epic Moments: Showcase the most thrilling and memorable moments from your Twitch streams, such as game-winning plays, hilarious bloopers, or awe-inspiring skills. These snippets will instantly grab your audience’s attention and make them want to see more.
Educate and Entertain: Blend entertainment with valuable information by sharing game tips, tricks, and walkthroughs in a fun and engaging manner. This way, you’ll not only entertain but also establish yourself as a go-to source of gaming insights.
Share Behind-the-Scenes Content: Give your followers a glimpse into your gaming world by sharing behind-the-scenes footage, such as your gaming setup, pre-stream rituals, or candid moments. This personal touch will help you connect with your audience on a deeper level.
B. Utilizing Hashtags and Captions Effectively
Captions and hashtags are powerful tools to increase your Reels’ visibility and reach. With Eklipse.gg’s AI-generated captions, you can convey your message effortlessly while keeping viewers hooked. Here’s how to make the most out of captions and hashtags:
Craft Engaging Captions: Write short, punchy captions that convey the essence of your Reel. Use humor, wordplay, or questions to pique your audience’s curiosity and encourage them to watch the entire clip.
Use Relevant Hashtags: Boost your Reels’ discoverability by using popular and relevant hashtags. Research trending gaming hashtags, or create unique ones that resonate with your niche. Don’t forget to use a mix of broad and specific hashtags to cast a wider net.
Avoid Overstuffing: While hashtags are great for increasing visibility, using too many can make your caption look spammy. Stick to a handful of well-selected hashtags that best describe your Reel’s content.
C. Monitoring Analytics and Adjusting Strategies Accordingly
To ensure your Reels make the maximum impact, it’s crucial to track their performance and fine-tune your strategy based on the insights you gain. Eklipse.gg can help you monitor key metrics like views, likes, and comments, which can inform your future content decisions.
1. Identify Top-Performing Content
Analyze your Reels’ performance to see what type of content resonates best with your audience. Double down on these themes, while also experimenting with new ideas to keep your content fresh and exciting.
2. Optimize Posting Times
Discover when your audience is most active and schedule your Reels to go live during these peak hours. This will ensure your content gets maximum visibility and engagement.
3. Engage with Your Audience
Make sure to reply to comments, questions, and feedback from your viewers. This interaction will not only boost your Reels’ engagement but also help you foster a loyal and active community around your
Conclusion
That’s how to make reels with existing video here. Only with some taps, you’ll have it all on your hand. Try it now!
In addition, you may need a tutorial on how to post long videos to Instagram, so you don’t have to worry about videos that are longer than 60 seconds. Discover the simplest method in this article of ours: How To Post a Long Video on Instagram.
Did you know that you can get free Pro Edits in Eklipse? Yes, you can! Eklipse now offers every new subscriber of the Eklipse Premium Plan one complimentary Pro Edit.
You’re missing out if you haven’t claimed your free edits yet! So in today’s post, we will guide you on how to claim the free Pro Edits on the Eklipse dashboard. Let’s get started!
The Eklipse Pro Edits service is like having a professional video editor at your fingertips. With Eklipse Pro Edits, you can send your clip or highlights and let our skilled editors turn it into a top-notch video.
The best part? You can make your video into anything you want! Want to turn your gameplay into epic highlights? No problem. Want to make a hilarious meme-filled montage? We’ve got you covered.
If you’re too busy (or simply don’t have the pro editing skills) to polish your stream clip, don’t worry! Eklipse Pro Edits has got your back!
How to Claim Eklipse Free Pro Edits?
You’re probably already familiar with the Eklipse dashboard, where you can find your generated highlights, Twitch clips, playlists, and edit results from “Convert to TikTok,” etc.
To get free Pro Edits on Eklipse, you need to do these two steps in the Eklipse Dashboard: activate your Eklipse premium plan and claim your free Pro Edits. Let’s jump into the instructions without further ado.
Step 1: Activate Eklipse Premium Plan
Source: Eklipse.gg
The free Premium Edit offer is only for Eklipse premium subscribers (monthly or annual subs). If you haven’t upgraded yet, follow these instructions first:
On the Eklipse dashboard, click the profile icon at the top right of the interface, then click “Account Settings”. Or you can hit the “Go Premium” button to skip forward to step 3.
Source: Eklipse.gg
Click the “Premium Plan” section.
Source: Eklipse.gg
Click “Go Premium” then select your desired plan.
Source: Eklipse.gg
We recommend the Annual Plan, as it only costs $12.49 per month (charged $149.99 annually) and will save you up to 37%!
Congratulations! You have become a member of the Eklipse Premium Plan. But where is your free Pro Edits feature? You can access it through the “Premium Clips” option in the left-side menu.
Here are the step-by-step instructions:
On the Eklipse dashboard, click “Premium Clips” on the left-side menu.
Source: Eklipse.gg
Click the “Request Edit Now” button on the right side of your interface.
Source: Eklipse.gg
Choose your clip by hitting the “Add Clips” button. You can pick an AI-generated clip or upload your video from a local drive.
Source: Eklipse.gg
Fill in the necessary information to create the perfect Premium Edit as preferred.
Source: Eklipse.gg
Click the “Purchase Premium Edit” button.
Source: Eklipse.gg
The payment window will pop up. Tap the “Purchase with 1 Credit” button to claim your free Premium Edit.
Source: Eklipse.gg
Important Tips
It’s important to note that you must claim your free Pro Edits within 3 months of purchasing your Premium Membership. If you miss this deadline, the credit will expire, and you’ll miss the opportunity to have professionally edited content to boost your streaming channel.
So, don’t forget to claim your free Pro Edits as soon as possible!
Final Thoughts
That’s how to claim your free Pro Edit included with the Eklipse Premium subscription. Eklipse Pro Edits lets you turn your clips into professional-looking videos by skilled editors.
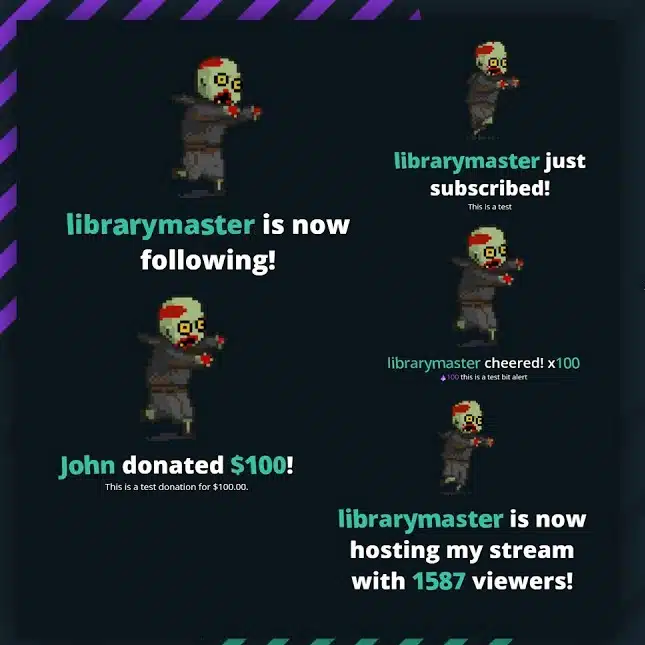
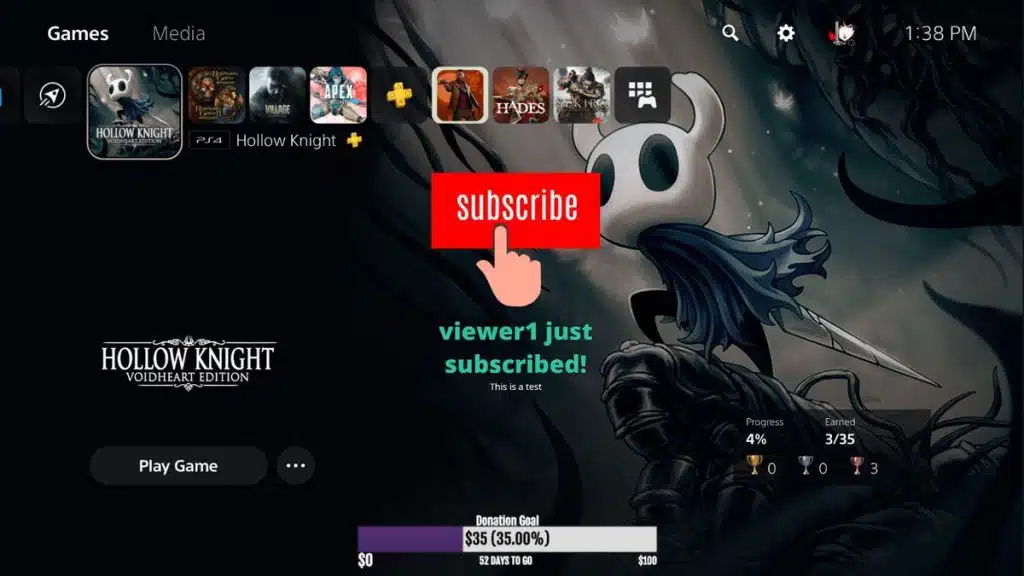
Twitch alerts are an integral part of any streamer’s toolkit. They are notifications that pop up on your stream when someone subscribes, donates, follows, or hosts your channel.
These alerts not only add a layer of interactivity to your stream, but they also help you build a stronger connection with your audience. By acknowledging their support through these alerts, you show your viewers that you value their presence and appreciate their contribution.
In this article, we will cover the best practices for Twitch alerts and the best tools to display them on your stream.
Before we dive into the list of tool, it is essential to understand what makes a great Twitch alert. Here are some factors to consider when choosing the perfect alerts for your stream:
Customizability
One of the key features of Twitch alerts is their customizability. You want to choose alerts that can be tailored to your brand and personality. The more options you have to customize your alerts, the better they will reflect your style and engage your audience.
Compatibility
When selecting Twitch alerts, you want to ensure that they are compatible with the streaming software you are using. For example, some alerts may only work with OBS, while others may be exclusive to Streamlabs.
Visual Appeal
The visual appeal of your Twitch alerts is crucial. You want to choose alerts that are eye-catching and reflect your brand. The better your alerts look, the more likely your viewers are to clip the moment and share them in social media.
Now that we have covered what to look for in Twitch alerts, let’s dive into the top Twitch alerts available in the market today.
Top Twitch Alerts Available in the Market
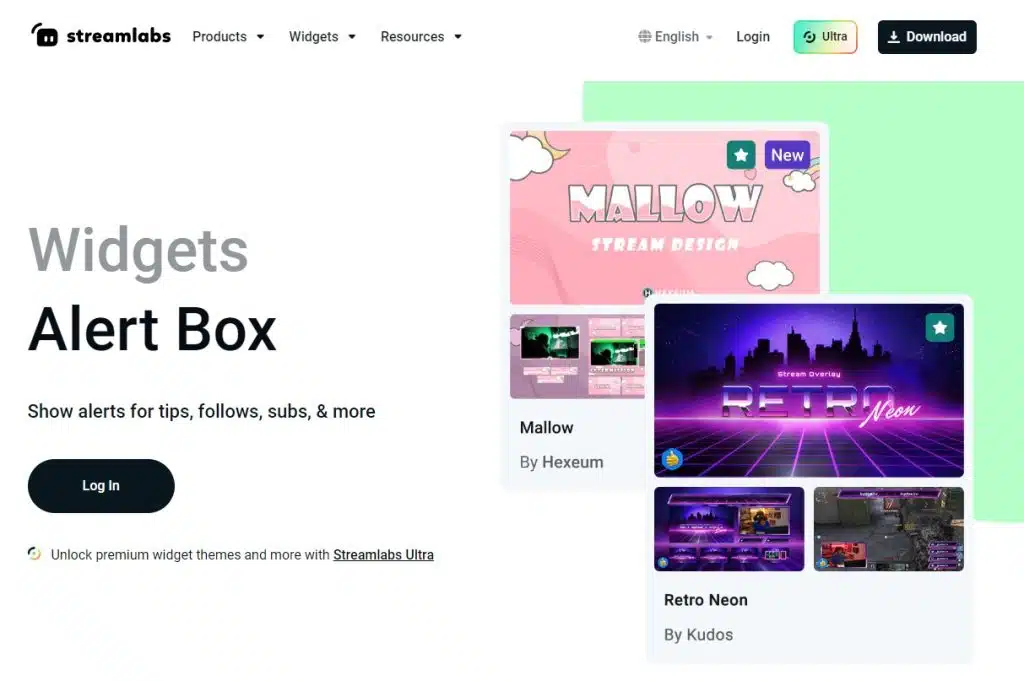
1. Streamlabs
Streamlabs is one of the most popular Twitch alert providers in the market today.
It offers a vast range of alerts, including follower alerts, donation alerts, and subscriber alerts. Streamlabs alerts are highly customizable, with a range of visual and audio options.
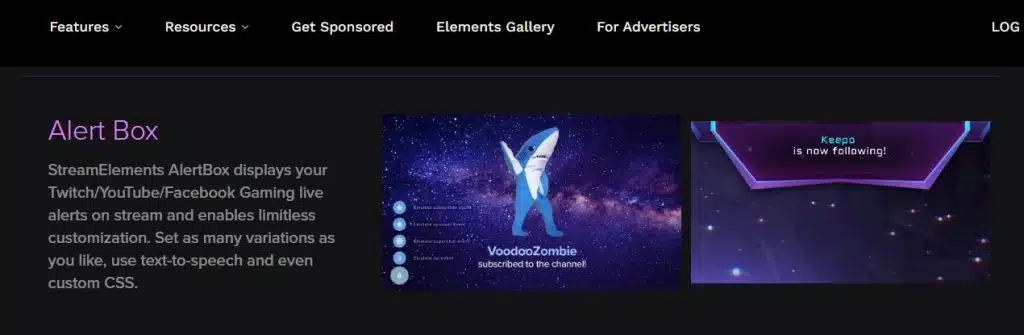
2. StreamElements
StreamElements is another popular Twitch alert provider that offers a range of alerts, including follower, donation, subscriber, and even the media share. The alerts provided are highly customizable, with a range of visual and audio options.
3. Muxy
Muxy is a unique Twitch alert provider that let viewers dictate what streamers should do in the game. It has a range of visual and audio options that allow you to make the best alerts that you want. Unfortunately, the list of games supported by Muxy is pretty limited.
4. Tipeeestream
If you’re looking for a Twitch alert provider that offers an alert that specialized in tipping and donation, Tipeeestream is a great option. Their alerts can be customized to suit your preferences with a range of visual and audio options, so you can engage with your viewrs
5. Wizebot
For customizable alerts on Twitch, including follower, donation, and subscriber alerts, Wizebot is another great option. They offer a range of visual and audio options to make your alerts unique. Wizebot is compatible with most streaming software, such as OBS, Streamlabs OBS, and XSplit.
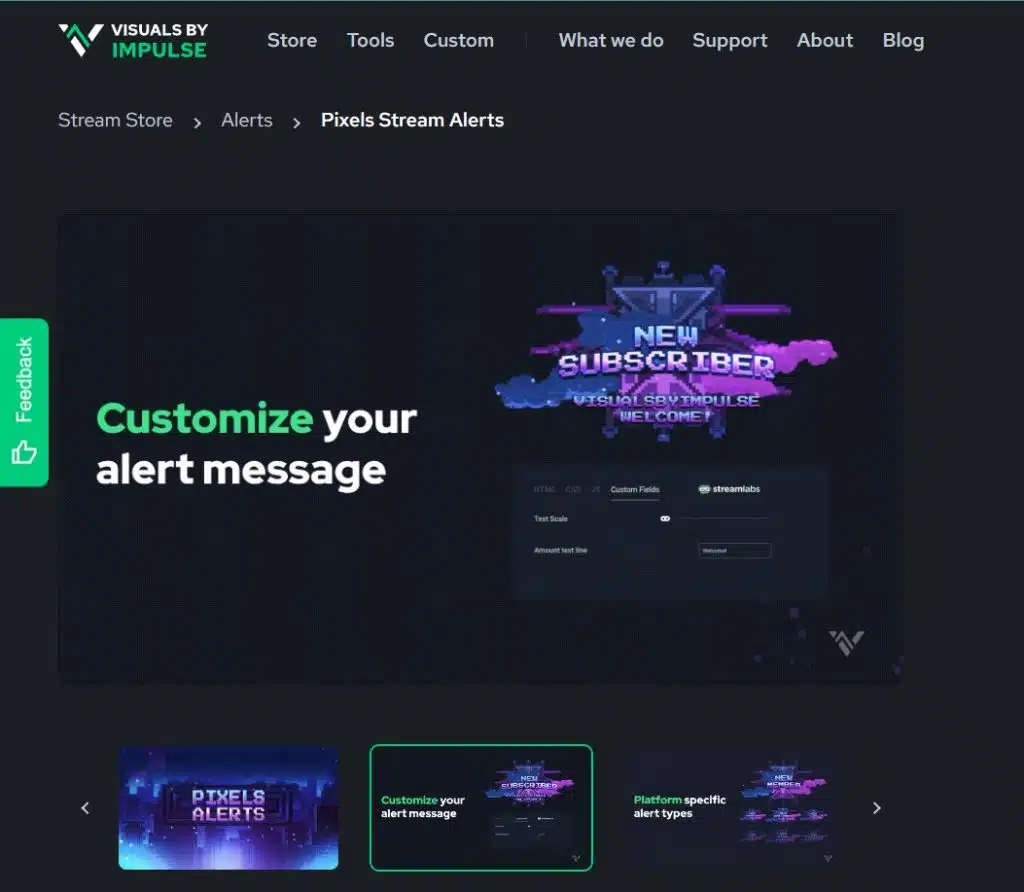
6. Visuals by Impulse
Visuals by Impulse is a Twitch alert provider that offers a range of alerts, including follower, donation, and subscriber. Their alerts can be customized with a range of visual and audio options.
7. Nerd or Die
Nerd or Die offers Twitch alerts that are highly customizable, including follower, donation, and subscriber. They provide a range of visual and audio options, allowing you to create alerts that are unique to your stream.
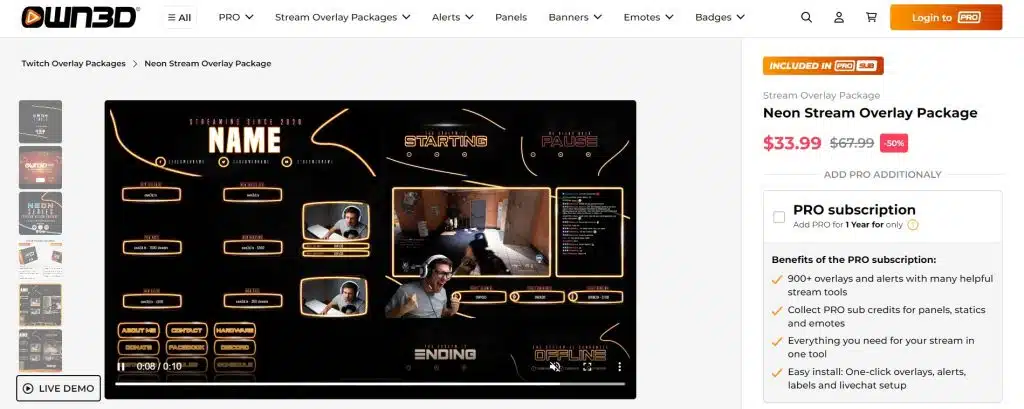
8. Own3D
Own3D is another Twitch alert provider that offers customizable alerts for follower, donation, and subscriber. They offer a range of visual and audio options to make your alerts unique.
Conclusion
Twitch alerts are an essential part of any streamer’s toolkit.
They add a layer of interactivity to your stream and help you build a stronger connection with your audience, and can create a more immersive and engaging streaming experience for your viewers.
With this knowledge, you can choose the perfect alerts to enhance your Twitch streaming experience and take your channel to the next level.
Maximize your Black Ops 6 rewards—Create highlights from your best gameplay with with Eklipse
Eklipse help streamer improve their social media presence with AI highlights that clip your Twitch / Kick streams automatically & converts them to TikTok / Reels / Shorts
Maximize your Black Ops 6 rewards—Create highlights from your best gameplay with with Eklipse
Eklipse help streamer improve their social media presence with AI highlights that clip your Twitch / Kick streams automatically & converts them to TikTok / Reels / Shorts
Can You Transfer Apex Legends Account From PS4 to PC? or How to do Apex Legends transfer ps4 to pc?
That’s the most frequently asked question lately regarding this popular game. Additionally, Apex Legends is playable on multiple platforms, such as PC, Nintendo Switch, consoles, and even mobile. No wonder many players wonder that there is also cross-progression available for this game.
But anyway, what are the differences between cross-play and cross-progression? Is every game that is available to cross-play provide cross-progression as well? Let’s find out about it through this article.
The game with a cross-play service will allow you to play the game through multiple platforms along with other players, such as Apex Legends. Furthermore, the cross-progression service will not only let you play through different platforms but also allow you to connect your gaming account across different platforms.
This means that if you want to play a game, you can play it from any platform you would like without having to start a new account on each platform. So, using the cross-progression service, you can access unlock contents from one device to another, as long as you have connected them both.
Additionally, not all the games have both services. It’s like Apex Legends which only has cross-play available, but not with cross-progression, particularly between PC and consoles.
Can You Transfer Apex Legends Account From PS4 to PC?
Source: Charlie INTEL
Since cross-progression is not yet available for Apex Legends, so there is no way to transfer the Apex account from PS4 to Xbox or PC. Therefore, whenever you desire to play Apex Legends from different platforms, you’ll be required to make a new Apex account for each platform.
However, you still can have cross-progression only on the PC platform by linking your account to your Steam account, or between console generations, such as from PS4 to PS5. You’ll be able to carry your progress this way.
Will Apex Legends Have Full Cross Progression Later On?
According to Apex Legends’ official developer, Respawn, they will add full cross-progression for this game soon enough due to massive demands from the players. Additionally, Respawn has said that the cross-progression for Apex Legends is coming in 2022.
However, there is no further update regarding this promising plan from Respawn. The former director of communication, Ryan K. Rigney, has explained that they still working on some technical challenges and also legal and contractual issues. But he never mentioned when exactly the cross-progression will be available on this game.
Apart from that, this is still nice progress though. Apex Legends is on its way to keeping up with other competitors, such as Fortnite and Warzone.
How do I link my PS4 Apex account to Steam?
If you’re an Apex Legends player who wants to link your PS4 account to Steam, you’re in luck! Here’s a step-by-step guide on how to do it:
Open Steam and log in to your account.
Click on the “Games” menu and select “Add a Non-Steam Game to My Library”.
Click on the “Browse” button and navigate to the location where your Apex Legends game is installed on your PC.
Select the “r5apex.exe” file and click “Add Selected Programs”.
Once Apex Legends has been added to your Steam library, right-click on the game and select “Properties”.
In the Properties menu, click on the “Set Launch Options” button.
In the Launch Options box, enter the following text: +fps_max 0 -novid -high -fullscreen +exec autoexec.cfg
Click “OK” to save the launch options.
Launch Apex Legends from your Steam library and log in to your PS4 account when prompted.
Congratulations! You’ve successfully linked your PS4 Apex Legends account to Steam. Now, let’s discuss the benefits and drawbacks of using Steam for Apex Legends.
One major benefit of using Steam for Apex Legends is that it provides a centralized platform for managing your game library and social connections. Steam also offers a range of features, such as cloud saves and automatic updates, that can make playing Apex Legends more convenient and seamless.
However, there are also some drawbacks to using Steam for Apex Legends. For example, players may experience slower performance or longer loading times when playing through Steam compared to playing directly through Origin. Additionally, certain features or promotions may be exclusive to Origin or other platforms, so players may miss out on some content by only using Steam.
Is Cross Progression Available for Apex Legends Mobile?
Source: Jabar Ekspres
The big fans of Apex Legends now can play its mobile version. The launch of this version might trigger players to start wondering if they can transfer their progress and unlocks to consoles or PC.
Unfortunately, Apex Legends Mobile is separate from Apex Legends on console or PC. There is no cross-play or even cross-progression available for the mobile version. So, you can only access and play Apex Mobile from your mobile phone.
Conclusion
According to the discussion above, if you wonder ‘Can you transfer Apex Legends account from PS4 to PC?’, the answer will be no, you can’t due to the unavailability of the cross-progression service. But, apart from that, Respawn is still trying to give us hope about adding this thing though it will take a long time.
In addition to that, if you want to clip the best moments of Apex Legends gameplay, you can try Eklipse as the best highlight clipper. No need extra effort because our powerful A.I will generate your clip automatically. Click the following button to give it a try!
witch badges serve as status symbols but are also fun to collect. There are several types of badges on Twitch, including chat badges, sub badges, and global badges.
In this post, we’ll focus on the global badges you may encounter on any channel.
There are several chat badges you can earn on Twitch, which are a great way to show more of your personality on the platform. Here are the user-type chat badges and simple chat badges that you can earn:
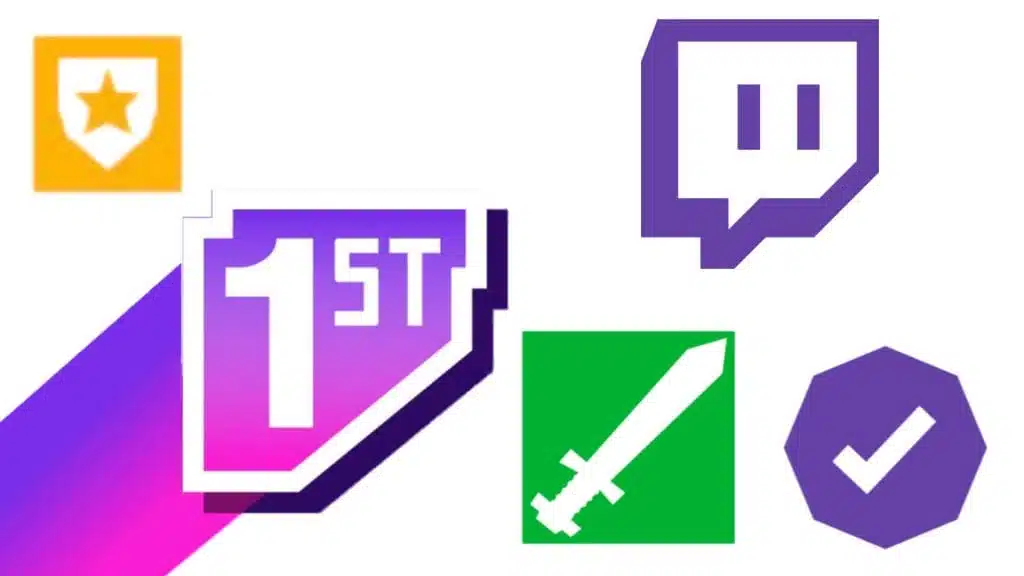
1. Twitch Verified User Badge
To get the Twitch Verified User badge, you must become a Twitch partner and get verified on the platform. This badge features a purple octagon with a checkmark and is displayed by your name at the top of your screen. You can add it to your account in your backend chat settings if it’s available to you.
2. Twitch Broadcaster Badge
The only way to get the broadcaster badge is to learn how to stream on Twitch and broadcast to your channel. When you type in your chat, the badge will appear, and you don’t have to jump through any additional hurdles to use it!
3. Twitch Chat Moderator Badge
Twitch Chat moderator badges are given out by individual Twitch streamers for their particular channels. To earn a moderator badge, be friendly and helpful in their chat, follow the channel’s rules, and don’t cause any drama. If you’re a frequent visitor and the channel is still growing, you may be asked to moderate the channel.
Find ways to support the streamer, such as visiting their Discord channel and offering to help with editing, graphics creation, or other services. If they can see that they can trust you, they will be happy to accept your help.
4. Twitch VIP Badge
Similar to the Chat moderator badge, the VIP badge is given out by streamers. To earn a VIP badge, be a loyal viewer of their channel, follow the rules, and support them in any way that you can. Eventually, they may give you the badge. If you’ve been there for a month or two and have been quite supportive, you can ask them what you can do to earn it.
5. Twitch Founders Badge
The Founder’s badge is awarded to the first few subscribers to any given channel. If you’re one of the first ten subscribers to an Affiliate channel or one of the first 25 subscribers to a Partnered channel, you will receive the badge for becoming part of their community. You must have an active subscription to display the badge.
6. Twitch Staff Badge
The Twitch Staff badge is a black square with a wrench in it and is given to Twitch employees. If you want to work for the world’s most popular streaming platform, visit their careers page to see if you qualify for any open positions.
Fun Fact: the wrench is similar to the tool in the VoHiYo Emote. VoHiYo is based on Twitch mod Volary and is one of the top Twitch emotes on the platform.
7. Twitch Admin Badge
The Twitch Admin badges are given to paid personnel who are selected to moderate channels, process reports, and enforce the platform’s Terms of Service. To become a Twitch admin, you must first be a global moderator.
For the chance to become a global moderator, you must work very hard on forums and other places where users seek support.
If you’re active, accurate in your information, and helpful, someone may approach you with the moderator opportunity. While admins are paid, global moderators are not. There is a lot of competition for both positions.
Twitch Badge from Supporting Streamer
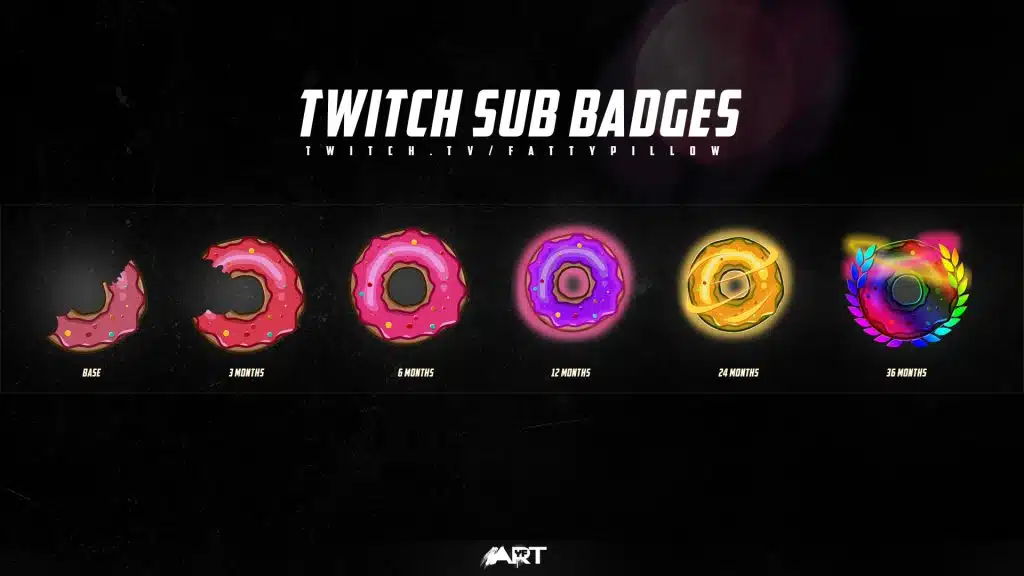
1. Subscriber Badges
These badges are earned by viewers who have subscribed to a Twitch channel for a certain amount of time. The longer a viewer has been subscribed, the cooler the badge they will have next to their name in the chat.
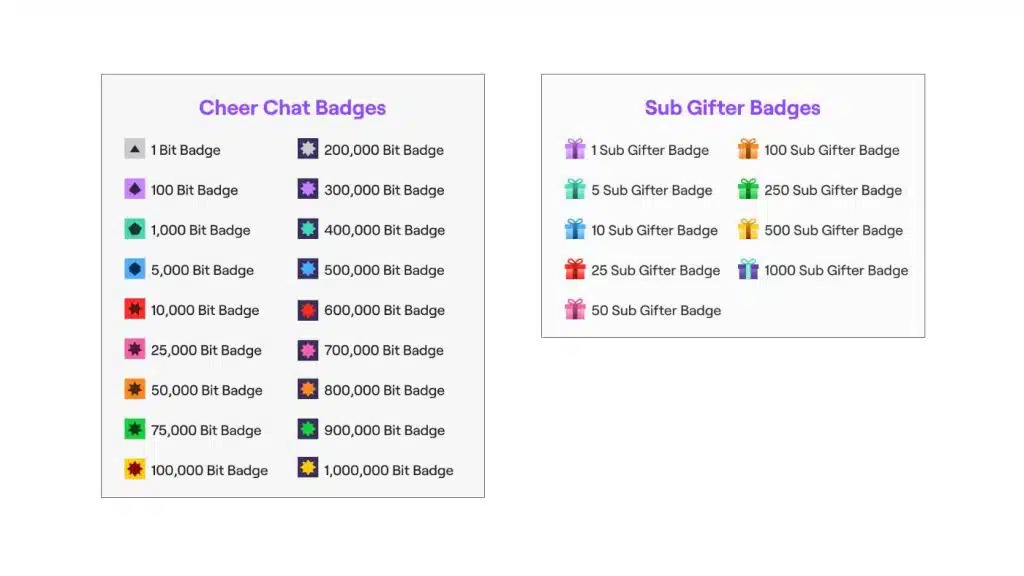
2. Cheer Badges
These badges are earned by viewers who have cheered with Bits, which are a virtual currency that viewers can use to support their favorite streamers. The more Bits a viewer has cheered with, the cooler the badge they will have.
3. Sub-Gifter Badges
Giving gifts is another way of demonstrating support for a channel. When you send sub gifts to other viewers, you can acquire sub-gifter badges. Nevertheless, these badges will only be visible as long as your gift subscription is active. Nonetheless, the positive aspect is that even after the badge disappears, it will continue to level up permanently.
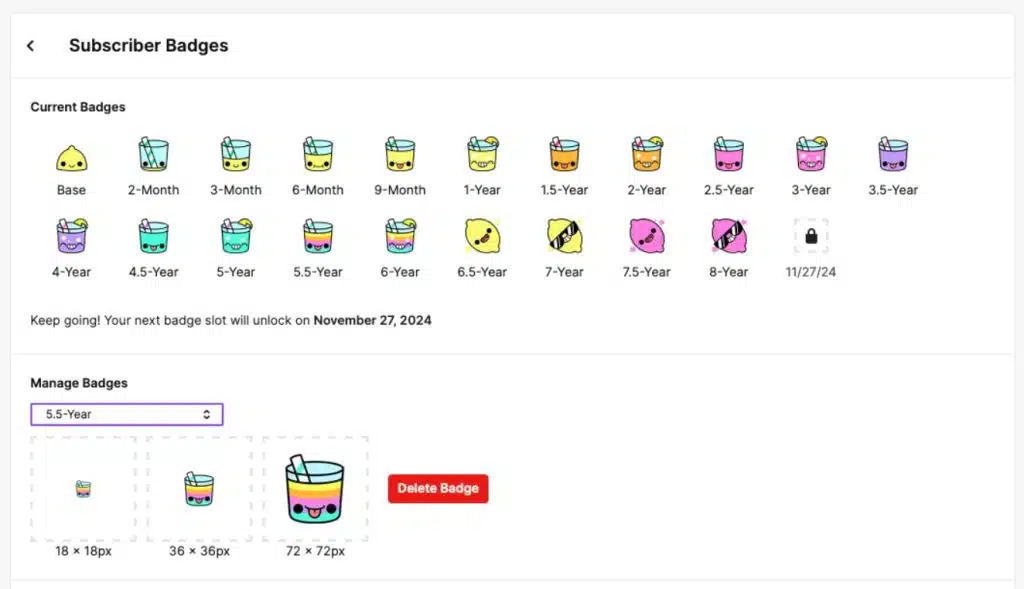
How to upload a custom subscriber badge
For the channel owner, If you want to upload a custom subscriber badge to Twitch, here are the steps you can follow:
Go to the Partner section of your Preferences on the Creator Dashboard.
Navigate to the Subscriptions section.
Click Loyalty Badges.
Choose the badge you’d like to modify by selecting it from the dropdown menu beneath Manage Badges.
Click the “+” symbol on each size to upload 3 identical images in the sizes specified by the uploader:
18×18 pixels
36×36 pixels
72×72 pixels
Once you have uploaded the images, click the Save Changes button to save your custom subscriber badge.
It’s important to note that custom subscriber badges are only available to Twitch Partners and Affiliates who have reached certain subscription milestones. If you’re not yet eligible for custom subscriber badges, you can still use the default badges provided by Twitch.
How to Change Sub Badges on Twitch
If you’re a Twitch streamer or a channel owner, you can customize your sub badges to better reflect your brand or community. Here are the steps to change your sub badges:
To manage your badges, go to your dashboard.
Click the Hamburger icon to open the menu.
Click Preferences, then Partner or Affiliate.
Scroll down to the Subscriptions section.
Click Loyalty Badges.
It’s important to note that changing your sub badges will only affect new subscribers. Existing subscribers will still see the old sub badges until they resubscribe. Additionally, if you want to change your sub badges in the future, you can repeat these steps to update them again.
Conclusion
In conclusion, subscriber badges on Twitch are a great way for streamers to reward their loyal fans and build a community.
They come in a variety of designs and can be earned or purchased. As a viewer, collecting badges can show your support and dedication to a channel, and can also give you a sense of belonging to a community. With the ability to customize your own subscriber badges, Twitch provides streamers with a great way to stand out and make their channel more unique.
So, whether you’re a streamer or a viewer, be sure to take advantage of the great features that Twitch has to offer!
Maximize your Black Ops 6 rewards—Create highlights from your best gameplay with with Eklipse
Eklipse help streamer improve their social media presence with AI highlights that clip your Twitch / Kick streams automatically & converts them to TikTok / Reels / Shorts