The Valorant Butterfly Knife brings “killing with style” to life with its aesthetic design. Here’s how you can get it in Valorant!
Riot Games has announced a new Recon Skin bundle that’s available now in Valorant. The Butterfly Knife was one of the most popular items, and fans can finally get their hands on this stylish knife!
The Recon bundle was created by the development team to add an extra element of ‘realism’. In addition, it also serves as having more content along more lines like CS:GO or Battlefield.
They also added in a butterfly knife. This knife has been getting quite attention since its release last week, here’s how you can get it!
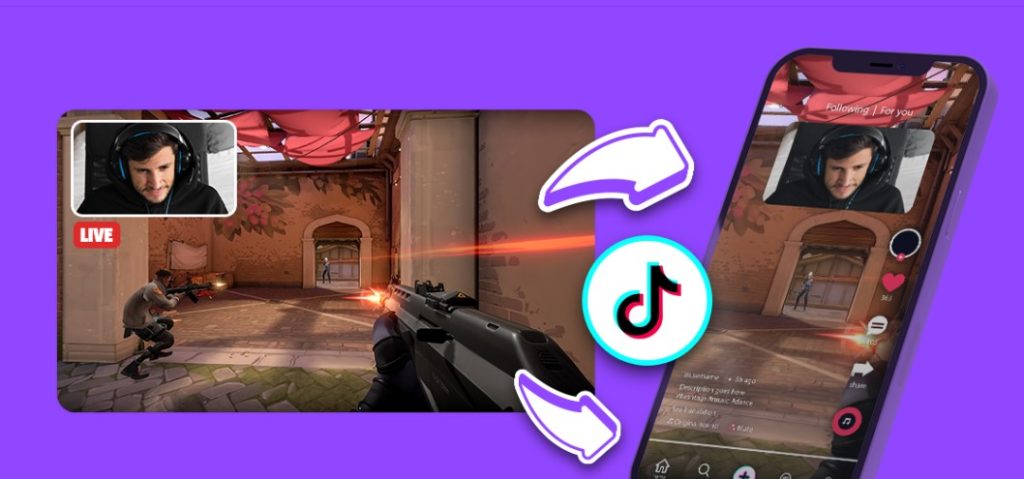
YouTube Shorts have recently rolled out to the YouTube app. Now, all YouTube users are able to create bite-size videos just like on TikTok and Instagram Reel. Since YouTube is accessible both from a mobile and a PC, you might wonder how to make YouTube Shorts on PC.
Well thankfully, it’s actually possible to do and it won’t require you extra effort to get it done. We’ve got you covered with this step by step guide!
Basically, to make YouTube Shorts through a PC is pretty simple. You just need to do the same steps as uploading regular videos and that’s it. However, you can only upload pre-recording videos and unable to record the new ones. Here are the steps to do it.
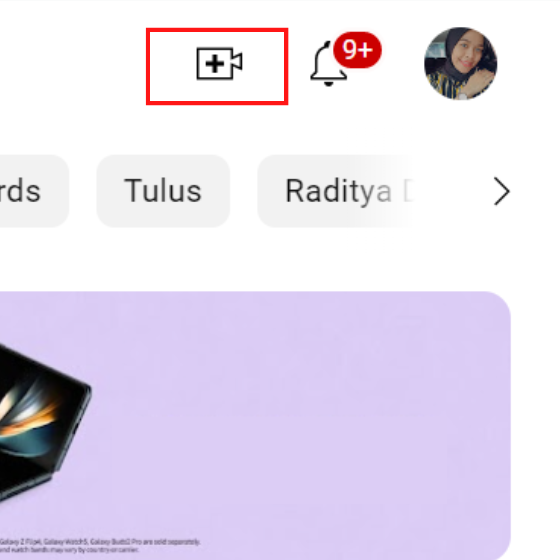
Step 1. To begin with, go to the YouTube website and log in to your account.
Step 2. Once you are on your YouTube homepage, navigate to the plus ‘+’ button at the upper-right corner.
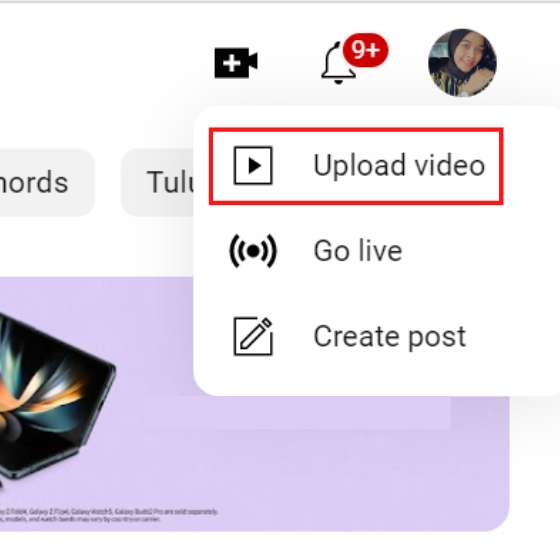
Step 3. Then, choose the Upload Video option.
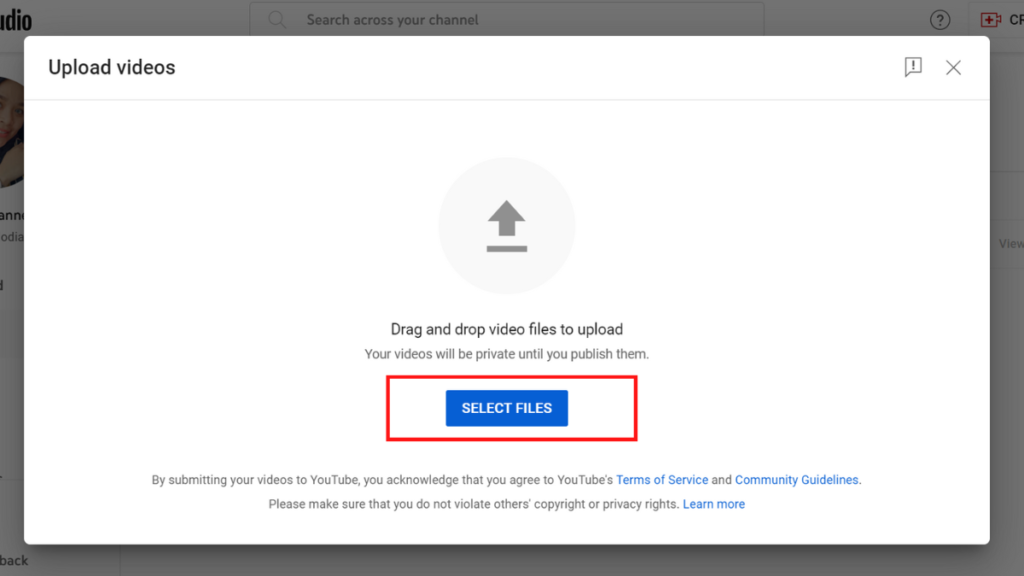
Step 4. After that, click on Select File to access your local library and choose the file you are going to post.
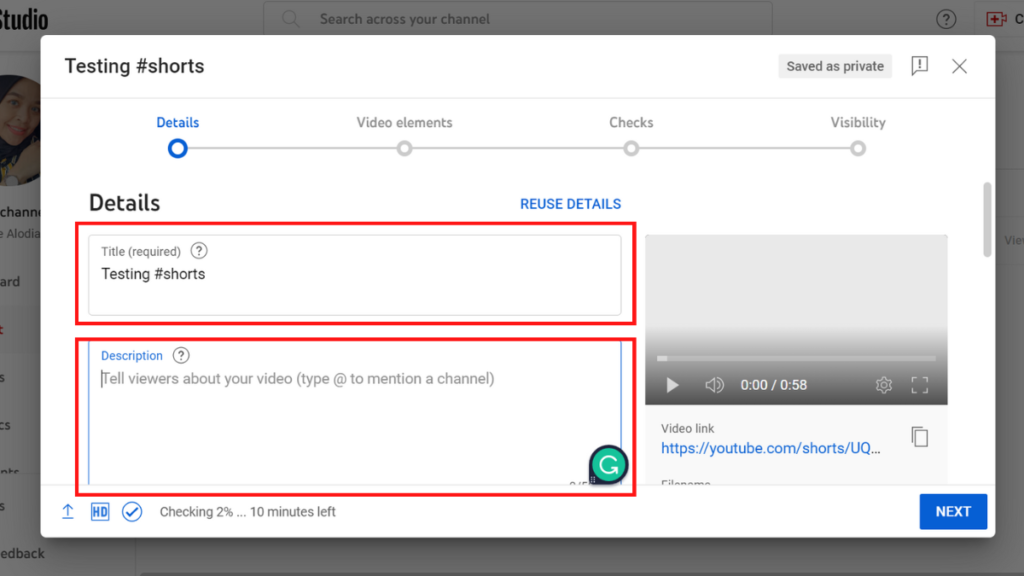
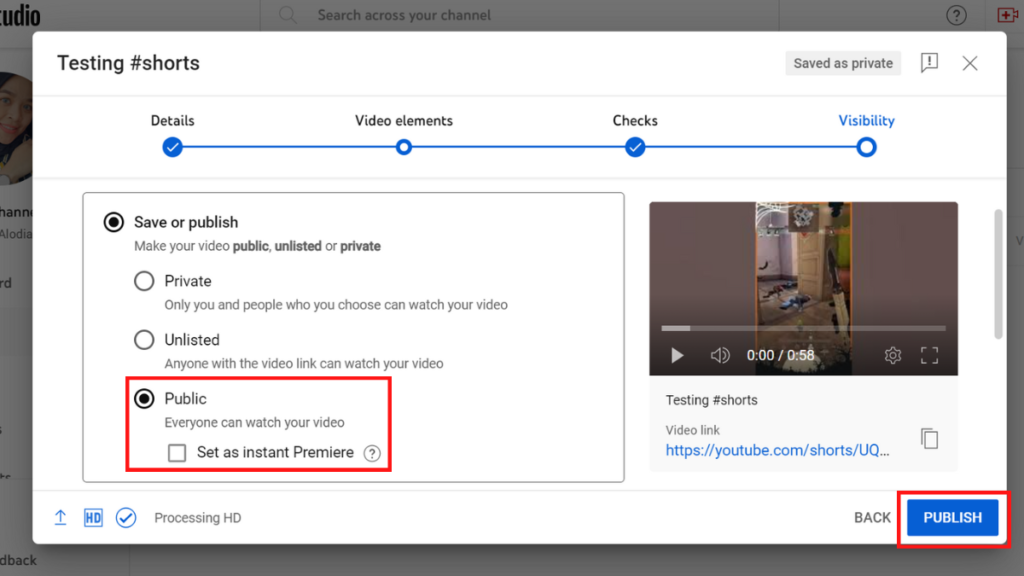
Step 5. Now, you can add the details for your video. Name a title and don’t forget to add a #short hashtag so that YouTube can identify your video as Shorts.
Step 6. Add a description to your video and a nice thumbnail. Make sure you select the audience for your audience and hit Next.
Step 7. If you have done all the steps, click the Public button and hit Publish. Voila! Your Short video is now airing!
How to Create YouTube Shorts on PC Using Eklipse
As previously mentioned, you can’t record a new Short video from scratch on a PC. As a result, you need to use your phone at least and copy the file to your device. However, it took forever to do all these steps.
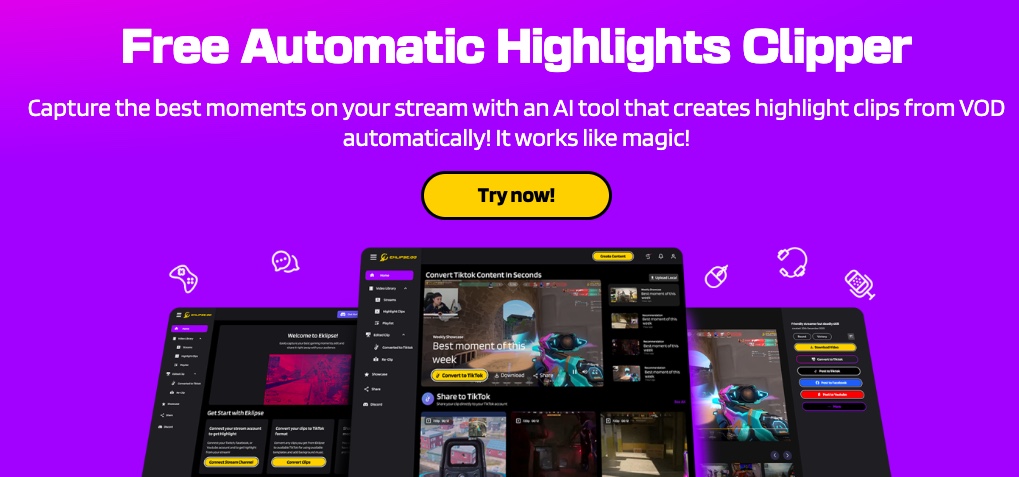
Alternatively, you can create stunning Short videos by clipping your streaming video. Thankfully, Eklipse can make it possible. With its powerful AI, Eklipse can help you convert your highlights into YouTube Short format. Here’s how.
Best Highlights Clipping Software
Eklipse.gg is an AI highlight generator and online video editor that clip your streams automatically and converts them to TikTok easily.
Step 1. Start off by heading to the Eklipse website and logging in to your account. Or if you don’t have an account, you can register first.
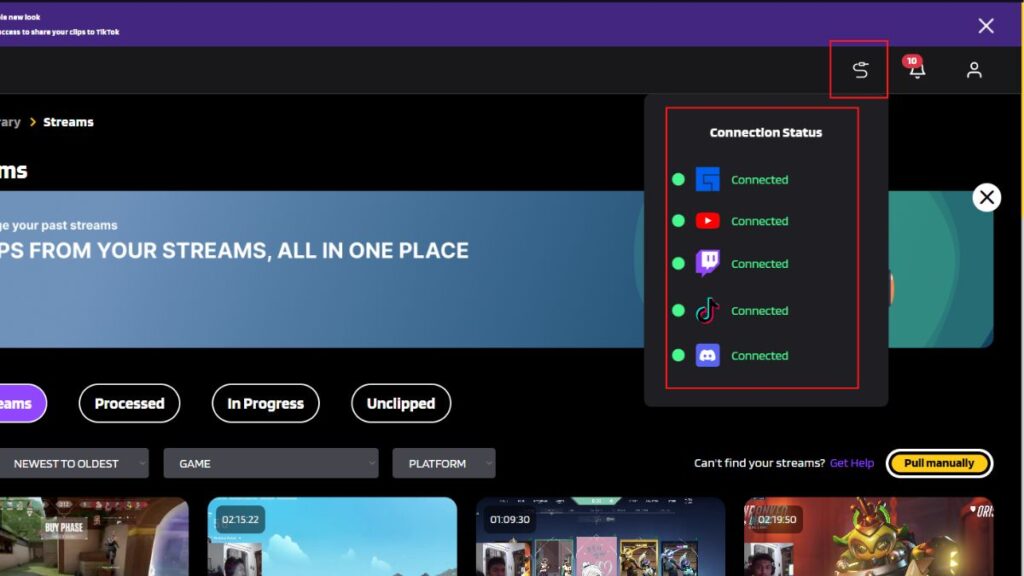
Step 2. Then, link your Eklipse account with your streaming platforms (YouTube, Twitch, Facebook, Discord, and more) by hitting the cable icon at the upper-right side.
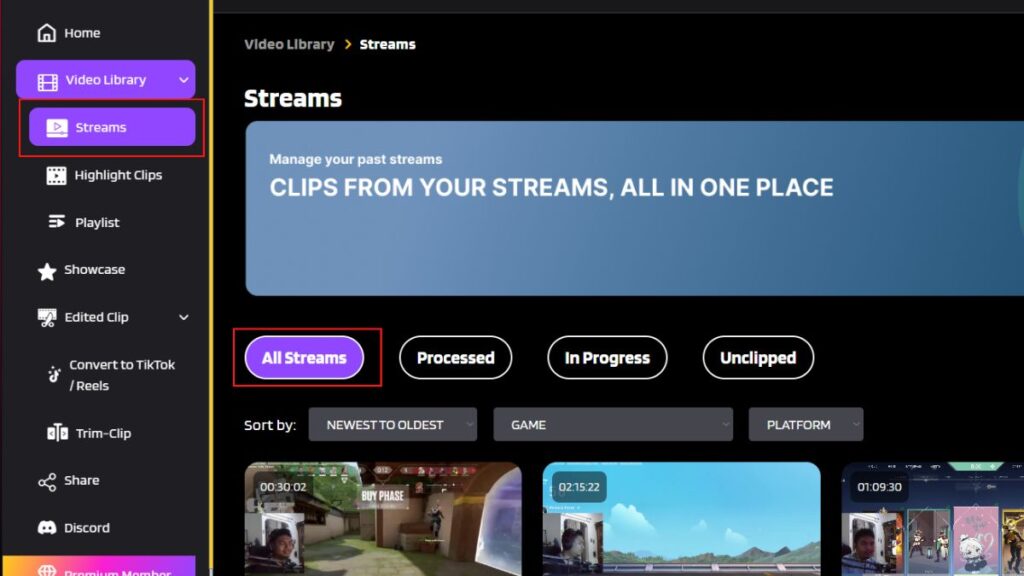
Step 3. Find the video in the Streams tab under the Video Library option and hit the All Streams section.
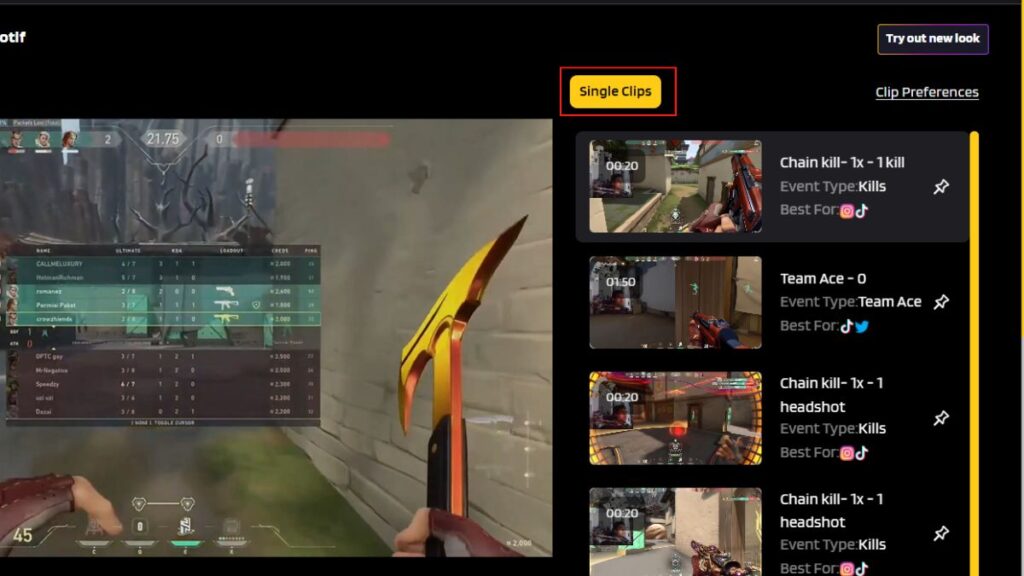
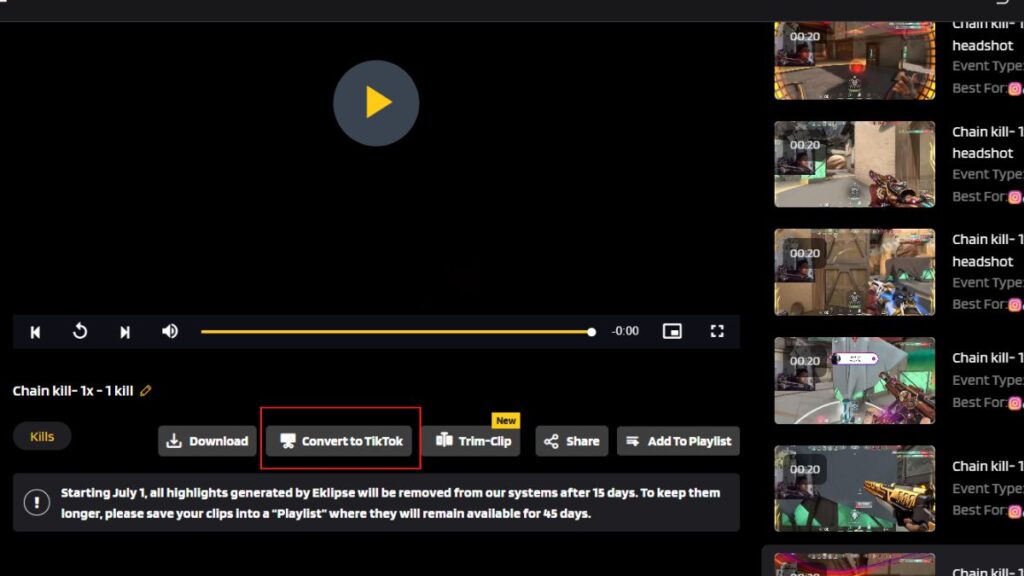
Step 4. Click on the video you’d like to clip and find the best clip under the Short Clips option.
Step 5. After that, hit the Convert to TikTok/Reel button under the video preview and choose the finest template.
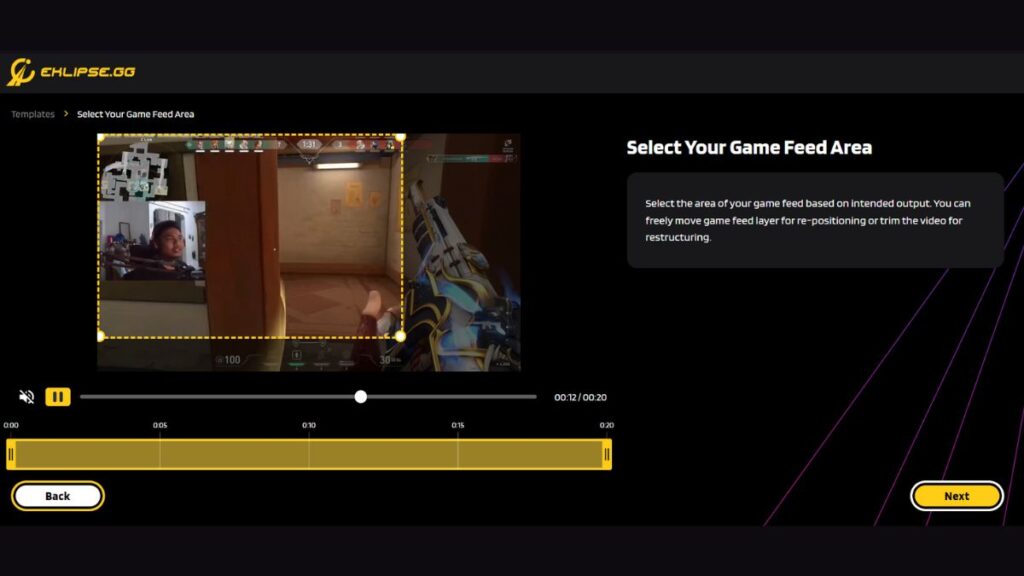
Step 6. Adjust your feed area, as well as your clip length and hit Next.
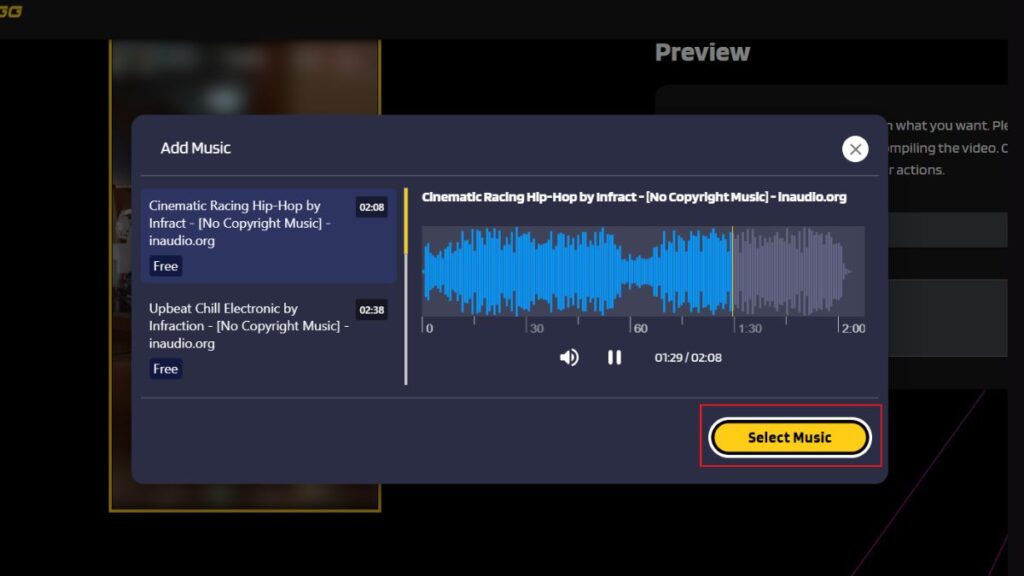
Step 7. To add a soundtrack, head to the Add Music option and choose any music you think matches your video. Click on Select Music.
Step 8. Select the music area you would like to use, the length, and the volume.
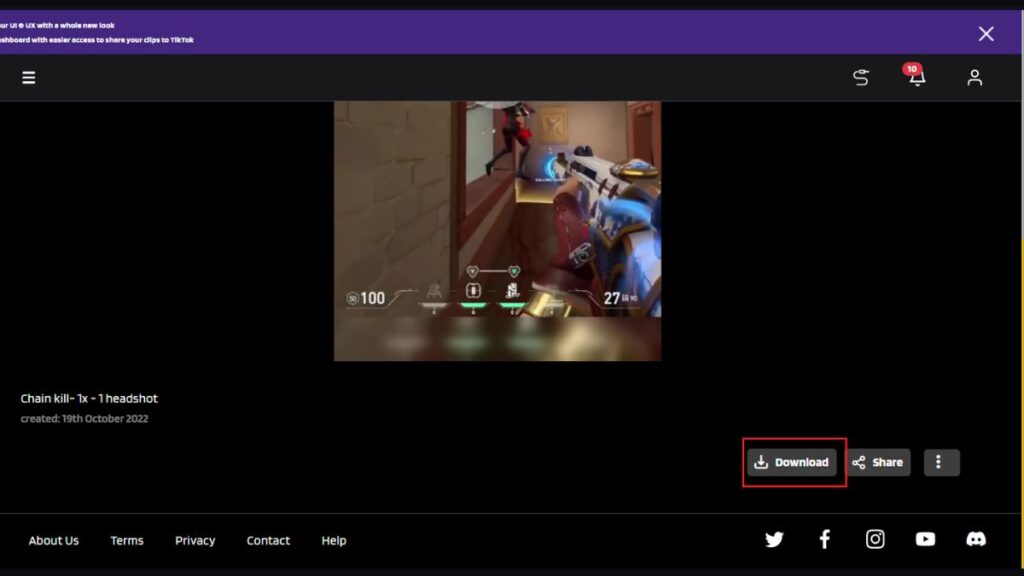
Step 9. Furthermore, hit Confirm and find your clip in the Convert to TikTok/Reel section under the Edited Clips option.
Step 10. Last but not least, select your edited clip and click on the share button. This is what makes Eklipse special. You don’t need to upload your Short video manually. Instead, use Eklipse and you can grab anything at once.
Tips for Better Quality YouTube Shorts
When it comes to publishing better-quality YouTube shorts, it’s essential to pay attention to the details. Every element of your video, from lighting to sound quality, can impact its success. Here are some tips to help you create visually appealing and engaging YouTube shorts that stand out from the crowd:
1. Lighting
Good lighting is crucial for producing high-quality video content. To ensure that your YouTube shorts look their best, try to shoot in well-lit environments. Natural light is the best option, but if you need to shoot indoors, make sure to use ample artificial lighting to brighten up your video.
2. Sound Quality
Good audio is just as important as good lighting when it comes to creating high-quality YouTube shorts. Consider investing in a dedicated microphone to capture clear audio that adds value to your video. Make sure to test your audio before shooting to ensure that your audience can hear you clearly.
3. Production Value
The overall production value of your YouTube shorts can greatly impact their success. Ensure that your video is well edited, and the pacing is appropriate for the length of the video. Consider adding text overlays and using appropriate music to make your video more engaging.
4. Appropriate Camera Angles
Using appropriate camera angles can help your YouTube shorts stand out from the crowd. Consider using different camera angles to keep your video visually interesting, and avoid shooting everything from one perspective.
5. Make Your Video Visually Appealing
The key to creating successful YouTube shorts is to make your video visually appealing and engaging. Use engaging visuals, such as animated transitions or creative text overlays, to add interest to your video.
Common Mistake To Avoid While Uploading Shorts
If you’re a creator looking to make your mark on YouTube with your short-form content, it’s important to avoid common mistakes that could hinder your success. Here are some of the most common mistakes creators make when creating YouTube shorts, and how to avoid them to ensure that your videos stand out and attract viewers:
1. Not optimizing video length
One of the biggest mistakes creators make is not optimizing their video length for the platform. YouTube shorts are meant to be brief and attention-grabbing, so it’s important to keep your video under 60 seconds. If your video is too long, viewers are more likely to lose interest and move on to something else.
2. Ignoring aspect ratio
Another common mistake is ignoring the aspect ratio of your video. YouTube shorts are best viewed in a vertical aspect ratio (9:16), so make sure your video is shot and edited accordingly. A video that doesn’t fit the recommended aspect ratio may not display correctly on mobile devices, which could discourage viewers from watching.
3. Failing to grab attention quickly
With so many videos competing for attention on the platform, it’s crucial to grab viewers’ attention within the first few seconds of your video. Make sure your opening is attention-grabbing and clearly communicates what your video is about. Consider using captions, text overlays, or sound effects to add extra impact.
4. Neglecting quality
While YouTube shorts are meant to be short and sweet, that doesn’t mean you should skimp on quality. Poor lighting, shaky camera work, or bad sound can all be major turnoffs for viewers. Take the time to shoot and edit your video carefully to ensure that it looks and sounds great.
Conclusion
Now you’re all caught up with how to make YouTube Shorts on PC. It’s worth noting that the Short video should be vertical or square between 15 to 60 seconds. And the most important thing is the #short hashtag. Otherwise, YouTube will categorize your video as the regular one. So, are you interested to give Eklipse a shot?
Additionally, in case you want to enjoy YouTube Shorts from a PC and don’t know where to begin, you can head over to our guide, and find the step-by-step there: How To Watch YouTube Shorts on PC: A Beginner Guide.
Repurposing Kick stream content is a smart move for anyone who wants to save time and resources while still providing valuable content to their audience. If you are looking for effective ways to repurpose your Kick stream content, then you are in the right place.
In this article, we will discuss 7 tips to repurpose Kick stream content and make the most out of it to grow your Kick channel!
Creating short vertical videos from your Kick stream content is an effective way to tap into the trend of short-form video content on platforms like TikTok, Instagram Reels, and Snapchat.
By taking short clips from your Kick stream and editing them into attention-grabbing vertical videos, you can reach a wider audience and keep your viewers engaged.
Don’t worry about editing because you can use tools like Eklipse.gg, an easy “convert to TikTok” app with a simple drag-and-drop video editing workflow.
You can edit your Kick clips into TikTok in a snap with templates. Additionally, Eklipse has features that allow you to make your content more personal, like a Kick channel name sticker, auto-caption, overlay, and you can even add text and music!
The best thing is, everything is available for FREE! You can check out Eklipse.gg to learn more about it!
2. Make Podcast Episodes
Repurpose your stream as Podcast? Why not!
Turning your Kick stream content into podcast episodes is another effective way to reach a wider audience, especially if you regularly host a Just Chatting Kick streams category.
Extract the audio from your Kick stream and upload it to platforms like Apple Podcasts, Spotify, or SoundCloud. This allows people who prefer audio content to access your content in the format they prefer.
3. Create a Highlight From the Stream, Post it as VOD on YouTube or Facebook
One of the best ways to repurpose your Kick stream is by creating highlights of it.
Edit and add intros, outros, and calls-to-action to create polished videos that provide value to your audience. Then, post them on YouTube or other video hosting platforms to increase your visibility and reach.
This tool allows you to automatically generate highlights and clips of your stream, so there’s no need to manually scroll through hours of your stream VOD.
Whether you are playing Call of Duty, Fortnite, or even doing a Just Chatting session, Eklipse can automatically turn your hours of stream into dozens of 30-60 second content.
This feature is also available for FREE, but consider upgrading to the Premium Plan, especially if you are a professional Kick streamer.
Maximize your Black Ops 6 rewards—Create highlights from your best gameplay with with Eklipse
Eklipse help streamer improve their social media presence with AI highlights that clip your Twitch / Kick streams automatically & converts them to TikTok / Reels / Shorts
MoistCr1TiKaL most popular GIFs can be one of your example.
GIFs are popular and easily shareable on social media.
By taking short clips from your Kick stream and converting them into GIFs using online tools like Giphy or Tenor, you can make your content more interactive and engaging.
Use the GIFs in your social media posts or as reactions in your messages.
5. Convert Your Highlight Into BRB or Starting Soon Screen
Switch your BRB screen to show off epic #gaming moments clipped by Eklipse!🪄 it’s 2023… time for some changes ¯_(ツ)_/¯🔥 Set-up now! https://app.eklipse.gg/account sstreamertipsstreamingtips ccontentcreatorttwitchyyoutubeffacebookhhowtosstreamingsstreamerggamerggaminghhighlightscclipsffypeeklipseeeklipseggeeklipsehighlightggrowthmadebyeklipse
If you have a highlight from your Kick stream content, use it as a BRB (be right back) or Starting Soon screen for your future Kick streams.
This can be a great way to create brand consistency and build anticipation for your next Kick stream. You can also use the highlight as an introduction to your channel for new viewers.
Eklipse also has plugin that allows you to create BRB and Starting Soon Screen from the compilation of your clips. So make sure to check it out!
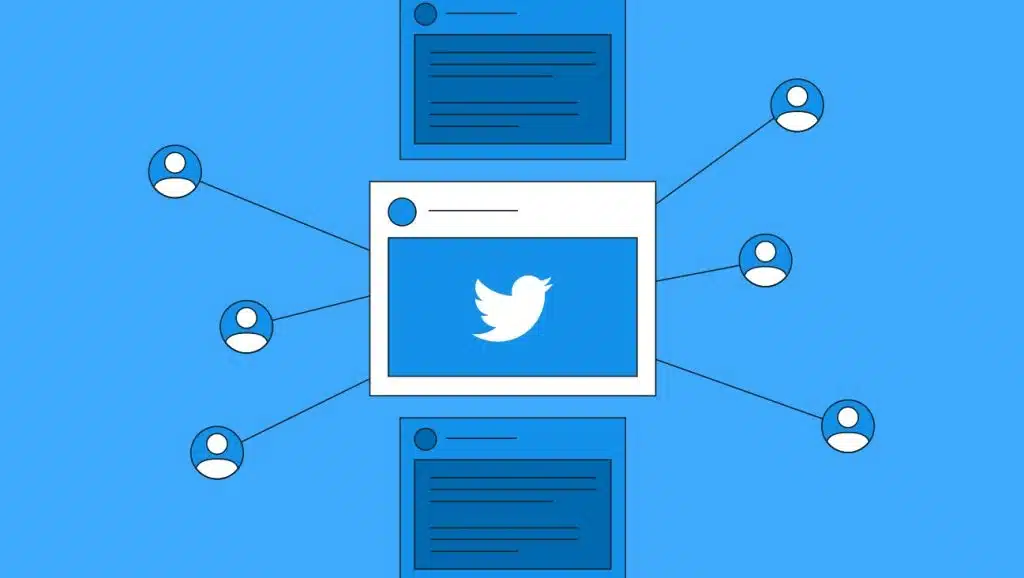
6. Share Quotes on Twitter
Sharing meaningful quotes from your Kick stream content on Twitter is an effective way to spark conversations and provide valuable insights to your audience. Use relevant hashtags and tag other users to increase your reach and engagement.
7. Tap into All the Popular Social Channels
To reach a wider audience, repurpose your Kick stream content across all popular social channels, including Facebook, Twitter, Instagram, TikTok, YouTube, even community-based social channels like Reddit or Discord.
Tailor your content accordingly to each platform to increase your chances of success.
Even though you are a Kick streamer, you should think of yourself as a content creator that has an omnichannel presence on social media. So, don’t stop at just Kick. Expand yourself as much as you can, and who knows?
You might find your luck and finally make money as a Kick streamer!
Conclusion
In conclusion, repurposing your Kick stream content is an effective way to save time and get the most out of your content.
Create short vertical videos, edit and post as VOD, make podcast episodes, transform your live video clips into GIFs, convert your highlight into BRB or Starting Soon screen, share quotes on Twitter, and tap into all the popular social channels.
By following these tips, you can take your Kick stream content and turn it into several different types of content to reach a wider audience and keep your viewers engaged.
Open Broadcaster Software (OBS) is a great open-source software for creating high-quality videos, but it can be difficult to set up.
This guide will help you adjust your video and audio settings to find the best recording configuration based on your output resolution, downscale filter, framerate, recording format, encoder, rate control, video and audio bitrate, and other factors.
Let’s dive deep into the guide for the best recording settings for OBS.
OBS is a free, open-source software for video recording and streaming.
It is compatible with Windows, macOS, and Linux, making it an excellent choice for all content creators looking to produce professional videos.
OBS is perfect for multi-source audio/video capturing and mixing, adjusting audio settings, and switching between scenes on the fly, previewing scenes and sources via Studio Mode, and monitoring eight different scenes simultaneously via Multiview.
What are the Best Recording Settings for OBS?
Before you start recording, it’s important to set up OBS correctly to ensure smooth video playback without performance issues.
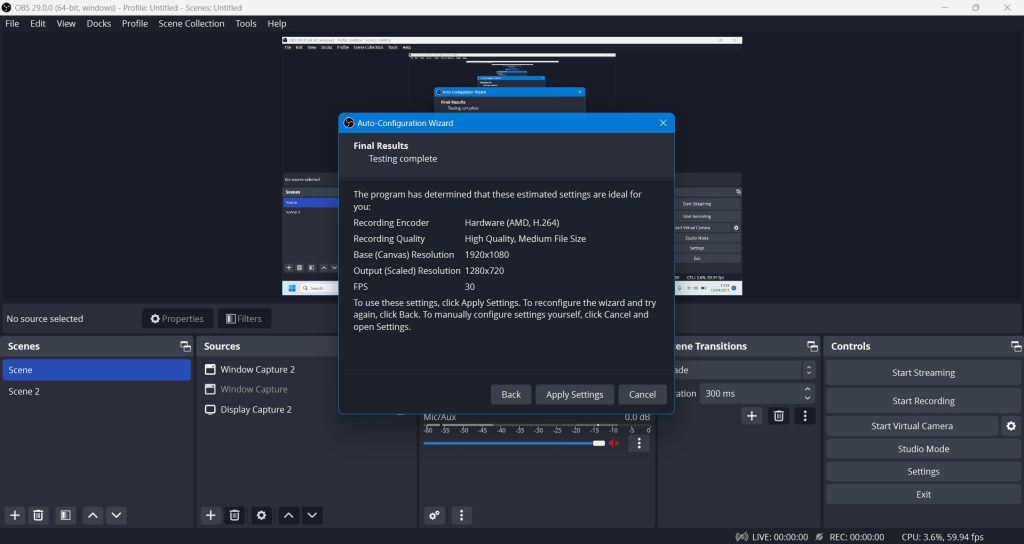
Keep in mind that there is no one-size-fits-all solution, and your ideal OBS setup will depend on your CPU and GPU. A good starting point to find your best recording settings for OBS is via the Auto-Configuration Wizard.
To access this menu, simply follow these steps:
Open OBS
Go to “Tools” in the top menu bar
Choose “Auto-Configuration Wizard”
Select “Optimize just for recording, I will not be streaming”
Set the “Base (Canvas) Resolution” to match your monitor resolution, and leave the FPS settings as they are
OBS will show you the recommended settings for recording
If you have a higher-end processor and graphics card, you can increase your video and audio settings. However, if you have lower or mid-level options, you will need to settle for them. Let’s proceed with this in mind!
1. Video Settings
While working out your optimal OBS recording settings, you’ll mainly focus on two sections: Video and Output.
To start, make your way to Settings. You can find them in the lower right corner of the interface or go to the File tab in the top left corner then Settings. Either way, you’ll open up a new window with an array of options. Your first point of interest is Video.
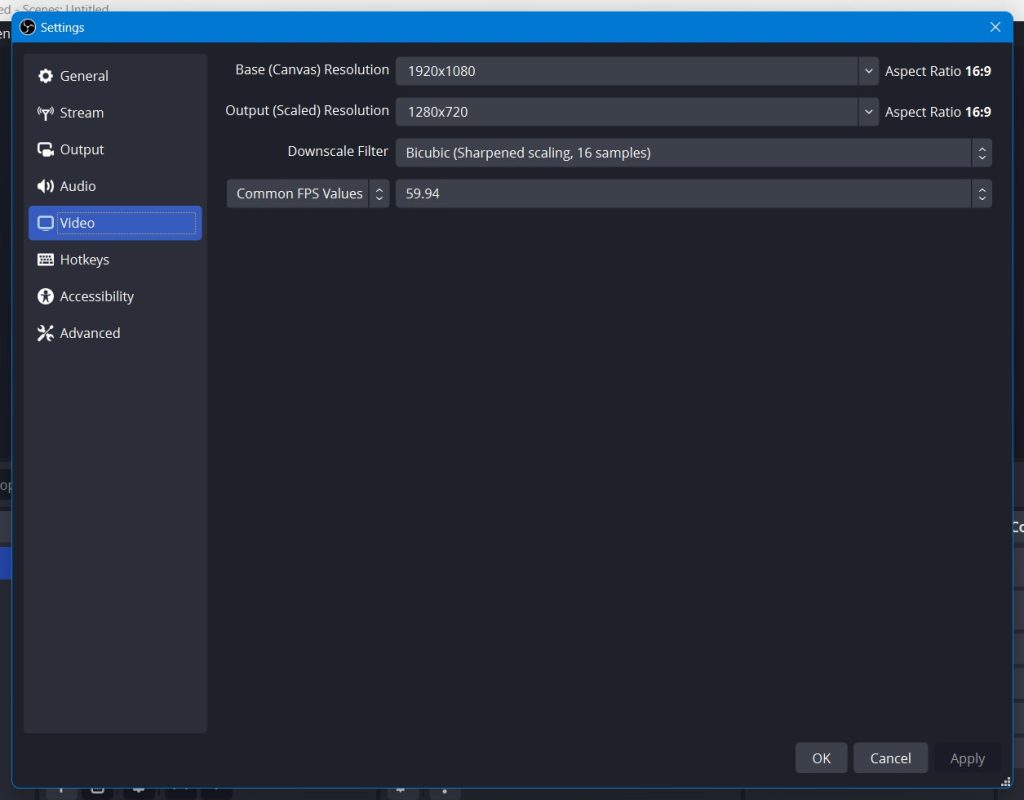
On the video settings, there are several settings that you need to know
Base (Canvas) Resolution: This is the resolution of the area where you will edit the layout of your recording.
Output (Scaled) Resolution: This is the size of your recorded video. You can set it to be the same as your resolution or lower.
Downscale Filter: This program is used to downscale your resolution from the base to the output.
Common FPS Value: This is the frame rate of your recording.
You can leave the base canvas resolution as it is since it won’t impact your recording performance. However, you should consider the output resolution, downscale filter, and FPS value.
For PCs with lower specifications, you can set the output to 720p (1280 x 720) with 30 FPS. To ensure that the recording won’t burden your CPU too much, you can select the downscale filter to “Billeniar.”
If you have a higher-end PC, you can use the same output resolution as the base and set the FPS value to 60 FPS.
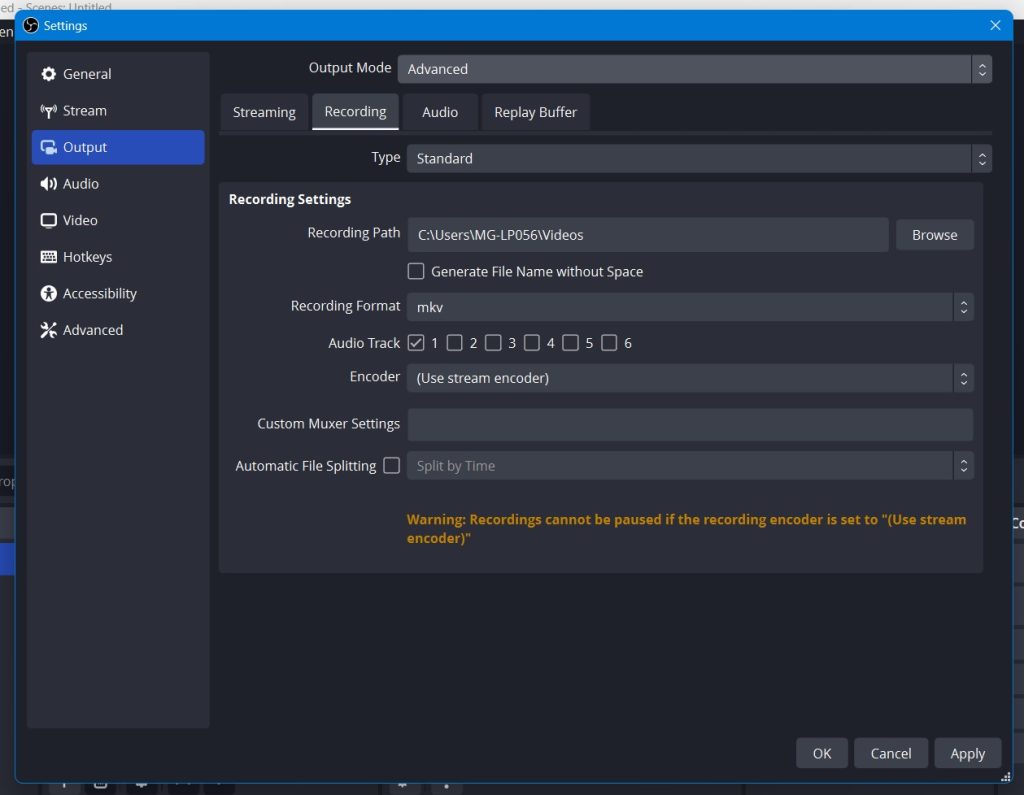
2. Output Settings
Your next step should be the Output section. Start by changing the Output Mode to Advanced. This will allow you to fine-tune the settings for the best recording performance in OBS.
Then, navigate to the Recording tab, where you’ll find the following settings:
Recording Path: The destination where your recording will be saved.
Recording Format: Choose the format of your recorded video.
Audio Track: If you’re using multi-track audio, you can select which track you want to record.
Encoder: A hardware device or software program that enables you to record and manage an advanced production with multiple cameras and audio tracks.
If you have a straightforward setup with single audio, the key settings to focus on are Recording Format and Encoder.
The best Recording Format options are .MKV or .FLV since they allow you to recover recordings in the event of a power outage, BSOD, or OBS crashing. However, if you prefer a more commonly used format for video editing, you can choose .MP4 or .MOV.
Choosing the right Encoder is a crucial decision and it depends on the capabilities of your CPU and GPU.
For those who have an Nvidia Series GPU, it is recommended to opt for NVENC.
On the other hand, if you have a mid-range CPU and AMD graphics card, then AMF would be a better option.
Finally, for those who have a powerful processor, it is advisable to go with x264.
3. Encoder Settings
After you choose your Encoder, several options will appear. The encoder type you choose will also impact the best Rate Control for your OBS recordings.
There are three smart options to consider:
CQP (NVENC and AMF only) for high-quality videos with large file sizes
CRF (x264 only) for another high-quality recording option
VBR for less detailed videos with more reasonable file sizes.
Once you’ve determined your Rate Control, the next step is to find the right OBS Recording Bitrate that balances your output resolution, framerate, and the platform you’ll be uploading to.
Keyframe Intervals are crucial for live streaming, but for determining your best recording settings in OBS, you can be more flexible and try out intervals between 2-8 seconds.
Lastly, you should consider the CPU Usage Presets, which determine the speed of encoding and the amount of CPU power used.
In most cases, the Veryfast setting strikes the best balance between video quality and CPU usage. However, if you encounter overload issues, you can switch to Superfast or Ultrafast.
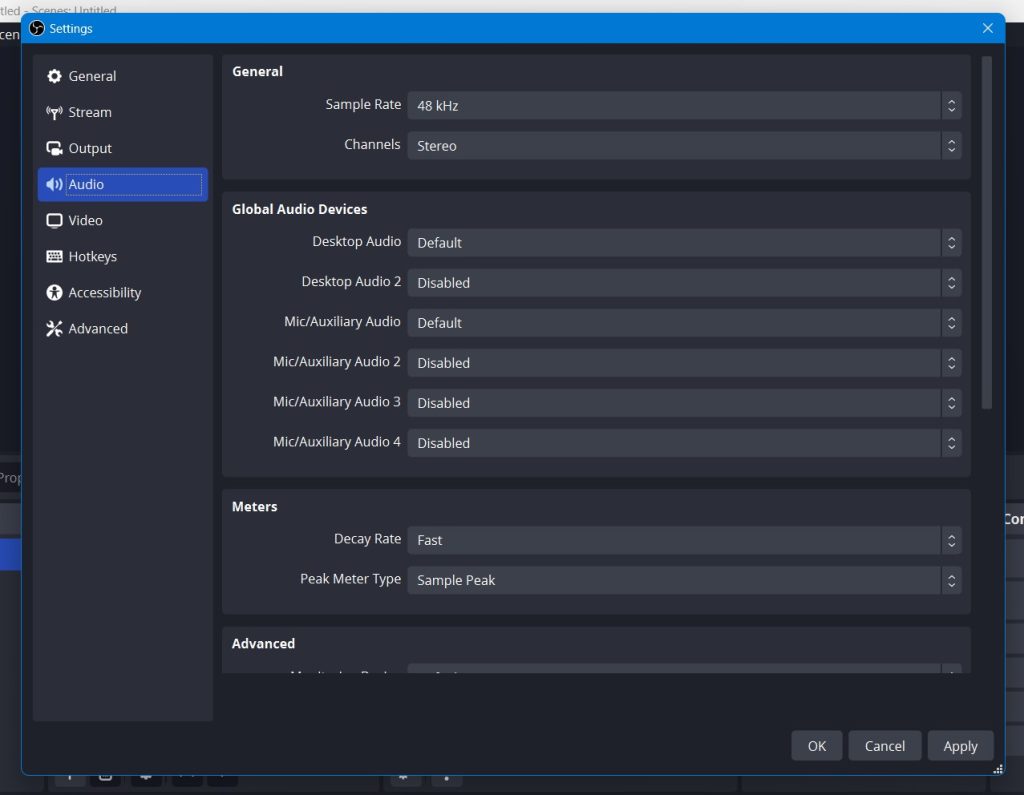
4. Audio Settings
Proceed to the Audio settings section. The initial setting you will notice is the Sample Rate which should match your microphone’s.
Keep the Channels as Stereo. The Global Audio Devices are all the audio inputs available, enable only the ones you intend to use for your recording, and leave the others unchanged.
Tips in Content Creation Using OBS Recordings
There are many purposes for recording using OBS. However, if you’re a gaming content creator, we’ve got some tips to help you create more content faster.
Creating gaming content from OBS recordings can involve hours of scrolling through your gameplay recordings to look for epic or funny moments. But there’s a tool that can save you so much time doing that.
Recently, we released an update that allows you to use Google Drive to export your gameplay recordings to Eklipse, so our AI can generate epic gaming highlights for you! Even better, Eklipse is also equipped with a “convert to TikTok” video editor, so you can easily edit any highlights into a vertical format video using templates, stickers, and many editing tools.
Why not give Eklipse a try? Learn more about the features by clicking the button below.
Maximize your Black Ops 6 rewards—Create highlights from your best gameplay with with Eklipse
Eklipse help streamer improve their social media presence with AI highlights that clip your Twitch / Kick streams automatically & converts them to TikTok / Reels / Shorts
Having learned the best OBS recording settings for both video and audio, you should keep in mind that your computer specifications may affect your ultimate setup. However, with some adjustments, even older systems can capture polished and seamless videos.
Now that you are familiar with OBS recording, why not experiment with live streaming? It could be an enjoyable experience!
Tired of having to copy various links or manually upload different VODs to create highlights? Now, you can use Google Drive files for Eklipse’s AI processing!
In today’s Eklipse update, we’re excited to announce that you can now upload all your gameplay from various platforms to Google Drive. Eklipse will then automatically generate engaging highlights using advanced AI technology.
So, what is this feature all about? Let’s dive in to learn more!
Eklipse Studio Update: Google Drive Synchronization
Source: Eklipse.gg
Forget spending hours combing through your gameplay footage for highlight-worthy moments! Eklipse now streamlines the content creation process with a powerful new feature: synchronization with Google Drive.
Once you’ve finished recording your gameplay, simply upload it to Google Drive, make the folder public (accessible to anyone with the link), and copy the Google Drive link to Eklipse. Our AI technology will then analyze your content and identify the most engaging moments, automatically creating highlights to be shared on social media.
This feature works on various streaming platforms: Twitch, YouTube, Kick, and Facebook. Just upload your VOD (video on demand) or pre-recorded gameplay and let the AI work its magic.
How to Edit Your Streams from Google Drive with Eklipse
Source: Eklipse.gg
Here are step-by-step instructions for creating AI Highlights using a local file with Eklipse.
Step 1: Record and Upload Your Stream File to Google Drive
Source: Eklipse.gg
Record your gameplay using any screen recorder (e.g., OBS). Alternatively, download your stream VOD (e.g., from Kick stream)
Upload your video to Google Drive.
Right-click on your uploaded video file and choose “Get Link.”
Choose “Anyone with the link” and “Editor” permissions under “General Access”
Click “Done.”
Step 2: Processing Your Gameplay Recording in Eklipse
On the left side menu, click “Clips,” then “Streams.”
Click the “Add Stream” button on the right side of the Eklipse interface.
Paste your Google Drive link into the designated box.
Select the game you recorded. Check this page for a list of games that Eklipse AI supports.
Name your stream.
Click “Use Google Drive”
Click “Get Clip” below the uploaded VOD and you’re done!
Pro-tip:
Please keep in mind that there are some limits to your gameplay recording. Your gameplay recording should be under 5GB and 5 hours in duration. Eklipse supports various video file formats such as .mp4, .mov, .flv, and .mkv.
Go Beyond with Eklipse Premium
Source: Eklipse.gg
Upgrading to the Eklipse Premium Plan is highly recommended to enjoy the Google Drive sync comfortably. Not only can Premium users edit videos directly from Google Drive, but they also get to enjoy other advanced features such as 3x faster processing, Voice Command, and Schedule Post.
Eklipse’s user-friendly interface and powerful AI technology make it easy to create high-quality content in no time. The value of this tool has been proven by many streamers and content creators, awarding Eklipse a stellar 4.8 rating on Product Hunt.
Learn more about Eklipse’s pricing and benefits by clicking here: Eklipse Premium Plan.
Final Thoughts
Don’t wait any longer to level up your content creation game! Eklipse update with Google Drive integration offers a seamless workflow and powerful AI to transform your gameplay footage into share-worthy highlights. Sign up for free today and see the difference for yourself!
Kick is a new streaming platform that has quickly gained popularity among gamers and creators. It offers a variety of features that make it a great choice for streamers of all levels, including low latency, high-quality streaming experience, a supportive community, and a variety of monetization options.
If you’re serious about leveling up your Kick stream, investing in the right streaming gear is essential. In this article, we’ll take a look at the best streaming gear for Kick streamers, including the best microphones, webcams, capture cards, and more.
First, let’s talk about the must-have gear for streaming. These are the basics that every streamer needs to get started.
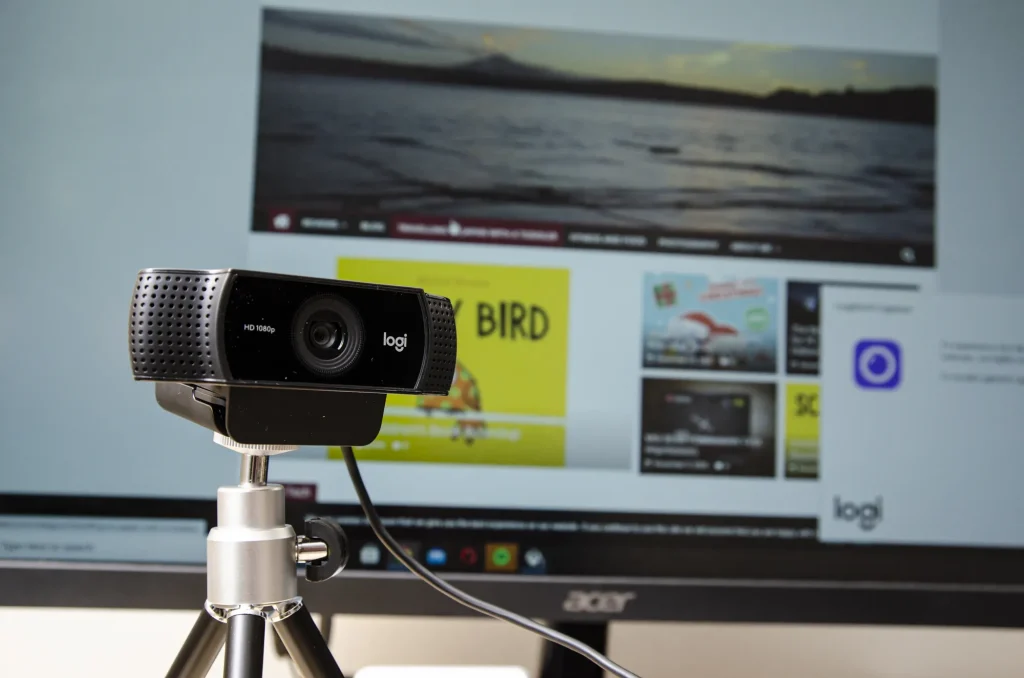
1. Webcams – Logitech C922 Pro
Best streaming gear for gaming
When it comes to webcams, the Logitech C922 Pro is a top choice for serious streamers.
With Full 1080p at 30 FPS or hyperfast 720p at 60 FPS, you’ll get superior video quality that captures every detail with bright, natural colors. The autofocus feature and 78° diagonal field of view make sure you’re always in focus and perfectly framed.
This camera delivers the smooth functioning and lag-free video you need to keep your audience engaged.
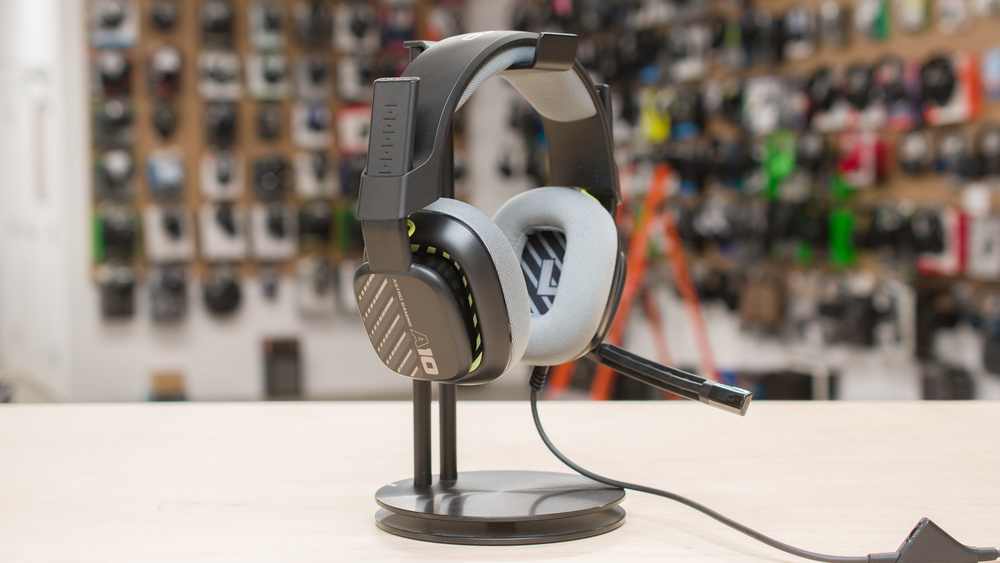
2. Headset – Astro A10 Gen 2
streamer gear list
The Astro A10 Gen 2 headset is a great choice for anyone looking for a reliable, versatile option. It comes in a variety of colors and patterns, making it easy to find a style that matches your vibe.
The flip-to-mute boom mic, replaceable ear pads and headband cushion, and flexible body make this headset comfortable and convenient to use.
It’s also compatible with PC, Mac, PlayStation 5, Xbox Series X/S, and Switch, so you can use it no matter how you play.
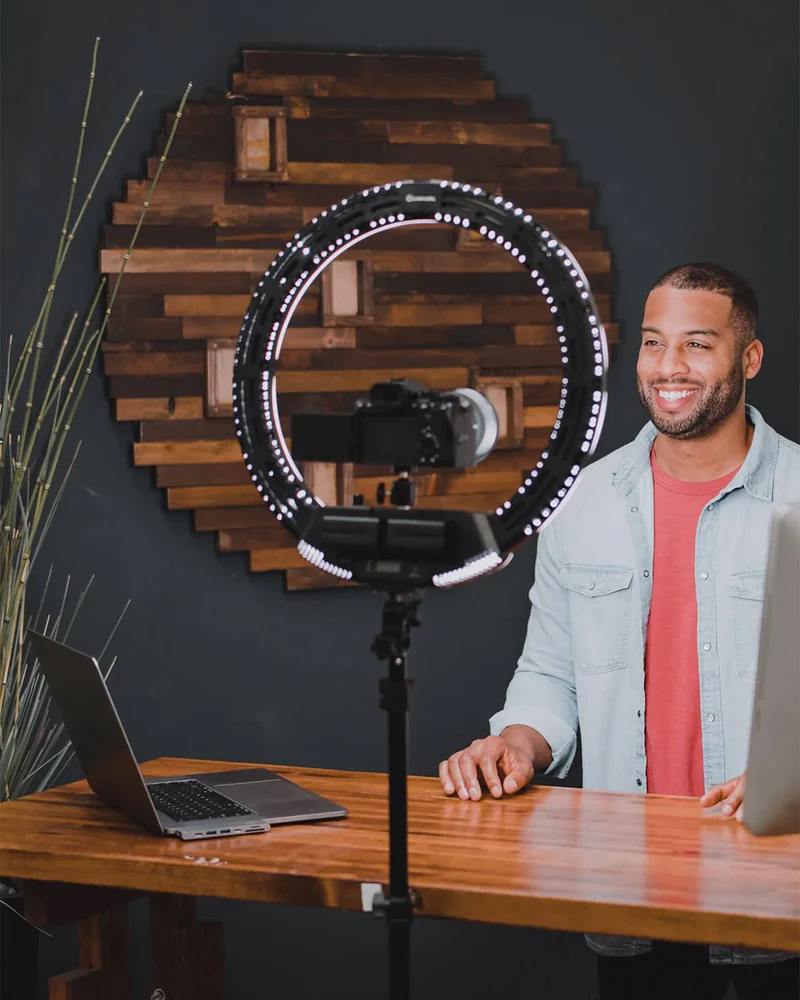
3. Lighting – Lume Cube 18″ Cordless Ring Light
live streaming equipment setup for gaming
Good lighting is essential for a professional-looking stream.
The Lume Cube 18″ Cordless Ring Light is a great option for anyone who wants to create a bright, even, and flattering light.
With adjustable color temperature, brightness, and built-in diffusion, this Ring Light offers a user-friendly experience for any creator. Plus, the battery packs make it wireless and portable, so you can use it anywhere you need it.
Additional Gear
Once you’ve got the essential gear, you can start thinking about upgrading to some nice-to-have gear. Here are a few options to consider:
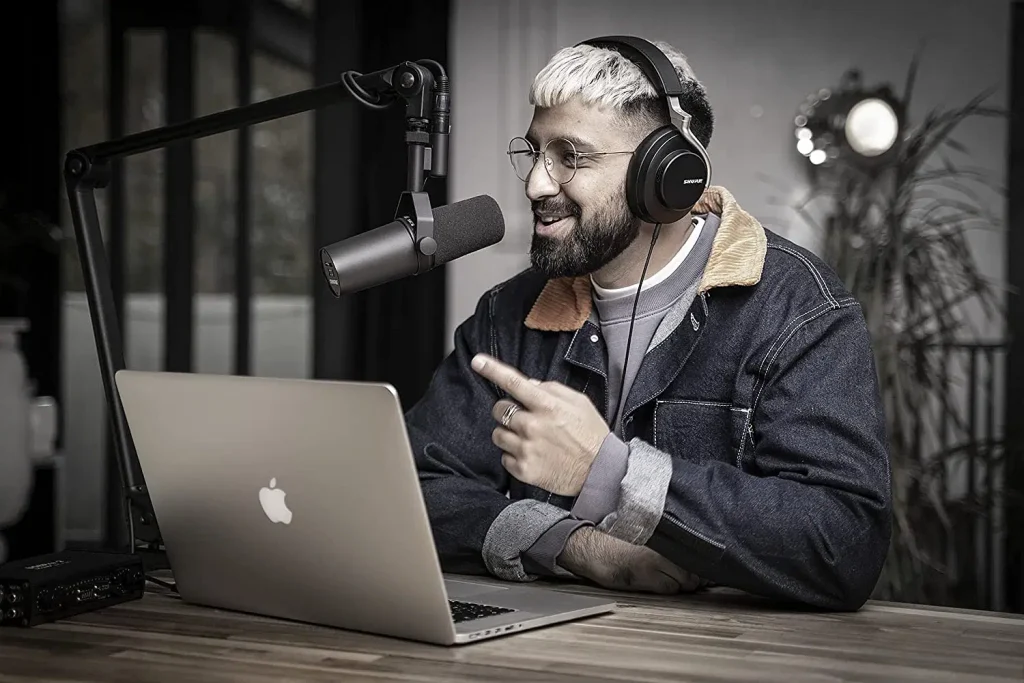
4. External Microphone – Shure SM7B
gaming streaming setup pc
If you’re serious about audio quality, the Shure SM7B microphone is a great choice.
This professional-grade mic is used by top streamers like Shroud, Tfue, and Sodapoppin for its durability and clear sound. The XLR connection means you’ll need to buy an audio mixer to connect it to your computer, but the built-in pop filter and detachable windscreen make it worth the investment.
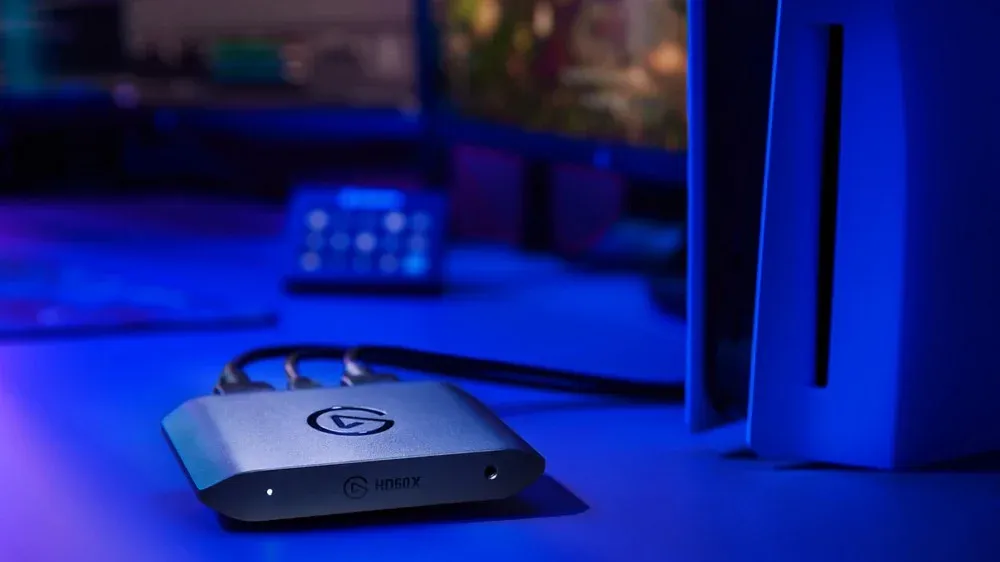
5. Elgato HD60X
best streaming equipment for pc
A capture card like the Elgato HD60X can help you record and stream your gameplay with ease. This gear can be considered as essential, especially if you are trying to stream console games on Kick.
While it’s not the only option out there, it’s certainly one of the most popular and comes with unparalleled support from Corsair. It’s almost plug-and-play with software like OBS, making it easy to get started.
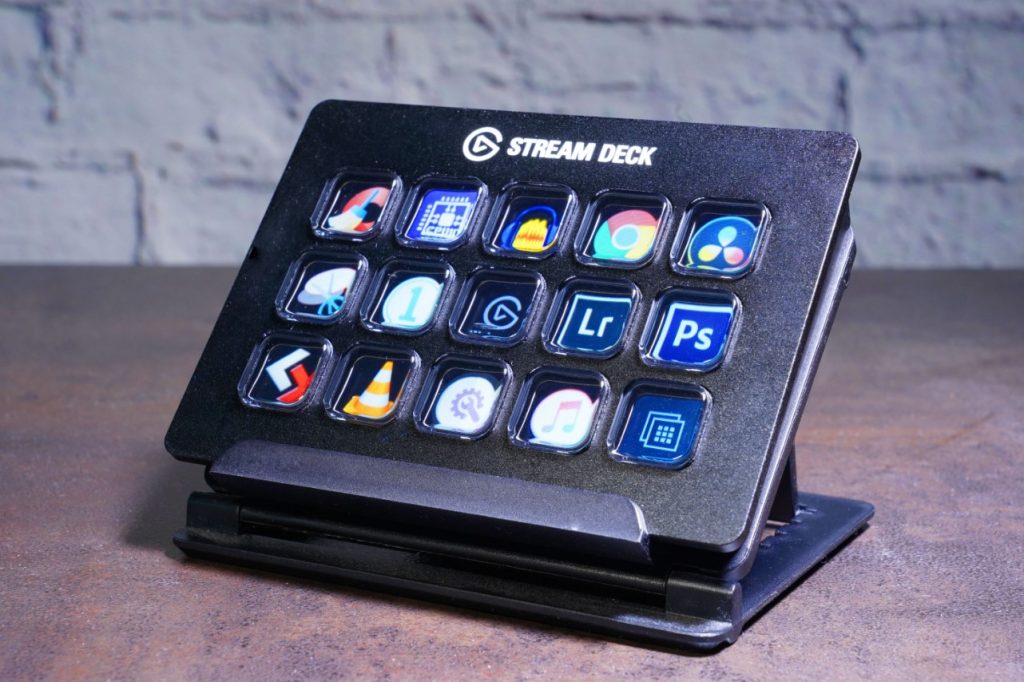
6. Elgato Stream Deck
best streaming gear 2023
The Elgato Stream Deck is a customizable desktop controller with 15 LCD keys that can be set to launch and manage apps like Twitch, YouTube, OBS, Spotify, and XSplit. It makes swapping among programs a breeze and can help you manage your stream more efficiently.
7. Joystick – 8bitdo Pro 2 Bluetooth controller
Best Streaming Gear for beginners
If you’re a gamer, having a high-quality joystick like the 8bitdo Pro 2 Bluetooth controller can make a big difference in your gameplay.
With precise inputs, support for up to three custom profiles, and two extra back buttons, this controller is a great choice for anyone who wants to take as you need them and as your budget allows.
Remember, the essential gear is what you need to get started, but the additional gear can take your streaming to the next level.
Conclusion
Ultimately, to start a successful Kick stream, the only thing you need is a good PC, fast internet, and the essentials, like a high-quality webcam, a comfortable headset, and good lighting. If you want to level up, invest in gear like a Shure SM7B mic, Elgato HD60X capture card, Elgato Stream Deck controller, and 8bitdo Pro 2 Bluetooth controller.
Just remember that while high-quality gear can make a difference, it’s not the only factor that matters. Your personality, content, and engagement with your audience are also crucial elements of a successful Kick channel.
Don’t forget to use Eklipse as your go-to tool for editing your streams. With our advanced AI, we can help you create highlights that clip your Twitch/Kick streams automatically and convert them to TikTok/Reels/Shorts.
Try Eklipse.gg for free now, or subscribe to our premium plan starting from $8.33 per month!
Maximize your Black Ops 6 rewards—Create highlights from your best gameplay with with Eklipse
Eklipse help streamer improve their social media presence with AI highlights that clip your Twitch / Kick streams automatically & converts them to TikTok / Reels / Shorts
How to become a Twitch streamer? If you are new in the world of live streaming, make sure you know these tips to nail your first live stream channel.
Gamers who use social video platform services like Twitch are giving an interactive gaming experience to others. This streaming website has more than just technology, it contributes also to cultivating communities of fans along with gamers that love it! On Twitch, users can stream gameplay and connect with friends and fans over the shared love of games.
If you are a gamer, then live streaming is something you wouldn’t want to miss out on. After all, getting paid to play games is fantastic, isn’t it? Are you curious about how to become a Twitch streamer and how the platform works? Read more about it below.
Looking for a creative way to promote your Kick channel? Try the new Kick channel name sticker, available for free from Eklipse!
Eklipse has been providing a channel name sticker feature since November 2022 to help boost your content awareness on social media. However, with the rising popularity of Kick.com in April 2023, many users have requested special features dedicated to this platform.
Don’t worry, we hear you! Today, Eklipse is excited to introduce a special Kick channel name sticker for free to promote your Kick.com channel. Keep reading to learn how it works!
What’s New: Option to Add Kick Channel on Channel Name Sticker
Source: Eklipse.gg
The Kick channel name sticker by Eklipse offers 11 sticker templates that you can customize with different colors and text. The best part is, that all of them are available for free!
With the Kick channel name sticker, you can easily showcase your channel’s branding on your social media content. You can choose a design that suits your channel’s theme, customize the colors and text, and apply it to your videos in just a few clicks.
How to Add Kick Channel Name Sticker
Adding the Kick streaming channel name sticker to your videos is easy. Just follow these simple steps:
Adding a Kick channel name sticker is a great move to strengthen your channel’s branding. Now, you don’t have to worry about your content being stolen or the audience forgetting your account’s name!
We’re also excited to see how this new feature can help elevate your TikTok content and boost your streaming channel. Try this cool feature here and make sure to share your amazing creations with us by tagging @Eklipsegg on TikTok!
In today’s fast-paced digital world, social media platforms have become essential marketing tools for gaming creators and streamers. Platforms such as Twitch and Kick.com offer gaming enthusiasts the perfect stage to showcase their skills and build a loyal following. But can you take advantage of the power of social media to skyrocket your streaming success? How can you use social media to boost Twitch and Kick streams?
In this article, we’ll explore the various strategies that can help you harness the potential of social media to grow your gaming channel on Twitch and Kick.com, all backed by intriguing statistics and insights.
So, gear up and get ready to unlock new levels of streaming success with the power of social media at your fingertips!
Before diving into social media promotion, it’s essential to understand your target audience. A recent study revealed that 55% of Twitch users are between the ages of 18 and 34.
Identifying your audience’s interests, preferred social media platforms, and online behaviors will help you develop a tailored strategy and engage with them more effectively.
Audience profiling is a critical step in ensuring your campaign is successful. An audience profile can help you personalize your campaign’s messaging to reach those most likely to convert.
You’ll need to include demographic information such as geography, age, education, occupation, and income; psychographic information such as personality traits, interests, preferred channels & content types.
Choose the Right Social Media Platforms
Photo by Geri Tech on Pexels.com – social media to boost twitch and kick streams
Set yourself goals and develop a strategy to achieve them in order to choose the right social media platforms to grow your Twitch or other livestreaming channel as a streamer/gaming creator.
Understand the platform you’re using and be realistic about the time you can dedicate to social media. Dedicate your time to one or two platforms and make them your go-to places for updates and audience engagement.
Remember, it’s better to excel on a few platforms than to spread yourself thin across multiple channels.
Optimize Your Social Media Profiles
Photo by Prateek Katyal on Pexels.com – social media to boost twitch and kick streams
Optimize Your Social Media Profiles Make sure your social media profiles are optimized for maximum visibility. A study showed that having a consistent username across platforms can increase brand recognition by 23%.
Create a compelling bio that highlights your unique personality and what sets you apart from other streamers. Use eye-catching profile images that are high-quality and visually appealing.
Include links to your Twitch and Kick.com channels in your bio or profile description so that people can easily find and follow you on those platforms.
Additionally, make sure to regularly update your profiles with new content and engage with your followers to keep them interested and coming back for more.
Consistently Share Engaging Content
Photo by Lucie Liz on Pexels.com – social media to boost twitch and kick streams
According to a report by Streaming Media, live video grew by 93% with an average viewing time of 26.4 minutes per session. Live videos hold users attention 10-20x longer than pre-recorded, on-demand content.
This highlights the importance of consistently sharing engaging content on social media to grow your streaming channel.
Posting highlights from your streams that showcase your skills or funny moments, sharing behind-the-scenes looks at your streaming setup or your life outside of streaming, and collaborating with other creators to create fresh and exciting content, you can attract new followers and keep your existing audience entertained.
Using interactive features like polls and quizzes can also help to increase engagement.
The frequency with which you should share your streams on social media can vary depending on the platform and your audience.
A general rule of thumb is to post regularly and consistently, but not so often that you overwhelm your followers with too much content.
For example, on platforms like Twitter and Instagram, you might post once or twice a day, while on platforms like Facebook and YouTube, you might post once or twice a week.
It’s important to find a balance that works for you and your audience. Experimenting with different posting frequencies can help you find what works best for engagement and growth.
Cross-Promote Your Channels
social media to boost twitch and kick streams
Cross-promoting your channels on different social media platforms can be a powerful way to grow your streaming channel.
By sharing your Twitch or Kick.com streams on platforms like Twitter, Instagram, and Facebook, you can reach a wider audience and attract new followers.
Offering exclusive content or incentives such as giveaways or sneak peeks can encourage your followers on one platform to follow you on another.
With 41% of Twitch users discovering new streamers through social media, cross-promotion can be an effective way to increase your visibility and grow your audience.
To cross-promote your channels on different social media platforms, you can follow these steps:
Identify the platforms where your target audience is most active.
Create accounts on those platforms and make sure your branding is consistent across all platforms.
Share your streams on those platforms and include a call-to-action encouraging your followers to check out your stream.
Offer exclusive content or incentives to encourage your followers on one platform to follow you on another.
Engage with your followers on all platforms to build a strong community.
By following these steps, you can effectively cross-promote your channels and reach a wider audience.
Engage With Your Community
Interacting with your audience regularly through comments, messages, or even live Q&A sessions can be a great way to build strong relationships with your viewers.
With 64% of consumers more likely to buy a product after watching a video on social media, fostering loyalty and increasing the chances of your content being shared with their network can be beneficial for your channel.
Here are some tips to help you interact with your audience:
Respond to comments and messages in a timely manner.
Be friendly and approachable in your responses.
Ask for feedback and suggestions from your audience.
Show appreciation for their support by thanking them for their comments and messages.
Address any concerns or questions they may have.
Monitor and Adjust Your Strategy
Monitoring and adjusting your strategy is an important part of promoting your channel on social media.
You can track the performance of your promotions to understand what resonates with your audience and use analytics tools to evaluate the success of your efforts.
Based on this information, you can make adjustments to your strategy and experiment with new tactics and trends to stay ahead of the curve.
Google Analytics, Sprout Social, and SocialPilot can help you track the performance of your social media promotions and provide valuable insights into their success. By analyzing this data, you can make informed decisions to improve your strategy and achieve better results.
Using the data from your analytics tools can help you make informed decisions and adjustments to your social media strategy.
By identifying successful types of content or promotions, effective times of day or days of the week for posting, and the most effective social media platforms for reaching your target audience.
Conclusions
Effectively leveraging social media is a game-changer for streamers looking to grow their Twitch and Kick.com channels.
By understanding your audience, choosing the right platforms, and consistently sharing engaging content, you can significantly enhance your online presence and attract more viewers.
So, embrace the power of social media and watch your streaming channel reach new heights.
But before using social media, of course, you need to have good streams that can attract viewers. Worry not, because you can use Eklipse as a help in creating highlights videos of your Twitch and Kick streams.
Eklipse is the perfect tool for Twitch and Kick streamers who want to create engaging and shareable content for their audience. With Eklipse, you can easily create highlights that will help you attract new viewers, grow your following, and make money from your streams.
You could also use Eklipse to convert your streams into vertical videos for TikTok, Shorts, and Reels easily. With a great content, your social media presence will boost easily!
Sign up for Eklipse today and start creating amazing highlights from your Twitch and Kick streams!
Maximize your Black Ops 6 rewards—Create highlights from your best gameplay with with Eklipse
Eklipse help streamer improve their social media presence with AI highlights that clip your Twitch / Kick streams automatically & converts them to TikTok / Reels / Shorts
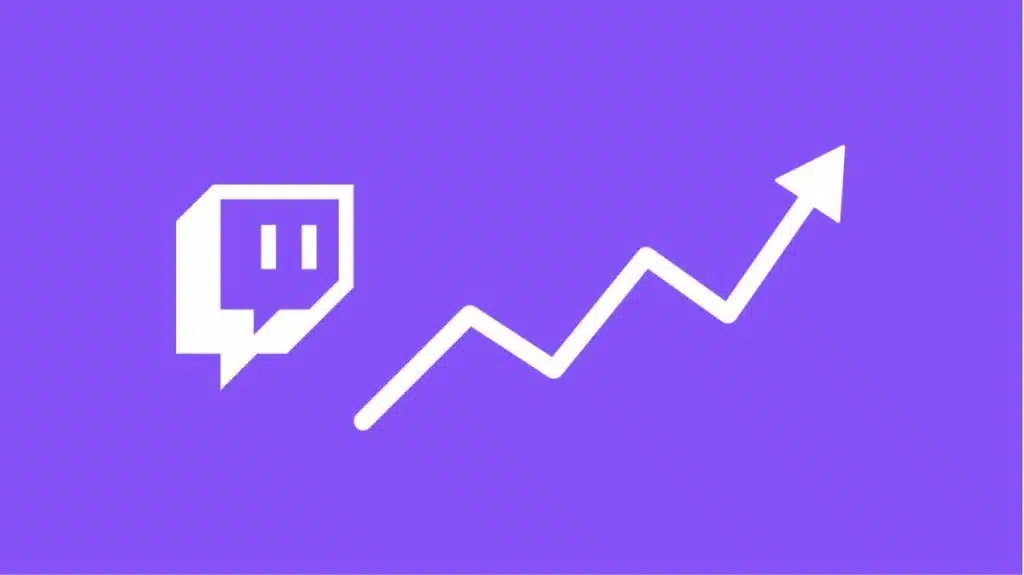
Are you a dedicated streamer looking to grow your audience and keep them engaged? A well-structured streaming schedule might just be the secret ingredient you need!
In today’s digital age, content creators face fierce competition, and the key to standing out is not only producing quality content but also ensuring your viewers know when to expect it.
This article will dive into the importance of a consistent streaming schedule and offer practical tips to help you build and maintain a successful streaming routine.
So, let’s get started and unlock the true potential of your streaming journey!
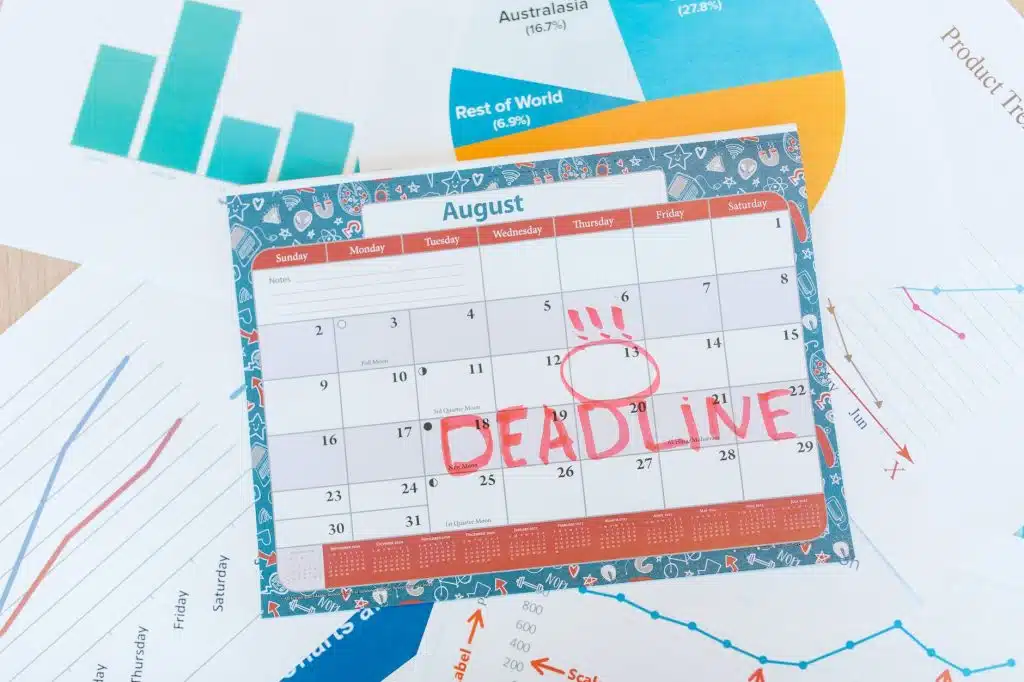
Although there is no set number of times a streamer needs to stream, maintaining a consistent schedule is vital for channel growth and viewer engagement.
A well-planned schedule helps you manage other tasks and reduces procrastination while ensuring regular streaming.
Moreover, it keeps your viewers, followers, and subscribers informed about when you will be live and on which days, increasing the likelihood of them tuning in.
Your streaming schedule largely depends on personal factors like work, school, or family obligations.
To create a successful schedule, identify time blocks that work around your personal commitments while still allowing you to dedicate the desired time to your hobby.
Twitch’s Recommendations for Stream Length and Frequency
There is no definitive answer for how long a streamer should stream.
However, statistics reveal that the average viewer spends approximately 25.4 minutes watching live video per session, compared to 19 minutes for video on demand.
Twitch suggests that each stream should be at least 2 hours long to build momentum and allow viewers to find your stream.
Streams should not be shorter than 1 hour. Typically, streamers are advised to go live 3-5 days per week for an average of 3-4 hours per session.
Schedules will vary depending on daily activities and stream content. Allocating time between shows for channel growth, content creation, networking, and promotion is crucial
Top Tips for Building and Maintaining an Effective Streaming Schedule
To maintain a consistent schedule and grow your channel, consider the following tips:
Set a regular schedule: Establish a dependable streaming schedule for your viewers, whether it’s daily or a few days a week at specific times¹.
Be consistent: Adhere to your established schedule as closely as possible.
Be flexible: While consistency is crucial, flexibility is also important. Communicate any schedule adjustments to your viewers in advance¹.
Utilize social media: Promote your stream schedule and remind viewers about your live sessions on social media platforms¹.
Engage with your audience: Interact with your audience to build a loyal fanbase and grow your channel¹.
Experiment with different times: Since the optimal streaming schedule varies, experiment with different times and days to find the best fit for you¹.
Take breaks: Prioritize mental and physical health by taking breaks to rest and recharge¹.
By considering these tips and understanding the importance of a consistent streaming schedule, you can effectively grow your channel and better engage your audience
Conclusion: Unleashing the Potential of Consistent Scheduling
To sum it up, creating and adhering to a consistent streaming schedule is fundamental to achieving success in the online streaming world.
Considering that the average viewer spends around 25.4 minutes watching live video per session and Twitch advises a minimum of 2 hours per streaming session, understanding the significance of a well-planned schedule is crucial.
By implementing the tips shared in this article and optimizing your streaming schedule, you can enhance audience engagement, and ultimately grow your channel!
")