Among Us, the 2018 online multiplayer social deduction game developed by Innersloth, has taken the gaming world by storm. As players engage in this captivating and suspenseful game, many streamers are broadcasting their thrilling gameplay moments on platforms like Twitch, Kick, and YouTube.
If you’re one of these content creators and want to showcase the best parts of your Among Us gameplay, you’re in luck! With the power of AI, you can automatically generate highlights from your streams.
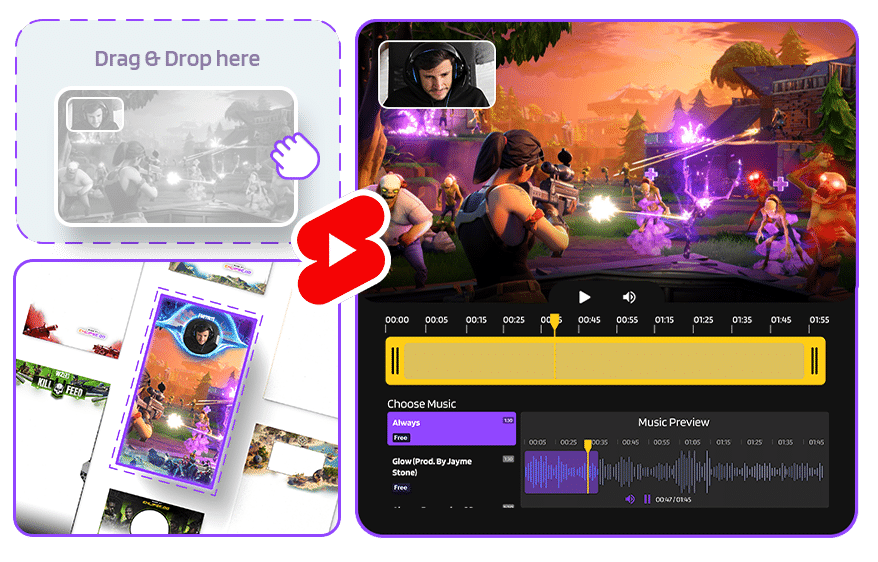
In this guide, we’ll show you how to effortlessly create Among Us highlights using the Eklipse AI highlights tool.
Step-by-Step Guide to Create Among Us Highlights from Twitch, YouTube, & Facebook Stream
To get started with crafting your very own Among Us highlights, you just need to follow these three simple steps:
Create Your Eklipse Account and Connect It to Your Livestream Platform: First things first, set up your Eklipse account. Make sure to connect it to the platform where you’re streaming, whether that’s Twitch, Kick, or YouTube.
Stream Your Exciting Gameplay on Your Chosen Platform: Next up, start streaming your awesome Among Us gameplay on the platform you like. This helps the Eklipse AI capture all the coolest moments from your game.
Edit and Share Your Content on Social Media: Once you’re done, you can edit your highlights and convert them into TikTok, Shorts, or Reels format. This way, you can share your gaming adventures with a wider audience on social media.
Just keep reading for a more detailed breakdown of each step. It’s super easy, and you’ll have amazing highlights in no time!
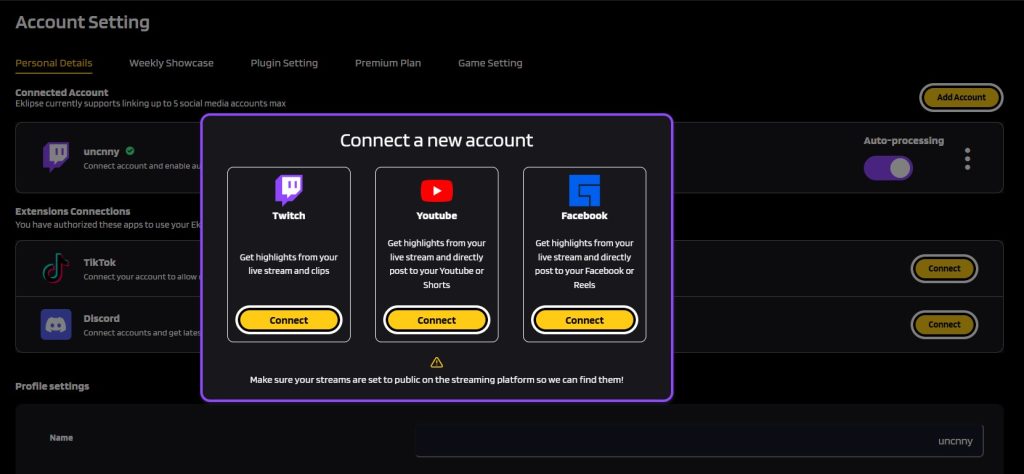
Within the Personal Details tab, locate and click the “Add Account” button in the upper-right corner.
By completing these steps, you’ll have successfully set up your Eklipse account and established a connection to your chosen livestream platform. Now, let’s move on to the next step.
Step 2: Stream Your Gameplay and Acquire Among Us Highlights on Eklipse
Source: Eklipse
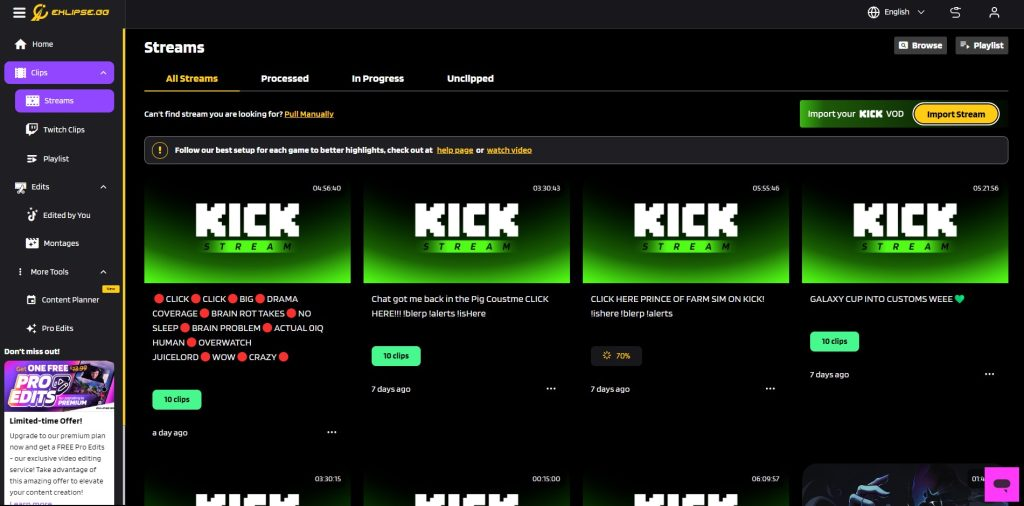
Access the “Clip” section and select “Streams” to view your past streams.
Ensure that your Twitch or YouTube stream is set to public so Eklipse can capture your highlights.
Click the “Get Clip” button and specify Among Us as the game.
Remember to categorize your stream under Among Us when broadcasting on Twitch, Kick, or YouTube.
After a brief wait, your Among Us Highlights will be ready for your enjoyment!
Step 3: Transform Your Content for TikTok/Shorts/Reels
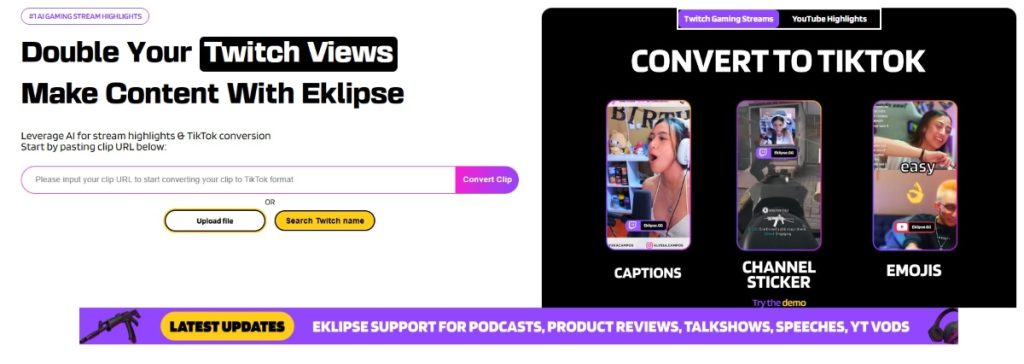
In the final step, you’ll have the opportunity to convert your enticing Among Us highlights into the popular TikTok/Shorts/Reels format. This conversion will allow you to extend your reach and engage a broader audience. Here’s how you can achieve this on Eklipse.
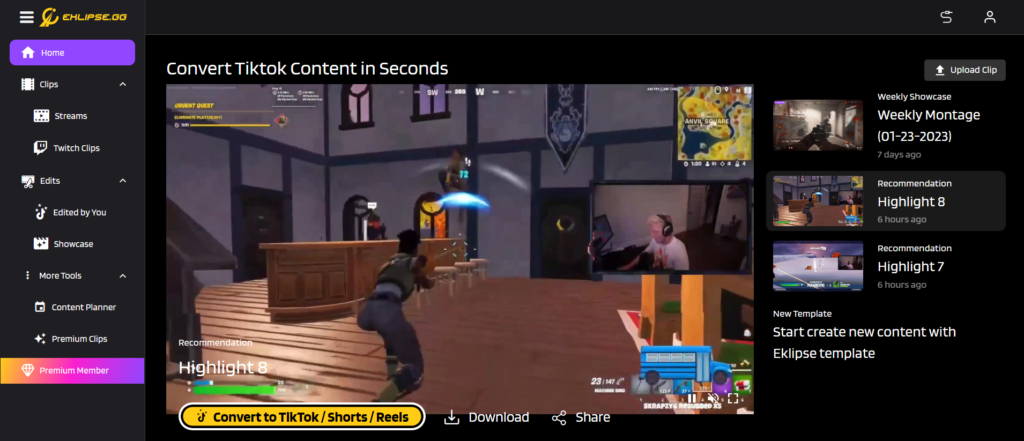
Choose one of your highlights from the Clip > Streams section, then click the “Convert to TikTok/Shorts/Reels” button.
Select a suitable template that complements your content.
Adjust the position of your facecam and gameplay area to enhance visual appeal.
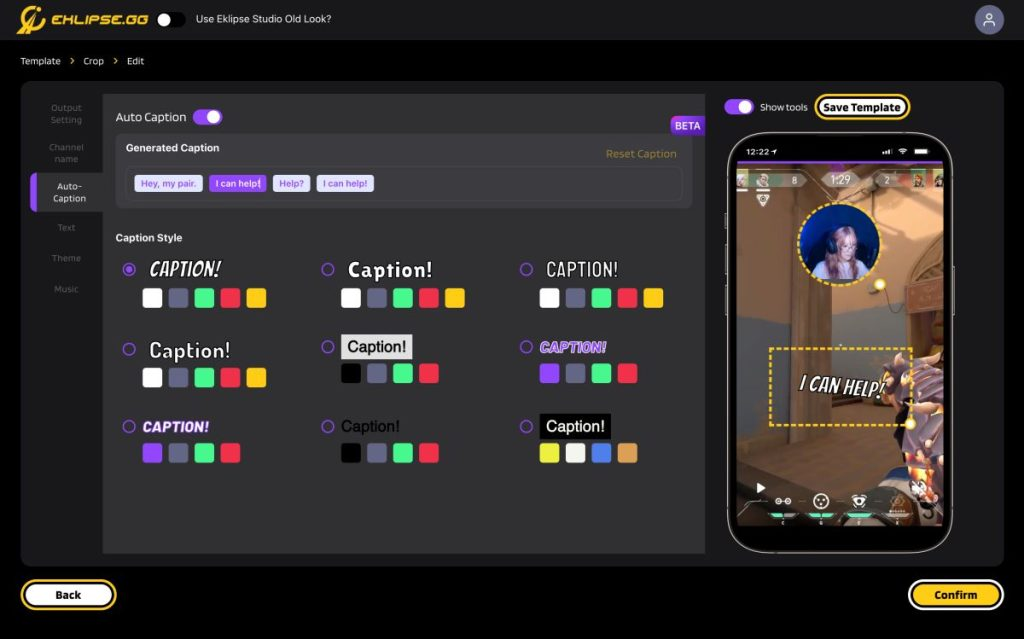
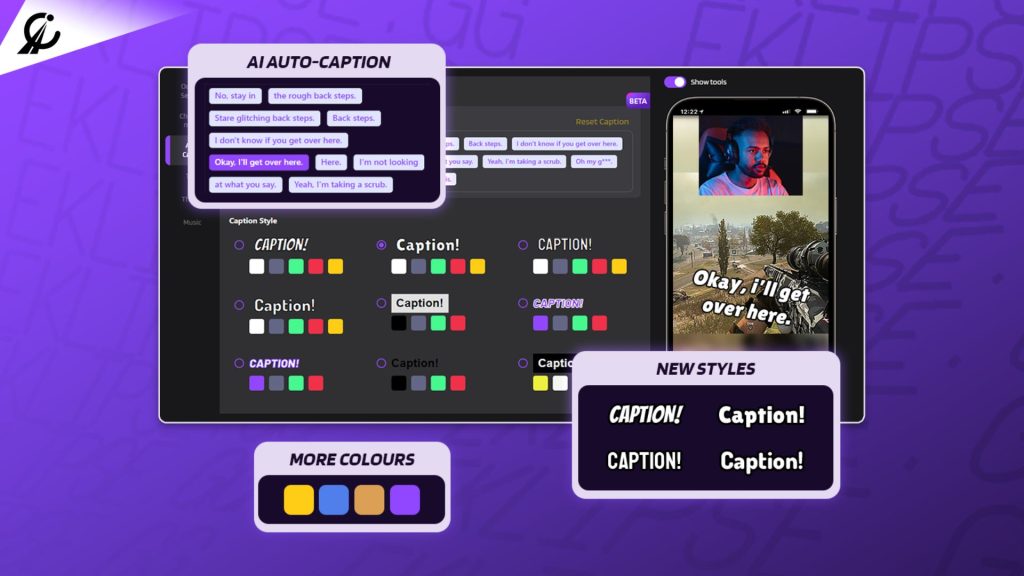
Enhance your highlights with text, channel name stickers, and auto-captions.
Once you’re satisfied, hit the Publish button, and your conversion to TikTok/Shorts/Reels format is complete.
Elevate your Among Us gameplay with Eklipse, the AI-powered platform that transforms your best moments into stunning highlights in no time. Whether you’re spotlighting your clever moves, heart-pounding twists, or teamwork with crewmates, Eklipse makes it easy to create captivating content that your audience will love. Follow our simple guide to turn your in-game adventures into shareable, high-quality clips that shine across social media.
Ready to get started? Sign up for Eklipse.gg now and unlock the power of AI for your Among Us highlights!
Maximize your Black Ops 6 rewards—Create highlights from your best gameplay with with Eklipse
Eklipse help streamer improve their social media presence with AI highlights that clip your Twitch / Kick streams automatically & converts them to TikTok / Reels / Shorts
In the previous article, we’ve already discussed Twitch vs YouTube, which is actually quite tough when it comes to the right choice. Well now, it’s time to see the battle of YouTube vs TikTok stream.
As we know that TikTok has become one of the most popular sharing platforms nowadays, especially among younger users. Due to this fact, no wonder that TikTok is now competing with YouTube which has been popular since 2005.
Due to the high number of users, many people made both platforms the mine of opportunity. Everyone can start making money through these platforms. But which one is right for you? YouTube or TikTok? Worry no more, since we’re going to figure it out through this post. Let’s go!
The best platform for you depends on your goals, target audience, and content style. Experiment with both YouTube and TikTok, but prioritize what resonates most with your viewers. Before you decide definitively, here are the key differences between TikTok and YouTube that you should know.
Who’s Watching?
YouTube: A wide audience enjoys everything from short clips to in-depth documentaries.
TikTok: Primarily attracts Gen Z, but its reach is expanding. It’s a hub for trendy, viral content.
Content Creation:
YouTube: Offers flexibility, with live streams, premieres, Shorts, and a reputation for high-quality content.
TikTok: Focuses on short, engaging videos with easy editing tools and a focus on storytelling.
Building a Community:
YouTube: Encourages interaction with comments, live chats, and personalized recommendations.
TikTok: Prioritizes engagement with features like duets, the For You Page, and high content visibility.
Monetization Options:
YouTube: Provides various ways to make money, including diverse ad formats for businesses.
TikTok: Offers immersive ad experiences and opportunities for sponsored hashtag challenges.
On a final note:
Both platforms offer unique advantages for businesses. Consider your goals, target audience, and content style to choose the best fit. Don’t be afraid to experiment and adapt your strategy for each platform.
Now that we’ve established this, let’s delve into a more detailed explanation.
1. YouTube vs TikTok Stream Monetization
Source: Tube Ranker
When discussing YouTube and TikTok, the focus often lies on how they can impact business engagement. Let’s start with YouTube first.
To generate revenue from YouTube content, creators need to be eligible to place ads within their videos. YouTube demonstrates its appreciation for its creators by offering a generous 55% share of its ad revenue. This translated to over $15 billion in payments to creators last year alone. In addition to AdSense, creators can also earn income through affiliate marketing, influencer marketing, and by leveraging Super Chat and Super Stickers.
On TikTok, generating revenue can be slightly easier compared to YouTube. Here, promoting brands and participating in affiliate marketing are prominent strategies. However, it’s crucial to have a sizable following and viewership established through your content first.
2. Ad Format Variety
Source: Influencer Marketing Hub
Speaking of ads, both YouTube and TikTok offer different types of ads. Understanding these ad types is crucial for supporting your goals. On YouTube, consider using skippable in-stream ads to increase sales and leads. For increasing brand awareness and reach, bumper ads are a good option. It’s worth noting that your ad format choice can significantly impact how you connect with your audience.
TikTok also offers several ad formats to help generate revenue. The first is the In-Feed ad, which appears and auto-plays on a user’s For You Page (FYP). Brand Takeover ads are another option, but users cannot like or comment on them. Additionally, you can leverage Hashtag Challenges and Branded Lenses in your marketing strategy.
3. Audience Reach and Engagement
Source: Search Engine Journal
The second factor to consider when choosing the right platform between YouTube and TikTok for business is audience engagement. According to data, YouTube captures 25% of all mobile traffic. Additionally, a staggering 95% of the global internet population accesses videos on this platform.
With this massive reach, YouTube can help you engage with a broader audience, increasing your chances of growing your career as a content creator there.
On the other hand, TikTok boasts a diverse user base, with Gen Zs making up 41% of the platform’s population. Millennials, Gen Xs, and baby boomers comprise the remaining user base. While Gen Zs may be the primary target for advertisers, there’s also a chance to reach a wide range of niche communities and age groups.
4 YouTube vs TikTok Algorithm
Now, let’s delve into the algorithms. Both YouTube and TikTok recommend content based on audience interest. TikTok prioritizes videos on someone’s FYP (For You Page) based on the content they previously enjoyed or interacted with.
The YouTube algorithm functions similarly to TikTok’s. However, YouTube also factors in view duration, user satisfaction with previously watched videos, and external elements like seasonal relevance and competition.
Ultimately, both algorithms ensure users discover content that resonates with them.
5. TikTok Stream vs YouTube Video Type
Source: Artlist
The content format differences are clear. YouTube focuses on long-form videos, ranging from 15 minutes to 12 hours in duration. TikTok, on the other hand, specializes in bite-sized, vertical videos with a maximum length of 10 minutes.
When it comes to content type, TikTok thrives on short-form content, often featuring fun and humorous elements like dance videos, pranks, short tutorials, lip-syncing, or mini vlogs.
YouTube offers a wider content arsenal. You can find review videos, game streams, reaction videos, tutorials, vlogs, and much more. Tone also varies, with content ranging from formal and casual to lighthearted and even serious. This diversity makes YouTube more flexible for content creation.
However, before producing a YouTube video, ensure you have a good setup for recording and editing. High editing skills and compatible software are often recommended. Conversely, TikTok offers all-in-one features for recording and editing videos, sometimes eliminating the need for separate editing software.
YouTube vs. TikTok: A Battle of Features
While both YouTube and TikTok are video-based platforms, they cater to different content styles and user experiences. Here’s a breakdown focusing on the apps themselves:
YouTube
Pros:
A Wide Range of Content Types: Supports everything from short clips (YouTube Shorts) to long-form documentaries, vlogs, live streams, and even movies.
Advanced Features: Offers features like premieres, live chat, end screens, cards, and playlists for enhanced audience engagement.
Detailed Analytics: Provides creators with in-depth data on video performance, demographics, and audience engagement.
Strong Search Engine Optimization: Videos can rank well in search results, driving organic traffic.
Monetization Powerhouse: Established monetization options like ads, sponsorships, and merchandise sales.
Cons:
Potential for Copyright Issues: Strict copyright laws can make it challenging to use copyrighted music or content.
High Production Barrier: Creating high-quality videos often requires investment in equipment and editing skills.
Algorithm Focus on Watch Time: Videos need to be engaging enough to keep viewers watching for longer to rank higher.
TikTok
Pros:
Simple and User-Friendly: Easy to use for creating and editing short-form videos with built-in tools and effects.
Discovery Power: The “For You Page” algorithm excels at promoting viral content, reaching a wider audience.
Engaging Features: Duets, challenges, stitches, reactions, and live streams foster high user engagement and interaction.
Trend-Driven Content: Capitalize on the latest trends and challenges to gain traction quickly.
Immersive Advertising: Offers innovative ad formats like interactive in-feed ads and sponsored hashtag challenges.
Cons:
Limited Content-Length: Not ideal for in-depth tutorials or complex topics.
Focus on Entertainment: May not be suitable for all types of businesses or educational content.
Fast-Paced Trends: Keeping up with the latest trends can be time-consuming and demanding.
How to Choose the Right Tool?
When it comes to video content, both YouTube and TikTok excel in different areas. YouTube caters to a wider range of content types, while TikTok thrives on short-form, trend-driven content creation with high engagement potential.
Consider your content goals and target audience to choose the platform that best suits your needs. You can even leverage both platforms for a comprehensive video strategy!
Final Thoughts
In conclusion, the battle between YouTube and TikTok isn’t a clear-cut one. The best platform depends on your brand’s marketing goals and target audience. If you’re targeting a younger crowd, TikTok might be ideal, while YouTube provides a broader reach across content styles. Consider factors like monetization, brand tone, and the editing resources available.
We hope this breakdown of YouTube vs. TikTok has been helpful. Don’t forget to check out our previous article for a deeper dive into YouTube Shorts, another player in the short-form video space.
For those needing powerful yet user-friendly editing tools to create captivating video content, look no further than Eklipse! Eklipse offers a free tier that lets you experiment with its advanced features, making it a perfect starting point for both beginners and seasoned creators.
Streaming has become a popular trend, and with the release of Twitch Studio, many streamers are contemplating whether to bid farewell to their old streaming software.
In this article, we’ll delve into the comparison between Twitch Studio and OBS, the widely acclaimed broadcasting software. By the end, you’ll have a clearer understanding of whether Twitch Studio surpasses OBS in terms of features and functionality.
So, let’s kick off the Twitch Studio vs OBS comparison!
While Twitch Studio is no longer in beta and offers a user-friendly approach, OBS Studio remains a powerhouse for customization. Choosing the right software depends on your experience level and streaming goals.
For now, it’s recommended to stick with OBS. As a consistently upgraded software with extensive compatibility, OBS remains an excellent choice for Twitch streaming.
Its versatility across operating systems and streaming platforms, along with its intuitive design and robust features, make it a reliable option for streamers.
While Twitch Studio is a promising option that may evolve to offer more features in the future, OBS Studio remains a well-established and feature-rich broadcasting software. The best choice depends on your experience level and streaming needs.
Twitch Studio: Price, Installation, and Features
Source: Twitch
Pros
Cons
Twitch Studio offers a streamlined workflow for Twitch broadcasters, simplifying setup and integration with the platform
Twitch Studio offers basic functionality but might not have the innovative features found in OBS or other software
Twitch Studio is tailored specifically for Twitch streaming, eliminating the need for third-party applications.
The software may not offer innovative features beyond basic functionality like desktop capture and color correction.
Built-in widgets are a simple and user-friendly way to add basic interactivity
Subpar design with limited preloaded layouts
Streamers can easily add and customize alerts using built-in widgets.
Preloaded layouts lack creativity, and custom layouts may be necessary for a visually appealing stream.
While Twitch Studio was initially introduced during TwitchCon in 2019, it has since graduated from beta and is now a fully released application. The software is continually evolving based on user feedback, aiming to provide an optimal Twitch streaming experience.
a. Price – Free Download
Twitch Studio is currently available for free and you can easily download it from the official Twitch website. However, there is no official confirmation on whether it will remain free in the future. Many other broadcasting software options are free, so it’s likely Twitch Studio will continue to be free as well.
b. Installation and Setup
Twitch Studio has a one-click download for Windows. Log in to your Twitch profile before launching the program. Twitch Studio will recognize your account automatically, no manual logins are needed.
Once launched, click “Get Started” to set up. The software will detect and connect your microphone and webcam if used. Choose from simple layouts for the main scene, BRB, and intermission scenes.
Finally, adjust settings like resolution and FPS. Twitch Studio provides recommended settings, but you can customize them as desired.
c. Features
When you launch Twitch Studio, you’ll see a default screen with Scenes and Sources on the left. Meanwhile, widgets, filters, chroma key options, and other features are on the right.
Twitch Studio has built-in widgets, eliminating the need for third-party apps. You can add alerts and customize elements with various alert types for borders, sounds, and text.
The Media Library in Twitch Studio offers a range of images, although no sound options. If the available images don’t meet your needs, you can upload your own.
OBS: Price, Installation, and Features
Source: OBS Studio
Pros
Cons
Supported across all operating systems and streaming services
Dependency on plugins for advanced features
OBS offers versatility, catering to gamers who frequently upgrade equipment and switch operating systems.
Additional programs are required to integrate overlays and notifications.
Small file size
Configuration for Twitch streaming can be time-consuming.
OBS automatically compresses files, reducing storage space requirements.
Intuitive design
User-friendly layout simplifies program navigation.
Beginners appreciate the intuitive interface.
OBS, an open-source broadcasting software compatible with various platforms, isn’t limited to Twitch alone. However, we’ll primarily focus on setting up OBS Studio specifically for Twitch streaming.
a. Price – Free Open-Source Software
As open-source software, OBS comes at no cost to you. Furthermore, you have the opportunity to modify the code and enhance it collaboratively with other users. Additionally, most OBS plugins are free, ensuring no hidden expenses.
b. Installation and Setup
For Twitch streaming with OBS Studio, visit OBSproject.com to download and install it.
Use the auto-configuration wizard to select streaming settings that align with your computer. Link OBS Studio with Twitch using the stream key in Settings.
In the Settings menu, find tabs like General, Output, Stream, Video, and more.
Configure Stream settings by selecting Twitch as the service and adding the server. Explore other tabs to optimize bandwidth, bitrate, FPS, encoder, and connect external devices.
c. Features
OBS is versatile across operating systems, ensuring access to all features. Being open-source, it receives frequent updates from many developers.
For recording, OBS offers diverse options. While game recording may not work universally, OBS solves this by adding Desktop and Window capture.
You can record the entire screen or specific tabs. Customizable hotkeys, transitions, overlays, and widgets enhance streams and make the content unique.
Twitch Studio vs OBS: Final Thoughts
So, Twitch Studio vs OBS? Which one should you choose? Twitch Studio provides a user-friendly interface and built-in widgets for Twitch streaming. OBS, an open-source software, offers extensive customization and platform versatility.
Twitch Studio is free with a simple installation, while OBS requires more setup time and relies on plugins for advanced features. In the end, your consideration should depend on your preferences and needs when deciding between the two.
Explore More
Looking to level up your streaming game? Discover Eklipse, the AI-powered highlight generator and “convert to TikTok” video editor that effortlessly boosts your social media growth.
Don’t miss out on expanding your reach and captivating a larger audience. Try Eklipse now, it’s free.
Choosing between NVENC vs x264 is a crucial decision for anyone looking to enhance their live streaming experience. As platforms like Twitch and YouTube gain immense popularity, understanding the strengths and weaknesses of these encoders can significantly impact your stream’s performance and quality.
Today, we will explore the differences between NVENC vs x264, focusing on how each encoder utilizes your PC’s resources. By examining your hardware specifications and streaming needs, you can make an informed choice that optimizes your live streaming setup.
The first question that might arise within you is, perhaps, “What are the real differences between NVENC vs x264?” The big difference between these encoders is how they use your PC’s resources. In simple terms, NVENC encoding relies on your graphics card’s (GPU) computational power, while x264 emphasizes your processor (CPU).
So, when it comes to picking the better encoding option for your next streaming adventure on Twitch, YouTube, Facebook Gaming, or even Kik, it’s pretty straightforward. If you’ve got an NVIDIA GPU, going for the NVENC encoder is a smart move. It lets your processor handle other tasks while you’re live streaming, giving you that extra processing power.
But what if you’ve got a beefy CPU but no GPU to match? Well, in that case, choosing x264 encoding would be more beneficial for you. Now, here’s the million-dollar question: What if you’ve got both a powerful graphics card and processor? Which one should you go with? Let’s break down the pros and cons of each encoder and find out.
Eklipse gives you everything you need to make streams that pop, grab views, & grow your fandom.
NVENC Encoder: Best Encoder for NVIDIA Graphic Card User
Encoder
Pros
Cons
GPU Encoding (NVENC)
Utilizes GPU for encoding, relieving CPU
Limited performance on older NVENC models
Allows CPU to focus on other processes during gameplay
Limited frame rate and resolution in older models
Improved game and stream performance
Fewer options for fine-tuning the encoding process
High-quality video encoding with modern Nvidia GPUs
Superior rendering of fast-paced games with rapid image changes
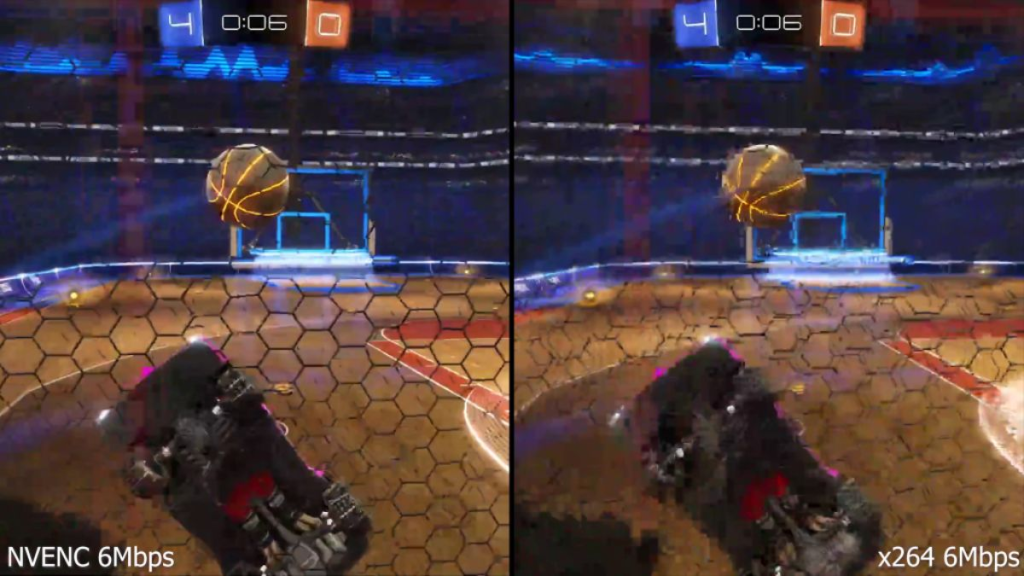
Nvidia’s Nvenc encoder utilizes the GPU for encoding, freeing up the CPU for other tasks. This improves game and stream performance. The new Nvenc, especially with RTX cards, produces high-quality frames at a high frame rate, surpassing other encoders.
NVENC vs x264 – Source: YouTube
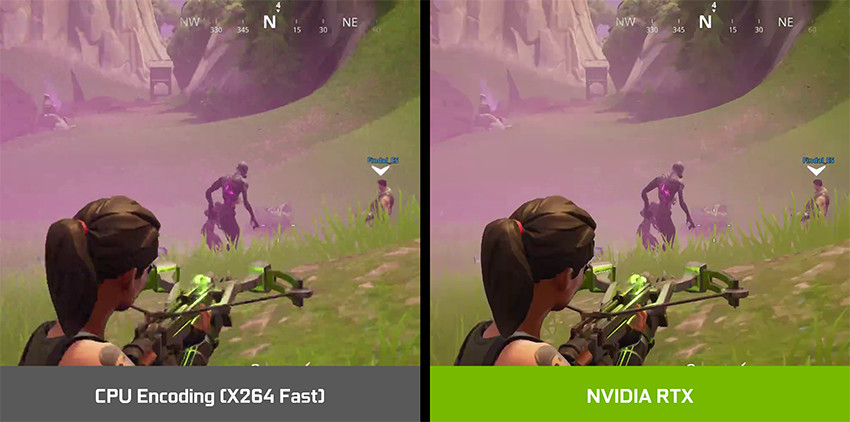
It excels in rendering fast-paced games with intricate details and produces sharper video quality compared to x264. Moreover, Nvenc accurately renders in-game text, ensuring legibility, while x264 may result in dropped frames and illegible text. Nvenc is the superior choice for achieving professional stream quality.
x264 Encoder: OBS Default Encoder That Utilizes Processor
Encoder
Pros
Cons
x264
Renowned for consistent performance
Other encoders perform better in certain areas
Compatible with OBS settings
CPU can become overloaded with multiple processes
Differentiates better between bright and dark colors
Nuances may not significantly impact stream quality
Free and open-source
Highly configurable
The x264 encoder has a reputation for consistent performance, but it faces competition from Nvenc in the gaming and streaming industry. Unlike Nvenc, which utilizes GPU for encoding, x264 relies on CPU. While this CPU encoding method is considered reliable for transferring precise frame data and works well with OBS settings, it can strain the CPU when running multiple processes during streaming.
This strain can significantly lower the quality of the stream, particularly in games with high-motion scenes. However, if you have a powerful CPU, x264 can achieve similar performance to Nvidia Nvenc. It excels in differentiating between various shades of colors, making it suitable for capturing nuances in-game environments. Nevertheless, GPU encoding is generally more efficient for gameplay streaming, especially at lower bitrates.
Nvenc and x264 are both video encoders, but they have different strengths and weaknesses, especially when it comes to live streaming.
Livestreaming Performance:
Nvenc’s main advantage for live streaming is its minimal CPU impact. It utilizes a dedicated chip on your Nvidia GPU for encoding, leaving your CPU free to run your game smoothly. Unlike x264, which relies on CPU processing, Nvenc prevents encoding from competing with your game for resources, reducing the risk of stuttering or frame drops.
Speed and Efficiency:
Nvenc’s hardware acceleration also means much faster encoding compared to x264. This speed is essential for real-time processing required for smooth live streaming. While x264 can produce excellent results, its slower processing, especially at higher quality settings, might not be ideal for the fast-paced world of live streaming.
Image Quality Considerations:
Nvenc excels in handling rapid scene changes and motion due to specialized algorithms. However, at high bitrates, x264 can achieve similar or slightly better quality. x264 shines in capturing details in bright scenes and sudden flashes, offering more control over image quality adjustments. Text can appear slightly sharper with x264 compared to Nvenc at the same bitrate.
Choosing the Right Tool:
For live streaming, Nvenc’s low CPU usage, fast encoding, and motion handling make it a top choice. If you prioritize image quality, especially in bright scenes, or need full control over encoding for recordings, x264 is a solid option. However, for most recording needs, Nvenc provides a good balance of quality and performance. The best encoder depends on your needs and hardware setup. Trying both can help you find the best fit.
Final Thoughts
The choice between NVENC vs x264 ultimately hinges on your specific hardware setup and streaming objectives. Each encoder offers unique advantages that cater to different needs. Don’t hesitate to experiment with both encoders to find the best fit for your style and requirements. With the right encoder in place, you can elevate your live streams, engage your audience more effectively, and enhance your overall content creation experience.
Now that you know which encoder delivers high-quality streaming, take the next step to boost your social media presence with Eklipse. This AI highlight generator automatically clips your live stream and converts it into TikTok videos. Don’t miss out—sign up now and watch your content go viral! Happy streaming!
“Street Fighter,” a renowned Japanese game franchise, has captured the hearts of gamers worldwide with its captivating series of fighting games and arcade games.
Among its latest iterations, Street Fighter V and the recently released Street Fighter 6 have gained significant popularity, often being showcased through live streaming platforms like Twitch, Kick, and YouTube.
In this guide, we’ll walk you through the steps to effortlessly create Street Fighter highlights using AI-powered technology.
Click on the User Profile Icon and navigate to Account Settings.
In the Personal Details tab, click the “Add Account” button at the upper-right corner of the screen.
Click “Connect” on your designated livestream account (Twitch, YouTube, or Facebook).
Toggle the “Auto-processing” option on Eklipse to automatically create Street Fighter V or Street Fighter 6 highlights from your live stream.
Step 2 – Stream on Twitch or YouTube and Retrieve Street Fighter Highlights
Source: Eklipse
After finishing the stream, go to Eklipse.gg to find and save your best moments. Let’s break down the process step by step:
Initiate a live stream of your Street Fighter gameplay on Twitch or YouTube.
After concluding your stream, return to Eklipse.gg to access your highlights.
Navigate to “Clip” and select “Streams” to view your archived streams.
Ensure your Twitch or YouTube stream settings are configured as public to allow Eklipse access to your highlights.
Click the “Get Clip” button and specify Street Fighter as the designated game.
Remember to categorize your stream under the Street Fighter game category when broadcasting on Twitch, Kick, or YouTube.
Allow a brief moment for the AI technology to work its magic, and your Street Fighter highlights will be ready for you.
Step 3 – Convert Your Content for TikTok/Shorts/Reels
Source: Eklipse
To expand the reach of your Street Fighter highlights and promote your live stream content to a broader audience, you can convert them into TikTok, Shorts, or Reels formats through Eklipse:
From the Clip > Streams section, choose a highlight.
Using Eklipse makes it easy to show off the best parts of your Street Fighter gameplay. Just sign up, connect your Twitch or YouTube account, and let Eklipse do the rest. After your stream, head back to Eklipse to find your highlights.
Then, you can turn them into cool TikTok or Shorts videos to share with even more people. With Eklipse, sharing your Street Fighter moments is simple and fun!
Don’t miss out on the opportunity to showcase your skills and expand your audience. Sign up today and start creating captivating content effortlessly!
Dead by Daylight, a popular multiplayer (4vs1) horror game, has a massive following, with many players streaming their gameplay experiences on platforms like Twitch. You can use this opportunity to gain more audiences by creating your Dead by Daylight highlights and sharing them on social media.
Source: Eklipse
Struggling to capture those heart-pounding Dead by Daylight escapes? Look no further! This guide will show you how to create epic highlights using an AI tool called Eklipse.
Creating Dead by Daylight highlights with AI-powered tools like Eklipse has never been easier. Follow this guide to efficiently capture the most exciting moments of your gameplay and share them across different platforms. Try Eklipse for free and watch your fanbase grow!
Maximize your Black Ops 6 rewards—Create highlights from your best gameplay with with Eklipse
Eklipse help streamer improve their social media presence with AI highlights that clip your Twitch / Kick streams automatically & converts them to TikTok / Reels / Shorts
To create good quality live streaming on Twitch, you need to use a good webcam, headphones/headset, a compatible PC or laptop, and other equipment. But on top of that, you’ll also need the best streaming software for Twitch to help you record the streaming video.
The best software for streaming on Twitch can be measured by its convenience of use, features, file size, and pricing. Luckily, there is a lot of streaming software in this world you can find and use for free or at affordable prices.
Still not sure which software can accommodate your needs? Keep reading to figure out some insights about the best software for doing Twitch live streaming. By the end of this article, you will be able to decide the best app to enhance your live experience.
The List of The Best Streaming Software for Twitch
Using good software to go live on any platform can improve your performance. Besides, people who decide to watch your content will be satisfied with the show. As a result, you can also engage with them instantly.
Take a look at these streaming software for Twitch, and pick one that suits you best.
1. OBS Studio: Best Free Open-Source Software for Twitch Recording
Source: Downloader System WordPress
OBS Studio is a popular choice for YouTube and Twitch streaming. It’s an open-source software that allows you to record and stream live content. One of its key features is its high level of customization, with a wide range of plugins available. You can use OBS Studio on Windows, Mac, or Linux, making it versatile for different operating systems. It’s beginner-friendly, making it easy for newcomers to start streaming with professional-looking transitions and effects.
Key Features:
High-Performance Video Recording and Streaming: Capture your screen, gameplay, webcam footage, and multiple sources simultaneously.
Scene Creation and Switching: Seamlessly switch between scenes/layouts with customizable transitions.
Intuitive Audio Mixer: Adjust the audio levels of each source independently, add noise reduction filters, and even apply effects like compression or EQ.
Extensive Customization Options: Configure hotkeys, personalize your streaming layout with themes and plugins and optimize stream quality based on your internet connection
Pros:
Free and open-source: Start streaming or recording without spending money.
Compatibility: Available for Windows, Mac, and Linux.
Customizability: Offers plugins and community support for personalization.
High-quality encoding: Records and streams in high-quality H264/AAC encoding.
Versatile: Compatible with Twitch and other platforms.
Cons:
Learning curve: Requires time to understand all features and settings.
Resource-intensive: This can be demanding on your computer’s hardware.
Limited platform compatibility: Some platforms may not support OBS Studio.
Best for: Professional streamers and video content creators for screen recording and streaming.
Pricing: Free
Pro Tips:
Optimize settings: Adjust settings for best performance.
Use scenes and sources: Organize your stream with different scenes and sources.
Test and troubleshoot: Perform test streams before going live.
Stay updated: Keep OBS Studio updated for new features.
vMix is another top streaming software known for its live HD video mixing capabilities. It allows you to capture and stream content directly to the internet. vMix offers different packages, from basic to pro versions, each with varying inputs and resolution quality. The Pro version is ideal for those seeking higher streaming quality. You can try vMix for free for 60 days to see which package suits your needs best.
Key Features:
Live Production Powerhouse: Mix multiple video and audio sources, and add transitions, overlays, titles, professional graphics, and animations.
Multi-Camera Support and NDI Integration: Handles multiple cameras and supports NDI (Network Device Interface) for a low-latency, high-quality connection.
Instant Replay and Recording: Capture and replay key moments in real time.
Customizable Layouts and Templates: Create professional-looking layouts with multiple video sources.
Pros:
Functionality: Offers live mixing, audio mixing, virtual sets, and more.
Quality: Supports streaming in resolutions up to 4K.
Customization: Easily customize your streaming setup with layouts and overlays.
Versatile: Suitable for Twitch and YouTube.
Drag and Drop Inputs: Simplifies adding multiple videos or images.
Cons:
Price: Can be more expensive than other options.
Compatibility: Limited to Twitch and YouTube streaming only.
Learning curve: Some features may be overwhelming for beginners.
Best for: Large-scale multi-camera events and simple one-person webcam content production.
Pricing: Lifetime licenses start from $60 (basic plan) to $1200 (pro plan)
Pro Tips:
Help and support: Access online help and forums for assistance.
Use vMix as an NDI camera: Connect cameras to vMix and use them as NDI cameras.
Hardware encoding: Use a hardware encoder for recording and streaming.
Engage with the community: Join forums and social media groups for insights.
3. XSplit Broadcaster: Best for Streaming Multiple Platforms Simultaneously
Source: XSplit
XSplit Broadcaster is a professional streaming software that offers comprehensive features for creating high-quality live streams. While the free version has limitations, upgrading to a paid version unlocks advanced features. XSplit allows streaming to multiple platforms simultaneously, including YouTube, Facebook Live, and Twitch, making it popular among gamers and professionals.
Key Features:
High-Performance Streaming and Recording: Capture from various sources, including your screen, gameplay, webcam, and audio.
Advanced Scene Management and Customization: Design various scenes with different source combinations.
Integrated Social Media Tools and Real-time Collaboration: Built-in integrations with Twitch, YouTube, and Facebook Live.
Green Screen and Chroma Key Effects: Remove the background from your webcam footage and replace it with a custom image or video.
Pros:
User-friendly interface: Simple to set up and manage streams.
Platform compatibility: Stream on various platforms including Twitch and YouTube.
Scene switching: Create multiple scenes for dynamic content.
Optimize settings: Configure settings for smooth streaming.
Cons:
Resource-intensive: Can be demanding on your computer.
Limited features in the free version: Some features require a paid subscription.
Learning curve for beginners: May be overwhelming at first.
Best for: Beginner streamers who seek a wide range of audiences by doing multiple streams.
Pricing: Annual subscription starts from $30.
Pro Tips:
Interact with audience: Engage with viewers through comments and reactions.
Customize your framework: Add macros and custom scripts for unique features.
Regularly update software: Keep XSplit updated for new features.
Utilize multiple scenes: Plan different scenes for varied content.
4. Streamlabs OBS: Best Software for Twitch Streaming with Great Interface
Source: OBS Project.com
Streamlabs OBS combines Streamlabs and OBS Studio, providing advanced features and a user-friendly interface. It supports editing, recording, and adding sound to your streams. While it’s free to use, upgrading to Streamlabs Prime offers more advanced features. Some users note that Streamlabs OBS can be resource-intensive, but it’s worth it for its streaming capabilities.
Key Features:
Simplified Stream Setup and Integration: User-friendly interface designed for streamers with pre-configured scenes, widgets, and more.
Built-in Alerting and Engagement Tools: Set up custom alerts for events like new followers, donations, subscriptions, polls, and more.
Streamlabs Desktop Integration (Optional): Streamlabs Desktop includes advanced alert customization, donation management tools, mobile streaming, and cloud storage for VODs.
Monetization Features: Set up donation buttons, connect with services like Patreon, and even sell merchandise directly.
Pros:
All-in-one solution: Offers custom graphics, overlays, widgets, and more.
Community engagement: Interact with viewers through comments and reactions.
Built-in features: Includes chatbot integration and various widgets.
Consistent updates: Regularly adds new features and improvements.
Stream on multiple platforms: Compatible with Twitch, YouTube, and more.
Cons:
Resource-intensive: This may require high computer specifications.
Learning curve: Features may be overwhelming for beginners.
Monthly subscription for all features: Some features require a paid subscription.
Best for: Beginners and professional streamers and content creators who want an all-in-one solution with integrated streaming tools.
Pricing: Free plan with premium option available for $149 per year.
Pro Tips:
Optimize your settings: Configure settings for optimal performance.
Create custom overlays and alerts: Customize your stream’s appearance.
Engage with your audience: Interact with viewers through comments and live reactions.
Regularly update your software: Keep Streamlabs updated for new features.
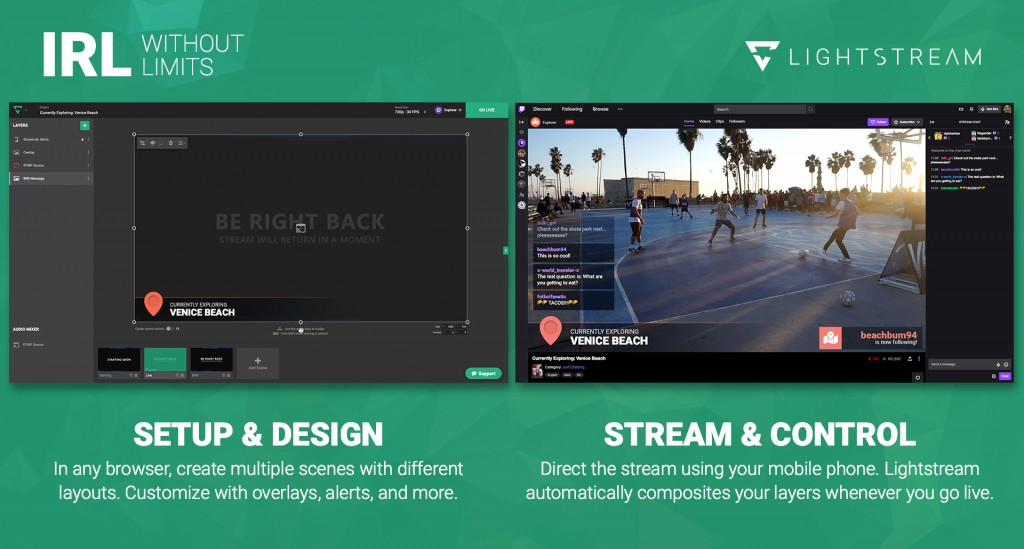
5. LightStream: Best Software for Twitch Streaming with Xbox One and Nintendo Switch
Source: Lightstream
LightStream stands out for its browser-based and cloud-based streaming capabilities. It’s ideal for users without a capture card and allows streaming from anywhere without recreating scenes. LightStream is beginner-friendly with easy setup and compatibility with consoles like Xbox One and Nintendo Switch. Its efficiency makes it a top choice for many streamers.
Key Feature:
Effortless Browser-Based Streaming: Broadcast directly from your web browser on any device.
Advanced Encoding with Low Latency: Smooth and reliable broadcasting, even with limited internet bandwidth.
Scene Creation and Customization: Combine and arrange various sources like webcam, gameplay capture, overlays, and more.
Seamless Integration with Popular Platforms: Integrates seamlessly with popular streaming platforms like Twitch, YouTube Live, and Facebook Gaming.
Pros:
Cloud-based: No need for a capture card or high-end PC.
Stream on multiple platforms: Compatible with Twitch, YouTube, and more.
Stream directly from the console: Popular among console gamers.
Customization: Offers various creative tools for customization.
Opt for the right subscription plan: Choose between the Gamer and Creator subscription options based on your needs and budget.
Cons
Requires a monthly subscription: Pricing starts at $7/month.
Lack of customization: Not as customizable as other options.
Limited platform compatibility: Only compatible with Twitch and YouTube.
Best for: Businesses, podcasters, talk show hosts, and console gamers who want to create more impactful live streams.
Pricing: Premium plan starts from $7 per month
Pro Tips:
Utilize creative tools: Explore options like stream alerts, image and video integrations, and more.
Test your stream before going live: Ensure everything is running smoothly.
Take advantage of the cloud: Use cloud capture and backup for an enhanced streaming experience.
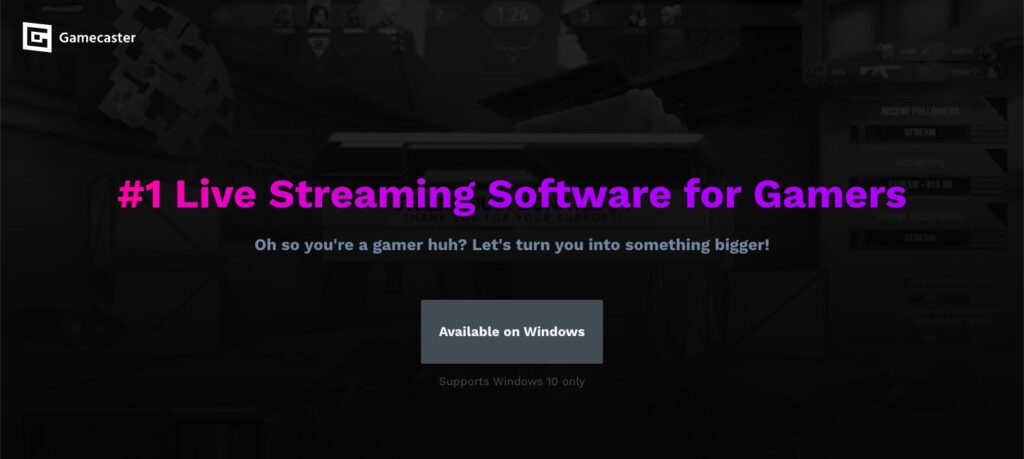
6. Gamecaster: Best Software for Editing Multiple Video Element
Gamecaster, an extension of XSplit, has evolved significantly during its beta phase. It offers a simple, user-friendly platform for Twitch streaming. However, Gamecaster does not allow for uploading personal branding graphics, although customization is still possible using built-in variables. It is also important to note that the operation of this app has been stopped over the past 2 years.
Key Features:
Simple and Streamlined Interface: Easy to navigate and control stream with accessible features.
In-Game Overlay and Stream Control: Start and stop stream, switch between scenes, monitor chat activity, view recent events and stats without leaving the game window.
Integration with Popular Streaming Platforms: Integrates seamlessly with major streaming platforms like Twitch, YouTube, Facebook Gaming, and others.
Built-in Customization Options: Lots of free themes with pre-designed layouts and alerts, or create your custom themes.
Pros:
Cloud saved settings: Stores your video editing preferences online.
Lightweight performance: Efficient design keeps CPU usage low.
Effortless setup: Intuitive interface and straightforward setup process.
Stream personalization: Craft a unique stream experience with personal visual elements.
Free and feature-rich: Free to use with all essential features to create content.
Cons:
No longer available: Unfortunately, the operation of this app has been stopped and cannot be used.
Limited overlay options: Adding external flair might require extra effort.
Limited functionality: Considering this application is no longer in operation, users cannot access its features.
Best for: Beginners and professional game streamers
Pricing: Free
Pro Tips:
Optimize your settings for performance: Tweaking settings can further enhance your streaming experience.
Shortcut savvy: Customize keyboard shortcuts for frequently used actions like starting/stopping the stream, switching scenes, or muting the microphone.
Do overlays strategically: Use overlays strategically to display essential information without overwhelming your viewers.
7. Twitch Studio: Best Twitch Built-In Streaming Software
Twitch Studio is Twitch’s built-in streaming software. It offers reduced latency compared to other software and allows users to create their scenes and alerts within the program. While customization options are currently limited, more features are expected to be added as the official launch approaches. Twitch Studio is free to use, but it may lack some features needed for content creators looking to expand their brand on other platforms.
Key Features:
Simplified Setup and Streaming: Streamlined setup process that configures your hardware automatically.
All-in-One Stream Management: The software keeps everything you need within reach in a single interface (health, interact with chat, manage alerts, and even customize your stream information (title, category, tags))
Built-in Overlays and Alerts: Twitch Studio comes with pre-built overlays that display essential information that is easy to customize.
Seamless Integration with Twitch: Being a first-party application, Twitch Studio integrates flawlessly with the official Twitch platform.
Pros:
Easy setup and onboarding: Easy setup with a guided onboarding process, ensuring a smooth start for first-time users.
Streamlined user interface: The interface simplifies navigation and reduces the learning curve.
Twitch-specific features: Includes built-in alerts, chat, and activity feed which enhance the streaming experience.
Regular updates: Constant updates ensure that new features and improvements are regularly added.
Designed for Twitch: Perfectly integrates with Twitch, providing a seamless streaming experience on the platform.
Cons:
Platform limitation: Limiting its utility for multiple platform streams.
Limited customization: Lacks extensive customization and plugin options compared to other streaming software.
Not for advanced users: May not suit advanced users who are looking for more control and flexibility with their streaming setup.
Best for: New streamers on Twitch
Pricing: Free
Pro Tips:
Single monitor streaming: The built-in overlay displays your stream status, chat activity, alerts, and more, allowing you to stream effectively with just one monitor.
Customize alerts: Tailor alerts and notifications to match your channel’s theme to keep viewers engaged.
Follow the setup guide: Easy-to-follow setup guide that helps you familiarize yourself with the program.
Conclusion
Final Thoughts
That’s all the best available streaming software options for Twitch in 2024. You can choose whichever you want! From the more advanced and highly customizable like OBS, or the simpler and easier to set up like Twitch Studio. If you want to maximize your streaming results, don’t forget to highlight the best moments in your live session with Eklipse.
Eklipse is ready to help you create the best streaming clips automatically. You can focus on your streaming on Twitch while Eklipse picks the best moments to be captured in various content formats (TikTok/Reels/Shorts) for free.
Curious to know more about what Eklipse can do? Try it out now!
Maximize your Black Ops 6 rewards—Create highlights from your best gameplay with with Eklipse
Eklipse help streamer improve their social media presence with AI highlights that clip your Twitch / Kick streams automatically & converts them to TikTok / Reels / Shorts
Calling all Apex Legends champions! Craving to showcase your dominance and clutch plays with the world? Look no further than the right Apex game recording software. Capturing those epic wins and sharing your skills is essential for any aspiring content creator or gamer. But with a plethora of options available, choosing the perfect tool can feel like dropping into a hot zone.
Fear not, Legends! This guide will airdrop the top 7 Apex Legends game recording software options for 2024. We’ll dissect each program’s features, helping you find the ideal weapon to capture your Apex glory. Let’s jump into the action and explore what these tools have to offer!
1. Outplayed – Best for Freemium Clipping with Automatic Highlights
Source: Overwolf
Outplayed is an automatic game recording software that captures your best gaming moments across multiple games, including Apex Legends. It records kills, headshots, and other key moments, allowing you to easily share your highlights on platforms like Discord and YouTube. The software is compliant with game developers’ terms of service and is built on Overwolf.
Key Features:
Automatic Video Capturing
Manual Recording
Once the match is over, you can flip through your captured clips in the match timeline, review your APM speed, and relive the game
Grab the clips you love most, give them a quick trim if you like, or move to the video editor to combine them into an epic collage
Pros:
Easy to Use
Automatic and Manual Recording
You can flip through your captured clips in the match timeline, review your APM speed, and relive the game
Once you’re done editing, you can easily share it with friends and foes alike across social networks
Supports Over 5000 Games
Cons:
Ads
Subscription Needed for Premium Features
Limited Features in Free Plan
Pricing: Free
2. Rav.ai – Best for Detailed Gameplay Recordings
Source: Rav.ai
Rav.ai is a game-changer for Apex Legends content creators. This AI-based video editing service is designed to help users automate their social media posting, particularly for Apex Legends gameplay.
Whether you’re a professional streamer or an enthusiastic gamer, Rav.ai can help you transform your raw gameplay footage into engaging, shareable content.
With Rav.ai, you can focus on what you do best – playing Apex Legends – and let the AI handle the editing.
Key Features:
Automated Video Editing
AI Stop Motion Video Maker
24/7 Availability
This AI video platform will help you automate YouTube, TikTok, and Instagram content
Pros:
With Rav.ai, you can get your video edited in hours.
Join the next social media revolution by adopting an AI-based social media video editor
Unleash your creativity with stop-motion videos
Customizable videos without watermark
Convenience
Cons:
Limited Control
Internet Dependency
Users may need some time to understand how to best utilize the platform
Pricing:
Monthly Plan: $50/month
One-Time Plan: Starting from $100/month
Enterprise Plan: For this, you need to schedule a demo and contact them
3. Gazoom – Best Social Media Integrated Clipping Tools
Source: zoom.gg
Gazoom is a desktop application that is best for capturing, editing, and sharing gaming clips, especially for Apex Legends. It’s designed to bring your gameplay to the next level by making the process of capturing and sharing your Apex Legends moments hassle-free.
Whether you’re pulling off an epic win or experiencing a hilarious fail in Apex Legends, Gazoom is there to capture every moment. It’s perfect for Apex Legends players who want to share their epic gaming moments with friends or on social media. It’s also a great tool for those who want to review and analyze their gameplay to improve their skills.
Key Features:
Gazoom can automatically capture and edit all your gaming clips
You can share your gaming clips across various social media platforms like Discord, Twitter, WhatsApp, Instagram, TikTok, YouTube, and Gfycat
Cloud Storage
This feature enables you to review your clips with your friends and analyze every moment
Offers a building block style strategy creator for games like Valorant and Counter-Strike that makes creating and understanding complicated strategies easy
Pros:
Supports more than 500+ games, including popular ones like Valorant, League of Legends, Apex Legends, Counter-Strike, Fortnite, PUBG
It has a very low impact on your fps, allowing for smooth gameplay
Offers free cloud storage
It provides advanced whiteboard features for strategy mapping
Allows for timestamped comments during VOD reviews
Cons:
Gazoom might not support all games, although it does support more than 500+ games
The quality of the recorded clips might be lower on low-end PC
The automatic capture feature might not capture every game event
Pricing:
Free with limited features
Premium plan: $19/month
Annual Plan: $199/year
4. NVIDIA ShadowPlay – Best for UHD Recordings
Source: nvidia.com
NVIDIA ShadowPlay is a software utility offered by NVIDIA specifically designed for gamers who play Apex Legends. It’s designed to enhance the gaming experience, share gameplay, and update graphic card drivers.
It provides several features to make capturing and editing gameplay footage easy and efficient. One noteworthy feature of the program is the Instant Replay function, which lets users retroactively save a specified portion of their recent gameplay without actively recording. Additionally, it can capture game highlights, like spectacular kills or achievements.
Key Features:
Allows users to capture high-quality video recordings up to 8K HDR at 30fps and 4K HDR at 60fps2.
GPU-Enhanced Encoding
Instant Replay
Pros:
High-quality game recording and streaming
Hardware accelerated, so it doesn’t impact game performance
Easy to use with hotkey controls
Supports broadcasting to popular platforms like Facebook Live, Twitch, or YouTube Live
Allows creation of GIFs and 8K screenshots
Cons:
Only works with Nvidia graphics cards
Can have up and down performance depending on your PC configuration
Limited Game Support
Pricing: Free
5. Medal TV – Best Free Gaming Clip Sharing App for Gamers
Source: MedalTV
Medal TV is a free, cross-platform gaming solution that’s perfect for Apex Legends players who want to share their epic gaming moments. Whether you’ve just pulled off a high-damage game, executed a flawless strategy, or experienced a hilarious in-game moment, Medal TV is there to capture it all.
This app runs quietly in the background while you’re immersed in the fast-paced world of Apex Legends, automatically detecting and recording your gameplay.
With just a single button press, you can create a clip of your most recent action, ready to be shared across various platforms including TikTok, Instagram, Twitter, and more.
Key Features:
Medal TV automatically detects what game you’re playing and records it for you
One-Button Clip Creation
Cross-Platform Sharing
Medal TV comes with a built-in editor for enhancing your clips
Pros:
Easy to use with one-button clip creation
Automatically detects and records your game
Allows cross-platform sharing
Comes with a built-in editor
Free
Cons:
Some users have reported that the app can be buggy
There have been complaints about the app crashing
Some users have reported that the clips can come out laggy
Pricing: Free
6. AMD ReLive – Best for Game Capture and Streaming
Source: AMD Indonesia
AMD ReLive is part of the AMD Radeon Software suite, designed to enable users to capture, edit, and share gameplay videos and screenshots. It’s an ideal tool for Apex Legends players, offering a simple and efficient way to record and share in-game moments.
The software is easy to configure and has a minimal impact on performance, which is measured in frames per second (FPS).
With AMD ReLive, Apex Legends players can capture their epic wins, intense battles, and unique strategies, then edit and share them with the world. Whether you’re a casual player or an aspiring esports star, AMD ReLive provides the tools you need to showcase your skills.
Key Features:
Allows users to capture their gameplay with ease. The captured content can be videos or screenshots
Users can stream their gameplay live to various platforms
Capturing gameplay using Radeon ReLive has a minimal impact on performance
Compatibie with DirectX® 9, 10, 11, 12, and Vulkan® APIs
Pros:
Easy to use and configure
Minimal impact on game performance
Supports a wide range of AMD graphics cards
Allows for live streaming of gameplay
Supports various versions of Windows
Cons:
The availability of specific Radeon ReLive recording functions will depend on the GPU being used
Older products have encoding support up to 1080P resolution at up to 60 Frames Per Second (FPS)
Some features are only available on newer graphics cards
Pricing: Free
7. EaseUS RecExperts – Best Screen Recording Software for Various Needs
Source: SteamDB
EaseUS RecExperts is an ideal tool for Apex Legends players of all levels. It’s designed for gamers who want to record their gameplay, create highlight reels, or share their strategies with the community. With its user-friendly interface and powerful tools, you can easily capture your best Apex Legends moments and turn them into engaging content.
The software works on Windows 7 and higher and macOS 10.13 and later, making it accessible to a wide range of gamers. Its simplicity and intuitive design make it easy to use, even for those who are new to video editing.
Whether you’re recording your first Apex Legends win or creating a montage of your best plays, EaseUS RecExperts makes the process straightforward and fun.
Key Features:
4K and 60 FPS Game Recording
Audio and Webcam Capture
User-Friendly Interface
Automated Recordings
A variety of File Outputs
Pros:
User-friendly interface with powerful tools
Supports 4K recording and 60 fps game recording
Captures audio and webcam video
Supports automated recordings
Offers a variety of common file outputs
Cons:
Limited editing features
Somewhat expensive
The free version is incredibly limited
Pricing:
Monthly Auto-Renew: $19.95/month
Yearly Auto-Renew: $39.95/year
Lifetime One-time price: $69.95
Business 2PCs, Lifetime Free Upgrades: $99.95
Business 5PCs, Lifetime Free Upgrades: $199.95
Final Thoughts
Based on the detailed breakdown of the top 7 Apex Legends game recording software options for 2024, each tool offers unique features catering to different needs and preferences. Outplayed, Rav.ai, Gazoom, NVIDIA ShadowPlay, Medal TV, AMD ReLive, and EaseUS RecExperts all provide various functionalities to enhance your gaming experience and content creation process.
Ultimately, the choice of game recording software depends on individual preferences, budget, and specific needs. Whether you prioritize automatic capturing, advanced editing, high-quality recordings, or user-friendly interfaces, there’s a tool tailored to meet your requirements among these top options for Apex Legends enthusiasts and content creators.
You can also rely on Eklipse, the AI-powered tool for effortlessly turning your Twitch/Kick/YouTube LIVE moments into TikTok/Short/Reels content with just one click! This free application not only detects but also automatically creates short videos of your best live moments.
The world of video editing is undergoing a revolution, and AI is at the forefront! But with so many options, choosing the right AI-powered editor can feel overwhelming. Fear not, creators! Today, we enter the arena with Eklipse vs Vizard, two of the most powerful AI editing tools on the market.
We’ll be dissecting their features, functionalities, and pricing structures to help you decide which AI editor best complements your workflow and unleashes your creative potential. Whether you’re a seasoned pro or a budding video whiz, this comparison will equip you with the knowledge to pick your champion. Let the AI editing battle commence!
Struggling to create engaging social media content from your streams? Eklipse is your solution!
This AI-powered video editor automatically generates highlight clips from your Twitch, YouTube, Kick, or Facebook streams, and then transforms them into the perfect format for TikTok, Reels, or Shorts. Save time, money, and effort while creating content that could go viral!
Boost Your Streaming Presence in Social Media with AI Highlights
Eklipse helps streamer improve their social media presence with AI highlights that clip your Twitch / Kick streams automatically & convert them to TikTok / Reels / Shorts
Vizard, an AI-powered video editor, automatically transforms long videos into bite-sized, social media and any clips perfect for platforms like TikTok, YouTube, and Instagram.
It further enhances your content by adding subtitles, titles, images, and other engaging elements, making your videos professional and captivating.
Features of Eklipse vs Vizard
Source: Eklipse
Since both Eklipse and Vizard are AI-powered video editing platforms, they naturally share some functionalities. Here’s a breakdown of their common features:
AI-Generated Clips: Leveraging advanced AI, both platforms analyze your videos and pinpoint golden moments for clipping. Review, edit, and save your clips on their dashboards, or have them create a weekly highlight reel automatically.
Online Video Editor: Both offer user-friendly online video editors equipped with drag-and-drop, cut, crop, rotate, and other essential tools for customization. Additionally, you can enhance your videos with subtitles, titles, images, stickers, filters, and more elements to elevate their engagement and professionalism.
Trending and Ready-Made Templates: No time to design? No problem! Both platforms offer libraries of trending, pre-made templates to transform your clips into captivating TikToks, Reels, or Shorts. Explore diverse categories like gaming, comedy, music, sports, and more. Even create your templates and save them for future use.
Download and Share: They both allow you to download your videos in high-quality MP4 format, or share them directly to your social media accounts, such as TikTok, Instagram, YouTube, Twitter, and more.
Eklipse Advanced Features
Source: Instagram
Eklipse and Vizard both boast unique features that set them apart. While Vizard caters to a broader audience, Eklipse shines for streamers and content creators seeking to transform their Twitch, YouTube, or Facebook streams into viral short-form content.
Notably, Eklipse offers specialized support for game streamers, effortlessly converting streams into engaging highlights.
Here’s a glimpse of Eklipse’s exclusive features:
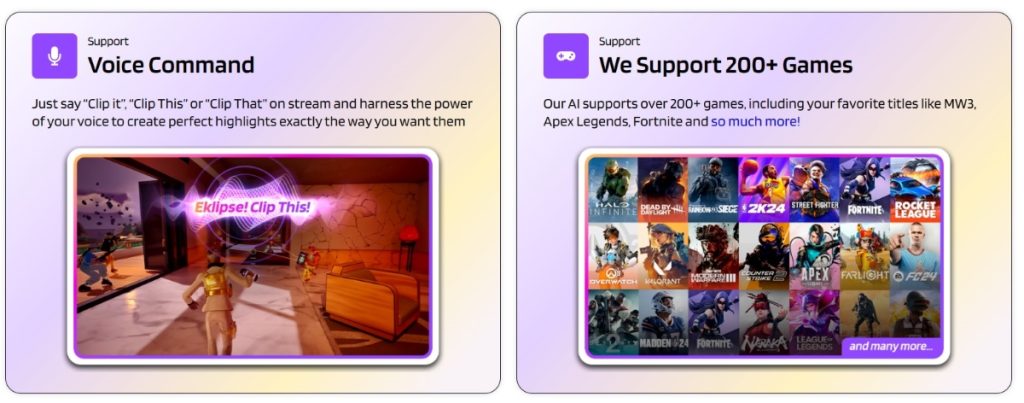
Voice Command: Stream on Twitch, YouTube, Kick, or Facebook and tag your epic moments in real-time with simple voice commands like “Clip it,” “Clip this,” or “Clip that.” Eklipse’s AI will automatically detect and clip those moments, saving you time and effort.
Channel Stickers: Make your clips instantly recognizable with personalized branding. Choose from single or multi-channel stickers, customize colors and text, upload your designs, and even add call-to-action stickers to encourage viewers to follow you elsewhere.
YouTube Video Highlights: Don’t just let your long-form YouTube content (podcasts, reviews, shows, commentaries, or educational videos) gather dust. Paste the link or upload the video file to Eklipse, and its AI will analyze and generate highlight clips. You can then refine and share them as captivating vertical videos perfect for TikTok, Reels, or Shorts.
Kick Support: Unlash the power of Kick, a mobile gamer’s live-streaming haven! Connect your Kick account to Eklipse and seamlessly capture your best moments. Transform your Kick clips into captivating vertical videos with Eklipse’s editing tools, ready to conquer TikTok, Reels, or Shorts.
Pro Edit (Premium): Take your highlight clips to the next level with professional editing. Eklipse’s Pro Edit service connects you with experienced editors who will add music, effects, and transitions to make your content truly shine.
Vizard Advanced Features
Source: Vizard
Vizard caters to a wider audience, offering a general-purpose video editing experience. It lets you transform any long video, like podcasts, webinars, interviews, or lectures, into bite-sized social media clips. This includes a YouTube video highlight feature, similar to Eklipse’s recent addition.
AI Face Tracking: Enhance your videos with dynamic face tracking! Apply playful masks, filters, or stickers to grab attention and add personality.
Predict Viral Potential: Vizard isn’t afraid to play fortune teller. Its AI Virality Score analyzes your clips and predicts their social media stardom, even offering suggestions for improvement.
Smart Keyword Highlighting: Let Vizard find the key points. Its AI Keyword Highlighter automatically identifies relevant phrases and helps you integrate them into captions and titles.
Emotionally Aware Emojis: Need a laugh track or a tearjerker emoji? Vizard’s AI Emoji Generator analyzes your video’s emotional tone and suggests matching emojis to spice up your captions and titles.
While Eklipse shares the AI Face Tracking feature, Vizard’s additional functionalities offer a broader toolkit for crafting engaging content from any long-form video.
User Experience of Eklipse and Vizard
Source: Eklipse
Both Eklipse and Vizard boast user-friendly interfaces that make video editing a breeze. Here’s the basic workflow for both platforms:
Upload or Link: Toss your video file from your device, or cloud storage, or paste the link from Twitch, YouTube, or Facebook – it’s your call!
Select or Generate: Want to pick your favorite moments or let AI do the heavy lifting? The choice is yours. Both platforms offer manual clip selection and AI-powered highlight generation.
Customize or Template: Feeling creative? Dive into the online video editor for custom edits. Need a quick turnaround? Pre-made templates for TikTok, Reels, or Shorts are at your fingertips.
Download or Share: Finished masterpiece? Download it to your device, or cloud storage, or share it directly to social media and your website.
But the similarities stop there! Let’s dive in and discover the pros and cons of each contender.
Eklipse: Streamer’s Paradise
Pros:
Streamlined Workflow: Eklipse shines for streamers. Connect your stream account for automatic uploads and notifications, letting you focus on creating content.
AI-Powered Highlights: Don’t have time to sift through hours of footage? Eklipse’s AI can intelligently identify the best moments and generate ready-made highlights.
Montage Maker: Create epic montages with ease! Simply add clips to a playlist and let Eklipse handle the rest. You can even fine-tune them with the built-in editor.
Game Stream Support: This is a game-changer (pun intended) for gamers! Eklipse specifically analyzes and highlights gaming streams, giving you the edge in social media competition.
Cons:
Limited Source Support: Eklipse primarily focuses on Twitch, YouTube, Facebook, and Kick streams.
Focus on Streamers: While it can handle other video formats, Eklipse caters more to streamers with its specialized features.
Limited Customization: While Eklipse offers a decent online video editor, Vizard might offer a wider range of editing tools for those seeking more creative control.
Vizard: Unleash Your Creativity
Pros:
Versatile Platform: Vizard isn’t picky! It can handle any type of video, from podcasts and lectures to interviews and webinars.
AI Virality Score: Ever wondered if your content has viral potential? Vizard’s AI analyzes your clips and predicts their social media stardom, even suggesting tweaks to improvement.
Advanced AI Features: Vizard pushes the boundaries with tools like AI face tracking, AI keyword highlighting, and emotionally-aware emoji generation, adding a unique touch to your videos.
User-Friendly Interface: Just like Eklipse, Vizard offers a user-friendly interface that makes it easy to learn and use, even for beginners.
Free Tier: Vizard has a free tier available, allowing you to try out its basic features before committing to a paid subscription.
Cons:
Manual Uploads for Streams: Unlike Eklipse, Vizard requires manual uploads for Twitch or YouTube streams.
No Stream-Specific Features: If you’re a streamer, you won’t find the specialized functionalities Eklipse offers for this niche.
Subscription Model (Some Premium Features): While Vizard offers a free tier, some advanced features like Pro Edit require a subscription.
The Verdict: Choose Your Weapon
Eklipse empowers streamers to conquer social media with ease. Its streamlined workflow, AI-powered highlights, and weekly showcase features are a dream come true for content creators who prioritize efficiency.
Vizard, on the other hand, unlocks a world of creative possibilities for any video editor. Its versatility across video formats, unique AI features, and focus on advanced editing tools make it ideal for those who want more control and customization.
Ultimately, the best platform depends on your content and workflow. If you’re a streamer seeking a streamlined solution, Eklipse might be your champion. If you’re a video editor craving versatility and creative power, Vizard could be the ultimate weapon in your arsenal.
Eklipse and Vizard Pricing Battle
Source: Eklipse
Both Eklipse and Vizard offer free and premium plans, letting you choose the features that fit your needs. Wondering which one reigns supreme? Let’s break it down!
Eklipse: (Free Plan)
The free Eklipse plan packs a punch:
720p clips: Get your social media ready with crisp video quality.
Gaming highlights: Stream on Twitch, YouTube, or Facebook? Eklipse automatically generates highlights, saving you time. (Bonus: It works for Kick streams too, in the premium plan!)
Free YouTube highlights (up to 30 minutes): Repurpose your long-form YouTube content into bite-sized social media gold.
Up to 6 hours of daily stream processing: Streamers rejoice! Eklipse handles extensive content with ease.
Auto captions, channel stickers, and scheduling: Polish your content and reach a wider audience with these handy features.
14 days of storage: Keep your creations accessible for two weeks.
Vizard: (Free Plan)
Vizard’s free plan caters to a broader audience:
300 minutes of video upload: Upload and work with a decent amount of video content each month.
1080p exports with watermark: Share your creations in high definition, with subtle Vizard branding.
10 AI clipping projects: Experiment with Vizard’s AI-powered clipping features to create engaging content.
Premium Powerhouse: Eklipse vs. Vizard
Ready to unleash the full potential of these platforms? Here’s a glimpse into their premium plans:
1080p high-res clips: Level up your video quality for maximum impact.
Watermark-free exports: Share your creations without any branding distractions.
90 days of storage: Keep your masterpiece collection readily available for longer.
Adjustable video minutes plan: Tailor your plan to your specific video editing needs. (Bonus: Access to local VoD uploads and processing of up to 12 hours of daily streams!)
Vizard (Starts from $30/month):
Up to 1200 minutes of video upload: Handle larger video projects with ease.
1080p exports without watermark: Share high-definition videos with a clean look.
40 AI clipping projects: Take full advantage of Vizard’s innovative AI clipping features.
200 video exports: Share your creations across multiple platforms. (Vizard also offers yearly plans with variations for Creators and Pros.)
The Verdict: It’s All About You!
Eklipse is a streamer’s haven, offering a free plan packed with valuable features and a budget-friendly premium option. Vizard, on the other hand, provides more upload space and advanced AI features for creators of all stripes in its premium plans.
Ultimately, the best platform depends on your content creation style and budget. So, grab your editing hat and dive into the world of Eklipse or Vizard – the choice is yours!
Comparison
Feature
Eklipse
Vizard
AI-Generated Clips
Yes
Yes
Online Video Editor
Yes
Yes
Trending and Ready-Made Templates
Yes
Yes
Download and Share
Yes
Yes
Stream Integration
Yes
No
Weekly Showcase
Yes
No
Montage Maker
Yes
No
Priority Processing
Yes
No
Watermark Removal
Yes
Yes
AI Face Tracking
Yes
Yes
AI Virality Score
Yes
Yes
AI Keyword Highlighter
No
Yes
AI Emoji Generator
No
Yes
Free Plan
up to 6 hours of streams
300 minutes of video upload
Premium Plan
$19.99/month or $149.99/year
$30/month or $192/year
Final Thoughts
Eklipse and Vizard are both great online video editing tools that can help you create short and engaging videos from your long videos. So, which one is better for you?
If you’re a streamer on Twitch, YouTube, or Facebook, Eklipse is your champion. Its streamlined workflow automatically generates highlights, saving you time. Plus, its affordable plans let you focus on creating content, not editing headaches.Vizard shines for video editors of all stripes. Its versatile platform handles any video format, and innovative AI features like “Virality Score” help your content stand out.
Ultimately, the best platform depends on your focus. Eklipse streamlines content creation for streamers, while Vizard empowers all video editors with creative freedom. So, grab your editing tools, pick your champion, and get ready to dominate social media!
If you are looking for the best Sizzle.gg alternatives in 2023 for creating gaming highlights automatically, you should give Eklipse a try. You can sign up for Eklipse for free here. Enjoy!
Dreaming of becoming a streamer? Twitch, a giant in the live-streaming world, is a fantastic starting point. But building a loyal fanbase solely on Twitch can be tough. That’s where platforms like YouTube Shorts come in!
Did you know you can transform your epic Twitch clips into bite-sized YouTube Shorts with just an online video editor? Today, we’ll break down the steps to effortlessly convert your content from landscape to a captivating vertical format.
Why You Should Repurpose Twitch Clips for YouTube Shorts
Source: washingtonpost.com
Do you create gaming Twitch clips featuring popular titles like Call of Duty, Fortnite, and Valorant? These clips showcase your impressive gaming skills, but to strengthen your online presence and reach a wider audience, consider adapting them for different platforms, including the vertical format of YouTube Shorts.
By repurposing your content, you can effectively connect with this vast and enthusiastic audience, gaining new followers who may not have discovered you on Twitch. And guess what? You can boost your online presence even more if you also create YouTube content from your Twitch livestream. To learn more about that, check out the guide below.
Step-by-Step Guide to Edit Twitch Clips Into YouTube Shorts
In this guide, we’ll show you how to seamlessly transform your epic Twitch clips into captivating YouTube Shorts using Eklipse. Eklipse offers a one-stop solution with its AI highlights tool that automatically generates clips from your streams and a built-in video editor perfect for tailoring long-form content into the bite-sized, vertical format of YouTube Shorts.
Ready to take your content across platforms? Follow these 5 simple steps:
After that, connect your Eklipse account to your Twitch by hitting the cable icon at the top-right corner of the page.
Source: Eklipse.gg
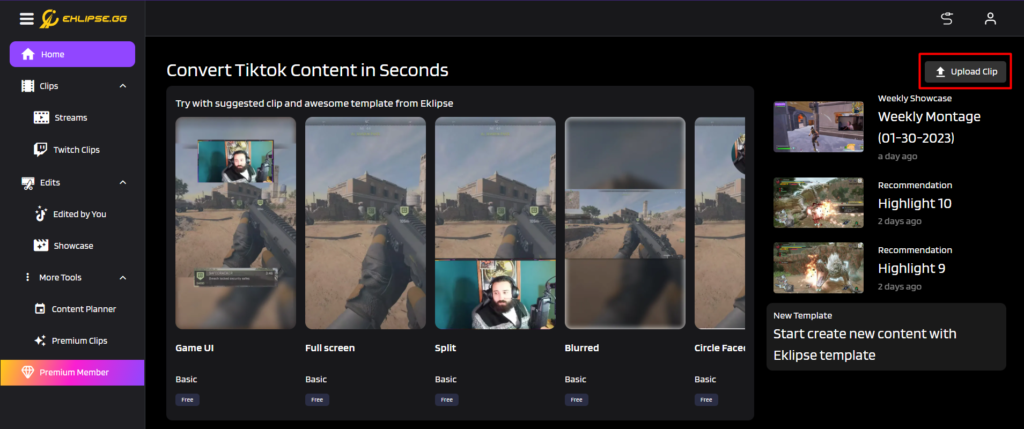
3. Upload Your Twitch Clip
Now, it’s time to import your chosen Twitch clip! Simply click the “Upload Clip” button and select the clip file from your computer.
Source: Eklipse.gg
Alternatively:
Don’t have the clip file readily available? No problem! Eklipse allows you to import your Twitch clip directly by pasting the URL into the designated field.
4. Refine Your Short with Templates and Editing
Eklipse offers a range of pre-designed templates to jumpstart your creative process. Choose the template that best compliments your clip and customize it further by adding layers for your face cam and gameplay footage. This step is also where you can trim the clip to fit the specific duration requirements of YouTube Shorts.
Source: Eklipse.gg
5. Add the final touches to your clip, and when you’re satisfied, hit “Confirm.”
Finalize your short by adding the finishing touches you desire. Eklipse allows you to enhance your creation with channel name stickers, auto-captions, and even custom text! Once you’re happy with the results, hit the “Confirm” button and your masterpiece is ready for the world!
Source: Eklipse.gg
Bonus Tip:
Don’t forget to leverage Eklipse’s built-in features to enhance your Twitch clips and stand out on YouTube Shorts.
By following these steps, you’ll be well on your way to repurposing your Twitch content and expanding your reach to a whole new audience on YouTube Shorts!
Valuable Twitch clips hold the potential to engage a wider audience. By strategically repurposing them as YouTube Shorts, content creators can extend their reach and cultivate a flourishing presence beyond their primary platform.
Tools like Eklipse streamline this process, offering functionalities specifically tailored to the needs of streamers. These tools seamlessly convert landscape-oriented Twitch clips into the vertical format required for YouTube Shorts.
Intuitive drag-and-drop editing facilitates the assembly of compelling Shorts, while a comprehensive library of pre-designed templates provides a springboard for creative expression. So, Get Started on Eklipse now!